


Wireless Optical Mouse and Wireless Multimedia Keyboard Combo
Ensemble souris optique et clavier multimédia sans fil Combo Inalámbrico de Ratón Óptico y Teclado Multimedia
DX-KBOM2
USER GUIDE • GUIDE DE L’UTILISATEUR • GUÍA DEL USUARIO
2 |
Contents |
Dynex Wireless Optical
Mouse and Wireless
Multimedia Keyboard
Combo DX-KBOM2
Contents |
|
Introduction ..................................................................................... |
2 |
Important safety instructions........................................................... |
2 |
Keyboard combo components.......................................................... |
2 |
Setting up the keyboard combo ....................................................... |
2 |
Using the keyboard combo............................................................... |
4 |
Troubleshooting ............................................................................... |
6 |
Legal notices ................................................................................... |
6 |
Warranty .......................................................................................... |
6 |
Français ....................................................... |
7 |
Español ...................................................... |
12 |
Introduction |
|
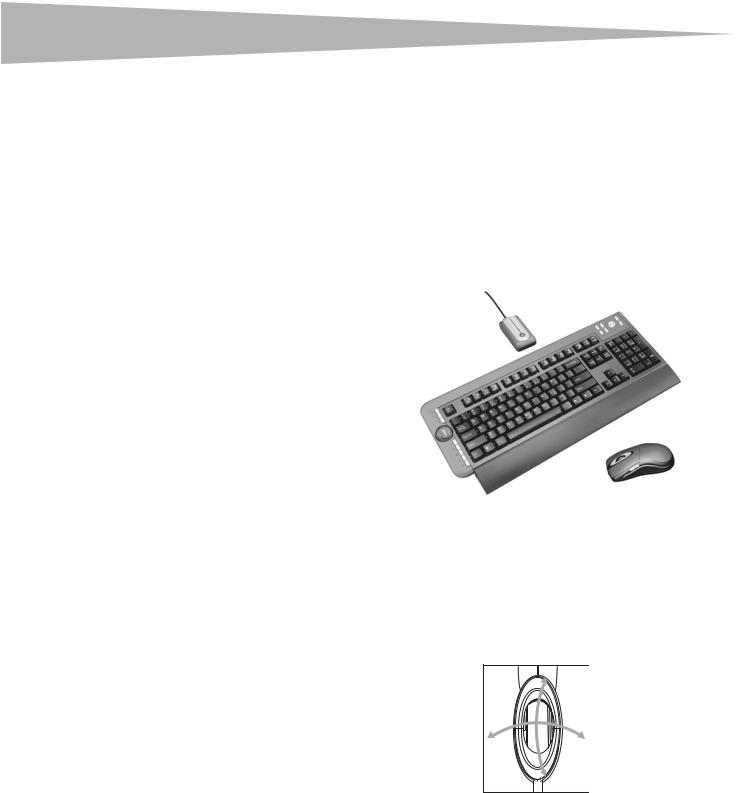
Thank you for choosing the Dynex DX-KBOM2 wireless optical mouse and wireless multimedia keyboard combo with the unique smart link function. This User Guide provides a general description of the keyboard combo’s features, setup instructions, and troubleshooting information.
Important safety instructions
•Always read the safety instructions in the User Guide carefully. Keep the User Guide for future reference.
•When using some operating systems, the driver software must be installed before operation.
•Do not drop or allow forceful impacts to the product, or install it in locations exposed to heavy vibrations.
•Do not disassemble or modify the product in any way. Disassembly or modification may not only void warranty, but also could cause damage or lead to fires or electric shock.
•Do not use or store the product in damp locations. Liquid entering the product may cause damage or lead to fires or electric shock.
•If this equipment does cause harmful interference to radio or television reception, which can be determined by turning the equipment off and on, you are encouraged to try to correct the interference by one or more of the following measures:
•Reorient or relocate the receiving antenna.
•Increase the separation between the equipment and receiver.
•Connect the equipment into an outlet on a circuit different from that to which the receiver is connected.
•Consult the dealer or an experienced radio/TV technician for help.
Caution: Any changes of modifications not expressly approved by the grantee of this device could void the user’s authority to operate the equipment.
•This device complies with Part 15 of the FCC Rules. Operation is subject to the following two conditions: (1) this device may not cause harmful interference, and (2) this device must accept any interference received, including interference that may cause undesired operation.
Keyboard combo components
Package contents
Make sure that the package contains the following items:
•Office wireless keyboard
•Wireless optical mouse
•USB receiver
•4 alkaline AA batteries (2 for keyboard, 2 for mouse)
•User Guide
•Drivers on CD
If any components are missing, contact Dynex immediately.
Features
The Dynex DX-KBOM2 wireless optical mouse and wireless multimedia keyboard combo is designed with three unique features:
•Smart Link eliminates the need to re-link the cradle to the mouse after completing the initial linkage procedure, even if you change batteries or restart the computer.
•The Universal Scroll Wheel is designed with the 4–way navigating function so that you can easily view whole documents using the up, down, left, and right controls on the scroll wheel.
•The two-channel, 27 MHz keyboard combo has 256 changeable IDs.
Setting up the keyboard combo
Installing the batteries
To install batteries:
Caution:
•Do not attempt to recharge, short-circuit, disassemble, heat, or throw the batteries into fire.
•Do not mix battery types. (For example, alkaline with zinc carbonate.) •When inserting new batteries, replace all at the same time. Do not mix old and new batteries.
•Weak batteries can leak and severely damage the mouse and keyboard.
1 Install 2 alkaline batteries in the mouse.
2 Install 2 alkaline batteries in the keyboard.
Setting up the keyboard combo
Installing the receiver
To connect the receiver:
1 Turn on the computer.
2Plug the USB connector of the receiver into the USB port on the computer.
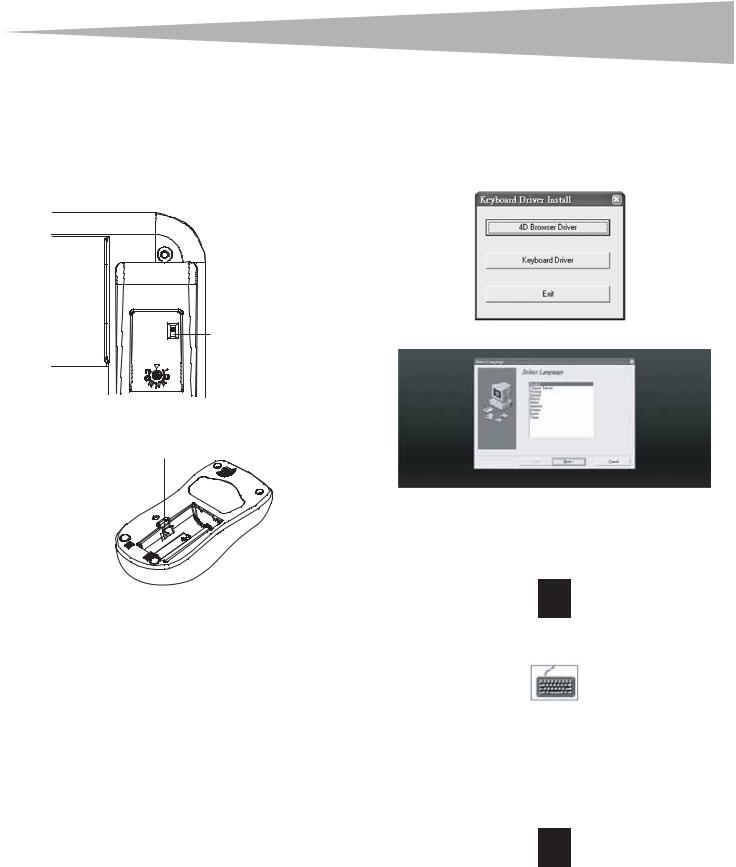
3Adjust the two-channel switch on the back of the keyboard to either channel 1 or 2 to select the keyboard channel.
3
Installing the driver
To install the mouse or keyboard driver:
Note:
The driver supports Windows 2000/ ME/XP.
1 Remove any existing mouse or keyboard drivers completely.
2Insert the driver CD in your computer, then select the mouse or keyboard driver to be installed.
CH1
Channel switch
CH2
4Adjust the two-channel switch inside the battery compartment of the mouse to either channel 1 or 2 to select the mouse channel.
Channel switch
3 Select a language for installation.
The operating system automatically installs the driver through auto-install.
4Restart the computer.
A Mouse icon will appear on the Windows task bar after you successfully finish the installation.
Linking the mouse with the receiver
Note: Link the mouse and keyboard within the effective distance of
39 inches (1 meter) for the mouse and 59 inches (1.5 meter) for the keyboard.
To link the mouse with the receiver:
1 Turn on your computer.
2Press the ID link button on the receiver. There will be a 15-second delay while the receiver links to the keyboard and the mouse. Within that 15-second delay:
•Press the ID link button on the keyboard, then press the ID link button on the receiver.
•Press the ID link button on the mouse to complete the linking process. The LED indicator on the receivers changes from flashing to green.
The keyboard and mouse are designed with Smart Link. After the linkage procedure is complete, you don’t have to re-link the mouse, even if you change batteries or restart the computer.
3If the mouse does not link with the receiver, repeat the ID linking process in Step 2.
4If there is interference when using the keyboard or mouse with the selected channel, re-link the keyboard and mouse by repeating Step 2. There are 256 changeable IDs for a single channel.
A Keyboard icon will appear on the Windows task bar after you successfully finish the installation.
Programming the mouse
A programmable key on the mouse allows you to set a number of mouse properties.
To program the mouse:
1Double-click the Mouse icon on the Windows task bar. A mouse programming screen displays.

4 |
Using the keyboard combo |
2Follow the instructions in the dialog boxes to set the mouse properties.
The following mouse properties can be set:
F1-F10 |
Explorer |
Paste |
Auto Scroll |
Find Computer |
Redo |
Backspace |
Find File |
Right |
Close Applications |
Home |
Run... |
Connect to Internet |
Horizontal Wheel |
Shift Lock |
Control Lock |
Internet Explorer |
Space |
|
Backward |
|
|
|
|
Control Panel |
Internet Explorer |
Start Menu |
|
Forward |
|
Copy |
Launch Default Browser System Help |
|
Cut |
Launch Default E-mail |
System Property |
Delete |
Left |
Tab |
Double-click |
Maximize Windows |
Undo |
Down |
Middle Button |
Undo Minimize All |
|
|
Windows |
Drag Lock |
Minimize All Windows |
Universal Scroll |
End |
Minimize Windows |
Universal Zoom |
Enter |
Page Down |
Up |
Escape |
Page Up |
|
Programming the keyboard
The keyboard is factory-configured with certain hot keys (see page 4). You may change the programmed functions on some of the programmable hot keys.
To program the keyboard:
•Double-click the Keyboard icon on the Windows task bar, then program the keys as desired.
Using the keyboard combo
Using the mouse
This wireless optical mouse has a high resolution of 800 dpi, which provides the most reliable and accurate movement.
•Avoid using the mouse on any reflective, transparent, metallic, or complex-pattern surfaces such as glass or a mirror.
•Avoid using the mouse under the following conditions:
•Direct sunlight
•Extreme hot, cold, dusty, or magnetic environment
•Near a fax machine, television, radio, mobile phone or any wireless device
•Press any button to wake up the keyboard or the mouse while the mouse is in sleeping mode.
Using power-saving
The optical sensor can be turned off to save power.
To use the power-saving:
1 Press and hold the link button.
2 Press the scroll button to turn off the optical sensor.
Low battery indicator
The mouse scroll wheel will light when the mouse batteries are low. Change the batteries immediately.
Using the keyboard
The office keyboard is designed with 16 hot keys and a scroll wheel. Two hot key areas located at both sides of the keyboard to control Office, computer, and media functions. The scroll wheel can be used to navigate on the screen.
Low battery indicator
There is a low battery indicator on the keyboard. The LED indicator lights when the keyboard batteries are low. Change the batteries immediately.
|
|
|
|
Name |
Function |
|
|
|
|
|
|
|
|
|
|
Low battery indicator |
The LED low battery indicator shows the |
|
|
|
|
|
battery status. The LED lights when the |
|
|
|
|
|
batteries are low. |
|
|
|
|
|
|
|
|
|
|
|
|
Multimedia hot keys
There are 8 multimedia hot keys located at the right corner of the keyboard. These keys include the following:
Key cap |
Name |
Function |
||||||
|
|
|
|
|
|
|
|
|
|
|
|
|
|
|
|
Media Player |
Press to play CD and media content. |
|
|
|
|
|
|
|
|
|
|
|
|
|
|
|
|
|
|
|
|
|
|
|
|
|
Pre Track |
Press to switch to the previous media track. |
|
|
|
|
|
|
|
|
Press once for each preceding track. |
|
|
|
|
|
|
|
|
|
|
|
|
|
|
|
|
|
|
|
|
|
|
|
|
|
|
|
|
|
|
|
|
|
|
Next Track |
Press to switch to the next media track. Press |
|
|
|
|
|
|
|
|
once for each subsequent track. |
|
|
|
|
|
|
|
|
|
|
|
|
|
|
|
|
|
|
|
|
|
|
|
|
|
|
|
|
|
|
|
|
|
|
Play/Pause |
Press to play or pause media. Once paused, |
|
|
|
|
|
|
|
|
press this key again to resume playing. |
|
|
|
|
|
|
|
|
|
|
|
|
|
|
|
|
|
|
|
|
|
|
|
|
|
|
|
|
|
|
|
|
|
|
Stop |
Press to stop playing media. |
|
|
|
|
|
|
|
|
|
|
|
|
|
|
|
|
|
|
|
|
|
|
|
|
|
Mute |
Press to turn off the sound. Press again to turn |
|
|
|
|
|
|
|
|
the sound back on. |
|
|
|
|
|
|
|
|
|
|
|
|
|
|
|
|
Volume up |
Press to increase the volume. Hold down to |
|
|
|
|
|
|
|
|
increase the volume more quickly |
|
|
|
|
|
|
|
|
|
|
|
|
|
|
|
|
Volume down |
Press to decrease the volume. Hold down to |
|
|
|
|
|
|
|
|
decrease the volume more quickly |
|
|
|
|
|
|
|
|
|
Using the keyboard combo |
5 |
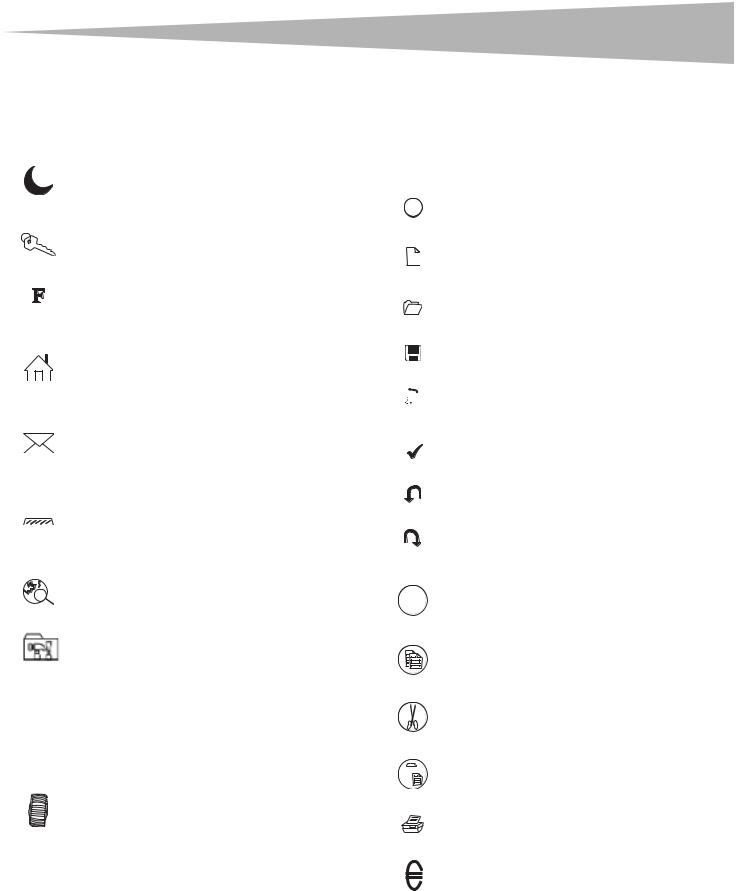
Computer, Web, and internet hot keys
There are eight hot keys located at the left side of the keyboard to control computer, Web, and e-mail access. These keys include the following:
Key cap |
Name |
Function |
|||||
|
|
|
|
|
|
|
|
|
|
|
|
|
|
PC Sleep |
Press to put the system into sleep mode if the |
|
|
|
|
|
|
|
computer supports power management and has |
|
|
|
|
|
|
|
it enabled. The user can put the computer to |
|
|
|
|
|
|
|
sleep at the press of any button, protecting data |
|
|
|
|
|
|
|
and saving energy. |
|
|
|
|
|
|
|
|
|
|
|
|
|
|
Log Off |
Press to open the Log Off Windows dialog box. |
|
|
|
|
|
|
|
Logging off closes all of programs, disconnects |
|
|
|
|
|
|
|
the computer from the network, and prepares |
|
|
|
|
|
|
|
the computer to be used by someone else. |
|
|
|
|
|
|
|
|
|
|
|
|
|
|
Function Lock |
Press to switch the function from the normal |
|
|
|
|
|
|
|
function keys (LED off) to the enhanced function |
|
|
|
|
|
|
|
keys (LED on). |
|
|
|
|
|
|
|
Note: The LED indicator is located on the receiver |
|
|
|
|
|
|
|
for the wireless office keyboard. |
|
|
|
|
|
|
|
|
|
|
|
|
|
|
IE Home |
Press to start the default Web browser or to go |
|
|
|
|
|
|
|
to the home Web page. If the Web browser is |
|
|
|
|
|
|
|
already activated, this ley opens the Home Web |
|
|
|
|
|
|
|
|
|
|
|
|
|
|
|
page. You can reassign the Home key to start |
|
|
|
|
|
|
|
|
|
|
|
|
|
|
|
another Web browser, another Home Web page, |
|
|
|
|
|
|
|
or another application |
|
|
|
|
|
|
|
|
|
|
|
|
|
|
Press to start the default e-mail program. If you |
|
|
|
|
|
|
|
|
are not sure what the default e-mail program is, |
|
|
|
|
|
|
|
|
|
|
|
|
|
|
|
press this key to find out. You can reassign the |
|
|
|
|
|
|
|
E-mail key to start another e-mail program or |
|
|
|
|
|
|
|
another application. |
|
|
|
|
|
|
|
|
|
|
|
|
|
|
My Computer |
Press to open My Computer. My computer shows |
|
|
|
|
|
|
|
the contents of your floppy diskette, hard disk, |
|
|
|
|
|
|
|
CD drive, and network drives. You can also search |
|
|
|
|
|
|
|
|
|
|
|
|
|
|
|
|
|
|
|
|
|
|
|
for and open files and folders, and gain access to |
|
|
|
|
|
|
|
options in Control Panel to modify the |
|
|
|
|
|
|
|
computer’s settings. |
|
|
|
|
|
|
|
|
|
|
|
|
|
|
Web search |
Press to open the Internet Explorer Search pane. |
|
|
|
|
|
|
|
|
|
|
|
|
|
|
Open Control Panel |
Press to open the Control Panel, which manages |
|
|
|
|
|
|
|
the computer system components and functions |
|
|
|
|
|
|
|
such as Mouse, Keyboard, Internet, Add/Delete |
|
|
|
|
|
|
|
Software/Hardware, and Monitor. |
|
|
|
|
|
|
|
|
Scroll wheel
The scroll wheel allows for easy navigation through a document on the screen. The scroll wheel requires a driver to operate under Windows. The driver is contained on the driver CD included with this product.
|
Name |
Function |
|
|
|
|
Scroll wheel |
Use to move around in a scrollable document as |
|
|
if you were using the scroll arrows or a mouse |
|
|
wheel, but without taking your hand off the |
|
|
keyboard. |
|
|
|
Function keys
There are 14 function keys that have been configured as “shortcuts” when using Microsoft Office applications. These function keys include the following:
Key |
Name |
Function |
Function |
|||||
|
|
|
|
|
|
|
key |
|
|
|
|
|
|
|
Help |
F1 |
Press to open the Help file (if available) for |
? |
|
|
the active window. |
|||||
|
|
|
||||||
|
|
|
|
|
|
|
|
|
|
|
|
|
|
|
New |
F2 |
Press to create a new document. |
|
|
N |
|
|
Note: For the keyboard versions used in Brazil, |
|||
|
|
|
|
Portugal, and Spain, the function key New is |
||||
|
|
|
|
|
|
|
|
defined as Bold. |
|
|
|
|
|
|
|
|
|
|
|
|
|
|
|
Open |
F3 |
Press to open a document in programs that |
|
|
|
|
|
|
|
|
support this command. |
|
|
|
|
|
|
|
|
|
|
|
|
|
|
|
Save |
F4 |
Press to save the file in the active window. |
|
|
|
|
|
|
|
|
|
|
|
|
|
|
|
|
|
|
|
|
|
|
|
|
|
|
|
|
|
|
|
|
|
|
|
|
|
|
|
|
|
|
|
|
|
|
|
|
|
|
|
Replace |
F5 |
Press to search for and replace the specified |
|
AB |
|
|
text and formatting. |
||||
|
|
|
|
|||||
|
|
|
|
|
|
|
|
|
|
|
|
|
|
|
Spell |
F6 |
Press to start the spell checking program in |
ABC |
|
|
the active document. |
|||||
|
|
|
|
|
|
Undo |
F7 |
Press to cancel the last action performed. |
|
|
|
|
|
|
|
|
|
|
|
|
|
|
|
Redo |
F8 |
Press to cancel the previous undo. |
|
|
|
|
|
|
|
|
Note: When using Excel, Redo can be enabled |
|
|
|
|
|
|
|
|
after you highlight and copy the content of a |
|
|
|
|
|
|
|
|
cell. |
|
|
|
|
|
|
|
|
|
|
|
|
|
|
|
Mark |
F9 |
Press to mark the selected item, and use £ or |
M |
|
|
Š to mark the text. If Mark is located at the |
|||||
|
|
Shift key, press Mark and the air ow key |
||||||
|
|
together to mark. |
||||||
|
|
|
|
|
|
|
|
|
|
|
|
|
|
|
Copy |
F10 |
Press to copy the highlighted text. |
|
|
|
|
|
|
|
|
|
|
|
|
|
|
|
Cut |
F11 |
Press to cut out the highlighted text. |
|
|
|
|
|
|
|
|
|
|
|
|
|
|
|
Paste |
F12 |
Press to paste the previously cut or copied |
|
|
|
|
|
|
|
|
text at the cursor position. |
|
|
|
|
|
|
|
|
|
|
|
|
|
|
|
|
|
|
|
|
|
|
|
|
|
|
|
|
|
|
|
|
|
PrtSc |
Press to print the document in the active |
|
|
|
|
|
|
|
|
|
window. |
|
|
|
|
|
|
|
|
|
|
|
|
|
|
|
Euro Sign |
Num |
Press to directly access the Euro sign and |
|
|
|
|
|
|
|
|
insert in the active document. |
|
|
|
|
|
|
|
|
|

6 |
Troubleshooting |
Troubleshooting
If the keyboard or the mouse is malfunctioning, do one of the following:
•Change the mouse or keyboard batteries.
•Move the receiver away from the computer and the monitor and repeat the set-up procedure on page 2.
•Make sure the USB port on the computer is working.
•Make sure that the receiver connector or cable is not broken or tangled.
Legal notices
Radio and TV Interference Statement
This equipment has been tested and found to comply within the limits for a Class B digital device, pursuant to Part 15 of the FCC rules. These limits are designed to provide reasonable protection against harmful interference in a residential installation. This equipment generates, uses and can radiate radio frequency energy and if not installed and used in accordance with the instructions, may cause harmful interference to radio communications. However, there is no guarantee that interference will not occur in a particular installation.
This Class B digital apparatus complies with Canadian ICES-003.
Copyright
© 2006 Dynex. DYNEX and the DYNEX logo are trademarks of Best Buy Enterprise Services, Inc. Other brands and product names are trademarks or registered trademarks of their respective holders. Specifications and features are subject to change without notice or obligation.
 Loading...