


 Loading...
3Com 3CRWXR10095A, 3CRWX120695A, WX4400, WXR100, 3CRWX440095A User Manual
...Wireless LAN Mobility System
Wireless LAN Switch Manager
Reference Manual
WX4400 3CRWX440095A
WX1200 3CRWX120695A
WXR100 3CRWXR10095A
http://www.3com.com/
Part No. 10015082
Published June 2006
3Com Corporation 350 Campus Drive Marlborough, MA USA 01752-3064
Copyright © 2006, 3Com Corporation. All rights reserved. No part of this documentation may be reproduced in any form or by any means or used to make any derivative work (such as translation, transformation, or adaptation) without written permission from 3Com Corporation.
3Com Corporation reserves the right to revise this documentation and to make changes in content from time to time without obligation on the part of 3Com Corporation to provide notification of such revision or change.
3Com Corporation provides this documentation without warranty, term, or condition of any kind, either implied or expressed, including, but not limited to, the implied warranties, terms or conditions of merchantability, satisfactory quality, and fitness for a particular purpose. 3Com may make improvements or changes in the product(s) and/or the program(s) described in this documentation at any time.
If there is any software on removable media described in this documentation, it is furnished under a license agreement included with the product as a separate document, in the hard copy documentation, or on the removable media in a directory file named LICENSE.TXT or !LICENSE.TXT. If you are unable to locate a copy, please contact 3Com and a copy will be provided to you.
UNITED STATES GOVERNMENT LEGEND
If you are a United States government agency, then this documentation and the software described herein are provided to you subject to the following:
All technical data and computer software are commercial in nature and developed solely at private expense. Software is delivered as “Commercial Computer Software” as defined in DFARS 252.227-7014 (June 1995) or as a “commercial item” as defined in FAR 2.101(a) and as such is provided with only such rights as are provided in 3Com’s standard commercial license for the Software. Technical data is provided with limited rights only as provided in DFAR 252.227-7015 (Nov 1995) or FAR 52.227-14 (June 1987), whichever is applicable. You agree not to remove or deface any portion of any legend provided on any licensed program or documentation contained in, or delivered to you in conjunction with, this User Guide.
Unless otherwise indicated, 3Com registered trademarks are registered in the United States and may or may not be registered in other countries.
3Com is a registered trademark of 3Com Corporation. The 3Com logo is a trademark of 3Com Corporation.
Mobility Domain, Mobility Point, Mobility Profile, Mobility System, Mobility System Software, MP, MSS, and SentrySweep are trademarks of Trapeze Networks, Inc.
Intel and Pentium are registered trademarks of Intel Corporation. Microsoft, MS-DOS, Windows, Windows XP, and Windows NT are registered trademarks of Microsoft Corporation.
All other company and product names may be trademarks of the respective companies with which they are associated.
ENVIRONMENTAL STATEMENT
It is the policy of 3Com Corporation to be environmentally-friendly in all operations. To uphold our policy, we are committed to:
Establishing environmental performance standards that comply with national legislation and regulations.
Conserving energy, materials and natural resources in all operations.
Reducing the waste generated by all operations. Ensuring that all waste conforms to recognized environmental standards. Maximizing the recyclable and reusable content of all products.
Ensuring that all products can be recycled, reused and disposed of safely.
Ensuring that all products are labelled according to recognized environmental standards.
Improving our environmental record on a continual basis.
End of Life Statement
3Com processes allow for the recovery, reclamation and safe disposal of all end-of-life electronic components.
Regulated Materials Statement
3Com products do not contain any hazardous or ozone-depleting material.
Environmental Statement about the Documentation
The documentation for this product is printed on paper that comes from sustainable, managed forests; it is fully biodegradable and recyclable, and is completely chlorine-free. The varnish is environmentally-friendly, and the inks are vegetable-based with a low heavy-metal content.

CONTENTS
ABOUT THIS GUIDE
|
Conventions |
17 |
|
|
|
|
Documentation |
18 |
|
|
|
|
Documentation Comments |
19 |
|
||
|
|
|
|
||
1 INSTALLING 3WXM |
|
|
|||
|
Hardware Requirements |
21 |
|
||
|
Hardware Requirements for 3WXM Client 21 |
||||
|
Hardware Requirements for 3WXM Monitoring Service 22 |
||||
|
Software Requirements 23 |
|
|||
|
Preparing for Installation |
23 |
|
||
|
User Privileges |
23 |
|
|
|
|
Serial Number and License Key 24 |
|
|||
|
Installing 3WXM |
24 |
|
|
|
|
Installation Log File |
26 |
|
|
|
|
Upgrading 3WXM |
26 |
|
|
|
|
Uninstalling 3WXM |
26 |
|
|
|
|
|
||||
2 WORKING WITH THE 3WXM USER INTERFACE |
|||||
|
Overview 29 |
|
|
|
|
|
Display Panels |
30 |
|
|
|
|
Organizer Panel |
30 |
|
|
|
|
Alerts Panel |
32 |
|
|
|
|
Content Panel |
33 |
|
|
|
|
Task List Panel |
35 |
|
|
|
|
Resizing a Display Panel |
37 |
|
||
|
Menu Bar Options |
38 |
|
|
|
|
Tool Bar Options |
39 |
|
|
|
|
Copying, Pasting, and Deleting Objects |
42 |
|||
|
Copy and Paste in the Organizer Panel |
42 |
|||
Copy and Paste Replace in the Organizer Panel 43

|
Copy and Paste in the Content Panel |
43 |
|||
|
Enabling Keyboard Shortcut Mnemonics (Windows XP Only) 44 |
||||
|
|
|
|
|
|
3 GETTING STARTED |
|
|
|
|
|
|
Starting 3WXM 47 |
|
|
|
|
|
Restricting Access to 3WXM |
|
50 |
|
|
|
Creating an Administrator Account 51 |
||||
|
Creating Provision or Monitor Accounts |
52 |
|||
|
Deleting 3WXM User Accounts 52 |
|
|||
|
Disabling Access Control |
|
52 |
|
|
|
|
|
|||
4 WORKING WITH NETWORK PLANS |
|
||||
|
Creating a Network Plan |
54 |
|
|
|
|
Managing Network Plans |
55 |
|
|
|
|
Saving a Network Plan |
55 |
|
||
|
Opening a Network Plan |
|
56 |
|
|
|
Importing a Network Plan |
57 |
|
||
|
Closing a Network Plan |
58 |
|
||
|
Deleting a Network Plan |
58 |
|
||
|
Sharing a Network Plan |
59 |
|
||
|
Defining a Mobility Domain |
60 |
|
||
|
Roaming Behavior |
60 |
|
|
|
|
Traffic Ports Used by a Mobility Domain |
62 |
|||
|
Creating a Mobility Domain |
62 |
|
||
|
Creating a WX Switch |
63 |
|
|
|
|
Creating a Third-Party AP |
63 |
|
|
|
|
Changing the Country Code |
|
65 |
|
|
Applying the Network’s RF Auto-Tuning Settings to the Network Plan 65 Uploading a WX Switch into the Network Plan 66
Converting Auto DAPs into Statically Configured APs 67 Creating a Network Domain 67
5 PLANNING THE 3COM MOBILITY SYSTEM
RF Planning Overview 69
Accessing the RF Planning Tools 70
Creating or Modifying a Site 72
Creating or Modifying Buildings in a Site |
74 |
|
|||
Creating or Modifying Floors |
77 |
|
|
|
|
Importing or Drawing Floor Details |
78 |
|
|
||
Importing a Drawing of a Floor |
78 |
|
|
||
File Recommendations |
79 |
|
|
|
|
Preparing a Drawing Before Importing It |
79 |
|
|||
Cropping the Paper Space |
84 |
|
|
|
|
Adjusting the Scale of a Drawing |
85 |
|
|
||
Adjusting the Origin Point |
86 |
|
|
|
|
Working with Layers |
87 |
|
|
|
|
Cleaning Up a Drawing |
|
89 |
|
|
|
Drawing Floor Objects Manually |
93 |
|
|
||
Specifying the RF Characteristics of a Floor |
94 |
|
|||
Recommendations 94 |
|
|
|
|
|
Converting Objects into RF Obstacles |
95 |
|
|||
Drawing RF Obstacles |
97 |
|
|
|
|
Importing RF Obstacle Data from a Site Survey |
98 |
||||
Defining Wireless Coverage Areas |
110 |
|
|
||
Creating a Wiring Closet |
111 |
|
|
|
|
Defining a Coverage Area |
113 |
|
|
|
|
Editing Coverage Areas |
|
125 |
|
|
|
Placing Third-Party Access Points 130 |
|
|
|||
Moving a Third-Party AP Icon to its Floor Location |
131 |
||||
Creating and Placing an Icon for a Third-Party Access Point 131 Placing Installed and Auto-Configured MAPs 135
Computing MAP Placement 136
Computing and Placing MAP Access Points for a Coverage Area 136
Assigning MAP Channels |
144 |
|
Computing Optimal Power |
147 |
|
Verifying the Wireless Network |
150 |
|
Showing RF Coverage 150 |
|
|
Placing RF Measurement Points 151 |
|
|
Using RF Interactive Measurement Mode |
153 |
|
Reading the RF Measurement Table 153 |
|
|
Generating RF Network Design Information |
155 |
|

6 CONFIGURING WX SYSTEM PARAMETERS
WX Switch Configuration Objects |
157 |
|
|
|
|
|||
Adding a WX Switch to the Network Plan |
161 |
|
|
|
||||
Creating a WX Switch as Part of RF Planning |
161 |
|
|
|||||
Creating a WX Switch Using the Create Wireless Switch Wizard |
161 |
|||||||
Creating a New WX Switch Based on a Configured Switch in the Network |
||||||||
Plan 162 |
|
|
|
|
|
|
|
|
Adding a Switch by Uploading its Configuration from the Network |
163 |
|||||||
Adding a Switch by Importing a Configuration File 163 |
|
|
||||||
Configuring Basic and Advanced Settings |
164 |
|
|
|
||||
Reviewing and Deploying Changes |
164 |
|
|
|
|
|||
Reviewing Changes |
|
164 |
|
|
|
|
|
|
Deploying Changes |
|
165 |
|
|
|
|
|
|
Using the Create Wireless Switch Wizard |
165 |
|
|
|
||||
Setting Up a Switch |
167 |
|
|
|
|
|
|
|
Modifying Basic Switch Parameters |
170 |
|
|
|
|
|||
Changing the WX Software Version 172 |
|
|
|
|||||
Changing the WX Model |
172 |
|
|
|
|
|
||
Changing Timezone Properties |
172 |
|
|
|
|
|||
Changing System Information |
173 |
|
|
|
|
|||
Converting Auto DAPs into Statically Configured DAPs |
174 |
|
||||||
Deleting Auto DAPs |
175 |
|
|
|
|
|
||
Launching a Telnet Management Session with the Switch |
175 |
|
||||||
Launching a Web Management Session with the Switch |
176 |
|
||||||
Viewing and Changing Port Settings |
176 |
|
|
|
|
|||
Viewing Port Settings |
176 |
|
|
|
|
|
||
Changing Port Settings |
176 |
|
|
|
|
|
||
Configuring a Port for a Directly Connected AP 178 |
|
|
||||||
Configure a Port for Wired Authentication |
179 |
|
|
|||||
Viewing and Changing Port Groups |
184 |
|
|
|
|
|||
Viewing Port Groups |
184 |
|
|
|
|
|
||
Creating a Port Group |
|
185 |
|
|
|
|
|
|
Changing a Port Group |
185 |
|
|
|
|
|
||
Viewing and Changing Management Settings |
186 |
|
|
|||||
Viewing Management Service Settings |
186 |
|
|
|||||
Changing Management Service Settings |
186 |
|
|
|||||
Configuring SNMP |
187 |
|
|
|
|
|
||
Viewing and Setting Log and Trace Settings |
198 |
|
||||
Viewing Log Settings |
198 |
|
|
|
|
|
Changing Log Settings |
198 |
|
|
|
|
|
Viewing and Configuring IP Services Settings |
201 |
|
||||
Viewing IP Services Setting 201 |
|
|
|
|||
Creating a Static Route |
202 |
|
|
|
|
|
Create an IP Alias 203 |
|
|
|
|
||
Configuring DNS |
203 |
|
|
|
|
|
Configuring NTP |
204 |
|
|
|
|
|
Configuring ARP |
205 |
|
|
|
|
|
Viewing and Configuring VLANs |
206 |
|
|
|
||
Viewing VLANs |
207 |
|
|
|
|
|
Creating a VLAN |
207 |
|
|
|
|
|
Changing VLAN Membership |
209 |
|
|
|
||
Changing VLAN Spanning Tree Settings |
210 |
|
||||
Changing VLAN IGMP Settings |
214 |
|
|
|||
Restricting Layer 2 Traffic Among Clients in a VLAN |
217 |
|||||
Restricting Layer 3 Traffic Among Clients in a VLAN |
218 |
|||||
Changing a VLAN’s Tunnel Affinity |
218 |
|
|
|||
Configuring the MSS DHCP Server |
219 |
|
|
|||
Changing the Aging Time for FDB Entries |
220 |
|
||||
Viewing and Configuring ACLs |
220 |
|
|
|
||
Viewing ACLs |
221 |
|
|
|
|
|
Creating an ACL |
221 |
|
|
|
|
|
Configuring Advanced ACL Settings |
226 |
|
||||
Adding a New ACE to a Configured ACL |
228 |
|
||||
Mapping an ACL |
228 |
|
|
|
|
|
Deleting an ACL |
230 |
|
|
|
|
|
Deleting an Individual ACE from an ACL |
230 |
|
||||
Viewing and Changing CoS Mappings |
231 |
|
|
|||
Viewing CoS Mappings |
231 |
|
|
|
|
|
Changing a DSCP-to-CoS Mapping |
232 |
|
|
|||
Changing a CoS-to-DSCP Mapping |
232 |
|
|
|||
Setting a Range of DSCP Values to a Single CoS Value |
233 |
|||||
Resetting CoS Mapping to their Default Values 233 |
|
|||||

7 CONFIGURING WIRELESS PARAMETERS
Viewing and Configuring Wireless Services |
235 |
|
|
||||
Wireless Service Parameters |
236 |
|
|
|
|
|
|
Viewing Wireless Services |
241 |
|
|
|
|
|
|
Configuring an 802.1X Wireless Service |
242 |
|
|
||||
Configuring a Voice over Wireless Service |
244 |
|
|
||||
Configuring a Web-Portal (WebAAA) Service |
247 |
|
|||||
Configuring an Open Access Service |
250 |
|
|
|
|||
Configuring a Custom Service |
252 |
|
|
|
|
||
Modifying Service Profile Settings 253 |
|
|
|
|
|||
Viewing SSID Encryption Settings and Access Rules |
258 |
||||||
Modifying SSID Encryption Settings and Access Rules |
260 |
||||||
Viewing and Configuring Radio Profiles |
263 |
|
|
|
|||
Viewing Radio Profile Settings |
263 |
|
|
|
|
||
Creating a Radio Profile |
264 |
|
|
|
|
|
|
Moving Radios Back to the Default Radio Profile |
264 |
|
|||||
Configuring Advanced Radio Profile Settings |
265 |
|
|||||
Viewing and Changing the Auto-DAP Profile |
269 |
|
|
||||
Viewing Auto-DAP Profile Settings |
269 |
|
|
|
|
||
Changing Auto-DAP Profile Settings |
270 |
|
|
|
|||
Converting Auto DAPs into Statically Configured DAPs |
272 |
||||||
Deleting Auto DAPs 272 |
|
|
|
|
|
|
|
Viewing and Configuring MAPs |
272 |
|
|
|
|
|
|
Viewing the Configured MAPs |
273 |
|
|
|
|
||
Creating a Distributed MAP |
273 |
|
|
|
|
|
|
Configuring a Directly Connected MAP |
275 |
|
|
||||
Changing the MAP-WX Security Mode |
277 |
|
|
||||
Configuring Advanced MAP Settings |
277 |
|
|
|
|||
Viewing and Changing Radio Settings |
281 |
|
|
|
|
||
Viewing Radio Settings |
281 |
|
|
|
|
|
|
Changing Radio Settings |
281 |
|
|
|
|
|
|
Viewing and Changing RF Detection Settings |
|
282 |
|
|
|||
Viewing RF Detection Settings |
282 |
|
|
|
|
||
Adding an Entry to the Permitted Vendor OUI List |
282 |
||||||
Adding an Entry to the Permitted SSID List |
283 |
|
|
||||
Adding an Entry to the Ignore List |
283 |
|
|
|
|
||
Adding an Entry to the Rogue List |
284 |
|
|
|
|
||

Adding an Entry to the Client Black List 284
Enabling Countermeasures |
284 |
Enabling MAP Signatures |
285 |
8CONFIGURING AUTHENTICATION, AUTHORIZATION, AND ACCOUNTING PARAMETERS
Creating and Managing Users in the Local User Database |
287 |
|||||
Viewing Users and Groups in the Local Database |
288 |
|
||||
Creating a Named User |
289 |
|
|
|
|
|
Creating a User Group and Assigning Users To It |
290 |
|
||||
Creating a MAC User 291 |
|
|
|
|
|
|
Creating a MAC User Group and Assigning Users To It |
292 |
|||||
Authorization Attributes |
293 |
|
|
|
|
|
Viewing and Configuring RADIUS Settings |
298 |
|
|
|||
Viewing RADIUS Settings, Servers, and Server Groups |
299 |
|||||
Creating a RADIUS Server |
299 |
|
|
|
|
|
Creating a RADIUS Server Group |
300 |
|
|
|
|
|
Changing Default RADIUS Settings |
301 |
|
|
|
||
Viewing and Configuring Global 802.1X Settings 303 |
|
|||||
Viewing Global 802.1X Settings |
303 |
|
|
|
|
|
Changing Global 802.1X Settings |
303 |
|
|
|
|
|
Viewing and Configuring 802.1X Network Access Rules 306 |
||||||
Viewing 802.1X Network Access Rules |
306 |
|
|
|||
Creating an 802.1X Network Access Rule |
306 |
|
|
|||
Viewing and Configuring MAC Network Access Rules |
310 |
|||||
Viewing MAC Network Access Rules 310 |
|
|
|
|||
Creating a MAC Network Access Rule |
310 |
|
|
|||
Viewing and Configuring WebAAA Network Access Rules |
313 |
|||||
Viewing Web AAA Network Access Rules |
313 |
|
|
|||
Creating a Web AAA Network Access Rule |
314 |
|
|
|||
Viewing and Configuring Last-Resort Network Access Rules |
316 |
|||||
Viewing Last-Resort Network Access Rules |
316 |
|
|
|||
Creating a Last-Resort Network Access Rule |
316 |
|
|
|||
Viewing and Configuring WX Administrator Access Rules |
318 |
|||||
Viewing WX Administrator Access Rules |
318 |
|
|
|||
Creating an Access Rule for Console Access |
319 |
|
|
|||
Creating an Access Rule for Telnet or SSH Access |
320 |
|
||||
Viewing and Configuring AAA Support for Third-Party AP Users 322
|
Viewing Settings for Third-Party AP AAA Support |
322 |
|
||||||
|
Creating a Proxy Access Rule |
322 |
|
|
|
|
|||
|
Configuring a RADIUS Proxy for a Client |
324 |
|
|
|||||
|
Specifying the WX Port Connected to the Third-Party AP |
324 |
|||||||
|
Viewing and Changing Location Policy Rules |
325 |
|
|
|||||
|
Viewing Location Policy Rules |
325 |
|
|
|
|
|||
|
Creating a Location Policy Rule |
326 |
|
|
|
|
|||
|
Viewing and Changing Mobility Profiles |
328 |
|
|
|
||||
|
Viewing Mobility Profiles |
328 |
|
|
|
|
|
||
|
Creating a Mobility Profile |
328 |
|
|
|
|
|||
|
|
|
|
||||||
9 CONFIGURING WX SWITCHES REMOTELY |
|
|
|||||||
|
How Remote WX Configuration Works |
332 |
|
|
|
||||
|
Drop Ship (WXR100 Only) |
332 |
|
|
|
|
|||
|
Staged WX |
334 |
|
|
|
|
|
|
|
|
3WXM Requirements |
335 |
|
|
|
|
|
|
|
|
Staging a WX Switch for Configuration by 3WXM |
336 |
|
||||||
|
Example 1: Deployment Site Has DHCP and Local DNS |
336 |
|||||||
|
Example 2: Deployment Site Has No DHCP and No DNS |
337 |
|||||||
|
Example 3: Deployment Site Has DNS But No DHCP 338 |
||||||||
|
Example 4: Deployment Site Has DHCP But Local DNS Domain Differs |
||||||||
|
From Corporate DNS Domain |
339 |
|
|
|
|
|||
|
Preconfiguring a Switch in 3WXM |
340 |
|
|
|
|
|||
|
Uploading a Partially Configured Switch and Completing its |
||||||||
|
Configuration with 3WXM |
341 |
|
|
|
|
|||
|
Replacing a Switch and Reusing its Configuration |
342 |
|
||||||
|
Requirements 342 |
|
|
|
|
|
|
||
|
How Switch Replacement Works 343 |
|
|
|
|||||
|
Enabling Replacement of Remote Switches |
343 |
|
||||||
|
Replacing a Switch |
344 |
|
|
|
|
|
|
|
|
|
||||||||
10 MANAGING WX SYSTEM IMAGES AND CONFIGURATIONS |
|||||||||
|
WX File Management Options |
345 |
|
|
|
|
|||
|
Devices Tab |
346 |
|
|
|
|
|
|
|
|
Task List Options |
347 |
|
|
|
|
|
|
|
|
Toolbar Options |
350 |
|
|
|
|
|
|
|
|
Synchronizing Local and Network Changes |
350 |
|
||||||
|
Reviewing Switch Configuration Changes |
350 |
|
||||||
|
Accepting Network Changes |
351 |
|
|
|
||||
|
Undoing Local or Network Changes |
351 |
|
||||||
|
Deploying Switch Configuration Changes |
352 |
|
||||||
|
Synchronizing When the Network and 3WXM Have Nonmatching |
||||||||
|
Changes |
353 |
|
|
|
|
|
|
|
|
Distributing System Images |
354 |
|
|
|
||||
|
Using the Image Repository |
354 |
|
|
|
||||
|
Distributing System Images |
355 |
|
|
|
||||
|
Rebooting WX Switches or MAP Access Points 356 |
||||||||
|
Enabling or Disabling Management of a Switch by 3WXM 357 |
||||||||
|
Viewing the Operation Log |
358 |
|
|
|
||||
|
Canceling a Scheduled Operation |
358 |
|
|
|
||||
|
Importing and Exporting Switch Configuration Files |
359 |
|||||||
|
Modifying Configuration Change Polling Options |
361 |
|||||||
11 |
|
|
|||||||
VERIFYING CONFIGURATION CHANGES |
|
||||||||
|
Verification Tabs |
363 |
|
|
|
|
|
|
|
|
Toolbar Options |
364 |
|
|
|
|
|
||
|
Filtering the Message List |
364 |
|
|
|
||||
|
Resolving an Error or Warning |
364 |
|
|
|
||||
|
Disabling a Rule from the Message List |
|
365 |
|
|||||
|
Changing Verification Options |
366 |
|
|
|
||||
|
Disabling and Reenabling Rules 367 |
|
|
|
|||||
12 |
|
|
|
|
|
||||
MANAGING CERTIFICATES |
|
|
|
|
|||||
|
Overview |
369 |
|
|
|
|
|
|
|
|
Processing Certificates |
370 |
|
|
|
|
|
||
|
Managing Certificates |
371 |
|
|
|
|
|
||
|
Reviewing Certificate Details |
371 |
|
|
|
||||
|
Deleting Certificates |
371 |
|
|
|
|
|||
|
Distributing Certificates to WX Switches |
372 |
|
||||||

13 CONFIGURING AND APPLYING POLICIES
|
How Changes Are Managed |
373 |
|
|||
|
Policies Created When You Migrate a 3.x Network Plan to 4.1 373 |
|||||
|
Viewing Policies |
374 |
|
|
|
|
|
Creating a Policy |
374 |
|
|
|
|
|
Configuring Feature Settings in a Policy |
375 |
||||
|
Applying Policy Changes to Switches |
375 |
||||
|
|
|
|
|
||
14 USING THE EVENT LOG |
|
|
|
|||
|
Displaying the Event Log |
377 |
|
|
||
|
Toolbar Options |
377 |
|
|
|
|
|
Refreshing Event Data 378 |
|
|
|
||
|
Reviewing Event Details |
378 |
|
|
|
|
|
Filtering Event Messages |
378 |
|
|
|
|
|
Using Predefined Event Filters |
378 |
||||
|
Filtering Events by Content |
379 |
|
|||
|
Filtering Events by Severity |
381 |
|
|||
|
Filtering Events by Facility |
381 |
|
|||
|
Creating and Saving Filters |
382 |
|
|||
|
Deleting Filters |
382 |
|
|
|
|
|
Exporting Filtered Data |
382 |
|
|
||
|
|
|
|
|
||
15 GENERATING REPORTS |
|
|
|
|||
|
Overview 384 |
|
|
|
|
|
|
Generating an Inventory Report |
|
385 |
|
||
|
Generating a Mobility Domain Configuration Report 386 |
|||||
|
Generating a WX Configuration Report |
387 |
||||
|
Generating a Client Summary Report |
388 |
||||
|
Generating a Client Details Report |
389 |
||||
|
Generating a Client Errors Report |
391 |
||||
|
Generating a Watch List Client Report |
392 |
||||
|
Generating a Network Usage Report |
393 |
||||
|
Generating an RF Summary Report |
394 |
||||
|
Generating a Radio Details Report |
395 |
||||
|
Generating a Rogue Details Report |
396 |
||||
|
Generating a Rogue Summary Report |
397 |
||||

|
Generating a Site Survey Order |
398 |
|
|
||
|
Generating a Work Order |
399 |
|
|
|
|
|
|
|
|
|||
16 MONITORING THE NETWORK |
|
|
||||
|
Overview 401 |
|
|
|
|
|
|
Requirements for Monitoring 402 |
|
|
|||
|
Accessing Monitored Data |
402 |
|
|
||
|
Using the Explore Window |
403 |
|
|
||
|
Toolbar Options |
405 |
|
|
|
|
|
Threshold Flags |
407 |
|
|
|
|
|
Displaying Object Details |
410 |
|
|
||
|
Displaying 802.11 Coverage |
410 |
|
|
||
|
Taking RF Measurements |
412 |
|
|
||
|
Using the Status Summary View |
414 |
|
|
||
|
Using the Client Monitor View |
415 |
|
|
||
|
Toolbar Options |
415 |
|
|
|
|
|
Refreshing Client Data |
416 |
|
|
|
|
|
Displaying Client Activity Information |
416 |
||||
|
Displaying Client Session Information |
427 |
||||
|
Managing the Client Watch List 434 |
|
|
|||
|
Displaying a Client’s Geographical Location |
439 |
||||
|
Terminating a Client’s Session |
441 |
|
|
||
|
Using the RF Monitor View |
442 |
|
|
||
|
Displaying RF Neighborhood Information |
443 |
||||
|
Displaying the SSID-to-BSSID Mapping |
444 |
||||
|
Displaying the Activity Log |
445 |
|
|
||
|
Displaying RF Environment Statistics |
446 |
|
|||
|
Using the RF Trends View |
447 |
|
|
|
|
|
Refreshing RF Trend Data |
449 |
|
|
||
|
Accessing Realtime Performance Statistics |
449 |
||||
|
Viewing Performance Data |
451 |
|
|
||
17 DETECTING AND COMBATTING ROGUE DEVICES
Overview 457 |
|
Rogue Detection Requirements |
458 |
Mobility Domain Requirement |
459 |
Rogue Detection Lists 460 |
|

|
Using the Rogue Detection Screen |
462 |
|
|
|
Toolbar Options 463 |
|
|
|
|
Filtering the Rogue List |
464 |
|
|
|
Displaying Rogue Details |
465 |
|
|
|
Displaying a Rogue’s Geographical Location |
468 |
||
|
Ignoring Friendly Third-Party Devices |
470 |
|
|
|
Adding a Device to the Attack List |
471 |
|
|
|
Converting a Rogue into a Third Party AP |
471 |
||
|
To convert a rogue into a third-party AP |
471 |
||
|
Adding a Rogue’s Clients to the Black List |
473 |
||
|
Configuring RF Detection Options from the Organizer Panel 473 |
|||
|
|
|
||
18 OPTIMIZING A NETWORK PLAN |
|
|||
|
Importing RF Measurements |
475 |
|
|
Importing the Measurements |
475 |
|
Applying the RF Measurements to the Floor Plan 477 |
||
Locating and Fixing Coverage Holes |
478 |
|
Locating a Coverage Hole |
478 |
|
Fixing a Coverage Hole |
480 |
|
Computing and Placing New MAPs 480
Adding New MAPs that Are Already Installed to the Network Plan 480
A CHANGING 3WXM PREFERENCES
Overview 481 |
|
|
|
Resetting Preferences Values |
481 |
|
|
Changing Network Synchronization Options |
482 |
||
Changing User Interface Options |
482 |
|
|
Changing Persistence Options |
483 |
|
|
Changing Tools Options 484 |
|
|
|
Changing Certificate Management Options |
484 |
||
Changing Options for RF Planning |
485 |
|
|
Configuring the Typical Client’s Transmit Power 485 |
|||
Changing Colors 485 |
|
|
|
Changing 3WXM Logging Options |
488 |
|
|

B CHANGING 3WXM SERVICES PREFERENCES
|
Overview |
491 |
|
|
|
|
|
|
|
Starting or Stopping the 3WXM Services |
493 |
|
|||||
|
Connecting to 3WXM Services |
494 |
|
|
||||
|
Certificate Check |
495 |
|
|
|
|
|
|
|
Verifying that the 3WXM Client is Receiving Service Data |
496 |
||||||
|
Changing Service Settings |
497 |
|
|
|
|||
|
Changing WX Connection Settings |
498 |
|
|
||||
|
Changing Monitoring Settings |
500 |
|
|
||||
|
To change monitoring settings |
501 |
|
|
||||
|
Accessing the 3WXM Services Log |
502 |
|
|
||||
|
Managing Network Plans |
503 |
|
|
|
|||
|
Backing Up a Plan |
503 |
|
|
|
|
||
|
Changing Backup Settings |
504 |
|
|
|
|||
|
Restoring a Plan from a Backup |
504 |
|
|
||||
|
Copying a Plan Backup from One Server to Another |
504 |
||||||
|
Deleting a Plan Backup |
505 |
|
|
|
|||
|
|
|
||||||
C OBTAINING SUPPORT FOR YOUR PRODUCT |
|
|||||||
|
Register Your Product |
507 |
|
|
|
|
||
|
Purchase Value-Added Services |
507 |
|
|
||||
|
Troubleshoot Online |
508 |
|
|
|
|
|
|
|
Access Software Downloads |
|
508 |
|
|
|
||
|
Telephone Technical Support and Repair |
508 |
|
|||||
|
Contact Us |
509 |
|
|
|
|
|
|
INDEX
ABOUT THIS GUIDE
This manual shows you how to plan, configure, deploy, and manage a
Mobility System wireless LAN (WLAN) using the 3Com Wireless LAN
Switch Manager (3WXM).
Read this manual if you are a network administrator or a person responsible for managing a WLAN.
If release notes are shipped with your product and the information there differs from the information in this guide, follow the instructions in the release notes.
Most user guides and release notes are available in Adobe Acrobat
Reader Portable Document Format (PDF) or HTML on the 3Com
World Wide Web site:
http://www.3com.com/
Conventions |
Table 1 and Table 2 list conventions that are used throughout this guide. |
||
|
Table 1 |
Notice Icons |
|
|
|
|
|
|
Icon |
Notice Type |
Description |
|
|
|
|
|
|
Information note |
Information that describes important features or |
|
|
|
instructions |
|
|
Caution |
Information that alerts you to potential loss of data or |
|
|
|
potential damage to an application, system, or device |
|
|
|
|

18 ABOUT THIS GUIDE
This manual uses the following text and syntax conventions:
Table 2 Text Conventions
Convention |
Description |
|
|
Menu Name > |
Indicates a menu item that you select. For example, |
Command |
File > New indicates that you select New from the File |
|
menu. |
|
|
Monospace text |
Sets off command syntax or sample commands and system |
|
responses. |
|
|
Bold text |
Highlights commands that you enter or items you select. |
|
|
Italic text |
Designates command variables that you replace with |
|
appropriate values, or highlights publication titles or words |
|
requiring special emphasis. |
|
|
[ ] (square brackets) |
Enclose optional parameters in command syntax. |
|
|
{ } (curly brackets) |
Enclose mandatory parameters in command syntax. |
|
|
| (vertical bar) |
Separates mutually exclusive options in command syntax. |
|
|
Keyboard key names |
If you must press two or more keys simultaneously, the key |
|
names are linked with a plus sign (+). Example: |
|
Press Ctrl+Alt+Del |
|
|
Words in italics |
Italics are used to: |
|
Emphasize a point. |
|
Denote a new term at the place where it is defined in the |
|
text. |
|
Highlight an example string, such as a username or SSID. |
|
|
Documentation |
The 3WXM documentation set includes the following documents. |
|
Wireless LAN Switch Manager (3WXM) Release Notes |
|
These notes provide information about the system software release, |
|
including new features and bug fixes. |
|
Wireless LAN Switch and Controller Release Notes |
|
These notes provide information about the system software release, |
|
including new features and bug fixes. |
|
Wireless LAN Switch and Controller Quick Start Guide |
|
This guide provides instructions for performing basic setup of secure |
|
(802.1X) and guest (WebAAA™) access, for configuring a Mobility |
|
Domain for roaming, and for accessing a sample network plan in |
|
3WXM for advanced configuration and management. |

Documentation Comments 19
Wireless LAN Switch Manager Reference Manual
This manual shows you how to plan, configure, deploy, and manage a
Mobility System wireless LAN (WLAN) using the 3Com Wireless LAN
Switch Manager (3WXM).
Wireless LAN Switch Manager User’s Guide
This guide shows you how to plan, configure, deploy, and manage a Mobility System wireless LAN (WLAN) using the 3Com Wireless LAN Switch Manager (3WXM). It contains information about recommended system requirements you should meet for optimum 3WXM performance, installing 3WXM client and 3WXM Services software, and an introduction to using the 3WXM interface.
Wireless LAN Switch and Controller Hardware Installation Guide
This guide provides instructions and specifications for installing a WX wireless switch in a Mobility System WLAN.
Wireless LAN Switch and Controller Configuration Guide
|
This guide provides instructions for configuring and managing the |
|
system through the Mobility System Software (MSS) CLI. |
|
Wireless LAN Switch and Controller Command Reference |
|
This reference provides syntax information for all MSS commands |
|
supported on WX switches. |
|
|
Documentation |
Your suggestions are very important to us. They will help make our |
Comments |
documentation more useful to you. Please e-mail comments about this |
|
document to 3Com at: |
|
pddtechpubs_comments@3com.com |
|
Please include the following information when contacting us: |
|
Document title |
|
Document part number and revision (on the title page) |
|
Page number (if appropriate) |

20 ABOUT THIS GUIDE
Example:
Wireless LAN Switch and Controller Configuration Guide
Part number 730-9502-0071, Revision B
Page 25
Please note that we can only respond to comments and questions about 3Com product documentation at this e-mail address. Questions related to Technical Support or sales should be directed in the first instance to your network supplier.
1 |
INSTALLING 3WXM |
|
This chapter describes how to install 3Com Wireless LAN Switch Manager (3WXM).
Hardware
Requirements
Hardware Table 3 shows the minimum and recommended requirements to run the
Requirements for 3WXM client.
3WXM Client
Table 3 Hardware Requirements for Running 3WXM Client
|
Minimum |
Recommended |
Processor |
Intel Pentium 4 2 GHz or |
Intel Pentium 4 3 GHz or |
|
equivalent |
equivalent |
RAM |
512 MB |
1 GB |
Hard drive space |
100 MB |
200 MB |
available |
|
|
Monitor resolution |
1024x768 pixels, 24-bit color |
1600x1200 pixels, 32-bit |
|
|
color |
CD-ROM drive |
CD-ROM or equivalent |
CD-ROM |
|
|
|

22 CHAPTER 1: INSTALLING 3WXM
Hardware Requirements for 3WXM Monitoring Service
Table 4 shows the minimum and recommended requirements to run the 3WXM monitoring service.
Table 4 Hardware Requirements for Running 3WXM Monitoring Service
|
Minimum |
Recommended |
Processor |
Intel Pentium 4 2.4 GHz or |
Intel Pentium 4 3.6 GHz or |
|
equivalent |
equivalent |
RAM |
1 GB |
2 GB |
Hard drive space |
1 GB |
2 GB |
available |
|
|
Monitor resolution |
1024x768 pixels, 24-bit |
1600x1200 pixels, 32-bit |
|
color |
color |
CD-ROM drive |
CD-ROM or equivalent |
CD-ROM |
|
|
|
Table 5 contains general recommended guidelines for hardware requirements and memory allocation based on the number of radios and WX switches your server will support. A larger number of WX switches implies more connections and data processing, and consequently, more CPU is required. A larger number of radios implies more data (including client sessions) which requires more RAM and storage.
Table 5 Recommended Server Hardware Allocation
Number of |
|
|
|
Radios |
1-25 WX Switches |
25-50 WX Switches |
50+ WX Switches |
1 – 1000 |
2.4 MHz P4 |
2.8 MHz P4 |
3.2 MHz Xeon |
|
500 MB RAM |
500 MB RAM |
1 GB RAM |
|
1 GB HD |
1 GB HD |
1 GB HD |
1 – 2000 |
2.4 MHz P4 |
3.0 GHz P4 |
3.6 GHz Xeon |
|
1 GB RAM |
1 GB RAM |
2 GB RAM |
|
2 GB HD |
2 GB HD |
2 GB HD |
|
|
|
|

|
Software Requirements 23 |
|
|
Software |
3WXM client and 3WXM monitoring services are each supported on the |
Requirements |
following operating systems: |
|
Microsoft Windows Server 2003 |
|
Microsoft Windows XP with Service Pack 1 (SP1) or later |
|
Microsoft Windows 2000 with Service Pack 4 |
|
You must use the English version of the operating system you select. Operating |
|
system versions in other languages are not supported with 3WXM. |
|
The following additional software is required for certain 3WXM features: |
|
Adobe Acrobat Reader 5.x or later (or plug-in)—For reading the |
|
Wireless LAN Switch Manager Reference Manual and release notes. |
|
Web browser (for example, Microsoft Internet Explorer 5.x or 6.x or |
|
Netscape Navigator 6.x or 7.x)—For displaying 3WXM work orders |
|
and inventory reports. |
|
|
Preparing for |
A licensed copy of 3WXM comes with a base license key. Before you |
Installation |
install 3WXM, make sure you have the appropriate administrative |
|
privileges on the system. |
|
After you have installed 3WXM, you will need to register your license and |
|
the serial number with 3Com in order to obtain an activation key. |
|
The base key along with its activation key enables you to manage up to |
|
10 wireless LAN switches. To manage more than 10 wireless LAN |
|
switches, you also need an upgrade key and an additional activation key, |
|
which you obtain from 3Com. See “Serial Number and License Key” on |
|
page 24 for more information. |
User Privileges |
Before you install 3WXM, make sure that you are logged in as a user who |
|
has permission to install software, or as an administrator. |
|
After you install 3WXM, you can configure 3WXM access privileges for |
|
the user accounts on the machine. Likewise, you can configure access |
|
privileges for the monitoring service, if installed. Access privileges for the |
|
3WXM client are completely independent of access privileges for the |
|
monitoring service, and are configured separately. |
24 CHAPTER 1: INSTALLING 3WXM
Serial Number and 3WXM comes with a base license key, which is provided on the CD cover. License Key To use 3WXM Services, you need to enter the base key and an activation
key, which you obtain from 3Com. The base key and activation key enable you to manage up to 10 wireless LAN switches. To manage more than 10 wireless LAN switches, you also need an upgrade key and additional activation key, which you obtain from 3Com.
Each time you connect the 3WXM client to the 3WXM services, it checks the license information. If the product is not licensed, the License wizard is displayed.
Installing 3WXM To install the 3Com Wireless Switch Manager, follow the instructions below.
The 3WXM install program installs either just the 3WXM client, or both the 3WXM client and Services. There is no option to install the
3WXM Services only.
1Insert the 3WXM CD in the CD-ROM drive.
If Autorun is enabled, wait briefly for the install program to start. If Autorun is disabled, follow these steps:
a In Windows Explorer, navigate to your CD-ROM drive.
b In the Software\3WXM directory, double-click install.exe.
The Introduction page of the 3Com Wireless Switch Manager installation wizard appears, and then the Contents screen appears, as shown below.
Installing 3WXM 25
2Open the 3Com Wireless Switch Management folder.
3Select 3Com Wireless Switch Manager.
4Click the View button.
The 3Com Wireless LAN Switch Manager (3WXM) information screen appears.
5Click the Install button.
The installation begins. During the installation, the 3Com Wireless Switch Manager installation wizard minimizes.
6When the installation is complete, maximize the 3Com Wireless Switch Manager installation wizard screen, and then press the Contents button.
7Press the Exit button to close the wizard, or navigate to the other items on the CD.
See “Getting Started” on page 47 for more information on getting started with 3WXM.
26 CHAPTER 1: INSTALLING 3WXM
Installation Log File During installation, an installation log file, 3WXM_InstallLog.log, is created and placed in the 3WXM installation folder. Double-click the log file’s icon to read the log file. Have this log file available if you need to contact 3Com Technical Support about an installation problem.
Upgrading 3WXM You can upgrade 3WXM by installing a newer version of 3WXM over a previous version. You do not need to uninstall the previous version before installing a newer version. Before you upgrade, 3Com recommends that you make a backup of the config-db directory in the 3WXM installation directory. As a best practice, back up the config-db directory on a regular basis to ensure that you have copies of your network plans.
CAUTION: If you uninstall a previous version of 3WXM before upgrading, make sure you note the serial number and license key from the License Information dialog box, which you access by selecting Help>Licensing from the main 3WXM window.
You can also save a copy of the license information by starting 3WXM and clicking Save in the License Information dialog box.
Uninstalling 3WXM You uninstall 3WXM by using its Uninstall wizard. Access the Uninstall wizard from the 3Com program list in the Windows Start menu or the Control Panel.
To uninstall 3WXM on Windows systems:
1Access the Windows Control Panel, and select Add or Remove Programs.
2Select 3WXM and click Change/Remove.

Uninstalling 3WXM 27
3Click Uninstall.
The 3WXM Uninstall Options dialog appears.
By default, the following are removed when you uninstall the client application:
Network plans
Access control
If the monitoring service was also installed, the monitoring service’s database directory is also uninstalled by default. The database directory contains the data collected by the monitoring service.
CAUTION: Do not delete the serial number unless specifically asked to do so by 3Com Technical Support.
Your license(s) to use this software are registered against this serial number. If you delete the serial number, the software will generate a new serial number if it is ever reinstalled. You will then require new licenses to register against the new serial number. If you delete the serial number, the license information will also be deleted.
CAUTION: If you delete an item, the item is permanently lost. For example, if you delete the database directory, all data collected by the monitoring service is lost, including historical trend data.
28 CHAPTER 1: INSTALLING 3WXM
To prevent an item from being uninstalled, click on the checkbox next to the item to remove the checkmark.
4Click Continue.
The uninstall program reports its progress. When the uninstall process is complete, the uninstall program reports that the items were successfully deleted.
5Click Done.
2 |
WORKING WITH THE 3WXM |
|
|
|
USER INTERFACE |
This chapter describes how to use the 3Com Wireless LAN Switch
Manager (3WXM) interface.
|
Overview |
|
|
|
|
When you start 3WXM client and log into 3WXM Services, the network |
|||||
|
|
|
|
|
|
plan is displayed by the 3WXM client. |
|
|
|
|
|
|
|
|
|
|
|
|
|
|
|
|
|
|
|
|
Organizer panel |
Content panel |
|||||||
|
|
|
|||||||||
|
|
|
|
|
|
Toolbar |
|
|
|
|
|
|
|
|
|
|
|
|
|
|
|
|
|
|
|
|
|
|
|
|
|
|
|
|
|
|
|
|
|
|
|
|
|
|
|
|
|
|
|
|
|
|
|
|
|
|
|
|
|
|
|
|
|
|
|
|
|
|
|
|
|
Alerts panel |
Lock |
|
icon |
||
|

30 CHAPTER 2: WORKING WITH THE 3WXM USER INTERFACE
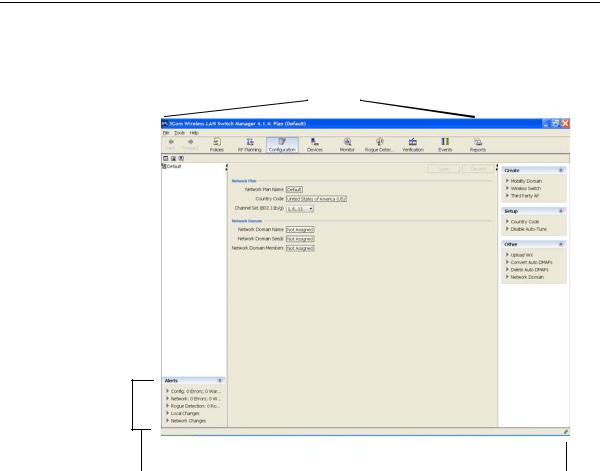
The network plan is the workspace in 3WXM you use to design and manage a 3Com network. The network plan defines the following:
Network equipment (WX switches, MAPs, and third-party access points)
Network site, including floor plans, RF characteristics of the floors, and radio coverage
You can use the planning tool to define the network site and add the equipment based on coverage and capacity needs. Alternatively, you can add new or existing switches and access points individually.
Planning and equipment configuration, and network management, are described in detail in other chapters of this manual. This chapter describes the 3WXM user interface.
Display Panels |
The main 3WXM window contains the following display panels. (Their |
|
|
locations are shown in the previous figure on page 34.) |
|
|
|
Organizer panel |
|
|
Alerts panel |
|
|
Content panel |
|
|
Task List panel |
The main 3WXM window also contains a tool bar to navigate to major features.
Organizer Panel The Organizer panel provides a tree-like view of the 3Com equipment and site data managed by 3WXM.
Loading...