


 Loading...
DHR Series
POWERED SPEAKER SYSTEM
EN
DE
FR
ES
PT
Owner’s Manual Benutzerhandbuch Mode d’emploi
Manual de instrucciones Manual do Proprietário
IT
RU
ZH
KO
JA
Manuale di istruzioni Руководство пользователя

FCC INFORMATION (U.S.A.)
1. IMPORTANT NOTICE: DO NOT MODIFY THIS UNIT! |
occur in all installations. If this product is found to be the source of |
|
This product, when installed as indicated in the instructions con- |
interference, which can be determined by turning the unit “OFF” |
|
tained in this manual, meets FCC requirements. Modifications not |
and “ON”, please try to eliminate the problem by using one of the |
|
expressly approved by Yamaha may void your authority, granted |
following measures: |
|
by the FCC, to use the product. |
Relocate either this product or the device that is being affected by |
|
|
||
2. IMPORTANT: When connecting this product to accessories |
the interference. |
|
and/or another product use only high quality shielded cables. |
Utilize power outlets that are on different branch (circuit breaker |
|
Cable/s supplied with this product MUST be used. Follow all |
or fuse) circuits or install AC line filter/s. |
|
installation instructions. Failure to follow instructions could void |
In the case of radio or TV interference, relocate/reorient the |
|
your FCC authorization to use this product in the USA. |
||
antenna. If the antenna lead-in is 300 ohm ribbon lead, change |
||
|
||
3. NOTE: This product has been tested and found to comply with |
the lead-in to co-axial type cable. |
|
the requirements listed in FCC Regulations, Part 15 for Class “B” |
If these corrective measures do not produce satisfactory results, |
|
digital devices. Compliance with these requirements provides a |
||
please contact the local retailer authorized to distribute this type |
||
reasonable level of assurance that your use of this product in a |
||
of product. If you can not locate the appropriate retailer, please |
||
residential environment will not result in harmful interference with |
||
contact Yamaha Corporation of America, Electronic Service Divi- |
||
other electronic devices. This equipment generates/uses radio |
||
sion, 6600 Orangethorpe Ave, Buena Park, CA90620 |
||
frequencies and, if not installed and used according to the |
||
The above statements apply ONLY to those products distributed |
||
instructions found in the users manual, may cause interference |
||
by Yamaha Corporation of America or its subsidiaries. |
||
harmful to the operation of other electronic devices. Compliance |
||
|
||
with FCC regulations does not guarantee that interference will not |
|
|
|
|
|
|
(class B) |
COMPLIANCE INFORMATION STATEMENT (Supplier’s declaration of conformity procedure)
Responsible Party : Yamaha Corporation of America
Address : 6600 Orangethorpe Ave., Buena Park, Calif. 90620
Telephone : 714-522-9011
Type of Equipment : POWERED SPEAKER SYSTEM
Model Name : DHR15, DHR12M, DHR10
This device complies with Part 15 of the FCC Rules.
Operation is subject to the following two conditions:
1)this device may not cause harmful interference, and
2)this device must accept any interference received including interference that may cause undesired operation.
(FCC SDoC)
2

PRECAUTIONS
PLEASE READ CAREFULLY BEFORE PROCEEDING
Please keep this manual in a safe place for future reference.
 WARNING
Always follow the basic precautions listed below to avoid the possibility of serious injury or even death from electrical shock, short-circuiting, damages, fire or other hazards. These precautions include, but are not limited to, the following:
If you notice any abnormality
•If any of the following problems occur, immediately turn off the power switch and disconnect the electric plug from the outlet.
-The power cord or plug becomes frayed or damaged.
-Unusual smells or smoke are emitted.
-Some object, or water has been dropped into the product.
-There is a sudden loss of sound during use of the product.
-Cracks or other visible damage appear on the product. Then have the product inspected or repaired by qualified Yamaha service personnel.
Power supply
•Do not place the power cord near heat sources such as heaters or radiators, and do not excessively bend or otherwise damage the cord, place heavy objects on it, or place it in a position where anyone could walk on, trip over, or roll anything over it.
•Only use the voltage specified as correct for the product. The required voltage is printed on the name plate of the product.
•Use only the supplied power cord.
If you intend to use the product in an area other than in the one you purchased, the included power cord may not be compatible. Please check with your Yamaha dealer.
•Check the electric plug periodically and remove any dirt or dust which may have accumulated on it.
•Make sure to fully insert the electric plug to prevent electric shocks or fire.
•When setting up the product, make sure that the AC outlet you are using is easily accessible. If some trouble or malfunction occurs, immediately turn off the power switch and disconnect the plug from the outlet. Even when the power switch is turned off, as long as the power cord is not unplugged from the wall AC outlet, the product will not be disconnected from the power source.
•Remove the electric plug from the outlet when the product is not to be used for extended periods of time.
•Do not touch the product or the electric plug during an electrical storm.
•Be sure to connect to an appropriate outlet with a protective grounding connection. Improper grounding can result in electrical shock, fire, or damage.
PA_en_12 1/2
Do not open
•This product contains no user-serviceable parts. Do not attempt to disassemble the internal parts or modify them in any way.
Water warning
•Do not expose the product to rain, use it near water or in damp or wet conditions, or place on it any containers (such as vases, bottles or glasses) containing liquids which might spill into any openings.
•Never insert or remove an electric plug with wet hands.
Fire warning
•Do not place any burning items or open flames near the product, since they may cause a fire.
Hearing loss
•Before turning the power of all devices on or off, make sure that all volume levels are set to the minimum. Failing to do so may result in hearing loss, electric shock, or device damage.
•When turning on the AC power in your audio system, always turn on the product LAST, to avoid hearing loss and speaker damage. When turning the power off, the product should be turned off FIRST for the same reason.
 CAUTION
Always follow the basic precautions listed below to avoid the possibility of physical injury to you or others. These precautions include, but are not limited to, the following:
Power supply
•When removing the electric plug from the product or an outlet, always hold the plug itself and not the cord. Pulling by the cord can damage it.
Location and connection
•Do not place the product in an unstable position or a location with excessive vibration, where it might accidentally fall over and cause injury.
•Keep this product out of reach of children. This product is not suitable for use in locations where children are likely to be present.
•Do not block the vents. This product has ventilation holes at the rear to prevent the internal temperature from becoming too high. In particular, do not place the product on its side or upside down. Inadequate ventilation can result in overheating, possibly causing damage to the product(s), or even fire.
•To ensure proper heat dissipation of the product, when installing it:
-Do not cover it with any cloth.
-Do not use the product in a confined, poorly-ventilated location.
Inadequate ventilation can result in overheating, possibly causing damage to the product(s), or even fire. Make sure that there is adequate space from the rear: at least 30 cm above, 30 cm at the sides and 30 cm behind.
3

•Do not place the product in a location where it may come into contact with corrosive gases or salt air. Doing so may result in malfunction.
•Before moving the product, remove all connected cables.
•When transporting or moving the DHR15, always use two or more people. Attempting to lift the product by yourself may result in injuries, such as back injuries, or cause the product to be dropped and broken, which could lead to other injuries.
•Do not use the speaker’s handles for suspended installation. Doing so can result in damage or injury.
•Do not hold the bottom of the product when transporting or moving it. In doing so, you may pinch your hands under the product, and result in injury.
•Do not press the rear panel of the product against the wall. Doing so may cause the plug to come in contact with the wall and detach from the power cord, resulting in short circuiting, malfunction, or even fire.
•Always consult qualified Yamaha service personnel if the product installation requires construction work. Improper installation might cause accidents, injuries, damage or malfunction of this product.
Maintenance
•Remove the power plug from the AC outlet when cleaning the product.
Handling caution
•Do not insert your fingers or hands in any gaps or openings on the product (ports).
•Do not rest your weight on the product or place heavy objects on it.
•Do not operate the product if the sound is distorting. Prolonged use in this condition could cause overheating and result in fire.
The model number, serial number, power requirements, etc., may be found on or near the name plate, which is at the rear of the unit. You should note this serial number in the space provided below and retain this manual as a permanent record of your purchase to aid identification in the event of theft.
Model No.
Serial No.
(rear_en_01)
PA_en_12 2/2
NOTICE
To avoid the possibility of malfunction/damage to the product or damage to other property, follow the notices below.
Handling and maintenance
•Do not use the product in the vicinity of a TV, radio, or other electric products. Otherwise, the product, TV, or radio may generate noise.
•Do not expose the product to excessive dust or vibration, or extreme cold or heat, in order to prevent the possibility of panel disfiguration, unstable operation, or damage to the internal components.
•Do not install in locations where temperature changes are severe. Otherwise, condensation may form on the inside or the surface of the product, causing it to break or deform the wood. Do not leave condensation on the wood; wipe immediately with a soft cloth.
•If there is reason to believe that condensation might have occurred, leave the product for several hours without turning on the power until the condensation has completely dried out, in order to prevent possible damage.
•Do not touch the speaker driver unit, since it might cause malfunction.
•Air blowing out of the bass reflex ports (hole or holes at the front) is normal, and often occurs when the speaker is handling program material with heavy bass content.
•Do not place the speaker face down.
•When cleaning the product, use a dry and soft cloth. Do not use paint thinners, solvents, cleaning fluids, or chemi- cal-impregnated wiping cloths, since this might cause alteration or discoloration.
•Always turn the power off when the device is not in use.
Information
About functions/data bundled with the product
•Even when the [  /
/ ] (power) switch is in standby status (POWER indicator is off), electricity is still flowing to the product at the minimum level. When you are not using the product for a long time, make sure you unplug the power cord from the wall AC outlet.
•XLR-type connectors are wired as follows (IEC60268 standard): pin 1: ground, pin 2: hot (+), and pin 3: cold (–).
About this manual
•The illustrations as shown in this manual are for instructional purposes only.
•The company names and product names in this manual are the trademarks or registered trademarks of their respective companies.
•Software may be revised and updated without prior notice.
About disposal
•This product contains recyclable components.
When disposing of this product, please contact the appropriate local authorities.
Yamaha cannot be held responsible for damage caused by improper use or modifications to the product.
4

Introduction
Thank you for purchasing the Yamaha DHR series Powered Loudspeaker. These products are designed for live performance, sound reinforcement and fixed installation sound system applications. This manual explains how to install, set up, and configure the connections for the installers, constructors, or general users familiar with speakers. Please read this manual thoroughly before you begin using this product in order to get the most out of its various functions. After reading this manual, please keep it available for future reference.
NOTE
The example illustrations used in this manual are taken from the DHR15, if not otherwise specified.
Contents
PRECAUTIONS ..................................................................... |
3 |
Introduction ........................................................................... |
5 |
Main Features........................................................................ |
5 |
Included Accessories............................................................ |
5 |
Controls and Connectors ...................................................... |
6 |
Setup Examples .................................................................... |
9 |
Installation Examples........................................................... |
13 |
Troubleshooting ................................................................... |
14 |
General Specifications (English only)................................ |
131 |
Block Diagram ................................................................... |
133 |
Dimensions ........................................................................ |
134 |
Main Features
•Sophisticated DSP processing
Our proprietary sound-processing technology, called FIR-X Tuning, utilizes a linear-phase FIR filter—delivering excellent sound quality with high resolution and a smooth frequency response that is unaffected by phase interference near the crossover point.
•Easy sound optimization
D-CONTOUR (Dynamic CONTOUR) constantly monitors the output of multiple frequency bands, and applies the optimum EQ adjustments to each according to the listener’s preferences. There are two modes: an FOH/MAIN mode for use as a main speaker, and a MONITOR mode for use as a floor monitor, letting you select the preset tuning optimized for each application.
•Various input/output connectors and convenient, simple mixing function
The comprehensive set of connectors—including XLR for a mixer, phone for a musical instrument, and RCA pin for an audio player—provides maximum flexibility in use with a wide variety of applications. Also, the DHR features simple mixing functionality, enabling you to select either a direct output of channel 1 (CH1) (parallel connection) or a mixed output of CH1 and CH2, for convenient system setup.
•Lineup for a variety of applications
The models are optimized for various applications: the DHR15 is ideal for use as a main speaker delivering powerful sound and the DHR12M with its sound character optimized for monitoring is ideal for use as a compact floor monitor. The rotatable horn equipped DHR10 is ideal for use as a fixed installation, and can be installed vertically or horizontally with optional brackets.
•High-grade and durable wood cabinet for superior sound
The naturally textured wood cabinet of the DHR features a durable coating with high damage resistance to protect the cabinet from scratches and bumps during transport, installations and removal.
Included Accessories
•AC power cord
•Owner’s manual (this book)
5
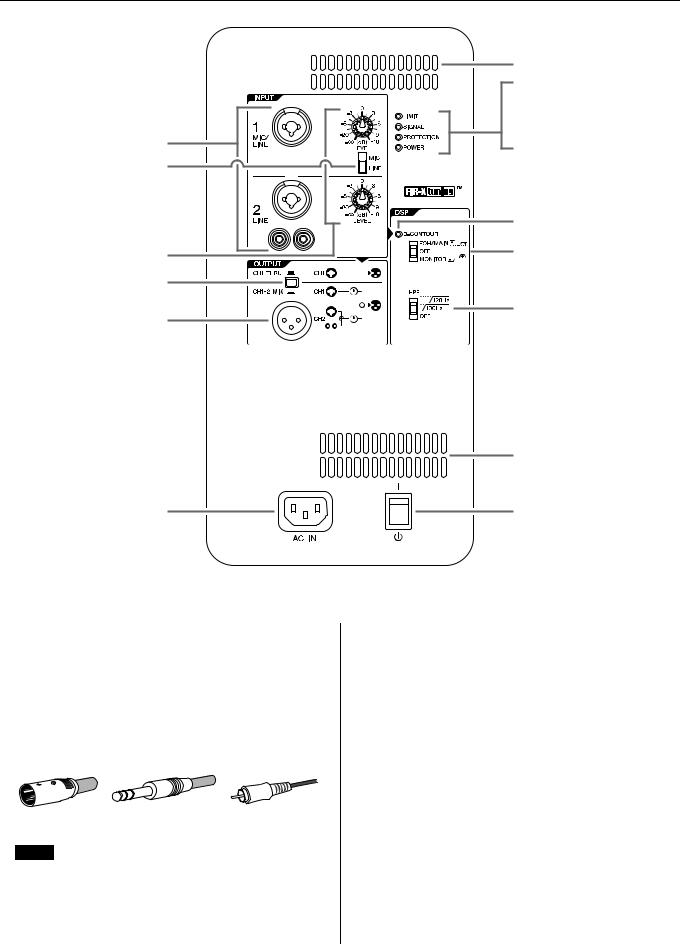
Controls and Connectors
Rear
|
!3 |
|
y |
|
u |
|
i |
q |
o |
|
|
w |
|
|
!0 |
e |
!1 |
|
|
r |
|
t |
!2 |
|
!3
!4 |
!5 |
qInput jacks (CH1 and CH2)
These are balanced combo jacks that support both XLR and phone plugs (both CH1 and CH2), and RCA pin plugs (CH2 only). For the combo jacks, connect a mixer, microphone, or digital musical instrument such as a keyboard. For RCA-pin jacks, connect a device such as an MP3 player or a CD player. For devices with high level signals such as a mixer, connect to CH2, or connect to CH1 then set the [MIC/LINE] switch (w) to [LINE].
XLR |
Phone |
RCA-pin |
NOTE
For CH2, inputs to the combo jack and to the RCA pin jacks will be mono mixed at a fixed balance. If you want to change the balance, adjust the volume of the connected sound source.
w[MIC/LINE] switch
Set this switch to [MIC] or [LINE] for the CH1 jack, depending on the level of the input signal. For low-level signals (such as microphones), set the switch to [MIC]. For high-level signals (such as mixer), set the switch to [LINE].
e[LEVEL] knobs
Adjust the level of each input jack (q).
rOutput switch
Selects the output signal sent to the output jack (t).
[CH1 THRU]: Delivers the direct output signal of CH1 only. Signal from CH2 will not be output.
[CH1+2 MIX]: Outputs the mixed signals of CH1 and CH2.
tOutput jack
This is a balanced XLR jack. This can be used to connect another DHR speaker. Outputs the signal selected by r output switch.
6

y[LIMIT] indicator
Indicates (lit in red) that the limiter is on when the output voltage of the amplifier has exceeded the maximum level, or when excessive integral power consumption is detected. If this indicator stays lit, lower the input level.
NOTE
Integral power consumption refers to the sum of power provided to the speaker driver per unit time.
u[SIGNAL] indicator
Indicates (lit in green) when an audio signal exceeding the threshold has been detected.
i[PROTECTION] indicator
Indicates (lit in red) when the protection circuit is active. The protection circuit will be activated and the speaker outputs will be muted in the situations listed below.
•If amplifier overheating is detected
•If overcurrent is detected
•When turning the power on; the protection circuit will be activated for a few seconds to prevent noise. The indicator turns off when the power supply has started normally.
If the protection circuit has engaged, waiting until the amplifier cools down or powering off and on again will return to normal operation. If the unit does not return to normal operation, please contact your Yamaha dealer.
o[POWER] indicator
Indicates (lit in green) when the [  /
/ ] (power) (!5) switch is turned on.
!0[D-CONTOUR] indicator
Indicates (lit in yellow) when the [D-CONTOUR] switch (!1) is set to [FOH/MAIN] or [MONITOR].
!1[D-CONTOUR] switch
Selects one of the D-CONTOUR (Dynamic CONTOUR) presets.
[FOH/MAIN]: Boosts the high and low frequency components so that the frequency response is suitable for a main speaker.
[MONITOR]: Reduces the low frequency range, which could otherwise tend to be boomy if the speaker is set directly on the floor. This enables you to hear mid and high frequency ranges clearly when using as a floor monitor.
[OFF]: Turns off D-CONTOUR. This is a generic frequency response setting.
!2[HPF] switch
Selects the cutoff frequency of the high pass filter. If you set this switch to [120Hz] or [100Hz], the low frequency components below each threshold will be cut. If you use the unit alone, set this switch to [OFF]. If you plan to use the unit along with a subwoofer, we recommend that you set this switch to [120Hz] or [100Hz].
Controls and Connectors
!3Vent
The unit contains a cooling fan.
CAUTION
Do not block the vents. This product has ventilation holes at the rear to prevent the internal temperature from becoming too high. Inadequate ventilation can result in overheating, possibly causing damage to the product(s), or even fire.
!4[AC IN] socket
Connect the supplied power cord in the order below. Before connecting the power cord, make sure that the DHR power is turned off.
1.Insert the plug of the power cord into this socket.
2.Plug the other end of the cord into the AC outlet.
NOTE
When removing the power cord, perform this procedure in reverse order.
WARNING
Use only the supplied power cord.
CAUTION
Turn off the power before you connect or disconnect the power cord.
!5[  /
/ ] (power) switch
Turns the power supply on [  ] or sets it to standby [
 ]. First, turn on the power of the connected sound source (external device), then the unit. When turning off the power, reverse the order by turning off the power of the unit first and then the connected sound source (external device).
NOTICE
Even when the switch is in the standby position, a small amount of electricity is still flowing to the unit.
NOTE
•Rapidly turning the unit on and off in succession can cause it to malfunction. After turning the unit off, wait for about 5 seconds before turning it on again.
•If you are using multiple units, turn on the power to each unit one by one. If you turn on the power to multiple units simultaneously, a temporary drop in the power voltage may occur, possibly resulting in abnormal operation of the units.
7

Controls and Connectors
Rear (DHR15) |
|
|
Rear (DHR10) |
|
|
|||||
!7 |
!7 |
!7 |
!6 |
|
!7 |
|||||
|
|
|
|
|
|
|
|
|
|
|
|
|
|
|
|
|
|
|
|
|
|
|
|
|
|
|
|
|
|
|
|
|
!6 |
!6 |
!6 !8 !6
!7
!7 |
Bottom |
|
|
|
Side (DHR12M) |
|
!8 |
FRONT
7°
!8
0°
Bottom
!6Screw holes for U-bracket M8 (DHR10 only)
For installing with the separately sold U-brackets.
!7Screw holes for eye bolts M10
(DHR15 and DHR10 only)
For installing the speaker using commercially available eye bolts (M10).
!8Pole socket
This socket adapts to commercially available speaker stands and speaker poles of 35 mm diameter.
Tiltable pole socket (DHR15 only)
This mount has two pole sockets. You can choose the angle of the speaker so that it is positioned horizontal to the floor or tilting down toward the floor by 7 degrees.
Tiltable pole socket
7° 
FRONT
7°
0°
8
Loading...