


3XARG458GD00
Whirlpool 3XARG458GD00, 3XARG496WP00, 3XARG496WP01, 3XARG458GD01, 3XARG496WP02 Repair Manual
...
TABLE OF CONTENTS
DESCRIPTION OF THE APPLIANCE
BEFORE USING THE REFRIGERATOR
HOW TO OPERATE THE REFRIGERATOR/FREEZER
USE OF THE ICE AND WATER DISPENSER
AUTOMATIC ICE MAKER
1 COMMON ICE MAKER PROBLEMS
MAINTENANCE AND CLEANING
VACATION
GUIDE TO FOOD STORAGE
TROUBLESHOOTING GUIDE/SERVICE
WATER CONNECTION
2\S3lb8-
A
3-sg
DESCRIPTION OF THE APPLtANCE
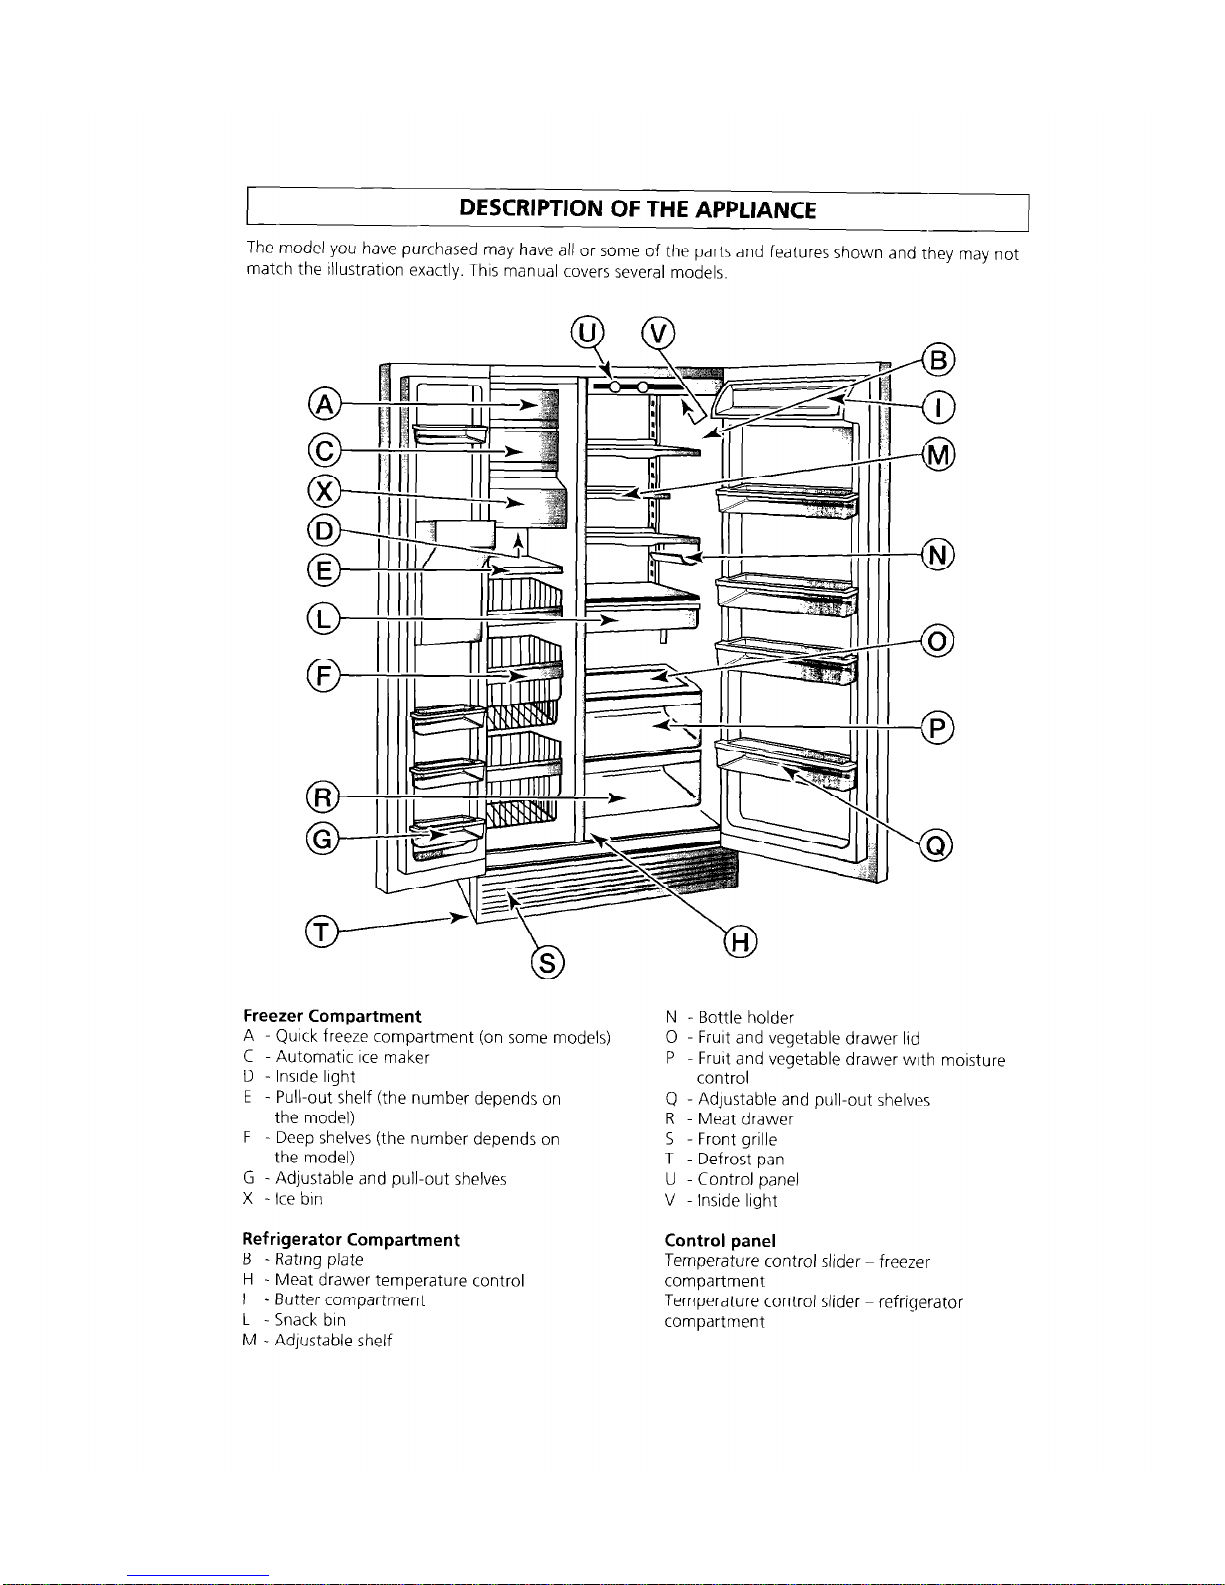
The model you have purchased may have all or some of the parts and features shown and they may not
match the lllustratron exactly. This manual covers several models
e
A
o-
C
c-
X
o-
D
o-
E
o-
L
c-
F
o-
R
o-
G
Freezer Compartment
N - Bottle holder
A - Quack freeze compartment (on some models)
C -Automatic Ice maker
D - lnsrde light
E - Pull-out shelf (the number depends on
the model)
F - Deep shelves (the number depends on
the model)
G - Adjustable and pull-out shelves
X - Ice bin
0 - Frurt and vegetable drawer lid
P - Fruit and vegetable drawer with moisture
control
Q - Adjustable and pull-out shelves
R - Meat drawer
5 - Front grille
T - Defrost pan
U - Control panel
V - Inside lrght
Refrigerator Compartment
B - Rating plate
H - Meat drawer temperature control
I - Butter compartment
L - Snack bin
M - Adjustable shelf
Control panel
Temperature control slider - freezer
compartment
Temperature control slider - refrigerator
compartment

DESCRtPTtON OF THE APPLIANCE
o-
T
0
B
-0
I
-0
M
-0
L
-0
0
-0
P
-0
Q
Freezer Compartment
D - Inside light
E - Shelf (the number depends on the model)
F - Deep shelves (the number depends on
the model)
G - Stationary freezer door shelves
N - Ice cube trays (Ice maker optional)
Refrigerator Compartment
A - Control panel
B - Rating plate
C - Inside light
H - Meat drawer temperature control
I - Butter compartment
L - Eggs container (on some models)
M - Adjustable shelf
0 - Fruit and vegetable drawer IId
P - Fruit and vegetable drawer with
moisture control
Q - Stationary door shelves
R - Meat drawer
5 - Front grille
T - Defrost pan
Control panel
Temperature control dial - freezer
compartment
Temperature control dial - refrrgerator
compartment

I
BEFORE USING THE REFRIGERATOR
I
After unpacking, make sure that the appliance
IS undamaged and that the door closes
perfectly tight. Any damage must be reported
to your retailer within 24 hours after delivery of
the appliance.
The packaglng box IS recyclable and IS marked
with the recycling symbol L%.
The appliance is built with reusable material
When scrapping, follow the local environment
protection disposal regulations. To avoid the
risk of children being trapped and therefore
suffocating, do not allow them to play or hide
inslde the refrigerator Render the refrigerator
inoperative by removing the doors and cutting
the power cable off. Do not dump the
appliance Take It to the local disposal centre
so that the refrigerant may be properly
recovered and treated.
Make sure that the installation and the
electrlcal connectlon are carried out by a
quailfled technician according to the
manufacturer’s Instructions and local safety
regulations.
Precautions and general
suggestions
. Use the refrigerator compartment only for the
storage of fresh food and the freezer
compartment only for the storage of frozen
food, the freezing of fresh food, and to make
ice cubes.
After Installation, make sure that the
refrigerator does not stand on the power cable
Do not store glass containers with llqulds In the
freezer since they may burst.
Do not eat ice cubes or ice lollies immediately
after taking them out of the freezer since they
may cause “cold” burns.
Before carrying out any maintenance or
cleaning, always unplug the appliance or
disconnect the power supply.
Do not store or use gasoline or other
flammable vapors and liquids in the vlncirlty of
this or any other appliance. The fumes can
create a fire hazard or explosion.
Installation
Make sure that your refrigerator IS not near a
heat source.
Place It In a dry and well ventilated room
If the refrigerator is installed below a kitchen
cabinet, leave a 50 mm gap abode the
appliance.
Clean the Inside of the refrigeralor before
using it.
Let the refrigerator stand (don’t move it) for at
least one hour before connecting It to the
power supply.
The ice maker should be connected to a water
supply that delivers drinkable or chemically
purified water.
Install and level the refrigerator on a floor that
will hold the weight and In an al-ea suitable
for its size and use.
Do not use the refrigerator In ar area
where the room temperature will fall
below 13°C.
BEFORE USING THE REFRIGERATOR
1
Declaration of conformity
l
This appliance is designed to store food and IS
manufactured in conformity with EEC directrve
No. 89/109
l
This appliance has been desrgned, built, and
marketed in compliance with:
-the safety targets of the Low Voltage EEC
Directive 73123;
- the protection requirements of the “EMC”
EEC Directive 89/336 amended by EEC
Drrectrve 93/68.
l
Thus appliance is free of CFC’s (refrigerant
crrcurt contains RI 34a). For more details, please
refer to the rating plate on the appliance.
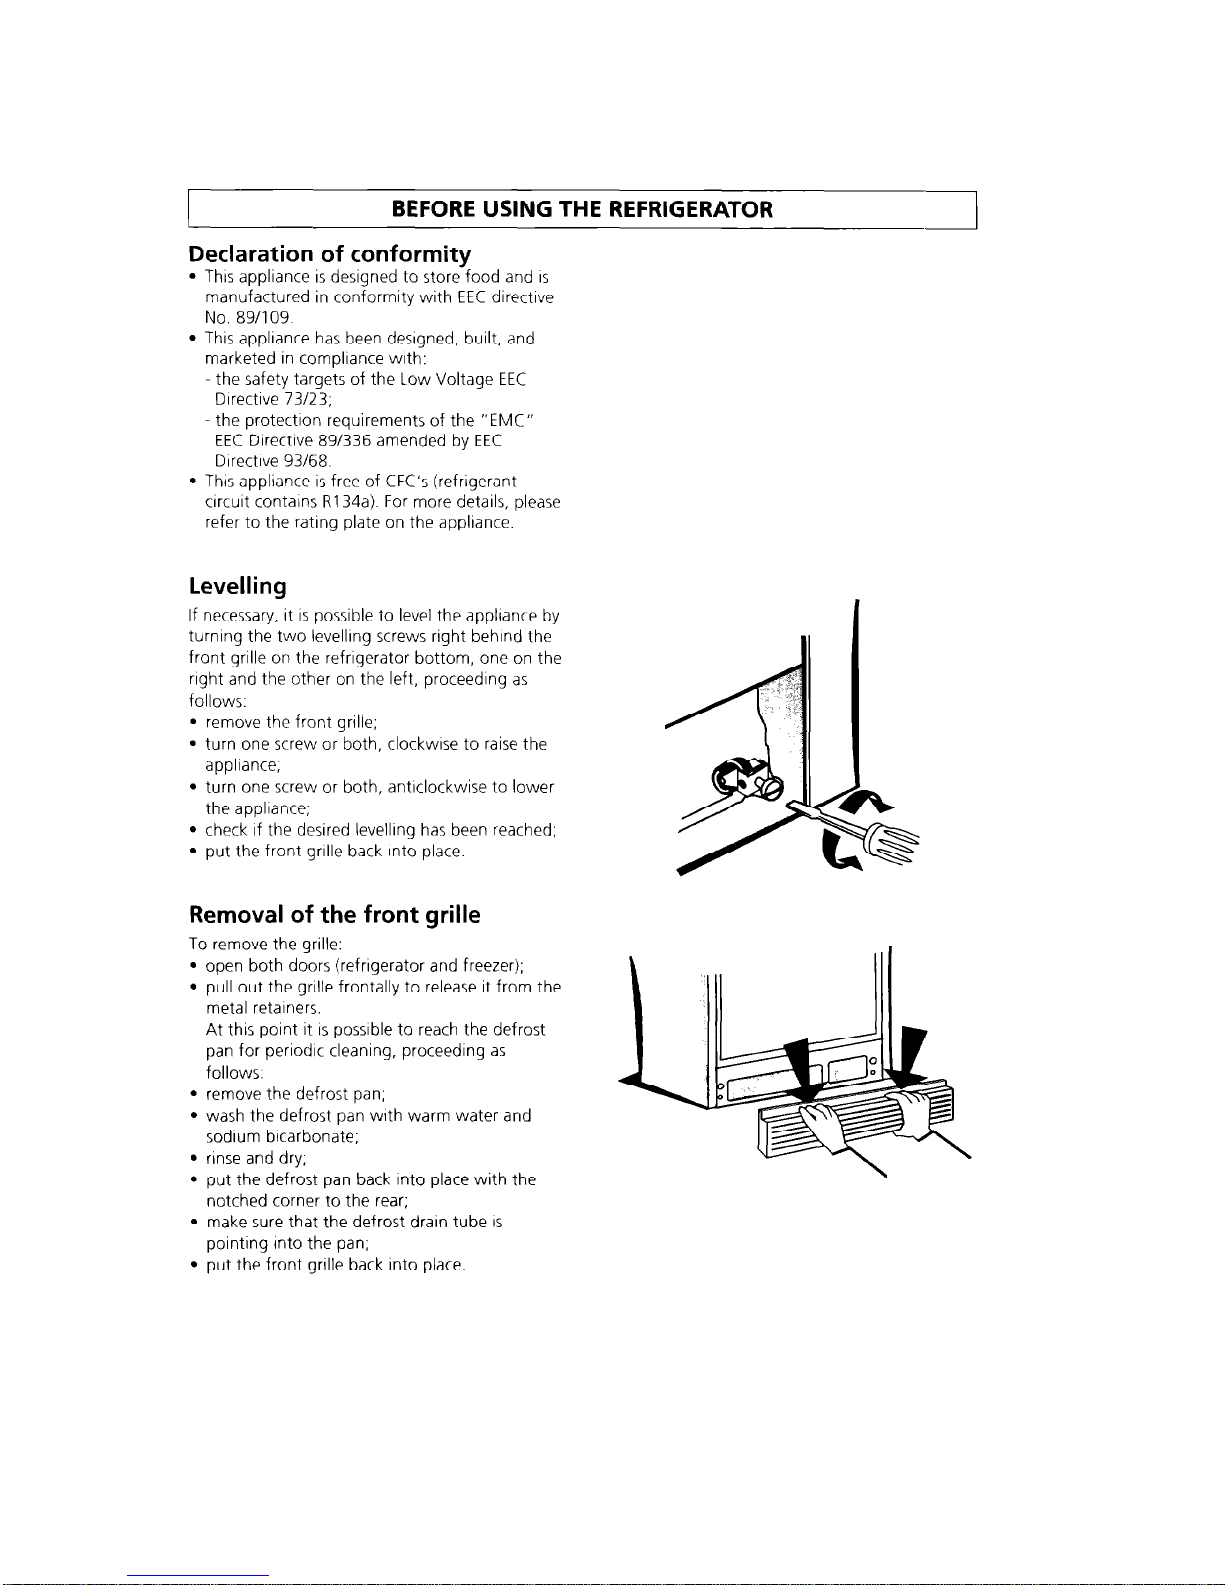
Levelling
If necessary, it
IS
possible to level the appliance by
turning the two levelling screws right behind the
front grille on the refrigerator bottom, one on the
right and the other on the left, proceeding as
follows:
l
remove the front grille;
l
turn one screw or both, clockwrse to raise the
appliance,
l
turn one screw or both, antrclockwise to lower
the appliance;
l
check If the desired levellrng has been reached;
l
put the front grille back Into place.
Removal of the front grille
To remove the grille:
l
open both doors (refrigerator and freezer);
l
pull out the grille frontally to release it from the
metal retainers.
At this point it
IS
possible to reach the defrost
pan for perrodrc cleaning, proceeding as
follows.
l
remove the defrost pan;
l
wash the defrost pan wrth warm water and
sodium btcarbonate;
l
rinse and dry,
l
put the defrost pan back Into place with the
notched corner to the rear;
. make sure that the defrost drain tube IS
pointing Into the pan;
l
put the front grille back into place.
HOW TO OPERATE THE REFRIGERATOR/FREEZER
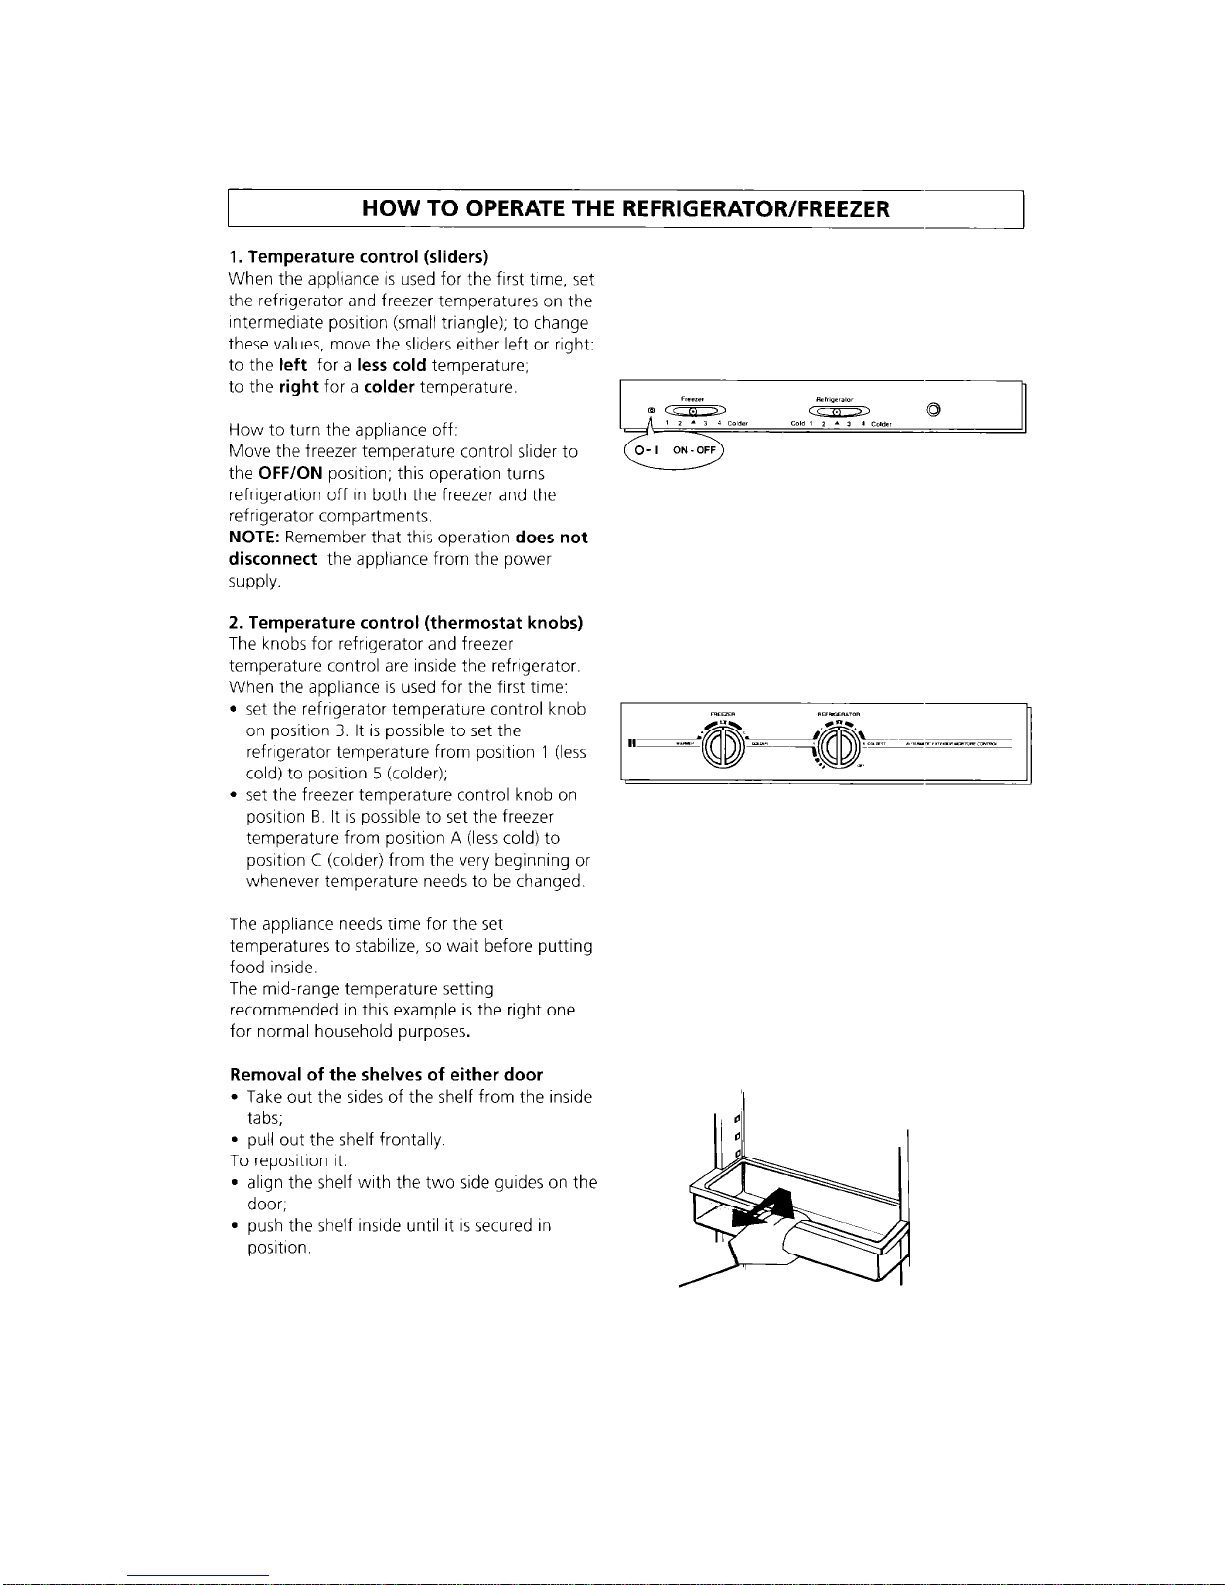
1. Temperature control (sliders)
When the applrance IS used for the first time, set
the refrigerator and freezer temperatures on the
Intermediate posrtron (small triangle); to change
these values, move the sliders either left or right:
to the
left
for a less
cold
temperature;
to the
right
for a
colder
temperature.
rrcszer r*blg.l.lOr
en
0
How to turn the appliance off:
I I - 1 1 CD,dll
cold 1 2 I 1 1 Colder
I \
Move the freezer temoerature control slider to
w
the
OFF/ON
position; this operation turns
refrigeration off In both the freezer and the
refrigerator compartments.
NOTE:
Remember that thus operation
does not
disconnect
the applrance from the power
supply.
2. Temperature control (thermostat knobs)
The knobs for refrigerator and freezer
temperature control are inside the refrrgerator.
When the appliance IS used for the first time:
l
set the refrigerator temperature control knob
on positron 3. It is possible to set the
refrigerator temperature from posItion 1 (less
cold) to posrtion 5 (colder);
l
set the freezer temperature control knob on
positron B. It IS possrble to set the freezer
temperature from position A (less cold) to
position C (colder) from the very beginning or
whenever temperature needs to be changed.
The appliance needs time for the set
temperatures to stabilize, so wart before putting
food inside.
The mid-range temperature setting
recommended In this example is the right one
for normal household purposes.
Removal of the shelves of either door
l
Take out the sides of the shelf from the inside
tabs;
l
pull out the shelf frontally.
To reposrtron It:
l
align the shelf with the two side guides on the
door;
l
push the shelf inside until it IS secured in
positron.
HOW TO OPERATE THE REFRIGERATOR/FREEZER
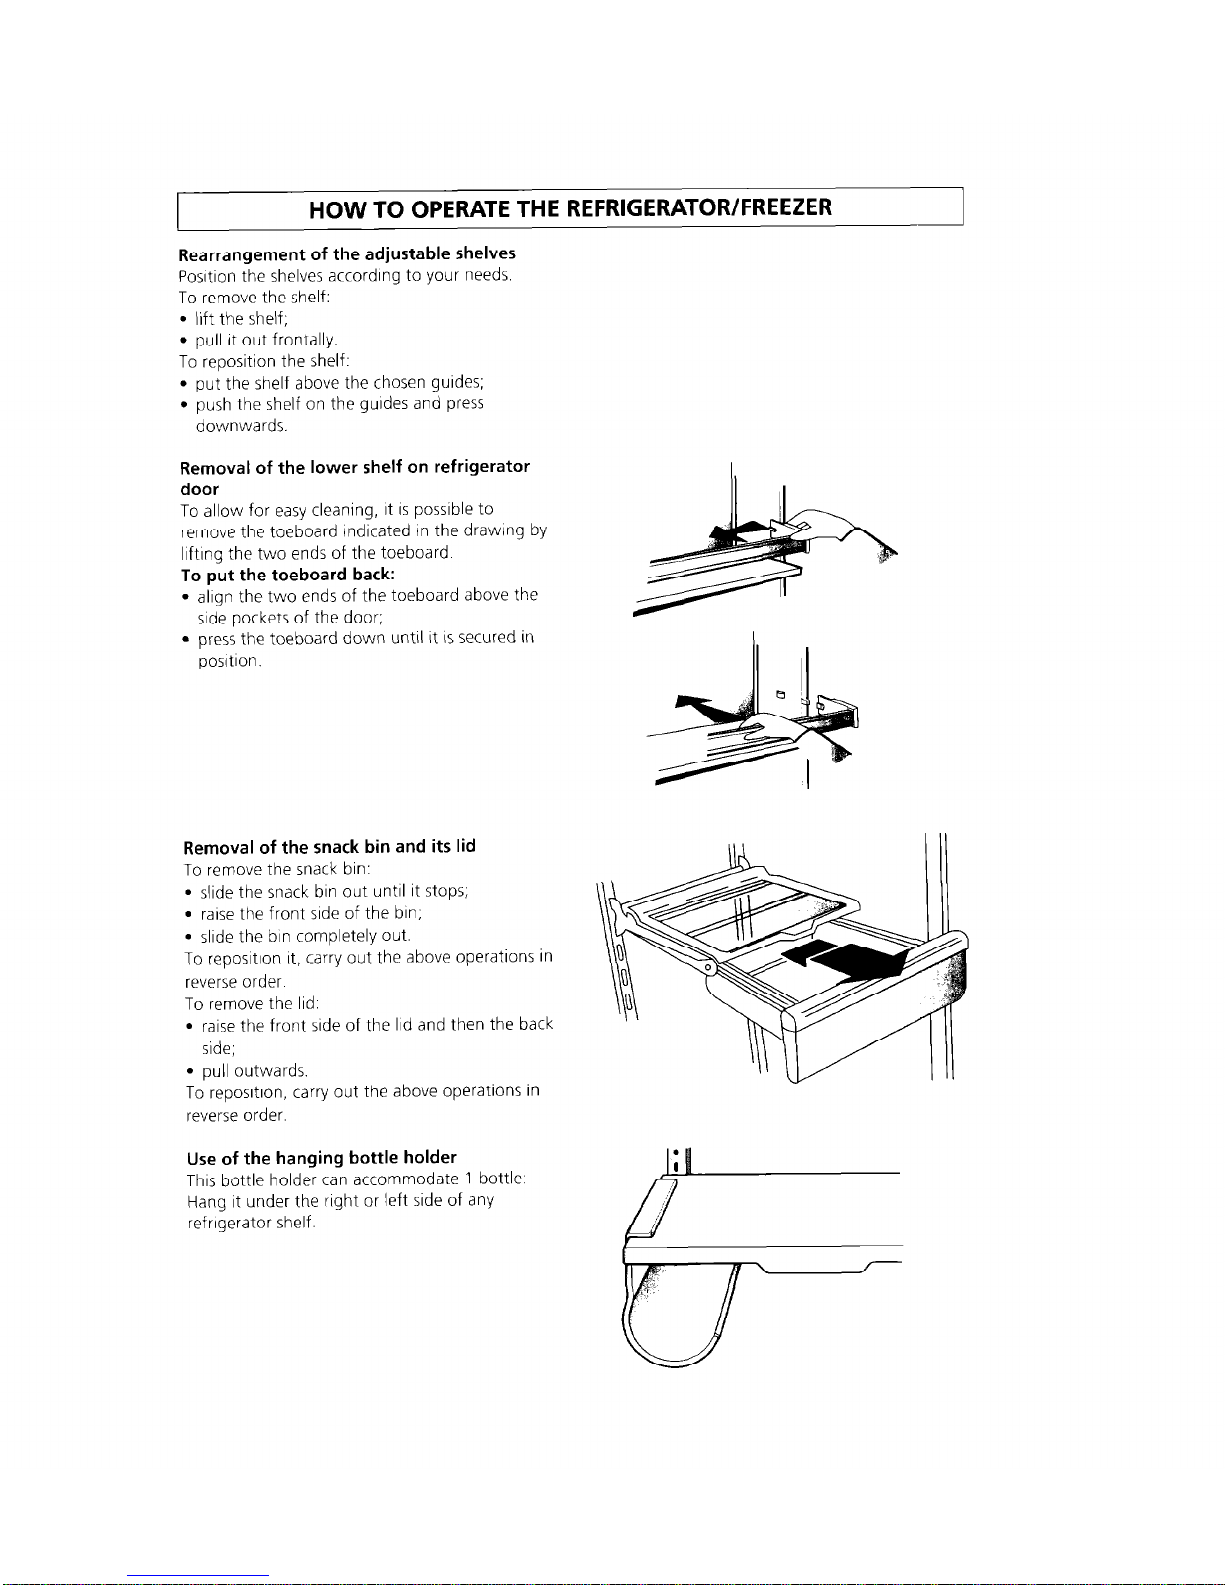
Rearrangement of the adjustable shelves
PosItIon the shelves according to your needs.
To remove the shelf:
l
lift the shelf;
. pull it out frontally.
To reposition the shelf:
. put the shelf above the chosen guides;
l
push the shelf on the guides and press
downwards.
Removal of the lower shelf on refrigerator
door
To allow for easy cleaning, It is possible to
remove the toeboard Indicated in the drawing by
llftlng the two ends of the toeboard.
To put the toeboard back:
l
align the two ends of the toeboard above the
side pockets of the door;
9 press the toeboard down until It
IS
secured in
Isosltion.
Removal of the snack bin and its lid
To remove the snack bin:
l
slide the snack bin out until it stops;
l
raise the front side of the bin;
l
slide the bin completely out.
To reposItIon It, carry out the above operations in
reverse order.
To remove the lid.
l
raise the front side of the Iid and then the back
side;
l
pull outwards.
To reposition, carry out the above operations in
reverse order.
Use of the hanging bottle holder
This bottle holder can accommodate 1 bottle:
Hang it under the right or left side of any
refrigerator shelf.
 Loading...