


Whirlpool 3LWED4705FW, 3DWGD4815FW, 3LWED4815FW, 4KWED4915FW, 3LWED4830FW Owner's Manual
...ELECTRIC OR GAS DRYER USE AND CARE GUIDE
GUIDE D’UTILISATION ET D’ENTRETIEN SÈCHE-LINGE ÉLECTRIQUE OU À GAZ SECADORA A GAS O ELÉCTRICA MANUAL DE USO Y CUIDADO
GUIDA ALL’USO E ALLA MANUTENZIONE DELL’ASCIUGATRICE ELETTRICA O A GAS ELEKTROODER GASTROCKNER – BEDIENUNGSUND PFLEGEANLEITUNG
Table of Contents (Original Instructions)
DRYER SAFETY........................................................................... |
2 |
CYCLE GUIDE.............................................................................. |
7 |
SPECIFICATIONS........................................................................ |
4 |
USING YOUR DRYER.................................................................. |
8 |
CHECK YOUR VENT SYSTEM FOR GOOD AIRFLOW............. |
5 |
DRYER CARE............................................................................. |
10 |
USE AUTOMATIC DRY CYCLES FOR |
|
TROUBLESHOOTING................................................................ |
12 |
BETTER FABRIC CARE AND ENERGY SAVINGS..................... |
5 |
DECLARATION OF CONFORMITY........................................... |
14 |
CONTROL PANEL & FEATURES................................................ |
6 |
|
|
Table des matières (Instructions d’origine)
SÉCURITÉ DU SÈCHE-LINGE................................................... |
15 |
TABLEAU DE COMMANDE ET CARACTÉRISTIQUES............ |
19 |
CARACTERISTIQUES................................................................ |
17 |
GUIDE DE PROGRAMMES........................................................ |
20 |
VÉRIFICATION D’UNE CIRCULATION D’AIR |
|
UTILISATION DU SÈCHE-LINGE............................................... |
21 |
ADÉQUATE POUR LE SYSTÈME D’ÉVACUATION .................. |
18 |
ENTRETIEN DU SÈCHE-LINGE................................................. |
23 |
UTILISATION DES PROGRAMMES AUTOMATIQUES |
|
DÉPANNAGE............................................................................... |
25 |
POUR UN MEILLEUR SOIN DU TISSU ET DAVANTAGE |
|
|
|
D’ÉCONOMIES D’ÉNERGIE....................................................... |
18 |
|
|
Índice (Instrucciones originales)
SEGURIDAD DE LA SECADORA............................................... |
27 |
PANEL DE CONTROL Y CARACTERÍSTICAS.......................... |
31 |
ESPECIFICACIONES.................................................................. |
29 |
GUÍA DE CICLOS........................................................................ |
32 |
REVISE QUE EL SISTEMA DE VENTILACIÓN |
|
USO DE SU SECADORA............................................................ |
33 |
TENGA UN BUEN FLUJO DE AIRE........................................... |
30 |
CUIDADO DE LA SECADORA................................................... |
35 |
USE LOS CICLOS SECADO AUTOMÁTICO PARA |
|
SOLUCIÓN DE PROBLEMAS.................................................... |
37 |
UN MEJOR CUIDADO DE LAS TELAS Y AHORRO |
|
|
|
DE ENERGÍA............................................................................... |
30 |
|
|
Sommario (Istruzioni originali)
SICUREZZA DELL’ASCIUGATRICE......................................... |
39 |
SPECIFICHE............................................................................... |
41 |
CONTROLLO DEL SISTEMA DI SFIATO |
|
PER IL CORRETTO FLUSSO DELL’ARIA................................ |
42 |
USO DEI CICLI DI ASCIUGATURA AUTOMATICA PER |
|
UNA MIGLIORE CURA DEI TESSUTI E PER RISPARMIARE |
|
ENERGIA.................................................................................... |
42 |
PANNELLO COMANDI E FUNZIONI......................................... |
43 |
GUIDA AI CICLI......................................................................... |
44 |
USO DELL’ASCIUGATRICE...................................................... |
45 |
MANUTENZIONE DELL’ASCIUGATRICE................................. |
47 |
RISOLUZIONE DEI PROBLEMI................................................ |
49 |
Inhaltsverzeichnis (Originalanweisungen)
SICHERHEITSHINWEISE.......................................................... |
51 |
TECHNISCHE DATEN................................................................ |
53 |
ÜBERPRÜFEN DES ABLUFTSYSTEMS AUF GUTE |
|
LUFTZIRKULATION................................................................... |
54 |
AUTOMATISCHE TROCKENPROGRAMME FÜR |
|
TEXTILSCHONENDES TROCKNEN UND ENERGIESPAREN.... |
54 |
BEDIENFELD UND FUNKTIONEN............................................ |
55 |
PROGRAMMLEITFADEN.......................................................... |
56 |
VERWENDEN DES TROCKNERS............................................. |
57 |
PFLEGE DES TROCKNERS...................................................... |
59 |
STÖRUNGSBEHEBUNG........................................................... |
61 |
4KWED4915 |
4KWED4815 |
4GWGD4815 |
4KWED4705 |
4GWGD4705 |
4KWED4605 |
3LWED4830 |
W11049660B |
3LWED4915 |
3LWED4815 |
3DWGD4815 |
3LWED4705 |
3DWGD4705 |
3DWED4815 |
3LWED4730 |

DRYER SAFETY
CAUTION – RISK OF FIRE/FLAMMABLE MATERIALS
This is an additional safety alert symbol that alerts you to the risk of re.
2

FOR YOUR SAFETY
1.DO NOT USE OR STORE PETROL OR OTHER FLAMMABLE MATERIALS IN THIS APPLIANCE OR NEAR THIS APPLIANCE.
2.DO NOT SPRAY AEROSOLS IN THE VICINITY OF THIS APPLIANCE WHILE IT IS IN OPERATION.
3.DO NOT MODIFY THIS APPLIANCE.
IMPORTANT SAFETY INSTRUCTIONS
WARNING: To reduce the risk of fire, electric shock, or injury to persons when using the dryer, follow basic precautions, including the following:
nRead all instructions before using the dryer. 


nKeep a minimum clearance of 100 mm (4 in.) between the rear of the dryer and any wall.
nThe operation of this appliance may affect the operation of other types of appliances which take their air supply for safe combustion from the same room. There has to be adequate ventilation to replace exhausted air and thus avoid the back-flow of gases into the room from appliances burning other fuels, including open fires, when operating the tumble dryer. If in doubt, consult the appliance manufacturers.
nDo not obstruct the air supply to the dryer (see Installation Instructions for minimum clearances).
nDo not place items exposed to cooking oils in your dryer. Oil-affected items can ignite spontaneously, especially when exposed to heat sources such as in a tumble dryer. The items become warm, causing an oxidation reaction in the oil. Oxidation creates heat. If the heat cannot escape, the items can become hot enough to catch fire. Piling, stacking, or storing oil-affected items can prevent heat from escaping and so create a fire hazard.
nIf it is unavoidable to dry in the dryer items that have been soiled with substances such as cooking oil, acetone, alcohol, petrol, kerosene, spot removers, turpentine, waxes and wax removers, or that have been contaminated by hair care products, should be washed in hot water with an extra amount of detergent
before being dried in the dryer. These items may give off vapours that could ignite or explode. Such washing will reduce, but not eliminate, the hazard.
nThis appliance is not intended for use by persons (including children under 8 years of age) with reduced physical, sensory, or mental capabilities, or lack of experience and knowledge, unless they have been given supervision or instructions concerning use of the appliance by persons responsible for their safety.
nCleaning and user maintenance by children must be supervised.
nChildren should be supervised to ensure that they do not play with the appliance.
nChildren less than 3 years of age should be kept away from the appliance unless continuously supervised.
nThe dryer should not be used if industrial chemicals have been used for cleaning.
nRemove all objects from pockets, such as lighters and matches, before placing items in the dryer.
nBefore the dryer is removed from service or discarded, remove the doors to the drying compartment.
nDo not reach into the dryer if the drum is moving. A door switch is fitted for your safety.
nDo not install or store the dryer where it will be exposed to the weather.
nDo not tamper with controls.
nDo not continue to use this appliance if it appears to be faulty.
nDo not repair or replace any part of the dryer or attempt any maintenance unless specifically recommended in this Use and Care Guide. Repairs and servicing should only be carried out by competent service personnel.
nDo not use fabric softeners or products to eliminate static unless recommended by the manufacturer of the fabric softener or product. Follow their instructions.
nClean dryer lint screen before or after each load. Do not operate dryer without lint screen in place.
nKeep area around the exhaust and inlet openings and adjacent surrounding areas free from the accumulation of lint, dust, and dirt.
nThe interior of the dryer and exhaust vent should be cleaned periodically by qualified service personnel.
nSee Installation Instructions for earthing instructions.
nDo not dry unwashed items in this dryer.
nThe final part of a tumble dryer cycle occurs without heat (cool down cycle) to ensure that the items are left at a temperature that ensures the items will not be damaged.
nItems such as foam rubber (latex foam), shower caps, waterproof textiles, rubber backed articles and clothes
or pillows fitted with foam rubber pads must only be dried on a clothesline.
nIf the supply cord is damaged, it must be replaced by the manufacturer or its service agent or a similarly qualified person in order to avoid a hazard.
WARNING: Never stop a tumble dryer cycle before the end of the drying cycle unless all items are quickly removed and spread out so that the heat is dissipated.
SAVE THESE INSTRUCTIONS
3
SPECIFICATIONS
These units are sold in multiple regions with different requirements for measuring capacity. Below are a few of the valid forms of measure posted on this product:
Dry Linen Capacity: A weight measure in load size that reflects the volumetric size of the dryer drum.
IEC Capacity: The capacity measure that represents the maximum capacity of dry linens and textiles which the manufacturer declares can be treated in a specific cycle.
IMPORTANT: This appliance is intended to be used in household and similar applications such as:
nstaff kitchen areas in shops, offices, and other working environments;
nfarm houses;
nby clients in hotels, motels, and other residential-type environments;
nbed and breakfast-type environments;
nareas for communal use in blocks of flats or in launderettes.
|
3LWED4705FW |
|
|
4KWED4605FW |
|
|
3LWED4815FW |
|
|
4KWED4705FW |
|
Models |
3DWED4815FW |
3LWED4730FW |
3DWGD4705FW |
4KWED4815FW |
4GWGD4705FW |
3LWED4915FW |
3LWED4830FW |
3DWGD4815FW |
4KWED4915FW |
4GWGD4815FW |
|
Rated Voltage |
220–240 V 2N~ |
220–240 V 2N~ |
220–240 V 2N~ |
220–240 V 2N~ |
220–240 V 2N~ |
|
|
|
|
|
|
Rated Frequency |
50 Hz |
50 Hz |
50 Hz |
60 Hz |
60 Hz |
|
|
|
|
|
|
Rated Current |
20 Amps |
13 Amps |
6 Amps |
20 Amps |
6 Amps |
|
|
|
|
|
|
Dry Linen Capacity |
15 kg (33 lb) |
15 kg (33 lb) |
15 kg (33 lb) |
15 kg (33 lb) |
15 kg (33 lb) |
(Maximum) |
|
|
|
|
|
IEC Capacity |
7 kg (15 lb) |
7 kg (15 lb) |
7 kg (15 lb) |
7 kg (15 lb) |
7 kg (15 lb) |
|
|
|
|
|
|
Height |
1067 mm (42") |
1067 mm (42") |
1067 mm (42") |
1067 mm (42") |
1067 mm (42") |
|
|
|
|
|
|
Width |
737 mm (29") |
737 mm (29") |
737 mm (29") |
737 mm (29") |
737 mm (29") |
|
|
|
|
|
|
Depth |
706 mm (2713⁄16") |
706 mm (2713⁄16") |
706 mm (2713⁄16") |
706 mm (2713⁄16") |
706 mm (2713⁄16") |
NOTE: The noise level of the dryer is below 70 dB(A).
Model 3LWED4830FW0 only:
SANS61121:2015 Energy information
This dryer has an Annual Energy Consumption of 472 kWh.
Consumption per year is based on 160 drying cycles of the Timed Dry cycle at full and partial loads, and the consumption of the low-power modes. Actual energy consumption per cycle will depend on how the appliance is used in Settings for Energy tests.
Full load: 6.0 kg – 80 minutes maximum Time setting with High (heavy) Temperature/Fabric setting
Partial load: 3.0 kg – 60 minutes Time setting with High (heavy) Temperature/Fabric setting
Energy consumption per cycle is 2.95 kWh.
4
CHECK YOUR VENT SYSTEM FOR GOOD AIRFLOW
Good airflow
Along with heat, dryers require good airflow to efficiently dry laundry. Proper venting will reduce your drying times and improve your energy savings. See Installation Instructions.
The venting system attached to the dryer plays a big role in good airflow.
Service calls caused by improper venting are not covered by the warranty and will be paid by the customer, regardless of who installed the dryer.
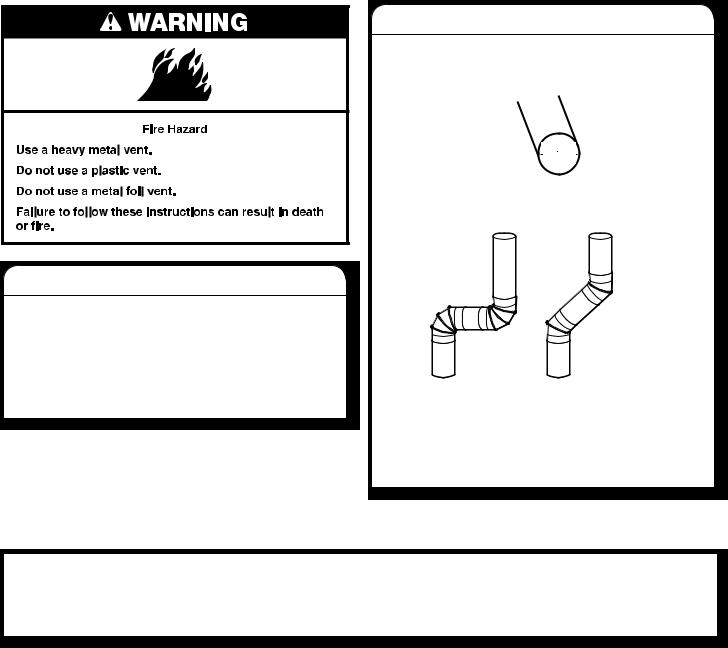
To maintain good airflow:
nClean your lint screen before each load.
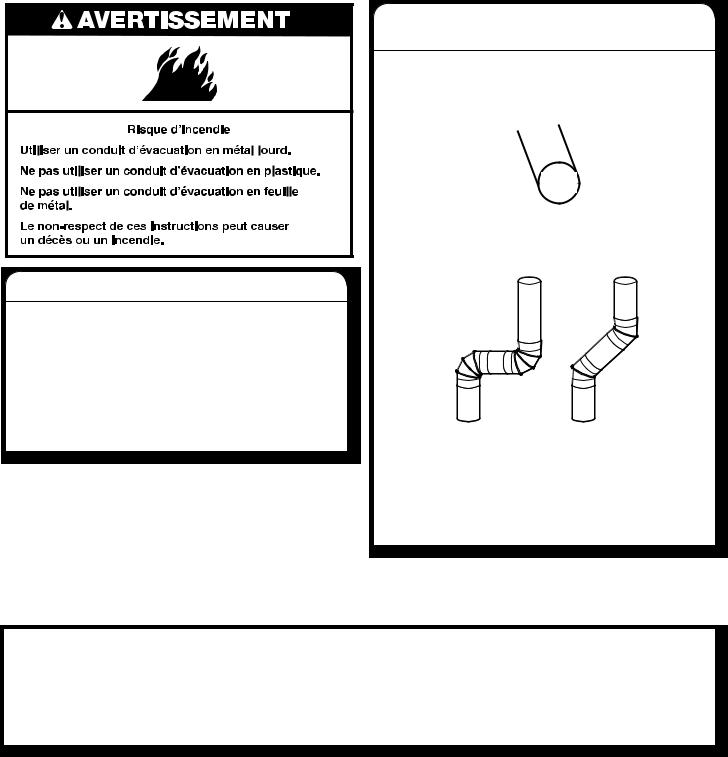
nReplace plastic or foil vent material with 102 mm (4") diameter heavy, rigid vent material.
102 mm 
 4"
4" 
nUse the shortest length of vent possible.
nUse no more than four 90° elbows in a vent system; each bend and curve reduces airflow.
Good  Better
nRemove lint and debris from the exhaust hood.
nRemove lint from the entire length of the vent system at least every two years. When cleaning is complete, be sure to follow the Installation Instructions supplied with your dryer for final product check.
nClear away items from the front of the dryer.
USE AUTOMATIC DRY CYCLES FOR BETTER FABRIC CARE AND ENERGY SAVINGS
Use the Automatic Dry cycles to provide the most energy savings and enhanced fabric care from the dryer. During Automatic Dry cycles, drying air temperature or moisture level are sensed in the load. This sensing occurs throughout the drying cycle and the dryer shuts off when the load reaches the selected dryness. The Energy Preferred cycle will provide optimal energy savings.
With Timed Dry, the dryer runs the amount of time set and sometimes results in shrinkage, wrinkling, and static due to over-drying. Use Timed Dry for the occasional damp load that needs a little more drying time or when using the drying rack.
5
CONTROL PANEL & FEATURES
1 |
|
2 |
|
|
|
|
|
3 |
4 |
|
|
|
|
|
|||||||||
|
|
|
|
|
|
|
|
|
|
|
|
|
|
|
|
|
|
|
|
|
|
|
|
|
|
|
|
|
|
|
|
|
|
|
|
|
|
|
|
|
|
|
|
|
|
|
|
|
|
|
|
|
|
|
|
|
|
|
|
|
|
|
|
|
|
|
|
|
|
|
|
|
|
|
|
|
|
|
|
|
|
|
|
|
|
|
|
|
|
|
|
|
|
|
|
|
|
|
|
|
|
|
|
|
|
|
|
|
|
|
|
|
|
|
|
|
|
|
|
|
|
|
|
|
|
|
|
|
|
|
|
|
|
|
|
|
|
|
|
|
|
|
|
|
|
|
|
|
|
|
|
|
|
|
|
|
|
|
|
|
|
|
|
|
|
|
|
|
|
|
|
|
|
|
|
|
|
|
|
|
|
|
|
|
|
|
|
|
|
|
|
|
|
|
|
|
|
|
|
|
|
|
|
|
|
|
|
|
|
|
|
|
|
|
|
|
|
|
|
|
|
|
|
|
|
|
|
|
|
|
|
|
|
|
|
|
|
|
|
|
|
|
|
|
|
|
|
|
|
|
|
|
|
|
|
|
|
|
|
|
|
|
|
|
|
|
|
|
|
|
|
|
|
|
|
|
|
|
|
|
|
|
|
|
|
|
|
|
|
|
|
|
|
|
|
|
|
|
|
|
|
|
|
|
|
|
|
|
|
|
|
2 |
|
|
|
3 |
|
4 |
|
|
|
|
||||
|
|
|
|
|
|
|
|
|
|
|
|
|
|
|
|
|
|
|
|
|
|
|
|
|
|
|
|
|
|
|
|
|
|
|
|
|
|
|
|
|
|
|
|
|
|
|
|
|
|
|
|
|
|
|
|
|
|
|
|
|
|
|
|
|
|
|
|
|
|
|
|
|
|
|
|
|
|
|
|
|
|
|
|
|
|
|
|
|
|
|
|
|
|
|
|
|
|
|
|
|
|
|
|
|
|
|
|
|
|
|
|
|
|
|
|
|
|
|
|
|
|
|
|
|
|
|
|
|
|
|
|
|
|
|
|
|
|
|
|
|
|
|
|
|
|
|
|
|
|
|
|
|
|
|
|
|
|
|
|
|
|
|
|
|
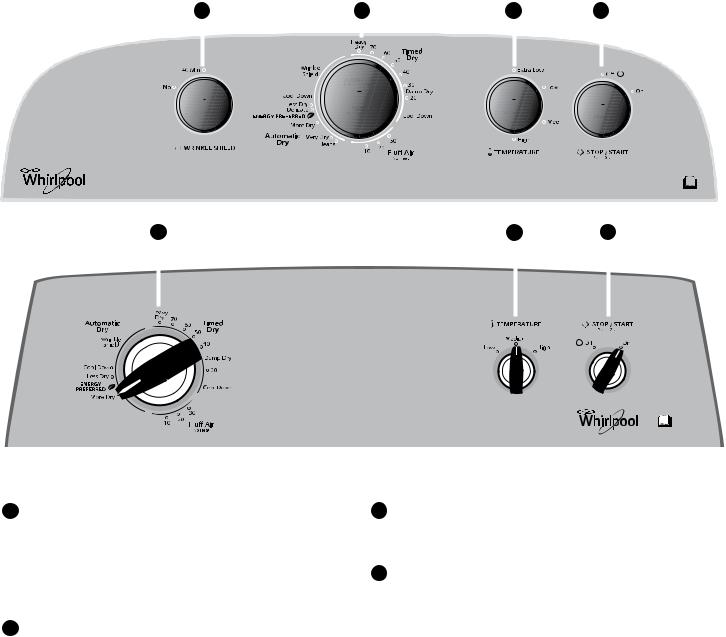
Not all features and options are available on all models.
Appearance may vary.
1WRINKLE SHIELD FEATURE (on some models)
When you are unable to remove a load of clothes from the dryer as soon as it stops, wrinkles can form. The Wrinkle Shield feature periodically tumbles, rearranges, and fluffs the load to help keep wrinkles from forming.
n Get 40 minutes of heat-free, periodic tumbling at the end of a cycle. Turn the Wrinkle Shield knob to on or off at any time before the cycle has ended.
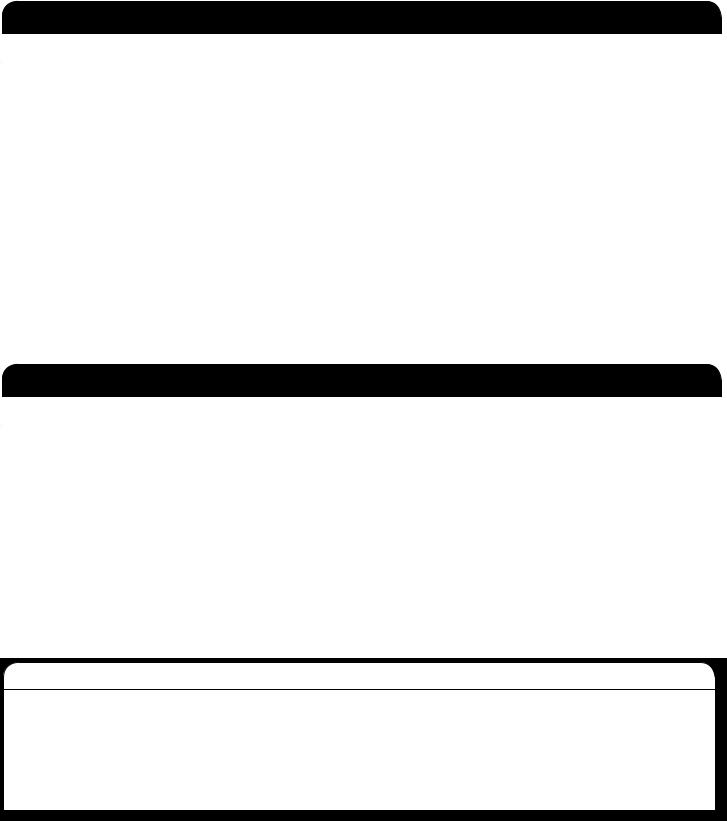
2DRYER CYCLE KNOB
Use your Dryer Cycle Knob to select available cycles on your dryer. Turn the knob to select a cycle for your laundry load. See “Cycle Guide” for detailed descriptions of cycles.
TIMED DRY
Will run the dryer for the approximate time on the control. On models with a selectable temperature knob, you may choose a setting based on the fabrics in your load. Drying time and temperature will depend on your dryer model.
AUTOMATIC DRY
Senses moisture in the load or air temperature and shuts off when the load reaches the selected dryness level. Gives the best drying in the shortest time. Drying time will vary based on fabric type, load size, and dryness setting.
3TEMPERATURE
Select a drying temperature based on the fabrics in your load. If you are unsure of the temperature to select for a load, select the lower setting rather than the higher setting.
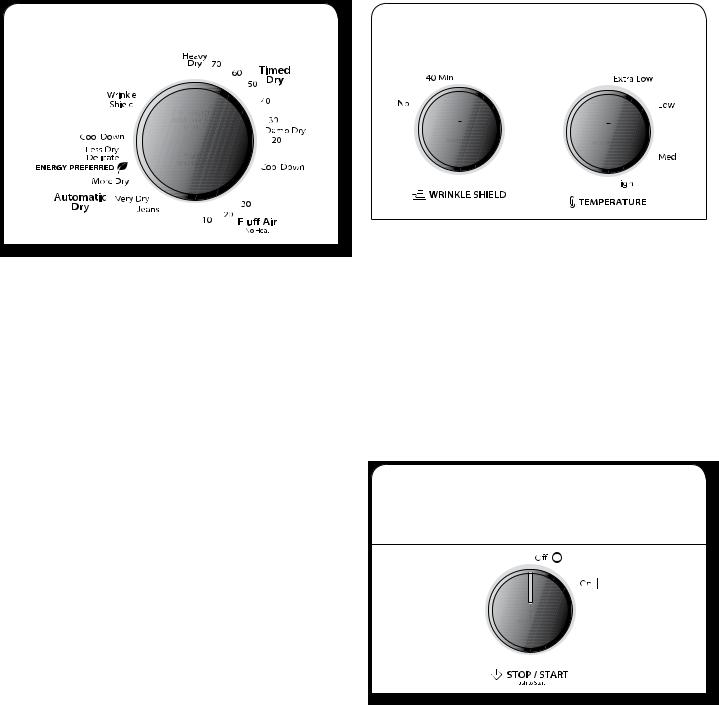
4STOP/START
The Cycle Signal produces an audible sound when the drying cycle is finished. Promptly removing clothes at the end of the cycle reduces wrinkling.
Turn the Stop/Start knob to select the desired setting (On or Off). Press the Stop/Start knob to start the dryer.
NOTE: When the Wrinkle Shield setting is selected, the tone will sound every 5 minutes until the clothes are removed or the Wrinkle Shield setting ends.
6
CYCLE GUIDE – AUTOMATIC DRY CYCLES
Not all cycles and settings are available on all models.
Choose Energy Preferred cycle for optimal energy savings.
|
|
|
Available |
|
|
Items to dry: |
Cycle: |
Temperature: |
Options: |
Cycle Details: |
|
|
|
|
|
|
|
Jeans, heavy work |
Jeans, |
High |
Wrinkle Shield |
Automatic cycles give the best drying in the |
|
clothes, towels |
More Dry, |
|
Temperature |
shortest time. Drying time varies based on |
|
|
or Very Dry |
|
fabric type, load size, and dryness setting. |
||
|
|
Cycle Signal |
|||
|
|
|
Select a drying temperature based on the |
||
|
|
|
|
||
|
|
|
|
fabrics in your load. If you are unsure of the |
|
Work clothes, medium |
Energy |
Medium |
Wrinkle Shield |
||
temperature to select for a load, select the |
|||||
weight fabrics, sheets |
Preferred |
|
Temperature |
||
|
lower setting rather than the higher setting. |
||||
|
|
|
|||
|
|
|
Cycle Signal |
|
|
|
|
|
|
|
|
Casual, shirts, pants, |
Delicate |
Low |
Wrinkle Shield |
|
|
lightweight items, |
or Less Dry |
|
Temperature |
|
|
synthetics, delicates, |
|
|
|
||
|
|
Cycle Signal |
|
||
athletic wear |
|
|
|
||
|
|
|
|
||
|
|
|
|
|
NOTE: If loads do not seem as dry as you would like, select More Dry or Very Dry next time you dry a similar load. If loads seem drier than you like, select Less Dry next time you dry a similar load.
CYCLE GUIDE – TIMED DRY CYCLES
Not all cycles and settings are available on all models.
TIMED DRY – Will run the dryer for the approximate time on the control.
|
|
|
Available |
|
Items to dry: |
Cycle: |
Temperature: |
Options: |
Cycle Details: |
|
|
|
|
|
Large or heavy items |
Heavy Dry |
Any |
Temperature |
Choose High to dry large or heavy loads. |
such as thick towels |
|
|
|
|
or robes |
|
|
|
|
|
|
|
|
|
Any load |
Damp Dry |
Any |
Temperature |
Dries items to a damp level or for items that |
|
|
|
|
do not require an entire drying cycle. |
|
|
|
|
|
Rubber, plastic, |
Fluff Air |
No Heat |
Temperature |
No heat drying. |
heat-sensitive fabrics |
|
|
|
|
|
|
|
|
|
Setting the Drying Temperature
If your dryer has multiple heat settings:
A High temperature setting may be used for drying heavyweight items such as towels and work clothes.
A Low to Medium temperature setting may be used for drying medium-weight items such as sheets, blouses, dresses, underwear, permanent press fabrics, and some knits.
Use the No Heat setting for foam, rubber, plastic, or heat-sensitive fabrics.
Line-dry bonded or laminated fabrics.
NOTE: If you have questions about drying temperatures for various loads, refer to the care label directions.
7
USING YOUR DRYER
WARNING: To reduce the risk of fire, electric shock, or injury to persons, read the IMPORTANT SAFETY INSTRUCTIONS before operating this dryer.
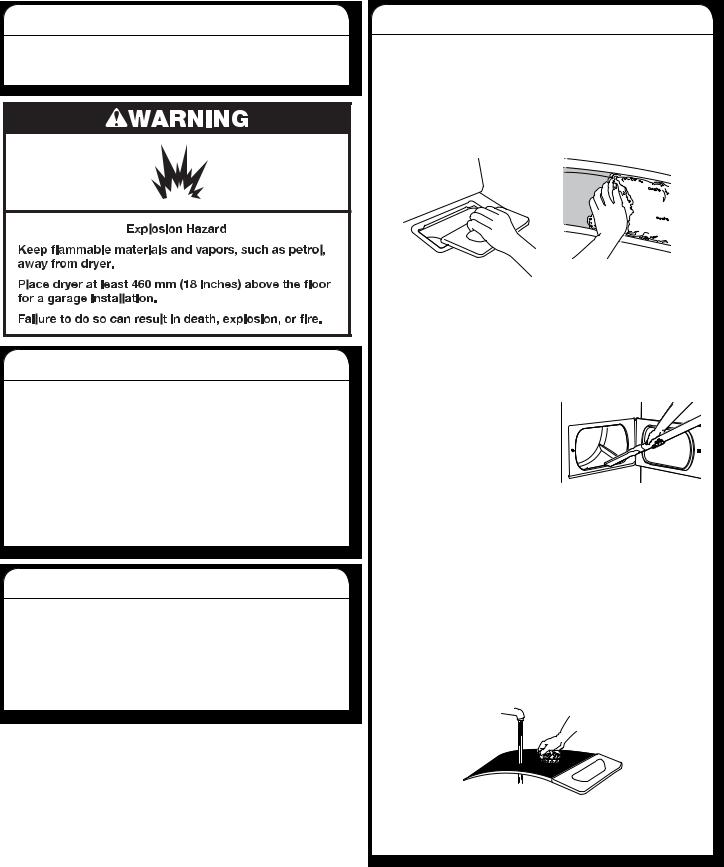
Before using your dryer, wipe the dryer drum with a damp cloth to remove dust from storing and shipping.
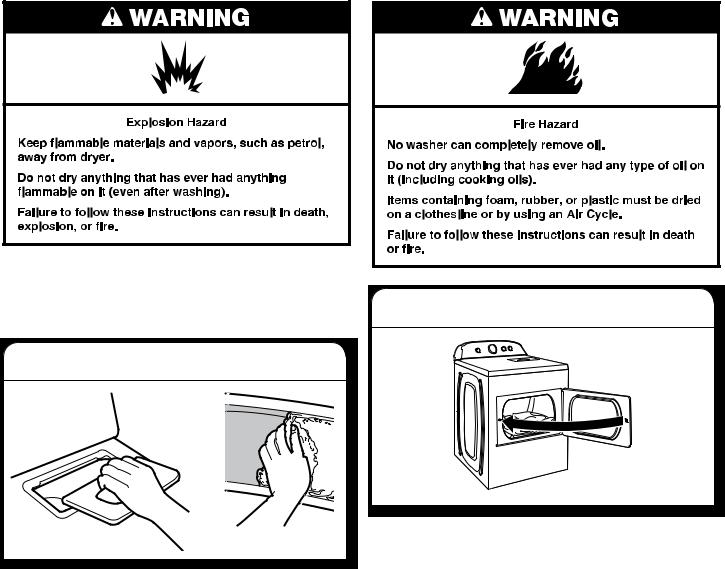
1. Clean the lint screen
Clean the lint screen before each load. Pull the lint screen out
of its holder. Roll lint off the screen with your fingers. Do not rinse or wash screen to remove lint. Push the lint screen firmly back into place.
For additional cleaning information, see “Dryer Care.”
2. Load the dryer
Place laundry in the dryer. Close the door.
NOTE: Your model may have a different door than the one shown. Some models have drop-down doors.
Do not tightly pack the dryer; clothes should be able to tumble freely.
8

3. Select the desired cycle |
|
5. Press STOP/START to begin cycle |
||||||||||||||
|
|
|
|
|
|
|
|
|
|
|
|
|
|
|
|
|
|
|
|
|
|
|
|
|
|
|
|
|
|
|
|
|
|
|
|
|
|
|
|
|
|
|
|
|
|
|
|
|
|
|
|
|
|
|
|
|
|
|
|
|
|
|
|
|
|
|
|
|
|
|
|
|
|
|
|
|
|
|
|
|
|
|
|
|
|
|
|
|
|
|
|
|
|
|
|
|
|
|
|
|
|
|
|
|
|
|
|
|
|
|
|
|
|
|
|
|
|
|
|
|
|
|
|
|
|
|
|
|
|
|
|
|
|
|
|
|
|
|
|
|
|
|
|
|
|
|
|
|
|
|
|
|
|
|
|
|
|
|
|
|
|
|
|
|
|
|
|
|
|
|
|
|
|
|
|
|
|
|
|
|
|
|
|
|
|
|
|
|
|
|
|
|
|
|
|
|
|
|
|
|
|
|
|
|
|
|
|
|
|
|
|
|
|
|
|
|
|
|
|
|
|
|
|
|
|
|
|
|
|
|
|
|
|
|
|
|
|
|
|
|
|
|
|
|
|
|
|
|
|
|
|
|
|
|
|
|
|
|
|
|
|
|
|
|
|
|
|
|
|
|
|
|
|
|
|
|
|
|
|
|
|
|
|
|
|
|
|
|
|
|
|
|
|
|
|
|
|
|
|
|
|
|
|
|
|
Select the desired cycle for your load. See the “Cycle Guide” for more information about each cycle.
AUTOMATIC DRY Cycles
You can select a different dryness level, depending on your load, by turning the knob to dryness level.
Selecting More Dry or Very Dry, Energy Preferred, or Less Dry automatically adjusts the dryness level at which the dryer will shut off. Once a dry level is set, it cannot be changed without stopping the cycle.
Automatic Dry cycles give the best drying in the shortest time. Drying time varies based on fabric type, load size, and dryness setting.
NOTE: More Dry or Very Dry removes more load moisture. Choose Energy Preferred for optimal energy savings. Less Dry removes less moisture and is used for loads you may want to put on a hanger to complete drying.
4. Set cycle settings and options
Select cycle settings and options by turning the knob to the desired position.
NOTE: Not all options and settings are available with all cycles.
Temperature
Turn the Temperature knob to change the drying temperature setting. See “Setting the Drying Temperature.”
Wrinkle Shield feature (on some models)
Get 40 minutes of heat-free, periodic tumbling at the end of a cycle. Turn the Wrinkle Shield knob to select NO
to turn off at any time before the cycle has ended.
Press and hold the Stop/Start knob to begin the cycle. To end the cycle early, turn the Stop/Start knob to OFF.
Promptly remove garments after cycle has completed to reduce wrinkling. Use the Wrinkle Shield feature to avoid wrinkling when you are unable to remove a load from the dryer as soon as it stops.
9
DRYER CARE
Cleaning the dryer location
Keep dryer area clear and free from items that would block the air flow for proper dryer operation. This includes clearing piles of laundry in front of the dryer.
Cleaning the dryer interior
To clean dryer drum
1.Apply a liquid, nonflammable household cleaner to the stained area of the drum and rub with a soft cloth until stain is removed.
2.Wipe drum thoroughly with a damp cloth.
3.Tumble a load of clean cloths or towels to dry the drum.
NOTE: Garments that contain loose dyes, such as denim blue jeans or brightly colored cotton items, may discolor the dryer interior. These stains are not harmful to your dryer and will not stain future loads of clothes. Dry these items inside out to avoid drum staining.
Removing accumulated lint
From inside the dryer cabinet
Lint should be removed every two years, or more often, depending on dryer usage. Cleaning should be done by a qualified servicer.
From the exhaust vent
Lint should be removed every two years, or more often, depending on dryer usage.
Cleaning the lint screen
Every load cleaning
The lint screen is located in the dryer. A screen blocked by lint can increase drying time.
To clean:
1.Pull the lint screen out of its holder. Roll lint off the screen with your fingers. Do not rinse or wash screen to remove lint. Wet lint is hard to remove.
2. Push the lint screen firmly back into place.
IMPORTANT:
nDo not run the dryer with the lint screen loose, damaged, blocked, or missing. Doing so can cause overheating and damage to both the dryer and fabrics.
nIf lint falls off the screen into the dryer during removal, check the exhaust hood and remove the lint. See “Venting Requirements” in the Installation Instructions.
n Clean space where lint  screen is located, as needed.
Using a vacuum, gently remove any lint that has accumulated outside of the lint screen.
As-needed cleaning
Laundry detergent and fabric softener residue can build up on the lint screen. This buildup can cause longer drying times for your clothes or cause the dryer to stop before
your load is completely dry. The screen is probably clogged if lint falls off while the screen is in the dryer.
Clean the lint screen with a nylon brush every 6 months, or more frequently, if it becomes clogged due to a residue buildup.
To wash:
1.Roll lint off the screen with your fingers.
2.Wet both sides of lint screen with hot water.
3.Wet a nylon brush with hot water and liquid detergent. Scrub lint screen with the brush to remove residue buildup.
4.Rinse screen with hot water.
5.Thoroughly dry lint screen with a clean towel. Reinstall screen in dryer.
10
Vacation, storage, and moving care
Non-Use or Storage Care
Operate your dryer only when you are at home. If you will be on vacation or not using your dryer for an extended period of time, you should:
1.Unplug dryer or disconnect power.
2.(For gas dryers only): Close shut-off valve to gas supply line.
3.Clean lint screen. See “Cleaning the lint screen.”
Moving Care
For power supply cord-connected dryers:
1.Unplug the power supply cord.
2.Make sure leveling legs are secure in dryer base.
3.Use tape to secure dryer door.
For direct-wired dryers:
1.Turn off power at fuse or breaker box.
2.Disconnect wiring.
3.Make sure leveling legs are secure in dryer base.
4.Use tape to secure dryer door.
For gas dryers:
1.Unplug or disconnect power to dryer.
2.Close shut-off valve in gas supply line.
3.Disconnect gas supply line pipe and remove fittings attached to dryer pipe.
4.Cap the open fuel supply line.
5.Make sure leveling legs are secure in dryer base.
6.Use tape to secure dryer door.
Reinstalling the Dryer
Follow the Installation Instructions to locate, level, and connect the dryer.
Changing the drum light (on some models)
1.Unplug dryer or disconnect power.
2.Open the dryer door. Locate the light bulb cover on the back wall of the dryer. Using a Phillips-head screwdriver, remove the screw located in the lower right-hand corner of the cover. Remove the cover.
3.Turn bulb counterclockwise. Replace the bulb with
a 10-watt appliance bulb only. Replace the cover and secure with the screw.
4.Plug into an earthed outlet or reconnect power.
11

TROUBLESHOOTING
First try the solutions suggested here to possibly avoid the cost of a service call.
If you experience |
Possible Causes |
Solution |
|
|
|
Clothes are not drying |
Lint screen or lint screen housing is |
Clean lint screen before each load. Clean space where |
satisfactorily, drying times |
clogged with lint. |
lint screen is located, as needed. Using a vacuum, gently |
are too long |
|
remove any lint that has accumulated outside of the lint |
|
|
screen. |
|
The Fluff Air cycle or No Heat temperature |
Select the right cycle for the types of garments being |
|
setting has been selected. |
dried. See “Cycle Guide.” |
|
Load too large and heavy to dry quickly. |
Separate the load to tumble freely. |
|
|
|
|
Exhaust vent or outside exhaust hood |
Run the dryer for 5–10 minutes. Hold your hand under |
|
clogged with lint, restricting air movement. |
the outside exhaust hood to check air movement. If you |
|
|
do not feel air movement, clean exhaust system of lint |
|
|
or replace exhaust vent with heavy metal or flexible |
|
|
metal vent. Make sure vent is not crushed or kinked. |
|
|
See Installation Instructions. |
|
Fabric softener sheets blocking the grill. |
Use only one fabric softener sheet and use it only once. |
|
|
|
|
Exhaust vent not the correct length. |
Check that the exhaust vent is not too long or has |
|
|
too many turns. Long venting will increase drying times. |
|
|
Make sure vent is not crushed or kinked. See Installation |
|
|
Instructions. |
|
|
|
|
Exhaust vent diameter not the |
Use 102 mm (4") diameter vent material. |
|
correct size. |
|
|
|
|
|
Dryer located in a room with |
Proper operation of dryer cycles requires temperatures |
|
temperature below 7ºC (45ºF). |
above 7ºC (45ºF). |
|
Dryer located in a closet without adequate |
Closet doors must have ventilation openings at the top |
|
opening. |
and bottom of the door. The front of the dryer requires |
|
|
a minimum of 25 mm (1") of airspace and, for most |
|
|
installations, the rear of the dryer requires 127 mm (5"). |
|
|
See Installation Instructions. |
Dryer will not run |
Door not closed completely. |
Make sure the dryer door is closed completely. |
|
|
|
|
Stop/Start knob not turned to On setting. |
Turn Stop/Start knob to On setting. |
|
|
|
|
Stop/Start knob not pressed firmly or held |
Press and hold the Stop/Start knob until you hear the dryer |
|
long enough. |
drum moving. |
|
|
|
|
Household fuse is blown or circuit breaker |
Electric dryers use two household fuses or circuit breakers. |
|
has tripped. |
The drum may be turning, but you may not have heat. |
|
|
Replace both fuses or reset the circuit breaker. If the |
|
|
problem continues, call an electrician. |
|
|
|
|
Incorrect power supply. |
Electric dryers require 240-volt power supply. Check with |
|
|
a qualified electrician. |
|
|
|
|
Wrong type of fuse. |
Use a time-delay fuse. |
|
|
|
Unusual sounds |
Dryer had a period of non-use. |
If the dryer hasn’t been used for awhile, there may be a |
|
|
thumping sound during the first few minutes of operation. |
|
|
|
|
A coin, button, or paper clip is caught |
Check the front and rear edges of the drum for small |
|
between the drum and front or rear of |
objects. Clean out pockets before laundering. |
|
the dryer. |
|
|
It is a gas dryer. |
The gas valve clicking is a normal operating sound. |
|
|
|
|
The 4 legs are not installed or the dryer |
The dryer may vibrate if not properly installed. |
|
is not level front to back and side to side. |
See Installation Instructions. |
|
|
|
|
Clothing knotted or balled up. |
When balled up, the load will bounce, causing the dryer |
|
|
to vibrate. Separate the load items and restart the dryer. |
No heat |
Household fuse is blown or circuit breaker |
The drum may be turning, but you may not have heat. |
|
has tripped. |
Electric dryers use 2 household fuses or circuit breakers. |
|
|
Replace both fuses or reset the circuit breaker. If the |
|
|
problem continues, call an electrician. |
|
Supply line valve not open. |
For gas dryers, make sure the supply line valve is open. |
|
|
|
|
Incorrect power supply. |
Electric dryers require 240-volt power supply. |
|
|
Check with a qualified electrician. |
|
|
|
12

TROUBLESHOOTING
First try the solutions suggested here to possibly avoid the cost of a service call.
If you experience |
Possible Causes |
Solution |
Cycle time too short |
Automatic cycle ending early. |
The load may not be contacting the sensor strips. |
|
|
Level the dryer. |
|
|
Use Timed Dry for very small loads. Change the Dry Level |
|
|
setting on Automatic Dry cycles. |
|
|
Increasing or decreasing the Dry Level setting will change |
|
|
the amount of drying time in a cycle. |
Lint on load |
Lint screen clogged. |
Lint screen should be cleaned before each load. |
|
|
|
Stains on load or drum |
Dryer fabric softener not properly used. |
Add dryer fabric softener sheets at the beginning of the |
|
|
cycle. Fabric softener sheets added to a partially dried |
|
|
load can stain your garments. |
|
|
Drum stains are caused by dyes in clothing (usually blue |
|
|
jeans). These will not transfer to other clothing. |
|
|
|
Loads are wrinkled |
Load not removed from dryer at the end |
Select Wrinkle Shield feature to tumble the load without |
|
of the cycle. |
heat to avoid wrinkling. |
|
Dryer tightly packed. |
Dry smaller loads that can tumble freely to reduce the |
|
|
chance of wrinkles forming. |
Odors |
You have recently been painting, staining, |
If so, ventilate the area. When the odors or fumes are gone |
|
or varnishing in the area where your dryer |
from the area, rewash and dry the clothing. |
|
is located. |
|
|
|
|
|
The electric dryer is being used for the |
The new electric heating element may have an odor. |
|
first time. |
The odor will be gone after the first cycle. |
|
|
|
Load is too hot |
Laundry items removed from the dryer |
Allow Cool Down cycle to finish before removing |
|
before the end of the cycle. |
laundry from dryer. All cycles are cooled slowly to reduce |
|
|
wrinkling and make it easier to handle. Items removed |
|
|
before Cool Down may feel very warm. |
|
A high temperature cycle was used, |
Select a lower temperature and use an automatic drying |
|
or a separate temperature control was |
cycle. These cycles sense the temperature or the moisture |
|
set on High. |
level in the load and shut off when the load reaches the |
|
|
selected dryness. This reduces overdrying. |
|
|
|
EU representative: Whirlpool EMEA S.p.A., Via Carlo Pisacane n. 1, 20016 Pero (MI), Italy Manufacturer: Whirlpool Corporation, 2000 N M 63, Benton Harbor, MI 49022 USA
For more information, visit us at www.whirlpool.com/accessories or contact the dealer from whom you purchased your dryer or an authorised service company.
LATIN AMERICA SERVICE
For other countries in Latin America, see our Warranty Card Latin America and visit our Whirlpool Latinoamerica website www.whirlpool-latam.com.
13

EU – DECLARATION OF CONFORMITY
Mr. Stefano Demattè, Global Platform Leader HA, representative of
WHIRLPOOL EMEA S.p.A. Socio Unico, Via Carlo Pisacane n. 1, 20016 Pero (Mi), Italy
declares that the products |
|
Product name |
Tumble Dryer |
Trade name |
Whirlpool |
Model |
3LWED4705FW0, 3LWED4830FW0, 3LWED4815FW0, 3LWED4730FW0 |
Trade name |
Maytag |
Model |
3LMEDC315FW0, 3LMEDC415FW0 |
have been designed, manufactured, and placed on the market in conformity with
EU Directives and Commission Regulations
Machinery Directive |
2006/42/EC |
EMC Directive |
2014/30/EU |
RoHS Directive |
2011/65/EU |
and the following standards have been applied |
|
Safety |
EN 60335-1:2012 + A11:2014 |
Safety |
EN 50570:2013 |
Safety |
EN ISO 12100:2010 |
EMC |
EN 61000-3-2:2014 |
EMC |
EN 61000-3-3:2013 |
EMC |
EN 61000-3-11:2000 |
EMC |
EN 61000-3-12:2011 |
EMC |
EN 55014-1:2006 + A1:2009 + A2:2011 |
EMC |
EN 55014-2:1997 + A1:2001 + A2:2008 |
EMF |
EN 62233:2008 |
RoHS |
EN 50581:2012 |
Name |
Stefano Demattè |
|
Global Platform Leader HA |
Date of issue |
31/1/2017 |
Signature
Whirlpool EMEA S.p.A. |
D-TD-2017-001 |
Via Carlo Pisacane n. 1, 20016 Pero (Mi), Italia Cap Soc. €102.759.269,40 i.v.
Registro Imprese/Cod. Fiscale/Partita IVA: 00693740425 - R.E.A.: 1106112
Sole shareholder company subject to direction and coordination of Whirlpool Corporation. www.whirlpoolcorp.com
14
SÉCURITÉ DU SECHE-LINGE
MISE EN GARDE – RISQUE D’INCENDIE/
DE MATÉRIAUX INFLAMMABLES
C’est un symbole supplémentaire d’alerte de sécurité qui des alertes vous au risque d’incendie.
15
POUR VOTRE SECURITE
1.NE PAS UTILISER OU REMISER D’ESSENCE OU AUTRES MATÉRIAUX INFLAMMABLES DANS CET APPAREIL MÉNAGER OU À PROXIMITÉ DE CELUI-CI.
2.NE PAS VAPORISER D’AÉROSOLS À PROXIMITÉ DE CET APPAREIL MÉNAGER LORSQU’IL EST EN FONCTIONNEMENT.
3.NE PAS MODIFIER CET APPAREIL MÉNAGER.
IMPORTANTES INSTRUCTIONS DE SECURITE
AVERTISSEMENT : Afin de réduire le risque d’incendie, de choc électeiue ou de blessures corporellles lors de l’utilisation du sèche-linge, il convient d’observer certaines précautions fondamentales, notamment :
nLire toutes les instructions avant d’utiliser le sèche-linge.
nLaisser un dégagement minimal de 100 mm (4") entre l’arrière du sèche-linge et les éventuelles parois environnantes.
nLe fonctionnement de cet appareil peut affecter celui d’autres appareils dont la source d’approvisionnement en air se fait dans la même pièce pour une combustion sans danger. Lorsqu’on utilise le sèche-linge, une aération adéquate est nécessaire pour renouveler l’air rejeté et ainsi éviter le retour dans la pièce de gaz en provenance d’appareils ménagers utilisant d’autres carburants comme combustible, y compris les feux ouverts. En case de doute, consulter le fabricant de l’appareil.
nNe pas obstruer l’alimentation en air du sèche-linge (voir les instructions d’installation pour les dégagements minimaux).
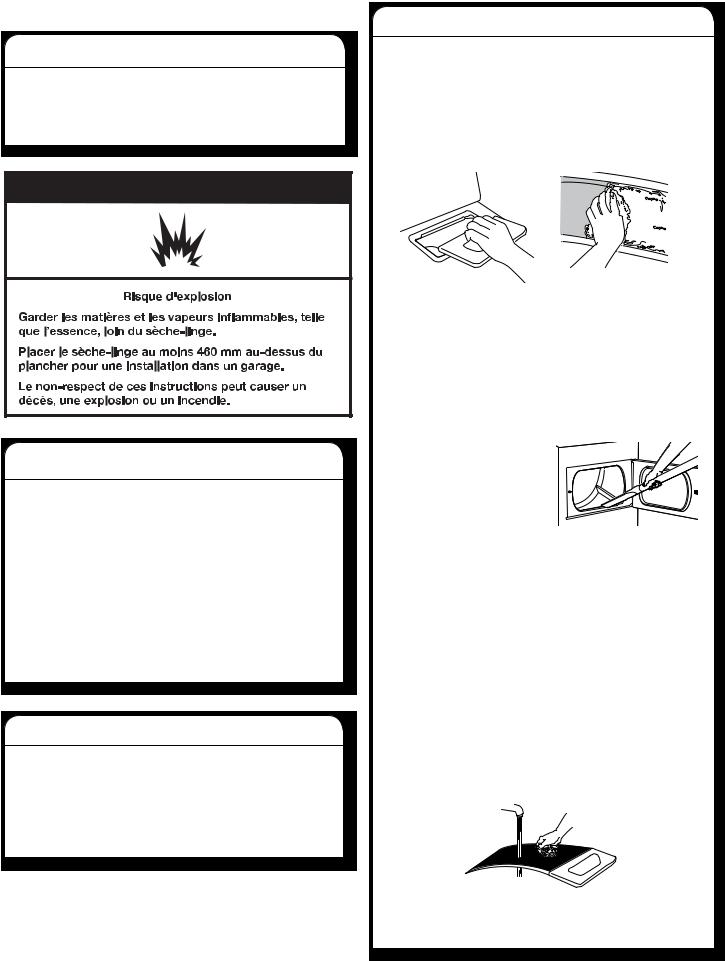
nNe pas placer d’articles tâchés d’huile de cuisson dans le sèche-linge. Des articles ayant été au contact d’huile peuvent d’enflammer spontanément, surtout s’ils sont exposés à des sources de chaleur, telles un sèche-linge. Les articles peuvent chaufer, entraînant une réaction d’oxydation de l’huile. Le phénomène d’oxydation crée de la chaleur. Si la chaleur ne peut pas s’échapper, les articles peuvent devenir suffisamment chauds pour prendre feu. Le fait d’empiler, d’entasser ou d’entreposer des articles ayant été au contact d’huile peut empêcher la chaleur de s’échapper et créer un risque d’incendie.
nSi l’on doit faire sécher dans le sèche-linge des articles ayant été souillés par des substances telles que de l’huile de cuisson, acétone, alcool, pétrole, kérosène, produit détachant, térébenthine, cire, décapant pour cire ou produits de coiffure, ils doivent être lavés à l’eau chaude avec un supplément de détergent avant d’être séchés dans le sèche-linge. Ces articles sont susceptibles de dégager des vapeurs qui pouraient s’enflammer ou exploser. Les laver ainsi au préalable permet de réduire mais non de supprimer ce risque.
nCet appareil ne convient pas à une utilisation par des personnes (y compris des enfants de moins de 8 ans)
àcapacités physiques, sensorielles ou mentales réduites, ou dépourvues d’expérience et de connaissances,
àmoins qu’elles ne soient placées sous supervision
ou qu’elles aient reçu des instructions concernant l’utilisation de l’appareil par une personne responsable de leur sécurité.
nLes enfants qui effectuent le nettoyage et l'entretien doivent être supervisés.
nIl convient de surveiller les enfants pour qu’ils ne jouent pas avec l’appareil.
nLes enfants de moins de 3 ans ne doivent pas se trouver à proximité de l’appareil à moins d’être constamment surveillés.
nNe pas utiliser le sèche-linge si l’on a utilisé des produits chimiques industriels pour le nettoyage.
CONSERVER CES INSTRUCTIONS
16

|
n La zone située autour des ouvertures de prise ou |
|
n Enlever tous les objets des poches tels que briquets, |
||
allumettes, avant de placer les vêtements dans le |
d’évacuation d’air et les zones adjacentes doivent être |
|
sèche-linge. |
exemptes de peluches et poussières. |
|
n Retirer les portes du compartiment de séchage avant |
n L’intérieur du sèche-linge et le conduit d’évacuation |
|
de retirer le sèche-linge pour un entretien ou de le mettre |
doivent être nettoyés régulièrement par un personnel |
|
au rebut. |
d’entretien qualifié. |
|
n Ne pas accéder à l’intérieur du sèche-linge pendant |
n Voir les instructions d’installation pour les instructions |
|
le fonctionnement du tambour. Pour votre sécurité, |
de mise à la terre. |
|
l’appareil est pourvu d’un contacteur de porte. |
n Ne pas faire sécher d’articles non lavés dans ce |
|
|
||
n Ne pas installer au entreposer le sèche-linge dans |
sèche-linge. |
|
un endroit où il serait exposé aux intempéries. |
n La partie finale du programme de séchage par culbutage |
|
|
||
n Ne pas effectuer d’intervention non autorisée sur |
a lieu sans chaleur (programme de refroidissement) pour |
|
les commandes. |
que les articles soient laissés à une température qui ne |
|
n Ne pas utiliser ce sèches-linge s’il semble défectueux. |
risque pas de les endommager. |
|
n Les articles tels que le caoutchouc mousse |
||
n Ne pas procéder à l’entretien, à la réparation ou au |
||
(mousse de latex), les bonnets de douche, les textiles |
||
remplacement de n’importe quelle pièce du sèche-linge, |
||
imperméabilisés, les articles avec endos de caoutchouc |
||
à moins que ceci ne soit spécifiquement recommandé |
||
et les vêtements ou oreillers rembourrés avec |
||
dans le Guide d’utilisation et d’entretien. Seul un |
||
matelassage en mousse doivent être séchés |
||
dépanneur compétent est habilité à effectuer une |
||
uniquement sur une corde à linge. |
||
intervention de réparation ou d’entretien sur cet appareil. |
||
n Si le cordon d’alimentation est endommagé, il doit être |
||
n Ne pas utiliser d’assouplissants pour tissu ou de produits |
||
remplacé par le fabricant, son agent de service ou toute |
||
pour éliminer l’électricité statique à moins que cela ne |
||
autre personne qualifiée afin d’éviter tout danger. |
||
soit recommandé par le fabricant d’assouplissants pour |
||
AVERTISSEMENT : Ne jamais arrêter un sèche- |
||
tissu ou du produit. Suivre leurs instructions. |
||
n Nettoyer le filtre à peluches du sèche-linge avant |
linge en phase de culbutage avant la fin du programme de |
|
ou après chaque charge. Ne pas utiliser le sèche-linge |
séchage à moins de retirer les articles rapidement et de les |
|
si le filtre à peluches n’est pas installé. |
étendre afin de dissiper la chaleur. |
CONSERVER CES INSTRUCTIONS
CARACTERISTIQUES
Ces appareils sont vendus dans diverses régions aux critères de capacité de mesure différents. Vous trouverez ci-dessous quelques unes des formes de mesures valables indiquées sur ce produit :
Capacité linge sec : une mesure de poids de la charge qui reflète la taille volumétrique du tambour du sèche-linge.
Capacité IEC : Mesure de capacité représentant la capacité maximale de linge sec et de textiles pour lesquels le fabricant conseille un programme spécifique de traitement.
IMPORTANT : Cet appareil est conçu pour un usage domestique et des utilisations similaires telles que les suivantes :
nespace cuisine du personnel dans les magasins, bureaux et autres environnements de travail;
nfermes;
npar les clients dans les hôtels, les motels et les autres environnements de type résidentiel;
nenvironnements de type chambres d’hôtes;
nzones communes dans les immeubles d’appartements ou dans des laveries.
|
3LWED4705FW |
|
|
4KWED4605FW |
|
|
3LWED4815FW |
|
|
4KWED4705FW |
|
Modèles |
3DWED4815FW |
3LWED4730FW |
3DWGD4705FW |
4KWED4815FW |
4GWGD4705FW |
3LWED4915FW |
3LWED4830FW |
3DWGD4815FW |
4KWED4915FW |
4GWGD4815FW |
|
Tension nominale |
220–240 V 2N~ |
220–240 V 2N~ |
220–240 V 2N~ |
220–240 V 2N~ |
220–240 V 2N~ |
|
|
|
|
|
|
Fréquence nominale |
50 Hz |
50 Hz |
50 Hz |
60 Hz |
60 Hz |
|
|
|
|
|
|
Courant nominal |
20 Amps |
13 Amps |
6 Amps |
20 Amps |
6 Amps |
|
|
|
|
|
|
Capacité linge sec |
15 kg (33 lb) |
15 kg (33 lb) |
15 kg (33 lb) |
15 kg (33 lb) |
15 kg (33 lb) |
(maximum) |
|
|
|
|
|
Capacité IEC |
7 kg (15 lb) |
7 kg (15 lb) |
7 kg (15 lb) |
7 kg (15 lb) |
7 kg (15 lb) |
|
|
|
|
|
|
Hauteur |
1067 mm (42") |
1067 mm (42") |
1067 mm (42") |
1067 mm (42") |
1067 mm (42") |
|
|
|
|
|
|
Largeur |
737 mm (29") |
737 mm (29") |
737 mm (29") |
737 mm (29") |
737 mm (29") |
|
|
|
|
|
|
Profondeur |
706 mm (2713⁄16") |
706 mm (2713⁄16") |
706 mm (2713⁄16") |
706 mm (2713⁄16") |
706 mm (2713⁄16") |
REMARQUE : Le niveau sonore du sèche-linge est inférieur à 70 dB (A).
17
VÉRIFICATION D’UNE CIRCULATION D’AIR ADÉQUATE POUR LE SYSTÈME D’ÉVACUATION
Circulation d’air adéquate
Un sèche-linge a besoin de chaleur et d’une circulation d’air adéquate pour sécher efficacement le linge. Une ventilation adéquate réduit les durées de séchage et accroît les économies d’énergie. Voir les Instructions d’installation.
Le système d’évacuation fixé au sèche-linge joue un rôle important dans la circulation de l’air.
Les interventions de dépannage causées par une ventilation incorrecte ne sont pas couvertes par la garantie et seront
à la charge du client, quel que soit l’installateur du sèche-linge.
Maintenir une bonne circulation d’air en effectuant les opérations suivantes :
nNettoyer le filtre à charpie avant chaque charge.
nRemplacer le matériau de conduits d’évacuation en plastique ou en aluminium par des conduits d’évacuation lourds et rigides de 102 mm (4") de diamètre.
102 mm 
 4"
4" 
nToujours employer les conduits d’évacuation les plus courts possible.
nNe pas utiliser plus de quatre coudes à 90° dans un circuit d’évacuation car chaque inclinaison et courbe réduit le flux d’air.
Bon  Mieux
Mieux 
nRetirer la charpie et les résidus du clapet d’évacuation.
nRetirer la charpie sur toute la longueur du circuit d’évacuation au moins tous les deux ans. Après le nettoyage, veuillez suivre les instructions d’installation fournies avec le sèche-linge pour une vérification finale de l’appareil.
nDégager tout article qui se trouverait devant le sèche-linge.
UTILISATION DES PROGRAMMES AUTOMATIQUES POUR UN MEILLEUR SOIN DU TISSU ET DAVANTAGE D’ÉCONOMIES D’ÉNERGIE
Utiliser les programmes de séchage automatique pour que le sèche-linge puisse réaliser davantage d’économies d’énergie et apporter un soin supérieur aux tissus. Durant les programmes de séchage automatique, la température de séchage de l’air et le niveau d’humidité sont détectés dans la charge. Cette détection se produit tout au long du programme de séchage
et le sèche-linge s’éteint lorsque la charge atteint le degré de séchage sélectionné. Le programme Energy Preferred entraînera des économies d’énergie optimales.
Avec l’option de séchage minuté, le sèche-linge fonctionne pendant la durée réglée, ce qui peut parfois entraîner le rétrécissement ou le froissement du linge, et l’accumulation d’électricité statique due au séchage excessif. Utiliser le séchage minuté pour une charge encore humide nécessitant un peu de temps supplémentaire ou lorsqu’on utilise la grille de séchage.
18
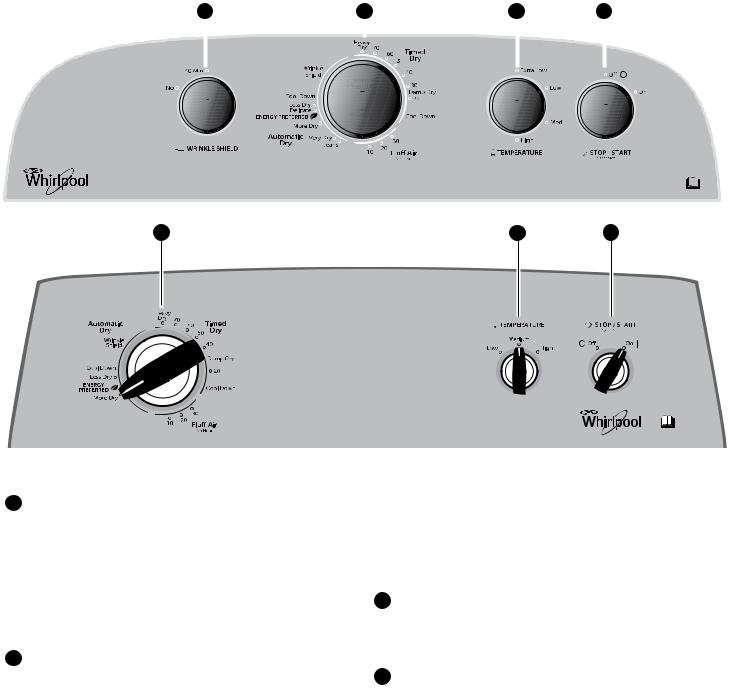
TABLEAU DE COMMANDE ET CARACTÉRISTIQUES
1 |
|
2 |
|
|
|
|
|
3 |
4 |
|
|
|
|
|
|||||||||
|
|
|
|
|
|
|
|
|
|
|
|
|
|
|
|
|
|
|
|
|
|
|
|
|
|
|
|
|
|
|
|
|
|
|
|
|
|
|
|
|
|
|
|
|
|
|
|
|
|
|
|
|
|
|
|
|
|
|
|
|
|
|
|
|
|
|
|
|
|
|
|
|
|
|
|
|
|
|
|
|
|
|
|
|
|
|
|
|
|
|
|
|
|
|
|
|
|
|
|
|
|
|
|
|
|
|
|
|
|
|
|
|
|
|
|
|
|
|
|
|
|
|
|
|
|
|
|
|
|
|
|
|
|
|
|
|
|
|
|
|
|
|
|
|
|
|
|
|
|
|
|
|
|
|
|
|
|
|
|
|
|
|
|
|
|
|
|
|
|
|
|
|
|
|
|
|
|
|
|
|
|
|
|
|
|
|
|
|
|
|
|
|
|
|
|
|
|
|
|
|
|
|
|
|
|
|
|
|
|
|
|
|
|
|
|
|
|
|
|
|
|
|
|
|
|
|
|
|
|
|
|
|
|
|
|
|
|
|
|
|
|
|
|
|
|
|
|
|
|
|
|
|
|
|
|
|
|
|
|
|
|
|
|
|
|
|
|
|
|
|
|
|
|
|
|
|
|
|
|
|
|
|
|
|
|
|
|
|
|
|
|
|
|
|
|
|
|
|
|
|
|
|
|
|
|
|
|
|
|
|
|
2 |
3 |
4 |
Certains programmes et options ne sont pas disponibles sur certains modèles.
L’apparence des appareils peut varier.
1CARACTÉRISTIQUE WRINKLE SHIELD (sur certains modèles)
Lorsqu’on ne peut pas enlever une charge du sèche-linge dès qu’elle s’arrête, des faux plis peuvent se former.
La caractéristique Wrinkle Shield effectue un culbutage de la charge, la réagence et l’aère à intervalles réguliers pour aider à éviter la formation de faux plis.
n Obtenez 40 minutes de culbutage périodique sans chaleur à la fin d’un programme. Appuyer sur
le bouton Wrinkle Shield pour activer ou désactiver cette fonction à tout moment avant la fin d’un programme.
2BOUTON DE PROGRAMME DU SÈCHE-LINGE
Utiliser le bouton de programme de séchage pour sélectionner les programmes disponibles sur le sèchelinge. Tourner le bouton de programme pour sélectionner un programme correspondant à la charge de linge.
Voir “Guide de programmes” pour des descriptions de programmes détaillées.
TIMED DRY (séchage minuté)
Ceci fait fonctionner le sèche-linge pour la durée approximative sur le module de commande. Pour les modèles dotés d’un bouton de sélection de température, vous pouvez choisir un réglage en fonction des tissus de votre charge. Le temps de séchage et la température dépendront du modèle de votre sèche-linge.
AUTOMATIC DRY (séchage automatique)
Détecte l’humidité de la charge et la température de l’air et s’éteint lorsque la charge a atteint le degré de séchage sélectionné. Permet d’obtenir le meilleur rendement de séchage en un minimum de temps. Le temps de séchage variera en fonction du type de tissu, du volume de la
charge et du réglage de séchage.
3TEMPERATURE (température)
Choisir une température de séchage en fonction des tissus de votre charge. Si vous hésitez sur la température à sélectionner pour une charge donnée, choisir le réglage plus bas plutôt que le réglage plus élevé.
4STOP/START (arrêt/mettre en marche)
Le signal de fin de programme émet un signal sonore qui indique la fin du programme de séchage. Le fait de sortir rapidement les vêtements à la fin du programme permet de réduire le froissement.
Tourner le bouton Stop/Start (arrêt/mettre en marche) pour activer ou désactiver le réglage désiré. Appuyer sur le bouton Stop/Start (arrêt/mettre en marche) pour mettre le sèche-linge en marche.
REMARQUE : Lorsque le réglage Wrinkle Shield est sélectionné et que le signal de programme est activé, un signal sonore retentit toutes les 5 minutes jusqu’à ce que les vêtements soient retirés ou que le réglage Wrinkle Shield se termine.
19
GUIDE DE PROGRAMMES – PROGRAMMES AUTOMATIQUES
Certains programmes ne sont pas disponibles sur certains modèles.
Sélectionner Energy Preferred (éconergique) pour des économies d’énergie optimales.
|
|
Température |
Options |
|
|
Articles à sécher : |
Programme : |
de séchage : |
disponibles : |
Détails du programme : |
|
|
|
|
|
|
|
Jeans, vêtements de |
Jeans, |
High |
Wrinkle Shield |
Permet d’obtenir le meilleur rendement |
|
travail lourds, serviettes |
More Dry |
(élevé) |
Temperature |
de séchage en un minimum de temps. |
|
|
ou Very Dry |
|
Le temps de séchage variera en fonction |
||
|
|
Cycle Signal |
|||
|
|
|
du type de tissu, du volume de la charge |
||
|
|
|
|
||
|
|
|
|
et du réglage de séchage. |
|
Vêtements de travail, |
Energy |
Medium |
Wrinkle Shield |
||
Choisir une température de séchage en |
|||||
articles moyennement |
Preferred |
(moyen) |
Temperature |
||
lourds, draps |
|
|
fonction des tissus de votre charge. Si vous |
||
|
|
Cycle Signal |
|||
|
|
|
hésitez sur la température à sélectionner |
||
Tout-aller, chemisiers, |
Delicate |
Low |
Wrinkle Shield |
pour une charge donnée, choisir le réglage |
|
le plus bas plutôt que le réglage le plus |
|||||
pantalons, articles |
ou Less Dry |
(bas) |
Temperature |
||
élevé. |
|||||
légers, synthétiques, |
|
|
|||
|
|
Cycle Signal |
|||
|
|
|
|||
tissus délicats, |
|
|
|
||
|
|
|
|
||
vêtements de sport |
|
|
|
|
|
|
|
|
|
|
REMARQUE : Si les charges ne semblent pas aussi sèches que désiré, sélectionner More Dry (plus sec) ou Very Dry (très sec) la prochaine fois que l’on sèche une charge semblable. Si les charges semblent plus sèches que désiré, sélectionner Less Dry (moins sec) la prochaine fois que l’on sèche une charge semblable.
GUIDE DE PROGRAMMES – SECHE-LINGE MINUTÉ
Certains programmes ne sont pas disponibles sur certains modèles.
TIMED DRY (séchage minuté) – Fait fonctionner le sèche-linge pour la durée approximative sur le module de commande.
|
|
Température |
Options |
|
Articles à sécher : |
Programme : |
de séchage : |
disponibles : |
Détails du programme : |
|
|
|
|
|
Articles lourds ou |
Heavy Dry |
N’importe |
Temperature |
Sélectionner High (Élevé) pour sécher |
volumineux tels que |
|
laquelle |
|
des charges importantes ou lourdes. |
serviettes épaisses |
|
|
|
|
ou peignoirs |
|
|
|
|
|
|
|
|
|
N’importe quelle charge |
Damp Dry |
N’importe |
Temperature |
Sèche les articles à un degré d’humidité |
|
|
laquelle |
|
ou les articles qui ne nécessitent pas |
|
|
|
|
un programme de séchage complet. |
Caoutchouc, plastique, |
Fluff Air |
No Heat |
Temperature |
Séchage sans chaleur. |
tissus sensibles à la |
|
(sans chaleur) |
|
|
chaleur |
|
|
|
|
|
|
|
|
|
Programme :
More Dry (plus sec) Very Dry (très sec)
Energy Preferred (éconergique) Delicate (articles délicats) Less Dry (moins sec)
Heavy Dry (séchage intense) Damp Dry (séchage humide) Fluff Air (duvetage à l’air)
Options disponibles :
Temperature (température) Wrinkle Shield (antifroissement)
Cycle Signal (signal de programme)
Réglage de la température de séchage
Si le sèche-linge comporte plusieurs réglages de chaleur :
On peut utiliser un réglage de chaleur High (élevée) pour sécher les articles lourds tels que les serviettes et les vêtements de travail.
Un réglage de chaleur Low (bas) à Medium (moyen) peut être utilisé pour sécher les articles moyennement lourds tels que draps, chemisiers, robes, sous-vêtements, tissus à pressage permanent et certains tricots.
Utiliser le réglage No Heat (sans chaleur) pour la mousse,
le caoutchouc, le plastique ou les tissus sensibles à la chaleur.
Sécher sur une corde à linge les tissus doublés ou multicouches.
REMARQUE : Pour toute question concernant
les températures de séchage pour diverses charges, consulter les instructions sur l’étiquette de soin.
20
UTILISATION DU SÈCHE-LINGE
AVERTISSEMENT : Pour réduire le risque d’incendie, de choc électrique ou de blessures à autrui, lire les IMPORTANTES INSTRUCTIONS DE SÉCURITÉ avant de faire fonctionner
ce sèche-linge.
Avant d’utiliser le sèche-linge, essuyer le tambour du sèche-linge avec un linge humide pour enlever la poussière accumulée au cours de l’entreposage et de l’expédition.
1. Nettoyer le filtre à charpie
Nettoyer le filtre à charpie avant chaque charge. Enlever le filtre à charpie en le tirant tout droit vers le haut. Enlever la charpie du filtre en la roulant avec les doigts. Ne pas rincer ni laver
le filtre pour enlever la charpie. Remettre le filtre à charpie fermement en place.
Pour plus d’informations sur le nettoyage, voir “Entretien du sèche-linge”.
2. Charger le sèche-linge
Placer le linge dans le sèche-linge. Fermer la porte.
REMARQUE : La porte de votre modèle peut différer de celle figurant sur l’illustration. Certains modèles peuvent comporter des portes à ouverture vers le bas.
Ne pas surcharger le sèche-linge; les vêtements doivent pouvoir culbuter librement.
21
3. Sélectionner le programme désiré |
|
4. Sélectionner les réglages |
||||||||||||||||||
|
|
|
|
|
|
|
|
|
|
|
|
|
et options du programme |
|||||||
|
|
|
|
|
|
|
|
|
|
|
|
|||||||||
|
|
|
|
|
|
|
|
|
|
|
|
|
|
|
|
|
|
|
|
|
|
|
|
|
|
|
|
|
|
|
|
|
|
|
|
|
|
|
|
|
|
|
|
|
|
|
|
|
|
|
|
|
|
|
|
|
|
|
|
|
|
|
|
|
|
|
|
|
|
|
|
|
|
|
|
|
|
|
|
|
|
|
|
|
|
|
|
|
|
|
|
|
|
|
|
|
|
|
|
|
|
|
|
|
|
|
|
|
|
|
|
|
|
|
|
|
|
|
|
|
|
|
|
|
|
|
|
|
|
|
|
|
|
|
|
|
|
|
|
|
|
|
|
|
|
|
|
|
|
|
|
|
|
|
|
|
|
|
|
|
|
|
|
|
|
|
|
|
|
|
|
|
|
|
|
|
|
|
|
|
|
|
|
|
|
|
|
|
|
|
|
|
|
|
|
|
|
|
|
|
|
|
|
|
|
|
|
|
|
|
|
|
|
|
|
|
|
|
|
|
|
|
|
|
|
|
|
|
|
|
|
|
|
|
|
|
|
|
|
|
|
|
|
|
|
|
|
|
|
|
|
|
|
|
|
|
|
|
|
|
|
|
|
|
|
|
|
|
|
|
|
|
|
|
|
|
|
|
|
|
|
|
|
|
|
|
|
|
|
|
|
|
|
|
|
|
|
|
|
|
|
|
|
|
|
|
|
|
|
|
|
|
|
|
|
|
|
|
|
|
|
|
|
|
|
|
|
|
|
|
|
|
|
|
|
Sélectionner le programme souhaité pour la charge. Voir le “Guide de programmes” pour plus d’informations sur chaque programme.
Programmes de SÉCHAGE AUTOMATIQUE
Selon votre charge, vous pouvez sélectionner un degré de séchage différent en tournant le bouton sur le degré de séchage.
Lorsqu’on sélectionne More Dry or Very Dry (plus sec ou très sec), Energy Preferred (éconergique), ou Less Dry (moins sec), le degré de séchage qui commandera l’arrêt du sèche-linge est automatiquement ajusté. Après avoir sélectionné un certain degré de séchage, il est impossible de le modifier sans arrêter le programme.
Les programmes de séchage automatique offrent un séchage idéal en un minimum de temps. La durée de séchage varie en fonction du type de tissu, de la taille de la charge et du réglage de niveau de séchage.
REMARQUE : Le séchage More Dry or Very Dry (plus sec ou très sec) élimine davantage d’humidité dans la charge. Sélectionner Energy Preferred pour réaliser des économies
d’énergie optimales. Le séchage Less Dry (moins sec) élimine moins d’humidité et est utilisé pour les charges que l’on souhaite placer sur un cintre pour qu’elles finissent
de sécher.
Sélectionner les réglages et options du programme en tournant le bouton sur la position souhaitée.
REMARQUE : Tous les réglages et options ne sont pas disponibles avec tous les programmes.
Temperature (température)
Tourner le bouton Temperature (température) pour modifier le réglage de la température de séchage. Voir “Réglage de la température de séchage”.
Caractéristique Wrinkle Shield (antifroissement) (sur certains modèles)
Le programme ajoute automatiquement 40 minutes
de culbutage périodique sans chaleur à la fin d’un programme. Tourner le bouton Wrinkle Shield pour désactiver cette fonction à tout moment avant la fin d’un programme.
5. Appuyer sur le bouton STOP/ START (arrêt/mettre en marche) pour démarrer un programme
Appuyer sans relâcher sur le bouton Stop/Start (arrêt/mettre en marche) pour démarrer le programme.
Pour finir le cycle plus tôt, mettre le bouton Stop/Start (arrêt/mettre en marche) sur OFF.
Retirer rapidement les vêtements une fois le programme terminé pour réduire le froissement. Utiliser la caractéristique Wrinkle Shield pour éviter le froissement lorsqu’on ne peut pas retirer une charge du sèche-linge dès que celle-ci s’arrête.
22
ENTRETIEN DU SÈCHE-LINGE
Nettoyer l’emplacement du sèche-linge
Éviter de laisser autour du sèche-linge des éléments qui pourraient obstruer la circulation de l’air et empêcher le bon fonctionnement du sèche-linge. Ceci implique de dégager également les éventuelles piles de linge placées devant le sèche-linge.
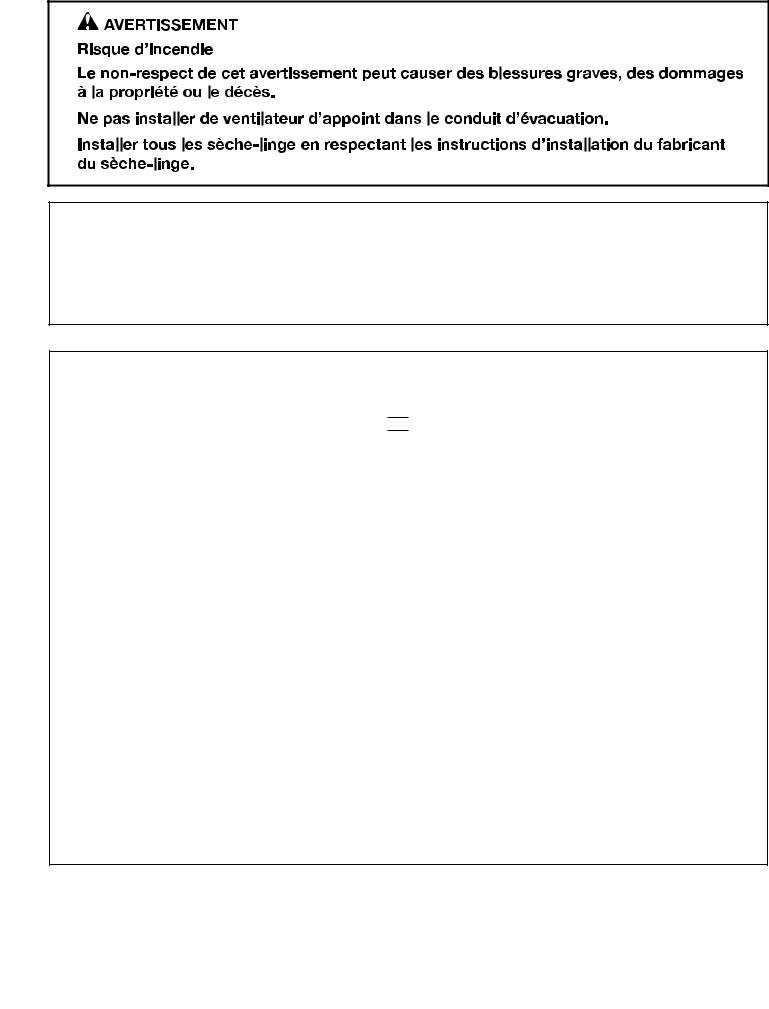
 AVERTISSEMENT
Nettoyage de l’intérieur du seche-linge
Nettoyage du tambour du sèche-linge
1.Appliquer un nettoyant domestique liquide et ininflammable sur la surface tachée du tambour
et frotter avec un linge doux jusqu’à ce que la tache soit supprimée.
2.Essuyer complètement le tambour avec un linge humide.
3.Faire culbuter une charge de linge ou de serviettes propres pour sécher le tambour.
REMARQUE : Les vêtements contenant des teintures instables, tels que jeans en denim ou articles en coton de couleur vive, peuvent décolorer l’intérieur du sèche-linge. Ces taches ne sont pas nocives pour votre sèche-linge et ne tacheront pas les vêtements des charges futures. Sécher ces articles sur l’envers pour éviter de tacher le tambour.
Retirer la charpie accumulée
De l’intérieur de la caisse du sèche-linge
Retirer la charpie tous les deux ans, ou plus souvent, selon l’utilisation du sèche-linge. Le nettoyage doit être effectué par un personnel d’entretien qualifié.
Dans le conduit d’évacuation
Retirer la charpie tous les deux ans, ou plus souvent, selon l’utilisation du sèche-linge.
Nettoyer le filtre à charpie
Nettoyage avant chaque charge
Le filtre à charpie se trouve dans l’ouverture de la porte du sèche-linge. Un filtre obstrué de charpie peut augmenter la durée de séchage.
Nettoyage :
1.Enlever le filtre à charpie en le tirant tout droit vers le haut. Enlever la charpie du filtre en la roulant avec les doigts. Ne pas rincer ni laver le filtre pour enlever la charpie. La charpie mouillée s’enlève difficilement.
2. Remettre le filtre à charpie fermement en place.
IMPORTANT :
nNe pas faire fonctionner le sèche-linge avec un filtre
à charpie déplacé, endommagé, bloqué ou manquant. Ceci peut entraîner une surchauffe et endommager
le sèche-linge et les tissus.
nSi de la charpie tombe dans le sèche-linge
au moment du retrait du filtre, vérifier le conduit d’évacuation et retirer la charpie. Voir “Exigences concernant l’évacuation” dans les Instructions d’installation.
n Nettoyer l’espace où se trouve le filtre à charpie,
selon les besoins. A l’aide d’un aspirateur, enlever
doucement toute la charpie qui s’est accumulée à
l’extérieur du filtre à charpie.
Nettoyage au besoin
Des résidus de détergent ou d’assouplisseur de tissu peuvent s’accumuler sur le filtre à charpie. Cette accumulation peut entraîner des temps de séchage plus longs, ou entraîner l’arrêt du sèche-linge avant que la charge ne soit complètement sèche. Si de la
charpie tombe du filtre alors qu’il est dans le sèche-linge, il est probablement obstrué.
Nettoyer le filtre à charpie avec une brosse de nylon tous les six mois ou plus fréquemment s’il se bouche en raison d’une accumulation de résidus.
Nettoyage :
1.Enlever la charpie du filtre en la roulant avec les doigts.
2.Mouiller les deux côtés du filtre à charpie avec de l’eau chaude.
3.Mouiller une brosse en nylon avec de l’eau chaude et du détergent liquide. Frotter le filtre avec la brosse pour enlever l’accumulation de résidus.
4.Rincer le filtre à l’eau chaude.
5.Bien sécher le filtre à charpie avec une serviette propre. Réinstaller le filtre dans le sèche-linge.
23
 Loading...