


3XWED5705
®
ELECTRIC AND GAS
DRYER
Use & Care Guide
SECADORA A GAS
Y ELÉCTRICA
Manual de uso y cuidado
SECHE-LINGE
ELECTRIQUE ET A GAZ
W10131580A
Guide d’utilisation et d’entretien
Table of Contents/Índice/Table des matières ....... 2
Models/Modelos/Modèles
3XWED5705, 3XWGD5705,
3XLER5437, 3XLGR5437

TABLE OF CONTENTS
DRYER SAFETY...........................................................................................3
DRYER DISPOSAL ...................................................................................... 5
PARTS AND FEATURES .............................................................................6
CHECKING YOUR VENT.............................................................................7
DRYER USE ................................................................................................. 7
Starting Your Dryer ..................................................................................7
Stopping and Restarting........................................................................... 8
Drying, Cycle and Temperature Tips........................................................ 8
Dryer Symbols ..........................................................................................8
Cycle Descriptions....................................................................................8
Additional Features...................................................................................9
Drying Rack (optional)...............................................................................9
ÍNDICE
SEGURIDAD DE LA SECADORA .............................................................13
ELIMINACIÓN DE LA SECADORA ..........................................................15
PIEZAS Y CARACTERÍSTICAS ................................................................16
REVISIÓN DE SU VENTILACIÓN .............................................................17
USO DE LA SECADORA ...........................................................................18
Puesta en marcha de su secadora.........................................................18
Para detener y volver a poner en marcha .............................................. 18
Consejos de secado, ciclos y temperatura............................................18
Símbolos de la secadora ........................................................................19
Descripción de los ciclos........................................................................19
Características adicionales.....................................................................20
Estante de secado (opcional) .................................................................20
DRYER CARE ............................................................................................ 10
Cleaning the Dryer Location................................................................... 10
Cleaning the Lint Screen ........................................................................10
Cleaning the Dryer Interior...................................................................... 10
Removing Accumulated Lint .................................................................. 10
Regular Servicing.................................................................................... 11
Vacation and Moving Care .....................................................................11
TROUBLESHOOTING ............................................................................... 11
ASSISTANCE OR SERVICE...................................................................... 12
CUIDADO DE LA SECADORA.................................................................. 21
Limpieza del lugar donde está la secadora ........................................... 21
Limpieza del filtro de pelusa...................................................................21
Limpieza del interior de la secadora ...................................................... 21
Eliminación de pelusa acumulada..........................................................21
Mantenimiento habitual .......................................................................... 22
Cuidado para las vacaciones y la mudanza .......................................... 22
SOLUCIÓN DE PROBLEMAS................................................................... 22
AYUDA O SERVICIO TÉCNICO................................................................ 23
TABLE DES MATIERES
SECURITE DU SECHE-LINGE .................................................................24
MISE AU REBUT DU SECHE-LINGE .......................................................26
PIECES ET CARACTERISTIQUES ...........................................................27
VERIFICATION DU CONDUIT D’EVACUATION......................................28
UTILISATION DU SECHE-LINGE.............................................................29
Mise en marche du sèche-linge .............................................................29
Arrêt et remise en marche ......................................................................30
Conseils pour séchage, programmes
et température.........................................................................................30
Symboles du sèche-linge ....................................................................... 30
Descriptions des programmes ...............................................................30
Caractéristiques supplémentaires.......................................................... 31
Grille de séchage (option).......................................................................32
ENTRETIEN DU SECHE-LINGE ...............................................................32
Nettoyage de l'emplacement du sèche-linge ........................................ 32
Nettoyage du filtre à peluches................................................................ 32
Nettoyage de l’intérieur du sèche-linge ................................................. 33
Retrait des peluches accumulées ..........................................................33
Service régulier ....................................................................................... 33
Précautions à prendre pour les vacances et avant un déménagement 33
DEPANNAGE ............................................................................................. 34
ASSISTANCE OU SERVICE...................................................................... 35
2
DRYER SAFETY
Your safety and the safety of others are very important.
We have provided many important safety messages in this manual and on your appliance. Always read and obey all safety
messages.
This is the safety alert symbol.
This symbol alerts you to potential hazards that can kill or hurt you and others.
All safety messages will follow the safety alert symbol and either the word “DANGER” or “WARNING.”
These words mean:
You can be killed or seriously injured if you don't immediately
DANGER
WARNING
All safety messages will tell you what the potential hazard is, tell you how to reduce the chance of injury, and tell you what can
happen if the instructions are not followed.
WARNING: For your safety, the information in this manual must be followed to minimize
the risk of fire or explosion, or to prevent property damage, personal injury, or death.
follow instructions.
can be killed or seriously injured if you don't
You
instructions.
follow
– Do not store or use petrol or other flammable vapors and liquids in the vicinity of this
or any other appliance.
– WHAT TO DO IF YOU SMELL GAS:
Do not try to light any appliance.
•
Do not touch any electrical switch; do not use any phone in your building.
•
Clear the room, building, or area of all occupants.
•
Immediately call your gas supplier from a neighbor's phone. Follow the gas supplier's
•
instructions.
If you cannot reach your gas supplier, call the fire department.
•
– Installation, service, or conversions for use on other gas supplies must be performed by
a qualified installer, service agency, or the gas supplier.
3

IMPORTANT SAFETY INSTRUCTIONS
To reduce the risk of fire, electric shock, or injury to persons when using the dryer, follow basic
WARNING:
precautions, including the following:
■
■
Read all instructions before using the dryer.
■
Gas dryers should only be installed in a room if the room
meets the appropriate ventilation requirements specified in
the national installation regulations. Make sure the room
containing the dryer has an adequate air supply for gas
combustion and/or drying operation. A window or equivalent
means of ventilation must be opened in the room when the
dryer is in use (an equivalent form of opening includes an
adjustable louvre, hinged panel, or
other means of ventilation that opens directly to outside air).
■
Keep a minimum clearance of 10 cm (4 in.) between the rear
of the dryer and any wall.
■
The operation of this appliance may affect the operation of
other types of gas appliances which take their air supply for
safe combustion from the same room. There has to be
adequate ventilation to replace exhausted air and thus avoid
the back-flow of gases into the room from appliances
burning other fuels, including open fires, when operating the
tumble dryer. If in doubt, consult the appliance
manufacturers.
■
Do not obstruct the air supply to the dryer (see Installation
Instructions for minimum clearances).
■
Do not place items exposed to cooking oils in your dryer. Oilaffected items can ignite spontaneously, especially when
exposed to heat sources such as in a tumble dryer. The
items become warm causing an oxidation reaction in the oil.
Oxidation creates heat. If the heat cannot escape, the items
can become hot enough to catch fire. Piling, stacking or
storing oil-affected items can prevent heat from escaping
and so create a fire hazard.
■
If it is unavoidable to dry in the dryer items that have been
soiled with substances such as cooking oil, acetone, alcohol,
petrol, kerosene, spot removers, turpentine, waxes and wax
removers, or that have been contaminated by hair care
products, should be washed in hot water with an extra
amount of detergent before being dried in the dryer. These
items may give off vapours that could ignite or explode. Such
washing will reduce, but not eliminate, the hazard.
■
This appliance is not intended for use by persons (including
children) with reduced physical, sensory or mental
capabilities, or lack of experience and knowledge, unless
they have been given supervision or instructions concerning
use of the appliance by persons responsible for their safety.
■
Children should be supervised to ensure that they do not
play with the appliance.
The dryer should not be used if industrial chemicals have
been used for cleaning.
■
Before the dryer is removed from service or discarded,
remove the doors to the drying compartment.
■
Do not reach into the dryer if the drum is moving. A door
switch is fitted for your safety.
■
Do not install or store the dryer where it will be exposed
to the weather.
■
Do not tamper with controls.
■
Do not continue to use this appliance if it appears to be
faulty.
■
Do not repair or replace any part of the dryer or attempt
any maintenance unless specifically recommended in this
Use and Care Guide. Repairs and servicing should only
be carried out by competent service personnel.
■
Do not use fabric softeners or products to eliminate static
unless recommended by the manufacturer of the fabric
softener or product. Follow their instructions.
■
Clean dryer lint screen before or after each load. Do not
operate dryer without lint screen in place.
■
Keep area around the exhaust and inlet openings and
adjacent surrounding areas free from the accumulation of
lint, dust, and dirt.
■
The interior of the dryer and exhaust vent should be
cleaned periodically by qualified service personnel.
■
See Installation Instructions for earthing instructions.
■
If the supply cord is damaged, it must be replaced by the
manufacturer or its service agent or a similarly qualified
person in order to avoid hazard.
■
Do not use an extension cord or a portable outlet device
with this dryer.
■
Do not dry unwashed items in this dryer.
■
Items such as foam rubber (latex foam), shower caps,
waterproof textiles, rubber backed articles and clothes or
pillows fitted with foam rubber pads should only be dried
using the Air Dry (no heat) Cycle.
■
The final part of a tumble dryer cycle occurs without heat
(cool down cycle) to ensure that the items are left at a
temperature that ensures the items will not be damaged.
WARNING:
Never stop a tumble dryer cycle before the
end of the drying cycle unless all items are quickly removed
and spread out so that the heat is dissipated.
SAVE THESE INSTRUCTIONS
4
DRYER DISPOSAL
This appliance is marked according to the European directive 2002/ 96/ EC on Waste Electrical and Electronic Equipment
(WEEE).
By ensuring this product is disposed of correctly, you will help avoid potential negative consequences for the environment and
human health, which could otherwise be caused by inappropriate waste handling of this product.
The symbol on the product, or on the documents accompanying the product, indicates that this appliance may not be treated as
household waste. Instead it shall be handed over to the applicable collection point for the recycling of electrical and electronic
equipment.
Disposal must be carried out in accordance with local environmental regulations for waste disposal.
For more detailed information about treatment, recovery and recycling of this product, please contact your local city office, your
household waste disposal service or the shop where you purchased the product.
5
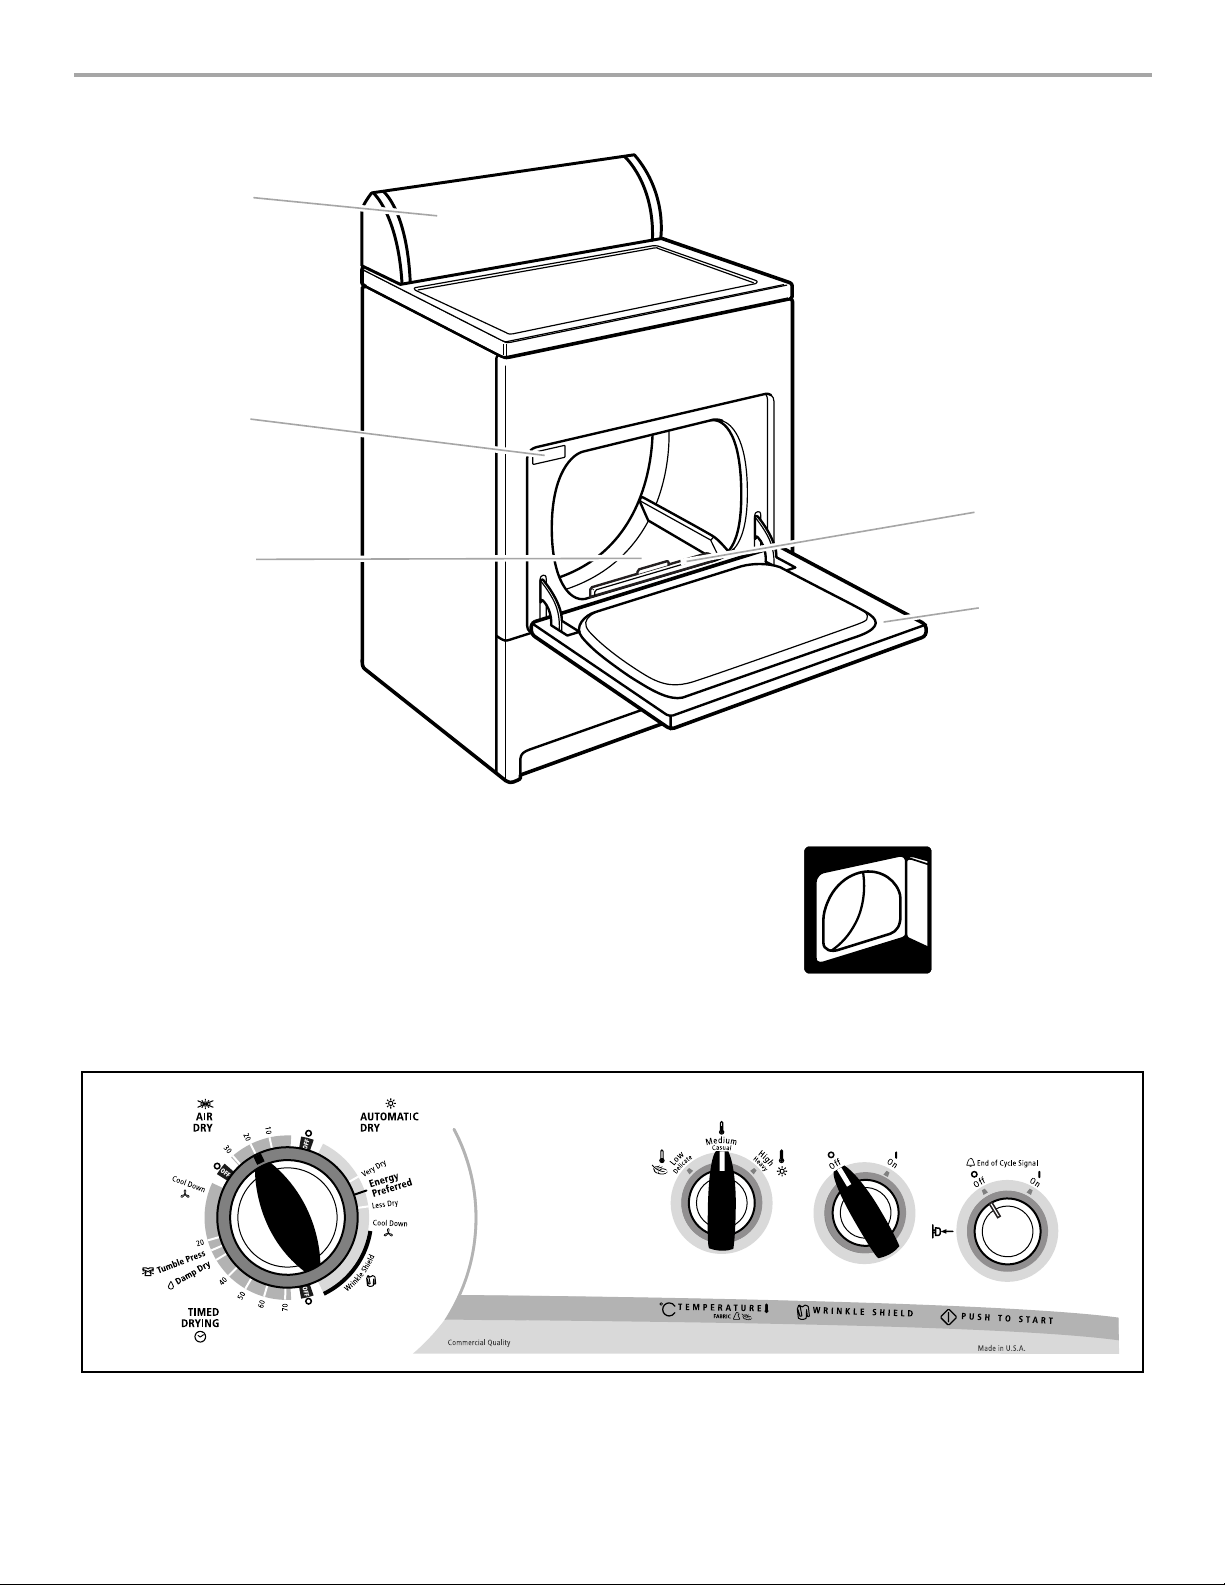
PARTS AND FEATURES
E
A
B
D
C
A. Control panel
B. Model and serial number label
C. Dryer drum
D. Lint screen
E. Wide-opening door
Control Panel
Additional features your dryer may have
End of Cycle Signal selector
Wrinkle Shield selector
Automatic Dry sensor
Super wide-swing door
6
CHECKING YOUR VENT
Your dryer must be properly installed and vented to achieve
maximum drying efficiency and shorten drying times. Use the
minimum recommended installation clearances found in the
Installation Instructions. Refer to the Installation Instructions for
more information.
WARNING
Fire Hazard
Use a heavy metal vent.
Do not use a plastic vent.
Do not use a metal foil vent.
Failure to follow these instructions can result in death
or fire.
DRYER USE
Starting Your Dryer
WARNING
Explosion Hazard
Keep flammable materials and vapors, such as petrol,
away from dryer.
Do not dry anything that has ever had anything
flammable on it (even after washing).
Failure to follow these instructions can result in death,
explosion, or fire.
If the dryer is not properly installed and vented, it will not be
covered under the warranty. Proper venting of your dryer is
important for satisfactory drying results. See the Installation
Instructions for more detail.
NOTE: Service calls caused by improper venting will be paid for
by the customer, whether it was a paid installation or selfinstalled.
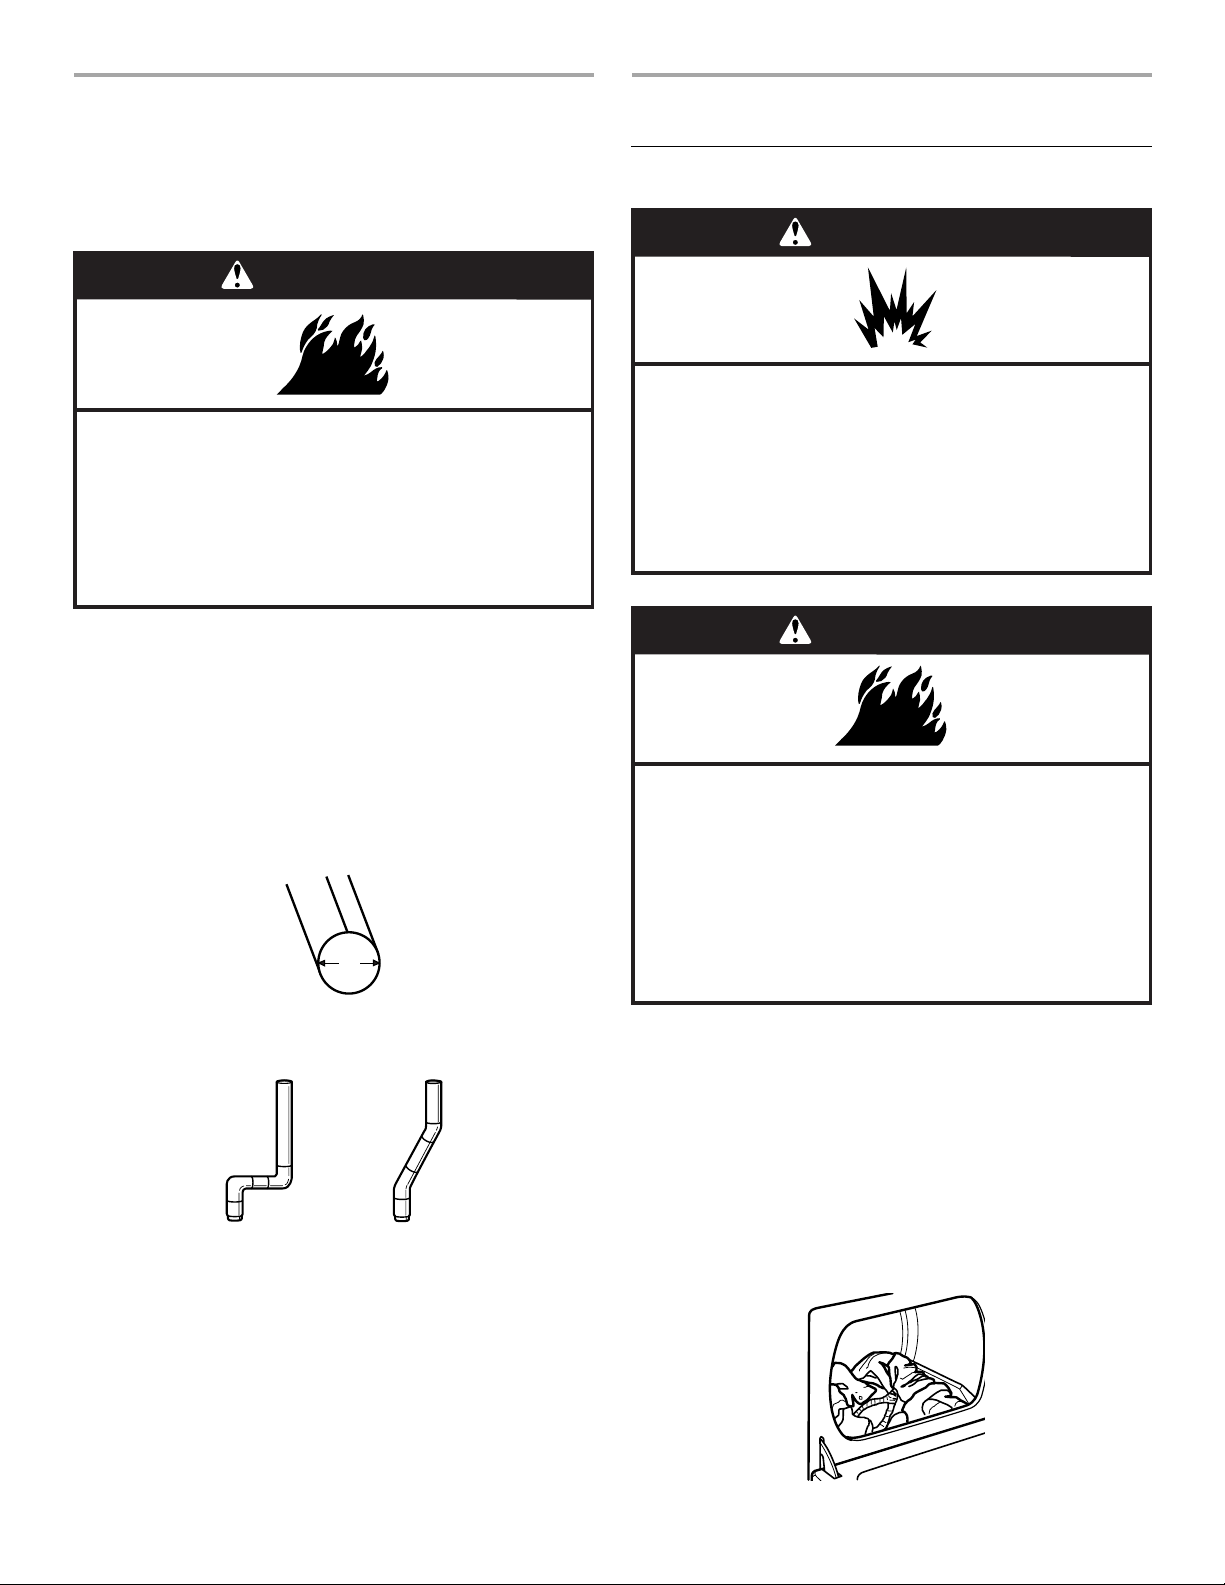
1. Do not use plastic vent or metal foil vent. Use 10.2 cm (4")
metal or flexible metal vent. Do not kink or crush flexible metal
vent. It must be completely extended to allow adequate
exhaust air to flow. Check vent after installation. Refer to the
Installation Instructions for proper length requirements of vent.
10.2 cm
(4")
2. Use a 10.2 cm (4") exhaust hood.
3. Use the straightest path possible when routing the vent.
Good Better
4. Use clamps to seal all joints. Do not use duct tape, screws or
other fastening devices that extend into the interior of the vent
to secure vent.
5. Clean exhaust vent periodically, depending on use, but at
least every 2 years, or when installing your dryer in a new
location. When cleaning is complete, be sure to follow the
Installation Instructions supplied with your dryer for final
product check.
WARNING
Fire Hazard
No washer can completely remove oil.
Do not dry anything that has ever had any type of oil on
it (including cooking oils).
Items containing foam, rubber, or plastic must be dried
on a clothesline.
Failure to follow these instructions can result in death
or fire.
WARNING: To reduce the risk of fire, electric shock, or injury to
persons, read the IMPORTANT SAFETY INSTRUCTIONS before
operating this appliance.
This booklet covers several different models. Your dryer may not
have all of the cycles and features described.
Before using your dryer, wipe the dryer drum with a damp cloth to
remove dust from storing and shipping.
1. Clean lint screen before each load. See “Cleaning the Lint
Screen.”
2. Load clothes loosely into the dryer and close the door. Do not
pack the dryer. Allow space for clothes to tumble freely.
Maximum clothing load (cotton fabrics) is 9.0 kg (19.8 lbs).
7
3. Turn the Cycle Control knob to the recommended cycle for the
type of load being dried. See “Drying, Cycle and Temperature
Tips.”
4. Select a temperature setting on models with a Temperature
selector. The cycle descriptions include temperature setting
suggestions.
NOTE: The temperature selector is part of the Cycle Control
knob on some models.
5. Select the End of Cycle Signal, if available. The signal is
helpful when drying permanent press or synthetics. Promptly
remove these items from the dryer at the end of the cycle to
help avoid wrinkles.
6. Press PUSH TO START. Your gas dryer has an electronic
ignition system for the burner which is fully automatic; no
action is needed by the user (there is no pilot light).
NOTE: Your dryer stops automatically when a cycle ends.
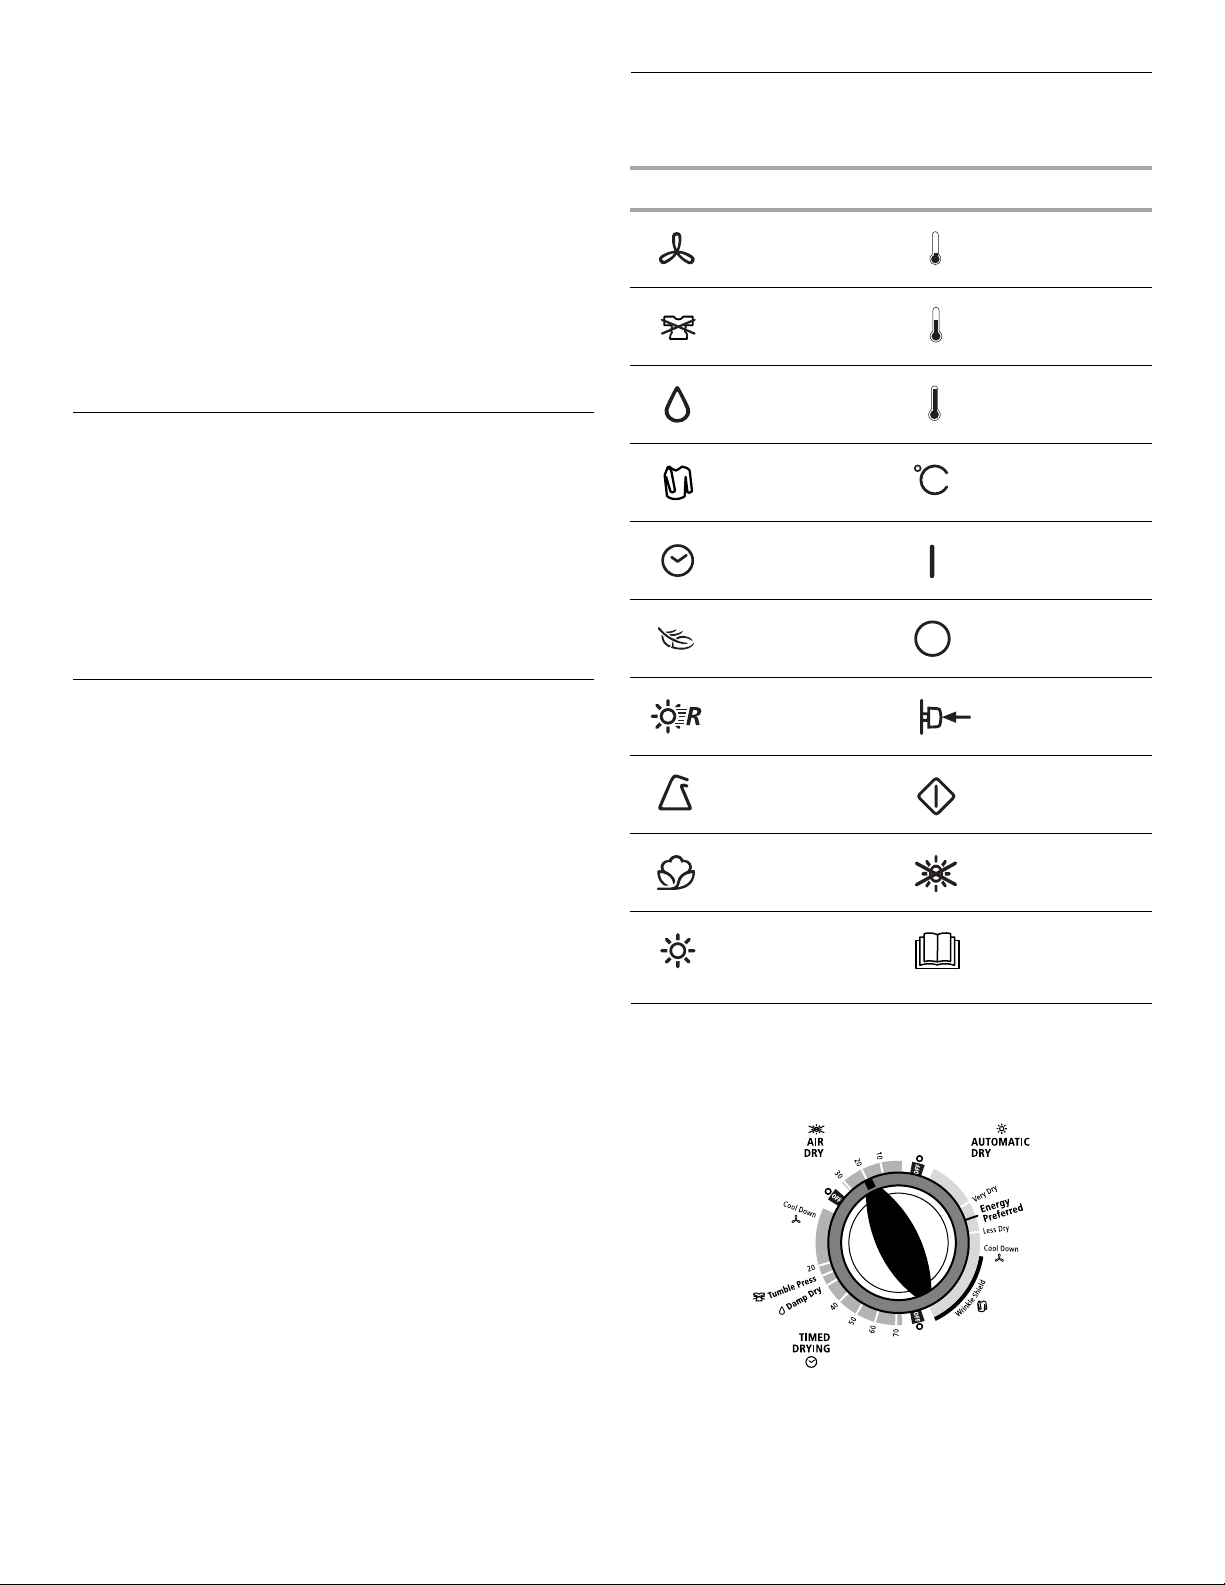
Dryer Symbols
The control panel of your dryer contains symbols. Refer to the
chart below for a definition of those symbols.
Symbols Symbols
Cool Down Low/Knits
TUMBLE PRESS
Cycle
Damp Dry High/Heavy
Medium/
Permanent Press
Stopping and Restarting
You can stop your dryer anytime during a cycle.
To stop your dryer
Open the dryer door or turn the Cycle Control knob to OFF.
NOTE: The Cycle Control knob should point to an Off area when
the dryer is not in use.
To restart your dryer
1. Close the door.
2. Select a new cycle and temperature (if desired).
3. Press the Start button.
Drying, Cycle and Temperature Tips
Select the correct cycle and temperature for your load.
Cool Down tumbles the load without heat during the last few
minutes of all cycles to make the load easier to handle.
Drying tips
■ Follow care label directions when they are available.
■ If desired, add a fabric softener sheet. Follow package
instructions.
■ Remove the load from the dryer as soon as tumbling stops, to
reduce wrinkling. This is especially important for permanent
press, knits and synthetic fabrics.
Cycle and temperature tips
■ Use a High heat setting for drying heavyweight items such as
towels, work clothes and sheets.
■ Use a Low heat setting for drying lightweight items such as
lingerie, underwear, blouses, dresses, permanent press
fabrics and some knits.
■ Use a Air Dry (no heat) setting for rubber, plastic or heat-
sensitive fabrics.
■ Line dry bonded or laminated fabrics.
NOTE: If you have questions about drying temperatures for
various loads, refer to the care label directions. If you are unsure
of the temperature to select for a load, select a lower setting
rather than a higher setting.
Wrinkle Shield Temperature
Timed Drying On
Delicates Off
Quick Dry Push to Start
Synthetics/
Permanent Press
Cotton Air Fluff
Heavy Read Operators
Push to Start
Manual
Cycle Descriptions
This manual covers several different models. Your dryer may vary
from the model shown and may not have all of the cycles and
features described.
Cycle Control knob
Auto Dry cycle
Use your Automatic cycle to dry most loads. Your dryer has a
control that senses the moisture level in the load and shuts off
when the load reaches the selected dryness.
8
■ Select the temperature from the temperature selector based
on the fabrics in your load.
After drying a load, check the dryness.
■ If the load is drier than you like, select a setting closer to
Delicates the next time you dry a similar load.
■ If a load is not as dry as you like, complete drying using a
Timed cycle. Select a setting closer to Heavy the next time
you dry a similar load.
NOTE: Drying time varies with an Automatic cycle. The type of
fabric, the size of the load, and the dryness selected affect drying
time. See “Drying, Cycle and Temperature Tips.”
Quick Dry
Use this cycle for drying small loads or loads that need a short
drying time. Choose a High or Medium Heat setting depending on
the types of fabrics being dried.
Delicates
Select this option to dry small loads or lightweight items. Set the
Temperature selector, if available, to Low Heat.
TUMBLE PRESS setting
Select this setting to remove wrinkles from items such as clothing
packed in a suitcase or items wrinkled from being left in the dryer
too long. Set the Temperature selector, if available, to Low Heat.
Timed Drying cycle(s)
Select the correct Timed Drying setting and temperature for your
load.
Use a longer Timed Drying setting for heavyweight and bulky
items, such as bedspreads and work clothes, or large loads that
require a long drying time. Set the temperature selector, if
available, to High Heat.
Use a shorter Timed Drying setting for lightweight items such as
lingerie or knits. Set the temperature selector, if available, based
on the fabrics in your load.
Air Fluff or Air Dry cycles
Use the Air Fluff or Air Dry cycle for items that require drying
without heat such as rubber, plastic or heat-sensitive fabrics. Set
the Cycle Control knob to Air Fluff or Air Dry. This chart shows
examples of items that can be dried using the Air Fluff or Air Dry
cycle.
Type of Load Air Fluff or
Foam rubber—pillows, padded bras,
stuffed toys
Plastic—Shower curtains, tablecloths
Rubber-backed rugs
Olefin, polypropylene, sheer nylon
*(Minutes). Reset cycle to complete drying if needed.
Air Dry cycle*
20 - 30
20 - 30
40 - 50
10 - 20
When using Air Fluff or Air Dry
■ Check that coverings are securely stitched.
■ Shake and fluff pillows by hand periodically during cycle.
■ Dry item completely. Foam rubber pillows are slow to dry.
Damp Dry
Select this cycle to dry items to a damp level, or to dry items that
do not require an entire drying cycle. Use the Damp Dry cycle on
items such as jeans (to avoid stiffness) or cotton clothing (to make
pressing easier). If your model has a Temperature selector, choose
a temperature setting based on the fabrics in your load.
End of Cycle Signal
■ The End of Cycle signal sounds when a cycle is complete. If
your End of Cycle signal is selectable, the signal will sound
only if set to On.
■ If the Wrinkle Shield feature is on, the signal sounds every few
minutes. The signal stops when you open the door or turn the
Cycle Control knob to Off.
Wrinkle Shield™ Feature
When you are unable to remove a load from the dryer as soon as it
stops, wrinkles can form. The Wrinkle Shield feature periodically
tumbles, rearranges and fluffs the load for up to 30 minutes
without heat to help keep wrinkles from forming. Turn the Wrinkle
Shield knob to ON to enable the Wrinkle Shield feature. A signal
will sound periodically when the Wrinkle Shield feature is on if the
End of Cycle Signal is selected. The signal and the tumbling will
end when you open the dryer door, or when you turn the Cycle
Control knob to Off.
Drying Rack (optional)
The drying rack is useful for machine drying items you would not
necessarily want to tumble dry or that you would normally line dry
(for example, tennis shoes, pillows, stuffed toys).
You can order a drying rack by contacting the dealer from whom
you purchased your dryer.
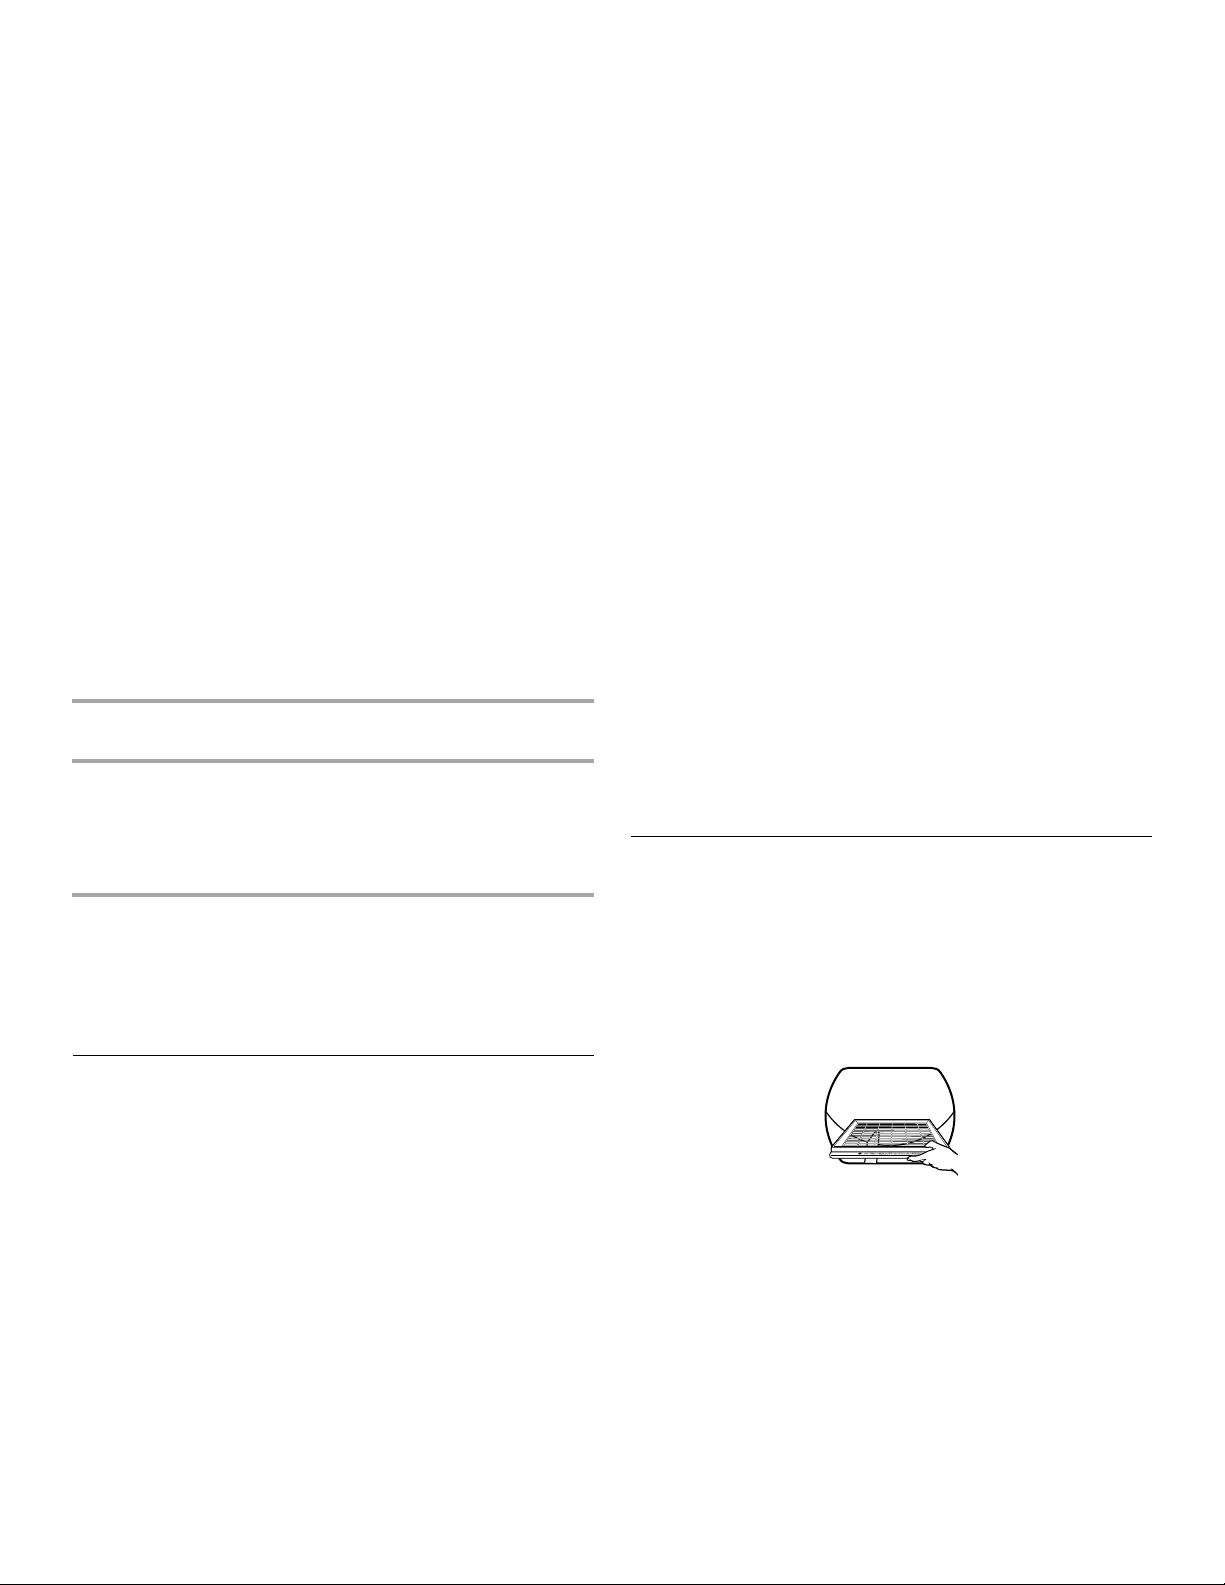
To use the drying rack
1. Slide rear pegs into the dimples on the back wall of the dryer.
Lower the front legs to rest on the dryer opening.
Additional Features
This manual covers several different models. Your dryer may not
have all of the features described.
Heavy Dry
Select this cycle to evenly dry large or heavy items such as thick
cotton bath towels or robes. Set the Temperature selector, if
available, to High Heat.
Cotton
Select this cycle to thoroughly dry heavy items such as sheets,
mattress pads and quilts, or a load of towels. Set the Temperature
selector, if available, to High Heat.
Synthetics/Permanent Press
Select this cycle to dry medium to lightweight synthetic or no-iron
items such as shirts, blouses, or dresses. Set the temperature
selector, if available, to Low Heat.
2. Put the wet items on top of the drying rack. Leave space
between the items so air can reach all the surfaces. Close the
door.
NOTE: Do not allow items to hang over the edge of the drying
rack.
3. Select cycle and temperature to match the fabrics in your
load. Items containing foam, rubber or plastic must be dried
on a clothesline or by using an air cycle. Refer to the following
table.
9
4. Press Start. Reset cycle to complete drying, if needed.
NOTE: The drying rack must be removed for normal tumbling. Do
not use the automatic cycle with the drying rack.
Rack Dry Cycle Temp Time*
Wool Sweaters
Block to shape and lay flat on
the drying rack
Stuffed toys or pillows
Cotton or polyester fiber filled
Stuffed toys or pillows
Foam rubber filled
Timed Low 60
Timed Low 60
Air
(no heat)
None 90
2. Push the lint screen firmly back into place.
IMPORTANT:
■ Do not run the dryer with the lint screen loose, damaged,
blocked, or missing. Doing so can cause overheating and
damage to both the dryer and fabrics.
■ If lint falls off the screen into the dryer during removal, check
the exhaust hood and remove the lint. See “Checking Your
Vent.”
As needed cleaning
Laundry detergent and fabric softener residue can build up on the
lint screen. This buildup can cause longer drying times for your
clothes, or cause the dryer to stop before your load is completely
dry. The screen is probably clogged if lint falls off the screen.
Clean the lint screen with a nylon brush every 6 months, or more
frequently if it becomes clogged due to a residue buildup.
Sneakers or canvas shoes Air
(no heat)
*(Minutes). Reset cycle to complete drying if needed.
None 90
DRYER CARE
Cleaning the Dryer Location
Keep dryer area clear and free from items that would obstruct the
flow of combustion and ventilation air.
WARNING
Explosion Hazard
Keep flammable materials and vapors, such as petrol,
away from dryer.
Place dryer at least 46 cm (18 inches) above the floor
for a garage installation.
Failure to do so can result in death, explosion, or fire.
Cleaning the Lint Screen
Every load cleaning
The lint screen is located in the door of the dryer. Clean the lint
screen before each load. A screen blocked by lint can increase
drying time.
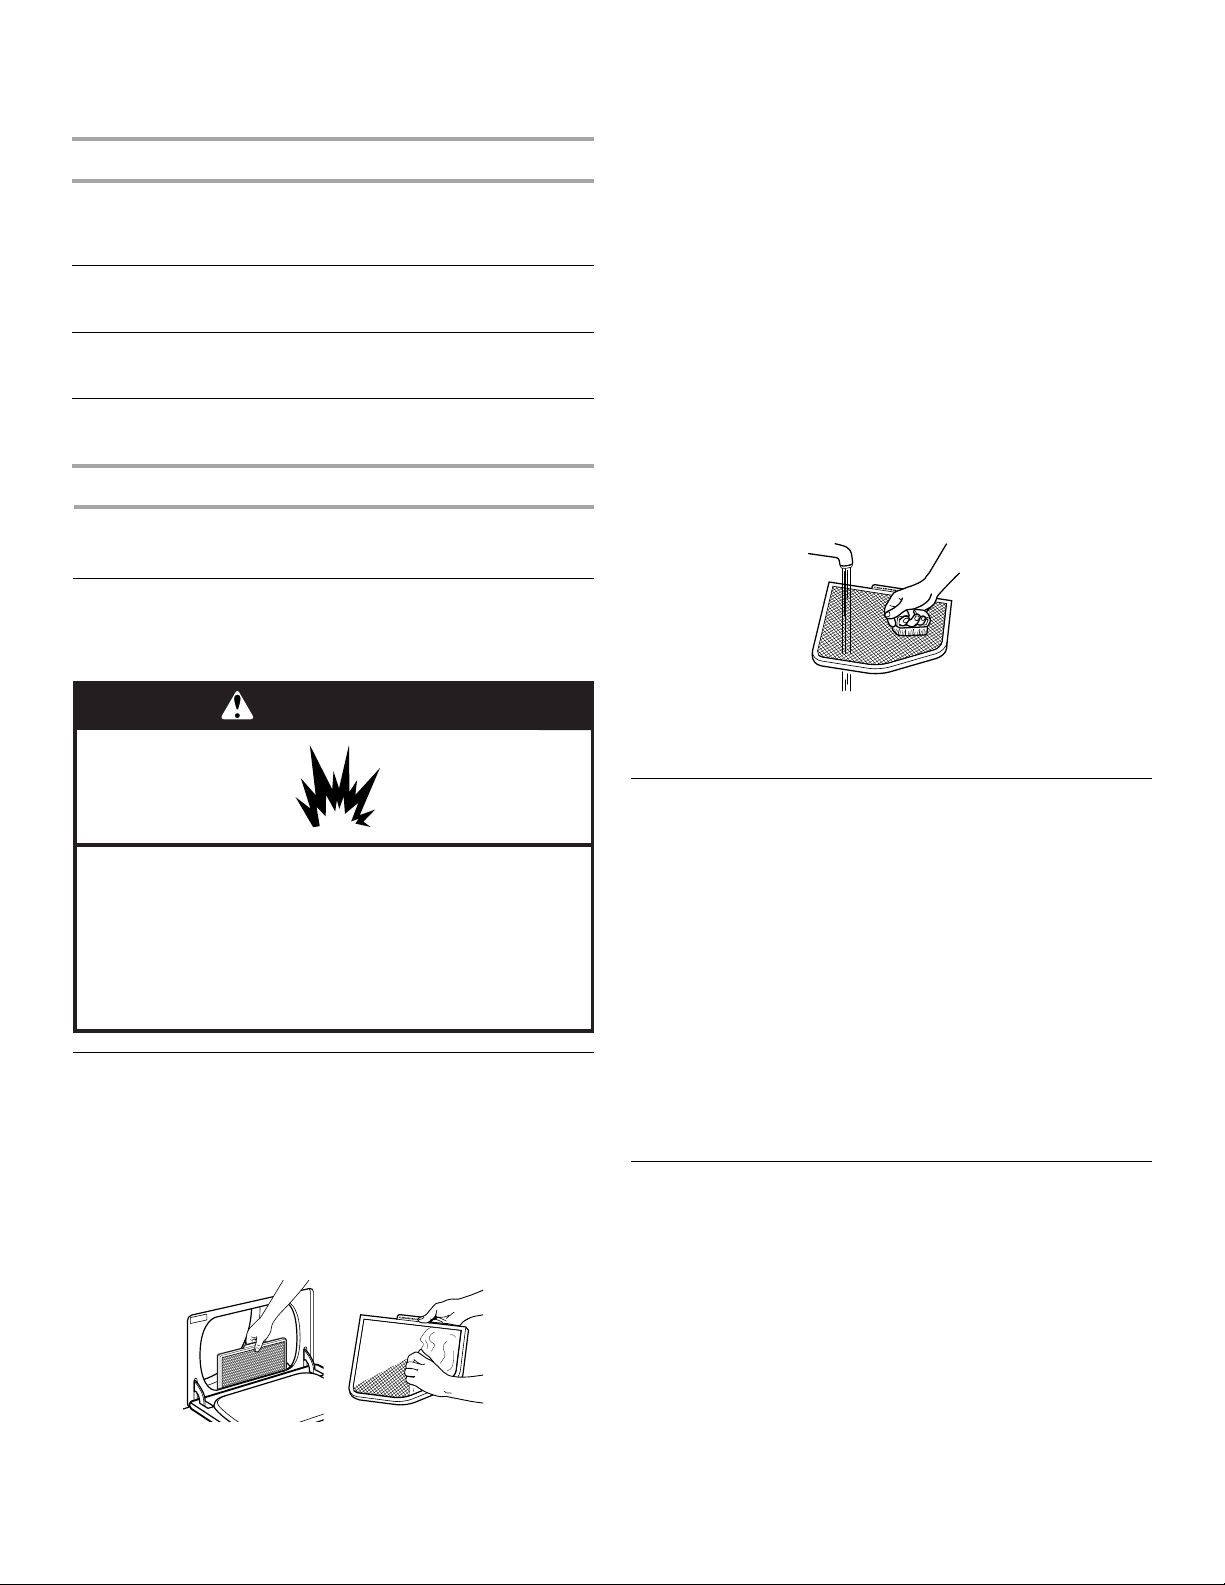
To cl ean
1. Pull the lint screen toward you. Roll lint off the screen with
your fingers. Do not rinse or wash screen to remove lint. Wet
lint is hard to remove.
To was h
1. Roll lint off filter using your fingers.
2. Wet both sides of lint screen with hot water.
3. Wet a nylon brush with hot water and liquid detergent. Scrub
lint screen with the brush to remove residue buildup.
4. Rinse screen with hot water.
5. Thoroughly dry lint screen with a clean towel. Insert lint screen
back into dryer.
Cleaning the Dryer Interior
To clean dryer drum
1. Make a paste with powdered laundry detergent and very
warm water.
2. Apply paste to a soft cloth.
OR
Apply a liquid, nonflammable household cleaner to the stained
area and rub with a soft cloth until all excess dye is removed.
3. Wipe drum thoroughly with a damp cloth.
4. Tumble a load of clean cloths or towels to dry drum.
NOTE: Garments that contain unstable dyes, such as denim blue
jeans or brightly colored cotton items, may discolor the dryer
interior. These stains are not harmful to your dryer and will not
stain future loads of clothes. Dry unstable dye items inside out to
avoid transfer of dye.
Removing Accumulated Lint
From Inside the Dryer Cabinet
Lint should be removed every 2 years, or more often, depending
on dryer usage. Cleaning should be done by a qualified person.
10
From Inside the Exhaust Vent
Lint should be removed every 2 years, or more often, depending
on dryer usage.
If you have any questions or comments, please call a designated
Whirlpool service company.
Regular Servicing
To keep your dryer operating at highest efficiency, regular
servicing by a designated Whirlpool service technician is
recommended. For normal use, this servicing should be at
12-month intervals. For heavy-duty usage, this interval should be
reduced accordingly.
Vacation and Moving Care
Vacation care
Operate your dryer only when you are at home. If you will be on
vacation or not using your dryer for an extended period of time,
you should:
1. Unplug dryer or disconnect power.
2. If you have a gas dryer, close shutoff valve in gas supply line.
3. Clean lint screen. See “Cleaning the Lint Screen.”
TROUBLESHOOTING
First try the solutions suggested here and possibly avoid the cost of a service call...
Moving care - Electric Dryers
1. Unplug the power supply cord.
2. Make sure leveling legs are secure in dryer base.
3. Use masking tape to secure dryer door.
Moving care - Gas Dryers
1. Unplug the power supply cord.
2. Close shutoff valve in gas supply line.
3. Disconnect gas supply line pipe and remove fittings attached
to dryer pipe.
4. Cap the open fuel supply line.
5. Make sure leveling legs are secure in dryer base.
6. Use masking tape to secure dryer door.
Dryer Operation
Dryer will not run
■ Has a household fuse blown, or has a circuit breaker
tripped?
Check that the fuse is intact and tight, or that the circuit
breaker has not tripped. Replace the fuse or reset the circuit
breaker. If the problem continues, call an electrician.
■ Is the correct power supply available?
Electric dryers require 220-240-volt power supply. Check with
a qualified electrician.
■ Was a regular fuse used?
Use a time-delay fuse.
■ Is the dryer door firmly closed?
■ Was the Start button firmly pressed?
No heat
■ For gas dryers, is the valve open on the supply line?
Unusual sounds
■ Has the dryer had a period of non-use?
If the dryer hasn’t been used for a while, there may be a
thumping sound during the first few minutes of operation.
■ Is a coin, button, or paper clip caught between the drum
and front or rear of the dryer?
Check the front and rear edges of the drum for small objects.
Clean out pockets before laundering.
■ Is it a gas dryer?
The gas valve clicking is a normal operating sound.
■ Are the four legs installed, and is the dryer level front to
back and side to side?
The dryer may vibrate if not properly installed. See the
Installation Instructions.
■ Is the clothing knotted or balled up?
When balled up, the load will bounce, causing the dryer to
vibrate. Separate the load items and restart the dryer.
Dryer Results
Clothes are not drying satisfactorily, drying times are too long,
or load is too hot
■ Is the lint screen clogged with lint?
Lint screen should be cleaned before each load.
WARNING
Fire Hazard
Use a heavy metal vent.
Do not use a plastic vent.
Do not use a metal foil vent.
Failure to follow these instructions can result in death
or fire.
■ Is the exhaust vent or outside exhaust hood clogged with
lint, restricting air movement?
Run the dryer for 5-10 minutes. Hold your hand under the
outside exhaust hood to check air movement. If you do not
feel air movement, clean exhaust system of lint or replace
exhaust vent with heavy metal or flexible metal vent. See the
Installation Instructions.
■ Are fabric softener sheets blocking the grille?
Use only one fabric softener sheet, and use it only once.
■ Is the exhaust vent the correct length?
Check that the exhaust vent is not too long or has too many
turns. Long venting will increase drying times. See the
Installation Instructions.
■ Is the exhaust vent diameter the correct size?
Use 10.2 cm (4") diameter vent material.
11
 Loading...