


WASHER INSTALLATION INSTRUCTIONS
INSTRUCTIONS POUR L’INSTALLATION DU LAVE-LINGE INSTRUCCIONES DE INSTALACIÓN DE LA LAVADORA ISTRUZIONI DI INSTALLAZIONE DELLA LAVATRICE WASCHMASCHINE – INSTALLATIONSANWEISUNGEN
TABLE OF CONTENTS (Original Instructions)
WASHER SAFETY....................................................................... |
2 |
INSTALLATION REQUIREMENTS............................................. |
3 |
Tools and Parts................................................................... |
3 |
Specifications...................................................................... |
4 |
Location Requirements...................................................... |
4 |
Drain System....................................................................... |
5 |
Electrical Requirements..................................................... |
5 |
INSTALLATION INSTRUCTIONS............................................... |
6 |
Connect Drain Hose........................................................... |
7 |
Connect Inlet Hoses........................................................... |
7 |
Level Washer....................................................................... |
9 |
Power Cord Installation.................................................... |
10 |
Complete Installation Checklist...................................... |
10 |
TABLE DES MATIÈRES (Instructions d’origine)
SÉCURITÉ DU LAVE-LINGE.................................................... |
11 |
EXIGENCES D’INSTALLATION................................................ |
12 |
Outillage et pièces............................................................ |
12 |
Caractéristiques................................................................ |
13 |
Exigences d’emplacement............................................... |
13 |
Système de vidange......................................................... |
14 |
Spécifications électriques................................................ |
15 |
INSTRUCTIONS D’INSTALLATION.......................................... |
15 |
Raccordement du tuyau de vidange............................... |
16 |
Raccordement des tuyaux d’arrivée d’eau..................... |
17 |
Établissement de l’aplomb du lave-linge........................ |
18 |
Installation du cordon d’alimentation............................. |
19 |
Liste de vérification pour installation terminée............. |
20 |
ÍNDICE (Instrucciones originales)
SEGURIDAD DE LA LAVADORA.............................................. |
21 |
REQUISITOS DE INSTALACIÓN.............................................. |
22 |
Herramientas y piezas...................................................... |
22 |
Especificationes................................................................ |
23 |
Requisitos de ubicación................................................... |
23 |
Sistema de desagüe......................................................... |
24 |
Requisitos eléctricos........................................................ |
25 |
INSTRUCCIONES DE INSTALACIÓN...................................... |
25 |
Conexión de la manguera de desagüe........................... |
26 |
Conexión de las mangueras de entrada......................... |
27 |
Nivelación de la lavadora................................................. |
28 |
Instalación del cable eléctrico......................................... |
29 |
Lista de control de la instalación terminada.................. |
30 |
INDICE (Istruzioni originali)
SICUREZZA DELLA LAVATRICE............................................. |
31 |
REQUISITI DI INSTALLAZIONE............................................... |
32 |
Utensili e parti................................................................... |
32 |
Specifiche Tecniche.......................................................... |
33 |
Requisiti di collocazione.................................................. |
33 |
Impianto di scarico........................................................... |
34 |
Requisiti Elettrici............................................................... |
35 |
ISTRUZIONI PER L’INSTALLAZIONE...................................... |
36 |
Connessione del tubo di scarico..................................... |
37 |
Connessione dei tubi d’ingresso..................................... |
37 |
Livellamento della lavatrice............................................. |
39 |
Installazione del cavo di alimentazione.......................... |
40 |
Elenco di controllo completo per l’installazione............ |
40 |
INHALTSVERZEICHNIS (Originalanweisungen)
WASCHMASCHINE – SICHERHEIT......................................... |
41 |
INSTALLATIONSANFORDERUNGEN...................................... |
42 |
Werkzeuge und Teile......................................................... |
42 |
Spezifikationen.................................................................. |
43 |
Anforderungen an den Aufstellraum............................... |
43 |
Drainagesystem................................................................ |
44 |
Elektrische Anforderungen.............................................. |
45 |
INSTALLATIONSANWEISUNGEN............................................ |
46 |
Ablaufschlauch anschließen............................................ |
47 |
Zulaufschläuche anschließen.......................................... |
47 |
Nivellierung der Waschmaschine.................................... |
49 |
Installation des Netzkabels.............................................. |
50 |
Komplette Installations-Checkliste................................. |
51 |
W10849505B

WASHER SAFETY
IMPORTANT SAFETY INSTRUCTIONS
WARNING: To reduce the risk of fire, electric shock, or injury to persons when using the washer, follow basic precautions, including the following:
νRead all instructions before using the washer. . 
νDo not wash articles that have been previously cleaned in, washed in, soaked in, or spotted with petrol, dry-cleaning solvents, or other flammable or explosive substances as they give off vapours that could ignite or explode.
νDo not add petrol, dry-cleaning solvents, or other flammable or explosive substances to the wash water. These substances give off vapours that could ignite or explode.
νUnder certain conditions, hydrogen gas may be produced in a hot water system that has not been used for 2 weeks or more. HYDROGEN GAS IS EXPLOSIVE. If the hot water system has not been used for such a period, before using the washer, turn on all hot water taps and let the water flow from each for several minutes. This will release any accumulated hydrogen gas. As the gas is flammable, do not smoke or use an open flame during this time.
νThis appliance is not intended for use by children or by persons with reduced physical, sensory, or mental capabilities, or lack of experience and knowledge, unless they have been given supervision or instructions concerning safe use of the appliance by persons responsible for their safety. Such persons must also understand the possible hazards involved during use.
νCleaning and user maintenance by children must be supervised.
νChildren should be supervised to ensure that they do not play with the appliance.
νChildren less than 3 years of age should be kept away from the appliance unless continuously supervised.
νBefore the washer is removed from service or discarded, remove the door or lid.
νDo not reach into the washer if the drum, tub, or agitator is moving.
νDo not install or store the washer where it will be exposed to the weather.
νDo not tamper with controls.
νDo not continue to use this appliance if it appears to be faulty.
νDo not repair or replace any part of the washer or attempt any maintenance unless specifically recommended in this Use and Care Guide.
Repairs and servicing should only be carried out by competent service personnel.
νSee Installation Instructions for earthing instructions.
νIf the supply cord is damaged, it must be replaced by Whirlpool or its service agent or a similarly qualified person in order to avoid a hazard.
SAVE THESE INSTRUCTIONS
2
INSTALLATION REQUIREMENTS
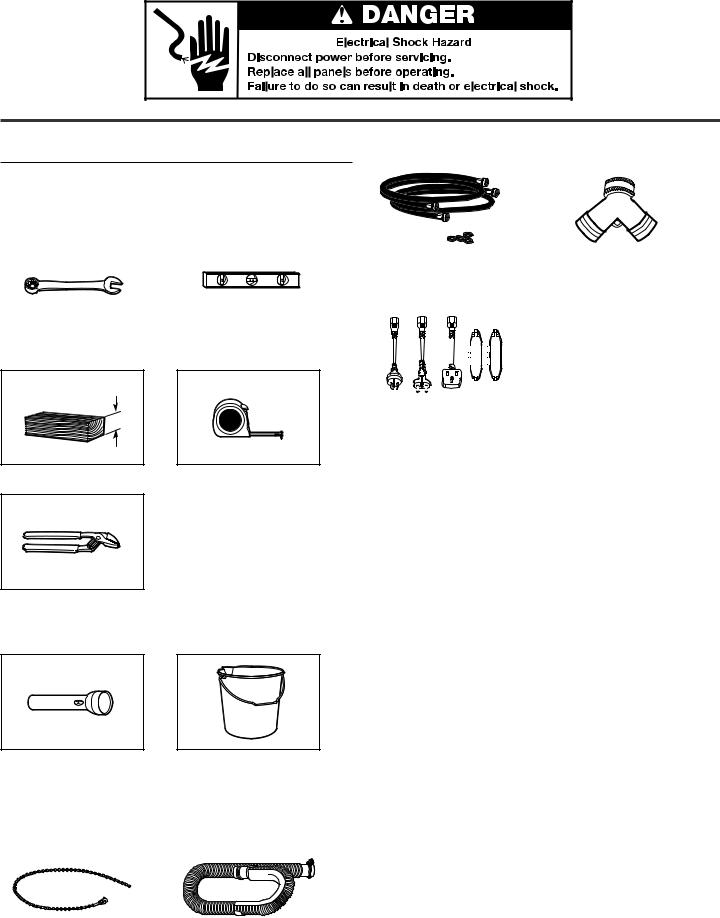
Tools and Parts
Gather required tools and parts before starting installation.
Tools needed:
|
|
|
Adjustable or open-end |
|
Level |
wrench 14 mm (9⁄16") |
|
|
102 mm
4" min (102(4" min)mm)
Wood block
Pliers that open to 44.5 mm (13⁄4")
Optional tools:
Flashlight
Parts supplied:
Ruler or measuring tape
Bucket
NOTE: All parts supplied for installation are in cardboard insert in the top of the washer.
|
|
|
|
|
|
|
|
|
|
|
|
|
|
Inlet hoses with flat |
|
“Y” connector |
|||||||||||
washers |
|
|
|||||||||||
|
|
|
|
|
|
|
|
|
|
|
|
|
|
|
|
|
|
|
|
|
|
|
|
|
|
|
|
|
|
|
|
|
|
|
|
|
|
|
|
|
|
|
|
|
|
|
|
|
|
|
|
|
|
|
|
|
|
|
|
|
|
|
|
|
|
|
|
|
|
|
|
|
|
|
|
|
|
|
|
|
|
|
|
|
|
|
|
|
|
|
|
|
|
|
|
|
|
|
|
|
|
|
|
|
|
|
|
|
|
|
|
|
|
|
|
|
|
|
|
|
|
|
|
|
|
Plugs and cord lock cover
Alternate parts: (Not supplied with washer) IMPORTANT: Use only Whirlpool authorized parts.
WARNING: To avoid electrical shock, disconnect washer from power source before replacing parts.
Your installation may require additional parts. To order, please contact the dealer from whom you purchased your washer or an authorized service company, or visit us at www.applianceaccessories.com.
If you have: |
You will need: |
Overhead sewer |
Standard 76 L (20 gal.) 990 mm (39") |
|
tall drain tub or utility sink, sump |
|
pump and connectors (available |
|
from local plumbing suppliers) |
25 mm (1") standpipe |
51 mm (2") diameter to 25 mm (1") |
|
diameter Standpipe Adapter Part |
|
Number 3363920 |
|
Connector Kit Part Number 285835 |
Drain hose too short |
Extension Drain Hose Part |
|
Number 285863 |
|
Connector Kit Part Number 285835 |
Lint clogged drain |
Drain Protector Part Number 367031 |
|
Connector Kit Part Number 285835 |
|
|
|
Cable tie |
|
Drain hose with clamp |
3

Specifications
These units are sold in multiple regions with different requirements for measuring capacity. Below are a few of the valid forms of measure posted on this product:
Dry Linen Capacity: A weight measure that reflects a maximum load size that can be loaded into the washer.
GULF (GSO) Capacity: A capacity measure that represents the capacity at which performance testing was completed.
GULF (GSO) Water Consumption: Water consumption which the manufacturer declares will be used in a specific cycle.
IMPORTANT: This appliance is intended to be used in household and similar applications such as:
•staff kitchen areas in shops, offices, and other working environments;
•farm houses;
•by clients in hotels, motels, and other residential-type environments;
•bed and breakfast-type environments;
•areas for communal use in blocks of flats or in launderettes.
Dry Linen Capacity
15 kg (33 lb)
IEC Capacity
15 kg (33 lb)
GULF (GSO) Capacity
15 kg (33 lb)
GULF (GSO) Water
Consumption
153 litres
Inlet Valve Water Pressure Specifications
|
|
GULF |
GULF |
Max. inlet |
Min. inlet |
(GSO) |
(GSO) |
water |
water |
Max. inlet |
Min. inlet |
pressure |
pressure |
water |
water |
|
|
pressure |
pressure |
862 kPa |
55 kPa |
690 kPa |
138 kPa |
|
|
|
|
NOTE: Sound Pressure Level, Lpa: 58 dBA (uncertainty, Kpa: +/–10 dBA).
Location Requirements
Select proper location for your washer to improve performance and minimize noise and possible “washer walk”. Install your washer in a basement, laundry room, closet, or recessed area.
699 mm |
686 mm |
(271⁄2") |
(27") |
1067 mm (42")
You will need:
νA water heater set to 49°C (120°F).
νAn earthed electrical outlet located within 1.2 m (4 ft) of power cord on back of washer.
νHot and cold water faucets located within 0.9 m (3 ft) of hot and cold water fill valves on washer, and water pressure
of 138–690 kPa (20–100 psi).
νA level floor with maximum slope of 25 mm (1") under entire washer. Installing on carpet is not recommended.
νFloor must support washer’s total weight (with water and load) of 143 kgs (315 lbs).
IMPORTANT: Do not install, store, or operate washer where it will be exposed to weather or in temperatures below 0°C (32°F). Water remaining in washer after use may cause damage in low temperatures. See “Washer Care” in your Use and Care Guide
for winterizing information. Proper installation is your responsibility.
Recessed area or closet installation
76 mm (3")
356 mm |
310 cm2 |
(14" max.) |
(48 in.2) |
|
432 mm |
|
(17") |
|
|
155 cm2 |
126 mm |
|
(24 in.2) |
(5") |
|
|
|
25 mm |
76 mm |
25 mm |
(1") |
|
(1") |
|
(3") |
Dimensions show recommended spacing allowed, except for closet |
||
door ventilation openings, which are the minimum required. This washer has been tested for installation with spacing of 0 mm (0") clearance on the sides. Consider allowing more space for ease of installation and servicing, and spacing for companion appliances and clearances for walls, doors, and floor moldings. Add spacing of 25 mm (1") on all sides of washer to reduce noise transfer. If a closet door or louvered door is installed, top and bottom air openings in door are required.
IMPORTANT: Washers that feature ventilation openings in the base of the unit must not be obstructed by carpet.
4
 Loading...