Toyota SPA26, SPB26, SP20 Manual

SP20 Series
HOME-USE SEWING MACHINE
INSTRUCTION
MANUAL
•Read this manual carefully before use and always follow the instructions.
•Keep the manual in a convenient place for easy reference.
•If you give the sewing machine to someone else, also give them this instruction manual.

Contents |
|
|
Before use |
|
|
• Important safety instructions ....................................................... 4 |
||
• How to change the power plug.................................................... 6 |
||
• |
Part names.................................................................................. 8 |
|
• |
How to use handwheel.............................................................. |
10 |
• |
How to use presser foot lever.................................................... |
10 |
• |
How to use reverse sewing lever............................................... |
10 |
• |
How to remove extension table ................................................. |
10 |
• |
Using the presser foot pressure adjustment knob..................... |
11 |
• |
Using the drop feed lever .......................................................... |
11 |
• |
Using the stitch length dial ........................................................ |
11 |
• How to use quick adviser .......................................................... 12 |
||
Sewing preparations |
|
|
• Connecting the power ............................................................... 13 |
||
• Installation of battery for winding the lower thread..................... 14 |
||
• Winding the lower thread .......................................................... 15 |
||
• Threading the lower thread ....................................................... 17 |
||
• Threading the upper thread....................................................... 18 |
||
• |
Using the needle threader......................................................... |
20 |
• Pulling up the lower thread........................................................ 22 |
||
• Application of each stitch pattern .............................................. 23 |
||
• Changing the presser foot......................................................... 25 |
||
• Changing the needle ................................................................. 27 |
||
•Relationship between the needle, thread
|
and fabric, and adjusting the thread tension ............................. 28 |
|
Sewing |
|
|
• Straight stitching and reverse sewing........................................ 29 |
||
• |
Zigzag sewing ........................................................................... 33 |
|
• Adjusting thread tension............................................................ 34 |
||
• |
Buttonhole sewing..................................................................... 35 |
|
• |
Overcasting ............................................................................... 38 |
|
• |
Zipper insertion ......................................................................... 39 |
|
• Blind hem stitching .................................................................... 41 |
||
• Stretch & Decoration stitching................................................... 44 |
||
Maintenance |
|
|
• Feed dog and hook maintenance.............................................. 45 |
||
• Changing light bulb ................................................................... 47 |
||
• |
Troubleshooting......................................................................... 48 |
|
• |
Servicing double-insulated products (230V-240V) ........... |
50 |
Others |
|
|
• |
Safety precaution about the battery .......................................... |
50 |
• |
Recycling .................................................................................. |
51 |
• |
Specifications ............................................................................ |
51 |
Before use
Sewing preparations
Sewing
Maintenance
Others

Before use |
Be sure to read this section before use |
|
• Important safety instructions
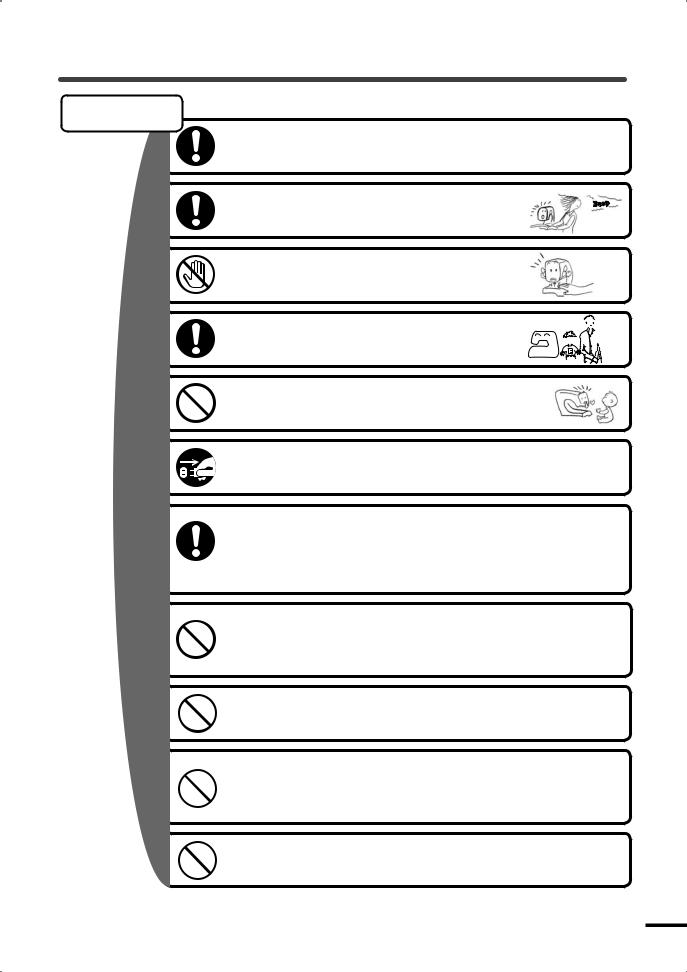
These safety instructions are designed to prevent danger or damage arising from the incorrect operation of the machine. Read carefully and always follow the instructions.
Explanation of “
 Warning
 Caution
Warning” and “ Caution”
An incorrect operation could result in death or serious injury.
An incorrect operation could result in an injury or damage to the machine.
Symbol explanation
Do not touch. |
Prohibited actions |
|
Required actions |
Remove the power plug |
|
from the outlet. |
||
|
 Warning
Use an AC 220 to 240 V power source.
Not doing so could cause an electric shock or a fire.
Do not damage the power cord, modify it, bend it excessively, jerk it or twist it.
Doing so could cause an electric shock or a fire.
If the power cord is damaged, it must be replaced by a special cord or assembly available from the manufacturer or its service agent.
Do not use outdoors.
Doing so could cause an electric shock or a fire.
Do not operate where aerosol ( spray ) products are being used or where oxygen is being administered.
Doing so could cause a fire.
 Caution
 4
4
When the machine is not in use it should be stored safely, not on the floor as protruding parts could cause injury if a person fell on the machine.
Not doing so could cause an injury.
 Caution
Before replacing the needle or presser foot or when threading the upper or lower thread, remove the power plug from the outlet.
Do not look away from the needle while operating the sewing machine.
If the needle breaks it could cause an injury.
Do not touch moving parts such as the needle, take-up lever or handwheel.
Doing so could cause an injury.
Children should only use the machine under 
 the supervision of a parent or guardian.


Otherwise they could injure themselves.
Do not use when young children are near the machine.
They could touch the needle and be injured.
Before leaving the sewing machine after using it, remove the power plug from the outlet.
Before using the sewing machine make sure that the presser foot holder clamp screw, needle clamp screw and needle plate screw are firmly tightened, and that the presser foot is properly set in the presser foot holder.
Not doing so could cause an injury.
Do not perform the |
• Sewing without lowering the presser foot. |
|
following actions. |
• Sewing while the needle is incorrectly installed. |
|
• Using a bent needle. |
||
Doing so could cause |
||
• Sewing while jerking the fabric. |
||
an injury. |
• Moving the pattern selection dial while sewing. |
Do not operate on an unstable surface such as a sofa or a bed.
If the sewing machine falls down, it could cause an injury or damages to the machine.
Do not drop or insert any foreign objects into any openings such as opening space when you remove the face cover and / or the outer casing space of bobbin case.
Doing so could cause an injury or damages to the machine.
Do not repair, disassemble or modify except what is mentioned in the instruction manual.
Doing so could cause an electric shock, a fire or an injury.
5

Before use
UK ONLY IMPORTANT |
PLEASE READ CAREFULLY |
• How to change the power plug
 Warning
When you change the power plug or cord, do not repair, disassemble or modify except at the authorised dealer or service centre.
Doing so could cause an electric shock or a fire
If for any reason the power plug for this product is removed it should be immediately disposed of safety and not stored anywhere where it could be inadvertently used again.
Doing so could cause an electric shock or a fire
The wires in this mains lead are coloured in accordance with the following code:
BLUE-NEUTRAL BROWN-LIVE ( OR ACTIVE )
As the colours of the mains lead of this appliance may not correspond with the coloured markings identifying the terminals in your plug - PROCEED AS FOLLOWS:
The earth plug pin is unnecessary. As the machine is designed under double insulation structure, the earth wire is removed from the machine. The wire coloured BROWN must be connected to the terminal marked L or A or coloured RED. The wire coloured BLUE must be connected to the terminal marked N or coloured BLACK. Neither core is to be connected to the earth terminal of a three-pin plug.
 6
6

• Memo
7

Before use
•Part names
•External appearance may differ from model to model.
ÚDepending on the sewing machine you have, some functions may not be applied. The model name is indicated on the label, located on the back of the sewing machine (model SPXXX).
Thread guide
Presser foot pressure adjustment knob
Ú Equipped only with model XXX34
Take-up lever
Light bulb
Face cover
Needle threader
Extension table (Accessory Box)
Presser foot holder
Presser foot holder clamp screw
Upper thread tension dial
Spool pin
Quick adviser
Stitch length dial
Pattern selection dial
Reverse sewing lever
Needle clamp screw
Needle thread guide
Needle plate
Feed dog
Presser foot
Bobbin case
Bobbin case cover
 8
8

Thread winding switch
Handwheel
Battery holder
Terminal box
Model label
Thread winding spindle
Hollow for carrying
( Insert your hand in the hollow ) when carrying sewing machine
Presser foot lever
Thread cutter
Drop feed lever
ÚEquipped only with model XXX34
Buttonhole adjustment screw
Foot controller
9
Before use
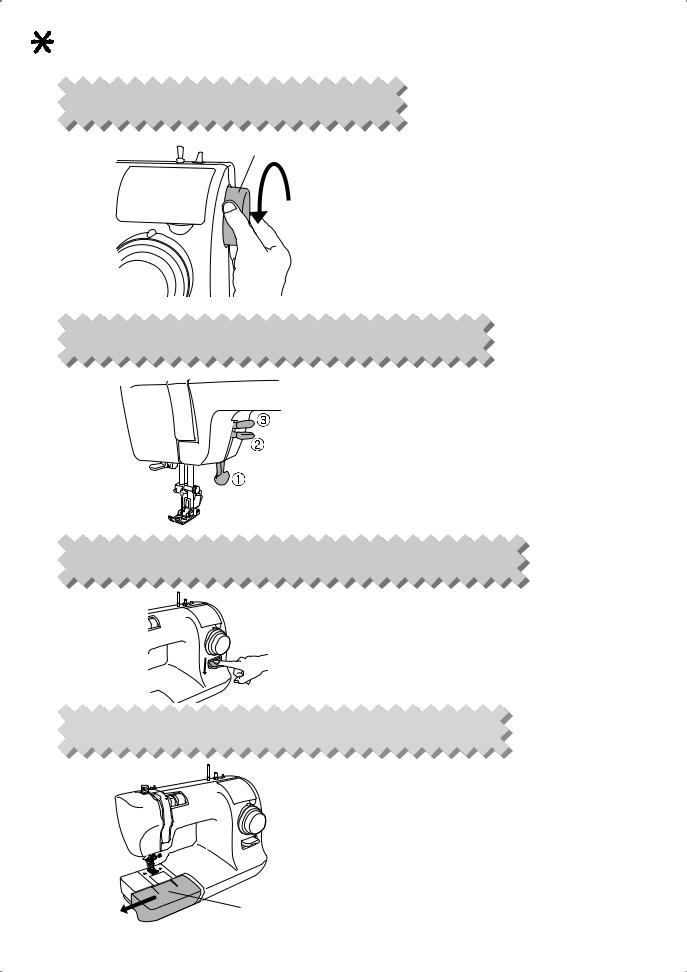
• How to use handwheel
Handwheel
Always turn the handwheel towards yourself. (in the direction of the arrow, forwards)
Note: If you turn it in the reverse direction it could tangle the thread.
• How to use presser foot lever
• When sewing, lower the presser foot lever to lower the presser foot. (Position 1)
• When inserting fabric, lift up the presser foot lever to raise the presser foot. (Position 2)
• When inserting very thick fabric under the presser foot, the lift height can be increased by holding the presser foot lever at this position. (Position 3)
• How to use reverse sewing lever
• To sew in reverse, press down on the reverse sewing lever.
• To return to sewing in the forward direction, release the reverse sewing lever.
• How to remove extension table
Pull out the extension table (accessory box) in the direction of the arrow.
Extension table
 10
10

Before use
• Using the presser foot pressure adjustment knob
Ú Equipped only with model XXX34
By turning the presser foot pressure adjustment knob at the top of the sewing machine, the amount of pressure applied by the presser foot can be adjusted. Turning the presser foot pressure adjustment knob toward “–” reduces the amount of pressure applied by the presser foot.
For best results when sewing stretch or thin fabrics, slightly reduce the pressure. Normally, sew with the knob set to “3”.
•Using the drop feed lever
ÚEquipped only with model XXX34
The feed dog can be lowered when feeding the fabric freely by hand, for example, when embroidering or quilting.
During normal sewing, move the lever to the right to raise the feed dog.
When feeding the fabric manually, move the lever to the left to lower the feed dog.
• Using the stitch length dial
(Used also when sewing stretch stitches. For details on sewing stretch stitches, refer to
page 42.)
• Stitch length dial (0 through 4)
Turn the stitch length dial to adjust the stitch length amount.
1. For shorter stitch, turn the dial to a lower
number.
2. For longer stitch, turn the dial to a higher number.
11
Before use
• How to use quick adviser
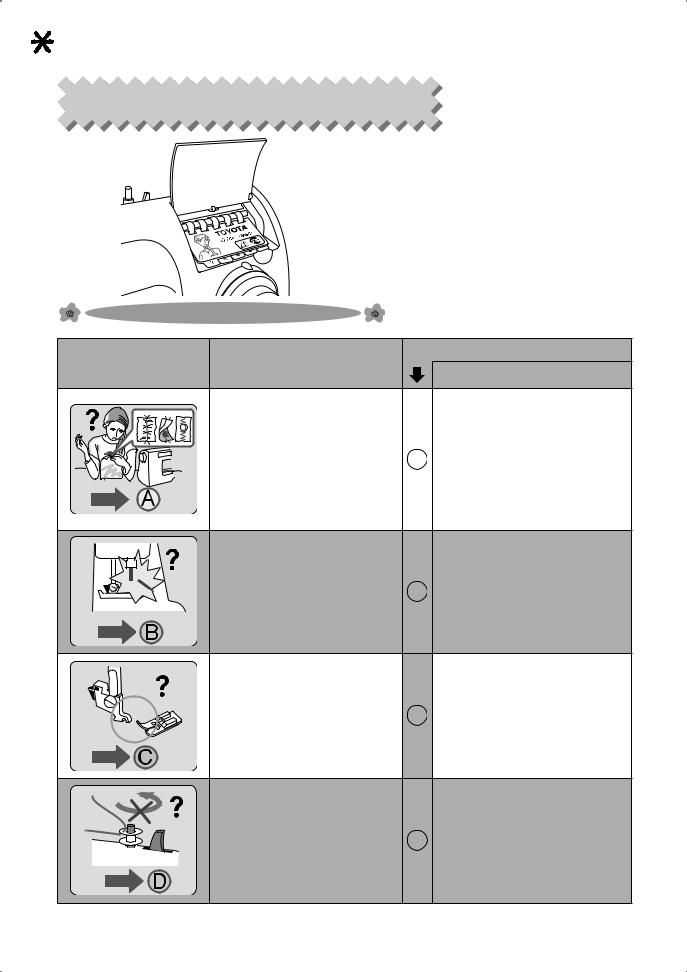
This quick adviser describes basic countermeasures about the main troubles.
Meaning of the illustrations
Illustrations of the |
|
Countermeasures illustrations |
Meaning of the illustrations |
|
Meaning of the illustrations. |
troubles |
|
|
• Jammed stitches |
|
Shows the following 3 |
• Unbalanced stitches |
|
procedures. |
• The fabric wrinkles/puckers |
|
1Adjusting thread tension. |
• Missed stitches |
A |
2Threading the lower thread |
Above troubles happen, |
|
correctly. |
refer to illustration A for |
|
3Threading the upper thread |
countermeasures. |
|
correctly. |
When needle is broken, |
|
Describes how to change |
refer to illustration B for |
|
needle correctly. |
countermeasures. |
B |
1Raise the needle. |
|
2Remove the needle. |
|
|
|
3Attach the new needle. |
When you want to know |
|
Describes how to attach |
how to attach presser foot, |
|
presser foot. |
refer to illustration C for |
C |
1Raise the presser foot lever. |
countermeasures. |
2Correctly position the |
|
|
|
presser foot under the |
|
|
presser foot holder. |
|
|
3Lower the presser foot lever. |
When you want to know |
|
Describes how to install battery |
how to wind lower thread, |
|
for winding lower thread. |
refer to illustration D for |
D |
1Insert the battery into the |
countermeasures. |
battery holder on the back of |
|
|
|
the sewing machine. |
|
|
2Push the thread winding |
|
|
switch to the left. |
 12
12

Sewing preparations
• Connecting the power
 Warning
Do not touch the power plug with wet hands.
Doing so could cause an electric shock.
Hold the power plug when removing it from the outlet.
Not doing so could damage the cord and cause an electric shock, fire or injury.
1 |
Prepare the foot controller. |
2 |
Insert the power cord connector into |
the terminal box. |
|
3 |
Insert the power plug into the outlet. |
|
The power is turned on. |
Power plug
Foot controller |
Terminal box |


 Connector
How to operate foot controller
Step on the foot controller to operate the sewing machine. |
|
The more you press the foot controller, the faster the |
|
machine runs. |
|
Release the foot controller to stop the machine. |
Foot controller |
13
Sewing preparations
• Installation of battery for winding the lower thread
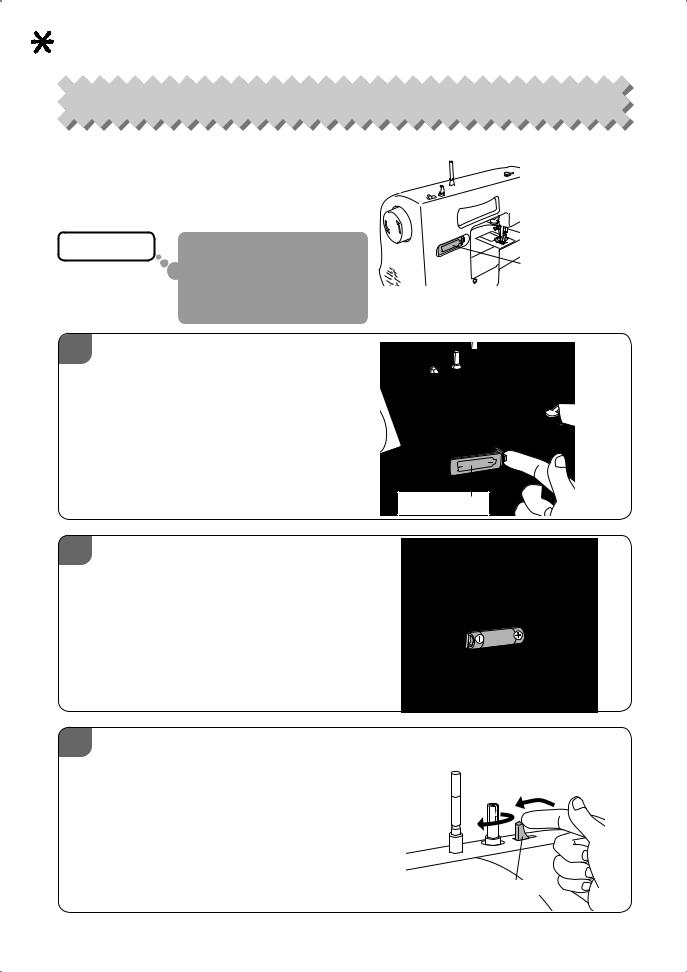
A battery is supplied as one of the accessories.
Before winding the lower thread, install it in the battery holder on back of sewing machine.
Attention |
If the machine will not be |
|
|
used for an extended period |
Battery holder |
|
of time, remove the battery. |
|
|
|
|
|
Not doing so may result in |
|
|
damage. |
|
1 Open the battery holder cover in the |
|
|
direction of the arrow. |
|
|
Battery holder cover
2 Install the battery while confirming polarity of it.
Attach battery holder cover.
Note: Refer to page 48, 49 when purchasing or changing batteries. (Use a AA alkaline battery (1.5 V).)
3 Hold the thread winding switch to the left, and check that the thread winding spindle rotates.
Note: The thread winding spindle rotates only while the thread winding switch is pushed to the left.
Thread winding switch
 14
14
Sewing preparations
• Winding the lower thread
The exclusive motor driven by a battery winds the lower thread.
 Caution
Before winding the lower thread, remove the power plug from the outlet.
Doing so could cause an injury.
Do not touch the lower thread winding spindle when winding the lower thread.
Doing so could cause an injury.
Attention
Use a TOYOTA-exclusive bobbin.
3 |
1 |
2 |
4 |
5 |
6 |
7 |
8 |
9 |
10 11 |
|
|
|
|
|
|
|
|
|
|
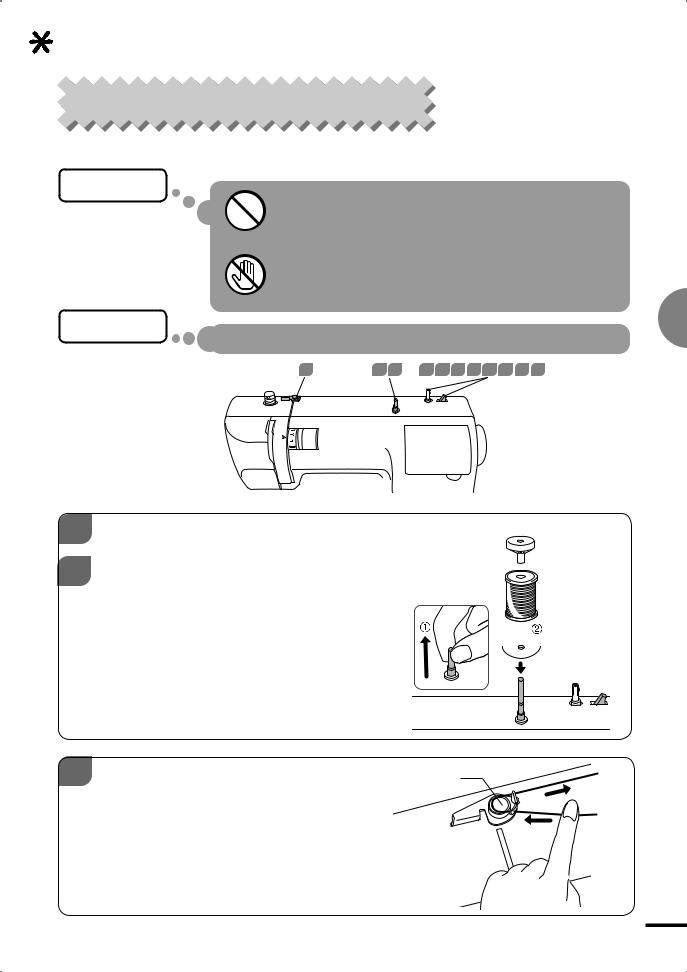
1 |
Pull up the spool pin. |
2 |
Insert the felt, the thread spool and |
|
the spool cap on the spool pin. |
Note: The felt is already inserted on the spool pin.
Spool pin 
Spool cap
 Felt
Felt
3 Pull the thread from the thread spool. |
Thread guide |
Support the thread on the sewing |
|
machine with one hand, using the other |
|
hand pass the thread around the thread |
|
guide as shown in the diagram. |
|
15

4 From the inside, pass the thread end through the hole in the bobbin, as shown.
Place the bobbin on to the 5 thread winding spindle so the
groove will meet the shaft projection.
Thread
Bobbin
Hole 

 Groove
Thread winding |
Shaft projection |
|
spindle |
||
|
6
7
8
9
10
11
Hold the thread end, and push the thread winding switch to the left to start winding.
After winding a little, release the thread  winding switch so that it returns to the right
  and stops winding.


Note: The thread is wound only while the thread winding switch is pushed to
the left.
Cut extra thread above the bobbin hole.
Push the thread winding switch to the left again.
Wind the thread to the amount you need.
To stop winding the thread, release the thread winding switch.
Attention |
Do not wind excessively, |
|
it causes sewing |
|
malfunction. |
Cut the thread. |
right |
wrong |
|
Remove the bobbin from the spindle. |
|
|
|
Attention |
If the thread tail remains |
|
|
|
from the bobbin hole, please |
|
|
cut it, otherwise sewing will not be performed correctly.
 16
16
 Loading...