


Modular In-Car Entertainment
Owner’s manual Mode d’emploi Bedienungsanleitung Gebruikershandleiding

operatiNG instructions ......................................................................... |
Page |
3 |
BEDIENUNGSANLEITUNG ............................................................................... |
Seite |
41 |
MODE D’EMPLOI ..................................................................................................... |
Page |
79 |
BEDIENINGSHANDLEIDING ........................................................................... |
Pagina |
117 |
ISTRUZIONI PER L’USO ...................................................................................... |
Pagina |
155 |
m
Read this manual thoroughly before using the MICE. Always keep this owner’s manual in the vehicle.
Lesen Sie diese Anleitung vor Benutzung der MICE gründlich. Bewahren Sie diese Anleitung immer im Fahrzeug auf.
Lisez ce manuel dans son intégralité avant d’utiliser le MICE. Conservez toujours ce mode d'emploi dans le véhicule.
Lees deze handleiding grondig voordat u de MICE gebruikt. Bewaar deze gebruikshandleiding altijd in uw voertuig.
Leggere con attenzione e per intero questo manuale prima di utilizzare il MICE. Tenere sempre nel veicolo il presente manuale d’uso.
MICE

MICE

Table of Contents
1. |
Introduction ..................................................................................................................... |
6 |
|
2. |
Safety precautions ............................................................................................................ |
7 |
|
|
2.1. |
Safety Symbols ......................................................................................................... |
7 |
|
2.2. |
Caution .................................................................................................................... |
7 |
|
2.3. What you should know ............................................................................................. |
8 |
|
|
2.4. |
Region code ............................................................................................................. |
8 |
|
2.5. |
VOD registration code .............................................................................................. |
8 |
|
2.6. |
Warning ................................................................................................................... |
9 |
|
2.7. |
Copyright ................................................................................................................. |
9 |
|
2.8. |
Later disposal ............................................................................................................ |
9 |
3. Features ............................................................................................................................ |
10 |
|
3.1. |
Power ....................................................................................................................... |
10 |
3.2. |
Compatibility ............................................................................................................ |
10 |
3.3. |
System functions ...................................................................................................... |
11 |
3.4. |
Additional video features .......................................................................................... |
11 |
3.5. |
Parts included in the box .......................................................................................... |
11 |
4. Overview ........................................................................................................................... |
12 |
|
4.1. |
MICE system ............................................................................................................. |
12 |
4.2. |
Remote control ......................................................................................................... |
14 |
4.3. |
Other accessories ...................................................................................................... |
18 |
5. Care ................................................................................................................................. |
19 |
|
5.1. How to handle the disc ............................................................................................. |
19 |
|
5.2. |
How to insert the remote control batteries ................................................................ |
19 |
5.3. |
How to insert the infrared headphone batteries ........................................................ |
20 |
6. Installing the MICE system ............................................................................................... |
21 |
|
6.1. Installing the MICE system (M and S) on top of the front seat ................................... |
21 |
|
6.2. Removing the MICE system (M or S) from the seat-top console ................................ |
23 |
|
7. Operation for all media .................................................................................................... |
24 |
|
7.1. |
Operation start ......................................................................................................... |
24 |
7.2. |
Inserting a disc ......................................................................................................... |
26 |
7.3. |
Playing a disc ............................................................................................................ |
26 |
7.4. Pausing and resuming or stopping playback ............................................................. |
27 |
|
7.5. To go to previous ...................................................................................................... |
27 |
|
7.6. To go to next ............................................................................................................ |
28 |
|
7.7. |
Repeat ...................................................................................................................... |
28 |
|
MICE |
|

7.8. |
Zoom ....................................................................................................................... |
28 |
7.9. |
Navigation ................................................................................................................ |
29 |
7.10. Ejecting the disc (MICE M only) ................................................................................ |
29 |
|
7.11. Selecting USB sources ............................................................................................... |
29 |
|
7.12. Using the AUX1 input ............................................................................................... |
30 |
|
8. Changing the default settings ......................................................................................... |
31 |
|
8.1. |
EQ predefined settings .............................................................................................. |
31 |
8.2. |
Volume adjustment ................................................................................................... |
31 |
8.3. |
Screen settings ......................................................................................................... |
32 |
9. Troubleshooting ............................................................................................................... |
33 |
|
9.1. |
Problem: IR headphones - Not working .................................................................... |
33 |
9.2. |
Problem: IR headphones - No sound ......................................................................... |
33 |
9.3. |
Problem: IR headphones - Poor audio quality ............................................................ |
34 |
9.4. |
Problem: Wired headphones - No audio ................................................................... |
34 |
9.5. |
Problem: Wired headphones - Poor sound quality ..................................................... |
34 |
9.6. |
Problem: Remote control - Not working ................................................................... |
35 |
9.7. |
Problem: Operation of the MICE M/S system - Unit is not working ........................... |
35 |
9.8. |
Problem: Operation of the MICE M/S system - No picture ........................................ |
35 |
9.9. |
Problem: Operation of the MICE M/S system - Blue screen on the MICE S ................. |
36 |
9.10. Problem: Picture quality ............................................................................................ |
36 |
|
9.11. Problem: DVD operation - No playback .................................................................... |
37 |
|
9.12. Problem: USB operation - USB device is not working .................................................. |
37 |
|
9.13. Problem: USB operation - Files are not visible or are not being recognized .................. |
38 |
|
10. Technical data.................................................................................................................... |
39 |
|
MICE

Recommendation
Please read this manual to get the full benefit of the system.
We suggest you keep this manual in the car. It will be easier for you to find the information in case of an emergency.
Your local authorised retailer will be pleased to clarify any queries you may have with the system or its operation if you cannot find the information you need in this manual or in the chapter ‘Troubleshooting’.
Toyota recommends that only parts and accessories that have been tested and approved by Toyota in terms of their safety, function and suitability should be used.
These operating instructions are designed to ensure that you can operate the MICE system safely and easily.
These operating instructions describe the functions of the MICE system, using the buttons on the screen module or on your remote control.
It is illegal to steal films and music, and also to download illegal content.
MICE
1. Introduction
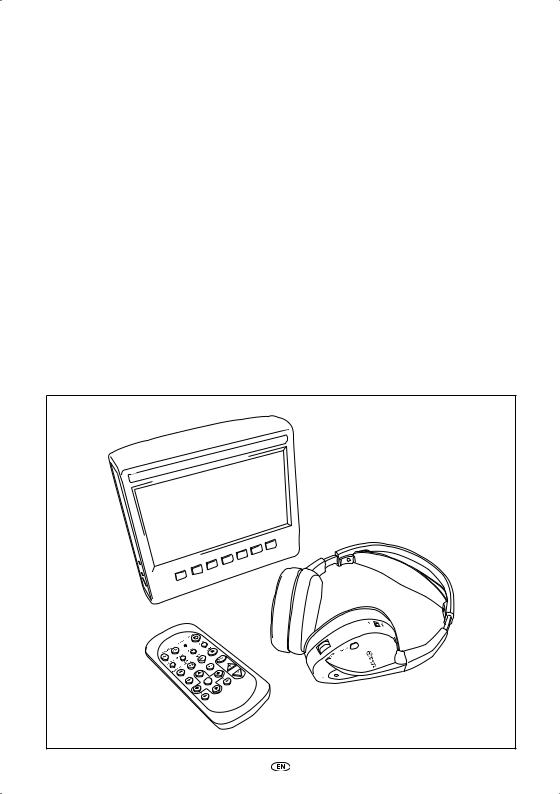
Congratulations on your purchase of a Toyota MICE (Modular In-Car Entertainment) system. This system has been developed to entertain your children and other passengers during car journeys, so that they can watch a movie, play a computer game or listen to music.
The MICE CD/DVD-module is a versatile digital video disc player, which is compatible with the following disc types: DVD, CD, CD-R, CD-RW, DVD+R/RW, DVD-R/RW and USB. Video discs can be viewed on the monitor screen. The playing of a disc is operated via the buttons on the MICE system or more in detail via the remote control unit. You can enjoy the stereo sound through your headphones (plugged or IR).
This instruction manual explains the basic instructions for the MICE entertainment system. The system may not respond to every operating command. Please refer to the instruction notes of the relevant discs.
Before reading the operating instructions, please check which type of screen you are looking at: the master or the slave. See detailed drawings of these screens and more explanation on page 12.
MICE

2. Safety precautions
2.1. Safety Symbols
mWarning: When this symbol appears in front of a text you must follow these recommendations to avoid irreparable damage to your car, system or connected devices or to avoid accidents with injuries or death as a result.
Caution: When this symbol appears in front of a text you must be very careful and follow the recommendations to avoid damage to your car, system or connected devices or to avoid injuries.
Disposal: When this symbol appears in front of a text, you are recommended or warned to follow the legislator’s rules for disposal of electrical equipment.

 Note: A simple recommendation for your convenience and for an optimal working of your system.
2.2. Caution
•The MICE system must be kept away from sources of radiation (these include also LCDs, radios, mobile phones, VCR appliances), and the device must be protected from shocks, extreme temperatures, excessive force, dust, humidity and direct sunlight.
•Keep the MICE system and remote control dry.
•Do not use the MICE system in a humid environment. Keep the system switched on after you have removed the disc to allow possible condensation inside the player to evaporate.
•Never insert foreign objects into the slot of the master MICE system.
•Only use attachments that are approved by the manufacturer of the MICE system.
•Do not leave plastic products in contact with the MICE system for long periods of time.
•Handle with care. Do not drop the MICE system, the remote control or headphones.
•There is no automatic switch-off function or screensaver included, so please switch off the MICE system and/or the headphones when not in use, to prevent premature wear.
•Only insert discs in a good and undamaged state.
•When a disc is inserted, it can take up to 10 seconds before the system detects the disc.
MICE
2.3. What you should know
• The MICE system is designed to play various media (DVD, audio CD and CD-ROM, USB).
• The functions of the MICE system depend on which of these media you wish to playback.
• Poor road conditions and vibrations can cause errors and the internal media reader to jump during playback.
2.4. Region code
The region code is permanently stored in your MICE system. |
|
|
|
|
||||
This code cannot be altered. Only discs with the appropriate region |
|
|
|
code can be played. |
||||
|
|
|
||||||
|
|
|
||||||
|
|
|
||||||
Region |
|
|
|
includes Europe, Egypt, Arabia, Japan and South Africa. |
|
|
|
|
|
|
|
|
|
|
|
||
|
|
|
|
|
|
|
||
|
|
|
|
|
|
|
||
2.5. VOD registration code
In order to have access to VOD (Video On Demand) or other media contents protected by DRM (Digital Rights Management) you will need to retrieve the 8 character DivX VOD registration code from the MICE M system.
To display the code on the screen, the following button sequence needs to be pressed (disc needs to be ejected and no USB inserted):
SUBTITLE – press twice
ZOOM – press twice
Enter – press once
The following message will be displayed:
DivX (R) Video On Demand
Your registration code is: xxxxxxxx
To learn more visit
www.divx.com/vod
OK
MICE

2.6. Warning
m
•The MICE system is a Class I laser product. The laser beam is harmful to the eyes. Never attempt to dismantle the housing protecting the player.
•If rear seat passengers wish to play on a game console or other connected device, please follow the appropriate safety and user instructions for the game console or that device.
2.7. Copyright
This system is manufactured under license from Dolby Laboratories. “Dolby” and the double-D symbol are trademarks of Dolby Laboratories.
This product contains one or more programs protected under international and U.S. copyright laws as unpublished works. They are confidential and proprietary to Dolby Laboratories. Their reproduction or disclosure, in whole or in part, or the production of derivative works therefrom without the express permission of Dolby Laboratories is prohibited. Copyright 1993-2002 by Dolby Laboratories. All rights reserved.
This product incorporates copyright protection technology that is protected by U.S. patents and other intellectual property rights. Use of this copyright protection technology must be authorized by Macrovision, and is intended for home and other limited viewing uses only unless otherwise authorised by Macrovision. Reverse engineering or disassembly is prohibited.
2.8. Later disposal
If, at a later date you wish to dispose of the MICE system, the infrared headphones and/or remote control, the legislator points out that disposal of electrical equipment as domestic waste is prohibited. Deposit old products at approved collection points for disposal of electrical equipment.
MICE
3. Features
3.1. Power
Operating voltage: 12V DC.
Low power consumption design.
3.2. Compatibility
Playable discs:
DVD Video (single/double layer), DVD+R/RW, DVD-R/RW, CD digital audio, CD text, CD recordable, CD rewritable.
MP3 System Structure:
Supports MP3 playback recorded in ISO9660/Joliet in CD and DVD recordable/rewritable discs.
Supports MP3 file system structure as follows: |
|
||
Folder depth: |
5 |
Each folder: |
650 |
Total folders: |
300 |
Total files: |
195.000 |
Multi-sessions: |
43 |
|
|
*Supportive MP3 file system structure is subject to change for improvements.
*Last memory function will start the song played back last time from the beginning.
MPEG4 Video (DIVX) support:
All DivX 3.11 movies on 1 CD, anything under 1Mbps average bitrate.
All DivX 4 content
DivX 5 content with no GMC and no Q-pel
DivX video created for Video on Demand
DivX video created on a DivX Certified encoding device
AC3 and MP3 audio in DivX video both CBR and VBR
DivX 3.11 movies on 2 CDs (high bitrates)
Xvid content
ADPCM audio, PCM audio, OGG vorbis audio
AVI files with bad audio/video interleaving
Post processing (de-blocking/de-ringing)
Subtitle be must “SMI” type.
10 MICE

3.3. System functions
Video input systems: |
Video output systems (only for MICE M): |
MULTI, NTSC, PAL |
MULTI, NTSC, PAL |
MICE system ports (see drawings on page 12):
MICE Master (MICE M): |
MICE Slave (MICE S): |
||||
- |
1 |
USB port |
- |
1 |
AV In port |
- 1 |
AV In port |
- 1 |
Headphones port |
||
- |
1 |
AV Out port |
- |
1 |
DC In port (12V) |
-1 Headphones port
-1 DC In port (12V)
3.4. Additional video features
Multi-angle*, multi-view*, multi-audio* function Multi-level forward and backward motion
Play position memory, Resume stop and Repeat functions
* Depending on the disc type, some of these features are not available.
3.5. Parts included in the box
MICE M: |
MICE S: |
- Master system |
- Slave system |
- Remote control (batteries included) |
- IR headphones (batteries included) |
- IR headphones (batteries included) |
- AUX cable |
- AUX cable |
- RCA Female/Female adapter |
- RCA Female/Female adapter |
|
MICE 11

4. Overview
4.1. MICE system
MICE Master (MICE M)
8 disc slot (only on MICE M)
|
|
|
5 |
|
7 |
|
3 |
|
6 |
8 |
|
1 |
4 |
|
|||
|
|
||||
|
2 |
|
|
|
|
MICE Slave (MICE S)
(is available independently)
 not functional
functional ON/OFF button
12 MICE
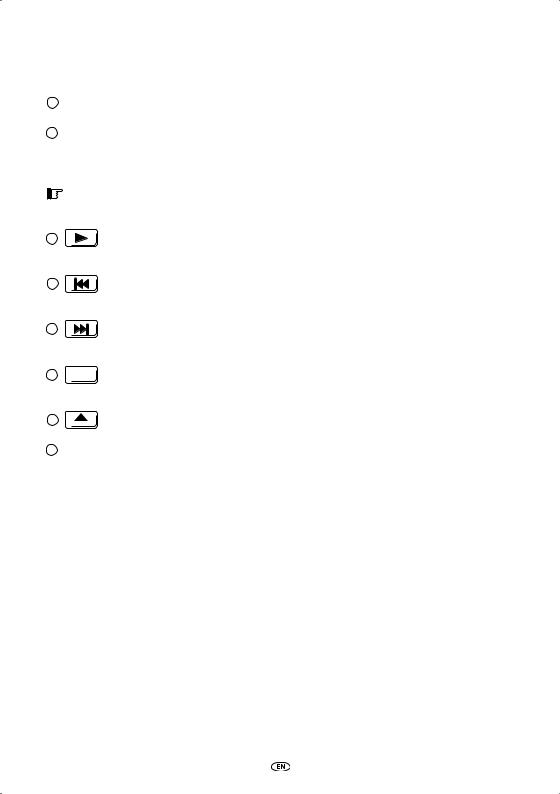
The screen module has 7 buttons, IR LEDs, an auto dimmer sensor and a remote control LED. These can be used in conjunction with the remote control buttons to operate the system.
1 Power – Press to switch the MICE system on or off.
2 AV – Press to select the Aux 2 mode. This button is used only for the MICE M/MICE M
combination. When 2 MICE M are installed you can select to view playback from both DVD players. To select USB, press the USB button on the remote control.
|
Note: Depending on the USB stick type, the USB device is auto selected when a cable is |
||||
|
|
|
|
|
inserted (only if no DVD disc is inserted into the DVD slot). |
3 |
|
|
|
|
Play – Press the Play button to play (when media is stopped) or pause/freeze frame |
|
(when media is playing) (MICE M only). |
||||
4 |
|
|
|
|
Previous – Press the Previous button to skip backwards to the previous section (DVD), |
|
previous track (CD), or previous file (USB) (MICE M only). |
||||
5 |
|
|
|
|
Next – Press the Next button to skip forwards to the next section (DVD), next track |
|
(CD), or next file (USB) (MICE M only). |
||||
6 |
|
|
|
|
Stop – Press the Stop button to stop the media when it is playing or paused (MICE M |
|
|
|
|||
|
only). |
||||
7 |
|
|
|
|
Eject – Press the Eject button to eject the disc from the MICE system (MICE M only). |
8 Disc slot (MICE M only).
 IR LED’s for IR headphones, Auto dimmer sensor, Remote control LED.
 AV input port – Connect an external device by using a genuine Toyota AUX cable (for camcorders, game consoles, etc.).
 USB port – This port is used to connect to an external USB device.
 AV output port – (MICE M only) Connect an external device by using a genuine Toyota AUX cable (for projectors, TV screens, etc.).
 Headphones port – Connect your wired headphones to this port.
 DC input port – Connect the AC/DC genuine Toyota power supply to use the MICE M system outside the car.
MICE 13
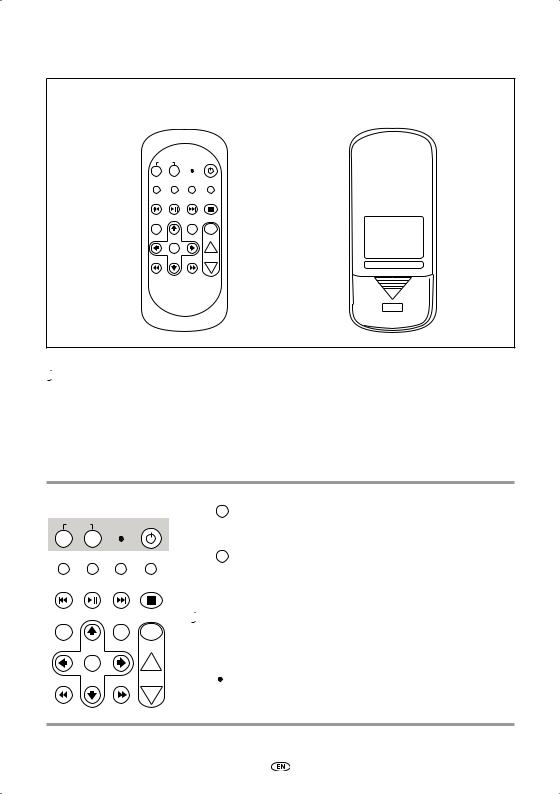
4.2. Remote control
Front view |
Back view |
ROW 1
ROW 2
ROW 3
ROW 4
ROW 5
ROW 6
SOURCE |
POWER |
POWER |
|
AV |
USB |
|
|
SUBTITLE |
REPEAT |
INFO |
ZOOM |
|
PLAY |
|
|
PREVIOUS |
PAUSE |
NEXT |
STOP |
MENU |
|
EQ |
SETUP |
|
ENTER |
|
+ |
FR |
|
FF |
|
|
|
|
– |

 Note: The remote control will work in conjunction with the MICE M and MICE S. However the MICE S requires the MICE M to play a DVD source.
The MICE S can be used as a stand-alone unit + game console or camcorder. The remote control will work to adjust settings and power ON/OFF.
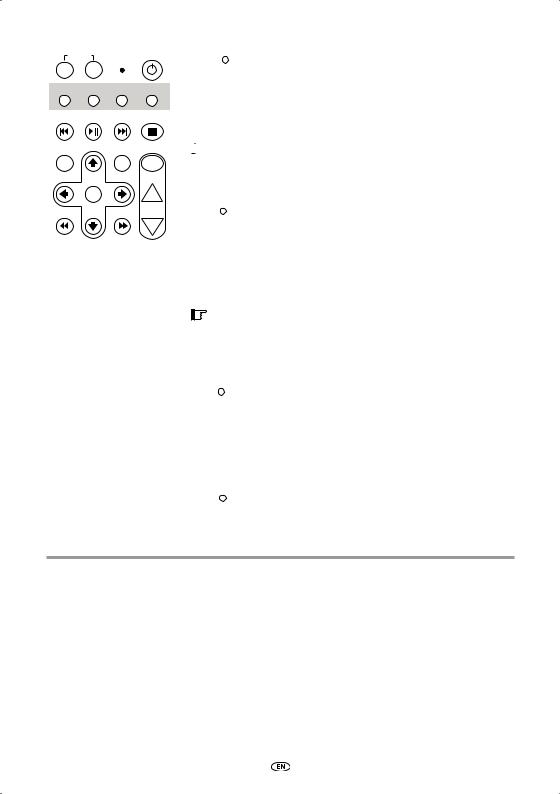
The remote control has 23 buttons and 1 LED.
These can be used in conjunction with the MICE system buttons to operate the system.
SOURCE |
POWER |
POWER |
|
AV |
USB |
|
|
SUBTITLE |
REPEAT |
INFO |
ZOOM |
|
PLAY |
|
|
PREVIOUS |
PAUSE |
NEXT |
STOP |
MENU |
|
EQ |
SETUP |
1. |
AV |
Press the AV button to select the AV source to view on the |
|
screen. |
|
2. |
USB |
Press the USB button to select or exit the USB playback |
option (this button will not function if there is no USB device connected to the MICE system).


 Note: Depending on the USB stick type, the USB device source is auto selected when a cable is inserted (only if no DVD disc is inserted in the DVD disc slot).
|
ENTER |
+ |
FR |
|
FF |
|
|
– |
3. LED LED will flash to confirm when remote buttons are pressed.
POWER
4. Press the POWER button to switch the MICE system ON/OFF.
14 MICE
SOURCE |
POWER |
POWER |
|
AV |
USB |
|
|
SUBTITLE |
REPEAT |
INFO |
ZOOM |
|
PLAY |
|
|
PREVIOUS |
PAUSE |
NEXT |
STOP |
MENU |
|
EQ |
SETUP |
|
ENTER |
|
+ |
|
|
|
|
FR |
|
FF |
|
|
|
|
– |
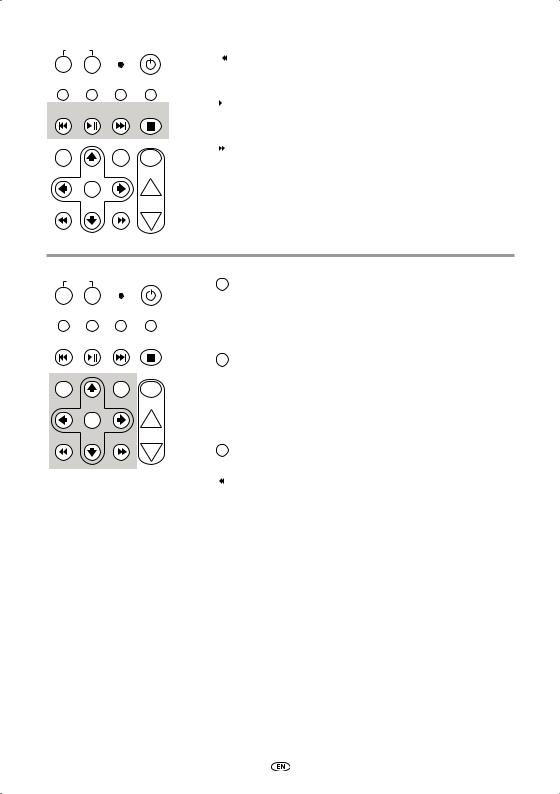
5. SUBTITLE For DVD: Press the SUBTITLE button to show, hide or select a subtitle language on the DVD (only when a movie is played). You can select other subtitle languages by pressing this button repeatedly (this function is not supported by all DVD films).

 Note: Unless you want to select other subtitle languages you must wait until the message disappears from the screen to select another subtitle option.
6. REPEAT Press the REPEAT button to select one of the following repeat modes:
•Repeat CHAPTER or Repeat TRACK (for a CD)
•Repeat TITLE
•Repeat ALL (for a CD or total contents of the USB-device)
•Repeat OFF (i.e. last selection showing no message)
|
Note: With a USB device the result of pressing this button |
|
repeatedly will depend on the kind of device connected. |
|
See the users’ instructions for this device to obtain more |
|
information. |
7. |
INFO Press the INFO button to display the general information |
|
about the movie (DVD) or track (CD) currently playing on the |
|
screen. |
|
To select the Info options Title elapsed, Title remain, Chapter |
|
elapsed and Chapter remain, Display Off, press the INFO |
|
button repeatedly. |
8. |
ZOOM DVD only: Press the ZOOM button repeatedly to zoom into |
|
the film in the following order: Normal view, Zoom 2x, Zoom |
|
3x, Zoom 4x, Zoom out 1/2, Zoom out 1/3, Zoom out 1/4, |
|
Zoom out and back to normal. |
MICE 15
SOURCE |
POWER |
POWER |
|
AV |
USB |
|
|
SUBTITLE |
REPEAT |
INFO |
ZOOM |
|
PLAY |
|
|
PREVIOUS |
PAUSE |
NEXT |
STOP |
MENU |
|
EQ |
SETUP |
|
ENTER |
|
+ |
FR |
|
FF |
|
|
|
|
– |
SOURCE |
POWER |
POWER |
|
AV |
USB |
|
|
SUBTITLE |
REPEAT |
INFO |
ZOOM |
|
PLAY |
|
|
PREVIOUS |
PAUSE |
NEXT |
STOP |
MENU |
|
EQ |
SETUP |
|
ENTER |
|
+ |
FR |
|
FF |
|
|
|
|
– |
16 MICE
PREVIOUS
9. Press the PREVIOUS button to skip backwards to previous
section (DVD), previous track (CD), or previous file (USB).
PLAY
PAUSE
10. Press the PLAY/PAUSE button to play (when media is stopped or paused) or Pause/freeze frame (when media is playing).
NEXT
11. Press the NEXT button to skip forwards to next section (DVD), next track (CD) or next file (USB).
STOP
.  Press the STOP button to stop the media when media player is playing or paused.
13. MENU For DVD: Press the MENU button to open the main menu on the DVD. You can open the various menu points using the navigation buttons. Confirm your selection by pressing the ENTER button. This button will not work with a sound CD or USB file.
14. EQ Press the EQ button to select different sound equaliser settings
• ROCK |
• POP |
• LIVE |
• DANCE |
• TECHNO |
• CLASSIC |
• SOFT |
• OFF (default) |
15. ENTER Press the ENTER button to confirm your selection.
FR
16. Press the FR (Fast Rewind) button to fast rewind the track, movie or file.
Following speeds can be chosen by repeatly pressing this button: 2x, 4x, 8x, 16x, 32x.
Pressing the last time or pressing the PLAY/PAUSE button will stop fast rewinding and start playback at normal speed.
17. Press the UP NAVIGATION button to move up through a DVD or USB menu.
18. Press the LEFT NAVIGATION button to move left through a DVD or USB menu.
19. Press the RIGHT NAVIGATION button to move right through a DVD or USB menu.
20. Press the DOWN NAVIGATION button to move down through a DVD or USB menu.
SOURCE |
POWER |
POWER |
|
AV |
USB |
|
|
SUBTITLE |
REPEAT |
INFO |
ZOOM |
|
PLAY |
|
|
PREVIOUS |
PAUSE |
NEXT |
STOP |
MENU |
|
EQ |
SETUP |
|
ENTER |
|
+ |
FR |
|
FF |
|
|
|
|
– |
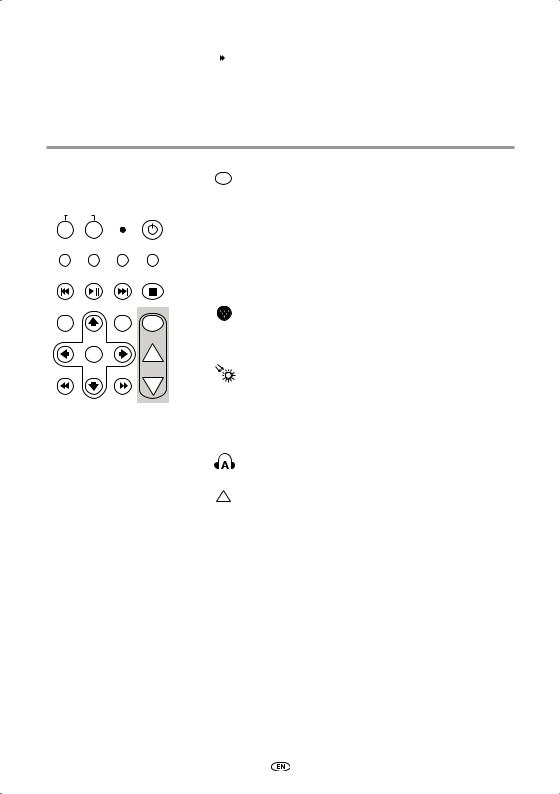
FF
21. Press the FF (Fast Forward) button to play the track, movie or file at a faster speed.
The following speeds can be chosen by repeatedly pressing this button: 2x, 4x, 8x, 16x, 32x.
Pressing the last time or pressing the PLAY/PAUSE button will stop fast rewinding and start playback at normal speed.
22.SETUP Pressing the SETUP button repeatedly will cycle through the following adaptable screen settings:

 Sound volume for wired headphones only (IR Headphones have their own volume adjustment wheel located underneath the right ear phone).
 Brightness
Color depth
 Contrast
1 |
Auto Dimmer |
|
Settings are as follows: |
||
|
-1: Auto Dimmer is ON (picture brightness is dimmed).
-0: Auto Dimmer is OFF (normal brightness).
-AUTO: Brightness will be adjusted according to the surrounding light level (default).
IR Headphone channel selection (Channel A/B).
23.+ Press the + button to increase the wired headphone volume or increase a monitor setting value. Holding this button will rapidly increase the volume until the button is released.
24. Press the – button to decrease the wired headphone volume or decrease a monitor setting value. Holding this button will rapidly decrease the volume until the button is released.
MICE 17
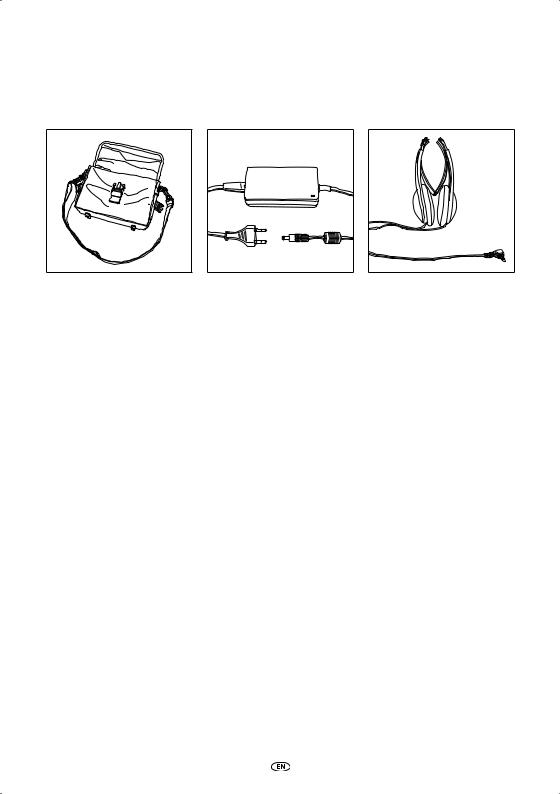
4.3.Other accessories
(Part number PZ486-00375-00)
• Bag |
• AC/DC Power Supply |
• Wired Headphones |
18 MICE
5. Care
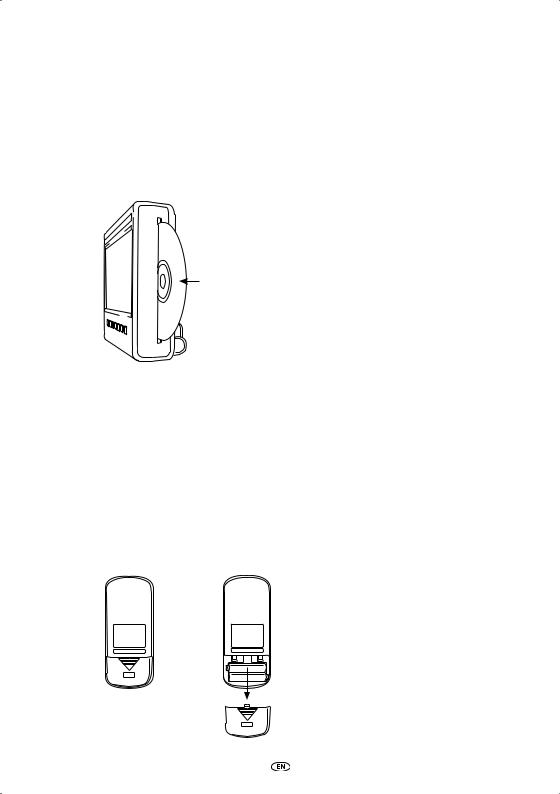
5.1. How to handle the disc
Read the following instructions for handling discs to prevent the MICE M suffering malfunctions and damage.
Disc label side facing towards rear of the vehicle
•Hold the disc only at the edges. Fingerprints, dirt and scratches can cause errors and jumping during playback.
•Clean the disc using a damp cloth only, starting from the centre and working towards the outside in a straight line. Then dry the disc carefully with a soft cloth.
•Always keep the discs in a protective cover. Exposure to temperature fluctuations, high humidity and direct sunlight may damage the discs.
5.2. How to insert the remote control batteries
1. Locate the remote control battery compartment down at the back of the remote control.
|
|
Battery type: |
|
|
24A |
|
|
LR03 |
|
|
Size AAA |
+ |
- |
1.5V |
- |
+ |
|
MICE 19
5.3.How to insert the infrared headphone batteries
+ |
- |
Battery type: |
|
24A |
|||
|
|
||
|
|
LR03 |
|
- |
+ |
Size AAA |
|
1.5V |
|||
|
|
1.Locate the headphone battery compartment in the right-hand earphone.
2.Insert 2 identical 1.5V type AAA batteries ensuring that the polarity marks (+ and -) match the right position.
20 MICE
6. Installing the MICE system
6.1. Installing the MICE system
(M and S) on top of the front seat
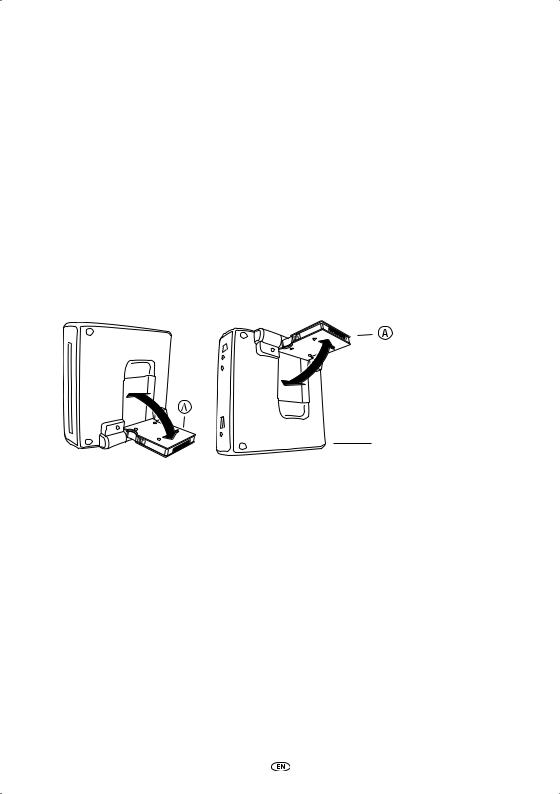
The MICE system is designed to be easily attached and detached by installing the docking station.
MICE M (Master)
1. Locate the rotation support  at the back of the MICE system.
Normal position |
Position upside down |
Rotation support with connetor
Rear of the MICE system
2.Rotate the rotation support  outward by pulling it out of the back of the MICE system.
3.Insert the rotation support  into the docking station
  on top of the front seat. As you can see in the drawing hereafter, the MICE system can also be inserted upside down (which might be more convenient for small children).
MICE 21
Normal position |
Position upside down |
 Docking station
Rotation support with connector

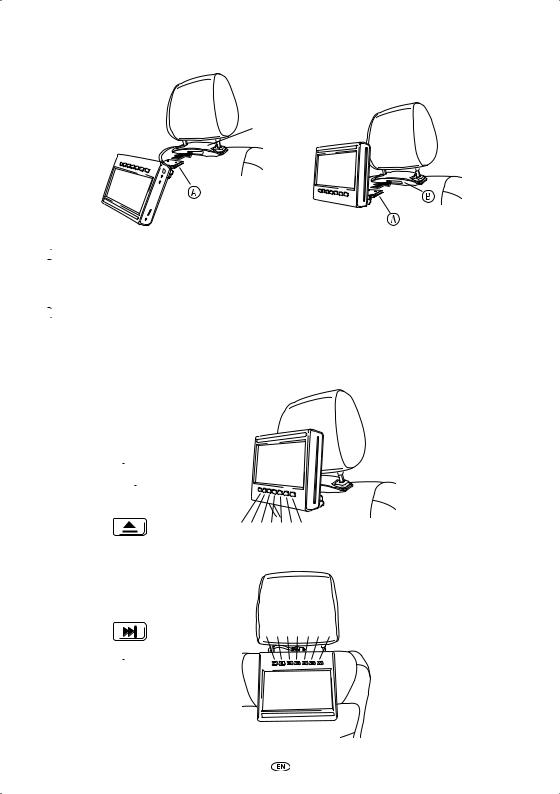
 Note: A click must be heard to ensure that the MICE system is firmly attached to the front seat! If the system is not properly inserted into the docking station
  on top of the front seat, it will not operate.

 Note: If the MICE system is inserted upside down in the headrest support, the buttons will change as is indicated in the drawings below:
Button order when the screen module is in normal position:
1.  Power
Power
2.  AV Source
3.  Play
Play
4.  Previous
5.  Next
Next
6.  Stop
Stop
7. |
Eject |
1 2 3 4 5 6 7 |
Button order when the screen is inserted upside down:
7.  Eject
Eject
6.  Stop
Stop
5. |
Next |
7 6 5 4 3 2 1 |
4.  Previous
3.  Play
Play
2.  AV Source
1.  Power
Power
22 MICE
MICE S (Optional)
1. Repeat steps 1 to 5 for the MICE S as described above for the MICE M.

 Note: Not all of the functions on the MICE M can be operated on the MICE S. See further information hereafter for more details about operation of the system.
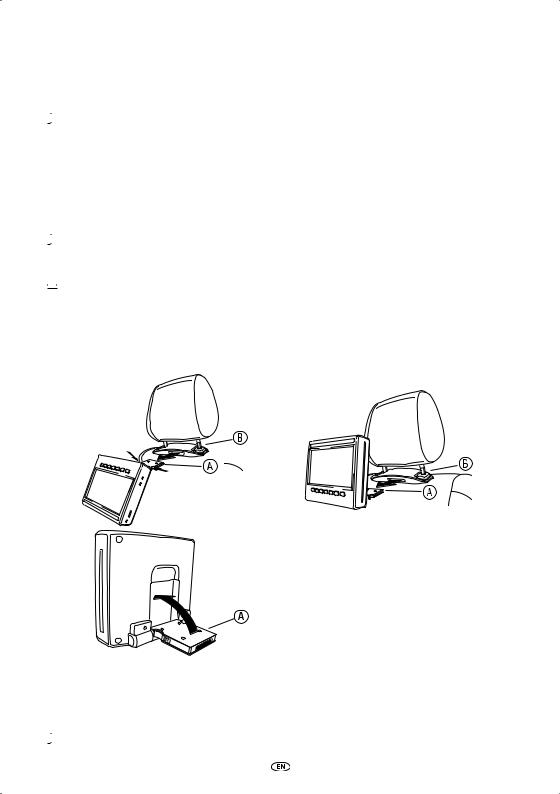
6.2. Removing the MICE system
(M or S) from the seat top console

 Safety Note: It is recommended that you remove the MICE system when leaving the car unattended. This to avoid theft.


 Caution: Before removing the MICE system ensure it is switched OFF.
1.To remove the MICE system from the docking station  on top of the front seat, first press both release clips at the side of the rotation support
  .
.
2.Pull the MICE system out of the docking station  while keeping the release clips pressed down.
press

 press and
  pull out
 press and pull out
3.Fold the rotation support  back into the back of the MICE system.
4.The docking station  will stay attached to the front seat.


 Note: To remove the docking station
  , please refer to your authorised retailer.
MICE 23
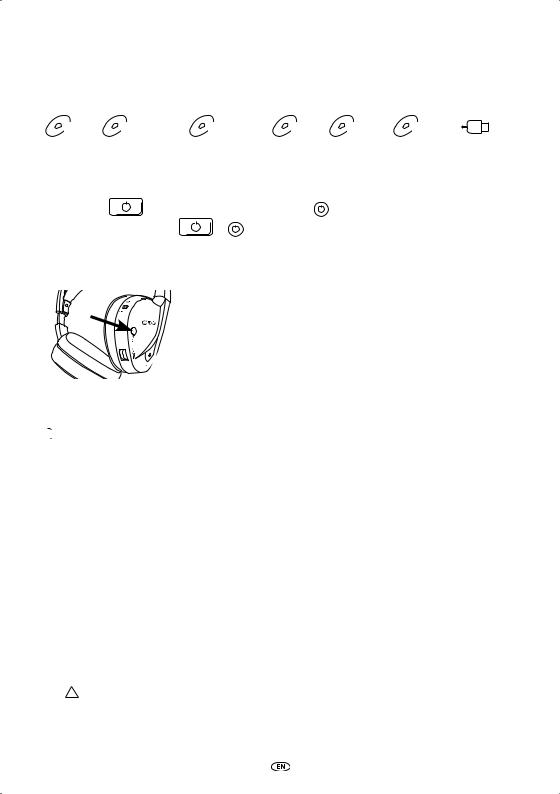
7. Operation for all media
DVD |
DVD+R/RW |
DVD-R/RW |
CD |
CD-R |
CD-RW |
USB |
7.1. Operation start
|
|
|
|
POWER |
1. Press the |
button on the master screen or the |
button on the remote control to turn |
||
|
|
|
POWER |
|
the power on. Press the |
or |
button again to turn the power off. |
||
2. If you are using IR headphones, switch on the headphones.
Press the Power button located on the right earpiece to switch the device on/off.
The red indicator light on the right earpiece will be lit when the IR headphones are switched on.

 Note: If no audio signal is received, the IR headphones will be switched off automatically after a short time.
Where two MICE systems are to be used
To avoid interference in the sound signal, the MICE systems and headphones must be set up correctly. The headphones must be set to the same channel as the MICE systems.
The MICE default factory setting is for the MICE M system Channel B and for the MICE S system Channel A.
Make sure that the headphones to be used for the MICE M system are switched to Channel B, and that the headphones to be used for the MICE S system are switched to Channel A.
Where two MICE M systems are to be used
Change the Channel B on one of the MICE M systems to Channel A.
To do so, press the SETUP button on the remote control. Change the channel selection by pressing the + or button.
Then select Channel A on one of the headphones to be used on the MICE M system with Channel A.
24 MICE

As a result, one MICE M system set to Channel A should have the corresponding headphones set to Channel A. The other MICE M system with the factory defaults setting on Channel B should have the corresponding headphones set to Channel B.
These settings will ensure optimum sound quality for your system and avoid interference.
aCorrect |
|
|
|
rWrong |
||||
|
|
|
|
|
|
|
|
|
Channel A |
|
|
Channel B |
|
Channel A |
|
|
Channel A |
|
|
|
|
|
|
|
|
|
Ch. A |
Ch. B |
Ch. A |
Ch. A |
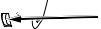
Insert a disc into the slot.


 Caution: Label side facing towards the rear of the vehicle!


 Caution: Do not force the disc into the slot!


 Note: Playback starts automatically.
Volume
Counterclockwise
 Volume control button
Clockwise
Turn the volume control wheel located underneath the right earpiece clockwise to increase or counterclockwise to decrease the volume until the desired volume is reached.


 Caution: Excessive exposure to loud volumes can cause irreparable damage to your hearing!


 Note: Note that + and
 buttons on the remote control will adjust the volume on the wired headphones only. To adjust the volume level on your IR headphones, please use the volume control wheel on the right earpiece.
MICE 25

7.2. Inserting a disc

 Note: Before inserting a disc into the MICE system, please ensure that it is clean and undamaged and that the disc has the appropriate region code.
1.Turn the MICE system ON.
If no disc is installed the system will halt on a white screen with the Toyota logo and will show the message ‘No disc’.
When the system is ON, playback will start automatically when a disc is inserted or a USB device (depending on the USB stick type) is connected.
2.Hold the disc with the label-side facing towards the rear of the vehicle.
3.Insert the disc into the CD/DVD slot at the right-hand side of the screen module until the disc is accepted and pulled inside.
4.If USB playback is started and a disc is inserted, press the USB button to switch between the USB and DVD source.
7.3. Playing a disc

 Note: You can play a disc by using the buttons on the remote control as well as the ones on the MICE system.

 Note: From here on, it is presumed that the headphones (plugged or infrared) and the MICE system are ON and working properly, and that a disc is correctly inserted.
1.Turn the MICE system ON.
2.If no disc is inserted, the message ‘No disc’ appears on the screen.
So insert a disc into the CD/DVD slot (see section 7.4 for the procedure).
3.When a disc is inserted, playback starts automatically.
If a sound CD is inserted, music will play.
If a movie DVD is inserted, the DVD starts to play the normal procedures until the main menu appears.
PLAY
PAUSE

 Note: To start playing, press
  on the MICE system or
  on the remote control.
26 MICE
7.4.Pausing and resuming or stopping playback
PLAY
PAUSE
1.To pause playback press the  button on the MICE system or the
  button on the remote control. Symbol II will appear on the screen.
PLAY
PAUSE
2.To resume playback press the  button on the MICE system or the
  button on the remote control once more.
STOP
3.To stop playback press the  button on the MICE system or the
  button on the remote control.
Note: If the |
|
|
STOP |
|||
|
or |
|
|
|
button is pressed once, the message ‘Press play key to continue’ will |
|
|
|
|
||||
appear on the screen. Playback can be started from the current position. |
||||||
Note: If the |
|
|
STOP |
|||
|
or |
|
|
|
button is pressed twice, playback will be stopped and can be |
|
|
|
|
|
|||
restarted from the beginning of the disc.
7.5. To go to previous
PREVIOUS
1.Press the  on the MICE system or
  button on the remote control to go back to the beginning of a previous part of the CD/DVD.
When playing music the current track will start playing again. When playing a movie the current chapter will start playing again.
PREVIOUS
2.To go back to previous tracks/chapters press the  on the MICE system or the
  button on the remote control over and over again until the preferred track/chapter is reached.
The disc will immediately start playing from that point.
MICE 27

7.6. To go to next
NEXT
1.Press the  button on the MICE system or the
  button on the remote control to move on to the beginning of the next section of the CD/DVD.
When playing music the next track will start playing. When playing a movie the next chapter will start playing.
2.To move on to the next track/chapter repeatedly press the button on the MICE system
NEXT
or the  button on the remote control until the track/chapter you want is reached. The disc will immediately start playing from that point.

 Note: If the MICE system is inserted upside down in the headrest support, the button will change as is indicated in the drawings shown in section 6.1.
7.7. Repeat
Pressing the REPEAT button will show the following messages on the screen: Pressing 1x: ‘Repeat’ message Chapter
Pressing 2x: ‘Repeat’ message Title Pressing 3x: ‘Repeat’ message All
Pressing 4x: Any message will disappear and the track/chapter will continue to play.
When choosing Chapter/Title or All, the current chapter/title or the whole movie will play again until repeat is disabled by pressing a fourth time.
7.8. Zoom
Press the ZOOM button to zoom in or out on the screen.
This function will work with every visual media.
Possible zoom settings:
• Zoom 2x |
• Zoom 3x |
• Zoom 4x |
• Zoom 1/2 |
• Zoom 1/3 |
• Zoom 1/4 |
28 MICE

7.9. Navigation
In zoom 2x, 3x or 4x you can move the screen up, down, left or right.
Press the  button to move the film left.
Press the  button to move the film right.
Press the  button to move the film down.
Press the  button to move the film up.
7.10. Ejecting the disc (MICE M only)
1.To eject the disc from the MICE M press the  button on the MICE system. Playback will stop and the disc will be ejected.

 Note: The ‘Eject’-message will appear on the screen until the disc is removed completely out of the MICE system. After the disc is ejected, the message ‘No Disc’ will appear on the screen.
7.11. Selecting USB sources
There are a number of different USB sources available when using the MICE system depending on the configuration. Depending on the USB stick type, the USB source will automatically play if no disc is inserted in the disc slot.
MICE M only: DVD and USB playback will be displayed on a single screen.

 Note: Read the users’ instructions for the connected USB source. Since it is not possible to operate all the USB options from the MICE system itself, you will need to use the remote control.
MICE M & MICE S
DVD and USB playback will be displayed on both MICE M and MICE S systems.

 Note: MICE S is only a monitor (DVD and USB readers are not installed inside the MICE S).
MICE 29
 Loading...