


DPL950-EN receiver new 5/7/03 10:35 AM Page 1
Safety Information
Thomson Information
CAUTION!
Invisible laser radiation when open. Avoid exposure to beam. Class 1 laser product. This system must be opened only by qualified technicians to prevent accidents caused by the laser beam.
LASER λ = 780 nm, P max = 5 mW
Rating Information: At bottom of the unit
this unit comply with the existing requirements
In accordance with the rating plate of the unit, this unit complies with current standards concerning electrical safety and electromagnetic compatibility.
Please respect the environment Before throwing any batteries away, consult your distributor who may be able to take them back for specific recycling.
Have a BlastJust Not in Your Eardrums Make sure you turn down the volume on the unit before you put on headphones. Increase the volume to the desired level only after headphone are in place.
ADVARSEL!
USYNLIG LASERSTRÅLNING VED ÅBNING NAR SIKKERHEDSAFBRYDERE ER UDE AF FUNKTION. UNGDÅ UDSAETTELSE FOR STRÅLNING.
VORSICHT!
UNSICHTBARE LASERSTRALUNG
WENN ABDECKUNG GEÖFFNET UND SICHERHEITS– VERRIEGELUNG ÜBERBRÜCKT.
NICHT DEM LASERSTRAHL AUSSETZEN!
CAUTION – INVISIBLE LASER RADIATION WHEN OPEN AND INTERLOCKS FAILED OR DEFEATED. AVOID EXPOSURE TO BEAM.
ATTENTION – RAYONNEMENT LASER INVISIBLE DANGEREUX EN CAS D'OUVERTURE ET LORSQUE LA SECURITE EST NEUTRALISEE.
EXPOSITION DANGEREUSE AU FAISCEAU.
CLASS 1 LASER PRODUCT
LASER KLASSE 1
APPAREIL A LASER DE CLASSE 1
LUOKAN 1 LASERLAITE
KLASS 1 LASERAPPARAT
VARNING–
OSYNLIG LASERSTRÅLNING NÄR DENNA DEL ÄR ÖPPNAD OCH SPÄRRAN ÄR URKOPPLADE. BETRAKTA EJ STRÅLEN.
VARO!
AVATTAESSA JA SOUJALUKITUSOHITETTAESSA OLET ALTTIINA NÄKYMÄTTÖMÄLLE. LASERSÄTEILYLLE ÄLÄ KATSO SÄTEESEEN.
For UK Only
CONNECT THE MAIN LEAD INTO AC MAINS POWER SOCKET
POWER SUPPLY 230V. It must not be connected to D.C. mains.
Note; The mains lead of the set is fitted with a molded plug. If the mains socket are not compatible or if for any reason the plug is removed please follow the directions below. The molded plug cannot be rewired and if removed must be disposed of safely.
DO NOT under any circumstances plug the severed plug into any mains socket as this could result in electric shock.
Important: If the plug is removed, rewire the new plug as follow:
The wires in the mains plug are coloured in accordance to the following code:
BLUE = NEUTRAL/BROWN = LIVE
If the colours of the wires in the mains lead of this apparatus may not correspond with the coloured markings identifying the terminals in your plug, proceed as follows:
BLUE wire to the terminal coded N (Neutral) or coloured black.
BROWN wire to the terminal coded L (Live) or coloured red.
DO NOT make any connection to the terminal in the plug which is marked by the letter E or by the earth symbol or
13A
coloured green or green and yellow.
A fused plug must be fitted with a 13A fuse approved by ASTA or BS1362 and fuse covers must be always be securely replaced. If you set does not work, the fuse may be blown.
T H E L I G H T N I N G FLASH AND ARROWHEAD WITHIN THE T R I A N G L E I S A W A R N I N G S I G N ALERTING YOU OF " D A N G E R O U S VOLTAGE" INSIDE THE PRODUCT.
CAUTION
RISK OF ELECTRIC SHOCK
DO NOT OPEN
CAUTION: TO REDUCE THE RISK OF ELECTRIC SHOCK, D O N O T R E M O V E C O V E R ( O R B A C K ) . N O U S E R - S E RV I C E A B L E PA R T S I N - S I D E . R E F E R S E RV I C I N G T O Q U A L I F I E D S E R V I C E PERSONNEL.
THE EXCLAMATION POINT WITHIN THE T R I A N G L E I S A WARNING SIGN ALERTING YOU OF I M P O R T A N T I N S T R U C T I O N S A C C O M PA N Y I N G T H E P R O D U C T.
SEE MARKING ON BOTTOM / BACK OF PRODUCT
WARNING:TO PREVENT FIRE OR ELECTRICAL SHOCK HAZARD, DO NOT EXPOSETHIS PRODUCT TO RAIN OR MOISTURE.
DPL950-EN receiver new 5/7/03 10:35 AM Page 4
Thomson Multimedia Pack
RCA is among the first Consumer Electronics companies to have adopted the mp3 format, starting with the release of its mp3 player, Lyra, into the market. (www.rca.com and www.lyrazone.com). RCA is proud of its initial success and has developed the competencies to enlarge its offering to other products like Discman and this System. RCA thanks you for your purchase of this System which aims at giving you tremendous pleasure while listening to your favorite music. In addition to this great System, RCA is proud to offer you the Music Match CD-ROM, which will assist you in managing your mp3 music library!
The MusicMatch Jukebox
This music management software, to be installed on your PC, allows you to compress music files recorded from you audio CDs into mp3 format and stores them on your PC.
•It makes the search and download of Internet music easier,
•It allows for the management of compressed music and the creation of your own playlist,
•The Jukebox is a true audio player installed on your PC,
•It gives access to thousands of net radios available on the web today.
You can download music files encoded in mp3 from several Internet sites like www.mp3.com, www.thomsonscenium.com.
PLAYING mp3
• Use .mp3 as the extension when converting audio files into mp3 for saving onto CD-R(W) or CD-ROM, e.g. Rocky08.mp3. Do not use any other extension e.g. .doc, .pdf.
• Do not use the .mp3 extension for other text or non-audio data files as this may result in serious malfunction and harmful noise interference.

DPL950-EN receiver new 5/7/03 10:35 AM Page 5
Table of Content
Safety Information
Thomson Multimedia Pack
Getting Started
Unpacking the DVD Receiver . . . . . . . . .2 Unpacking the Speakers . . . . . . . . . . . . .2 Inserting Batteries into Remote Control .3 Set Up and Maintenance of the
Receiver . . . . . . . . . . . . . . . . . . . . . . . . . .3 Protect your Components from Overheating . . . . . . . . . . . . . . . . . . . . . . .3 Disc Information . . . . . . . . . . . . . . . . . . .3 Connecting to Audio-Visual
Components . . . . . . . . . . . . . . . . . . . . . .4 Digital Connection . . . . . . . . . . . . . . . . .5 Connecting Antennas . . . . . . . . . . . . . . .5 Connecting the Speakers . . . . . . . . . . . . .6 Connecting the Subwoofer . . . . . . . . . . .6 Positioning your Speaker . . . . . . . . . . . . .7 Front Speaker Placement . . . . . . . . . . . . .7 Preferred Surround Placement . . . . . . . .8 Advanced Surround Setting . . . . . . . . . .8 Test Tone / Channel Balance . . . . . . . . . .9 Using Headphones . . . . . . . . . . . . . . . . . .9 Factory Setting . . . . . . . . . . . . . . . . . . . . .9
Operating your Receiver
CD/mp3 Player
mp3 Recommendations . . . . . . . . . . . . .30 Loading and Playing an Audio CD . . . .30 On-Screen Banner Display for CD Playback . . . . . . . . . . . . . . . . . . . . . . . . .32 On-Screen Display for mp3 playback . . .35
EN
Radio
Operating the Radio . . . . . . . . . . . . . . .37
Troubleshooting Tips . . . . . . . . . .40
Care and Maintenance . . . . . . . . .42
Remote Codes . . . . . . . . . . . . . . .43
Language Codes . . . . . . . . . . . . . .45
Receiver Controls . . . . . . . . . . . . . . . . . .10 Remote Control . . . . . . . . . . . . . . . . . . .11 Display . . . . . . . . . . . . . . . . . . . . . . . . . .12 Switching On/Off . . . . . . . . . . . . . . . . . .13 Selection of Audio/Video Source . . . . . .13 Using the Remote to Control Additional Components . . . . . . . . . . . . . . . . . . . . . .14
Advanced Sound Control
Sound Enhancement Systems . . . . . . . .15
Fine Setting of Components . . . . . . . . .16
Fine Setting of the Speakers . . . . . . . . .17
Advanced Setting . . . . . . . . . . . . . . . . .17
DVD Player
Basic Playback Features . . . . . . . . . . . . .19 Quick Search . . . . . . . . . . . . . . . . . . . . .19 Freeze Frame and Frame Advance . . . .19 Slow Motion Playback (DVD only) . . . . .20 On-Screen Banner Display . . . . . . . . . . .20 Setup Menu . . . . . . . . . . . . . . . . . . . . . .25
1
DPL950-EN receiver new 5/7/03 10:35 AM Page 6
Getting Started
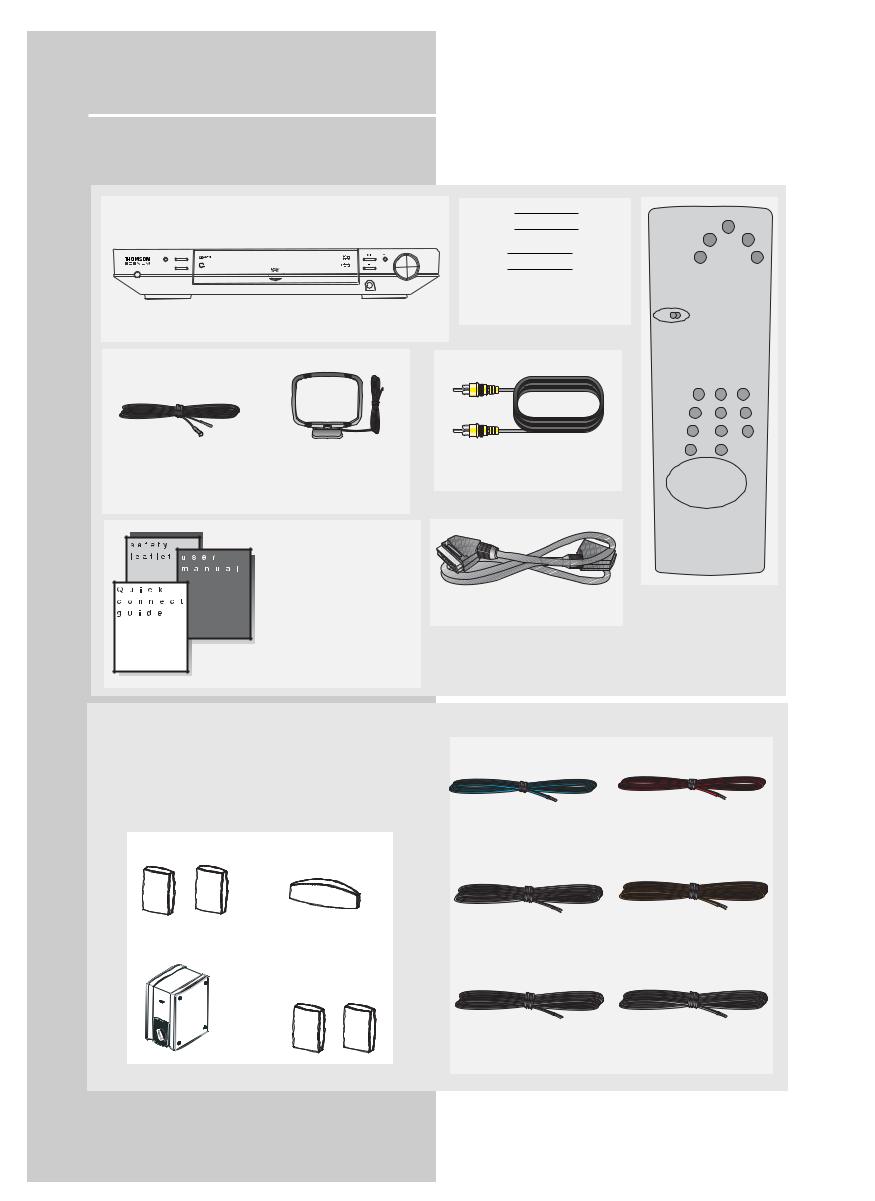
Unpacking the DVD Receiver
You should receive the following items:
|
|
D |
I |
G |
I |
T A |
L |
A |
/ |
V |
R E C E |
I |
V E R |
BAND/APP |
SOURCE |
|
|
|
|
|
|
|
|
|
|
|
VOLUME |
RANDOM |
SURROUND |
mp3 |
|
|
|
|
|
|
|
|
|
|
|
|
|
|
|
|
|
|
|
|
|
|
|
||
POWER/ECO |
|
|
|
|
|
|
|
|
|
|
|
|
|
|
|
|
|
|
|
|
|
|
|
|
|
|
PHONES |
One DVD receiver unit
One Pig-Tail |
One external AM loop |
antenna wire |
antenna |
• one instruction book;
• one safety leaflet;
• one Quick Connection Guide
• one warranty card
 + -
+ -
 + -
+ -
One pair of “AA” batteries
one video cable (single wire) with yellow connectors;
one SCART cable;
theater modes
OPEN/CLOSE |
info |
|
|
|
stereo |
delay |
|
tv |
dvd |
|
|
|
|
digital |
tuner up |
level |
|
tape |
sat/cab |
|
|
|
tuner |
video |
|
|
|
/ vcr |
|
|
|
|
hifi |
dvd /cd |
pty |
|
RDS |
|
|
|||
|
|
tuner down |
||
tv |
vcr/sat |
return |
|
menu |
|
|
|
|
pr |
|
|
|
|
pr |
|
|
1 |
2 |
3 |
|
|
4 |
5 |
6 |
|
|
7 |
8 |
9 |
|
memo |
0 |
|
|
|
clear |
PLAY |
|
|
REV |
|
FWD |
||
ZOOM |
|
PAUSE |
||
REC vcr |
STOP |
|
|
|
MULTI PRODUCT
One Universal Remote
Control
Unpacking The Speakers
• one set of speakers including 1 set of left and right front speakers, 1 centre speaker, 1 subwoofer and 1 set of left and right rear speakers.
1 X green/black wire for center speaker
FRONT SPEAKERS |
CENTER SPEAKER |
|
1 X white/black wire for
SUBWOOFER |
front left speaker |
|
|
|
REAR SPEAKERS |
|
(SURROUND SOUND) |
1 X blue/black wire for rear left speaker
1 X red/black wire for front right speaker
1 X purple/black wire for subwoofer
1 X gray/black wire for rear right speaker
2
DPL950-EN receiver new 5/7/03 10:35 AM Page 7
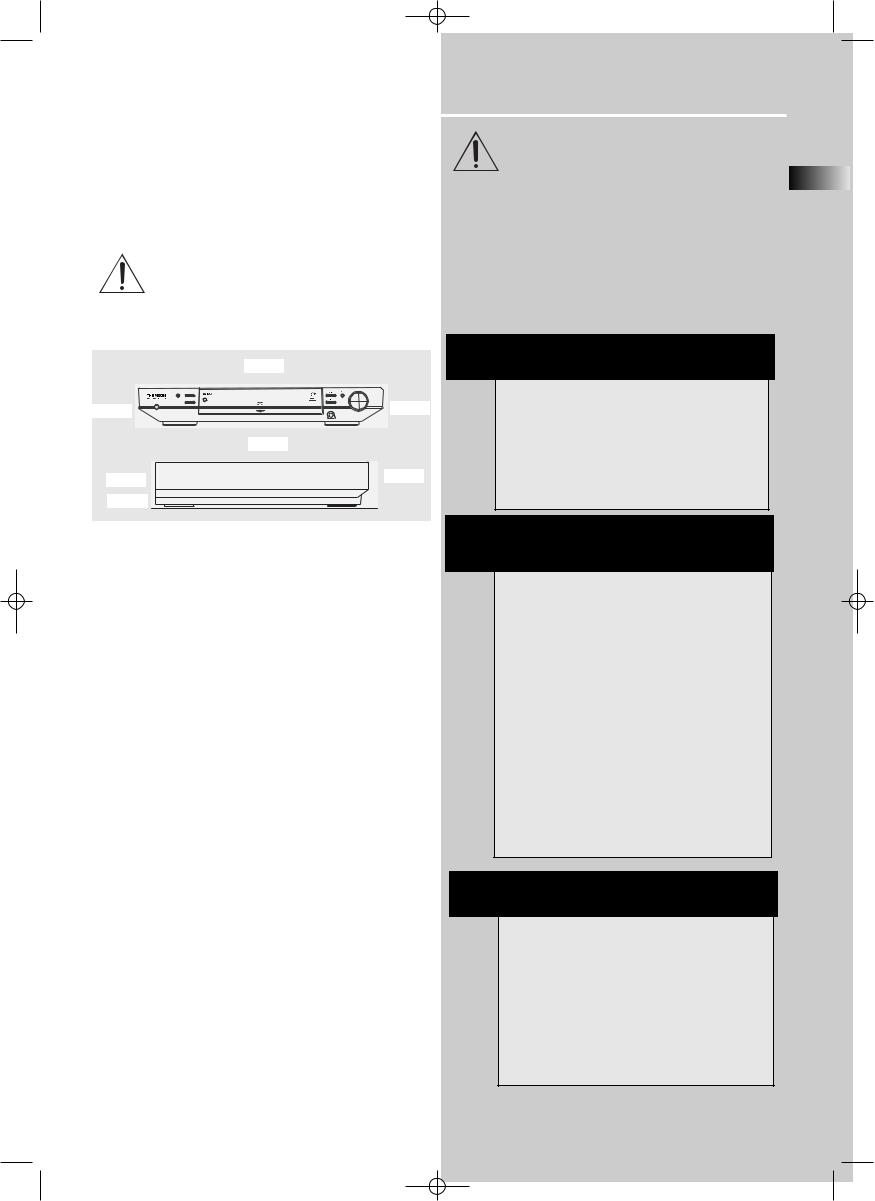
Inserting Batteries into Remote Control
Insert two AA(R6) batteries according to the + and - signs on the battery compartment. To use the remote control, point it directly at your receiver.
Set up and Maintenance of the Receiver
IMPORTANT NOTE
• Provide spaces for sufficient ventilation as indicated below. If the space is insufficient, the unit may overheat resulting in malfunction and shorter life time.
10cm/4”
|
D I G I T A L A / V R E C E I V E R |
|
BAND/APP SOURCE |
|
VOLUME |
RANDOM |
mp3 |
|
SURROUND |
10cm/4” |
|
POWER/ECO |
PHONES |
|
10cm/4” |
|
|
|
10cm/4” |
|
Rear |
|
Front |
|
|
5cm/2”
Getting Started
Protect your Components from Overheating
EN
•Do not block ventilation holes in any component. Arrange the components so that air can circulate freely.
•Do not stack components directly on top of each other.
•Allow adequate ventilation when placing your components in a stand.
•Place the receiver near the top shelf of the stand so heated air rising from it will not affect other components.
About CDR, CDRW, Audio mp3, Compact Disk Audio (CDA), DVD Video, DVD Audio
This model is compatible to play CDR, CDRW, Audio mp3, Compact Disk Audio (CDA), Video Compact Disk (VCD) and DVD Audio.
While your disc player is compatible with the largest number of discs possible, it cannot be guaranteed that you will be able to play discs which might not be compatible with audio CD, VCD and SVCD standards.
•Do not connect to the AC power cords until all connections are completed.
•Do not use your set immediately after transferring it from a cold place to a warm place: there is risk of condensation.
•Do not expose your set to water and excessively high temperatures.
•After having disconnected your set, clean the case with a soft cloth, or with a slightly damp leather chamois. Never use strong solvents.
Disc handling precaution:
•Do not touch the recorded surface.
•Do not use record cleaning sprays, solvent or anti-static liquid.
•If the disc is dirty, clean it with a damp cloth and wipe from the center out. Wipe in straight line and not in circular motion.
•Do not attach stickers, label on the disc.
•Store the disc in its case after playing.
NOTES ON CD-R/RW DISC
This unit is compatible with CD-RW/ CD-R discs for playback.
•Do not affix any type of labels to either side (recordable or labeled side) of a CD-R/RW disc as this may result in the unit malfunctioning.
•To avoid damages to the CD-R/RW disc, do not open the disc compartment door while the disc is being read.
•Do not load an unrecorded CD-R/RW disc into the unit. This may take a longer time to read the disc.
•Playback capability for CD-RW discs may vary due to variations in the quality of the CD-RW disc and the recorder used to create the disc.
Playback capability of CD-R / DVD-R and rewritable discs, compatibility with this player depends on the recorder, the burning software and the disc used.
ATTENTION
This unit is incompatible with the following disc formats:
DVD-ROM, DVD-RW, DVD+RW, DVD RAM, DVD-R, CDV, SACD, DVD Audio (High resolution tracks). JPEG pictures, Kodack disc, Divx video disc, photo CD, CD-G, S-VCD, Data part of CD Extra, disc with non standard shape (e.g. heart), disc with region code different from the one specified on the back of the unit.
3

DPL950-EN receiver new 5/7/03 10:35 AM Page 8
Getting Started
Connecting to Audio-Visual Components
ANALOG INPUT
Alternatively, if you have no VCR or SAT, you can connect any other compatible components like TAPE player, TV to your DVD receiver via the VCR/SAT input.
¥ VCR audio/video out will have output signal in SAT, DVD/CD and TUNER modes. When VCR (source) is selected, there will be no audio/video signal from VCR audio/video out.
VCR
INAUDIOTO |
OUTAUDIOTO |
(VCR) |
(VCR) |
TOVIDEOOUT(VCR)
TOVIDEO IN(VCR)
TV SCART INPUT
Plug the SCART cable provided into the TV (RGB SCART) out socket of your DVD receiver and into the AV1 in socket (sometimes also call AUX1 or EXT 1) on your TV set.
DIGITAL INPUT
Connect components capable of outputing Dolby Digital (e.g. SAT) or standard PCM (CD) format digital signals. Read section on "Input Signal Setting" under "Advanced Sound Control" carefully to adjust the matching input settings.
|
MONITOR |
|
DVD ONLY |
OUT |
IN |
IN |
|
|
|
|
|
|
|
|
|
|
|
|
|
|
OUT |
|
|
|
|
|
|
|
DIGITAL OUTPUT |
|
OUT |
|
Pr |
|
|
VIDEO |
|
|
|
|
|
|
|
|
|
|
Connect components |
||
|
|
|
|
|
|
|
|
|
|
|
|
|
|
|
|
|
|
|
capable of recording |
|
|
|
Pb |
|
|
L |
|
|
digital signals (e.g. MD, |
|
|
|
|
|
|
|
|
||
|
|
|
|
L |
|
|
|
|
CD recorder player) |
|
|
|
|
|
|
AUDIO |
|
|
equiped with a optical |
|
|
|
Y |
|
|
|
|
|
|
|
|
|
R |
|
R |
|
|
input. |
|
|
|
|
|
|
|
|
|||
|
|
|
COMPONENT VIDEO |
|
|
|
T V |
OPTICAL |
OPTICAL |
|
S-VIDEO OUT |
|
OUT |
IN |
IN |
|
IN |
OUT |
|
|
|
OUT (480P/480I) |
|
||||||
|
DVD ONLY |
|
|
||||||
|
|
|
|
VCR |
SAT |
|
|
|
|
|
|
COMPONENT |
|
|
|
|
|
||
|
S |
To SCART AUDIO/VIDEO IN (TV) |
|
|
|
|
|||
|
- |
|
|
|
|
|
|||
VIDEO IN (TV) |
VIDEO |
|
|
|
(SAT)OUTAUDIOTO |
(SAT)OUTVIDEO |
(SAT)OUTOPTICAL |
|
|
|
IN |
|
|
|
|
|
|||
|
(TV) |
IN |
|
|
|
|
|
|
|
|
TV |
(TV) |
|
|
|
|
|
|
|
|
|
|
|
|
|
|
|
|
|
|
|
|
|
|
|
|
SAT |
|
|
|
|
|
|
|
S-VIDEO |
|
|
|
|
|
|
|
|
|
S-video provides a better connection for the video portion of the signal |
||||
|
|
|
|
|
than composite video (yellow color terminal). When connecting S-video |
||||
|
|
|
|
|
cable, a Composite video cable (yellow RCA connector) must also be |
||||
|
|
|
|
|
used. S-video will have video output for DVD playback only. |
||||
Component video output
Component video terminal provides the best connection for video. By seperating the color information (Pb/Pr) and the luminance signal (Y), the image is improved comparing with S-video or composite video connection (result may vary on different TV / monitor). If your TV is equipped with these terminals (e.g. Y/Pb/Pr, Y/Cb/Cr, Y/B-Y/R-Y), use an appropriate video cable (75 Ohm) and connect to the system. Make sure to match the terminal color.
SCART output
If no SCART socket is available on your TV set, check whether your TV has another Video socket (Components, S-Video or composite) that you can use to connect your player using the corresponding socket. Do not forget to connect the Audio cable to your TV set.
Note: If your TV set is equipped with compomet sockets and you choose for this connection, you must correctly configure whether RGB or Component signal will be used. For more information about RGB switching, please refer to page 24.
4
 Loading...