


MULTIMEDIA PLAYER WITH DVB-T2 RECEIVER
МУЛЬТИМЕДИЙНЫЙ ПЛЕЕР С DVB-T2 ПРИЕМНИКОМ
TF-DVBT226
Instruction manual
Руководство по эксплуатации

Table of contents
Dear customer!
Thank you for purchasing our product. For safety, it is strongly recommended to read this manual carefully before connecting, operating and/or adjusting the product and keep the manual for reference in the future.
Table of contents |
2 |
Before you start |
3 |
Important safeguards |
3 |
Utilization of the product |
3 |
Connection |
4 |
Connection |
4 |
Operation |
5 |
Control elements |
5 |
Front panel |
5 |
Rear panel |
5 |
Remote controller |
6 |
Changing the battery |
6 |
General operation |
7 |
OSD operation |
8 |
Installation |
8 |
Program |
8 |
Picture |
9 |
Channel |
9 |
Time |
9 |
Option |
9 |
USB |
10 |
USB information |
10 |
PVR and EPG |
11 |
Time Shift |
11 |
General information |
12 |
Troubleshooting |
12 |
Accessories |
13 |
Supported formats |
13 |
Specifications |
14 |
contents of Table
2

Before you start
Before you start
Important safeguards |
Utilization of the product |
•To prevent risk of fire or electric shock, avoid merging the unit into the water or under conditions of high humidity.
•Switch off the device from the socket, if you’re not going to use it for a long time.
•Do not place objects on the device.
•Place the unit in a dry and ventilated area. Eliminate proximity to heaters, do not expose to sunlight, mechanical vibration, humidity and dusty environment.
•It is possible to use a small amount of neutral detergent to clean the device.
•Never use abrasive materials or organic substances (alcohol, gasoline, etc.) to clean the device.
•For repair and maintrnance contact only authorized service centers.
•Before connecting the device to the mains, please make sure the network cable can be easily disabled at any time.
•Unplug from the mains and from the cable television antenna, unless you intend to use it for a long time, or before a thunderstorm. Do not touch the unit, power cord and antenna cable during a thunderstorm!
•Before you turn on the device, please check the reliability of its connection to the power supply and other devices.
•This unit can not receive television signals during the movement of the vehicle.
•After prolonged exposure to cold, before turning on leave the device for 1 hour at a room temperature.
 Before using this product, carefully read the manual. After you read, save it for future use. If necessary, contact your local dealer for service.
All the illustrations in this manual are schematic images, which may differ from actual objects.
If you want to dispose of this product, do not mix it with general household waste. There is a separate collection system for used electronic products in accordance with legislation that requires proper treatment, recovery and recycling.
Please contact your local authorities for the correct method of disposal. By doing so, you will ensure that your disposed product undergoes the necessary treatment, recovery and recycling and thus prevent potential negative effects on the environment and human health.
3

Connection
Connection
Antenna input
• Connect an external DVB-T/T2 antenna
(cable) connector to the antenna input RF IN.
 The signal in the block cable antenna can fail to contain DVB-T/T2 signal due to the carrier frequency altered by the cable network operator.
 In order to receive digital air TV signal use an indoor or outdoor UHF antenna. Specify the possibility and quality of digital air signal with your local digital TV service providers. The absence of a stable TV signal in your area cannot be a reason for returns or refunds without an additional test of TV signal reception in your area.
 To increase the reception quality of the state digital air television in rural areas or at significant distances from a broadcasting center we recomment using individual active outdoor UHF antennae with a high resistance factor, and placing them at maximum possible heights.
Power adaptor input
• Connect the DC power adaptor to this input and plug it into the electrical outlet.
Loop output
• Connect the LOOP OUT jack to TV's antenna input using a special adapter (not included) for supplying an analog TV signal.
HDMI-out
• If your TV has an HDMI video input, connect it to an HDMI output of this unit using an HDMI cable (included).
Stereo audio output
• Connect the left (white) and right (red) terminals of the stereo audio output to the corresponding audio inputs on your TV using an RCA cable.
CVBS output
• Connect the yellow composite
video output to the composite video input on your TV using an RCA cable.
Connection
4

Operation
Operation
Controllers
Front panel
|
|
|
|
|
|
|
|
|
|
|
|
|
|
|
|
|
|
|
|
|
|
|
|
|
|
|
|
|
|
|
|
|
|
|
|
|
|
|
|
|
|
|
|
|
|
|
|
|
|
|
|
|
|
|
|
|
|
|
|
|
|
|
|
|
1 |
2 |
3 |
4 |
5 |
|
|||||||
1.POWER button
2.MENU button
3.CHbutton
4.CH+ button
5.USB port
Rear panel
6 |
7 |
8 |
9 |
10 |
6.Antenna input
7.Antenna output (loop)
8.HDMI output
9.Composite AV output (RCA)
10.Power adaptor socket
5
Operation
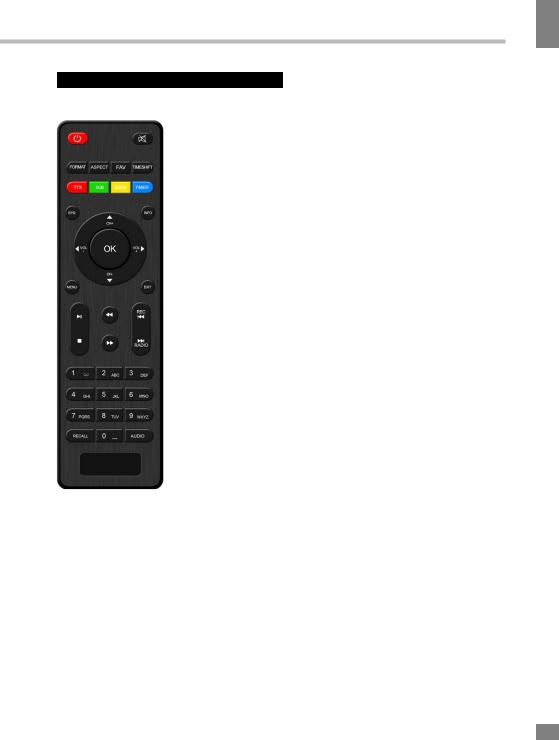
Remote controller
YELLOW (ZOOM): Function key (Zoom ).
BLUE (TIMER): Function key (Enter Schedule menu). EPG: Shows the electronic program guide.
INFO: Display information about the current channel when playing channel or show the receiver’s software and hardware info when main menu is showing.
UP/DOWN (CH+/-): To switch channel or move the cursor. LEFT/RIGHT (VOL+/-): To increase/decrease volume; Press to move the cursor.
OK: To confirm current setting or display channel list in no-menu mode.
MENU: Display main menu on TV screen, and press again to hide the menu.
EXIT: Use this key to quit current menu.

 (PLAY/PAUSE) : Switch pause/play mode when playback or timeshift.
 (STOP): Stop record, timeshift or stop playback multimedia file.
 : Fast backward to view the current playing multimedia file or timeshift channel.
 : Fast forward to view the current playing multimedia file or timeshift channel.
REC ( ): Start to recording when USB disk is available (Go to the previews file in file list).
RADIO ( ): Switch between TV and Radio mode (Go to the next file in file list).
0~9: Numeric keys.
RECALL: Go back to the previous viewed channel. AUDIO: Switching audio language.
Changing the battery
POWER: Switch the receiver between standby and working mode.
MUTE: To switch on/off volume. FORMAT: Quick change receiver's output resolution by one key.
ASPECT: Switch Aspect Ratio quickly.
FAV: Displays your favorite channels list; press FAV again to access to the other favorite lists.
TIMESHIFT: Begin to timeshift.
RED (TTX): Function key (Switch on teletext, if current channel has this option, and use EXIT key to quit teletext).
GREEN (SUB): Function key (Display subtitle options (availability depends on the channel)).
1.Remove the battery compartment cover on the back of the RC.
2.Insert two AAA batteries into the battery compartment making sure that the correct polarity is observed.
3.Install the cover back.
•The RC should be pointed at remote sensor within 8 meters and within 30 degrees at the left or the right side.
•Take the battery out of the RC if it is not used for a long time.
•Do not mix new and used batteries or different types of batteries. Weak batteries can leak and severely damage the RC.
•Do not expose the RC to shock, liquids, and do not place it in an area with high humidity.
Operation
6

Operation
Operation
General operations
STANDBY
When this unit is connected to the mains, it goes into operation mode. When the unit is running, press STANDBY button to turn the device into sleep mode. In sleep mode, press STANDBY button on the remote or press and
hold this button on the panel to turn the device from sleep mode.
INFO
When viewing a TV channel, press this button to display/hide the menu pages containing various information about the current channel (frequency, reception level etc.).
EPG
Press EPG button to display the menu of the electronic TV guide (Electronic Program Guide), which displays the schedule of programs for a certain period of time for each available channel. Using this function, you can easily find programs you are interested in. Use UP/DOWN cursor buttons to select the desired TV program. Use LEFT/RIGHT cursor buttons to switch pages of the interactive program guide.
 EPG-information cannot work if the service is not provided by operator.
AUDIO
Press AUDIO to select the audio language or audio channel, if this choice is supported by the current channel.
CH+/CH-
Press these buttons to select the previous or next channel.
Cursor
Press these buttons to navigate through the various menus.
OK
Press this button to confirm the selection options in the menu.
VOL-/VOL+
Press these buttons to adjust the sound volume level.
The number buttons
Press number buttons to enter the channel number you want or other numbers (such as passwords, play time, etc.).
REV/FWD
When playing a media file, press these buttons for fast forward or backward playback.
PLAY/PAUSE
When playing a media file, press this button to start or pause the playback.
Red/Green/Yellow/Cyan buttons
Press the colored buttons to perform various operations in the edit menu of channels, teletext recording.
MUTE
Press this button to enable/disable the sound.
TTX
Press this button to enable or disable the Teletext (Teletext is not supported by some TV channels).
REC
When a USB drive is connected to this unit, while watching TV channels press REC to start recording video from the channel to USB. Press STOP button to stop recording.
7
Operation
SUB
Click this button to select subtitle language, if this choice is supported by the current channel.
RADIO
Press this button to switch between TV and radio.
RECALL
Click this button to select the last-viewed channel.
PREV/NEXT
When playing a media file, press these buttons to select previous/next file.
STOP
When playing a media file, press this button to stop playback.
OSD operation
1.Press MENU button to enter the setting menu displayed on the screen.
2.Press LEFT/RIGHT cursor buttons on the RC to select setting page.
3.Press OK button on the RC to go to the parameter list.
4.Press UP/DOWN cursor buttons on the RC to select a parameter to adjust.
5.Press LEFT/RIGHT cursor buttons on the RC to adjust the selected parameter.
6.Press MENU button to return to the previous menu page. Press EXIT button on the RC to quit the menu.
 Some menu items may be in grey color, in this case they are not adjustable. Pictures of OSD menu are for reference only; they may differ from the real screens.
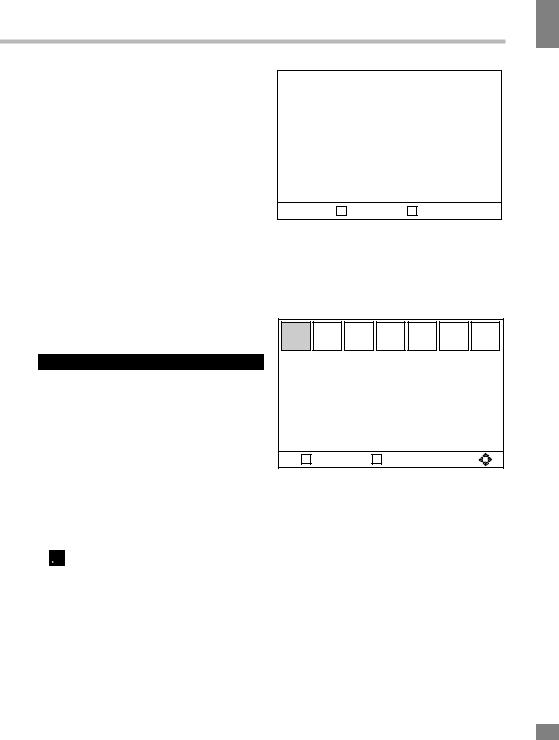
Installation
When you start the unit for the first time, or after resetting it to factory defaults, you will see the Installation menu on the screen.
Installation
OSD Language
Country
Channel Search
EXIT Return |
ОК Confirm |
•OSD Language: select the language of the system menu.
•Country: select your country.
•Channel Search: press OK to start automatic channel search.
Program |
|
Program Edit |
Program |
|
|
EPG |
|
Sort |
|
LCN |
|
EXIT Return |
ОК Confirm |
• Program Edit: Enter password (000000) to access the channel editor menu.
You can edit the channel list using the following functions: favourite, move, skip, lock, delete.
Favourite: Select the program you want to add to your list of favouites and press the
FAV button.
Move: Select the program that you want to move — press the Red button to mark the program — press UP/DOWN to move it up and down the list and press OK to confirm.
Skip: Select the program you want to skip and press the Green button to skip it.
Lock: Choose a channel and press the Yellow button on the RC; The channel will be locked. You must enter the password
(000000 by default) to unlock it.
Operation
8

Operation
9
Operation
Delete: Choose a channel and press the Blue button on the RC; Press OK to confirm. The channel will be deleted.
•EPG: See «General operations» program for more details about Electronic Program Guide.
•Sort
Adjust the way the channels are sorted.
• LCN
Set logical channel number on/off.
Picture |
|
|
|
|
Picture |
Aspect Ratio |
|
|
Resolution |
|
|
TV Format |
|
|
Video Output |
|
|
LED Display Settings |
||
|
EXIT Return |
ОК Confirm |
• |
Aspect Ratio: 4:3 LB/4:3 PS/16:9 FIT/16:9 |
|
LB. |
Resolution: 480i/480p/576i/576p/720p/ |
|
• |
||
1080i/1080p/Auto. |
||
•TV Format: PAL/NTSC/Auto.
•Video output: select composite (CVBS) or HDMI output.
•LED Display Settings: switch the unit display on and off and adjust its settings.
Channel Search
Channel Search |
|
Auto Seach |
|
Manual Search |
|
Country |
|
Antenna Power |
|
EXIT Return |
ОК Confirm |
• Auto Search: automatically search for available channels and save them.
•Manual Search: manually seach for each channel and save it.
•Country: select your country of residence.
•Antenna Power: select to enable an external active antenna (if installed).
Time |
|
Time |
|
Time Offset |
|
Country Region |
|
Time Zone |
|
Sleep |
|
EXIT Return |
ОК Confirm |
• Time Offset: set the GMT time zones automatically or manually.
•
set to manual.
Option |
|
|
Option |
OSD Language |
|
Subtitle Laguage |
|
Audio Language |
|
Digital Audio |
|
EXIT Return |
ОК Confirm |
•OSD language: select the on-screen menu language.
•Subtitle language: select the subtitle
language.
•Audio language: select the audio track language if several languages are supported.
•Digital audio output: select the digital output type (PCM/RAW).
|
|
|
Operation |
System |
|
USB |
Operation |
|
|
|
|
|
System |
|
USB |
Parental Guidance |
Multimedia |
|
|
Set Password |
|
Photo Configure |
|
Restore Factory Default |
Movie Configure |
|
|
Information |
|
|
|
|
PVR Configure |
|
|
Software Update |
|
|
|
|
|
|
|
Game Center |
|
|
|
EXIT Return |
ОК Confirm |
EXIT Return |
ОК Confirm |
• Parental Guidance: lock viewing of a |
• Multimedia: if a USB storage containing |
||
channel (first enter the original password |
media files is connected to this unit, press |
||
000000 or your own password). |
OK button to show the menu in which you |
||
• Set password: set or change the |
can select an icon to start playback of |
||
password for the locked channels (enter |
corresponding supported type file (Music/ |
||
the original password 000000 or your |
Photo/Movie/PVR). |
||
own password). You will then be asked |
• Photo Configure: adjust slide time, |
||
to enter a new password. Note: if you |
mode and aspect ratio. |
||
forget your password use the master |
|
• Movie Configure: adjust subtitle size, |
|
password 888888. |
background and font color. |
||
• Restore Factory Default: reset all |
• PVR Configure: PVR and Timeshift |
||
settings to initial factory values. You will be |
setting (see below). |
||
asked to enter the password. |
|
|
The screen menu of your unit can be |
• Information: view model, hardware and |
changed without prior notice and hence differ |
||
software information. |
from the menu represented in this Manual. |
||
• Software Update: update the unit's software from a USB stick. Only for qualified technicians.
• Game Center: access to pre-installed games.
10
 Loading...