


Radio with alarm
Радиоприёмник с будильником
TF-1566U
Instruction manual
Руководство по эксплуатации
Instruction manual
Dear customer!
Thank you for purchasing our product. For safety, it is strongly recommended to read this manual carefully before connecting, operating and/or adjusting the product and keep the manual for reference in future.
1 |
|
2 |
3 |
4 |
5 6 |
7 |
|
||||||||||||
|
|
|
|
|
|
|
|
|
|
|
|
|
|
|
|
|
|
|
|
|
|
|
|
|
|
|
|
|
|
|
|
|
|
|
|
|
|
|
|
|
|
|
|
|
|
|
|
|
|
|
|
|
|
|
|
|
|
|
|
|
|
|
|
|
|
8 |
|
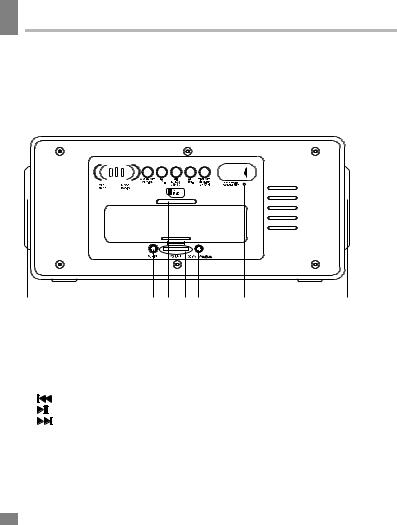
11. VOLUME regulator |
8 |
||
|
12. DC IN 5V power input |
||||
|
13. FM antenna |
||||
9 10 11 12 |
13 |
||||
|
|
Description |
|
|
|
1. Function switch |
6. TIME SET/MEM-UP/12H/24H button |
||||
2. ALARM.SET/MEM-DN button |
7. USB port |
|
|||
3. |
/TUNbutton |
8. Speakers |
|
||
4. |
/MEMO/USB/SD button |
9. AUX IN jack |
|
||
5. |
/TUN+ button |
10. Memory card slot |
|
||
|
|
|
|||
Not indicated: battery compartment (back panel), additional battery terminal (back panel), LED display (front panel)
2

Instruction manual
Remote controller
1
2 

 7
7
8
3
9
4 

 10
10
11
5
6
1.
 /PLAY/PAUSE button 2.
  /TUNING button
3.USB/SD button
4.CLOCK button
5.SNOOZE button
6.Number buttons
7. /TUNING button
8.MUTE button
9.REPEAT button
10.ALARM button
11.MEMORY button
Utilization of the product
If you want to dispose of this product, do not mix it with general household waste. There is a separate collection system for used electronic products in accordance with legislation that requires proper treatment, recovery and recycling.
Please contact your local authorities for the correct method of disposal. By doing so, you will ensure that your disposed product undergoes the necessary treatment, recovery and recycling
and thus prevent potential negative effects on the environment and human health.
Important safeguards
•The instruction manual contains important operating and maintenance instructions. For your safety, it is necessary to refer the manual. Keep the manual for use in future.
•Do not hit or drop the unit.
•Do not expose the unit to vibration, direct sunlight, too high or low temperature or humidity.
•If you are not going to use the unit within a long period of time, remove the batteries to avoid their leakage.
•Do not disassemble the unit yourselves. Refer servicing to qualified service personnel.
3
3

Instruction manual
Power supply
Battery operation
•Open the battery compartment cover. Insert 4 x AAA batteries (not included). Please observe correct battery polarities or the unit will not work. Close the battery compartment cover.
•When the batteries are exhausted, they should be replaced.
•Do not use new and old batteries together. Do not recharge or heat the batteries. Uncharged batteries are not a reason for addressing to a repair service.
•Disconnect power cord from the socket, when the unit is on battery supply. Battery power is automatically disconnected when the power cord is connected to a power socket.
AC adaptor power
•Plug the supplied AC/DC power adaptor into the power input on the back of the unit. Connect the power cord to the AC household main outlet. Make sure the voltage is compatible.
•Always remember to disconnect the power cord from the main supply before disconnecting it from the unit.
•Disconnect the power cord from the mains when not in use.
Additional power
• Insert 2 batteries AG13 into the additional battery terminal. This is
additional power supply intended for maintenance of clock and alarm
settings. Without the additional power you will need to set the clock and alarm anew after each interruption of power supply.
• When the batteries are exhausted they should be replaced. New batteries should be aquired by user. Replace the batteries only with batteries of the same type.
Setting the clock
Set the function switch to MODE position. Press and hold CLOCK button on the RC (TIME SET/MEMUP/12H/24H button on the unit) until the digits flash. Press repeatedly  /TUNand
  /TUN+ buttons on the unit (
 /TUNING and
  /TUNING buttons on the RC) to set 12-hour or 24-hour clock display mode. Press CLOCK (TIME SET/MEM-UP/12H/24H) button to go to hour setting, hour digits will flash. Press repeatedly
  /TUNand
  /TUN+ (
 /TUNING and
  /TUNING) buttons to set hours. Press CLOCK (TIME SET/MEMUP/12H/24H) button to go to minute setting, minute digits will flash. Press repeatedly
  /TUNand
  /TUN+ (
  /TUNING and
  /TUNING) buttons to set minutes. Press CLOCK (TIME SET/MEM-UP/12H/24H) button to confirm clock setting.
4
4

Instruction manual
Radio operation
•Set the function switch to RADIO position; the current radio frequency will be displayed for several seconds, then clock will be displayed.
•Press repeatedly  /TUNand
 /TUN+ buttons on the unit (
 / TUNING and
  /TUNING buttons on the RC) to change the current frequency downwards or upwards by 100 KHz.
•Press and hold  /TUNand
  /TUN+ (
 /TUNING and
  /TUNING) buttons to search the nearest strong signal station downwards or upwards automatically.
•Press MEMORY button on the RC (
 /MEMO/USB/SD button on the unit); C01 will blink. Press repeatedly TIME SET/MEM-UP/12H/24H or ALARM.SET/MEM-DN buttons on the unit to select the position number for the current frequency. Press MEMORY (
 /MEMO/USB/SD) button to save the frequency in the position (1~30).
•Press and hold MEMORY (
 / MEMO/USB/SD) button; it will start scanning from the lowest frequency and automatically save all available stations in positions (up to 30).
•When stations are saved in the memory, press repeatedly TIME SET/ MEM-UP/12H/24H or ALARM.SET/ MEM-DN buttons on the unit or number buttons on the RC to select saved stations.
•In radio mode, press SNOOZE button; the display will show the current frequency for 10 seconds, then return to clock.
•Rotate VOLUME regulator to adjust the sound volume level. Press MUTE button on the RC to switch off the sound; the digits on the display will blink. Press MUTE button again to enable the sound.
•Extend the FM antenna for a better signal reception.
Alarm operation
Setting the alarm
•Set the function switch to MODE position.
•Press and hold ALARM button on the RC (ALARM.SET/MEM-DN button
on the unit) until the digits flash. AL1 indicator will be blinking showing that the 1st alarm is being set.
• Press repeatedly  /TUNand
  /TUN+ buttons on the unit (
 / TUNING and
  /TUNING buttons on the RC) to set hours of the 1st alarm (AL1). Press ALARM (ALARM.SET/ MEM-DN) button to save hours; minute digits will flash. Press repeatedly
  / TUNand
  /TUN+ (
 /TUNING and
  /TUNING) buttons to set hours of the 1st alarm. Press ALARM (ALARM. SET/MEM-DN) button to save minutes; the unit is in the signal sound selection
5


 5
5

6
 Loading...