


USB media player USB-медиаплеер
TF-CCR8090B
Instruction manual
Руководство по эксплуатации

contents of Table
Table of contents
Dear customer!
Thank you for purchasing our product. For safety, it is strongly recommended to read this manual carefully before connecting, operating and/or adjusting the product and keep the manual for reference in the future.
TABLE OF CONTENTS ........................................................................... |
2 |
IMPORTANT SAFEGUARDS ................................................................... |
3 |
INSTALLATION/CONNECTION ............................................................... |
4 |
CONTROL ELEMENTS............................................................................ |
8 |
GENERAL OPERATIONS ........................................................................ |
8 |
RADIO OPERATIONS.............................................................................. |
9 |
USB OPERATIONS.................................................................................. |
9 |
BLUETOOTH OPERATIONS................................................................... |
10 |
TROUBLESHOOTING GUIDE.................................................................. |
12 |
ACCESSORIES ....................................................................................... |
12 |
SPECIFICATIONS .................................................................................... |
13 |
2

Before you start
Utilization of the product
If you want to dispose of this product, do not mix it with general household waste. There is a separate collection system for used electronic products in accordance with legislation that requires proper treatment, recovery and recycling.
Please contact your local authorities for the correct method of disposal. By doing so, you will ensure that your disposed product undergoes the necessary treatment, recovery and recycling and thus prevent potential negative effects on the environment and human health.
Before you start
Important safeguards
•Read carefully through this manual to familiarize yourself with this high-quality sound system.
•The beginning of operation in the moment of the unit installation. Before use the device in winter it is recommended to heat up the passenger compartment during 20 seconds or to the operation temperature.
•Use the unit with the temperature that goes beyond the operation temperature greatly decreases the operation resource of the screen and other components of device and can result an outage.
•Disconnect the vehicle’s negative battery terminal while mounting and connecting the unit.
•When replacing the fuse, be sure to use one with an identical amperage rating. Using a fuse with a higher amperage rating may cause serious damage to the unit.
•Make sure that pins or other foreign objects do not get inside the unit; they may cause malfunctions,
or create safety hazards such as electrical shock.
•Do not use the unit in places where it can be exposed to water, moisture and dust.
•Do not open covers and do not
repair the unit yourself. Consult the dealer or an experienced technician for help.
•Make sure you disconnect the power supply and aerial if you will not be using the system for a long period or during a thunderstorm.
•Make sure you disconnect the power supply if the system appears to be working incorrectly, is making an unusual sound, has a strange smell, has smoke emitting from it or liquids have got inside it. Have a qualified technician check the system.
•The unit is designed for negative terminal of the battery, which is connected to the vehicle metal. Please confirm it before installation.
•Do not allow the speaker wires to be shorted together when the unit is switched on. Otherwise it may overload or burn out the power amplifier.
3
Installation
Installation
Installation
General notes
•Choose the mounting location where the unit will not interfere with the normal function of the driver.
•Before finally installing the unit
connect the wiring and make sure that the unit works properly.
•Consult with your nearest dealer if installation requires the drilling of holes or other modifications of the vehicle.
•Install the unit where it does not get in the driver’s way and cannot injure the passenger if there is a sudden stop, like an emergency stop.
•Avoid installing the unit where it would be subject to high temperature, such as from direct sunlight, or from hot air, from the heater, or where
it would be subject to dust, dirt or excessive vibration.
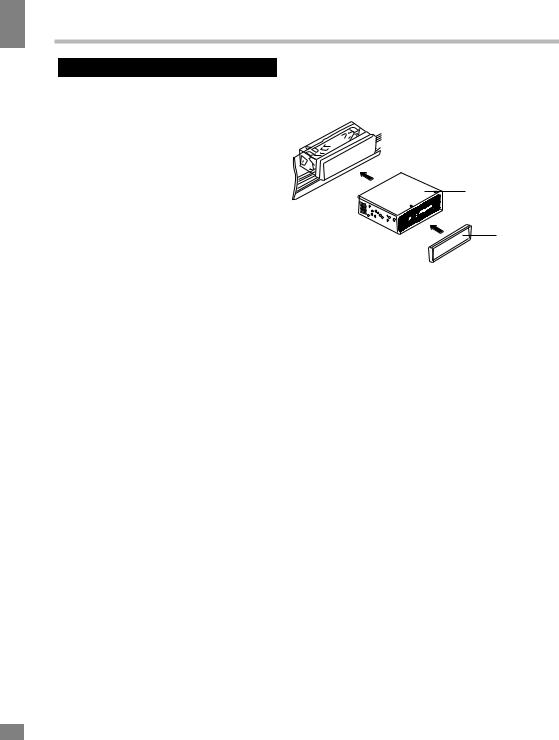
DIN front-mount
1.Install the sleeve into the dashboard; ensure it is installed with the correct side and there are no obstacles (wires, dashboard elements, etc) for the unit installation.
2.After installing the sleeve into the dashboard, slide the unit into the sleeve.
3.Attach the decoration frame to the front panel of the unit.
 Sleeve
 Dashboard
Unit
Frame
4

Dismantling the unit
1.Make sure the ignition is turned off, then disconnect the cable from the vehicle battery’s negative (-) terminal.
2.Insert fingers into the groove in the front of the decoration frame and pull it out (Fig. 1).
3.Insert the release keys into the
gaps between unit and sleeve (Fig.2)
4.Pull out the release keys and
detach the unit from the dashboard (Fig.3).
Installation
Installation
Release key
 Unit
Unit


 Dashboard
|
Frame |
|
Fig.1 |
Fig.2 |
Fig.3 |
5

Connection
Connection
Connection diagram
5A
Notes
•In spite of having any kinds of speaker systems, they must use 4 ohms speaker impedance to reduce the distortion at high volume levels.
•Do not let the auto antenna and ground wires touch each other.
6
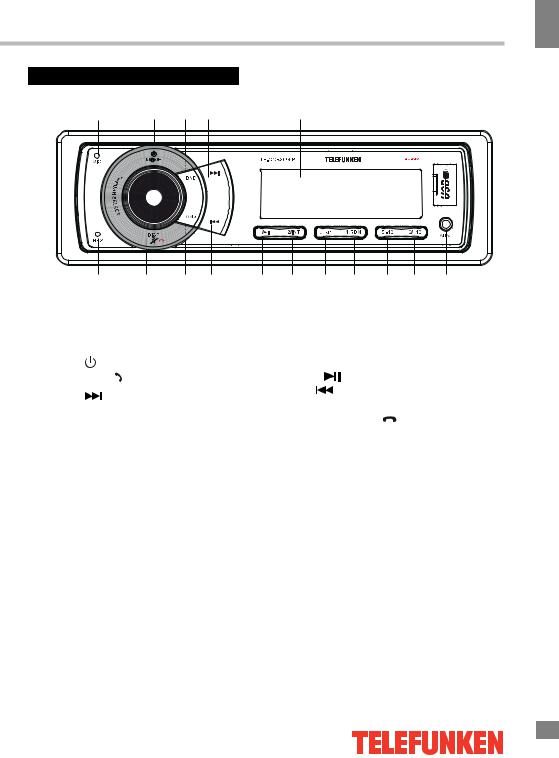
Control elements
Control elements
2 |
3 |
4 |
5 |
6 |


 7 1
7 1 


18 |
17 |
16 |
15 |
14 |
13 |
12 |
11 |
10 |
9 |
8 |
1. |
VOLUME knob/SELECT button |
11. |
4/RDM button |
|
2. |
Microphone |
12. 3/RPT button |
||
3. |
(POWER)/MODE button |
13. |
2/INT button |
|
4. |
BND/ button |
14. |
1/ button |
|
5. |
button |
15. |
button |
|
16. |
AMS button |
|||
6. |
Display |
|||
17. |
DISP/MUTE/ button |
|||
7. |
USB port |
|||
18. |
Reset button (hole) |
|||
8. |
AUX input |
|||
|
|
|||
9.6/+10 button
10.5/-10 button
Control elements
7

Operation
8
Operation
General operation
Turning the unit on/off |
Loudness |
Press the POWER button to turn the unit on. Press and hold the button again to turn the unit off.
Resetting the unit
When first using the device or after replacing the car battery, you must reset the unit. Press the RESET button (hole) with a pointed object (such as a ballpoint pen) to set the unit to its initial state.
When some errors occur, you can also press the RESET button to return to factory settings, but note that it will erase clock setting and some memorized functions.
Mode selection
Press the MODE button repeatedly to select between Radio, AUX or USB modes. Operation modes are indicated on the display. The USB mode is not available unless a USB storage device is connected.
Volume control
Adjust the volume by rotating the VOLUME knob. Press the DISP button to mute the sound.
Sound settings
Press the SELECT/VOLUME knob repeatedly to select a parameter: BAS (bass) => TRE (treble) => BAL (balance) => FAD (fader) => LOUD ON/OFF => EQ (equalizer) => STEREO => DX(distance)/ LOC(local) => VOL(volume).
Rotate the knob to adjust each mode.
•Bass/Treble: from -7 to +7;
•Balance: -10 (left) to +10 (right);
•Fader: from -10 (rear) to +10 (front).
•Loudness: see “Loudness” paragraph below
•EQ: select POP/CLASS/ROCK or OFF.
When equalizer is in any mode except OFF, bass and treble are not adjustable.
Activating this feature will enhance bass and treble frequencies when listening to music at low volumes.
AUX input
AUX-in jack is intended for connecting an external audio equipment to amplify the sound. If connection is made correctly, the audio signal from the external source will be transmitted through the acoustics of the head unit. This enables to adjust the volume and quality of the sounding. For example, you can connect an MP3-player to listen to tracks using the car acoustic system.
Time display
Press and hold the DISP button to show the current time on the display for 3 seconds.
In this mode press and hold the DISP button again. The time will start to flash.
Rotate the VOLUME knob to select the current hour and minutes and press the SELECT button to confirm.

Operation
Radio operations |
|
USB operations |
Band select |
|
USB port |
In Radio mode press the BND button to select a radio band: FM1 => FM2 => FM3.
Automatic / manual tuning
•Shortly press  or
or button. AUTO will be displayed on the screen. The radio will automatically search for the previous or next frequency with a strong and clear signal.
•Press and hold or
will go to the manual tuning mode, MANUAL will be displayed. Press /
/ buttons repeatedly to adjust the needed frequency manually. If both buttons have not been pressed for several seconds, the device will return to AUTO mode.
Storing and recalling stations
Auto storing
Press and hold the AMS button for several seconds to automatically find and store the 6 strongest stations in the current band corresponding to the preset number button. Press either of the 6 number buttons to recall a stored station.
Preset scan
Press the AMS button shortly to scan the preset stations. All preset stations are scrolled during few seconds. To remain on a station, press again the AMS button.
Manual storing and recalling
•Tune to a station as described above in the Automatic / manual tuning section.
•Press and hold one of the 1- 6 preset button for 2 seconds until LCD shows the corresponding number, which indicates that station is stored on this number.
•Press 1- 6 preset buttons to listen to stored stations.
Note: the unit can stored up to 6 stations for each of the three bands.
Carefully connect a USB driver to the USB port on the front panel. Unit starts playback automatically.
USB notes
USB format supports 2.0. Capacity: up to 32 GB. Supported file systems are FAT/ FAT32.
According to the USB 1.1/2.0 Standard, usage of a USB device with power current consumption exceeding 500 mA is not recommended without supplementary power supply. Failure to use supplementary power for connected USB drives with power consumption exceeding this value
as well as defective USB drives may cause mechanical or thermal changes of elements of the unit as well as failure of internal elements of USB port. Such damages are not warranty cases.
Warning: usage of external USB drives containing BIN files in the root directory may cause malfunction of the unit or damage to the software.
Operation
9
Operation
10
Operation
Next/Previous track
Press  or
or buttons to choose the next or the previous track. Press and hold this button to choose forward playback or backward playback; release the button to return to normal playback.
Play/Pause
Press 1/ button to pause the playback, press one more time to resume normal playback.
Intro playback
When 2/INT button is pressed, the first several seconds of each track on the storage is played. INT indicator will be displayed. Press again to stop intro and listen to track.
Repeat playback
When 3/RPT button is pressed, playback of the selected track will be continually repeated and RPT indicator will be displayed until the track repeat mode is canceled by pressing 3/RPT button again.
Random playback
When 4/RDM button is pressed, each track is played in random instead of a normal order. RDM indicator will be displayed. To cancel the Random mode, press 4/RDM button again.
Jumping by 10 tracks
Bluetooth operations
Pairing
Turn on the unit, put your mobile phone near the unit, activate the Bluetooth function on the phone. Soon the phone will find the new Bluetooth device named "TFCCR8090B".
Enter the pairing password “8888”. The phone will notify you when the matching is successful. Afterwards, the BT ON will appear on the LCD, and the Bluetooth logo " " will stop blinking. Now you can perform the Bluetooth operations.
Handsfree phone operation
Once you have paired your phone with the unit, you can dial and receive calls via Bluetooth. During the incoming call the phone number will appear on the LCD.
•Press the BND/ button shortly to accept the call. Then you can talk with the other party through the microphone on the panel.
•Press the  button shortly to reject the incoming call.
•Press the  button shortly to hang up after you finish talking.
Press 5/-10 button to jump 10 tracks back. Press 6/+10 button to jump 10 tracks forward.
When there is less than 10 tracks on your storage device, this function is inactive.
 Loading...