


Car FM transmitter
Автомобильный FMтрансмиттер
TF-FMT10
Instruction manual
Руководство по эксплуатации
Instruction manual
Dear customer!
Thank you for purchasing our product. For safety, it is strongly recommended to read this manual carefully before connecting, operating and/or adjusting the product and keep the manual for reference in the future.
Utilization of the product
If you want to dispose this product, do not mix it with general household waste. There is a separate collection system for used electronic products in accordance with legislation that requires proper treatment, recovery and recycling.
Please contact your local authorities for the correct method of disposal. By doing so, you will ensure that your disposed product undergoes the necessary treatment, recovery and recycling and thus prevent potential negative effects on the environment and human health.
Important safeguards
•Read carefully through the manual to familiarize yourself with this unit.
•Keep this manual handy as a reference for operating procedures and precautions. Do not allow persons who have not read through this manual to use this unit.
•Connect this unit only to the vehicle lighter jack of your car with +12-24 V DC power. If the voltage is too high, it may
cause damage to this unit.
•Careful handling of the unit can prolong its operation life.
•Due to variety of car lighter jack sizes depending of vehicle type, ensure that this unit is properly contacted in the lighter socket.
•Should this product fail to operate properly, contact your local dealer.
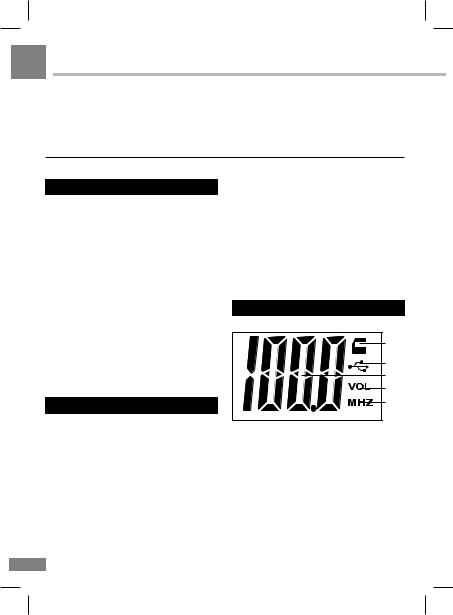
LCD layout
1 |
2 |
3 |
4 |
5 |
1.Memory card indicator. Active when a memory card is being used.
2.USB indicator. Active when a USB is being used.
3.Number display.
4.Volume indicator. Active when volume is being adjusted.
5.Frequency indicator. Active when frequency is being displayed.
2

|
|
|
Instruction manual |
Controllers |
|
|
Not indicated: USB port (back bottom |
|
|
panel), memory card slot (back bottom |
|
Transmitter |
|
panel) |
|
|
|
|
|
|
|
|
Remote controller |
1 |
|
1 |
|
|
|
|
|
|
|
2 |
6 |
|
|
3 |
7 |
|
|
|
|
|
|
4 |
8 |
|
|
|
|
2 |
|
|
9 |
|
7 |
|
|
3 |
|
5 |
|
|
|
|
|
4 |
8 |
|
|
5 |
9 |
1. CH button |
|
|
|
||
|
|
2. CHbutton |
|
6 |
|
3. |
/ button |
4.VOL+/- buttons
5.Number buttons
1. |
Car lighter plug |
6. |
CH+ button |
|
|||||
2. |
Hinge |
7. |
|
|
|
button |
|
||
|
|
|
|||||||
|
|
|
|||||||
3. |
Display |
8. |
EQ button |
|
|||||
4. |
B+ button |
9. |
FOLDER+/- buttons |
|
|||||
5. |
|
|
button |
|
|
|
|
|
|
6. |
A- button |
|
Changing the battery |
|
|||||
7. |
AUX input (on the right panel) |
|
Press the catch and at the same time |
|
|||||
8. |
|
|
button |
pull out the battery tray. Insert 1 lithium |
|
||||
|
|
|
|||||||
|
|
|
|||||||
9. |
|
|
button |
battery, type CR2025 (3 V), with the |
|
||||
|
|
|
|
|
3 |
|
|||
|
|
|
|
|
|
||||
|
|
|
|
|
|
|
|
|
|
3

Instruction manual
stamped (+) mark facing upward into the tray. Insert the battery tray into the remote controller.
Operations
General operations
•Insert the plug of this unit into your vehicle’s cigarette lighter.
•Tune your radio to an unused
FM frequency, then match the same frequency of this unit. Press B+ button on the unit or CH+ button on the RC to increase frequency by 0.1 MHz. Press A- button on the unit or CHbutton on the RC to decrease frequency by 0.1 MHz. Also you can press number buttons on the RC to input the needed frequency, then press CH button to confirm.
•To increase volume level, press and
hold button on the unit or press VOL+ button on the RC. To decrease volume,
press and hold button on the unit or press VOLbutton on the RC.
•After you switch the unit on, the frequency and volume adjusted by you will be saved.
•To improve the display angle for viewing it, you can rotate the cabinet of this unit in one plane relative to the hinge axis.
AUX line input
Use the provided audio cable to connect an MP3/MP4 players or another external device to the AUX input of this unit. When using this function, press
 button on the unit or

 button on the
4
4
RC to stop playback of USB or memory card, and all functions will be controlled by the external device.
Playback operations
•Insert a USB or SD card containing MP3 files into USB port or memory card slot of this unit correspondingly.
It will play and transmit the MP3 files automatically.
•Press
 button on the unit or

 button on the RC to stop or continue playback.
•Press button on the unit or RC to select next track. Press
 button on the unit or RC to select previous track. Press number buttons on the RC to input the needed track number directly.
•If the USB or memory card contains folders with files, press FOLDER-/+ buttons on the RC to select previous or next folder.
•Repeatedly press and hold
 button on the unit to enable or disable repeat playback mode.
•Repeatedly press EQ button on the RC to switch between equalizer modes (Normal(E0)/Pop(E1)/Rock(E2)/Jazz(E3)/ Classic(E4)/Country(E5)).
•Stop playback before disconnecting USB/SD.
 USB/SD capacity supported: up to 16 GB. For correct and satisfactory operation, licensed SD memory cards and USB drives of famous brands should be used with this unit. Avoid using memory cards and USB of unknown brands. FAT and FAT32 file systems are supported.
 Loading...