Telefunken TF-SRP3403B User Manual [ru]

PORTABLE STEREO BLUETOOTH, USB/SD PLAYER / СТЕРЕОМАГНИТОЛА C BLUE-
TOOTH®, USB/SD
TF-SRP3403B
Instruction manual
Руководство по
эксплуатации

Instruction manual
Dear customer!
Thank you for purchasing our product. For safety, it is strongly recommended to read this manual carefully before connecting, operating and/or adjusting the product and keep the manual for reference in future.
Description
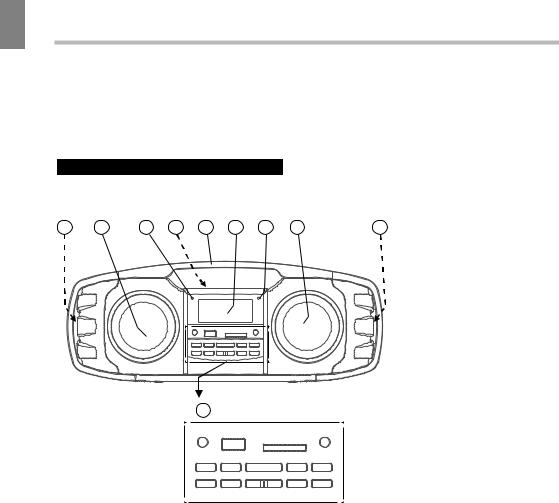
Front panel
1 |
2 |
3 |
4 |
5 |
6 |
7 |
2 |
1 |
8 |
|
|
|
|
|
9 |
10 |
|
11 |
12 |
|
13 |
15 |
17 |
20 |
22 |
|
14 |
16 |
18 |
19 |
21 |
23 |
1. |
Passive subwoofer (Left & Right) |
15. |
TREBLE+ button |
||
2. |
Main speaker (left/right) |
16. |
TREBLEbutton |
||
3. |
Charge LED indicator |
17. |
PLAY/PAUSE/PAIR/FM MODE button |
||
4. |
Smartphone/tablet slot |
18. |
BACK button |
||
5. |
Handle |
19. |
NEXT button |
||
6. |
Liquid crystal display |
20. |
STOP/PROG/MEM button |
||
7. |
Bluetooth® pairing indicator |
21. |
PLAY MODE/MEM+/FOLDER+ button |
||
8. |
Function buttons panel |
22. |
VOLUME+ button |
||
9. |
POWER button (On/Standby) |
23. |
VOLUMEbutton |
||
10. |
USB port |
|
|
||
11. |
SD card slot |
|
|
||
12. |
FUNCTION button |
Not indicated: |
|||
13. |
BASS+ button |
Back panel: FM antenna, headphone jack, |
|||
14. |
BASSbuton |
AUX input, USB charging port, DC input |
|||
|
|
|
|
(microUSB) |
|
|
|
|
|
|
|
|
|
|
|
|
|
2

Instruction manual
Utilization of the product
If you want to dispose of this product, do not mix it with general household waste. There is a separate collection system for used electronic products in accordance with legislation that requires proper treatment, recovery and recycling.
Please contact your local authorities for the correct method of disposal. By doing so, you will ensure that your disposed product undergoes the necessary treatment, recovery and recycling and thus prevent potential negative effects on the environment and human health.
Important safeguards
•The instruction manual contains important operating and maintenance instructions. For your safety, it is necessary to refer to the manual. Keep the manual for future use.
•Do not hit or drop the unit.
•Do not expose the unit to vibration, direct sunlight, too high or low temperatures or humidity.
•Do not disassemble the unit yourselves. Refer servicing to qualified service personnel
All the illustrations in this manual are schematic images, which may differ from actual objects.
Power supply
•The unit operates on internal rechargeable Li-ion battery.
•The battery can be recharged from any standard USB port (e.g. PC USB port).
•It can also be recharged with the provided microUSB AC adaptor. Before first plugging the appliance check that voltage indicated on the rating label corresponds to the mains voltage in your home.
•Insert the microUSB plug of the AC adaptor into the microUSB socket at the back of the unit.
•Plug the adaptor into the wall outlet.
•Press the POWER/STANDBY button on the unit to switch it on.
•The unit is charging if the charging LED indicator is on.
•Normal operation time on full charge is 5-6 hours.
•For best results, try to fully charge the battery before each use. If the battery is drained, please allow it to recharge for a few hours.
•When the unit is not being used, we suggest keeping it plugged in and charging.
USB charging port
•This unit is equipped with a DC 5V USB charging port on the back panel.
•Connect the device you would like to charge (e.g. smartphone, tablet) with a suitable USB cable (not included) into the USB charging port. This function is only active the AC adaptor is plugged in.
General operations
Sound control
•Adjusting loudness can be done by using the volume control buttons on this unit and also the volume control of the device you have already connected to (if using Bluetooth or AUX-input).
•You can also press the BASS+/- and TREBLE+/- buttons (for stronger bass/treble) for quality sound effects.
If there is no sound, make sure the volume on both devices is not set to 0.
Function button
Pressing the FUNCTION button repeatedly will allow you to see and select one of the different source functions, as follows:
Bluetooth => FM radio => USB => SD => AUX
3

Instruction manual
Bluetooth® wireless playback
•This unit can wirelessly playback audio from any device with Bluetooth® A2DP function.
•The wireless range is approximately within 10 meters.
•Wireless audio streaming requires pairing of a Bluetooth device (e.g. smartphone).
HOW TO PAIR YOUR DEVICE TO THIS UNIT:
•Make sure the Bluetooth® function is switched on in your device (e.g. smartphone, tablet).
•Switch on the unit and press the FUNCTION button repeatedly until the the display shows BT.
•Once the Bluetooth® pairing indicator begins flashing, you will find the unit listed in the Bluetooth® connections list of your device (as TF-SRP3403B).
•If asked for a passcode, enter “0000”.
•The initial setup is required only once per device. To pair another device repeat the above steps. The unit can remember up to 4 devices, however, only one device can be paired at a time.
•The pairing LED indicator will flash slowly when searching for a Bluetooth® device, blink faster when the pairing is in process and stay on when the devices are connected.
Radio operation
•Press the FUNCTION button repeatedly until the display shows FM.
•To improve radio reception, adjust the unit position. To further enhance reception, extend the telescopic antenna found at the rear of the unit.
•After tuning into a desired station, use FM MODE button to select MONO/STEREO mode. In cases of poor reception we recommend to use the MONO mode for better sound clarity.
Manual frequency adjustment
•Press and quickly release the TUNE+ or TUNEbuttons to manually adjust the radio frequency one step at a time.
•When the desired station is found, it can be saved into one of the MEMORY positions.
See “Radio memory” section for further details.
Automatic frequency adjustment
•Press and hold the TUNE+ or TUNEbuttons to automatically seek the next available radio frequency.
•When the desired station is found, it can be saved into one of the MEMORY positions.
See “Radio memory” section for further details.
Radio memory
•After tuning into a desired station, it can be stored into one of the 20 available memory positions.
•Short press the PROG. button to go to memory setting mode. Display will show “P-01” (FLASHING).
•Press and release the MEMORY+ or MEMORYbutton to choose the desired memory storage position you would like to store into (from P-01 to P-20).
•Short press PROG. again to confirm selection. The display will stop flashing.
Recalling a saved memory station
•Short press MEMORY+/- buttons to find a saved memory position.
•To erase a saved radio station, simply replace it with a new station in the same memory position.
USB/SD operation
Playback
•Turn on the device
•Insert a USB device into the USB port or SD card into the slot. Press FUNC. button
4
4
 Loading...