


DE
CLIPSO® ESSENTIAL
EN
NL
DA
FI
FR
IT
NO
SV
Bedienungsanleitung- - User's Guide - Handleiding Brugsanvisning Käyttöohje - Guide de l'utilisateur Manuale d’uso - Brukerveiledning - Bruksanvisning.
www.tefal.com

FACE C O T E C O U V E R C L E
*je nach Modell - *depending on model - *afhankelijk van het model - *afhængig af model - *mallista riippuen - *selon modèle - *secondo il modello - avhengig av modell - *beroende på modell.

fig. 1 |
fig. 2 |
fig. 3 |
fig. 4 |
fig. 5 |
fig. 6 |
fig. 7* |
fig. 8 |
fig. 9 |
fig. 10 |
fig. 11 |
fig. 12 |
fig. 13 |
fig. 14 |
fig. 15 |
fig. 16 |
fig. 17 |
fig. 18 |
fig. 19 |
fig. 20 |

Wichtige Sicherheitshinweise
Um Ihre Sicherheit zu gewährleisten, entspricht dieses Gerät den gültigen Normen und Vorschriften: DE - Richtlinien für Geräte, die unter Druck stehen
-Materialien, die in Kontakt mit Lebensmitteln kommen
-Umweltschutz
•Dieses Gerät wurde für den Hausgebrauch entwickelt.
•Lesen Sie bitte die nachstehenden Hinweise sorgfältig durch und lesen Sie im Zweifelsfall in der „Bedienungsanleitung“ nach.
•Überwachen Sie den Schnellkochtopf wie alle Kochgeräte aufmerksam, insbesondere wenn Sie ihn in der Nähe von Kindern benutzen.
•Stellen Sie Ihren Schnellkochtopf nie in einen heißen Ofen.
•Ein Schnellkochtopf, der unter Druck steht, darf nur ganz vorsichtig bewegt werden. Berühren Sie die heißen Oberflächen (vor allem die Metallteile) nicht. Verwenden Sie die Topfgriffe und Knöpfe. Verwenden Sie gegebenenfalls Handschuhe.
•Überprüfen Sie regelmäßig, dass die Topfgriffe richtig befestigt sind. Ziehen Sie die Schrauben der Topfgriffe gegebenenfalls nach.
•Verwenden Sie Ihren Schnellkochtopf nur für den vorgesehenen Verwendungszweck.
•Ihr Schnellkochtopf gart unter Druck. Bei unsachgemäßer Verwendung kann es zu Verbrühungen kommen. Vergewissern Sie sich, dass der Schnellkochtopf richtig verschlossen ist, bevor Sie ihn in Betrieb nehmen. Siehe Kapitel „Schließen“.
•Vergewissern Sie sich, dass der Garregler auf der Position „Abdampfen“ steht und dass die Druckanzeige gesunken ist, bevor Sie den Schnellkochtopf öffnen.
•Öffnen Sie den Schnellkochtopf nie mit Gewalt. Vergewissern Sie sich, dass er nicht mehr unter Druck steht. Siehe Kapitel „Sicherheit“.
•Verwenden Sie Ihren Schnellkochtopf niemals ohne Flüssigkeit, dies würde ihn schwer beschädigen. Stellen Sie sicher, dass auch während des Kochens stets ausreichend Flüssigkeit vorhanden ist.
•Verwenden Sie ausschließlich laut Bedienungsanleitung geeignete Herdplatten und Kochfelder.
•Bereiten Sie niemals Rezepte auf Milchbasis in Ihrem Schnellkochtopf zu.
•Verwenden Sie kein grobes Salz in Ihrem Schnellkochtopf. Fügen Sie nach dem Garen feines Salz hinzu.
•Füllen Sie Ihren Schnellkochtopf niemals zu mehr als 2/3 (Markierung des maximalen Füllstands).
•Bei der Zubereitung von Lebensmitteln, deren Volumen sich während des Garens ausdehnt, wie zum Beispiel Reis, Hülsenfrüchte oder Kompott usw. darf der Schnellkochtopf nur bis zur Hälfte seiner Kapazität gefüllt werden. Lassen Sie Ihren Schnellkochtopf bei Suppen aus Kürbis, Zucchini, … einige Minuten abkühlen, und stellen Sie ihn anschließend unter fließendes kaltes Wasser, damit er weiter abkühlt.
•Stechen Sie nach der Zubereitung von Fleisch, das mit einer Haut überzogen ist (z. B. Rinderzunge, …), die sich unter Druck aufblähen kann, nicht in das Fleisch, solange die Haut aufgebläht aussieht; Sie könnten sich verbrühen. Wir empfehlen Ihnen, das Fleisch vor dem Kochen einzustechen.
•Bei der Zubereitung von mehligen Lebensmitteln (Erbsenmus, Rhabarber, …) muss Ihr Schnellkochtopf vor dem Öffnen leicht geschüttelt werden, damit die Lebensmittel beim Öffnen des Deckels nicht herausspritzen.
•Vergewissern Sie sich vor jeder Verwendung, dass die Ventile nicht verstopft sind. Siehe Kapitel „Vor dem Garen“.
•Verwenden Sie Ihren Schnellkochtopf nicht zum Frittieren von Lebensmitteln in Öl unter Druck.
•Beschränken Sie sich bei der Handhabung der Sicherheitssysteme auf Maßnahmen zur Reinigung und Instandhaltung.
•Verwenden Sie für Ihren Schnellkochtopf ausschließlich passende Original-Ersatzteile von TEFAL/ Tefal. Verwenden Sie vor allem einen Topf und einen Deckel von TEFAL/ Tefal.
•Alkoholdämpfe sind brennbar. Bringen Sie die Speisen etwa 2 Minuten vor dem Aufsetzen des Deckels zum Kochen. Bei der Zubereitung von Rezepten mit Alkohol muss der Schnellkochtopf besonders überwacht werden.
•Säurehaltige oder salzige Lebensmittel dürfen vor oder nach ihrer Zubereitung nicht im Schnellkochtopf aufbewahrt werden, um den Topf nicht zu beschädigen.
Bewahren Sie diese Bedienungsanleitung auf!!!

Beschreibung
DE
A. Garregler |
G. Dichtungsring |
B. Positionsmarkierung |
H. Dampfkorb* |
C. Dampfaustritt |
I. Dreifuß* |
D. Knopf zum Öffnen/Schließen |
J. Markierung der maximalen Füllhöhe |
E. Druckanzeige |
K. Topf |
F. Druckventil |
L. Topfgriff* |
Technische Daten
Durchmesser des Schnellkochtopfs – Artikel-Nummer
|
Topf- |
oben Topf- |
CLIPSO |
Material Topf |
|
Kapazität |
durchmesser |
||||
durchmesser |
ESSENTIAL |
und Deckel |
|||
|
Boden |
||||
|
|
|
|
||
|
|
|
|
|
|
6 L |
24 cm |
18 cm |
P44247 |
|
|
|
|
|
|
|
|
7,5 L |
24 cm |
18 cm |
P43948 |
Edelstahl |
|
|
|
|
|
|
|
9 L |
24 cm |
18 cm |
P44249 |
|
|
|
|
|
|
|
Technische Daten:
Maximaler Betriebsdruck: 55 kPa
Maximaler Sicherheitsdruck: 110 kPa
Geeignete Herdarten
• Der Schnellkochtopf ist für alle Herdarten einschließlich Induktion geeignet.
Gas |
Elektro |
Glaskeramik-Kochfeld |
Induktion |
Elektrische |
|
|
Halogen-Kochfeld |
|
Heizspirale |
•Bei Elektroherdplatten muss darauf geachtet werden, dass deren Durchmesser maximal so groß ist wie der Bodendurchmesser des Schnellkochtopfs.
Heizen Sie den Topf nicht leer auf, um Schäden am Produkt zu vermeiden.
*je nach Modell |
1 |
DE |
• Bei Glaskeramik-Kochfeldern muss darauf geachtet |
||||||
werden, dass der Topfboden sauber und trocken ist. |
|||||||
|
• Bei Gasherden ist zu |
vermeiden, dass |
die |
||||
|
Gasflamme über den Rand des Schnellkochtopfes |
||||||
|
hinaus schlägt. |
|
|
|
|
|
|
|
Achten Sie bei allen Herdarten darauf, dass der |
||||||
|
Schnellkochtopf in der Mitte des Kochfeldes steht. |
||||||
|
|
|
|
Zubehör von TEFAL |
|||
|
|
|
• Im Handel sind folgende Zubehörteile für den |
||||
|
|
|
Clipso Schnellkochtopf erhältlich: |
||||
|
- |
|
|
|
|
Artikel-Nummer |
|
|
|
|
|
|
|
||
|
Zubehör |
|
|
||||
|
|
|
|
|
|
||
|
Dichtungsring |
|
6L - 7,5L - 9L |
|
X1010006 |
|
|
|
|
|
|
|
|
|
|
|
Dampfkorb* |
|
6L - 7,5L - 9L |
|
792654 |
|
|
|
|
|
|
|
|
||
|
Dreifuß* |
|
792691 |
|
|||
|
|
|
|
|
|
|
|
•Wenn Teile ersetzt werden müssen oder das Produkt repariert werden muss, wenden Sie sich an ein autorisiertes TEFAL Servicecenter.
•Verwenden Sie nur TEFAL-Originalteile, die für Ihr Modell geeignet sind.
Verwendung
Öffnen
•Drücken Sie den Knopf Öffnen (D) am Deckel -
Abb. 1.
•Heben Sie den Deckel ab und lassen Sie den Knopf dabei gedrückt - Abb. 2.
Schließen
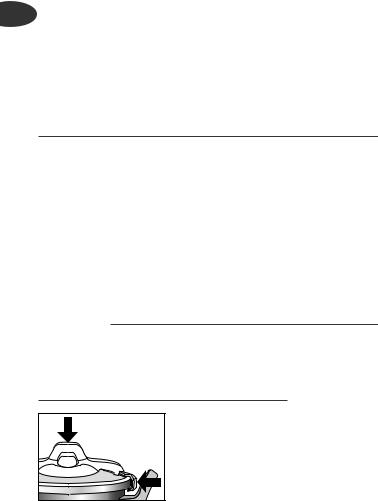
•Drücken Sie den Öffnen/Schließen-Knopf (D) am Deckel und legen Sie ihn auf den Topf -
Abb. 3.
•Drücken Sie etwas auf den Deckel, bevor Sie
den Knopf loslassen (D), um den Verriegelungsmechanismus auszulösen.
• Lassen Sie den Öffnen/Schließen-Knopf (D) am Deckel los und vergewissern Sie sich, dass die Verriegelungszargen unter dem Rand des
Topfes einrasten (K) - Abb. 4.
2

Minimale und maximale Füllhöhe
DE
•Minimale Füllhöhe 250 ml (2 Glas) - Abb. 5.
•Maximale Füllhöhe 2/3 der Topfhöhe (J) - Abb. 6
Für einige Lebensmittel gilt Folgendes:
•Bei der Zubereitung von Lebensmitteln, deren Volumen sich während des Garens erhöht, wie zum Beispiel Reis, Hülsenfrüchte oder Kompott darf der Schnellkochtopf nur bis zur Hälfte seiner Kapazität gefüllt werden. Bei Suppen sollten Sie eine schnelle Druckminderung durchführen (siehe Abschnitt „Ende des Kochvorgangs“).
Verwendung des Dampfkorbs*
Die Lebensmittel im Dampfkorb* dürfen den Deckel des Schnellkochtopfs nicht berühren.
•Gießen Sie 750 ml Wasser in den Topf (K).
•Stellen Sie den Dreifuß* (I) unten in den Topf.
•Stellen Sie den Korb* (H) auf den Dreifuß* - Abb. 7.
Verwendung des Garreglers
•Stecken Sie den Garregler (A) auf den Dampfaustritt
(C) und richten Sie die beiden Piktogramme  aneinander aus.
•Drücken Sie den Garregler nach unten - Abb. 8 und drehen Sie ihn bis zum Anschlag bei .  - Abb. 9.
Garen von Speisen:
•Drehen Sie die Positionsmarkierung bis zum Anschlag bei  .
.
Entfernen des Garreglers:
•Drücken Sie auf den Garregler (A) und richten Sie ihn auf die beiden Piktogramme  - Abb. 10.
•Entfernen Sie ihn - Abb. 11.
*je nach Modell |
3 |

DE Erstgebrauch
•Stellen Sie den Dreifuß* (I) in den Topf.
•Füllen Sie den Schnellkochtopf zu 2/3 mit Wasser
(J)- Abb. 6.
•Stellen Sie den Dampfkorb* (H) auf den Dreifuß*
(I)- Abb. 7.
•Schließen Sie den Schnellkochtopf.
•Bringen Sie den Garregler an (A) und drehen Sie ihn bis zum Anschlag bei  - Abb. 9.
•Stellen Sie den Schnellkochtopf auf eine Heizquelle, die auf maximale Leistung eingeschaltet ist.
•Wenn Dampf aus dem Ventil auszutreten beginnt, verringern Sie die Leistung und stellen Sie die Leistung.
•Schalten Sie nach 20 Minuten die Heizquelle ab.
•Drehen Sie die Positionsmarkierung  langsam, bis sie bei der gewünschten Geschwindigkeit
  mit der Sie den Druck ablassen möchten, stoppt.
•Wenn die Druckanzeige (E) völlig abgesunken ist, steht der Schnellkochtopf nicht mehr unter Druck.
•Öffnen Sie den Schnellkochtopf - Abb. 1 - 2.
Vor dem Garen
•Vergewissern Sie sich vor jeder Benutzung des Schnellkochtopfs bei Tageslicht, dass der Dampfaustritt (C) nicht blockiert ist - Abb. 12.
•Überprüfen Sie außerdem, dass sich das Sicherheitsventil (F) bewegen lässt - (siehe Abschnitt „Reinigung und Wartung“).
•Füllen Sie den Schnellkochtopf.
•Schließen Sie den Schnellkochtopf - Abb. 3 - 4.
•Bringen Sie den Garregler an (A) - Abb. 8.
•Drücken Sie den Garregler nach unten und drehen Sie ihn bis zum Anschlag bei  - Abb. 8.
•Vergewissern Sie sich, dass der Schnellkochtopf richtig verschlossen ist, bevor sie ihn in Betrieb nehmen.
•Stellen Sie den Schnellkochtopf auf eine Heizquelle, die auf maximale Leistung eingestellt ist.
4 |
*je nach Modell |

Während des Garens
•Sobald ständig Dampf aus dem Dampfaustritt entweicht und ein zischendes Geräusch (PSCHHHT) zu hören ist, verringern Sie die Leistung der Heizquelle.
•Stellen Sie einen Timer auf die in Ihrem Rezept angegebene Kochzeit ein.
•Prüfen Sie während des Kochens, dass das Ventil ständig summt. Wenn nicht genug Dampf vorhanden ist, erhöhen Sie die Leistung der Heizquelle etwas; wenn zu viel Dampf vorhanden ist, verringern Sie die Leistung.
DE
Die Druckanzeige (E) verhindert den Druckaufbau, falls der Schnellkochtopf nicht richtig verschlossen sein sollte.
Die Druckanzeige (E) verhindert das Öffnen des Topfes, solange er noch unter Druck steht.
Wenn die Druckanzeige
(E) nicht fällt, tauchen Sie den unteren Teil des Schnellkochtopfs in ein mit kaltem Wasser gefülltes Becken - Abb. 13. Manipulieren Sie die Druckanzeige nicht.
Sollten Lebensmittel oder Flüssigkeit herausspritzen, während Sie den Dampf entweichen lassen, bringen Sie den Garregler (A) wieder in Kochposition  und führen Sie dann eine schnelle Druckminderung durch.
Ende des Garvorgangs
Ablassen des Dampfs:
Nach Abschalten der Wärmequelle haben Sie zwei Möglichkeiten:
- Langsames Druckablassen:
•Drehen Sie den Garregler (A) und wählen Sie
dabei die Geschwindigkeit, mit der Sie den Druck ablassen möchten, bis zum Anschlag bei  .
.
•Sobald die Druckanzeige(E) völlig abgesunken ist, steht der Schnellkochtopf nicht mehr unter Druck.
-Schnelles Druckablassen:
•Tauchen Sie den unteren Teil des Schnellkochtopfs in ein mit kaltem Wasser gefülltes Becken - fig. 13.
•Sobald die Druckanzeige (E) völlig abgesunken ist, steht der Schnellkochtopf nicht mehr unter
Druck. Drehen Sie das Wasser aus und drehen Sie dann die Positionsmarkierung  des Garreglers (A) bis zum Anschlag bei
  .
.
•Sie können den Schnellkochtopf öffnen - Abb. 1 - 2 .
- Beim Kochen schäumender und stärkehaltiger Lebensmittel , sollten Sie den Druck nicht ablassen, sondern mit dem Öffnen warten, bis die Druckanzeige gefallen ist. Verringern Sie die empfohlene Kochzeit etwas.
• Sie können Schnellkochtopf dann öffnen -
Abb. 1 - 2. |
5 |
|

DE Reinigung und Instandhaltung des Schnellkochtopfs
Um die Funktionsfähigkeit des Schnellkochtopfs zu erhalten, sollten Sie diese Reinigungsund Instandhaltungsempfehlungen nach jedem Gebrauch befolgen.
•Reinigen Sie den Schnellkochtopf nach jedem Gebrauch mit warmem Wasser und flüssigem Geschirrspülmittel. Befolgen Sie dasselbe Verfahren für den Korb*.
•Verwenden Sie nie Chlorwasser oder chlorhaltige Reinigungsmittel.
•Überhitzen Sie den Topf nicht im leeren Zustand.
Reinigen der Topfinnenseite:
•Reinigen Sie sie mit einem Scheuerpad und Geschirrspülmittel.
•Wenn die Innenseite des Edelstahltopfes einen schimmernden Glanz oder weiße Punkte aufweist, reinigen Sie sie mit Essig.
Reinigen der Topfaußenseite:
•Reinigen Sie sie mit einem Schwamm und flüssigem Geschirrspülmittel.
Reinigen des Deckels:
•Reinigen Sie den Deckel mit einem Schwamm und flüssigem Geschirrspülmittel.
Nach längerem Gebrauch auftretende bräunliche Verfärbungen und Streifen stellen keine Beeinträchtigung der Funktionstüchtigkeit des Schnellkochtopfs dar.
Prüfen Sie regelmäßig, dass die Griffe fest angebracht sind. Ziehen Sie sie bei Bedarf erneut fest.
Um die Lebensdauer des Schnellkochtopfs zu verlängern, sollten Sie ihn im leeren Zustand nicht überhitzen.
Reinigen der Deckeldichtung:
•Reinigen Sie nach jedem Gebrauch den Dichtungsring (G) und die Rille zum Einlegen.
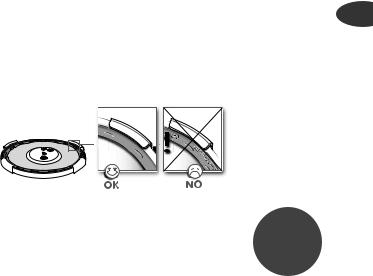
•Wie Sie den Dichtungsring wieder richtig einlegen, wird in - Abb. 13 – 14 gezeigt.Achten Sie beim Wiedereinsetzen darauf, dass die Markierung „face côté couvercle“ [ Deckelseite] in Richtung Deckel zeigt.
Sie können den Topf und den Deckel im Geschirrspüler reinigen, nachdem Sie den Dichtungsring und den Garregler entfernt haben.
Der Dichtungsring ist nicht spülmaschinengeeignet.
Reinigen des Garreglers (A):
6 |
*je nach Modell |
•Entfernen Sie das Betriebsventil (A) - Abb. 10 -11.
•Spülen Sie den Garregler (A) unter fließendem Wasser - Abb. 15.
•Prüfen Sie, ob sich das Druckventil bewegen lässt (siehe Zeichnung rechts).
Reinigen des Dampfaustritts (C) am Deckel:
•Entfernen Sie das Ventil (A) - Abb. 10 - 11.
•Prüfen Sie visuell und bei Tageslicht, dass der Dampfaustritt (C) frei und rund ist - Abb. 12. Reinigen Sie ihn bei Bedarf mit einem Zahnstocher - Abb. 16 und durch Spülen.
Reinigen des Sicherheitsventils (F):
•Reinigen Sie den Teil des Sicherheitsventils, der sich im Deckel befindet, indem Sie ihn unter fließendes Wasser halten.
•Prüfen Sie den korrekten Betrieb, indem Sie mit einem Baumwolltuch fest auf den Stift drücken, der sich frei bewegen sollte - Abb. 17.
Austauschen des Dichtungsrings des Schnellkochtopfs:
•Tauschen Sie den Dichtungsring des Schnellkochtopfs jedes Jahr oder wenn er Risse aufweist.
•Verwenden Sie immer einen TEFAL/ Tefal OriginalDichtungsring, der für Ihr Modell geeignet ist.
Aufbewahren des Schnellkochtopfs:
•Legen Sie den Deckel mit der Oberseite nach unten auf den Topf - Abb. 18.
DE
Falls das Sicherheitsventil versehentlich teilweise oder ganz aus dem Gehäuse tritt, muss der Topf bei einer von TEFAL autorisierten Servicestelle überprüft werden..
Um die Lebensdauer des Schnellkochtopfs zu verlängern, sollten Sie ihn nicht leer überhitzen.
Nach 10 Jahren Gebrauch muss Ihr Schnellkochtopf bei einer von TEFAL autorisierten Servicestelle überprüft werden.
Die Druckanzeige
(E) verhindert den Druckaufbau, falls der Schnellkochtopf nicht richtig verschlossen
sein sollte.
Sicherheit
Der Dampfkochtopf ist mit mehreren Sicherheitsvorrichtungen ausgestattet:
• Sicherheit beim Schließen:
-Die Verriegelungszargen müssen mit dem Rand des Deckels in Kontakt sein. Sonst kommt es zu einem Dampfleck in der Druckanzeige und der Schnellkochtopf kann keinen Druck aufbauen.
•Sicherheit beim Öffnen:
-Solange der Schnellkochtopf unter Druck steht, kann der Öffnen-Knopf nicht gedrückt werden.
-Versuchen Sie nie, den Schnellkochtopf mit Gewalt zu öffnen.
7

DE - vor.Nehmen Sie keinerlei Eingriffe an der Druckanzeige
-Vergewissern Sie sich, dass der Topf nicht mehr unter Druck steht.
•Zwei Sicherheitsvorrichtungen gegen Überdruck:
-Erste Vorrichtung: Das Sicherheitsventil (F) lässt den Druck ab - Abb. 19.
-Zweite Vorrichtung: Der Dichtungsring lässt Dampf zwischen Deckel und Topf entweichen -
Abb. 20.
Wenn eines der Überdruck-Sicherheitssysteme ausgelöst wird:
•Schalten Sie die Heizquelle aus.
•Lassen Sie den Schnellkochtopf vollständig abkühlen.
•Öffnen Sie ihn (siehe Abschnitt „Öffnen“).
•Prüfen und reinigen Sie den Garregler (A), den Dampfauslass (C), den Dampfaustritt (F) und den Dichtungsring (G).
•Falls nach all diesen Prüfungen und der Reinigung das Produkt undicht ist oder nicht mehr funktioniert, bringen Sie es zu einer autorisierten TEFAL Servicestelle.
Die Druckanzeige (E) verhindert das Öffnen des Topfes, solange er noch unter Druck steht.
|
|
Tipps zum Gebrauch: |
|
1 |
- Der aus dem Druckventil austretende Dampf ist sehr |
||
|
heiß. |
|
|
2 |
- Sobald die Druckanzeige angestiegen ist, kann der |
||
|
Schnellkochtopf nicht mehr geöffnet werden. |
||
3 |
- Überwachen Sie den Schnellkochtopf wie alle Kochgeräte |
||
|
aufmerksam, insbesondere wenn Sie ihn in der Nähe von |
||
|
Kindern verwenden. |
|
|
4 |
- Achtung, der Dampfstrahl ist sehr heiß. |
||
5 |
- Benutzen Sie zum Tragen des Schnellkochtopfes immer |
||
|
die beiden Topfgriffe. |
|
|
6 |
- Bewahren Sie keine Lebensmittel im Schnellkochtopf auf. |
||
7 |
- Verwenden Sie niemals Chlorwasser oder |
||
|
chlorhaltige Reinigungsmittel, da diese die Qualität des |
||
|
Edelstahls angreifen könnten. |
||
8 |
- Lassen Sie den Deckel nicht im Wasser liegen. |
||
9 |
- Der Dichtungsring Ihres Schnellkochtopfs muss jedes |
||
|
Jahr bzw. wenn er Risse aufweist ausgetauscht werden. |
||
10 - Der Schnellkochtopf |
darf erst gereinigt werden, |
||
|
nachdem er vollständig ausgekühlt ist und geleert |
||
|
wurde. |
|
|
11 - Nach 10 Jahren |
Gebrauch muss der |
||
8

Schnellkochtopf bei einer autorisierten TEFAL |
DE |
Servicestelle überprüft werden. |
Garantie
•Für den Topf Ihres neuen TEFAL Schnellkochtopfs gilt eine 10-Jahres-Garantie, sofern der Schnellkochtopf gemäß der Bedienungsanleitung genutzt wurde, bei:
-allen Mängeln an der Metallstruktur des Topfes.
-vorzeitiger Abnutzung des Grundmetalls.
•Für die übrigen Teile gilt eine 1-Jahres-Garantie auf Ersatzteile (Verschleißteile wie Dichtungsring, Griffe, Dampfkorb), außer wenn in Ihrem Land dahingehend eine spezielle anderslautende Gesetzgebung gilt. Diese Garantie deckt alle Mängel oder Fertigungsfehler ab.
•Die vertragliche Garantie gilt nur bei Vorlage eines gültigen Kaufnachweises, auf dem das Kaufdatum angegeben ist.
Die Garantie gilt nicht für:
•Schäden, die aus der Nichteinhaltung von wichtigen Empfehlungen oder auf unsachgemäßen Gebrauch zurückzuführen sind, insbesondere:
•Stöße, Herunterfallen, in einen heißen Ofen stellen, usw.
•Die Garantie kann nur in autorisierten TEFAL Servicestellen geltend gemacht werden.
•Ihre nächstliegende TEFAL Servicestelle entnehmen Sie bitte der beigefügten Servicestellen-Liste.
Gesetzlich vorgeschriebene
Kennzeichnungen
Kennzeichnung |
Stelle |
|
|
|
|
Angabe des Herstellers oder der |
An der Deckelverkleidung |
|
Handelsmarke |
||
|
||
Herstellungsjahr und -los |
Im Deckel |
|
|
|
|
Kapazität |
|
|
Artikel-Nummer |
An der Außenseite des |
|
Maximaler Sicherheitsdruck (PS) |
Topfbodens |
|
Maximaler Betriebsdruck (PF) |
|
|
|
|
9

DE TEFAL beantwortet Ihre Fragen
Probleme |
Empfehlungen |
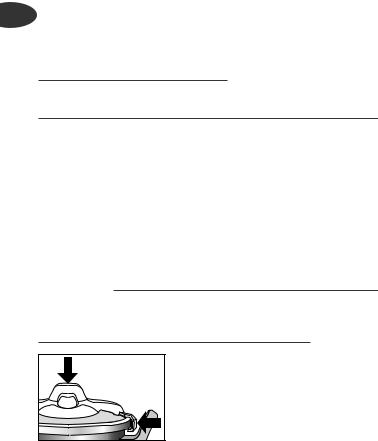
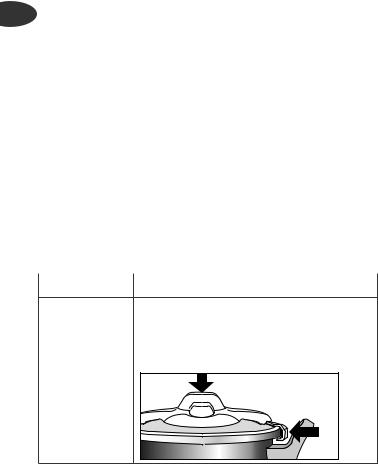
Wenn Sie den Drücken Sie den Öffnen/Schließen-Knopf (D) am Deckel nicht schlie- Deckel und legen Sie ihn auf den Topf - Abb. 3. ßen können: Drücken Sie leicht oben auf den Deckel, bevor Sie
den Knopf loslassen (D) um den Verriegelungsmechanismus auszulösen.
Lassen Sie den Öffnen/Schließen-Knopf (D) am Deckel los und achten Sie darauf, dass die Verriegelungszargen unter dem Rand des Topfes eingerastet sind (K) - Abb. 4.
Wenn der Schnell- |
Lassen Sie den Schnellkochtopf von einem autori- |
||
kochtopf unter |
sierten TEFAL Servicestelle überprüfen. |
||
Druck erhitzt wurde, |
|
|
|
ohne dass sich |
|
|
|
Flüssigkeit darin |
|
|
|
befindet: |
|
|
|
|
|||
Wenn die Druckan- Dies ist in den ersten Minuten normal. |
|||
zeige nicht gestie- |
Wenn dieses Phänomen anhält, prüfen Sie Folgendes: |
||
gen ist und |
- Die Leistung der Heizquelle ist ausreichend hoch; falls |
||
während des |
nicht, erhöhen Sie sie. |
|
|
Kochens kein |
- Es befindet sich ausreichend Flüssigkeit im Topf. |
||
- Der Garregler ist auf |
. |
||
Dampf aus dem |
|||
Ventil entweicht: |
- Der Schnellkochtopf ist richtig geschlossen. |
||
- Der Dichtungsring und der Rand des Topfes sind |
|||
|
|||
|
nicht beschädigt. |
|
|
|
- Der Dichtungsring sitzt richtig im Deckel (siehe |
||
|
Abschnitt „Reinigung und Wartung“). |
||
|
|
||
Wenn die Druckan- |
Dies ist in den ersten Minuten normal. |
||
zeige gestiegen ist |
Wenn dieses Phänomen anhält, tauchen Sie den |
||
und während des |
Schnellkochtopf in ein mit kaltem Wasser gefülltes |
||
Kochens kein |
Becken, bis die Druckanzeige fällt- Abb. 13. |
||
Dampf aus dem |
Reinigen Sie den Garregler(A) - Abb. 15 und den |
||
Ventil entweicht: |
Dampfaustritt (C) - Abb. 16 und prüfen Sie, ob der Stift |
||
|
des Sicherheitsventils problemlos sinkt - Abb. 17. |
||
10

Probleme |
Empfehlungen |
DE |
|
|
|
Wenn Dampf rund um |
Ist der Deckel richtig geschlossen. |
|
den Deckel entweicht, |
Die Position der Deckeldichtung. |
|
prüfen Sie Folgendes: |
Den Zustand des Dichtungsrings. Tauschen Sie ihn |
|
|
bei Bedarf aus. |
|
|
Die Sauberkeit des Deckels, des Dichtungsrings |
|
|
und der Einlegerille im Deckel. |
|
|
Den Zustand des Topfrandes. |
|
|
|
|
Wenn Sie den Deckel |
Prüfen Sie, ob sich die Druckanzeige in der unteren |
|
nicht öffnen können: |
Position befindet. |
|
|
Tauchen Sie andernfalls den Schnellkochtopf in ein |
|
|
mit kaltem Wasser gefülltes Becken, bis die Damp- |
|
|
fanzeige fällt - Abb. 13. |
|
|
Manipulieren Sie die Druckanzeige nicht. |
|
|
|
|
Wenn die Lebensmittel |
Die Kochzeit. |
|
nicht gekocht werden |
Die Leistung der Heizquelle. |
|
oder anbrennen, prüfen |
Die richtige Position des Garreglers. |
|
Sie Folgendes: |
Die Menge der Flüssigkeit. |
|
|
|
|
Wenn Lebensmittel im |
Lassen Sie den Topf vor dem Reinigen einweichen. |
|
Schnellkochtopf |
Verwenden Sie nie Chlorwasser oder chlorhaltige |
|
angebrannt sind: |
Reinigungsmittel. |
|
|
|
|
Wenn eines der |
Schalten Sie die Heizquelle aus. |
|
Überdruck- |
Lassen Sie den Schnellkochtopf abkühlen, ohne |
|
Sicherheitssysteme |
ihn zu bewegen. |
|
ausgelöst wird: |
Warten Sie, bis die Druckanzeige fällt, und öffnen Sie |
|
|
den Schnellkochtopf (siehe Abschnitt „Öffnen“). |
|
|
Überprüfen und reinigen den Garregler, den |
|
|
Dampfaustritt, das Sicherheitsventil und den Dich- |
|
|
tungsring.. |
|
|
Sollte das Problem weiterhin bestehen, lassen Sie |
|
|
den Schnellkochtopf von einer autorisierten TEFAL |
|
|
Servicestellen prüfen. |
|
|
|
|
11

IMPORTANT SAFEGUARDS
Please read these instructions carefully before first use.
For your safety, this appliance complies with the applicable standards and regulations: - Pressure vessel appliance
- Materials in contact with food - Environment
EN • This product has been designed for domestic use only.
•Any commercial use, inappropriate use or failure to comply with the instructions, the manufacturer accepts no responsibility and the guarantee will not apply.
•Take time to read all of the instructions and always refer back to the “User's Guide”.
•As with any cooking appliance, ensure close supervision if you are using the pressure cooker with children nearby.
•Do not put your pressure cooker into a hot oven.
•When the pressure cooker is under pressure, take great care when moving it. Do not touch the hot surfaces. Use the handles and knobs. Wear gloves if necessary.
•Regularly check that the pan handles are fixed properly. Tighten if necessary.
•Do not use your pressure cooker for any purpose other than that for which it is designed.
•Your pressure cooker cooks under pressure. Burns could result from boiling over if not used properly. Make sure that the pressure cooker is properly closed before bringing it up to pressure. Refer to section “Closing”.
•Always make sure that the valve is in the decompression position  before opening your pressure cooker.
•Never force the pressure cooker open. Make sure that the internal pressure has returned to normal. Refer to section “Safety”.
•Never use your pressure cooker without liquid: this could cause serious damage. Always make sure that there is enough liquid in it during cooking.
•Use heat source(s) that are compatible with your pressure cooker, in line with the instructions for use.
•Never make milk-based recipes (such as rice pudding, semolina pudding ...) in your pressure cooker.
•Do not use rock salt in your pressure cooker, but rather add table salt when the cooking is nearly finished.
•Never fill your pressure cooker more than two-thirds full (maximum fill mark).
•For food that expands during cooking, like rice or dried vegetables or stewed fruit, etc., never fill your pressure cooker more than half full. For certain soups like pumpkin or courgette, give your pressure cooker a few minutes to cool down, then cool it down fully by placing it under cold running water.
•After cooking meat which has an outer layer of skin (such as ox tongue), which could swell due to the effects of pressure, do not pierce the skin after cooking if it appears swollen: you could get burnt. Pierce it before cooking.
•When cooking food with a thick texture (chick peas, rhubarb, stewed fruit, etc.) the pressure cooker should be shaken slightly before opening to ensure that the food does not spurt out.
•Always check that valves are clear before use. Refer to section “Before cooking”.
•Do not use the pressure cooker to fry under pressure using oil.
•Do not interfere with the safety systems, except for cleaning and maintenance in accordance with instructions.
•Use only original TEFAL spare parts suitable for your model. Particularly, use a TEFAL pan and lid.
•Alcohol vapours are flammable. Bring to a boil for about 2 minutes before closing the lid. Watch your appliance when preparing alcohol-based recipes.
•Do not use your pressure cooker to store acidic or salty food before and after cooking to avoid damaging your pan.
•You can use the pan to cook food without the lid. Do not use the lid if you do not intend the food to be cooked under pressure.
KEEP THESE INSTRUCTIONS
12

Descriptive diagram
A. Operating valve |
G. Seal |
B. Valve positioning mark |
H. Steam basket* |
C. Steam release outlet |
I. Trivet* |
D. Lid opening/closing button |
J. Maximum fill mark |
E. Pressure indicator |
K. Pan |
F. Safety valve |
L. Pan handle* |
*depending on model |
|
EN
Specifications
Pressure cooker base diameter - references
Capacity |
Ø Pan |
Ø Base |
CLIPSO |
Pan and lid |
|
diameter |
diameter |
ESSENTIAL |
material |
||
|
|||||
|
|
|
|
|
|
6 L |
24 cm |
18 cm |
P44247 |
|
|
|
|
|
|
|
|
7,5 L |
24 cm |
18 cm |
P43948 |
Stainless steel |
|
|
|
|
|
|
|
9 L |
24 cm |
18 cm |
P44249 |
|
|
|
|
|
|
|
Technical information:
Maximum operating pressure: 55 kPa:(8 psi)
Maximum safety pressure: 110 kPa:(16 psi)
Compatible heat sources
GAS |
SOLID |
CERAMIC |
INDUCTION |
ELECTRIC |
||||||
|
HOTPLATE |
OR |
|
COIL |
||||||
|
|
HALOGEN |
|
|
||||||
|
|
|
|
|
|
|
|
|
|
|
|
|
|
|
|
|
|
|
|
|
|
|
|
|
|
|
|
|
|
|
|
|
|
|
|
|
|
|
|
|
|
|
|
•Your pressure cooker can be used on all heat sources except Aga hobs but including induction.
•On a solid hotplate, use a plate with a diameter equal to or less than that of the pressure cooker base.
Never heat your pan when empty, as you risk damaging your product.
13
•On ceramic and halogen hobs, make sure that the base of the pan is clean and dry.
•On gas, the flame should not extend beyond the diameter of the pan.
EN For all heat sources, make sure that your pressure cooker is well centered.
Ensure that plastic handles are not exposed to direct heat: this can make the plastic brittle and more susceptible to breakage.
TEFAL Accessories
•The following Clipso pressure cooker accessories are available. Contact the helpline.
|
- |
|
|
Reference number |
|
|
|
|
|
||
|
Accessories |
|
|
||
|
Gasket |
|
6L - 7,5L - 9L |
X1010006 |
|
|
|
|
|
|
|
|
Steam basket* |
|
6L - 7,5L - 9L |
792654 |
|
|
|
|
|
|
|
|
Trivet* |
|
792691 |
|
|
|
|
|
|
|
|
•To replace parts or for repairs, contact the helpline - see contact list.
•Use only original TEFAL parts suitable for your model.
Use
Opening
•Press the opening button (D) on the lid - fig. 1.
•Lift the lid keeping the button pressed down - fig. 2.
Closing
•Press the opening/closing button (D) on the lid and place it on the pan - fig. 3.
•Apply a little force on the top of the lid before releasing the button (D) to trigger the locking
mechanism.
• Release the opening/closing button (D) on the lid and ensure that the jaws are properly locked under the rim of the pan (K) - fig. 4.
14 |
*depending on model |

Minimum and maximum filling
•Minimum 250 ml (2 glasses) - fig. 5.
•Maximum 2/3rd of the depth of the pan (J) - fig. 6.
For some foods:
•For foodstuffs that expand during cooking, like rice or soups or dried vegetables or stewed fruit, etc., do not fill your pressure cooker more than half full. For soups, we recommend you carry out a fast pressure release (refer to section "End of cooking").
EN
Food placed in the steam basket* must not touch the pressure cooker lid.
Using the steam basket*
•Pour 750 ml of water into the base of the pan (K).
•Place the trivet* (I) in the base of the pan.
•Place the basket* (H) on the trivet* - fig. 7.
Using the operating valve
•Place the valve (A) on the steam release outlet (C) aligning the two symbols  .
.
•Press the valve down fully - fig. 8 and turn until it stops at  - fig. 9.
To cook food:
•Turn the valve positioning mark until it stops at  .
.
To remove the operating valve (when it is no longer pressurised):
•Press down on the operating valve (A) and align the two symbols  - fig. 10.
•Remove it - fig. 11.
*depending on model |
15 |

First use
•Place the trivet* (I) in the base of the pan.
•Fill the pressure cooker up to 2/3rd full with water (J)
EN - fig. 6.
•Place the steam basket* (H) on the trivet* (I) - fig. 7.
•Close the pressure cooker.
•Fit the operating valve (A) and turn until it stops at  - fig. 9.
•Place the pressure cooker on a heat source set to maximum power.
•When steam starts escaping through the valve, reduce the heat source and set a timer for 20 minutes.
•After 20 minutes, turn off the heat.
•Gradually turn the valve positioning mark  until it stops at
  adjusting the speed at which you want to release the pressure.
•When the pressure indicator (E) drops, your pressure cooker is no longer under pressure.
•Open the pressure cooker - fig. 1 - 2 and rinse it. Note: the appearance of stains on the inside of the pan does not alter the quality of the metal in any way. They are simply scale deposits. To remove the deposits, you can use a sponge pad with a little diluted white vinegar.
Position your pressure cooker so that the steam is released away from you.
Before cooking
•Every time you use your cooker, first visually check in good daylight that the steam release outlet
(C)is not blocked - fig. 12.
•Also check that the safety valve (F) moves freely - (refer to section “Cleaning and maintenance”).
•Fill the pressure cooker with the food and the necessary amount of liquid for cooking (see “Minimum and Maximum filling” section).
•Close the pressure cooker - fig. 3 - 4.
•Fit the operating valve (A) - fig. 8.
•Press the valve down fully and turn until it stops at
 - fig. 9.
•Make sure that the pressure cooker is properly closed before bringing it up to pressure.
•Place the pressure cooker on a heat source set to maximum power.
16 |
*depending on model |
During cooking
•When steam escapes through the operating valve continuously, and a regular hissing sound (PSCHHHT) is heard, reduce the heat source.
•Set a timer for the cooking time stated in your recipe.
•During cooking, check that the valve murmurs regularly. If there is not enough steam, increase the heat source slightly; if there is too much steam, reduce the heat source.
The pressure indicator
(E) prevents the pressure cooker from increasing
in pressure if it is not EN properly closed.
As with any cooking appliance, watch over it carefully especially if you are using your pressure cooker around children.
Steam is very hot as it exits the steam release outlet.
The pressure indicator
(E) prevents you from opening the pressure cooker if it is still under pressure.
If the pressure indicator
(E) does not drop, place the base of your pressure cooker into a sink filled with cold water - fig. 13.
Never interfere with the pressure indicator.
If food or liquid starts to spray out while you are releasing the steam, return the operating valve (A) to cooking position  then release the steam using the fast pressure release method described opposite.
End of cooking
To release the steam:
•After the heat has been turned off you have two alternatives:
-Slow pressure release:
•Gradually turn the operating valve (A) adjusting
the speed at which you want to release the pressure until it stops at  . Make sure that the cooker is positioned so that the steam is directed away from you.
•When the pressure indicator (E) drops again, your pressure cooker is no longer under pressure.
This method is used for stews, vegetables, meat joints and fish dishes. If you notice any food or liquid start to spray out from the valve when you are releasing steam, set the selector to cooking position  then wait a minute and then gradually turn the operating valve again, making sure that nothing else spurts out.
- Fast pressure release:
•Place your pressure cooker in a sink under cold running water, directing the flow onto the metal part of the lid - fig. 13.
•When the pressure indicator (E) drops again, your pressure cooker is no longer under pressure.
17

EN
Turn off the water and then, turn the positioning mark
 of the operating valve (A) until it stops at
  .
.
• You can open the pressure cooker - fig. 1 - 2.
This method is used for soups, rice, pasta, cake and pudding mixes, recipes containing rice or pasta and recipes with a high liquid content.
If in doubt about which method of pressure release is correct, use the fast pressure release method.
•When cooking frothy or starchy foods, do not release the pressure by turning the operating valve (A). Instead lift the pressure cooker away from the heat source, leave the operating valve (A) in the cooking position and let the cooker cool slowly at room temperature (takes about 15 minutes) until the pressure indicator drops down. Reduce the recommended cooking time a little.
•You can open the pressure cooker - fig. 1 - 2.
Cleaning and maintenance
Cleaning the pressure cooker
To ensure the correct operation of your pressure cooker, follow these cleaning and maintenance recommendations after each use.
•Wash the pressure cooker (pan and lid) after each use using warm water with washing-up liquid in it. Follow the same procedure for the basket*.
•Never use bleach or products containing chlorine.
•Do not overheat your pan when empty.
To clean the inside of the pan:
•Wash with a sponge pad and washing-up liquid.
•If the interior of the steel pan has an iridescent sheen, clean it using white vinegar or a special stainless steel cleaning product.
To clean the outside of the pan:
•Wash using a sponge and washing-up liquid. Clean it with a special stainless steel cleaning product.
The browning and marks which may appear following long term use do not affect the operation of the pressure cooker.
Regularly check that the pan handles are attached properly.
Tighten them again if necessary.
For a longer pressure cooker life, do not overheat your pressure cooker pan when it is empty.
18
To clean the lid:
•Wash the lid using a sponge and washing-up liquid.
To clean the lid seal:
•After each use, clean the seal (G) and its groove using a sponge, warm water and washing-up liquid..
•To refit the seal, refer to - fig. 13 - 14. Ensure that the words “face côté couvercle” [facing lid side] are against the lid.
•Replace the pressure cooker seal every year or if it shows signs of splitting or damage.
To clean the operating valve (A) :
•Remove the operating valve (A) - fig. 10 -11.
•Wash the operating valve (A) under running tap water - fig. 15.
•Check that it moves freely: see drawing on the right.
To clean the steam release (C) outlet on the lid:
•Remove the valve (A) - fig. 10 - 11.
•Check visually and in plain daylight that the steam release outlet (C) is clear and round - fig. 12. If necessary, clean with a toothpick - fig. 16 and rinse.
To clean the safety valve (F):
•Clean the part of the safety valve located inside the lid by placing it under running water.
•Check its correct operation by pressing hard, using a cotton bud, on the pin, which should move freely
- fig. 17.
To change the seal of your pressure cooker:
•Change the seal of your pressure cooker every year or if it has any splits or is damaged.
•Always use an original TEFAL seal suitable for your model.
You can wash the
pan and the lid in EN the dishwasher
after you have removed the seal and the operating valve.
Never put the seal in the dishwasher.
If the safety valve accidentally comes out of its housing partly or fully, this may cause a leak without any danger.
Contact the helpline - see contact list.
For a longer pressure cooker life, do not overheat your pressure cooker pan when it is empty.
19

To store your pressure cooker:
• Turn the lid over on the pan - fig. 18.
EN
You must have your pressure cooker checked in a TEFAL Approved Service Centre after 10 years of use. Contact the helpline - see contact list.
The pressure indicator (E) prevents you from opening the pressure cooker if it is still under pressure.
The pressure indicator (E) prevents the pressure cooker from increasing in pressure if it is not properly closed.
Safety
Your pressure cooker is fitted with several safety devices:
• Closing safety:
-The jaws must be in contact with the rim of the lid. If this is not the case, there is steam leakage from the pressure indicator and the pressure cooker will not build up pressure.
• Opening safety:
-If the pressure cooker is under pressure, the opening button cannot be pressed.
-Never try to force the pressure cooker open.
-Above all do not interfere with the pressure indicator.
-Make sure that the internal pressure has fallen.
•Two safety devices operate to prevent overpressure:
-First device: the safety valve (F) releases the pressure and steam escapes - fig. 19.
-Second device: the seal allows steam to escape from between the lid and the pan - fig. 20.
If one of the overpressure safety systems is triggered:
•Turn off the heat source.
•Let the pressure cooker cool down completely.
•Open it (refer to section “Opening”).
•Check and clean the operating valve (A), the steam release outlet (C), the safety valve (F) and the seal (G).
•If, after these checks and cleaning, your product leaks or no longer works, take it to a TEFAL Approved Service Centre. Contact the Customer Relations Helpline - see contact list.
20

Recommendations for use
1- Steam is very hot when it leaves the operating valve.
2 - As soon as the pressure indicator rises, you can no EN longer open your pressure cooker.
3- As with any cooking utensil, ensure close supervision if you are using the pressure cooker near children.
4- Watch out for the jet of steam.
5- To move the pressure cooker, use the two pan handles.
6- Never leave food in your pressure cooker.
7- Never use bleach or products containing chlorine, as these will alter the quality of the stainless steel.
8- Do not leave the lid soaking in water.
9- Change the seal every year or if it has any splits or is damaged.
10- You must only clean your pressure cooker when it is cold and empty.
11- It is essential to have your pressure cooker checked in a TEFAL Approved Service Centre after 10 years of use. Contact the Customer Relations Helpline - see contact list.
Guarantee
•Your new TEFAL pressure cooker comes with a ten-year guarantee for use under the conditions set out in these instructions. This guarantee covers:
-Any defects relating to the metal structure of the pressure cooker body,
-Any premature deterioration of the metal base.
•For other parts, a one year parts and labour guarantee is provided (except where applicable law in your own country states otherwise). This guarantee covers any defects or manufacturing faults.
•The contractual guarantee cover is provided only on presentation of a valid proof of purchase which shows the date of purchase.
•The guarantee cover excludes:
•The normal life of the seal, pressure control valve or locking indicator seal is limited. These parts are excluded from the guarantee and will require periodic renewal.
21
•Any damage consecutive to a failure to follow the major recommendations made or due to negligent use, especially:
- Dropping, falls, bangs or knocks, placing in an oven…
EN |
- Washing the lid in the dishwasher. |
|
|
||
• Only TEFAL Approved Service Centres are authorised to |
|||||
|
provide service under guarantee. |
|
|
|
|
|
• Please call the Helpline number below for the address of |
||||
|
your nearest TEFAL Approved Service Centre. |
||||
|
Helpline: 0845 602 1454 - UK |
|
|
|
|
|
(01) 677 4003 - Ireland |
|
|
|
|
|
Or consult our web site: www.tefal.co.uk |
|
|
||
|
|
|
Regulatory markings |
||
|
|
|
|
||
|
Marking |
|
Location |
||
|
|
|
|||
|
Identification of manufacturer or commercial |
On the lid |
|||
|
brand |
|
|
|
|
|
Production year and batch |
|
Inside of the lid |
||
|
Capacity |
|
On the exterior base |
||
|
Model reference |
|
|||
|
Maximum safety pressure (PS) |
|
of the pan |
||
|
Maximum operating pressure (PF) |
|
|
|
|
|
TEFAL answers your questions |
|
|||
|
|
|
|
||
|
Problems |
Recommendations |
|||
If you are unable Press the opening/closing button (D) on the to close the lid: lid and place it on the pan - fig. 3.
Apply a little force on the top of the lid before releasing the button (D) to trigger the locking mechanism. Release the opening/closing button (D) on the lid and ensure that the jaws are properly
locked under the rim of the pan (K) - fig. 4
22

Problems |
Recommendations |
|
|
|
|
|
|
If your pressure |
Have your pressure cooker checked by a TEFAL Appro- |
|
|
cooker has been |
ved Service Centre. Contact the Customer Relations |
|
|
heated under pres- |
Helpline. |
|
EN |
sure without any |
|
|
|
liquid in it: |
|
|
|
|
|
|
|
If the pressure in- |
This is normal during the first few minutes. |
|
|
dicator has not |
If this problem persists, check that: |
|
|
risen and nothing |
- The heat source is sufficiently high; if not, increase it. |
|
|
is escaping |
- The quantity of liquid in the pan is sufficient. |
|
|
through the valve |
- The operating valve is on |
. |
|
during cooking: |
- The pressure cooker is properly closed. |
|
|
- The seal or the edge of the pan is not damaged. |
|
||
|
|
||
|
- The seal is correctly positioned in the lid, (refer to |
|
|
|
section “Cleaning and Maintenance”) |
|
|
|
|
|
|
If the pressure |
This is normal during the first few minutes. |
|
|
indicator has risen |
If the problem persists, place your pressure cooker in |
|
|
and nothing is |
a sink under cold running water from a tap until the |
|
|
escaping through |
pressure indicator drops - fig. 13. |
|
|
the valve during |
Clean the operating valve (A) - fig. 15 and the steam |
|
|
cooking: |
release outlet (C) - fig. 16 and check that the safety |
|
|
|
valve pin drops without difficulty - fig. 17. |
|
|
|
|
|
|
If steam leaks |
The correct closure of the lid. |
|
|
from around the |
The position of the lid seal. |
|
|
lid, check: |
The seal is correctly fitted in the lid. |
|
|
|
The cleanliness of the lid, the seal and its groove in the |
|
|
|
lid. |
|
|
|
The rim of the pan is in good condition and not dama- |
|
|
|
ged. |
|
|
|
|
|
|
If you are unable |
Check that the pressure indicator is in the lowered po- |
|
|
to open the lid: |
sition. |
|
|
|
Otherwise, place your pressure cooker in a sink under cold |
|
|
|
running water from a tap until the pressure indicator |
|
|
|
drops - fig. 13. |
|
|
|
Never interfere with the pressure indicator. |
|
|
|
|
|
|
If the food is not |
The cooking time. |
|
|
cooked or is |
The power of the heat source. |
|
|
burned, check: |
The correct position of the operating valve. |
|
|
|
The quantity of liquid. |
|
|
|
|
|
|
23
Problems |
Recommendations |
If food has burned in Leave the pan to soak before cleaning it.
the pressure cooker: Never use bleach or products containing chlorine.
EN
If one of the |
Turn off the heat source. |
overpressure safety |
Let the pressure cooker cool down without moving it. |
systems is triggered: |
Wait for the pressure indicator to drop and open |
|
the pressure cooker. (refer to section “Opening ”). |
|
Check and clean the operating valve, the steam |
|
outlet, the safety valve and the seal. |
|
If the problem persists, contact the Customer |
|
Relations Helpline. |
Golden rules when pressure cooking (for UK Consumers)
•The minimum quantity of liquid required for normal cooking is 250 ml (½ pint) for the first ¼ hour cooking. For each additional ¼ hour, or part of ¼ hour, add a further 150 ml (¼ pint) of liquid. For example, 45 minutes cooking requires 600 ml (1 pint) of liquid. Note: This is only a general guide. Certain foods, such as rice, pulses, steamed puddings and Christmas puddings may require extra water (see text below).
•When steaming foods in the basket* use a minimum of 750 ml (1¼ pint) water in the cooker.
•Always use a liquid that gives off steam when boiled e.g. water stock, wine, beer or cider. Never use oil or fat. All pressure cooking requires some liquid.
•Whatever the size of pressure cooker, the maximum filling level when all the ingredients and liquid have been added are:
Solid foods e.g. vegetables, meat joints: no more than two-thirds full Liquids and cereals e.g. soups, stews, rice, cereal and pasta: no more than half full
Pulses e.g. dried beans and dried peas: no more than one-third full
•When cooking pulses they swell up and tend to froth up. Use 1.2 litres (2 pints) water for every 450 g (1 lb) pre-soaked weight of pulses. Remember all dried peas and dried beans, must be soaked in boiling water for 1 hour before cooking. Drain, rinse thoroughly and cook in fresh water. Never eat uncooked beans or peas. Soaking is not necessary for red lentils. The high temperatures achieved in the pressure cooker ensure that any natural toxins in the pulses are destroyed. Canned beans and pulses can simply be drained and rinsed before adding to the pressure cooker.
24 |
*depending on model |

• For steamed suet puddings, sponge puddings or Christmas puddings, a short pre-steaming time is best to enable the raising agent to activate and prevent a heavy, close texture. Extra liquid is required so use a minimum of 1½ pint/900 ml of boiling water for a combined steaming and cooking time of up to 1 hour. For each additional ¼ hour of cooking, or part of ¼ hour, add
a further ¼ pint/150 ml of boiling water. Pre-steaming is done with the EN operating valve in the steam release position on a low heat for the required time. Then turn the operating valve to the cooking pot position, and increase
the heat to bring to full pressure. Lower the heat and pressure cook for the required time.
•Never cook dumplings with the lid tightly closed, as they could rise up and block the safety devices. Cook the stew and at the end of cooking, release the steam and cook gently for about 10 - 15 minutes without the lid on.
•Pressure cooking times vary according to the size of individual pieces or thickness of the food, not the weight.
•To prevent discolouration of the interior, caused by mineral deposits in hard water areas, add a tablespoon of lemon juice or vinegar.
•Cooking containers must withstand temperatures of 130°C (250°F). Any covering on containers, e.g. foil, greaseproof paper or cling film, must be securely tied otherwise they could block the safety devices. Do not use plastic lids as they prevent steam from being in contact with the food. Also, they could distort and come off during cooking which could block the safety outlets.
•Accurate timing is essential when pressure cooking to prevent overcooking, especially with vegetables, fruit and fish.
25

BELANGRIJKE VOORZORGSMAATREGELEN
|
Omwille van uw veiligheid is dit apparaat conform de geldende normen en |
|
|
reglementeringen: |
|
|
- Leidraad Uitrustingen onder Druk |
|
|
- Materialen in contact met voedingsmiddelen |
|
|
- Milieu |
|
|
• Dit apparaat werd voor huishoudelijk gebruik ontworpen. |
|
|
• Neem de tijd om alle instructies te lezen en sla de 'Handleiding' er altijd op na. |
|
|
• Net als voor elk ander kookgerei dient u de snelkookpan onder toezicht te houden, vooral |
|
|
indien u de snelkookpan in de nabijheid van kinderen gebruikt. |
|
NL |
• Zet uw snelkookpan niet in een hete oven. |
|
• Indien uw snelkookpan onder druk staat dient u deze zeer voorzichtig te verplaatsen. |
||
|
Raak de hete oppervlakken niet aan. Gebruik de handgrepen en knoppen. Gebruik indien |
|
|
nodig ovenhandschoenen. |
|
|
• Controleer regelmatig of de handvatten van de binnenpan correct geplaatst zijn. Schroef |
|
|
ze indien nodig opnieuw vast. |
|
|
• Gebruik uw snelkookpan niet voor andere doeleinden dan die waarvoor deze werd |
|
|
gemaakt. |
|
|
• Uw snelkookpan staat tijdens het gebruik onder druk. Oneigenlijk gebruik kan leiden tot |
|
|
verwondingen door contact met kokend water. Zorg ervoor dat de snelkookpan goed |
|
|
gesloten is voordat u deze gaat gebruiken. Zie paragraaf 'Sluiten'. |
) voordat u uw |
|
• Zorg ervoor dat het drukventiel in de drukverlagende stand staat ( |
|
snelkookpan opent.
• Gebruik nooit kracht om de snelkookpan te openen. Zorg ervoor dat het drukniveau in de pan verminderd is. Zie paragraaf 'Veiligheid'.
• Gebruik uw snelkookpan nooit droog, dit kan uw pan aanzienlijk beschadigen. Zorg ervoor dat er tijdens het koken altijd voldoende vocht aanwezig is.
• Maak van geschikte warmtebronnen gebruik, conform de gebruiksinstructies.
• Gebruik geen snelkookpan voor recepten gebaseerd op melk.
• Gebruik geen grof zout in uw snelkookpan, maar voeg liever tafelzout toe wanneer het gerecht bijna klaar is.
• Vul uw snelkookpan niet hoger dan 2/3 (maximale vulstreep).
• Voor voedingsmiddelen die tijdens het koken opzwellen, zoals rijst, gedroogde groenten of fruitcompotes, ... dient u uw snelkookpan niet meer dan halfvol te gebruiken. Geef voor bepaalde soepen (zoals pompoen of courgette soep) de snelkookpan een paar minuten de tijd om af te koelen. Laat de snelkookpan vervolgens helemaal afkoelen door deze onder koud stromend water te plaatsen.
• Na het koken van vleesgerechten met huid (zoals ossentong…), die onder druk op kan zwellen, dient u het vlees niet in te prikken zolang de huid er opgezwollen uitziet; u loopt dan het risico door kokend vocht gewond te raken. Wij raden u aan het vlees voor het koken in te prikken.
• In geval van brijachtige voedingsmiddelen (spliterwten, rabarber…), dient u de snelkookpan voor het openen licht te schudden zodat de voedingsmiddelen niet uit de pan spatten.
• Controleer voor elk gebruik dat de drukventielen niet verstopt zijn. Zie paragraaf 'voor het koken'.
• Gebruik uw snelkookpan niet om onder druk met olie te frituren.
• Udientdebeveiligingssystemenalleenvolgensdeinstructiestereinigenenteonderhouden.
• Gebruik alleen originele TEFAL onderdelen die met uw model overeenkomen. Gebruik vooral een pan en deksel.
• Alcoholdampen zijn brandbaar. Breng ongeveer 2 minuten voordat u het deksel sluit de vloeistof aan de kook. Houd uw pan onder toezicht wanneer u recepten met alcohol bereidt.
• Gebruik uw snelkookpan niet om zure of zoute voedingsmiddelen voor of na het koken in op te slaan omdat deze de pan aan kunnen tasten.
Bewaar deze instructies
26
 Loading...