


Optigrill Elite XL GC760D30
OptiGrill Elite XL
EN
RU
PL
UK
CS
HU
SK
HR
RO
BG
BS
SL
SR
Instructions for use - Инструкция по эксплуатации -
Instrukcja użytkowania - Інструкція з використання -
Pokyny k použití - Használati útmutató - Návod na použitie
- Upute za uporabu - Instrucţiuni de utilizare - Инструкции
за употреба - Uputstvo za upotrebu - Navodila za uporabo
- Uputstvo za upotrebu -

SAFETY INSTRUCTIONS
IMPORTANT SAFEGUARDS
Use, maintenance, cleaning and product installation guidelines: for
your own safety, please read through all paragraphs of the instruction
manual including the associated pictograms.
This appliance is intended for indoor, domestic household use only. It is not
EN
intended to be used in the following applications, and the guarantee will not
apply for:
- staff kitchen areas in shops, offices and other working
environments;
- farm houses;
- by clients in hotels, motels and other residential type
environments;
- bed and breakfast type environments.
Before first use remove all packaging materials, stickers and accessories from
the inside and the outside of the appliance.
This appliance is not intended for use by persons (including children) with
reduced physical, sensory or mental capabilities, or lack of experience and
knowledge, unless they have been given supervision or instruction concerning
use of the appliance by an adult responsible for their safety. Children should
be supervised to ensure that they do not play with the appliance, and do not
use as a toy.
This appliance can be used by children aged from 8 years and above and
persons with reduced physical, sensory or mental capabilities or lack of
experience and knowledge if they have been given supervision or instruction
concerning use of the appliance in a safe way and understand the hazards
involved. Cleaning and user maintenance shall not be made by children unless
they are older than 8 and supervised.
Keep the appliance and its cord out of reach of children less than 8 years.
Never leave the appliance unattended when in use.
Accessible surface temperatures can be high when the appliance
is operating. Never touch the hot surfaces of the appliance.
This appliance is not intended to be operated by means of an external timer
2

or separate remote-control system.
Fully unwind the power cord before plugging in the appliance.
If the power supply cord is damaged, it must be replaced by the manufacturer
or its after sales service in order to avoid any danger.
Do not use an extension lead. If you accept liability for doing so, only use an
extension lead which is in good condition, has a plug with an earth connection
and is suited to the power rating of the appliance. Take all necessary precautions
to prevent anyone tripping over an extension cord.
Always plug the appliance into an earthed socket.
Make sure that the electric power supply is compatible with the power rating
and voltage indicated on the bottom of the appliance.
Use a sponge, hot water and washing up liquid to clean the cooking plates.
Never immerse the appliance, its power cord or plug in water or any other liquid.
WARNING: Do not heat or pre-heat without the 2 cooking plates inside the
grill.
Do
• Read the instructions carefully, common to different models depending on the accessories your
appliance with supplied with. Keep the instructions within reach.
• If an accident occurs, rinse the burn immediately with cold water and call a doctor if necessary.
• Before firs t use, wash the plates (see paragraph 11), pour a little cooking oil onto the plates and wipe with a soft
cloth or paper kitc hen towel.
• Position the power cord carefully, whether an extension is used or not, so that guests can move freely around the
table without tripping over it.
• Cooking fumes may be dangerous for animals which have a particular ly sensitive respiratory sy stem, such as birds.
We advise bird owners to keep them away from the cooking area.
• Always keep the appliance out of the reach of children.
• Check that both faces of the plate are clean before use.
• To prevent damage to the plates, only use them on the appliance for which they were designed (e.g ., do not place in
an oven, on t he gas ring or electric hot-plate, etc .).
• Ensure that the plates are stable, well positione d and correctly c lipped to the appliance. Only use the plates provided
with the appliance or bought from an Approved Ser vice Centre.
• Always use a woode n or plastic spatula to avoid d amaging the cooking plate s.
• Only use p arts or accessories provided with the app liance or bought from an Approved Service Centre. Do not use
them for other appliances or intention.
Do not
• Do not use the appliance outside.
• Never leave the appliance unattended when plugged in or in use.
• To prevent the appliance from overheating, do not place it in a corner or below a wall cupboard.
• Never place the appliance directly on a fragile surface (glass table, tablecloth, varnished furniture,
etc.) or on a soft surface such as a tea-towel.
EN
3

• Never place the appliance under a cupboard attached to a wall or a shelf or next to inflammable
materials such as blinds, curtains or wall hangings.
• Never place the appliance on or near hot or slippery surfaces; the power cord must never be close
to or in contac t with hot parts of the appliance, clos e to a source of heat or resting on sharp e dges.
• Do not place cooking utensils on the cooking surfaces of the appliance.
• Never cut food directly on the plates,
• Do not use metal scouring pads, abrasive wire wool or harsh scouring powder a s this may damage
the nonstick coating.
• Do not move the appliance when in use.
• Do not carry the appliance by the handle or metallic wires.
EN
• Never run the appliance empty.
• Do not use aluminium foil or other objects between the plate and the food being cooked.
• Do not remove the grease collection tray while cooking. If the grease collection tray becomes full
when cooking: let the appliance cool down before emptying.
• Do not place the hot plate on a fragile surface or under water.
• To preser ve the non-sti ck propertie s of the coating, avo id excessive pre-he ating with the ap pliance
empty.
• The plates should never be handled when hot.
• Do not cook food in aluminium foil.
• To avoid spoiling your appliance, do not use flambé recipes in connection with it at any time.
• Do n ot place a sheet of alum inum or any other objec t between the pl ates and the heat ing element.
• Never heat or cook whilst the grill is open.
• Never heat up the appliance without the cooking plates.
Tips/information
• Thank you for buying this appliance, which is intended for domestic use only.
• For yo ur safety, this applian ce complies with the a pplicable stan dards and regulat ions - Low voltage
directive - Electromagnetic compatibility - The environment - Materials in contact with food.
• On first use, there may be a slight odour and a little smoke during the first few minutes.
• Ou r company has an on going policy of res earch and develo pment and may modi fy these produc ts
without prior notice.
• Do not consume foodstuff that comes into contact with the parts marked with logo
• If the food is too thick, the safety system will stop the appliance from working.
• The instrument panel is fragile: clean, wipe and dry with a dry, soft cloth only. Do not clean it with
a wet sponge as this may damage its functions.
.
Environment
Environment protection first!
Your appliance contains valuable materials which can be recovered or recycled.
Leave it at a local civic waste collection point.
4
A1 A2 A3
A5
A6
A7
A8
A
B
D
E
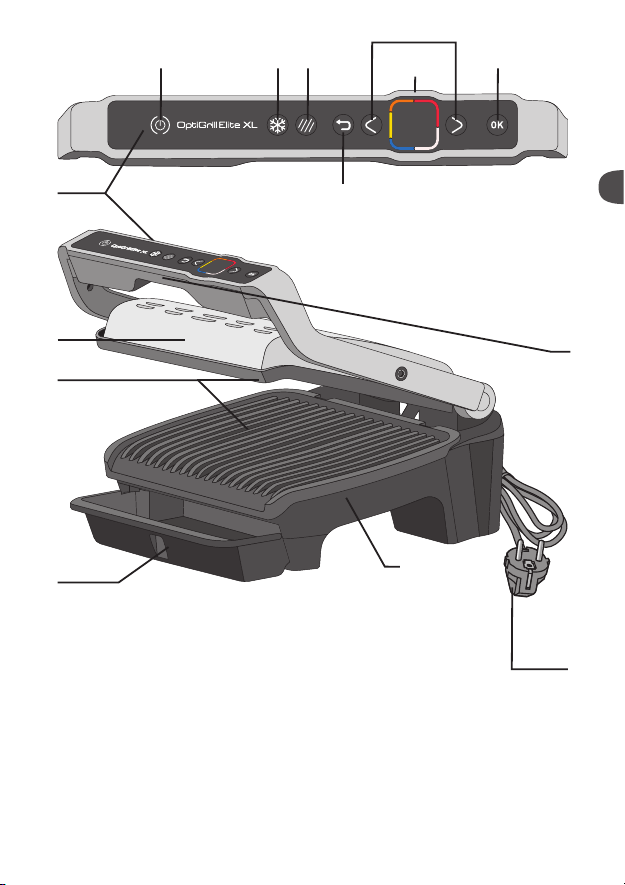
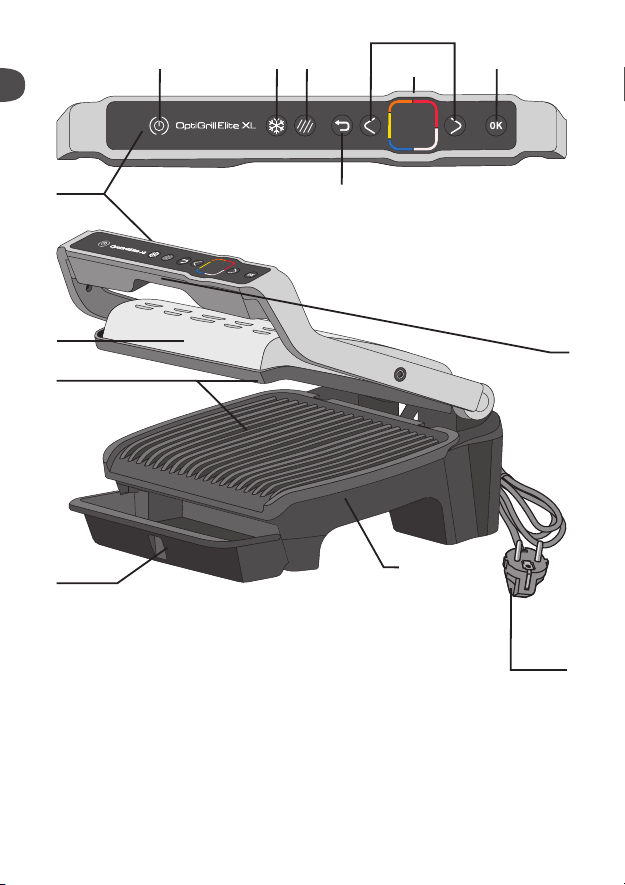
Description
A
Control panel
A1
On/O button
A2
Frozen food function
A3
Searing function
A4
Return button
Buttons are only activated when they are lit up.
A5
Adjustment and
navigation buttons
A6
Preheating indicator and
cooking level
A7
Display screen
A8
OK button
A4
B
B
C
D
E
F
EN
C
F
Appliance body
Handle
Cooking plates
Drip tray
Power cord
5
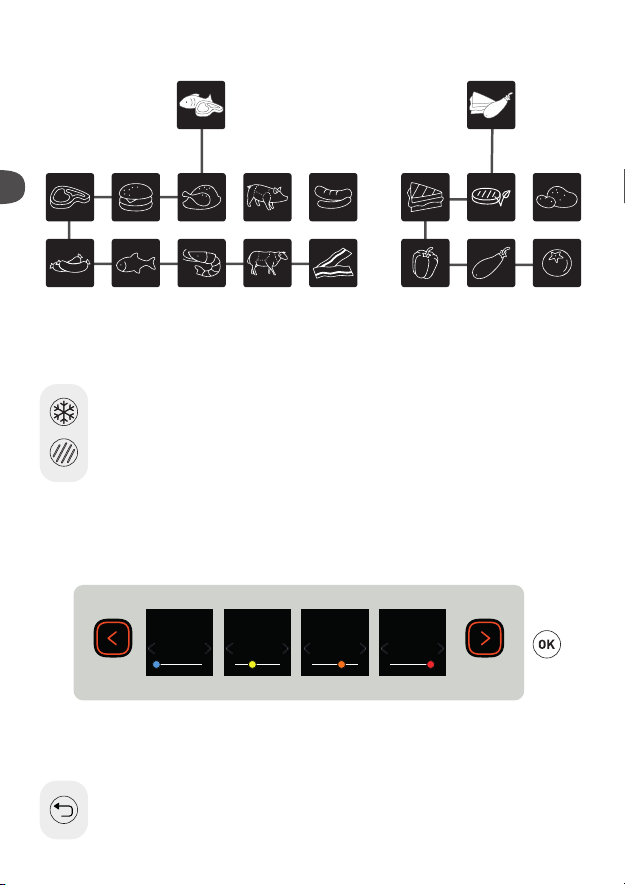
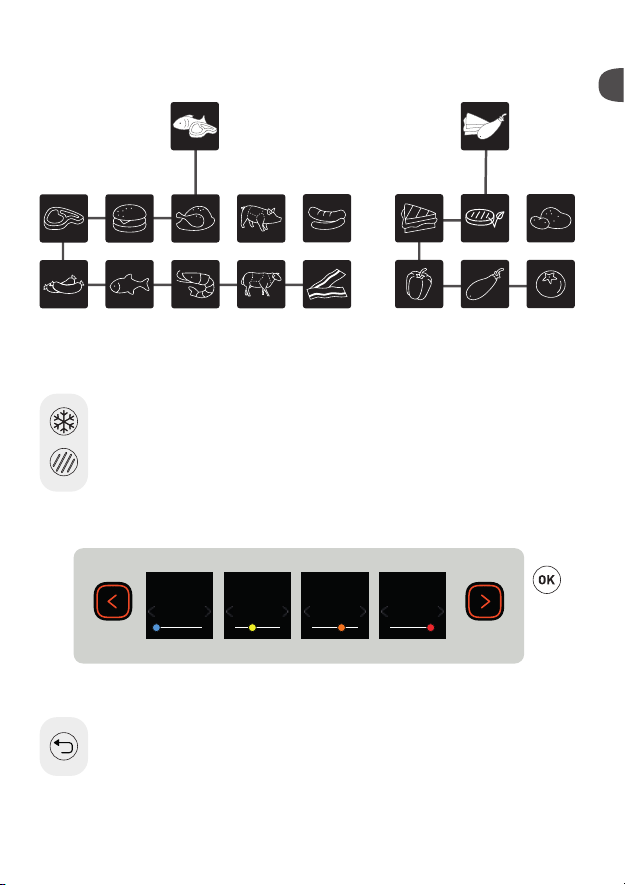
16 automatic cooking programs
EN
Two additional cooking
options in automatic mode
Frozen food function
Searing function
Note: The Frozen food function and Searing function can be used independently or both at the
same time.
Manual mode
Manual
mode
°C
120
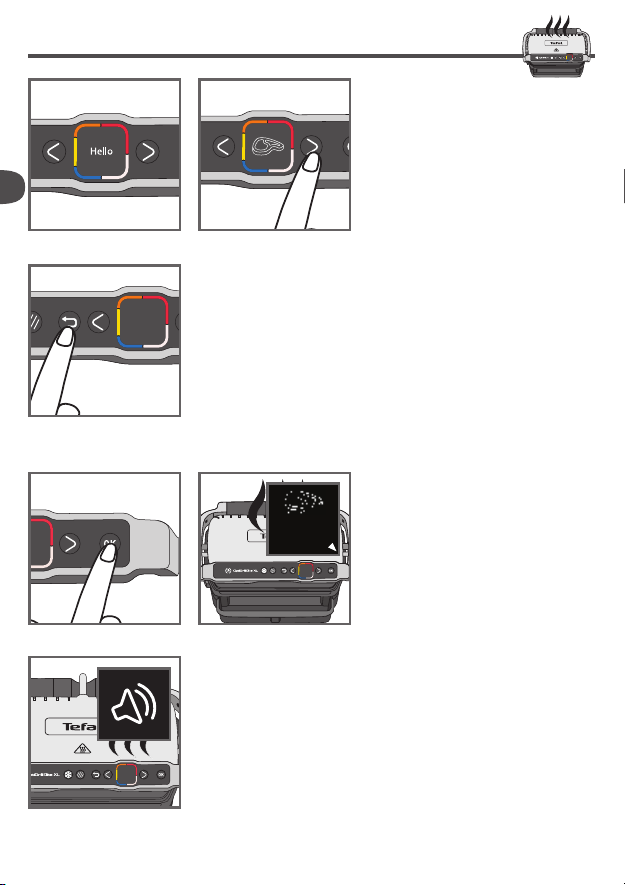
A Return button
If you are in a submenu and wish to return to the main menu,
press once on the return button.
If you have selected the wrong program, press twice on the
6
return button to cancel the function.
Manual
mode
160
Manual
mode
°C
200
Manual
mode
°C
240
°C

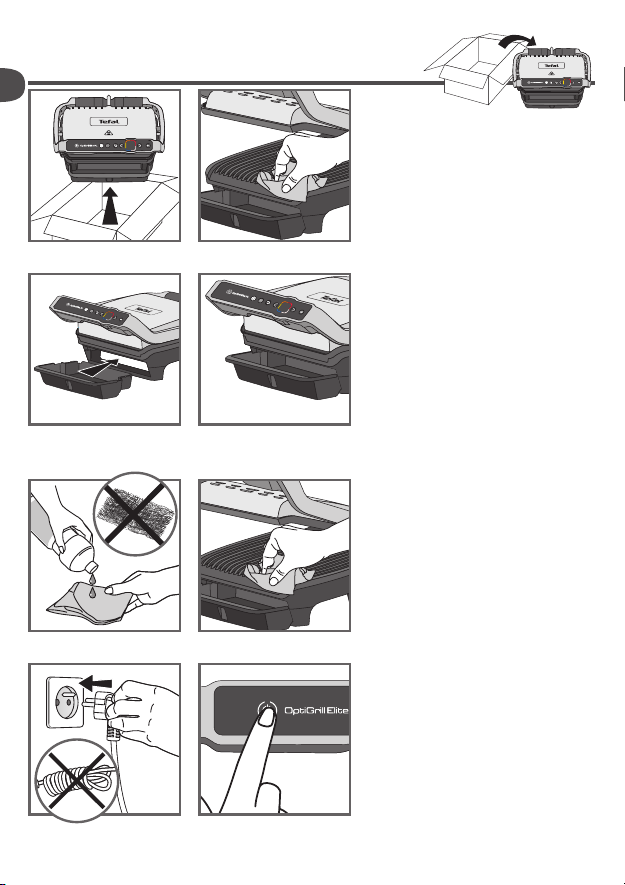
1 Before first use
1 2
3 4
5 6
OK
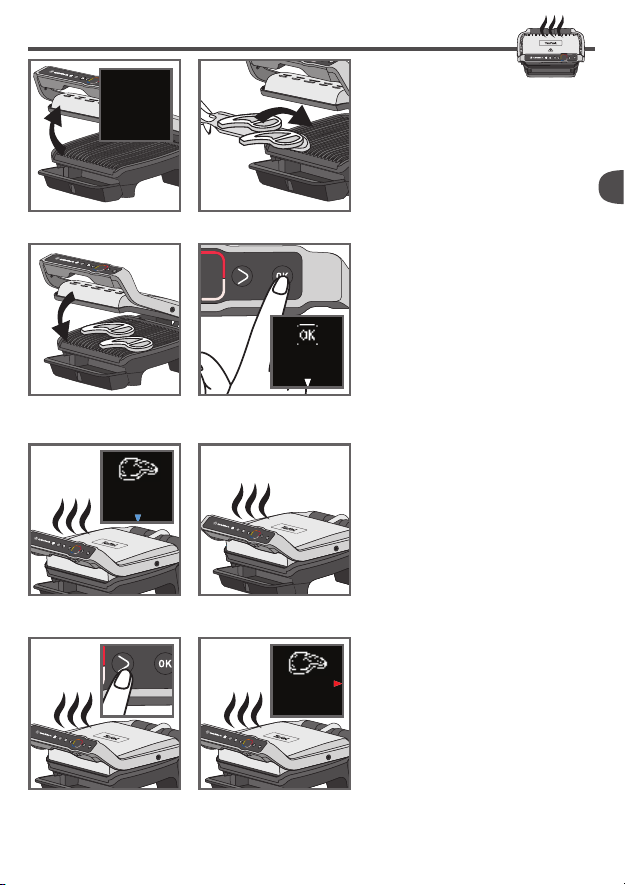
1 Remove all packaging, stickers and
various accessories from both the
inside and outside of the appliance.
2 Prior to rst use, thoroughly clean the
cooking plates using some hot water
and some washing-up liquid, carefully
rinse and dry.
3-4 Install the removable drip tray at the
front of the machine.
5 If you wish, for best results and to
improve the eectiveness of the
non-stick surface, you can wipe the
cooking plates with a paper towel
dipped in a little cooking oil.
6 Remove any excess oil with a clean
paper towel.
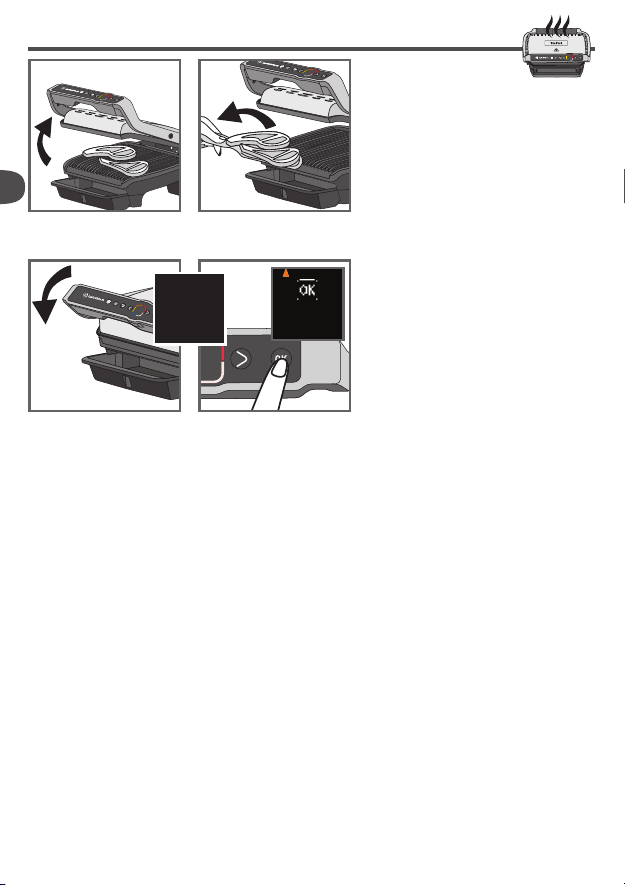
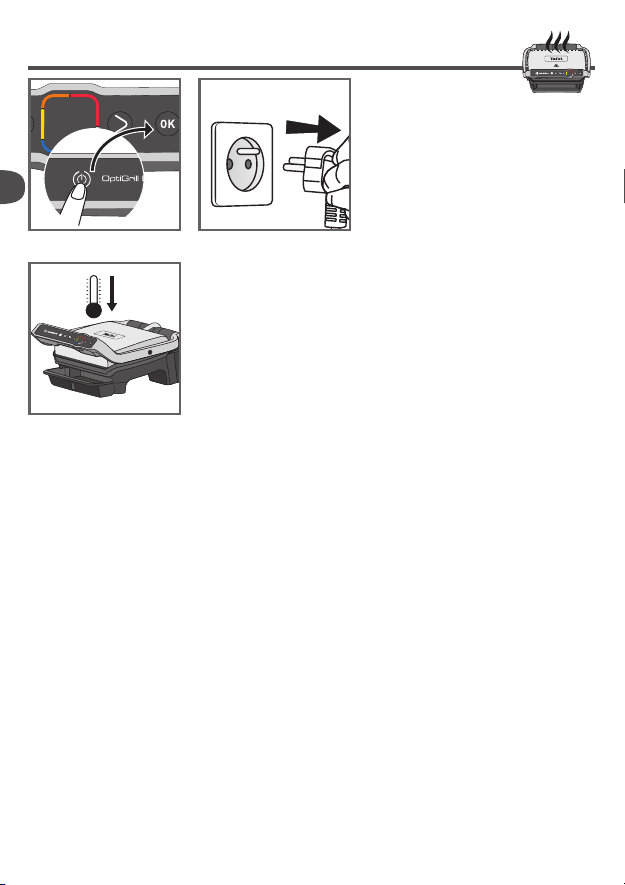
7 Make sure the top and bottom
plates are correctly positioned in the
appliance. Do not start preheating
without the plates. Connect the
appliance to the mains supply. (the
cable must be completely unwound).
8 Press the On/O button.
Caution: Ensure that there is no food
between the plates.
EN
7 8
7
2
Language
choice
English
Deutsch
Choix de la
langue
Français
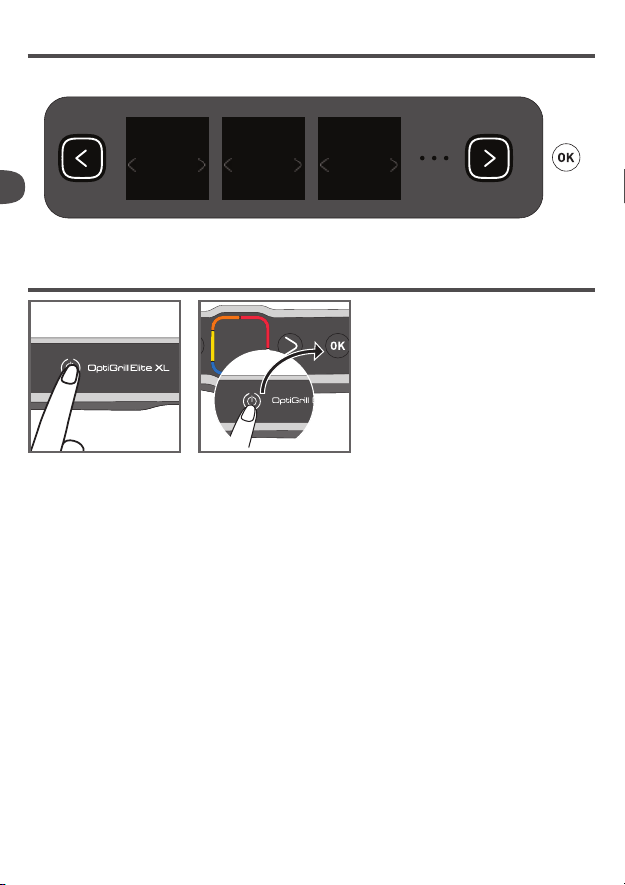
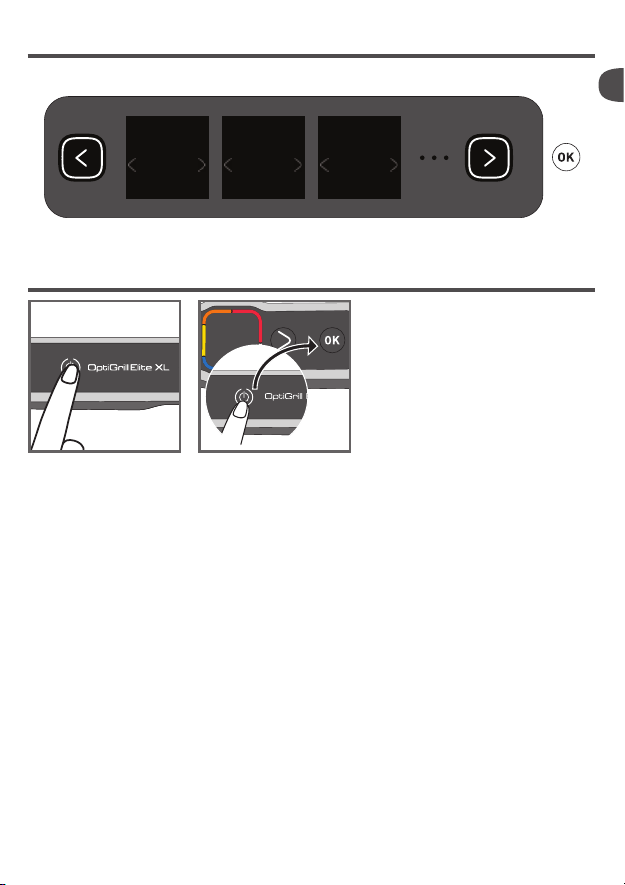
Using for the first time
9 Select your language using the arrows then press ok.
Sprachauswahl
EN
DE
EN
9
3
On/Off button
10 11
FR
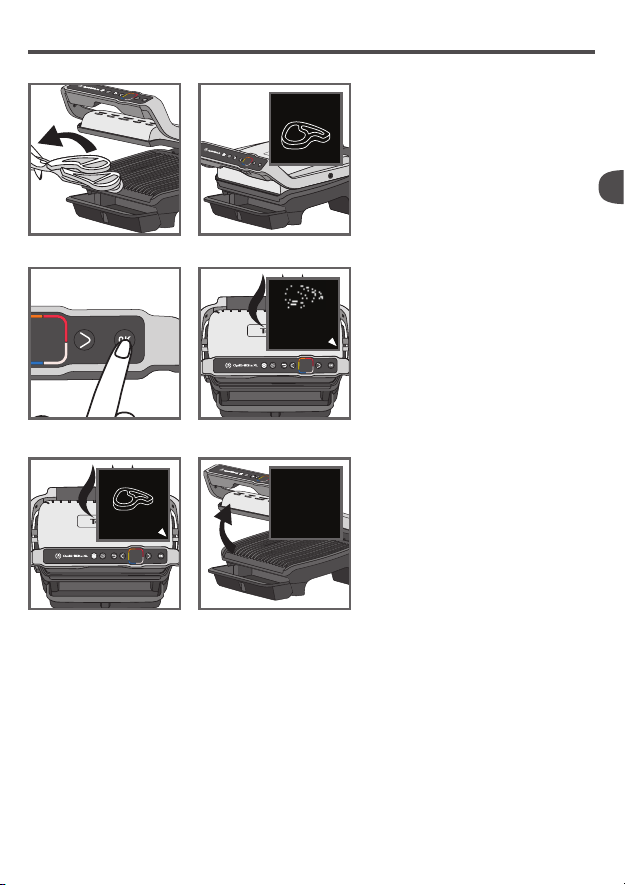
10 Switch on g. 10.
11 To switch o the grill press once on
the On/O button and once on the
OK button to switch o the appliance.
8
Searing
4
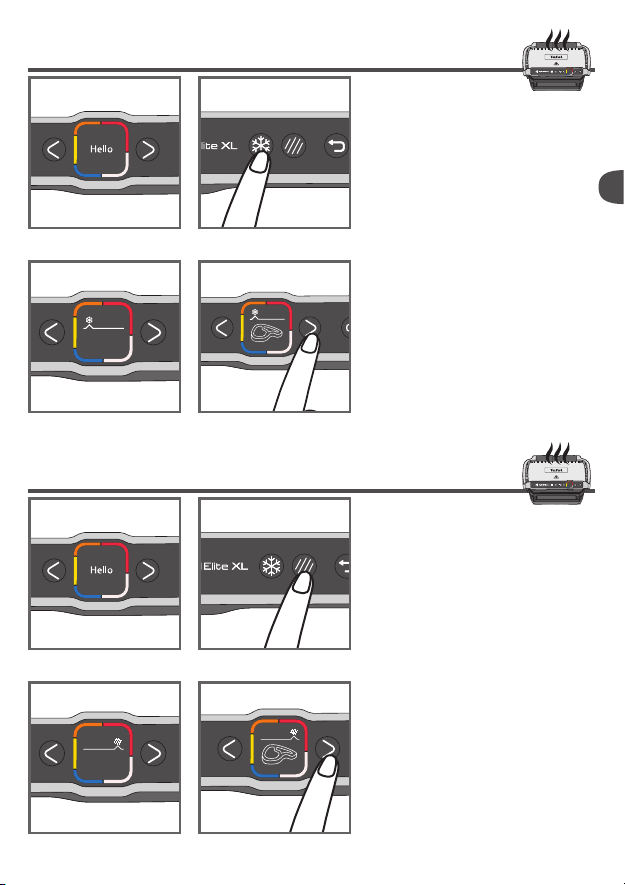
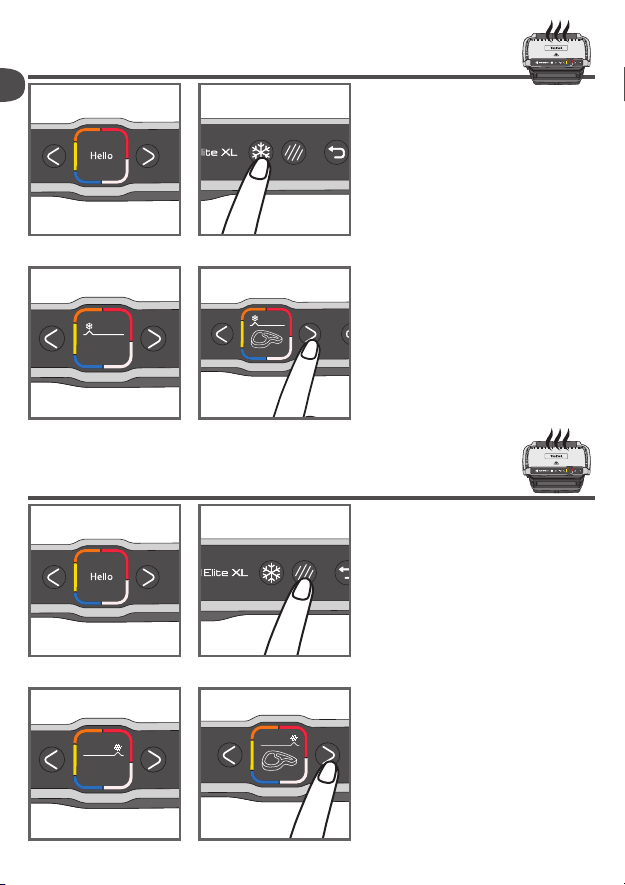
Frozen food
Frozen food function in automatic mode only
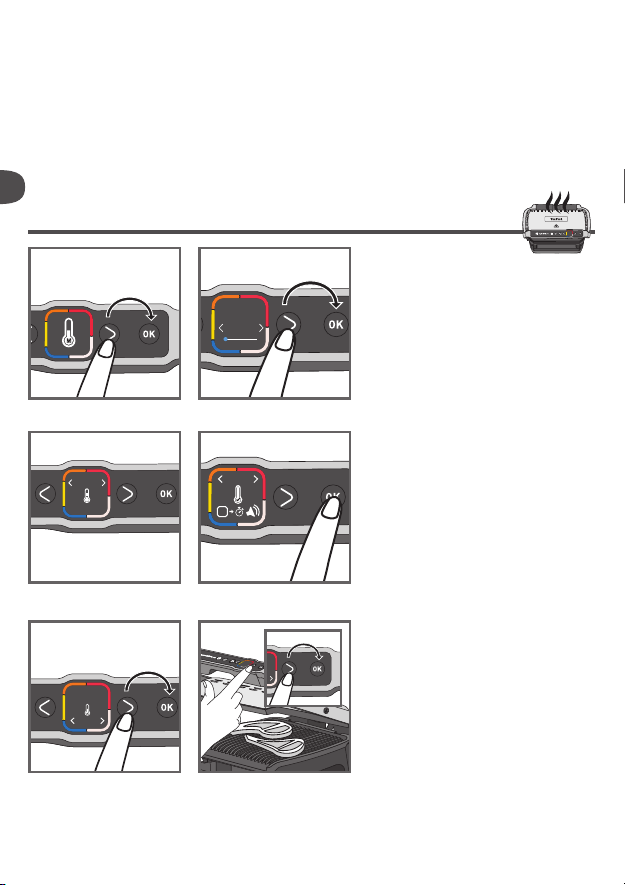
13-15 Frozen food function must
If you forget to activate the option,
use the "return" button and repeat the
steps.
This function is only available in
automatic mode, not in manual
12 13
ON
mode.
14 15
5
Searing function in automatic only
17-19 Searing function must be activated
If you forget to activate the option,
use the "return" button and repeat the
steps.
This function is only available in
automatic mode, not in manual
16 17
mode.
be activated before starting
preheating, if the food to be
cooked is frozen/deep frozen.
before starting preheating, if you
want signicant searing on the
food to be cooked.
EN
boost ON
18 19
9
6
Preheating in
progress
Cooking in automatic mode
21 Select the appropriate cooking mode
according to the type of food to be
cooked.
Note about meat: the cooking
results of the pre-dened programs
may vary depending on the origin,
EN
20 21
the cut and the quality of the food to
be cooked; the programs having been
developed and tested with food of
good quality.
Similarly, the thickness of the meat
must be taken into account during
cooking; you must not cook foods
over 4 cm thick.
22 If you would like to change program,
you can return to the main menu by
pressing once on the return button.
22
If you are unsure of which cooking mode to use, please refer to the Cooking Guide, page 20.
23 Press the OK button : the appliance
starts to preheat.
Note: if you select the wrong
program, use the "return" button.
24
Wait 4 to 7 minutes. Once the appliance
has started to preheat, if you wish to
change the program, press the return
button and then the OK button to
23 24
conrm and return to the main menu.
Press the return button again to cancel
the function.
10
25
25 A beep sounds to signal that
preheating is nished.
Caution: if the appliance remains
closed for too long after preheating is
nished, the safety system will turn o
the appliance.
Start of
cooking
Well-done
insert
the food
26 27
28 29
30 31
32 33
to start
cooking
in 01:35
26-27
Once preheating has nished, you can
insert your ingredients. Fully lift the
grill lid and place the food on the grill.
Caution: if the appliance remains
open for too long, the safety system
will turn o the appliance.
EN
28-31
The appliance automatically
calculates the cooking cycle (time
and temperature) according to the
quantity and thickness of the food.
Close the appliance so that the
cooking cycle can start.
Note for very thin foods, such as
bacon: The "OK" button is on. Then
press "OK" again to make sure that the
appliance recognises the food and
that the cooking cycle starts.
The arrow moves along the cooking
level indicator and when it reaches
a cooking level, the level is displayed
and a beep sounds.
Note: the cooking levels are pre-
programmed for each automatic
mode.
During cooking, a beep will alert
the user each time a cooking level is
reached (e.g. rare/yellow).
Depending on the degree of cooking,
the indicator changes colour and the
cooking progress arrow moves on the
screen.
Note, especially for meat, that it is
normal for the cooking results to vary
according to the type, quality and
origin of the food.
32-33
At any time, you can nd out the time
remaining to reach the dierent levels
of cooking. Press the right arrow if you
want to see in how long before the
next cooking level is reached. Note
that this does not select the cooking
levels. The grill continues to cook
to the last cooking level and a beep
sounds at each level.
11
to stop
EN
34 35
OK
36
37
cooking
34-35 When the cooking level of your
choice is reached and the beep sounds,
open the appliance and remove your
food.
36-37 Close the lid. The screen asks
for your conrmation to stop cooking.
Conrm with OK if all foods have been
removed, otherwise allow it to continue
cooking.
If you wish to cook more food, refer to
paragraph 7, page 13.
Note: the safety system will turn o the
power automatically if no program is
selected after a certain time.
12
7
Preheating in
progress
How to cook a second batch
Second batch of the same type of food
Any refill?
38-39 At the end of the rst cook, an "any
rell" screen appears. If you want to grill
the same type of food, press OK.
EN
38 39
40 The appliance starts preheating.
41 Wait until preheating has nished.
40 41
42 Put the food on the grill.
43 Then follow steps 26 to 36.
Wait
insert
the food
42 43
Second cooking with a dierent type of food
Once cooking your rst ingredient has nished:
1. Ensure that the appliance is closed and that there is no food inside.
2. Select the appropriate cooking program or mode.
3. Press the OK button to start preheating. During preheating, the preheating indicator is displayed on
the screen.
4. Once preheating has nished, a beep sounds and the preheating information is shown on the screen.
5. The appliance is ready to use once preheating has nished. Lift the grill lid and place the food inside
the grill. Then follow steps 26-36.
13
Manual
mode
00:00
Important:
– Preheating is essential to cooking.
Reminder: before starting preheating, ensure that the appliance is closed and that there is no food
inside.
– Wait until preheating is nished before opening the grill and putting food inside.
Note: if the new preheating cycle is started immediately after the end of the previous cycle, the
preheating time will be shorter.
EN
8
Cooking in manual mode
44 Select manual mode and press OK to
conrm.
°C
120
45 Select the desired temperature using
the adjustment buttons. Please refer
to manual cooking guide page 21.
Press OK to conrm the selected
temperature.
44 45
46 Wait until preheating has nished.
14
160°C
Preheating
46 47
160°C
48 49
160°C
OK
47 Once preheating has nished, press
OK to start the timer.
Note: the cooking time can also be set
from the start of preheating.
48 Press the adjustment buttons to select
the desired cooking time.
49 Insert your food and press OK to start
cooking and begin the countdown.
Press OK to adjust the temperature
and/or the clock at any time.

160°C
Remove
Overcooked
00:00
50 51
9
Comments
50-51 A beep sounds to indicate when
the cooking time has nished.
Remove your food.
Press OK to stop the beeping and
remove your food.
52-54
Depending on your personal preferences,
open the grill and remove foods that
have reached the desired cooking level,
then close the grill to continue cooking
other foods. The program will continue
the cooking cycle until the last cooking
level of the selected mode.
EN
52 53
your food
54 55
risk
55 Note: the safety system will turn
o the power automatically after a
certain time.
15
10
End of use
EN
56 Press the On/O button and conrm
by pressing the OK button.
57 Unplug the appliance.
56 57
2 H
58
58 Let it cool for at least 2 hours.
To prevent accidental burns, allow
the grill to cool completely before
cleaning.
16
11
Cleaning
59 60
61 62
63 64
65
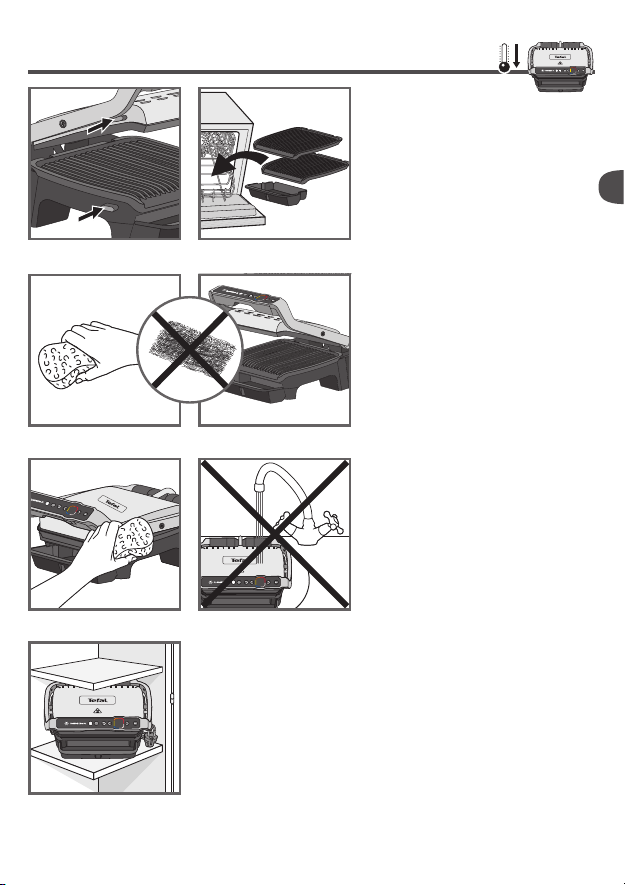
59 To unlock the plates, press the release
tabs on the left hand side of the
appliance. Before cleaning, unlock and
remove the plates to prevent damage
to the cooking plates.
60 The drip tray and cooking plates are
dishwasher safe. The appliance and
its power cord must never be put
in the dishwasher. If you wash the
plates in a dishwasher, always wipe
the plates over with a little cooking
oil on next use in order to condition
the coating and ensure the best
performance from the non-stick. The
heating elements should never be
cleaned after the plates have been
removed. If they are very dirty, wait
until the appliance has cooled down
completely and clean them with a dry
cloth.
61-62
To make washing the plates easier,
soak them for 1 hour in hot water and
some washing-up liquid, then rinse
thoroughly to remove all residue. Dry
them gently with a paper towel.
Do not use metal scouring pads, steel
wool or abrasive cleaners to clean any
part of the grill or cooking plates, use
only nylon or non-metallic cleaning
pads suitable for non-stick surfaces.
Empty the drip tray and wash it in
warm, slightly soapy water, then wipe
it thoroughly with a paper towel.
63 To clean the grill lid, wipe with a
sponge moistened with warm water
and dry with a soft, dry cloth. To clean
the control panel, use only a soft, dry
cloth.
64 The appliance must not be
submerged in water or in any other
liquid.
65 Always ensure that the appliance is
clean, cold and dry prior to storage.
All repairs must be done by an
authorised service centre.
EN
17
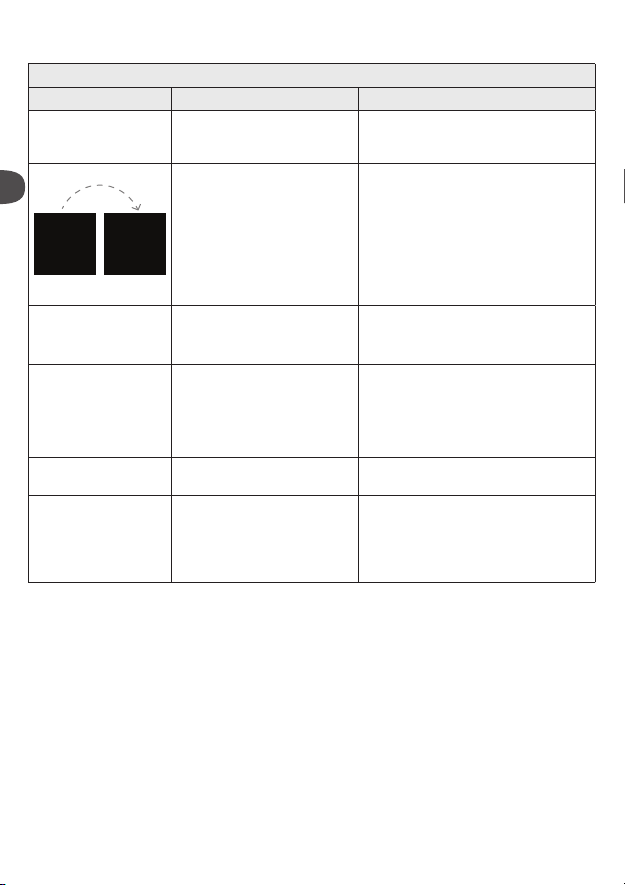
Troubleshooting Guide
5sec
OPTIGRILL ELITE TROUBLESHOOTING GUIDE
Problem Cause Solution
A change of language Switch on the grill, press ON, then
The preheating time was not
EN
Preheating
not nished,
remove your
My appliance does not
switch o
food
10s beforechangeover
to manual
Err 1 to Err 8 The unit has been stored or
completely nished. The grill
was opened and the food
placed on the plate before the
end of preheating.
mode
Missing a second press or too
long a time between the 2
presses.
used in a room that is too
cold.
Appliance overheating.
Err 9 to Err 13 Appliance failure. Unplug the appliance and contact
The appliance shuts
down itself during the
preheating or cooking
cycle.
The appliance remained open
for too long during cooking.
The unit has been idle for
too long after preheating or
preheating has nished.
immediately on the Frozen button
(while the screen displays "Hello")
It is possible to cook the food, but you
have to check the cooking progress
because the grill is in manual mode.
The temperature can be adjusted.
Or
Open the grill, remove the food, close
the grill properly and wait until the end
of preheating.
Press the On/O button once then
press OK
Unplug the appliance and wait a few
minutes.
Plug the grill in again and switch it on.
If the problem persists, contact
customer services.
customer services.
Unplug the appliance and wait a few
minutes. Then plug in your appliance
again and turn it on.
18

OPTIGRILL ELITE TROUBLESHOOTING GUIDE
to stop
00:00
Problem Cause Solution
cooking
to start
cooking
End of cooking conrmation
request
Food not detected because it
is too thin, for example bacon
2 solutions:
Press OK if all of the food has been
removed
Or
Do not press OK and leave the food to
cook a little longer
Press OK to start cooking
Food too thick, over 4 cm 2 solutions:
for manual
mode
I cannot set a time in
manual mode
The screen is stuck on
temperature setting
Press OK to continue cooking in
manual mode
Or
Remove the food and cut thinner to
reduce the thickness, to allow cooking
in automatic mode
Press OK once to go to the time setting
and then adjust it using the arrows.
Press OK to conrm.
180°C
EN
* For the UK only: do not cook chicken breast from frozen. Always thaw completely first.
** As bacon is a thin food, after closing the lid, press the "OK" button to make sure the appliance
recognise the food and the cooking cycle starts.
*** For the UK only: For food safety reasons the Food Standards Agency do not advise serving rare or
medium burgers. Only serve well done burgers.
19
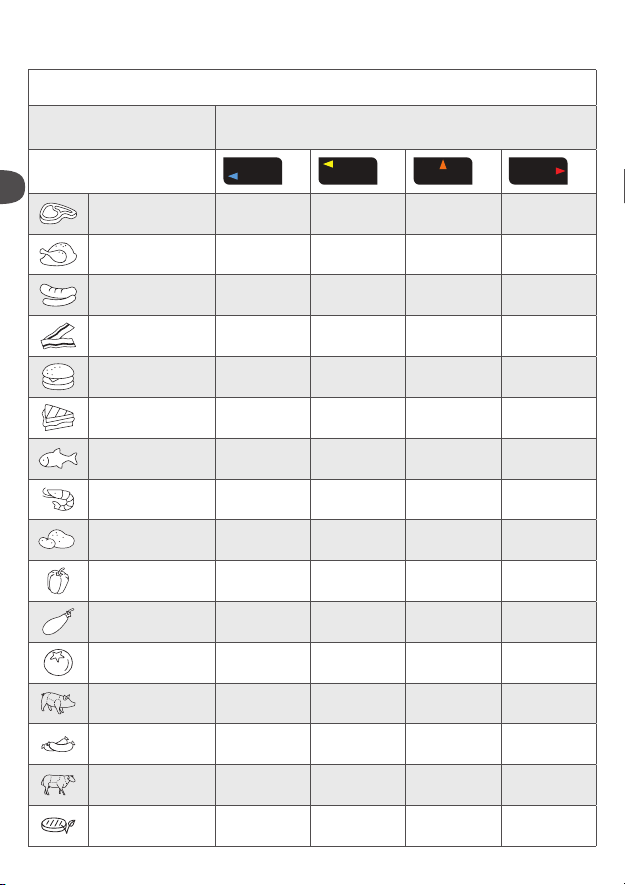
Cooking levels for each automatic program
16 AUTOMATIC PROGRAMS
EN
MENUS
AUTOMATIC
PROGRAMS
Blue
Beef Very rare (Blue) Rare Medium Well done
Chicken breast* - - - Well done
Sausage - - - Well done
Bacon** - - Medium Crispy
Beef Burger*** - - - Well done
Panini -
Fish - Medium
Seafood - Medium
Potato - - - Soft
Pepper - - Crunchy Soft
Aubergine - - - Grilled
COOKING LEVEL INDICATOR
Rare
Lightly
cooked
Medium
Toasted Crispy
Medium to
well-done
Medium to
well-done
Well-done
Well done
Well done
20
Tomato - - Crunchy Soft
Pork - Medium
Pre-cooked
sausages
- - - Soft
Lamb - Medium
Medium to
well-done
Medium to
well-done
Well done
Well done
Vegetarian Steak - - - Soft

to 195°C
to 235°C
to 270°C
COOKING ADVICE FOR OTHER FOODS
PRODUCTS
COOKING
PROGRAM
COOKING
TIP
Pork tenderloin (boneless), pork belly
Bratwurst (pre-cooked pork)
Well done*
220°C / 8 min 30 sec
Rindswurst (pre-cooked beef) 220°C / 8 min 30 sec
Nürnberger Wurst (pre-cooked pork) 220°C / 4 min 30 sec
MANUAL MODE
FRUIT OR VEGETABLES
From 180°C
From 220°C
- - Courgette (slices)
- - Asparagus (whole)
- - Mushroom
- Onion -
Broccoli orets - -
Baby carrot - -
- Fennel -
Sweet potato
(slices)
- -
- Apple (slices) -
- Banana -
- Peach (Stoned and sliced) -
From 225°C
EN
21

OPTIGRILL ELITE PREPARATION ADVICE
For more signicant searing, it is best to return the grilled food to the grill before serving it to
your guests.
PRODUCTS PREPARATION ADVICE
POTATO
EN
PEPPER • Cut in half lengthway and remove seeds
AUBERGINE
TOMATO
PORK * Use the searing function if the thickness is more than 20 mm.
• Cut lengthways
• Coat or brush the potato slices with oil for the best cooking
results.
• Cut lengthways
• Coat or brush the aubergine slices with oil for the best cooking
results.
• Use round tomatoes
• Use tomatoes that are not too ripe
• Cut in half widthways
• For optimal cooking, place the rounded side of the halved
tomato on the bottom plate of the grill.
22

ИНСТРУКЦИИ ПО ТЕХНИКЕ БЕЗОПАСНОСТИ
ВАЖНЫЕ МЕРЫ БЕЗОПАСНОСТИ
Руководство по эксплуатации. В целях собственной безопасности,
а также бережного и длительного пользования прибором
внимательно изучите все разделы руководства по эксплуатации,
в том числе соответствующую инфографику.
Этот прибор предназначен только для домашнего бытового использования
в помещениях. Устройство не предназначено для использования в
нижеприведенных случаях, гарантия на которые не распространяется:
– в кухонных помещениях, предназначенных для персонала магазинов, в
офисах и в других рабочих помещениях;
– на фермах;
– клиентами отелей, мотелей и других подобных мест проживания;
- в мини-гостиницах.
Перед первым использованием удалите все упаковочные материалы,
наклейки и принадлежности изнутри и снаружи устройства.
Данное устройство не предназначено для использования лицами (в том
числе детьми) с пониженными физическими, сенсорными или умственными
способностями или имеющими недостаточный опыт или знания, если
только они не находятся под присмотром или были проинструктированы по
поводу использования устройства лицом, ответственным за их безопасность.
Следите за тем, чтобы дети не играли с этим устройством.
Этим устройством могут пользоваться дети старше 8 лет, а также
лица с ограниченными физическими, сенсорными и умственными
способностями или с недостаточным опытом и знаниями, если они
находятся под присмотром или получили инструкции по безопасной
эксплуатации устройства и понимают связанные с этим опасности. Чистку
и пользовательское обслуживание могут выполнять дети старше 8 лет и при
условии надзора за ними.
Устройство и его кабель питания должны быть недоступны для детей
младше 8 лет.
Во время использования никогда не оставляйте устройство без присмотра.
Во время использования доступные поверхности
устройства могут сильно нагреваться. Никогда не
прикасайтесь к горячим поверхностям устройства.
Это устройство не предназначено для использования с внешним таймером
или отдельной системой дистанционного управления.
23
RU

Перед подключением устройства к электросети полностью разматывайте
кабель питания.
Если кабель питания поврежден, то во избежание опасности его должен
RU
заменить изготовитель или его технический представитель.
Не используйте удлинители. Если вы согласны взять на себя ответственность
за использование удлинителей, то выбирайте только те, которые находятся
в хорошем состоянии, имеют вилку с заземлением и соответствуют
номинальной мощности устройства. Примите все необходимые меры
предосторожности, чтобы никто не споткнулся об удлинитель.
Всегда подключайте устройство к розетке с заземлением.
Убедитесь, что источник электропитания соответствует номинальной
мощности и напряжению, указанным на нижней части устройства.
Для очистки пластин используйте губку, горячую воду и моющее средство.
Никогда не погружайте устройство, кабель питания или вилку в воду или
любую другую жидкость.
ПРЕДУПРЕЖДЕНИЕ. Не используйте гриль без двух пластин, установленных
внутрь.
Всегда
• Внимательно прочитайте инструкции, общие для разных моделей в зависимости от принадлежностей,
поставляемых с устройством, и храните их в пределах досягаемости.
• При случайном получении ожога промойте его холодной водой и немедленно обратитесь к врачу при
необходимости.
• Перед первым использованием вымойте пластины (см. раздел 5), налейте на них небольшое количество
растительного масла и протрите мягкой тк анью или бумажным кухонным полотенцем.
• Размести те кабель питания аккуратно, с удлинителем или без, таким образом, чтобы люди могли свободно
перемещаться вокруг с тола, не спотыкаясь о кабели.
• Дым может быть оп асен для животных , которые обладают особ о чувствитель ным обонянием, т аких как птицы.
Мы рекомендуем владельцам птиц держать их подальше от зоны приготовления пищи.
• Всегда храните устройство в недоступном для детей месте.
• Перед использованием убедитесь, что пластины чистые с обеих сторон.
• Чтобы предотвратить повреждение пластин, используйте их только с тем устройством, для которого они
предназначены (напри мер, не ставите их в печь, на г азовые горелки, элек трические варочные пане ли и т.д.).
• Убедитесь, что пластины устойчивы, надежно зафиксированы и правильно расположены на устройстве.
Используйте только пластины, поставляемые в комплекте с устройством или приобретенные в
специализированном сервисном центре.
• Чтобы не повредить пластины устройс тва, всегда используйте деревянную или пластиковую лопатк у.
• Используйте только детали и аксессуары, поставляемые в комплекте с устройс твом или приобретенные в
специализированном сервисном центре. Не используйте их для других изделий или целей.
Никогда
• Не используйте устройство вне помещений.
• Никогда не оставляйте подключенное или работающее устр ойство без присмотра.
• Чтобы избежать перегрева, не ставьте устройство в угол или под шкаф у стены.
24

• Никогда не ставьте устройство непосредственно на хрупкие поверхности (стеклянный стол, скатерть,
лакированную мебель и др.) или на мягкие поверхности, например на ку хонное полотенце.
• Никогда не ставьте устр ойство под настенный шк аф, полку или рядом с горючим и материалами, такими к ак
жалюзи, шторы или гобелены.
• Никогда не ставьте устройство на горячие или скользкие поверхности либо поблизости от них. Кабель
питания не долж ен находиться вблизи или в ко нтакте с горячими час тями устройст ва, в непосредств енной
близости к источнику теп ла или острым краям.
• Не кладите к ухонные приборы на варочные поверхнос ти устройства.
• Никогда не режьте пищу непосредственно на пластинах.
• Не используйте металлические мочалки и агрессивные чистящие порошки, так как они могут повредить
антипригарное покрытие плас тин.
• Не перемещайте ус тройство во время эксплуатации.
• Не поднимайте устройство за рукоятку или металлические провода.
• Не используйте устройство без пищи.
• Не кладите алюминиевую фольгу и другие предметы между плас тиной и приготовляемой пищей.
• Не извлекайте поддон для жира во время использования устройства. Если поддон для жира заполнился в
процессе приготовления пищи, дайте устройству остыть и опустошите поддон.
• Не помещайте горячие пластины на хрупкие поверхности или под воду.
• Чтобы сохранить антипригарные свойства покрытия, избегайте чрезмерного предварительного разогрева
пустого устройства.
• Никогда не переносите горячие пластины.
• Не готовьте при помощи устройства пищу, завернутую в алюминиевую фольгу.
• Чтобы не испортить устройс тво, никогда не используйте его для приготовления блюд способом «фламбе».
• Не помещайте лис ты алюминия и другие предметы меж ду пластинами и нагревательным элементом.
• Никогда не готовьте на открытом гриле.
• Никогда не нагревайте ус тройство без плас тин.
Советы и информация
• Благодарим за приобретение данного устройства, которое предназначено только для домашнего
использования.
• В целях безопа сности данный прибор соот ветствует применимы м стандартам и нормати вам — Директива
по низковольтному оборудованию — Директива об электромагнитной совместимости — Директива об
охране окружающей среды — Директива о материалах, непосредственно контактирующих с продуктами
питания.
• Во время первых минут использования устройство может испускать легкий запах и дым.
• Наша компания проводит постоянные исследования и разработки и может вносить изменения в данное
изделие без предварительного уведомления.
• Не употребляйте в пищу продукты, которые были в непосредственном контакте с частями устройства,
имеющими маркировку .
• Если пища слишком толстая, предохранительная система автоматически отк лючит устройство.
• Панель управления хрупкая. Очищайте ее и протирайте насухо только сухой мягкой т канью. Не чистите ее
влажной г убкой во избежание повреждения органов управления.
Защита окружающей среды
Защита окружающей среды превыше всего!
Данное устройство содержит материалы, пригодные д ля переработки и вторичного использования.
С дайте его в ближайший пункт сбора отходов.
RU
25
RU
A1 A2 A3
A5
A6
A7
A8
A
B
D
E
Описание
A
Панель управления
A1
Кнопка «Вкл./выкл.»
A2
Функция приготовления
замороженных
продуктов
A3
Функция зажаристой
корочки
Кнопки активны, только когда подсвечены.
26
A4
Кнопка возврата
A5
Кнопки регулировки и
навигации
A6
Индикатор прогрева и
уровень приготовления
A7
Экран дисплея
A4
B
A8
Кнопка «OK»
B
Корпус устройства
C
Рукоятка
D
Рабочие пластины
E
Поддон для сока
F
Шнур питания
C
F
12 автоматических программ
приготовления
RU
Два варианта приготовления в
автоматическом режиме
Функция приготовления замороженных продуктов
Функция зажаристой корочки
Ручной режим
Manual
mode
120
Manual
°C
160
Кнопка возврата
Если вы находитесь в подменю и хотите вернуться в
главное меню, нажмите кнопку возврата один раз.
Если выбрана неправильная программа, нажмите кнопку
возврата дважды для отмены функции.
mode
Manual
mode
°C
200
Manual
mode
°C
240
°C
27
1 Подготовка
RU
1 2
3 4
5 6
ОК
1 Удалите все упаковочные
материалы, наклейки и любые
другие вкладки изнутри и снаружи
устройства.
2 Перед первым использованием
тщательно очистите все пластины с
помощью небольшого количества
горячей воды и моющего
средства, осторожно сполосните и
просушите.
3–4 Расположите съемный поддон для
сока в передней части устройства.
5 При желании для достижения
наилучших результатов
приготовления и повышения
эффективности антипригарного
покрытия рабочие пластины
можно протирать бумажным
полотенцем, смоченным небольшим
количеством растительного масла.
6 Удалите излишки масла с помощью
чистого бумажного полотенца.
7 Убедитесь, что верхняя и нижняя
пластины правильно установлены в
устройство. Не выполняйте прогрев
устройства без установленных
пластин. Подключите устройство
к сети (шнур питания следует
полностью размотать).
8 Нажмите кнопку «Вкл./выкл.».
Осторожно! Убедитесь, что между
пластинами нет продуктов.
28
7 8
2
Language
choice
English
Deutsch
Choix de la
langue
Français
Перед первым использованием
9 С помощью кнопок со стрелками выберите язык и нажмите «ОК».
Sprachauswahl
EN
DE
FR
9
3
Кнопка «Вкл./выкл.».
10 Включение
11 Для включения гриля нажмите на
кнопку «Вкл./выкл.» два раза или
один раз на кнопку «Вкл./выкл.» и
один раз на кнопку «ОК».
10 11
RU
29
Searing
4
Frozen food
Функция приготовления замороженных
продуктов в автоматическом режиме
RU
12 13
ON
14 15
5
Функция зажаристой корочки в автоматическом
13–15 Функцию приготовления
замороженных продуктов
следует включать до начала
прогрева при выборе
автоматического режима,
если для приготовления
используются продукты,
подвергнутые (глубокой)
заморозке.
Если вы забыли включить эту
функцию, нажмите кнопку возврата
и выполните эти шаги заново.
Эта функция доступна только в
автоматическом (не в ручном)
режиме.
режиме
17-19 Если вы хотите приготовить
продукт с более румяной
корочкой, включите функцию
зажаристой корочки до
начала прогрева при выборе
автоматического режима.
Если вы забыли включить эту
функцию, нажмите кнопку возврата
и выполните эти шаги заново.
16 17
Эта функция доступна только в
автоматических программах (но не в
ручном режиме).
30
boost ON
18 19
 Loading...