


3-064-678-34 (1)
250P-DSR
Digital
Camcorder
Operating Instructions
Before operating the unit, please read this manual thoroughly, and retain it for future reference.
DSR-250P
©2000 Sony Corporation

Welcome!
Congratulations on your purchase of this Sony Digital camcorder.
With your Digital camcorder, you can capture life’s precious moments with superior picture and sound quality. Your Digital camcorder is loaded with advanced features, but at the same time it is very easy to use. You will soon be producing home video that you can enjoy for years to come.
WARNING |
Voor de klanten in Nederland |
To prevent fire or shock hazard, do not expose the unit to rain or moisture.
To avoid electrical shock, do not open the cabinet. Refer servicing to qualified personnel only.
For the Customers in Europe
This product with the CE marking complies with the EMC Directive (89/336/EEC) issued by the Commission of the European Community.
Compliance with these directives implies conformity to the following European standards:
•EN55103-1:Electromagnetic Interference (Emission)
•EN55103-2:Electromagnetic Susceptibility (Immunity)
This product is intended for use in the following Electromagnetic Environment(s): E1 (residential), E2 (commercial and light industrial), E3 (urban outdoors) and E4 (controlled EMC environment ex. TV studio)
The electromagnetic fields at the specific frequencies may influence the picture and sound of this digital camcorder.
Bij dit product zijn batterijen gelevered. Wanneer deze leeg zijn, moet u ze niet weggooien maar inleveren als KCA.
“Memory Stick”
2

Table of contents
Getting started |
|
Using this manual ............................................... |
4 |
Checking supplied accessories ......................... |
6 |
Step 1 Installing the microphone ..................... |
7 |
Step 2 Preparing the power supply ................ |
8 |
Step 3 Inserting a cassette ............................... |
13 |
Recording – Basics |
|
Recording a picture .......................................... |
15 |
Shooting backlit subjects (BACK |
|
LIGHT) .......................................... |
27 |
Spot light .............................................. |
28 |
Checking the recording – END SEARCH / |
|
EDITSEARCH / Rec Review ....................... |
29 |
Playback – Basics |
|
Playing back a tape ........................................... |
30 |
Viewing the recording on a monitor ............. |
35 |
Advanced Recording Operations |
|
Shooting with manual adjustment ................. |
36 |
Focusing manually ........................................... |
45 |
Adjusting the white balance ........................... |
47 |
Presetting the adjustment for picture quality |
|
– Custom preset ............................................. |
50 |
Using the guide frame ..................................... |
52 |
Marking an Index ............................................. |
53 |
Adjusting the recording level manually |
|
– Sound recording level ................................ |
54 |
Connecting an optional external |
|
microphone ..................................................... |
56 |
Using an external audio system or |
|
microphone ..................................................... |
58 |
Backing up recordings to another tape ......... |
59 |
Using a video light ........................................... |
60 |
Superimposing the date and time on a |
|
picture .............................................................. |
61 |
Recording a still image on a tape |
|
– Tape Photo recording ................................. |
62 |
Shooting with all the pixels |
|
– PROG. SCAN ............................................... |
64 |
Using the wide mode ....................................... |
66 |
Using the fader function .................................. |
67 |
Using special effects – Digital effect .............. |
69 |
Superimposing a still image in a “Memory |
|
Stick” on a moving picture |
|
– MEMORY MIX ............................................ |
71 |
Interval recording ............................................. |
74 |
Frame by frame recording – Cut recording ... |
76 |
Advanced Playback Operations |
|
Searching for a recording by index |
|
– Index search ................................................. |
77 |
Searching the boundaries of recorded tape by |
|
title – Title search ........................................... |
79 |
Searching a recording by date – Date search ... |
80 |
Searching for a photo – Photo search/Photo |
||
scan .................................................................. |
|
82 |
Playing back a tape with digital effects ......... |
84 |
|
Editing |
|
|
Dubbing a tape .................................................. |
|
85 |
Dubbing only desired scenes |
|
|
– Digital program editing ............................. |
|
88 |
Using with an analog video unit and a PC |
|
|
– Signal convert function .............................. |
|
94 |
Recording video or TV programs .................. |
|
96 |
Audio dubbing ................................................ |
|
100 |
Setting time values ......................................... |
|
105 |
Superimposing a title ..................................... |
|
110 |
Making your own titles .................................. |
|
114 |
Labelling a cassette ......................................... |
|
116 |
Erasing the cassette memory data ................ |
|
118 |
Customizing Your Camcorder |
|
|
Changing the menu settings ......................... |
|
120 |
Resetting the date and time ........................... |
|
128 |
“Memory Stick” Operations |
|
|
Using a “Memory Stick” – introduction ...... |
129 |
|
Recording still images on a “Memory Stick” |
||
– Memory Photo recording ........................ |
|
134 |
Recording an image from a tape as a still |
|
|
image ............................................................. |
|
137 |
Copying still images from a tape |
|
|
– Photo save .................................................. |
|
140 |
Viewing a still picture – Memory Photo |
|
|
playback ........................................................ |
|
142 |
Copying an image recorded on a “Memory |
|
|
Stick” to tapes ............................................... |
|
146 |
Playing back images continuously |
|
|
– SLIDE SHOW ............................................ |
|
148 |
Preventing accidental erasure |
|
|
– Image protection ....................................... |
|
149 |
Deleting images .............................................. |
|
151 |
Writing a print mark – Print mark ............... |
|
154 |
Additional Information |
|
|
Compatibility of DVCAM and DV |
|
|
formats ........................................................... |
|
156 |
Usable cassettes ............................................... |
|
158 |
About i.LINK ................................................... |
|
161 |
Troubleshooting .............................................. |
|
162 |
Self-diagnosis display .................................... |
|
168 |
Warning indicators and messages ............... |
|
169 |
Using your camcorder abroad ...................... |
|
171 |
Maintenance information and precautions ... |
172 |
|
Specifications ................................................... |
|
176 |
Quick Reference |
|
|
Identifying the parts and controls ................ |
|
177 |
Quick Function Guide .................................... |
|
191 |
Index .................................................... |
Back cover |
|
3

— Getting started —
Using this manual
As you read through this manual, buttons and settings on your camcorder are shown in capital letters.
e.g. Set the POWER switch to ON.
When you carry out an operation, you can hear a beep or a melody sound to indicate that the operation is being carried out.
Note on cassette memory
Your camcorder is based on the DVCAM/DV format. We recommend that you use a tape with cassette memory .
The functions which require different operations depending on whether or not the tape has cassette memory are:
•Searching the end point of the recording – end search (p. 29, 33)
•Searching a recording by index – index search (p. 77)
•Searching a recording by date – date search (p. 80)
•Searching for a photo – photo search (p. 82).
The functions you can operate only with cassette memory are:
•Searching the boundaries of recorded tape by title – title search (p. 79)
•Superimposing a title (p. 110)
•Making your own titles (p. 114)
•Labelling a cassette (p. 116).
For details, see page 158.
You see this mark in the introduction of the features that are operated only with cassette memory.
Tapes with cassette memory are marked with (Cassette Memory).
4
Using this manual
Note on TV colour systems
TV colour systems differ from country to country.
To view your recordings on a TV, you need a PAL system-based TV.
Copyright precautions
Television programs, films, video tapes, and other materials may be copyrighted. Unauthorized recording of such materials may be contrary to the provision of the copyright laws.
Precautions on camcorder care
•The LCD screen and the viewfinder are manufactured using high-precision technology. Effective ratio of pixels is 99.99% or more. However, there may be some tiny black points and/or bright points (red, blue, green or white) that constantly appear on the LCD screen and in the viewfinder. These phenomena are not malfunctions. These points do not affect the recorded picture in any way.
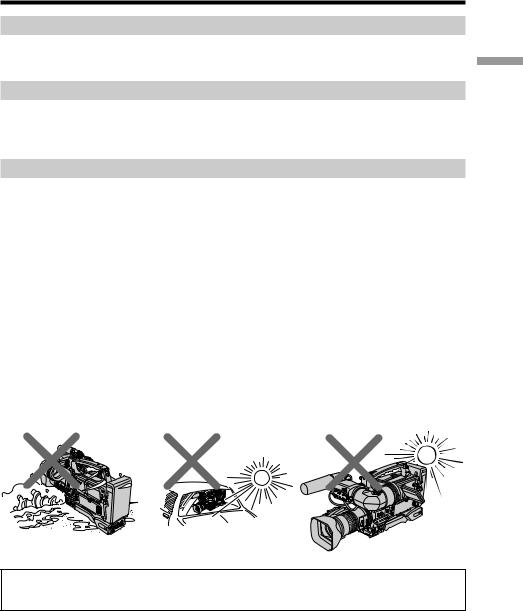
•Do not let your camcorder get wet. Keep your camcorder away from rain and sea water. Letting your camcorder get wet may cause your camcorder to malfunction. Sometimes this malfunction cannot be repaired [a].
•Never leave your camcorder exposed to temperatures above 60 °C (140 °F), such as in a car parked in the sun or under direct sunlight [b].
•Do not place your camcorder so as to point the viewfinder or the LCD screen or lens toward the sun. The inside of the viewfinder, LCD screen, or lens may be damaged
[c].
•The use of the radio communication equipment such as cellular phones or transceivers near the unit may cause a malfunction and can affect the audio/video signals. The cellular phones or transceivers near the unit should be switched off.
[a] |
[b] |
[c] |
started Getting
Contents of the recording cannot be compensated if recording or playback is not made due to a malfunction of the camcorder, video tape, etc.
5
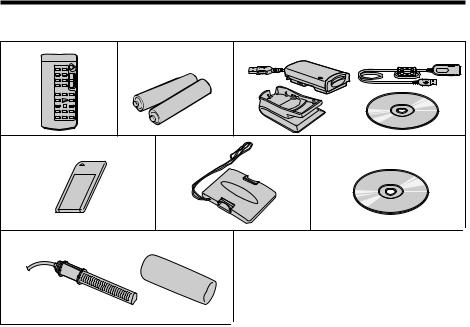
Checking supplied accessories
Make sure that the following accessories are supplied with your camcorder.
1 |
2 |
3 |
4 |
5 |
6 |
7 |
|
|
1 Wireless Remote Commander (1) |
4 “Memory Stick” (1) (p. 129) |
|
(p. 188)
2R6 (Size AA) battery for Remote Commander (2) (p. 189)
3Memory Stick Reader/Writer (1), Stand (1), Specified extension cable (1), Driver software (CD ROM) (1)
You cannot use the “PIXELA ImageMixer” software to copy images from your camcorder to your computer.
5 Hood cap (1) (p. 15)
6Application software: PictureGear 4.1Lite (CD ROM) (1) (p. 145)
7Microphone (1) (p. 7), Wind screen (1) (p. 7)
8 Operating instructions (2)
6
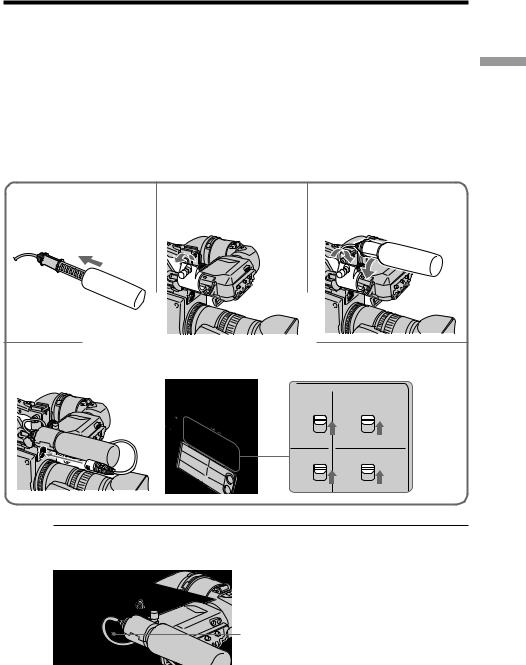
Step 1 Installing the microphone
Install the supplied microphone. Be sure to connect the microphone plug to the MIC IN +48V connector.
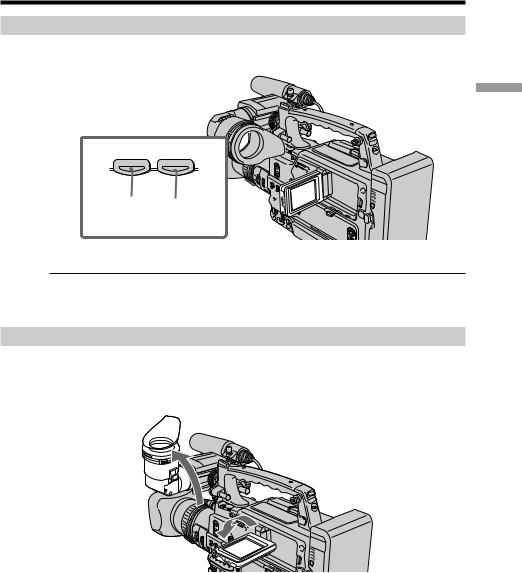
(1) Attach the wind screen to the microphone.
(2) Loosen the microphone holder screw and open the cover.
(3) Place the microphone into the holder with the model name (ECM-NV1) facing upward, close the cover, and tighten the screw.
(4) Connect the plug of the microphone to the MIC IN +48V connector.
(5) Set the AUDIO INPUT switches to FRONT, and the AUDIO SELECT switches to AUTO, for both channels 1 and 2.
When you manually adjust the audio level, see “Adjusting the recording level manually – Sound recording level” on page 54.
started Getting
1 |
2 |
3 |
4 5
AUDIO |
AUDIO |
INPUT |
SELECT |
FRONT |
AUTO |
REAR |
CH-1 |
MANUAL |
|
FRONT |
AUTO |
REAR |
CH-2 |
MANUAL |
When the wind is blowing hard
When inputting the sound via the MIC IN +48V connector, you can reduce the wind noise. Set the MIC LOW CUT switch to ON. This is only activated for the front microphone.
MIC LOW CUT switch
When you unplug the microphone plug
Unplug it while pressing the PUSH button.
7

Step 2 Preparing the power supply
The following power supplies can be used with the camcorder. •BP-L40 (A)/L60A/L90A lithium-ion battery pack
•NP-1B Ni-Cd Battery Pack (The DC-L1Battery Adaptor is required.) •BP-90A Ni-Cd Battery Pack (The DC-L90 Battery Adaptor is required.)
•AC power (The AC-550CE, AC-DN1/DN2A, or CMA-8ACE AC Adaptor is required.) Alternatively, you can make combined use of internal and external batteries, by mounting one of the above batteries as an internal battery and connecting, such as a BP90A contained in a DC-210 Battery Adaptor to the DC IN 12V connector of the camcorder as an external source.
Using a BP-L40 (A)/L60A/L90A battery pack
With a battery pack, the camcorder will operate continuously for the time shown below. BP-L40 (A): Approx. 190 minutes
BP-L60A: Approx. 420 minutes BP-L90A: Approx. 700 minutes
The numbers above indicate the time using only the viewfinder.
Before use, charge the battery pack with the BC-L50/L100CE Battery Charger.
The BP-L40 (A)/L60A/L90A is free from memory effect. There is no need to discharge it fully before recharging.
Notes on using the battery pack
•A warm battery pack may not be fully recharged.
•Even when fully charged, battery packs gradually lose their charge naturally. Use the battery packs as soon as possible after recharging.
•To prolong the life of battery packs, store them in a cool place (about 20 °C (68 °F)), and charge in a place with an ambient temperature between 10 °C and 30 °C (50 °F to 86 °F).
•Before long-term storage, discharge the battery fully. This extends the battery life. •It is recommended that the BP-L40 (A) be used at 30 W or less.
•When using the BP-L40 (A), the specified capacity may not be obtained if it is connected to the camcorder with accessories which is operated at 30 W or higher, especially when the ambient temperature is low.
•At low temperatures, the usable time of battery packs decreases. When the ambient temperature is 0 °C (32 °F), usable time decreases by about 10%. (However, the usable time is affected by the power consumption of the camcorder in addition to the usage status of the battery packs.) The usable time of battery packs increases if they are warmed to the room temperature (about 20 °C (68 °F)) before use at low temperatures.
•If you use the BP-L40 (A) at temperatures of 0 °C (32 °F) or below, when power consumption of the camcorder and accessories is 40 W or higher (due to using a video light, for example), power may break after a short time (a few minutes). To increase the usable time, store the BP-L40 (A) in a warm place, and power on the camcorder before the BP-L40 (A) cools down.
•Compared to the BP-L40 (A), the BP-L60A/L90A offer better performance at low temperatures. The BP-L60A/L90A are recommended for use at low temperatures.
•Carrying a spare battery pack is recommended.
8
Step 2 Preparing the power supply
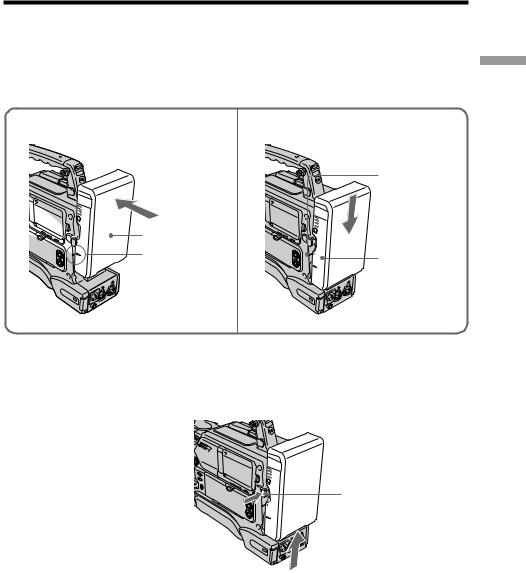
Installing the battery pack
(1) Attach the battery pack against the rear of the camcorder, aligning the side line of the battery pack with the line on the camcorder.
(2) Slide the battery pack down until its “bLOCK” arrow points at the matching line on the camcorder.
1 |
2 |
Matching line on the camcorder
Battery pack |
|
|
LO |
|
|
CK |
|
|
Align these lines. |
LOCK |
“LOCK” arrow |
|
|
started Getting
To remove the battery pack
Holding the battery release button in, pull the battery pack up.
Battery release button
LOCK
9
Step 2 Preparing the power supply
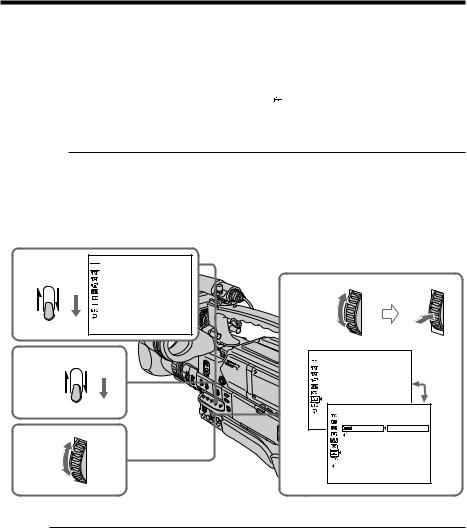
Setting up the type of the battery pack
Set up the type of the battery pack installed to the camcorder, using the menu. If you do not set the type, the battery remaining indicator will not indicate the correct capacity.
(1) Push the CUSTOM PRESET/MENU switch in the MENU direction and release it to display the menu.
(2) Turn the SEL/PUSH EXEC dial to select  , then press the dial.
(3) Turn the SEL/PUSH EXEC dial to select uREMAIN, then press the dial. (4) Turn the SEL/PUSH EXEC dial to select the type of the battery pack, then
press the dial.
Setting |
Meaning |
LI-ION |
When using a lithium-ion battery pack (BP-L40 (A)/L60A/L90A) |
|
|
NI-CD |
When using a nicad battery pack (NP-1B/BP-90A) |
|
|
(5) Push the CUSTOM PRESET/MENU switch in the MENU direction and release it to make the menu disappear.
1
CUSTOM PRESET |
MENU |
TC/UB SET

 TC PRESET
UB PRESET
TC RUN
TC MAKE UB T I ME
[MENU] : END
5 |
CUSTOM PRESET |
MENU |
|
4
2,3
SETUP MENU
CLOCK SET
LTR S I ZE

 REMA I N
SETUP MENU |
|
CLOCK SET |
|
LTR S I ZE |
|
[MENU] : END |
LI-ION |
REMA I N |
|
RETURN |
NI-CD |
[MENU] : END |
|
When the battery capacity is low
The BATT and REC lamps (red) in the viewfinder and the TALLY lamps on the camcorder will flash.
10
Step 2 Preparing the power supply
Using an AC adaptor
When using an AC-550CE AC Adaptor
Connect the camcorder to the AC power supply as shown in the following figure, and turn the POWER switch of the AC-550CE ON.
To AC power source
AC-550CE
AC Adaptor
|
POWER switch: ON |
LO |
|
CK |
|
|
DC connecting |
|
cable |
|
CAMERA/ |
DC IN 12V |
CCU |
|
When using an AC-DN1 AC Adaptor
Mount the AC-DN1 on the camcorder in the same way as a battery pack, then connect to the AC power source.
To AC power source
started Getting
Note
When total power consumption of the camcorder and accessories is 38 W or higher, or when using a video light, use the AC-DN2A AC adaptor (lower than 150 W).
11

Step 2 Preparing the power supply
Avoiding breaks in operation due to dead batteries
If you use both an internal battery pack and an external battery connected to the DC IN 12V connector at the same time, you can avoid breaks in operation due to the dead batteries.
When the external battery begins to fail and an internal battery pack is installed
Remove the DC output cable of the external battery from the DC IN 12V connector. The power source will switch to the internal battery pack.
When the external battery begins to fail and an internal battery pack is not installed
First install a fully charged internal battery pack to the camcorder, then remove the DC output cable of the external battery from the DC IN 12V connector. The power source will switch to the internal battery pack. To use an external battery again, connect a fully charged external battery to the DC IN 12V connector before removing the internal battery pack. The power source will switch to the external battery.
Continuous operation when operating with only an internal battery pack
First, connect a fully charged external battery to the DC IN 12V connector, then change the internal battery.
Notes
•Whenever an internal battery pack is installed and an external battery is connected to the DC IN 12V connector, the external battery is always used as the power source.
•There may be some noise on the video or audio signal at the instant the power sources are switched.
•When changing the battery pack, make sure that the POWER switch is set to OFF.
•When using the two NP-1B battery packs, be sure to change both of them at the same time.
12

Step 3 Inserting a cassette
The camcorder can use standard-size and mini-size DVCAM/DV cassettes.
Before inserting a cassette, make sure that no cassette is in the cassette compartment. Inserting a cassette forcibly may damage internal parts of the camcorder.
(1) Install the power source (p. 8).
(2) While sliding OPEN in the direction of the arrow, open the cassette lid. (3) Insert the cassette with the window facing out and the REC/SAVE switch
facing upward. Check for tape slack before inserting the cassette.
[a] Inserting a standard-size cassette
Insert the cassette with the cassette window (on the front) facing outward.
[b] Inserting a mini-size cassette
Insert the cassette with the cassette window (on the front) facing outward. Push the cassette between the both guides.
(4) Close the cassette lid until it clicks.
started Getting
2 |
3-[a] |
|
OPEN |
3-[b] |
4 |
|
Mini-size |
|
cassette match |
|
marks |
|
Guides |
To eject a cassette
Follow the procedure above, and take out the cassette by pressing the EJECT button in step 3.
13
Step 3 Inserting a cassette
Note
Internal parts of the camcorder may become bent or otherwise damaged if you attempt to insert a mini-size cassette in the wrong direction (such as with the cassette turned backside front so the reel holes face the cassette holder window or with the cassette turned sideways so that a short side enters first).
When you use cassettes with cassette memory
Read the instruction about cassette memory to use this function properly (p. 158).
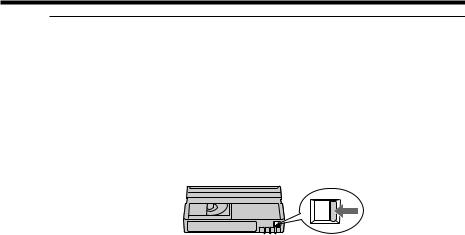
To prevent accidental erasure
Slide the REC/SAVE switch on the cassette to the SAVE position.
If Q flashes even if the cassette has been inserted
Insert the cassette again.
14
— Recording – Basics —
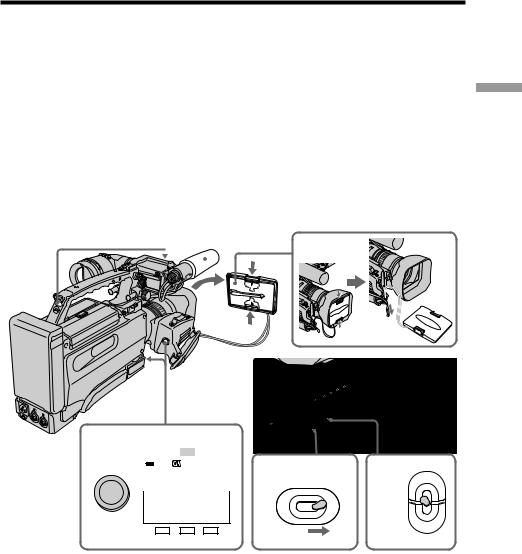
Recording a picture
Your camcorder automatically focuses for you.
(1) Remove the hood cap and pull the hood cap string to fix it.
(2) Install the power source and insert a cassette. See “Step 2” and “Step 3” for more information (p. 8 to 14).
(3) Set the POWER switch to ON.
(4) Set the MEMORY/CAMERA/VTR selector to CAMERA. Your camcorder is set to the standby mode. The picture now being shot is displayed in the viewfinder.
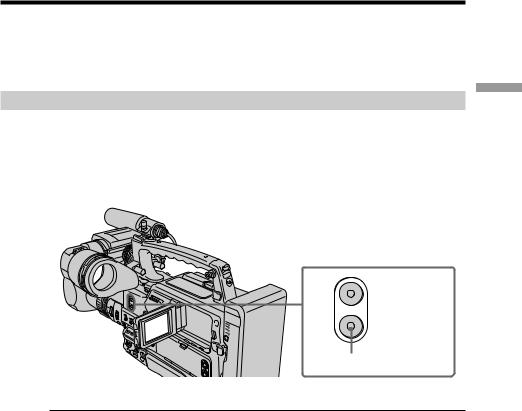
(5) Press START/STOP. Your camcorder starts recording. “STBY” in the viewfinder changes to “REC” and the REC lamp in the viewfinder lights up. Also, the TALLY lamps located on the front and rear of your camcorder light up. To stop recording, press START/STOP again. This camcorder is equipped with two START/STOP buttons, and you can use either of them for recording start/stop.
TALLY lamps Microphone
1
5 |
|
|
TALLY |
|
|
|
|
|
|
|
TAKE |
REC BATT |
3 |
4 |
|
S |
|
|
Li |
REC 00:00:00:01 |
MEMORY |
||
RT/S |
|
|
|
||||
A |
T |
|
|
|
|
|
|
T |
|
O |
|
|
|
|
|
|
P |
|
|
|
POWER |
|
|
|
|
|
|
|
|
|
|
|
|
|
|
DVCAM |
|
CAMERA |
|
|
|
|
|
|
|
|
|
|
|
|
|
32K |
|
|
|
|
|
|
|
|
OFF |
ON |
|
|
|
|
SHUTTER |
GAIN UP |
|
|
VTR |
Basics – Recording
15

Recording a picture
To turn off the TALLY lamps
When you turn off the TALLY lamp located on the viewfinder, set the TALLY switch located on the front of the viewfinder to OFF, and when you turn off the TALLY lamp located on the rear, set the TALLY switch located below the TALLY lamp to OFF. The intensity of the front TALLY lamp can be chosen from high (HIGH) or low (LOW).
Note
Fasten the grip strap firmly.
Note on the progressive mode
If you intend to use the images on your PC or play the images back as still images, we recommend that you set PROG. SCAN to ON in the menu settings before shooting (p. 120). The picture quality improves in this mode, but if you shoot a moving subject, the image shakes when it is played back.
To enable smooth transition
Transition between the last scene you recorded and the next scene is smooth as long as you do not eject the cassette even if you turn off your camcorder. When you use a tape with cassette memory, however, you can make the transition smooth even after ejecting the cassette if you use the end search function (p. 29).
However, check the following:
•When you change the battery pack, set the POWER switch to OFF.
•Do not mix recordings in the DVCAM format and the DV format on one tape.
•If you record a tape in DV format, the transition of a tape may not be smooth. We recommend that you use DVCAM cassettes and set REC MODE to DVCAM in the menu settings to obtain reliable clear pictures.
Note on transition
The playback picture may be distorted or the time code may not be written properly between scenes when you change the recording format on one tape.
If you leave your camcorder in standby mode for five minutes
The head drum of the camcorder automatically stops rotating. This is to prevent the tape wear and save the battery power. To re-start recording, press the START/STOP button. It may take more time to start recording. However, this is not a malfunction.
16
Recording a picture
Using the ND filter
Using the ND filter (the ND filter 1 setting corresponds to 1/4 of the quantity of light and the ND filter 2 setting corresponds to 1/32 of the quantity of light), you can record a picture clearly by adjusting light amounts, even if you shoot under too bright conditions.
When the ND1 or ND2 indicator flashes on the LCD screen or in the viewfinder
The ND filter is necessary.
When ND 1 flashes, set the ND FILTER selector to 1 so that the ND 1 indicator on the LCD or viewfinder screen stops flashing and remains on.
When ND 2 flashes, set the ND FILTER selector to 2 so that the ND 2 indicator on the LCD or viewfinder screen stops flashing and remains on.
Basics – Recording
When ND OFF flashes on the LCD screen or in the viewfinder
The ND filter is not necessary. Set the ND FILTER selector to OFF so that the indicator disappears from the LCD or viewfinder screen.
The ND filter is now deactivated.
ND
FILTER
OFF 1 2
Notes
•If you set the ND FILTER selector to another positions during recording, the picture may be blurred or audio noise may occur. We recommend that you check the position of the ND FILTER selector before shooting.
•When shooting a too bright object, diffraction off the small aperture may cause slight off set in focusing. This phenomenon is quite common with a use of a video camera recorder. Using the ND filter will reduce influence of such phenomenon, and you can attain a better shooting condition.
When the DISPLAY switch located on the front of the viewfinder is set to OFF or turning off the indicators using the DISPLAY button
The ND filter indicator will disappear after you set the ND FILTER selector to the appropriate position according to the ND filter indication.
When you adjust the iris manually |
|
The selected position is displayed, however, the recommended position of the ND |
|
FILTER selector is not indicated. |
17 |
|

Recording a picture
Usable cassettes
The camcorder can use standard-size and mini-size DVCAM/DV cassettes. (To ensure high-quality playback, editing, and storage of recorded contents, we recommend using highly reliable DVCAM cassettes).
The following table lists the cassettes that can be used in the camcorder.
Model name |
Cassette size |
PDV-64ME/64MEM/64N/94ME/124ME/124MEM |
Standard size |
/124N/184ME/184MEM/184N |
|
|
|
PDVM-12ME/22ME/32ME/32MEM/32N/40ME/40MEM/40N |
Mini size |
|
|
The numbers in the model names show maximum recording/playback time (minutes) for each model. For example, the maximum recording/playback time of the PDV184ME is 184 minutes.
When you use a DV cassette, set REC MODE to DV SP in the menu settings. You can record on a tape 1.5 times longer than the DVCAM format.
To set the audio reference level
When using the camcorder in a editing system containing both consumer DV and professional equipment, setting the audio reference level to –12 dB is recommended. Set up the A REF LVL item in the menu settings (p. 120).
–12 dB : Audio reference level commonly used for DV products (The maximum level is 0 dB.)
–18 dB (the default setting) : Audio reference level for professional use
Notes
•You cannot record on a tape in LP mode in the DV format.
•If you insert an incorrect type of cassette, it will be automatically ejected. •Changing the audio reference level setting from –18 dB to –12 dB increases the audio
recording level by 6 dB whether the AUDIO SELECT (CH-1/CH-2) switches are set to AUTO or MANUAL.
If you use a DV cassette without setting REC MODE to DV SP
The recordable time is 2/3 time that indicated on the cassette.
Cassettes that can be played back with your camcorder
You can play back both cassettes recorded in the DVCAM format or in the DV format, however, you cannot play back cassettes that were recorded in LP mode in the DV format.
18

Recording a picture
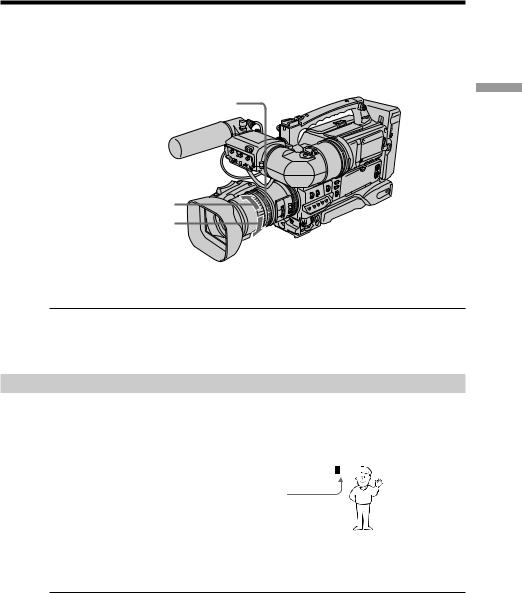
Adjusting the viewfinder position
To adjust the viewfinder left-to-right position, loosen the left-to-right positioning ring, and to adjust the front-to-back position, loosen the front-to-back position locking knob.
Viewfinder front-to-back position locking knob
Viewfinder left-to-right positioning ring
Left eye adaptor
By fitting a left eye adaptor, you can use the camcorder with your left eye to the viewfinder. For details, contact your Sony dealer.
Adjusting the viewfinder screen
The following adjustments are provided to improve the visibility of the viewfinder screen. Although these adjustments may make the viewfinder image clearer, they have no effect on the output video signal from the camcorder.
BRIGHT control
CONTRAST control
PEAKING control
Basics – Recording
19

Recording a picture
Eyepiece focus adjustment
Depending on the eyesight of the operator — whether longsighted or shortsighted — the optimal position of the viewfinder image varies. Adjust the eyepiece focus to get the clearest viewfinder image for your eyesight. First focus the image with the lens, then adjust the eyepiece focusing knob. The adjustment range is from –3 to 0 diopters1).
1)Diopter: A unit to indicate the degree of convergence or divergence of a bundle of rays.
Eyepiece focusing knob
To modify the adjustment range
Using an optional part allows you to modify the adjustment range to –2 to +1 diopters or –0.5 to +3 diopters. For details, consult your Sony dealer.
20
Recording a picture
Contrast and brightness adjustment
Carry out these adjustments with the color bars displayed.
(1) Push the CUSTOM PRESET/MENU switch in the MENU direction and release it to display the menu in standby or recording mode.
(2) Turn the SEL/PUSH EXEC dial to select  , then press the dial.
(3) Turn the SEL/PUSH EXEC dial to select COLOUR BAR, then press the dial. (4) Turn the SEL/PUSH EXEC dial to select ON, then press the dial.
(5) Push the CUSTOM PRESET/MENU switch in the MENU direction and release it to erase the menu display.
(6) Watching the color bars, turn the CONTRAST and BRIGHT controls to adjust the contrast and brightness.
Basics – Recording
1,5 |
CUSTOM PRESET |
MENU |
|
6 PEAKING control
CONTRAST control 
BRIGHT control
2-4
OTHERS |
|
WORLD T I ME |
|
BEEP |
|
COMMANDER |
|
D I SPLAY |
|
EXT RECCTL |
|
DATE REC |
|
COLOUR BAR |
|
HRS METER |
|
OTHERS |
|
WORLD T I ME |
|
BEEP |
|
[MENU] : END |
|
COMMANDER |
|
D I SPLAY |
|
EXT RECCTL |
|
DATE REC |
OFF |
COLOUR BAR |
|
HRS METER |
ON |
OTHERS |
|
RETURN |
|
WORLD T I ME |
|
BEEP |
|
[MENU] : END |
|
COMMANDER |
|
D I SPLAY |
|
EXT RECCTL |
|
DATE REC |
|
COLOUR BAR ON |
|
HRS METER |
|
RETURN |
|
[MENU] : END
Outline emphasis adjustment
Turning the PEAKING control changes the degree of outline emphasis in the viewfinder image, to make focusing easier.
21

Recording a picture
Using the LCD screen
While sliding OPEN in the direction of the battery pack, then open the LCD panel. The picture being shot is displayed on the LCD screen. To turn off the LCD screen, set the LCD switch to OFF or close the LCD panel with the LCD screen facing toward the camcorder body.
The LCD panel is opened up to 90 degrees and it rotates about 90 degrees to the battery side and about 180 degrees to the lens side.
To close the LCD panel, set it vertically and swing it into the camcorder body until it clicks.
180° 


 90°
90°
OPEN |
LCD switch |
If you turn the LCD panel over so that it faces the other way in standby or recording mode, the  indicator appears on the LCD screen and in the viewfinder (Mirror mode).
When you use the LCD screen outdoors in direct sunlight
The LCD screen may be difficult to see. If this happens, we recommend that you use the viewfinder.
When you adjust the angle of the LCD panel
Make sure that the LCD panel is opened up to 90 degrees.
When using both the LCD screen and the viewfinder during shooting
The usable time of the battery pack when using both the LCD screen and the viewfinder will be shorter than when using the viewfinder only.
Pictures in the mirror mode
The picture on the LCD screen is a mirror-image. However, the recording picture will be normal.
Indicators in the mirror mode
The STBY indicator appears as Xzand REC as z. Some of the other indicators appear mirror-reversed and others are not displayed. However, if you close the LCD panel with the LCD screen turned over, indicators appear normally.
22
Recording a picture
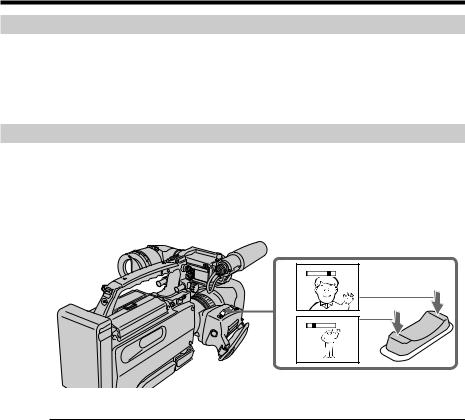
Adjusting the brightness of the LCD screen
To adjust the brightness of the LCD screen, press LCD BRIGHT + or –.
– LCD BRIGHT +
To darken To brighten 
Even if you do the LCD screen adjustment using the LCD BRIGHT +/– buttons
The recorded picture will not be affected.
Recording in a low position
You can record in a low position to get an interesting recording angle. Lift up the viewfinder or rotate the LCD panel with the screen facing up to record from a low position.
Basics – Recording
23
Recording a picture
After recording
(1) Close the LCD panel. (2) Eject the cassette.
(3) Set the POWER switch to OFF. (4) Remove the battery pack.
Using the zoom feature
To zoom with the zoom lever
Press the power zoom lever a little for a slower zoom. Press it deeper for a faster zoom. Using the zoom function sparingly results in better-looking recordings.
“T” side: for telephoto (subject appears closer)
“W” side: for wide-angle (subject appears farther away)
W |
T |
W |
T |
T |
|
|
W |
When you shoot close to a subject
If you cannot get a sharp focus, press the “W” side of the power zoom lever until the focus is sharp. You can shoot a subject that is at least about 80 cm (about 2 feet 5/8 inch) away from the lens surface in the telephoto position, or about 1 cm (about 1/2 inch) away in the wide-angle position.
24
Recording a picture
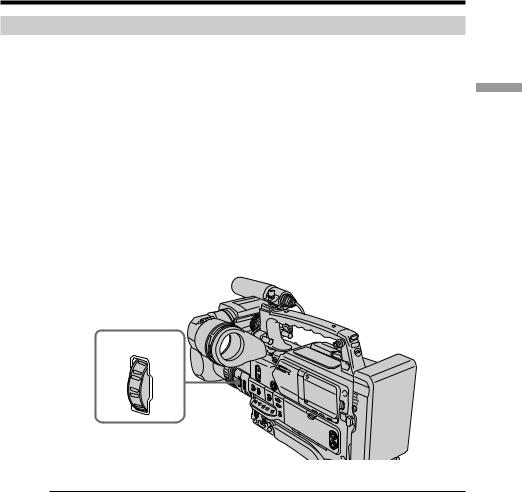
To zoom with the zoom ring
Using the zoom ring, you can control the zoom by your desired speed and you can make fine adjustments.
During recording, turn the zoom ring to the desired speed.
Zoom ring
For wide-angle
For telephoto
Note
If you turn the zoom ring quickly, the zoom may not respond to the zoom ring adjustment. Rotate the zoom ring with appropriate speed.
Using the digital zoom – Zoom greater than 12×
Zoom greater than 12× is performed digitally, if you set D ZOOM to 24× or 48× in the menu settings. The digital zoom function is set to OFF as a default setting (p. 120). If you use the digital zoom function, the picture quality deteriorates.
|
|
|
|
|
|
|
|
The right-ended portion of the bar |
W |
|
|
|
|
T |
|
|
|
|
|
|
|
|
|
|
|
|
|
|
|
|
|
shows the digital zooming zone. |
|
|
|
|
|
|
|
The digital zooming zone appears |
|
|
|
|
|
|
|
when you set D ZOOM to 24× or 48× . |
|
|
|
|
|
|
|
Basics – Recording
You cannot use the digital zoom:
–When you set PROG. SCAN to ON in the menu settings (p. 120).
–When the MEMORY/CAMERA/VTR selector is set to MEMORY.
25
Recording a picture
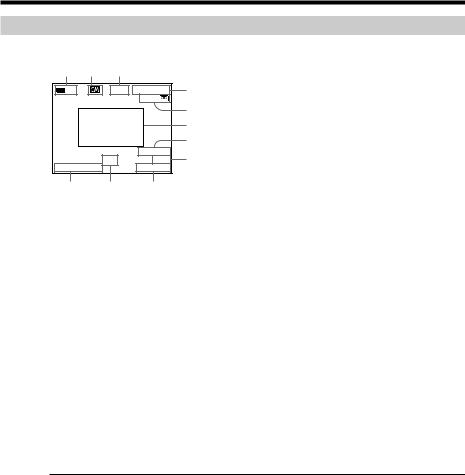
Indicators displayed during recording
The indicators are not recorded on the tapes.
[a] |
[b] |
[c] |
|
|
|
|
Li |
|
REC |
00:00:00:01 |
[d] |
|
|
|
|
45min |
[e] |
|
|
|
|
|
|
|
|
|
|
|
[f] |
|
|
|
|
|
[g] |
|
|
|
ND1 |
DVCAM |
[h] |
4 |
7 |
2001 |
32K |
||
|
12:05:56 |
|
|||
[k] |
|
[j] |
[i] |
|
|
[a] Remaining battery capacity indicator
This appears after you turn on the power and wait for a while. When uREMAIN is set to LI-ION in the menu settings, “Li” is indicated, and when it is set to NI-CD, “Ni” is indicated.
[b]Cassette memory indicator
This appears when using a tape with cassette memory.
[c] STBY/REC indicator [d]Time code/User bits
[e] Remaining tape indicator
This appears after you insert a cassette.
[f] Guide frame
[g]DVCAM format/DV format in SP mode indicator [h]Audio mode indicator
[i] Time indicator
[j] ND filter indicator
The most suitable mode will flash regardless of the current mode. After you select the appropriate position, it will stop flashing and remain on when the DISPLAY switch located on the front of the viewfinder is set to ON, or it will disappear when the DISPLAY switch is set to OFF.
[k] Date indicator
Time code
The time code indicates the recording or playback time, “00:00:00:00” (hours : minutes : seconds : frames). You cannot rewrite only the time code. You can preset the time code. The time code can be preset or be reset during recording (p. 105).
On user bits display
You can display the user bits by setting the DISPLAY SELECT switch to U-BIT (p. 109).
Remaining tape indicator
The indicator may not be displayed accurately depending on the tape.
Note on the date/time indicator
Recording date/time is not displayed during shooting, however, it is automatically recorded on the tape. You can check the recording date/time during playback by pressing DATA CODE. When you want to display the date and time during shooting, set DATE REC to ON in the menu settings. However, once you record with the date and time, you cannot erase them.
26
Recording a picture
On remaining battery capacity indicator
The camcorder cannot detect the type of the battery pack automatically. According to your battery pack, set up the uREMAIN item properly (p. 10). A wrong setup does not indicate the correct battery capacity.
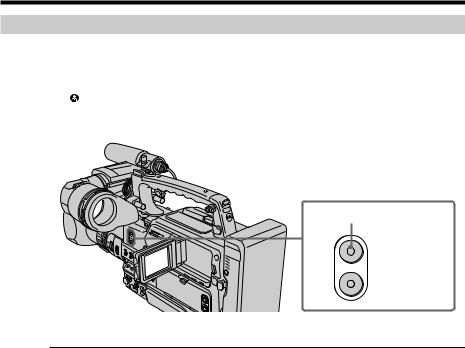
Shooting backlit subjects (BACK LIGHT)
When you shoot a subject with the light source behind the subject or a subject with a light background, use the backlight function.
Press BACK LIGHT in standby, recording, or memory mode.
The .indicator appears on the LCD screen or in the viewfinder.
To cancel, press BACK LIGHT again.
Basics – Recording
SPOT LIGHT
BACK LIGHT
BACK LIGHT
If you press SPOT LIGHT when using the backlight function
The backlight function will be canceled and the spot light function will be enabled.
When you manually adjust two or more functions from the following: iris, gain, and shutter speed
You cannot use the backlight function.
27
Recording a picture
Spot light
This function prevents people’s faces, for example, from appearing excessively white when shooting subjects lit by strong light, such as in the theater.
Press SPOT LIGHT in standby, recording, or memory mode.
The indicator appears on the LCD screen or in the viewfinder.
To cancel, press SPOT LIGHT again.
SPOT LIGHT
SPOT LIGHT
BACK LIGHT
If you press BACK LIGHT when using the spot light function
The spot light function will be canceled and the backlight function will be enabled.
You cannot use the spotlight mode while in the following settings:
–Old movie
–Shutter speed value of 1/25 or smaller
–When you manually adjust two or more functions from the following: iris, gain, and shutter speed
28
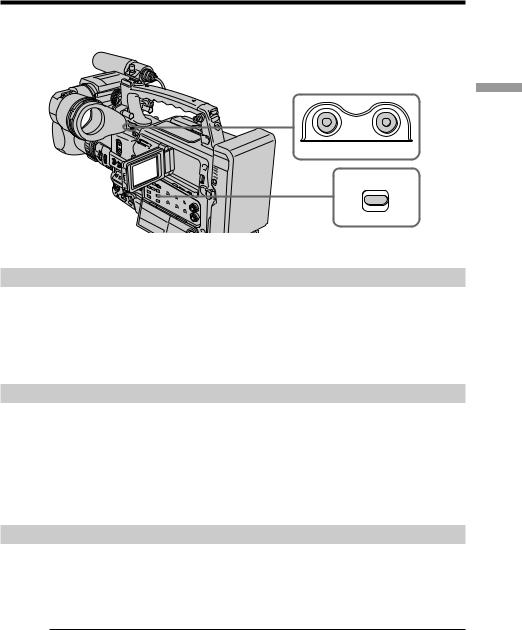
Checking the recording
– END SEARCH / EDITSEARCH / Rec Review
You can use these buttons to check the last recorded picture or shoot so that the transition between the last recorded scene and the next scene you record is smooth.
 EDITSEARCH

END SEARCH
Basics – Recording
Searching the end point of the recording — END SEARCH
You can easily go to the end of the last recorded portion.
Press END SEARCH in standby mode.
The camcorder rewinds or fast-forwards the tape and the last five-second recorded picture is played back. After playback the camcorder turns to standby mode. You can monitor the sound from the speaker or headphones.
Changing the next recording start point — EDITSEARCH
You can change the next recording start point in standby mode.
Hold down the +/– side of EDITSEARCH in standby mode. The recorded picture is played back.
+: to go forward
– : to go backward
Release EDITSEARCH to stop playback. If you press START/STOP, re-recording begins from the point you released EDITSEARCH. You cannot monitor the sound.
Checking the last recorded picture — Rec Review
You can check the last recorded portion.
Press the –7 side of EDITSEARCH momentarily in standby mode.
The last few-seconds of picture is played back and the camcorder returns to standby. You can monitor the sound from the speaker or headphones.
End search function
When you use a tape without cassette memory, the end search function does not work once you eject the cassette after you record on the tape. If you use a tape with cassette memory, the end search function works even once you eject the cassette.
If there is a blank portion at the beginning or between the recorded portions, the end
search function may not work correctly (p. 158).
29

— Playback – Basics —
Playing back a tape
You can monitor the playback picture on the LCD screen or in the viewfinder. You can also control playback using the Remote Commander supplied with your camcorder.
(1) Install the power source.
(2) Set the POWER switch to ON and insert the recorded tape. (3) Set the MEMORY/CAMERA/VTR selector to VTR.
(4) Press mto rewind the tape. (5) Press Nto start playback.
(6) To adjust the volume, turn the MONITOR knob.
4 |
REW |
5 |
PLAY |
|
|
6
To increase the volume To decrease the volume
|
|
R |
I |
T |
O |
|
||
N |
|
|
O |
|
|
M |
||
2 |
3 |
MEMORY |
|
||
|
POWER |
|
|
CAMERA |
|
OFF |
ON |
|
VTR |
1 |
|
To stop playback
Press x.
30
 Loading...