


2-674-627-11(3)
Micro Hi-Fi
Component
System
Operating Instructions
Owner’s Record
The model and serial numbers are located on the rear of the unit. Record the serial number in the space provided below. Refer to them whenever you call upon your Sony dealer regarding this product.
Model No. ______________ Serial No. ______________
CMT-DX2D
CMT-SX2D
©2006 Sony Corporation

WARNING
To reduce the risk of fire or electric shock, do not expose this apparatus to rain or moisture.
To prevent fire, do not cover the ventilation of the apparatus with news papers, table-cloths, curtains, etc. And don’t place lighted candles on the apparatus.
To prevent fire or shock hazard, do not place objects filled with liquids, such as vases, on the apparatus.
Do not install the appliance in a confined space, such as a bookcase or built-in cabinet.
This appliance is classified as a CLASS 1 LASER product. This marking is located on the rear exterior.
Don’t throw away the battery with general house waste, dispose of it correctly as chemical waste.
NOTICE FOR THE CUSTOMERS IN THE UNITED KINGDOM
A moulded plug complying with BS1363 is fitted to this equipment for your safety and convenience. Should the fuse in the plug supplied need to be replaced, a fuse of the same rating as the supplied one and approved by ASTA or BSI to BS1362, (i.e., marked with  or
or  mark) must be used.
If the plug supplied with this equipment has a detachable fuse cover, be sure to attach the fuse cover after you change the fuse. Never use the plug without the fuse cover. If you should lose the fuse cover, please contact your nearest Sony service station.
NOTICE FOR THE CUSTOMERS IN THE U.S.A.
This symbol is intended to alert the user to the presence of uninsulated “dangerous voltage” within the product’s enclosure that may be of sufficient magnitude to constitute a risk of electric shock to persons.
This symbol is intended to alert the user to the presence of important operating and maintenance (servicing) instructions in the literature accompanying the appliance.
CAUTION
The use of optical instruments with this product will increase eye hazard.
WARNING
This equipment has been tested and found to comply with the limits for a Class B digital device, pursuant to Part 15 of the FCC Rules. These limits are designed to provide reasonable protection against harmful interference in a residential installation. This equipment generates, uses, and can radiate radio frequency energy and, if not installed and used in accordance with the instructions, may cause harmful interference to radio communications. However, there is no guarantee that interference will not occur in a particular installation. If this equipment does cause harmful interference to radio or television reception, which can be determined by turning the equipment off and on, the user is encouraged to try to correct the interference by one or more of the following measures:
–Reorient or relocate the receiving antenna.
–Increase the separation between the equipment and receiver.
–Connect the equipment into an outlet on a circuit different from that to which the receiver is connected.
–Consult the dealer or an experienced radio/TV technician for help.
CAUTION
You are cautioned that any changes or modifications not expressly approved in this manual could void your authority to operate this equipment.
Note to CATV system installer:
This reminder is provided to call the CATV system installer’s attention to Article 820-40 of the NEC that provides guidelines for proper grounding and, in particular, specifies that the cable ground shall be connected to the grounding system of the building, as close to the point of cable entry as practical.
2GB

NOTICE FOR THE CUSTOMERS IN CANADA
CAUTION
The use of optical instruments with this product will increase eye hazard.
Disposal of Old Electrical & Electronic Equipment (Applicable in the European Union and other European countries with separate collection systems)
This symbol on the product or on its packaging indicates that this product shall not be treated as household waste. Instead it shall be handed over to the applicable collection point for the recycling of electrical and electronic equipment. By ensuring this product is disposed of correctly, you will help prevent potential negative consequences for the environment and human health, which could otherwise be caused by inappropriate waste handling of this product. The recycling of materials will help to conserve natural resources. For more detailed information about recycling of this product, please contact your local Civic Office, your household waste disposal service or the shop where you purchased the product.
3GB

Table of Contents |
|
How to use this manual........................... |
6 |
Playable discs.......................................... |
6 |
Getting Started |
|
Hooking up the system............................ |
9 |
Setting the clock.................................... |
13 |
Selecting a language ............................. |
13 |
Disc – Play |
|
Loading a disc ....................................... |
14 |
Playing a disc ........................................ |
14 |
— Normal Play/Shuffle Play |
|
Playing DVDs using the menu.............. |
16 |
Playing VIDEO CDs with PBC functions |
|
(Ver. 2.0)......................................... |
17 |
— PBC Play |
|
Playing repeatedly................................. |
18 |
— Repeat Play |
|
Creating your own program .................. |
19 |
— Program Play |
|
Using the on-screen display to |
|
search .............................................. |
20 |
Disc – Various functions |
|
Changing the sound/subtitle/angle........ |
21 |
Changing the language.......................... |
22 |
— Language |
|
Adjusting the image and audio |
|
settings ............................................ |
23 |
— AV |
|
Restricting disc playback ...................... |
25 |
— Rating (Parental Control) |
|
System setup item list ........................... |
26 |
Tuner |
|
Presetting radio stations ........................ |
28 |
Listening to the radio ............................ |
29 |
— Preset Tuning |
|
— Manual Tuning |
|
Using the Radio Data System (RDS).... 30
(European model only)
Tape – Play |
|
Loading a tape ...................................... |
31 |
Playing a tape ....................................... |
31 |
Tape – Recording |
|
Recording your favorite CD tracks on a |
|
tape ................................................. |
31 |
— CD-TAPE Synchro Recording |
|
Recording on a tape manually .............. |
32 |
— Manual Recording |
|
Sound Adjustment |
|
Selecting the sound effect..................... |
33 |
Singing along........................................ |
33 |
(CMT-SX2D Asian and Oceanian |
|
models only) |
|
Timer |
|
Falling asleep to music ......................... |
35 |
— Sleep Timer |
|
Waking up to music.............................. |
35 |
— Play Timer |
|
Timer recording radio programs........... |
36 |
— Rec Timer |
|
Display |
|
Turning off the display ......................... |
37 |
— Power Saving Mode |
|
Adjusting the brightness of the |
|
indicators ........................................ |
37 |
Viewing information about the disc in the |
|
display ............................................ |
38 |
Viewing information about the disc in the |
|
on-screen display............................ |
39 |
Viewing the tuner information in the |
|
display ............................................ |
39 |
4GB

Optional Components |
|
Controlling the TV with the remote...... |
40 |
Using the THEATRE SYNC |
|
function........................................... |
40 |
Hooking up optional components ......... |
41 |
Listening to audio from a connected |
|
component ...................................... |
42 |
Enjoying the 5.1 channel sound with the |
|
optional amplifier ........................... |
42 |
Recording audio from a connected |
|
component ...................................... |
43 |
Recording on a connected |
|
component ...................................... |
43 |
Troubleshooting |
|
Problems and remedies ......................... |
44 |
Messages ............................................... |
48 |
Additional Information |
|
Precautions............................................ |
49 |
Specifications........................................ |
51 |
Glossary ................................................ |
53 |
List of button locations and reference |
|
pages ............................................... |
56 |
5GB
How to use this manual
•This manual mainly explains operations using the remote, but the same operations can also be performed using the buttons on the unit having the same or similar names.
•The OSD (on-screen display) may vary depending on the country model.
•The English OSD screen (on-screen display) is used for illustration purposes only.
•“DVD” may be used as a general term for DVD VIDEOs, DVD+RWs/DVD+Rs and DVD-RWs/DVD-Rs.
•The following symbols are used in this manual.
Symbol Meaning
Functions available for DVD VIDEOs, DVD-Rs/DVD-RWs in video mode, and DVD+Rs/ DVD+RWs
Functions available for VIDEO CDs (including Super VCDs or CD-Rs/CD-RWs in video CD format or Super VCD format)
Functions available for music
CDs or CD-Rs/CD-RWs in music
CD format
Functions available for DATA CDs (CD-ROMs/CD-Rs/CD- RWs containing MP3* audio tracks and JPEG image files)
*MP3 (MPEG1 Audio Layer 3) is a standard format defined by ISO/MPEG which compresses audio data.
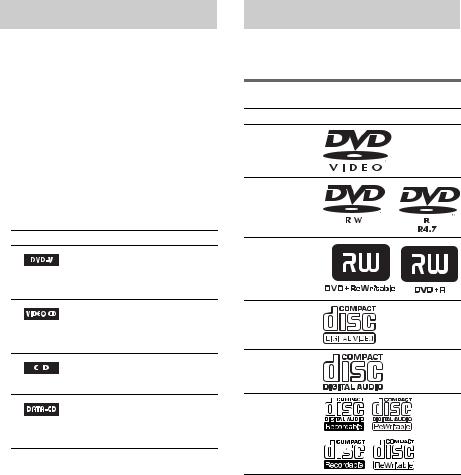
Playable discs
You can play back the following discs on this system. Other discs cannot be played back.
List of playable discs
Format of discs Disc logo
DVD VIDEOs
DVD-RWs/
DVD-Rs
DVD+RWs/
DVD+Rs
VIDEO CDs
Audio CDs
CD-Rs/CD-RWs
“DVD VIDEO,” “DVD-R” and “DVD-RW” logos are trademarks.
6GB

Region code of DVDs you can play on this system
Your system has a region code printed on the back of the unit and will only play DVDs labeled with identical region code.
DVDs labeled ALL will also be played on this system.
If you try to play any other DVD, the message “Playback Prohibited by Area Limitations.” will appear on the TV screen. Depending on the DVD, no region code indication may be labeled even though playing the DVD is prohibited by area restrictions.
Discs that this system cannot play
•CD-ROMs (except for extension “.MP3”, “.JPG” or “.JPEG”)
•CD-Rs/CD-RWs other than those recorded in the following formats:
–music CD format
–video CD format
–MP3 (MPEG1 Audio Layer-3)/JPEG format that conforms to ISO9660* Level 1/ Level 2 or Joliet
•CD-ROMs recorded in PHOTO CD format.
•Data part of CD-Extras
•Super Audio CDs
•DVD-ROMs
•DVD-RAMs
•DVD Audio discs
•A DVD with a different region code.
•DVD+R DL (Double layer) discs
•DVD-RWs recorded in VR (Video Recording) mode
•Photo-movies created after shooting on a DVD camcorder in VR (Video Recording format) mode
•Discs with non-standard shapes (e.g., heart, square, star) cannot be played on this unit. Attempting to do so may damage the unit. Do not use such discs.
•A disc with paper or stickers on it.
•A disc that has the adhesive, cellophane tape, or a sticker still left on it.
*A logical format of files and folders on a CD-ROMs, defined by ISO (International Organization for standardization).
Notes about CD-R/CD-RW/ DVD-R/DVD-RW (Video mode)/ DVD+R/DVD+RW
•In some cases, CD-Rs, CD-RWs, DVD-Rs, DVD-RWs (Video mode) (DVD-RWs created in video mode have the same format as a DVD VIDEO), DVD+R or DVD+RW cannot be played on this system depending upon the recording quality or physical condition of the disc, or the characteristics of the recording device. Furthermore, the disc will not play if it has not been correctly finalized. For more information, see the operating instructions for the recording device. Note that some playback functions may not work with some DVD+RWs/ DVD+Rs, even if they have been correctly finalized.
•A disc recorded in packet write format cannot be played.
Note on playback operations of DVDs and VIDEO CDs
Some playback operations of DVDs and VIDEO CDs may be intentionally set by software producers. Since this system plays DVDs and VIDEO CDs according to the disc contents the software producers designed, some playback features may not be available. Also, refer to the instructions supplied with the DVDs or VIDEO CDs.
Music discs encoded with copyright protection technologies
This product is designed to playback discs that conform to the Compact Disc (CD) standard. Recently, various music discs encoded with copyright protection technologies are marketed by some record companies. Please be aware that among those discs, there are some that do not conform to the CD standard and may not be playable by this product.
continued 
7GB

Note on DualDiscs
A DualDisc is a two sided disc product which mates DVD recorded material on one side with digital audio material on the other side. However, since the audio material side does not conform to the Compact Disc (CD) standard, playback on this product is not guaranteed.
Cautions when playing a disc that is recorded in Multi Session
•When playing a disc which contains audio tracks in music CD format, MP3 audio tracks and JPEG image files, only the audio tracks in music CD format can be played back.
•CD-R and CD-RW discs recorded in multisession that have not ended by “closing the session” are not supported.
Copyrights
This product incorporates copyright protection technology that is protected by U.S. patents and other intellectual property rights. Use of this copyright protection technology must be authorized by Macrovision, and is intended for home and other limited viewing uses only unless otherwise authorized by Macrovision. Reverse engineering or disassembly is prohibited.
This system incorporates Dolby1) Digital and DTS2) Digital Surround System.
1)Manufactured under license from Dolby Laboratories. “Dolby” and the double-D symbol are trademarks of Dolby Laboratories.
2)Manufactured under license from Digital Theater Systems, Inc. “DTS” and “DTS 2.0 + Digital Out” are trademarks of Digital Theater Systems, Inc.
8GB

Getting Started
Hooking up the system
Perform the following procedures 1 to 6 to hook up your system using the supplied cords and accessories. The terminals on the rear side vary depending on the country model. Be sure to check the connection procedure.
European and Russian models
AM loop antenna
FM antenna
Started Getting
|
|
|
|
|
|
|
|
|
|
|
|
|
|
|
|
|
|
|
|
|
|
|
|
|
|
|
|
|
|
|
|
|
|
|
|
|
|
|
|
|
|
|
|
|
|
|
|
|
|
|
|
|
|
|
|
|
|
|
|
|
|
|
|
|
|
|
|
|
|
|
|
|
|
|
|
|
|
|
|
|
|
|
|
|
|
|
|
|
|
|
|
|
|
|
|
|
|
|
|
|
|
|
|
|
|
|
|
|
|
|
|
|
|
|
|
|
|
|
|
|
|
|
|
|
|
|
|
|
|
|
|
|
|
|
|
|
|
|
|
|
|
|
|
|
|
|
|
|
|
|
|
|
|
Front speaker (Right) |
|
|
|
|
|
|
|
|
|
Front speaker (Left) |
Other models
AM loop antenna
FM antenna
|
|
|
|
|
|
|
|
|
|
|
|
|
|
|
|
|
|
|
|
|
|
|
|
|
|
|
|
|
|
|
|
|
|
|
|
|
|
|
|
|
|
|
|
|
|
|
|
|
|
|
|
|
|
|
|
|
|
|
|
|
|
|
|
|
|
|
|
|
|
|
|
|
|
|
|
|
|
|
|
|
|
|
|
|
|
|
|
|
|
|
|
|
|
|
|
|
|
|
|
|
|
|
|
|
|
|
|
|
|
|
|
|
|
|
|
|
|
|
|
|
|
|
|
|
|
|
|
|
|
|
|
|
|
|
|
|
|
|
|
|
|
|
|
|
|
|
|
|
|
|
|
|
|
|
|
|
|
|
|
|
|
|
|
|
|
|
|
Front speaker (Right) |
|
|
|
|
|
|
|
|
|
|
Front speaker (Left) |
continued 
9GB

1 Connect the speakers. |
Plug type C |
Insert only the |
|
Connect the right and left speaker cords to |
AM loop antenna |
||
stripped portion* |
|||
the SPEAKER jacks as shown below. |
|
|
|
Insert only the stripped portion |
|
|
Gray/Solid (3) |
Black/Stripe (#)
2Connect the FM and AM antennas.
Set up the AM loop antenna, then connect it.
Plug type A |
|
AM loop antenna |
Insert only the |
stripped portion* |
Extend the FM lead antenna horizontally
* Strip off an end-portion of wire covering.
|
|
|
|
|
|
Extend the FM lead |
North American model: |
||||
antenna horizontally |
Connect white side. |
||||
|
|
|
|
Other models: |
|
|
|
|
|
Connect brown side. |
|
* Strip off an end-portion of wire covering.
Note
Keep the antennas away from the speaker cords.
3Connect a TV.
Select one of the following connections.
Connection A (For all models)
If your TV has component video input jacks, connect your TV to the COMPONENT VIDEO OUT jacks with a component video cord (not supplied). For European and Russian models, make sure to set the VIDEO OUT SELECTOR to COMPONENT.
If your TV is compatible with progressive format file signals, use this connection and set “PROGRESSIVE.” For details, see “To change the type of signal output from the system” (page 24).
Plug type B |
|
|
|
|
Insert only the |
VIDEO OUT SELECTOR* |
|
AM loop antenna |
stripped portion* |
||
|
Extend the FM lead |
|
antenna horizontally |
* European and Russian models only |
|
|||
* Strip off an end-portion of wire covering. |
|
||
10GB
Connection B (For European and
Russian models)
Connect the t INPUT jack of your TV to the T LINE-TV jack with the SCART cord (not supplied). Make sure to set the VIDEO OUT SELECTOR to EURO AV.
When you connect using the SCART cord, check that the TV conforms to RGB signals. If the TV conforms to RGB signals, change the input mode of the TV to RGB signals. Refer to the operating instructions supplied with the TV to be connected.
Note
Only the video signal will be output through the
SCART cord.
Connection C (Except for European and Russian models)
Connect the video input jack of your TV to the VIDEO OUT jack with the video cable (supplied)*.
* except for European and Russian models
When using a TV
Turn on the TV and select the video input so that you can view the pictures from this system.
When connecting a video deck
Connect the TV and the video deck using video and audio cords (not supplied) as shown below.
|
|
|
|
|
StartedGetting |
|
|
TV |
|
|
|
|
|
|
|
||
|
|
|
|
|
|
|
|
|
|
|
|
Video deck |
|
|
|
System |
|
Do not connect directly.
If you connect a video deck between this system and the TV, you may experience video leakage when watching the video signal from this system. Do not connect a video deck between this system and the TV.
Note
Do not place the TV on this system.
4For models with a voltage selector, set the VOLTAGE SELECTOR to the local power line voltage.
Depending on the model, the VOLTAGE SELECTOR may differ.
5Connect the power cord to a wall outlet.
If the supplied adapter on the plug does not fit your wall outlet, detach it from the plug (only for models equipped with an adapter). To turn on the system, press ?/1.
Note
Install this system so that the power cord can be unplugged from the wall socket immediately in the event of trouble.
continued 
11GB
6(Asian and Oceanian models only) Set the color system to PAL or NTSC depending on the color system of your TV.
The color system is factory set to NTSC for region code 3 models, and PAL for other region code models. Each time you perform the procedure below, the color system changes as follows:
NTSC y PAL
1Press DVD (or FUNCTION + or – repeatedly) to switch the function to DVD.
Playback starts automatically if a disc with auto playback function is loaded. Press x to stop playback.
2Press ?/1 to turn off the system.
3Press ?/1 on the unit while holding down x on the unit.
The system turns on and the color system is changed.
Notes
•A disturbance in the TV screen may be present for a moment after changing the color system as described above.
•When you play back a VIDEO CD recorded in a different color system from the one you set to the unit, the picture image may be distorted.
•To set the VCD color system, see page 23.
To connect optional components
See page 41.
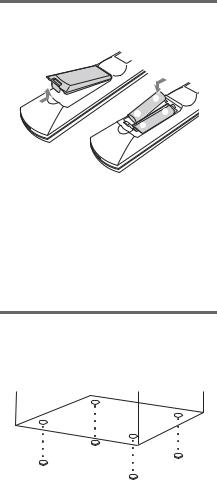
Inserting two R6 (size AA) batteries into the remote
e
E E 
 e
e
Note
If you do not use the remote for a long period of time, remove the batteries to avoid possible damage from battery leakage and corrosion.
Tip
With normal use, the batteries should last for about six months. When the remote no longer operates the system, replace both batteries with new ones.
Attaching the speaker pads
Attach the supplied speaker pads to the bottom of the speakers to stabilize the speakers and prevent them from slipping.
12GB

Setting the clock
Use buttons on the remote for the operation.
1 Press ?/1 to turn on the system.
2 Press CLOCK/TIMER SET.
3 Press . or > repeatedly to set the hour.
4 Press ENTER.
5 Press . or > repeatedly to set the minute.
6 Press ENTER.
The clock starts working.
To adjust the clock
1Press CLOCK/TIMER SET.
2Press . or > to select “CLOCK SET,” then press ENTER.
3Do the same procedures as step 3 to 6 above.
Notes
•The clock settings are canceled when you disconnect the power cord or if a power failure occurs.
•You cannot set the clock in Power Saving Mode (page 37).
Selecting a language
You can change the on-screen display language.
1 Turn on your TV and select the video input.
2 Press ?/1 to turn on the system.
3 Press DVD (or FUNCTION + or – repeatedly) to switch the function to DVD.
Playback starts automatically if a disc with auto playback function is loaded. Press x to stop playback.
4 Press  DISPLAY in stop mode.
5 Press < or , repeatedly to select
“Language,” then press ENTER.
6 Press M or m repeatedly to select
“OSD,” then press ENTER.
7 Press M or m repeatedly to select a language from the displayed list, then press ENTER.
8 Press  DISPLAY to turn off the Setup Display.
Started Getting
13GB
Disc – Play
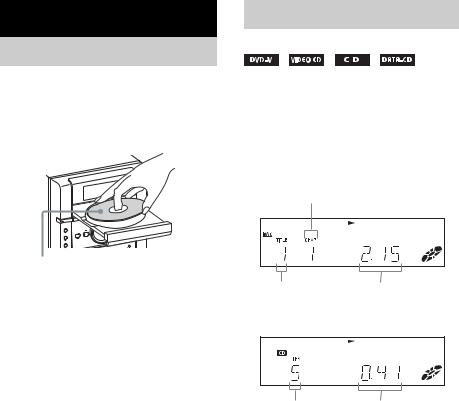
Loading a disc
Use buttons on the unit for the operation.
1 Press Z.
2 Place a disc with the label side up on the disc tray.
When you play an 8 cm Disc, place it on the inner circle of the tray.
3 Press Z again to close the disc tray.
Notes
•Do not use a disc with tape, seals or paste on it as this may cause malfunction.
•Do not forcibly press the disc tray closed with your finger, as this may cause malfunction.
14GB
Playing a disc
— Normal Play/Shuffle Play
Before playing a DVD, VIDEO CD or JPEG turn on your TV and select the video input. Depending on the DVD or VIDEO CD, some operations may be different or restricted. Refer to the operating instructions supplied with the disc.
Example: When playing a DVD
Chapter number
Title number |
Playing time |
Example: When playing a CD
Track number |
Playing time |
1 Press DVD (or FUNCTION + or – repeatedly) to switch the function to DVD.
Playback starts automatically if a disc with auto playback function is loaded.
2 Press H (or DVD NX on the unit).
Playback starts.

Other operations
To |
Do this |
|
Stop play |
Press x. |
|
|
|
|
Pause |
Press X (or DVD NX on the |
|
|
unit).1) |
|
|
Press X again to go to the next frame |
|
|
(DVD/VIDEO CD only). |
|
|
Press H (or DVD NX on the unit) |
|
|
to resume play. |
|
|
|
|
Select a track, |
Press . or > repeatedly during |
|
image or |
play or pause. |
|
chapter |
Press . once during play or pause |
|
|
to go back to the beginning of the |
|
|
current track (except for MP3). |
|
|
|
|
Locate a point |
Press m or M during play. |
|
quickly in fast |
Each time you press the button, |
|
forward or fast |
searching speed changes. |
|
reverse (Scan) |
To return to Normal Play, press H |
|
(Except for |
(or DVD NX on the unit). |
|
MP3/JPEG)2) |
|
|
Play all tracks |
Press PLAY MODE repeatedly in |
|
on the disc in |
stop mode until “SHUF” appears in |
|
random order |
the display, then press H (or DVD |
|
(Shuffle |
NX on the unit). |
|
Play)3) |
|
|
Watch frame |
During play, press |
SLOW4) or |
by frame |
SLOW y. Each time you press the |
|
(Slow-motion |
button, the playback speed changes. |
|
Play) |
To return to Normal Play, press H |
|
(DVD/VIDEO |
(or DVD NX on the unit). |
|
CD only)1)2) |
|
|
Rotate the |
Press < or ,. |
|
current image |
Each time you press ,, the image |
|
(JPEG only) |
turns clockwise by 90º. |
|
|
Each time you press <, the image |
|
|
turns counterclockwise by 90º. |
|
|
|
|
Switch to |
Press DVD NX on the unit |
|
DVD function |
(Automatic Source selection). |
|
from another |
Playback starts automatically when a |
|
source |
disc is loaded. |
|
|
|
|
Cut the sound |
Press MUTING. |
|
|
Press MUTING again or VOLUME + |
|
|
to restore sound. |
|
|
|
|
Remove a disc |
Press Z on the unit. |
|
|
|
|
1)There may be some disturbance in the video image.
2)For DVDs and VIDEO CDs, no sound is output.
3)You cannot perform Shuffle Play on DVDs and VIDEO CDs with PBC function.
4)DVD only
Notes |
|
|
• Depending on the DVD or VIDEO CD, some |
|
|
operations may be restricted. |
|
|
• Maximum number of albums on a disc: 100 (The |
|
|
maximum number of MP3 audio tracks or JPEG |
|
|
image files that can be contained on a disc is 999.) |
|
|
Disc |
||
However, when a large number of non-MP3/JPEG |
||
files are present, the maximum number of albums, |
||
tracks and files may decrease. |
– |
|
Play |
||
• For data CD, playback is possible up to 16 levels. |
||
|
||
• The system supports MP3 audio tracks recorded with |
|
|
a bit rate of 32 to 320 kbps and a sampling frequency |
|
|
of 32/44.1/48 kHz for MPEG1 Audio Layer-3. |
|
|
• An album that does not include an MP3 audio track |
|
|
or JPEG image file is skipped. |
|
|
• If you put the extension “.MP3” to data not in MP3 |
|
|
format, the system cannot recognize the data |
|
|
properly and will generate a loud noise which could |
|
|
damage your speaker system. |
|
|
• The following discs take a longer time to start |
|
|
playback. |
|
|
– a disc recorded with complicated tree structure. |
|
|
– a disc recorded in Multi Session. |
|
|
– a disc to which data can be added (non-finalized |
|
|
disc). |
|
|
• Some CD-Rs or CD-RWs cannot be played on this |
|
|
system depending on file format. |
|
|
Tip |
|
|
When playing the data disc contained MP3 audio |
|
|
tracks and JPEG image files, set “Data CD Priority” |
|
|
(page 23). |
|
Resuming playback from the point you stopped the disc
— Resume Play (DVD/VIDEO CD/CD only)
This system memorizes the point where you stopped the disc so you can resume from that point.
1While playing a disc, press x to stop playback.
“RESUME” appears in the display. If “RESUME” does not appear, Resume Play is not available.
2Press H (or DVD NX on the unit). The player starts playback from the point you stopped the disc in step 1.
continued 
15GB

Notes
•You cannot perform Resume Play during Shuffle Play or Program Play.
•This function may not work properly with some discs.
•Depending on where you stop the disc, the system may not resume playback from exactly the same point.
•Resume play is canceled when:
–you press x in stop mode.
–you turn off the system.
–you open the disc tray.
–you change the play mode.
–you change the function.
Playing a track by entering the track number in Normal Play mode (on the remote only)
Press the number button(s) to enter the track number of the track you want to play.
To enter a track number over 10
1Enter the corresponding digits.
2Press ENTER.
Example:
To play track number 30, press 3 and 0, then press ENTER.
Selecting an album/track/file using the on-screen display (MP3/ JPEG only)
Press M/m/</, repeatedly to select a track or file, then press ENTER.
The selected track or file starts playing.
Notes
•On the TV screen, up to 16 characters can be displayed for album names, and up to 11 characters for track/file names. When multiple album names use the same first 16 characters, the tracks and files in those albums are displayed together in a single folder.
•Only the letters in the alphabet and numbers can be used for album or file names. Anything else is displayed as “-”.
•If an MP3 audio track is played, indicated elapsed time may be different from the actual time.
Playing DVDs using the menu
A DVD is divided into a lot of sections, which make up a picture or music feature. These sections are called “titles.” When you play a DVD which contains several titles, you can select the title you want using TOP MENU. When you play DVDs that allow you to select items such as the language for the subtitles and the language for the sound, select these items using MENU.
1 Press TOP MENU or MENU.
The disc’s menu appears on the TV screen. The contents of the menu vary from disc to disc.
2 Press M/m/</, or the number buttons to select the item you want to play or change.
3 Press ENTER.
16GB

Playing VIDEO CDs with PBC functions (Ver. 2.0)
— PBC Play
You can use PBC* menus on your TV screen to enjoy the disc’s interactive software. The menu format and structure may differ depending on each disc.
* PBC: Playback Control
1 Press DVD (or FUNCTION + or – repeatedly) to switch the function to DVD.
2 Press H (or DVD NX on the unit) to start playing a VIDEO CD with PBC functions (Ver. 2.0).
The PBC menu appears on the TV screen.
3 Press the number buttons to select the item number you want.
4 Press ENTER.
5 Continue playback according to the instructions on the menus to enjoy interactive playback.
Refer to the operating instructions supplied with the disc, as the operating procedure may differ according to the VIDEO CD.
To go back to a previous menu
Press O RETURN.
Note
Depending on the VIDEO CD, “Press ENTER” in step 4 may appear as “Press H” in the operating instructions supplied with the disc. In this case, press ENTER.
To cancel playback with PBC functions
1Press x twice to cancel Resume Play (page 15).
2Press MENU repeatedly until “PBC Off” appears.
3Press H (or DVD NX on the unit). Playback starts from the selected track. Still images, such as the menu screens, will not be shown.
To return to PBC playback, repeat steps 1 through 3, selecting “PBC On” in step 2.
Play – Disc
17GB

Playing repeatedly
— Repeat Play
You can play all the tracks/files or a single track/ file on a disc repeatedly.
Using the front panel display
Press REPEAT during play until “REP” or “REP1” appears.
REP: For all the tracks/files on the disc. REP1: For a single track/file only.
To cancel Repeat Play
Press REPEAT repeatedly until both “REP” and “REP1” disappear.
Notes
•You cannot perform Repeat Play during PBC playback of VIDEO CDs (page 17).
•When you select “REP1,” that track/file is repeated endlessly until “REP1” is canceled.
Using the on-screen display
Press REPEAT repeatedly during play.
Each time you press the button, the setting changes cyclically as follows:
•Off: does not play repeatedly.
•Repeat All: repeats all the tracks/files on a disc.
•Repeat Track: repeats the current track/file.
To cancel Repeat Play
Select “Off.”
Notes
•You cannot perform Repeat Play during PBC playback of VIDEO CDs (page 17).
•Repeat Play is canceled when:
–you turn off the system.
–you open the disc tray.
–you switch to other functions except DVD.
–you search for a track/file.
18GB
 Loading...