


 Loading...
Home Audio System
Operating Instructions
Getting started
Playing a disc
Listening to the radio
Listening to a file on a USB device
Listening to music with optional audio components
Listening to music through a BLUETOOTH connection
Additional information
Troubleshooting
Precautions/Specifications
CMT-SBT40D
WARNING
To reduce the risk of fire, do not cover the ventilation opening of the appliance with newspapers, tablecloths, curtains, etc.
Do not expose the appliance to naked flame sources (for example, lighted candles).
To reduce the risk of fire or electric shock, do not expose this appliance to dripping or splashing, and do not place objects filled with liquids, such as vases, on the appliance.
As the main plug is used to disconnect the unit from the mains, connect the unit to an easily accessible AC outlet. Should you notice an abnormality in the unit, disconnect the main plug from the AC outlet immediately.
Do not install the appliance in a confined space, such as a bookcase or built-in cabinet.
Do not expose batteries or appliances with battery-installed to excessive heat, such as sunshine and fire.
The unit is not disconnected from the mains as long as it is connected to the AC outlet, even if the unit itself has been turned off.
Disposal of Old Electrical & Electronic Equipment (Applicable in the European Union and other European countries with separate collection systems)
Before operating this system
Malfunctions that occur during the normal use of the system will be repaired by Sony in accordance with the conditions defined in the limited warranty for this system. However, Sony will not be liable for any consequences arising from a failure to play caused by a damaged or malfunctioning system.
Music discs encoded with copyright protection technologies
This product is designed to playback discs that conform to the Compact Disc (CD) standard. Recently, various music discs encoded with copyright protection technologies are marketed by some record companies.
Please be aware that among those discs, there are some that do not conform to the CD standard and may not be playable by this product.
Note on DualDiscs
A DualDisc is a two sided disc product which mates DVD recorded material on one side with digital audio material on the other side. However, since the audio material side does not conform to the Compact Disc (CD) standard, playback on this product is not guaranteed.
Note on playback operations of a DVD
Some playback operations for a DVD may be intentionally restricted by software producers. Since this system plays a DVD according to the disc contents, some playback features may not be available.
Note about double-layer DVDs
The playback picture and sound may be momentarily interrupted when the layers switch.
2GB

Region code (DVD VIDEO only)
Your system has a region code printed on the rear of the unit and will only play a DVD VIDEO (playback only) labeled with an identical region code or  .
.
Note on multi-session discs
This system can play back continuous sessions on a disc when they are recorded in the same format as the first session. When a session recorded in a different format is encountered, that session and the ones following it cannot be played back. Note that even if the sessions are recorded in the same format, some sessions may not play back.
3GB

Table of Contents |
|
Before operating this system ................................................................. |
2 |
Getting started |
|
Location and Function of Controls......................................................... |
6 |
Preparing the Remote........................................................................... |
10 |
Attaching the Speaker Pads .................................................................. |
10 |
Connecting Your TV............................................................................... |
11 |
Setting Up the Color System.................................................................. |
11 |
Setting the clock.................................................................................... |
12 |
Playing a disc |
|
Playing a DVD/CD ................................................................................. |
13 |
To change the play mode ................................................................ |
13 |
Creating your own program (Program Play)....................................... |
14 |
Other Playback Operations.............................................................. |
15 |
Listening to the radio |
|
Tuning in a radio station ....................................................................... |
17 |
Presetting radio stations ....................................................................... |
17 |
Selecting a preset radio station ........................................................ |
18 |
Listening to a file on a USB device |
|
Playing a file on a USB device................................................................ |
19 |
Listening to music with optional audio components
Playing back the music of optional audio components ...................... |
20 |
4GB

Listening to music through a BLUETOOTH |
|
connection |
|
Pairing the system with a BLUETOOTH device and listening to |
|
music ................................................................................................. |
21 |
Listening to music through a registered device ................................. |
22 |
Listening to music by one-touch action (NFC)...................................... |
23 |
Additional information |
|
Setting the Automatic Standby function............................................. |
24 |
Setting the BLUETOOTH Standby mode ............................................... |
25 |
Setting the wireless BLUETOOTH signal ON/OFF.................................. |
25 |
Adjusting the sound ............................................................................ |
26 |
Using the timers................................................................................... |
26 |
Setting the Sleep Timer.................................................................. |
26 |
Setting the Play Timer.................................................................... |
26 |
Using the Setup Menu ......................................................................... |
28 |
Troubleshooting |
|
Troubleshooting .................................................................................. |
30 |
Messages .............................................................................................. |
33 |
Precautions/Specifications |
|
Precautions.......................................................................................... |
34 |
Compatible USB devices and versions.................................................. |
35 |
BLUETOOTH wireless technology ........................................................ |
36 |
Specifications........................................................................................ |
37 |
5GB
Getting started
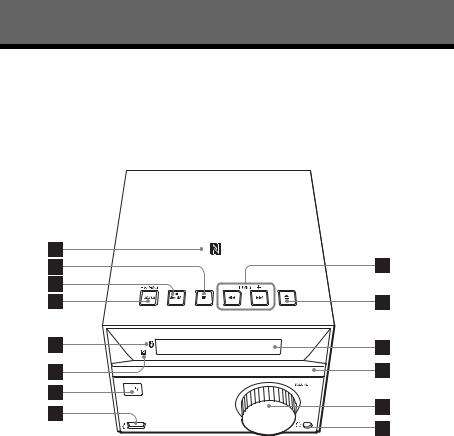
Location and Function of Controls
Note
This manual mainly explains operations using the remote, but the same operations can also be performed using the buttons on the unit having the same or similar names.
Unit (front/top)
6GB

Remote
/ (previous/next) buttons
Use to cue the beginning of a track or file.
TUNING +/– button
Use to tune-in a desired radio station.
Remote: / (fast-rewind/fast- forward) buttons
Use to fast-forward/fast-rewind a track or file.
Remote: PRESET +/– buttons
Use to recall the preset stations.
(open/close) button
Use to open and close the disc tray .
Display window
Disc tray
Use to load a disc (page 13).
Unit: VOLUME control
Remote: VOLUME +/– button
Use to adjust the volume.
(headphone) jack
Use to connect headphones.
(USB) port
Use to connect a USB device (page 19).
/ (power) button
Use to turn the power on or off.
Remote sensor
 (BLUETOOTH) LED
Lights up or blinks to show the BLUETOOTH connection status.
Unit: FUNCTION/PAIRING button
Use to change the source. Each press changes to the next source in the
following sequence:
DVD/CD USB BT AUDIO FM AUDIO IN
Press and hold to enter the BLUETOOTH Pairing mode.
Remote: DVD/CD/USB/BLUETOOTH/ FM/AUDIO IN buttons
Use to select the source.
Unit: (play/pause) button
Remote: (play)/ (pause) buttons
Use to start or pause a playback.
(stop) button
Use to stop a playback.
N-Mark
Place a smartphone/tablet equipped with the NFC function close to this mark to perform BLUETOOTH registration, connection or disconnection by a onetouch action (page 23).
BLUETOOTH MENU button
Use to open or close the BLUETOOTH menu (page 21, 22, 25).
EQ button
Use to select a sound effect (page 26).
AUDIO/SUBTITLE button
Use to select an audio signal format when multiple audio signals are available
started Getting
7GB
Use to select the FM reception mode (monaural or stereo) when listening to FM stereo programs (page 17).
Use to select a subtitle language when multilingual subtitles are available (page 15).
(Return)/DVD MENU button
Use to return to the previous screen while operating in the folder or file list displayed on the TV screen.
Use to open or close the DVD menu during playback of a DVD VIDEO.
MUTING
Use to mute and unmute the sound.
 DISPLAY
Use to display or hide the pull-down menu for search mode or information about the current playback.
An underscore “_” is displayed in the place of an unrecognizable character.
SHIFT button
Press and hold to use the number buttons, TIME , ZOOM and SUBTITLE .
SETUP button
Use to open or close the setup menu.
 (enter) button
Use to confirm an item.
/ / / buttons
Use to select an item.
DVD TOP MENU button
Use to open the DVD top menu when playing a DVD.
Use to turn the PBC function on and off when playing a VIDEO CD with the PBC function.
ANGLE button
Use to switch the camera angle when multi-angles are recorded on a DVD VIDEO.
PLAY MODE/ZOOM button
Use to select the play mode (page 13).
Use to enter the preset setting mode for FM radio (page 17).
Use to zoom in or zoom out a picture when viewing a DVD VIDEO, a VIDEO CD, an Xvid video or a JPEG image.
MEGA BASS button
Use to boost bass sound (page 26).
TIMER MENU button
Use to set the timer menu (page 26).
TIME/DIMMER button
Use with SHIFT to display the clock. The operation works even if the system is turned off (page 12).
Use to change the brightness of the display window .
TV INPUT button
Use to switch the TV’s input source between the TV signal and another input source. Note that only Sony TVs can be operated using this remote.
TV / (power) button
Use to turn the TV on or off. Note that only Sony TVs can be operated using this remote.
8GB

Unit (back)
started Getting
FM ANTENNA
Connect the FM antenna.
Note
Find a location and an orientation that provide good reception, and then fix the FM antenna to a stable surface (window, wall, etc.).
Secure the end of the FM lead antenna with adhesive tape.
AUDIO IN and VIDEO OUT jacks
AUDIO IN:
Connect an external audio component with an audio connecting cable (not supplied).
VIDEO OUT:
Connect the video input jack of the TV or projector with the video cord (supplied).
SPEAKERS
Connect the speakers.
~ AC IN (120 – 240 V AC) input
Connect the power cord to the wall outlet.
FM lead antenna (Extended horizontally.)
To right speaker
To left speaker
Speaker cord (Red/ )
Speaker cord (Black/ )
To wall outlet
9GB
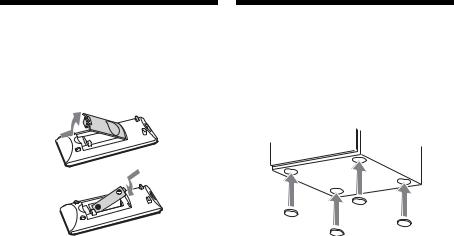
Preparing the |
Attaching the |
Remote |
Speaker Pads |
Insert an R6 (size AA) battery (not supplied), |
Attach the supplied speaker pads at each |
matching the polarities as shown below. |
corner on the bottom of the speakers to |
|
prevent them from slipping. |
Notes on using the remote
With normal use, the battery should last for about six months.
If you do not use the remote for a long period of time, remove the battery to avoid damage from battery leakage and corrosion.
10GB
Connecting Your TV
Connect the video input jack of your TV to the VIDEO OUT jack on the unit, using the supplied video cord.
When connecting a video deck
Connect the TV and the video deck using video and audio cords (not supplied) as shown below.
|
|
|
TV |
|
|
|
|
|
|
|
|
|
|
|
|
|
|
|
|
|
Video deck |
|
|
Unit |
|
||
|
|
|
||||
|
|
|
|
|
|
|
Do not connect directly.
If you connect a video deck between this system and the TV, you may experience video leakage when watching the video signal from this system. Do not connect a video deck between this system and TV.
Setting Up the Color
System
Change the color system if necessary from [PAL] or [NTSC] after connecting your TV. The factory default for the color system is [PAL] on models for Europe, Russia, Oceania, China, Africa and Middle East, and [NTSC] for other models. Note that the color system setup function is not available for North American and Latin American models (except for Argentine model).
1Press / to turn on the system.
2Press SETUP in DVD/CD function.
The setup menu appears on the TV screen.
Selected category |
Selected setup item |
Setup categories |
Options |
3Press / to select [SCREEN] settings, then press  .
.
4Press / to select [TV System], then press  .
.
5Press / to select [PAL] or [NTSC], then press  .
.
Press SETUP to turn off the setup menu.
started Getting
11GB

Note
The display on the TV screen may be interrupted momentarily after changing the color system.
Setting the clock
1Press / to turn on the system.
2Press TIMER MENU .
If setting the clock for the first time, proceed to step 4.
3Press / to select “CLOCK,” then press  .
.
4Press / to set the hour, then press  .
.
5Press / to set the minutes, then press  .
.
Complete the clock setting.
Note
The clock settings are reset when you disconnect the power cord or if a power failure occurs.
To display the clock when the system is off
Press TIME/DIMMER while holding SHIFT. The clock is displayed for about 8 seconds.
12GB
Loading...