


3-864-705-13(1)
Compact Hi-Fi
Component
System
Operating Instructions |
|
GB |
|
|
|
|
|
Mode d’emploi |
|
|
FR |
Owner’s Record
The model and serial numbers are located on the bottom. Record the serial number in the space provided below. Refer to them whenever you call upon your Sony dealer regarding this product.
Model No. Serial No.
CMT-MD1
CMT-MD1DX
©1998 by Sony Corporation

WARNING
To prevent fire or shock hazard, do not expose the unit to rain or moisture.
To avoid electrical shock, do not open the cabinet. Refer servicing to qualified personnel only.
Do not install the appliance in a confined space, such as a bookcase or built-in cabinet.
US and foreign patents licensed from Dolby Laboratories Licensing Corporation.
The laser component in this product is capable of emitting radiation exceeding the limit for Class 1.
This appliance is classified as a CLASS 1 LASER product. The CLASS 1 LASER PRODUCT MARKING is located on the bottom exterior.
The following caution label is located inside the unit.
IN NO EVENT SHALL SELLER BE LIABLE FOR ANY DIRECT, INCIDENTAL OR CONSEQUENTIAL DAMAGES OF ANY NATURE, OR LOSSES OR EXPENSES RESULTING FROM ANY DEFECTIVE PRODUCT OR THE USE OF ANY PRODUCT.
NOTICE FOR THE CUSTOMERS IN THE USA
This symbol is intended to alert the user to the presence of uninsulated “dangerous voltage” within the product’s enclosure that may be of sufficient magnitude to constitute a risk of electric shock to persons.
This symbol is intended to alert the user to the presence of important operating and maintenance (servicing) instructions in the literature accompanying the appliance.
Caution:
The use of optical instruments with this product will increase eye hazard.
Note to CATV system installer:
This reminder is provided to call CATV system installer’s attention to Article 820-40 of the NEC that provides guidelines for proper grounding and, in particular, specifies that the cable ground shall be connected to the grounding system of the building, as close to the point of cable entry as practical.
INFORMATION
This equipment has been tested and found to comply with the limits for a Class B digital device, pursuant to Part 15 of the FCC Rules. These limits are designed to provide reasonable protection against harmful interference in a residential installation. This equipment generates, uses, and can radiate radio frequency energy and, if not installed and used in accordance with the instructions, may cause harmful interference to radio communications. However, there is no guarantee that interference will not occur in a particular installation. If this equipment does cause harmful interference to radio or television reception, which can be determined by turning the equipment off and on, the user is encouraged to try to correct the interference by one or more of the following measures:
—Reorient or relocate the receiving antenna. —Increase the separation between the equipment and receiver.
—Connect the equipment into an outlet on a circuit different from that to which the receiver is connected.
—Consult the dealer or an experienced radio/TV technician for help.
CAUTION
You are cautioned that any changes or modification not expressly approved in this manual could void your authority to operate this equipment.
NOTICE FOR THE CUSTOMERS IN CANADA
CAUTION:
TO PREVENT ELECTRIC SHOCK, DO NOT USE THIS POLARIZED AC PLUG WITH AN EXTENSION CORD, RECEPTACLE OR OTHER OUTLET UNLESS THE BLADES CAN BE FULLY INSERTED TO PREVENT BLADE EXPOSURE.
2

Table of Contents
Getting Started |
|
Step 1: Hooking up the system ............ |
4 |
Step 2: Setting the time ......................... |
8 |
Step 3: Presetting radio stations .......... |
9 |
Connecting optional A/V components |
|
and outdoor antennas ................... |
11 |
Basic Operations |
|
Playing a CD ......................................... |
14 |
Recording a CD on an MD .................. |
15 |
Playing an MD ...................................... |
17 |
Listening to the radio ........................... |
18 |
Recording from the radio .................... |
20 |
The CD Player |
|
Playing the CD tracks repeatedly ...... |
22 |
Playing the CD tracks in random |
|
order ................................................ |
22 |
Programming the CD tracks ............... |
23 |
Using the CD display ........................... |
24 |
Labeling a CD ....................................... |
25 |
Making a space between tracks 3 |
|
seconds long ................................... |
36 |
– Editing |
|
Before you start editing ....................... |
38 |
Labeling an MD .................................... |
39 |
Erasing recordings ............................... |
40 |
Moving recorded tracks ...................... |
42 |
Dividing recorded tracks .................... |
43 |
Combining recorded tracks ................ |
44 |
Undoing the last edit ........................... |
45 |
Sound Adjustment
Reinforcing the bass sound ................. |
46 |
|
|
GB |
|||
Selecting the Preset Equalizer menu . 47 |
|||
|
|||
Other Features
Labeling the preset station .................. |
47 |
Using the Radio Data System (RDS) |
|
(European model only) ................. |
49 |
Falling asleep to music ........................ |
49 |
Waking up to music ............................. |
50 |
Timer recording radio programs ....... |
51 |
The MD Deck |
|
– Playback |
|
Playing the MD tracks repeatedly ..... |
26 |
Playing the MD tracks |
|
in random order ............................. |
27 |
Programming the MD tracks .............. |
27 |
Using the MD display .......................... |
29 |
– Recording |
|
Before you start recording .................. |
30 |
Recording the favorite CD tracks |
|
on an MD ........................................ |
31 |
Recording on an MD manually .......... |
32 |
Starting recording with 6 seconds of |
|
prestored audio data ..................... |
33 |
Marking track numbers ....................... |
35 |
Additional Information |
|
Precautions ............................................ |
53 |
System limitations of MDs .................. |
54 |
Self-diagnosis Display ......................... |
55 |
Troubleshooting ................................... |
55 |
Specifications ........................................ |
58 |
Index ....................................................... |
60 |
3

Getting Started
Step 1: Hooking up the system
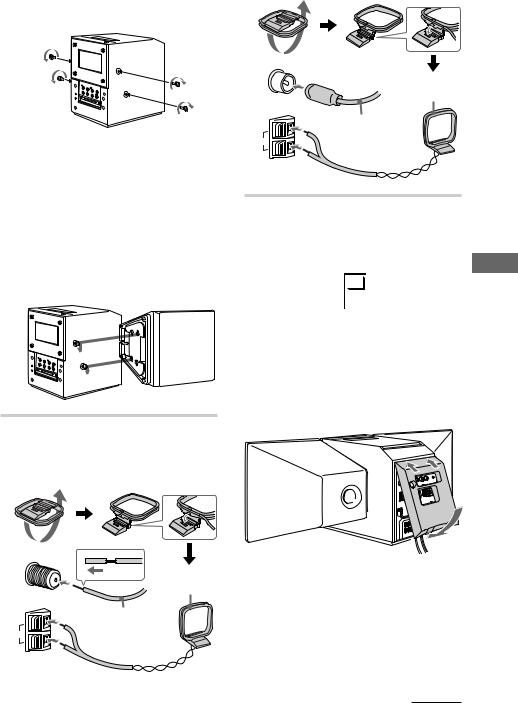
Follow steps 1through 8to hook up your system using the supplied cords and accessories.
|
FM antenna |
AM loop antenna |
The rear cover |
Right speaker |
Left speaker |
15
3 |
2 |
|
|
|
4 |
|
7 |
|
6 |
1Remove the rear cover.
Push in on the tabs and pull up the cover
2Connect the speakers.
1Connect the speaker cords to SPEAKER terminals as shown below.
Jack type A
|
+ |
|
White/ |
|
|
Solid/ |
– |
|
Red (‘) |
||
|
||
|
L |
|
Black/ |
|
|
Stripe/ |
Insert this |
|
Black (’) |
||
portion |
||
|
||
Jack type B |
|
|
|
Insert this |
|
|
portion |
|
Black (’) |
White(‘) |
|
|
Note
Keep the speaker cords away from the antennas to prevent noise.
4
2 (CMT-MD1 only) |
Jack type B |
Fasten the four screws to both sides of |
|
the system. |
|
3(CMT-MD1 only) Attach the speakers.
Facing the front of the system, attach the speaker connected to the SPEAKER R terminals onto the right side of the system and the speaker connected to the SPEAKER L terminals onto the left side of the system.
Afterwards, push down on the speakers to make sure they are securely fastened to the system.
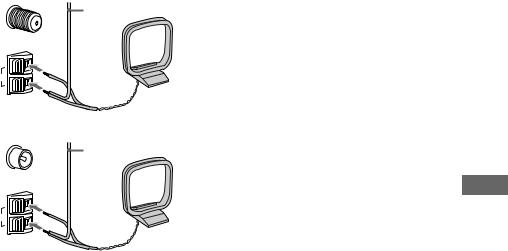
3Connect the FM/AM antennas.
Set up the AM loop antenna, then connect it.
Jack type A
FM 75Ω
COAXIAL
LOOP
ANTENNA
y AM
AM loop antenna
Extend the FM wire antenna horizontally
4For models with a voltage selector, set VOLTAGE SELECTOR to the position of your local power line voltage.
|
|
110-120V |
|
|
|
|
Getting |
|
|
|
|
|
|
|
|
|
|
|
|
220-240V |
|
|
|
|
||
|
|
|
|
|
|
|||
|
|
|
|
|
|
|||
|
|
|
|
|
|
|
||
|
|
|
|
|
|
|
|
|
|
|
|
VOLTAGE SELECTOR |
|
||||
|
|
|
|
|
|
|
|
Started |
|
|
5After making sure that the cords are |
||||||
|
|
|
||||||
|
|
correctly and securely connected, |
|
|||||
|
|
reinstall the rear cover. |
|
|||||
|
|
Put the wires through the hole at the |
|
|||||
|
|
bottom of the rear cover. |
|
|||||
|
|
|
|
|
|
|
|
|
|
|
|
|
|
|
|
|
|
FM 75Ω
COAXIAL
LOOP
ANTENNA
y AM
AM loop antenna
Extend the FM wire antenna horizontally
continued 5

Step 1: Hooking up the system (continued)
6Turn the system upside down holding the disc door with firm hand and set the speaker cord into a groove at the bottom of the system.
7Connect the power cord to a wall outlet.
If the plug of the power cord does not fit your wall outlet, detach the supplied adaptor from the plug (only for models equipped with an adaptor).
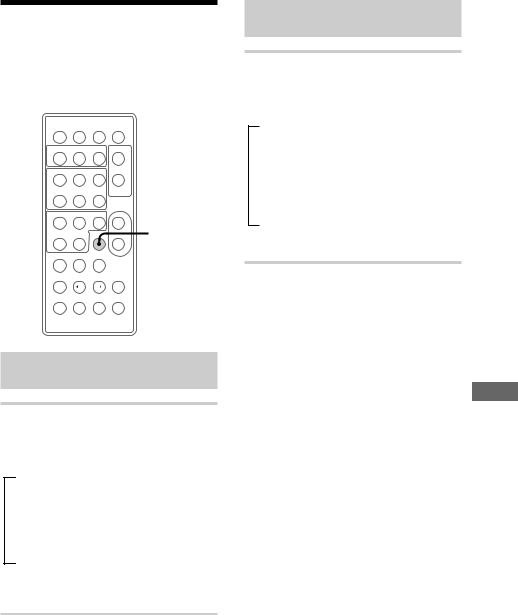
8To use the remote, pull out the insulating sheet to allow power to flow from the battey.
The remote already contains a battery.
Note (CMT-MD1 only)
Do not attempt to lift up the system by the speakers. There is a chance the system will detach and drop. To move the system, detach the speakers first and carry them separately.
On placement
The system is equipped with a cooling fan on the rear panel. Do not block the rear and side ventholes. Keep a distance of 10 cm (4 in) or more
6 between the back of the system and wall.
Note on the glass over the display
The glass over the display window on the cover of the CMT-MD1/MD1DX is made of tempered glass. Under normal conditions, this tempered glass is more shock resistant and able to bear more weight than ordinary glass. This glass, however, may shatter if it receives a sharp blow or if it is scratched.
To detach the speakers (For CMT-MD1 only)
1Slide the speakers in the opposite direction
of the arrows of the illustration in “Attach the speakers” (see step 2-3 on page 5.)
2After detaching the speakers, set the speaker cords into the speaker cord groove at the bottom of the speaker. Otherwise, the speaker cord could be damaged.
Groove
Tip (CMT-MD1 only)
When using the system with the speakers detached, you may remove the four screws on both sides of the system. If you do, be sure to retain the screws for future use.
To replace the speaker grille (For CMT-MD1 only)
To remove the speaker grille, grasp one of the corners and lift the grille out towards you. You can replace the grille with one of the other supplied grilles of a different color.
Verify which sides of the grille are rounded, then attach the grille with the rounded sides on the top and the bottom.
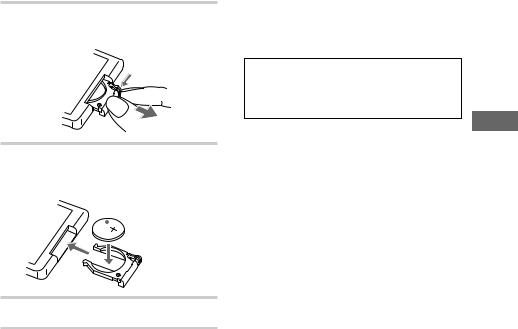
Replacing the battery in the remote
1 Slide out and remove the battery case.
To avoid battery leakage
If you are not going to use the remote for a long time, remove the battery to avoid damage caused by corrosion from battery leakage.
Notes on lithium battery
•Keep the lithium battery out of the reach of children.
Should the battery be swallowed, immediately consult a doctor.
•Wipe the battery with a dry cloth to assure a good contact.
•Be sure to observe the correct polarity when installing the battery.
•Do not hold the battery with metallic tweezers, otherwise a short-circuit may occur.
WARNING
Battery may explode if you mistreated.
Do not recharge, disassemble or dispose of in fire.
2 Insert a new lithium battery CR2025 with the + side facing up.
a lithium battery  CR2025
3 Slide the battery case back in.
CAUTION
Danger of explosion if battery is incorrectly replaced.
Replace only with the same or equivalent type recommend by the manufacturer. Discard used batteries according to the manufacturer’s instructions.
Battery life
You can expect the remote to operate for about six months (using a Sony CR2025 lithium battery) before the battery run down. When the battery no longer operates the remote, replace the battery with a new one.
Started Getting
7

Step 2: Setting the time
You must set the time before you use the timer functions.
The clock is on a 24-hour system for the European model, and a 12-hour system for other models.
The European model is used for illustration purpose.
1 / u
– +
( P |
p |
=+
( |
P |
p + |
|
= |
+ |
– |
2,4 |
|
– |
+ |
|
CURSOR ? |
|
|
3 |
|
|
|
|
1 |
|
|
3,5 |
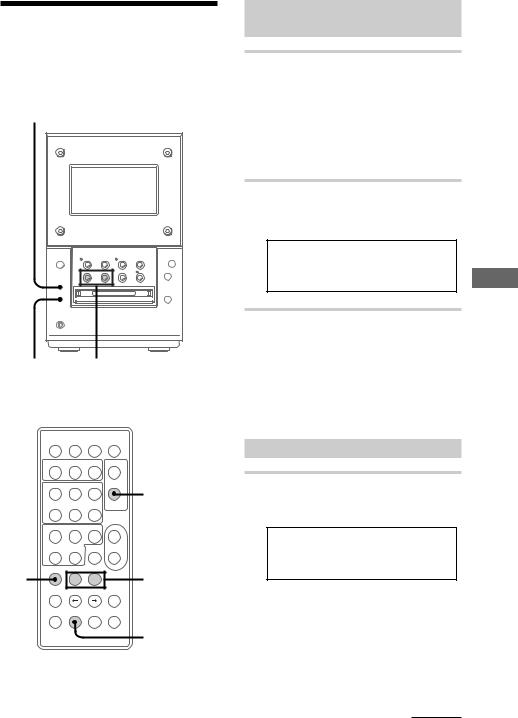
1 Press CLOCK/TIMER SET while the power is off.
The clock appears and the hour indication flashes.
2 Press +/– to set the hour.
 0 : 0 0
3 Press ENTER/YES or CURSOR /.
The minute indication flashes.
1 1 : 0 0
4 Press +/– to set the minute.
5 Press ENTER/YES.
The clock starts.
If you have made a mistake
Press CURSOR ? or / repeatedly so that the incorrect item flashes, then set it again.
To change the preset time
You can change the preset time while the power is on.
1Press CLOCK/TIMER SET.
2Press +/– repeatedly until “CLOCK SET ?” appears.
3Press ENTER/YES.
4Repeat steps 2 through 5.
Tips
•The built-in clock shows the time in the display while the power is off.
•The upper dot flashes for the first half of a minute (0 to 29 seconds), and the lower dot flashes for the last half of a minute (30 to 59 seconds).
8
Step 3: Presetting radio stations
You can preset the 20 for FM and 10 for AM stations.
FUNCTION |
|
|
|
|
|
|
|
|
g |
1/u |
(P |
p |
(P |
p |
|
|
|
|
+ |
|
= 0 |
) + |
– |
|
|
|
|
|
|
|
– |
+ |
|
|
|
|
|
|
6 |
1 |
3 |
|
|
|
|
|
|
1 / u |
|
–+  2
2
( P p |
STEREO/MONO |
=+
( |
P |
p + |
|
= |
+ |
– |
4,6 |
4 |
– |
+ |
|
|
|
5,7
To tune in the desired
station
1 Press TUNER/BAND repeatedly until the band you want appears in the display.
Pressing TUNER/BAND turns the power on.
Each time you press the button, the band changes as follows:
FM ˜ AM
2 Press TUNING MODE on the remote repeatedly until “AUTO” appears.
LEVELSYNC
DBFB
AUTO
F M 8 7 . 5 M H z
3 Press TUNING +/–.
The frequency indication changes and scanning stops when the system tunes in a station. “TUNED” and “STEREO” (for a stereo program) appear. When you want to stop scanning, press
TUNING MODE on the remote.
To preset the station
4 Press EDIT, then +/– on the remote repeatedly until “Frq-Memory ?” appears.
|
LEVELSYNC |
|
DBFB |
TUNED |
AUTO |
F r q - M e m o r y ?
Started Getting
continued 9

Step 3: Presetting radio stations (continued)
5 Press ENTER/YES on the remote.
6 Press +/– on the remote to select the preset number you want.
LEVELSYNC
DBFB
TUNED
F M 8 7 . 5 M H z  1
1
The preset number
7 Press ENTER/YES on the remote.
The station is stored.
8 Repeat steps 1 through 7 to preset other stations.
To tune in a station manually
Press TUNING MODE on the remote repeatedly until “MANUAL” appears in step 2, then press TUNING +/– to tune in the station and continue from step 4.
To change the preset number
Start again from step 1.
To change the AM tuning interval (except for European model)
The AM tuning interval is factory-set to
9 kHz (10 kHz in some areas). To change the AM tuning interval, tune in any AM station first, then turn off the power. While holding down the FUNCTION button, turn the power back on. When you change the interval, all the AM preset stations are erased. To reset the interval, repeat the same procedure.
Tips
•The preset stations are retained for a day even if you disconnect the power cord or if a power failure occurs.
•You can create titles for the preset stations (see page 47).
•To improve broadcast reception, reorient the supplied antennas or connect the optional external antenna.
•When an FM program has static noise, press STEREO/MONO on the remote until “MONO” appears. There will be no stereo effect, but the reception will improve. Press the button again to restore the stereo effect.
10
Connecting optional A/V components and outdoor antennas
To enhance your system, you can connect optional components. Refer to the instructions included with each component for details.
Connecting audio
components
Connecting an MD deck for analog recording
Be sure to match the color of the plugs and the connectors. To listen to the sound from the connected MD deck, press FUNCTION repeatedly until “TAPE” appears.
To the audio input |
To the audio output |
||||||||||||
of the MD deck |
of the MD deck |
||||||||||||
|
|
|
|
|
|
|
|
|
|
|
|
|
|
|
|
|
|
|
|
|
|
|
|
|
|
|
|
|
|
|
|
|
|
|
|
|
|
|
|
|
|
|
|
|
|
|
|
|
|
|
|
|
|
|
|
|
|
|
|
|
|
|
|
|
|
|
|
|
|
|
|
|
|
|
|
|
|
|
|
|
|
|
|
Connecting a tape deck
Be sure to match the color of the plugs and the connectors. To listen to the sound from the connected tape deck, press FUNCTION repeatedly until “TAPE” appears.
To the audio input |
To the audio output |
||||||||||||
of the tape deck |
of the tape deck |
||||||||||||
|
|
|
|
|
|
|
|
|
|
|
|
|
|
|
|
|
|
|
|
|
|
|
|
|
|
|
|
|
|
|
|
|
|
|
|
|
|
|
|
|
|
|
|
|
|
|
|
|
|
|
|
|
|
|
|
|
|
|
|
|
|
|
|
|
|
|
|
|
|
|
|
|
|
|
|
|
|
|
|
|
|
|
|
To listen to analog components
If the sound from a connected component is distorted, reduce the input level.
1Press FUNCTION repeatedly until “TAPE” appears.
2Turn off the system by pressing 1/u.
3While holding FUNCTION down, press 1/u again.
“Attenuate ON” appears and “ATT” lights in the display.
ATT LEVELSYNC
DBFB
A t t e n u a t e O N
To reset to the original level, repeat steps 1, 2, and 3.
Started Getting
continued 11
Connecting optional A/V components and outdoor antennas (continued)
Connecting a VCR
Be sure to match the color of the plugs and the connectors. To listen to the sound from the connected VCR, press FUNCTION repeatedly until “TAPE” appears.
To the audio output of the VCR
Connecting outdoor
antennas
Connect an outdoor antenna to improve reception.
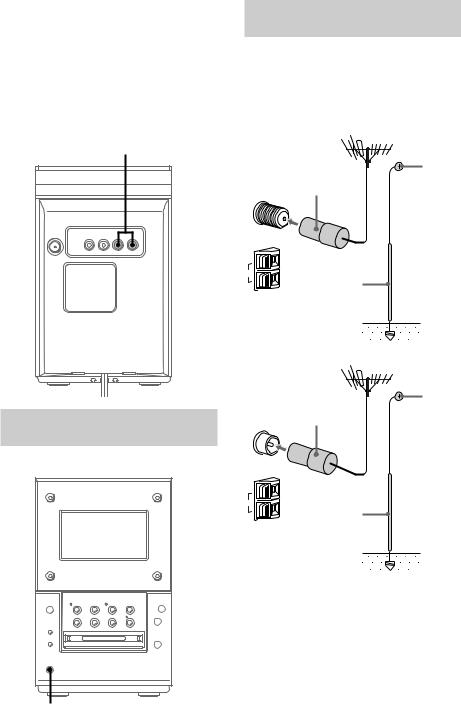
FM antenna
Connect an optional FM outdoor antenna or you can use a TV antenna instead.
Jack type A
|
|
|
|
|
SIGNAL |
IEC standard socket |
|
y |
GND |
||
SIG |
NAL GND |
||||
connector (not supplied) |
|
|
|||
|
|
|
|||
FM |
|
|
|
|
|
75Ω |
|
|
|
|
|
|
|
AXIAL |
|
|
|
|
|
CO |
|
|
|
LOO |
P |
|
|
|
|
|
NNA |
|
|
|
|
ANTE |
|
|
|
||
|
|
|
|
||
y |
|
|
|
|
|
AM |
|
|
|
|
|
|
|
Ground wire |
|
|
|
|
|
(not supplied) |
|
|
|
Jack type B
Connecting the
headphones
Connect the headphones to the PHONES jack.
|
|
|
|
g |
1/u |
(P |
p |
(P |
p |
|
|
|
|
+ |
|
= 0 |
) + |
|
– |
|
|
|
|
|
|
– |
+ |
|
|
|
|
|
|
6 |
IEC standard socket |
|
y |
||
connector (not supplied) |
SIG |
NAL |
||
|
||||
|
|
|||
FM |
|
|
|
|
75Ω |
|
|
|
|
|
|
AXIAL |
|
|
|
CO |
|
|
|
LOO |
P |
NA |
|
|
ANTEN |
|
|
||
|
|
|
||
y |
|
|
|
|
AM |
|
Ground wire |
|
|
|
|
|
|
|
|
|
(not supplied) |
|
|
GND
SIGNAL GND
PHONES jack
12
AM antenna
Connect a 6 to 15 meter (20 to 50 feet) insulated wire to the AM antenna terminal. Leave the supplied AM loop antenna connected.
Jack type A
|
Insulated wire |
FM |
(not supplied) |
75Ω |
|
COAXIAL |
|
LOOP |
|
ANTENNA |
|
y |
|
AM |
|
Jack type B
|
Insulated wire |
FM |
(not supplied) |
75Ω |
|
COAXIAL |
|
LOOP |
|
ANTENNA |
|
y |
|
AM |
|
Important
If you connect an outdoor antenna, connect a ground wire to the y terminal with the screw clamp. To prevent a gas explosion, do not connect the ground wire to a gas pipe.
Started Getting
13
Basic Operations
Playing a CD
To turn on the system, press 1/u.
1/u |
3 CD p 1,2 |
|
6 |
g
1/u |
(P |
p |
(P |
p |
+
= 0 ) +
–
–+
6
CD/MD |
VOLUME +/– |
=0/)+ |
|
OPEN/
1 / u
CLOSE 1/u CD
–+
( P |
p |
=+
CD ( |
|
CD p |
( |
P |
p + |
CD P |
|
VOL +/– |
= |
+ |
– |
–+
CD =/+
1 Press CD 6 (or OPEN/CLOSE CD on the remote) to open the disc door and place a CD on the disc tray.
|
With the |
6 |
label side up |
2 Press CD 6 (or OPEN/CLOSE CD on the remote) to close the disc door.
3 Press CD ^ (or CD ( on the remote).
Play starts.
The CD ^ indicator lights up green.
|
CD |
|
|
|
|
LEVELSYNC |
|
||
|
|
|
|
|
TRACK |
|
DBFB |
|
|
|
C D |
1 |
|
0 m 3 5 s |
|
||||
|
|
|
|
|
|
|
|
|
|
|
|
|
|
|
|
|
|
||
|
|
|
|
|
|
|
|||
|
The track number |
The playing time |
|||||||
|
|
|
|
|
|
|
|
|
|
|
|
|
|
|
|
|
|
|
|
To |
Do this |
|
|
|
|
||||
|
|
|
|
|
|
|
|
|
|
Stop play |
Press CD p. |
|
|
|
|
||||
|
|
|
|
|
|
|
|
|
|
Pause |
Press CD ^ (or CD P on the |
||||||||
|
|
remote). The CD ^ indicator |
|||||||
|
|
lights up orange. Press again |
|||||||
|
|
to resume play. |
|||||||
|
|
|
|
|
|
|
|
|
|
Select a track |
Press CD/MD =0 (or CD |
||||||||
|
|
= on the remote) or CD/ |
|||||||
|
|
MD )+ (or CD + on |
|||||||
|
|
the remote) repeatedly until |
|||||||
|
|
you find the desired track. |
|||||||
|
|
|
|
|
|
|
|
|
|
Find a point in |
Press and hold CD/MD |
||||||||
a track |
=0 or )+, during |
||||||||
|
|
play and release it at the |
|||||||
|
|
desired point. “– OVER –” |
|||||||
|
|
appears when the CD ends. |
|||||||
Remove the CD |
Press CD 6 (or OPEN/CLOSE |
||||||||
|
|
CD on the remote) to open the |
|||||||
|
|
door. |
|
|
|
|
|||
|
|
|
|
|
|
|
|
|
|
Adjust the |
Press VOLUME +/– (or |
||||||||
volume |
VOL +/– on the remote). |
||||||||
14

Tips
•You can start playing from the desired track in step 3.
1Press CD/MD =0 or )+ repeatedly until you find the desired track.
2Press CD ^.
•Pressing CD ^ (or CD ( on the remote) when the power is off automatically turns the power on and starts CD play if there is a CD on the disc tray (One Touch Play).
•You can switch from another source to the CD player and start playing a CD by pressing CD ^ (or CD ( on the remote) (Automatic Source Selection).
•If there is no CD on the disc tray, “CD NO DISC” appears in the display.
Notes
•Do not use a CD with tape, seal or paste, on it as this may damage of the system.
•Do not push the disc door closed, as this may damage the system. Press CD 6 (or OPEN/ CLOSE CD on the remote) to close the disc door.
Recording a CD on an MD
— CD-MD Synchro Recording
You can make a digital recording of a CD on an MD, marking track numbers in the same sequence as the original CD. If you use a recorded MD, the system automatically locates the end of the recorded portion and starts the new recording from there. You can also record a program of favorite tracks (see page 31).
To turn on the system, press 1/u.
1/u |
4 |
5 |
|
2,3 |
|
|
|
|
|
|
|
6 |
|
|
|
|
|
|
g |
Basic |
|
|
|
|
|
|
|
1/u |
(P |
p |
(P |
p |
+ |
Operations |
|
|
|
|
|
|
|
|
= 0 |
) + |
|
|
– |
|
|
|
|
|
|
|
|
|
– |
+ |
|
|
|
|
|
|
|
|
|
6 |
|
MD indicator MD p MD 6
1 Insert a recordable MD.
With the arrow pointing toward the system
With the label side up and the shutter slide rightward
continued 15

Recording a CD on an MD (continued)
2 Press CD 6 to open the disc door and place a CD on the disc tray.
With the label side up
6
3 Press CD 6 to close the disc door.
4 Press CD-MD SYNC.
The MD stands by for recording and the CD pauses at the beginning.
CD |
MD |
LEVELSYNC |
|
TRACK |
DBFB |
|
SYNC |
|
C D |
- 7 2 m 3 1 s |
|
|
|
|
5 Press MD ^.
Recording starts. When the recording is completed the CD stops and the MD pauses automatically. Press MD p, the MD stops.
To stop recording
Press MD p.
Before inserting an MD
When the power is on, make sure the MD indicator is off. If the MD indicator lights up blue, another MD is already inserted. Press MD 6 and remove the MD.
Tip
The MD is labeled with the disc title of the CD automatically (see page 25) when using a new recordable MD or an MD whose tracks have been completely erased (see page 41) (Disc Memo Copy function).
While “TOC” is lit or is flashing
To ensure complete recording, do not move the system or disconnect the power cord. The system updates the Table of Contents (TOC) while “TOC” is flashing.
If the MD ends during recording
The CD and the MD stop automatically.
Notes
•The MD recording is complete only after all the recording information is entered to TOC at which point TOC stops flashing and goes out. Be careful not to disconnect the power cord or move the system before this point. Before disconnecting the power cord, do the following:
–Remove the MD.
–Press 1/u to turn off the system.
•If the MD is record protected, “MD Protected” appears in the display and the MD cannot be recorded on. Press MD 6 and remove the MD, slide the record protection tab to the closed position (see page 30), reinsert the MD and try again.
•Please do not use MDs with labels that are protruding or labels that have not been positioned correctly. Use of such MDs may damage this system.
16
Playing an MD |
1 Insert an MD. |
|
|
With the |
|
To turn on the system, press 1/u. |
arrow |
|
pointing |
||
You can play an MD just like a CD. |
||
toward the |
||
|
system |
1/u |
|
2 MD p |
VOLUME +/– |
With the |
|
|
|||
|
|
|
|
|
|
|
label side up |
|
|
|
|
|
|
|
|
|
and the |
|
|
|
|
|
|
|
|
|
shutter slide |
|
|
|
|
|
|
|
|
|
rightward |
|
|
|
|
|
|
|
g |
|
2 Press MD ^ (or MD ( on the |
||
|
|
|
|
|
|
|
remote). |
|
|
|
|
|
|
|
|
|
Play starts. The MD ^ indicator lights |
||
|
|
|
|
|
|
|
up green. |
|
|
1/u |
(P |
p |
(P |
p |
|
+ |
|
MD |
|
|
|
|
|
|
|
|
LEVELSYNC |
||
|
= 0 |
) + |
|
|
– |
|
|
TRACK |
DBFB |
|
|
|
|
|
|
|
|||
|
|
|
|
|
|
|
|
|
|
|
– |
+ |
|
|
|
|
|
|
|
|
|
|
|
|
6 |
|
M D |
1 |
0 m 3 5 s |
|
|
|
|
|
|
|
|
The track |
The playing |
|
|
|
|
|
|
|
|
number |
time |
CD/MD |
|
MD indicator |
MD 6 |
To |
Do this |
|
|||
=0/)+ |
|
|
|
|
|
|
|||
|
|
|
|
|
|
|
Stop play |
Press MD p. |
|
|
|
|
|
|
|
|
Pause |
Press MD ^ (or MD P on the |
|
|
|
|
|
|
1 / u |
|
|
remote). The MD ^ indicator |
|
|
|
|
|
|
|
|
lights up orange. |
||
|
|
|
|
|
|
1/u |
|
||
|
|
|
|
|
|
|
|
Press again to resume play. |
|
MD ( |
|
|
– |
+ |
|
MD P |
Select a track |
Press CD/MD =0 (or MD |
|
|
|
|
|
|
|||||
|
|
|
|
|
|
=on the remote) or CD/MD |
|||
|
|
( |
P |
p |
|
|
|
||
|
|
|
|
|
|
MD p |
|
)+ (or MD + on the |
|
MD =/+ |
|
|
|
|
|
|
remote) repeatedly until you find |
||
|
= |
+ |
|
|
|
|
|||
|
|
|
|
|
|
|
|
the desired track. |
|
|
|
( |
P |
p |
+ |
|
Find a point |
Press CD/MD =0 or |
|
|
|
|
|
|
|
VOL +/– |
|||
|
|
|
|
|
|
in a track |
)+ during play and release |
||
|
|
= |
+ |
|
– |
|
|||
|
|
|
|
|
|
|
|
it at the desired point. |
|
– + |
Remove the |
Press MD 6. |
|
|
|
|
MD |
|
|
Adjust the |
Press VOLUME +/– (or VOL +/– |
|
volume |
on the remote). |
Operations Basic
continued 17

Playing an MD (continued)
Before inserting an MD
When the power is on, make sure the MD indicator is off. If the MD indicator lights up blue, another MD is already inserted. Press MD 6 and remove the MD.
Tips
•You can start playing from the desired track in step 2.
1Press CD/MD =0 (or MD =on the remote) or CD/MD )+ (or MD + on the remote) repeatedly until the desired track appears in the display.
2Press MD ^.
•Pressing MD ^ (or MD ( on the remote) when the power is off automatically turns the power on and starts MD play if there is an MD in the deck (One Touch Play).
•You can switch from another source to the MD deck and start playing an MD by pressing MD ^ (or MD ( on the remote) (Automatic Source Selection).
Note
Please do not use MDs with labels that are protruding or labels that have not been positioned correctly. Use of such MDs may damage this system.
Listening to the radio
Preset radio stations in the system’s memory first. To turn on the system, press 1/u.
1/u |
3 |
|
|
|
|
|
|
|
g |
1/u |
(P |
p |
(P |
p |
|
|
|
|
+ |
|
= 0 |
) + |
|
– |
|
|
|
|
|
|
– |
+ |
|
|
|
|
|
|
6 |
1 |
|
|
VOLUME +/– |
|
|
|
|
|
|
|
1 / u |
|
|
|
1/u |
TUNER BAND |
– |
+ |
TUNING |
|
|
|
MODE |
( |
P |
p |
|
PRESET +/– |
|
|
STEREO/ |
= |
+ |
|
|
|
|
|
MONO |
( |
P |
p |
+ |
|
|
|
VOL +/– |
= |
+ |
|
– |
|
– |
+ |
|
18
1 Press TUNER/BAND (or TUNER BAND on the remote) repeatedly until the band you want appears.
Each time you press the button, the band changes as follows:
FM ˜ AM
LEVELSYNC
DBFB
MANUAL
F M 8 7 . 5 M H z
2 Press TUNING MODE on the remote repeatedly until “PRESET” appears.
LEVELSYNC
DBFB
PRESET
F M 8 7 . 5 M H z
3 Press TUNING + or – (or PRESET + or – on the remote) to select the desired station’s preset number.
|
|
LEVELSYNC |
|
|
|
|
|
|
|
|
DBFB |
|
|||
|
|
|
PRESET |
|
|||
F M 8 7 . 5 M H z |
1 |
|
|
||||
|
|
|
|
|
|
|
|
|
|
|
|
|
|
|
|
|
|
The |
|
||||
Frequency or the station |
|
||||||
name* or RDS station |
preset |
||||||
name** |
number |
||||||
*If you label a preset station, it appears in the display.
**European model only.
To |
Do this |
Turn off the |
Press 1/u to turn off the |
radio |
system. |
Adjust the |
Press VOLUME +/– (or |
volume |
VOL +/– on the remote). |
|
|
To listen to non-preset radio stations
•Press TUNING MODE on the remote repeatedly until “MANUAL” appears in step 2, then press TUNING + or – to tune in the desired station (Manual Tuning).
•Press TUNING MODE on the remote repeatedly until “AUTO” appears in step 2, then press TUNING + or –. The frequency indication changes and scanning stops when the system tunes in a station (Automatic Tuning).
To cancel the Automatic Tuning
Press TUNING MODE on the remote.
Tips
•Pressing TUNER/BAND (or TUNER BAND on the remote) when the power is off automatically turns the power on and tunes in the last received station (One Touch Play).
•You can switch from another source to the tuner by pressing TUNER/BAND (or TUNER BAND on the remote) (Automatic Source Selection).
•To improve broadcast reception, reorient the supplied antennas or connect the optional external antenna.
•When an FM program has static noise, press STEREO/MONO on the remote until “MONO” appears. There will be no stereo effect, but the reception will improve. Press the button again to restore the stereo effect.
Operations Basic
19

Recording from the radio
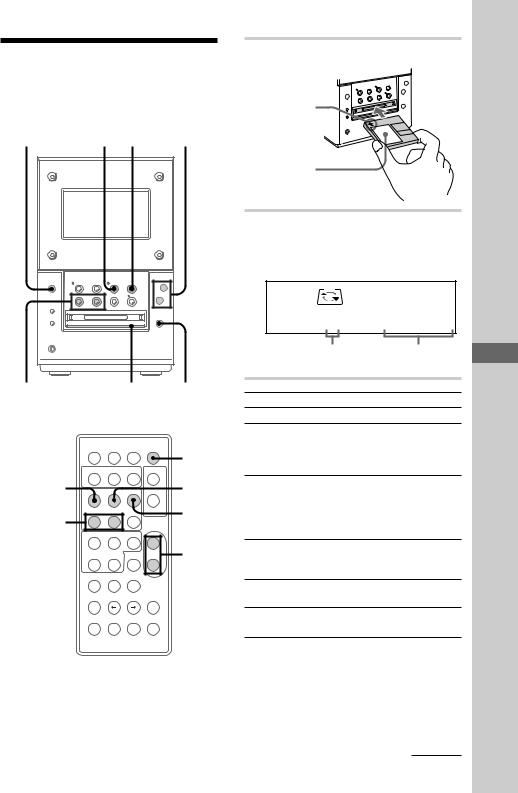
You can record a radio program on an MD. If you use an MD with tracks already recorded on it, the system automatically locates the end of the recorded portion and starts the new recording from there. To record after erasing all tracks on an MD, see page 41.
To turn on the system, press 1/u.
1/u |
|
|
6 MD p |
|
|
|
|
|
g |
1/u |
(P |
p |
(P |
p |
|
|
|
|
+ |
|
= 0 |
) + |
|
– |
|
|
|
|
|
|
– |
+ |
|
|
|
|
|
|
6 |
2 |
|
4 |
|
5 |
MD 6 |
|
|
|
|
|
|
|
|
|
|
1 / u |
|
2 |
|
|
|
|
1/u |
|
– |
+ |
|
3 |
|
6 |
( |
P |
p |
|
|
MD p
=+
6 ( |
P |
p + |
4 |
= |
+ |
– |
|
–+
1 Insert a recordable MD.
With the arrow pointing toward the system
With the label side up
and the shutter slide rightward
2 Press TUNER/BAND (or TUNER BAND on the remote) repeatedly until the band you want appears.
3 Press TUNING MODE on the remote repeatedly until “PRESET” appears.
4 Press TUNING + or – (or PRESET + or – on the remote) to select the desired station’s preset number.
|
MD |
LEVELSYNC |
|
|
|
|
|
|
|
|
DBFB |
|
|||
|
|
|
PRESET |
|
|||
F M 8 7 . 5 M H z |
1 |
|
|
||||
|
|
|
|
|
|
|
|
|
|
|
|
|
|
|
|
|
|
|
|
|
|||
Frequency or the |
The |
||||||
preset station name* |
preset |
||||||
or RDS station name** |
number |
||||||
*The titles you entered appear sequentially (see “Labeling the preset station” on page 47).
**European model only.
20
5 Press REC.
The MD stands by for recording and the REC indicator lights up red.
6 Press MD ^ (or MD ( or MD P on the remote).
Recording starts.
To stop recording
Press MD p.
To record non-preset radio stations
To record non-preset stations, press TUNING MODE on the remote repeatedly until “MANUAL” appears in step 3, then press TUNING + or – to tune in the desired station.
Tip
If noise is heard while recording an AM radio station, reorient the AM loop antenna to reduce the noise.
While “TOC” is lit or is flashing
To ensure complete recording, do not move the system or disconnect the power cord. The system updates the Table of Contents (TOC) while “TOC” is flashing.
Notes
•The MD recording is complete only after all the recording information is entered to TOC at which point TOC stops flashing and goes out. Be careful not to disconnect the power cord or move the system before this point. Before disconnecting the power cord, do the following:
–Remove the MD.
–Press 1/u to turn off the system.
•If the MD is record protected, “MD Protected” appears in the display and the MD cannot be recorded on. Press MD 6 and remove the MD, slide the record protection tab to the closed position (see page 30), reinsert the MD and try again.
•Please do not use MDs with labels that are protruding or labels that have not been positioned correctly. Use of such MDs may damage this system.
Operations Basic
21

The CD Player
Playing the CD tracks repeatedly
–– Repeat Play
You can repeat a CD in normal play, Shuffle Play and Program Play.
1 / u
–+
( P p |
REPEAT |
=+
( |
P |
p + |
= |
+ |
– |
|
– |
+ |
Press REPEAT during play until “REPEAT” or “REPEAT 1” appears.
CD |
LEVELSYNC |
TRACK |
REPEAT DBFB |
C D 1 |
2 m 3 5 s |
|
|
REPEAT: For all the tracks on the current CD.
REPEAT 1*: For a single track only.
*You cannot repeat only one track during Shuffle Play and Program Play.
To cancel Repeat Play
Press REPEAT until “REPEAT” or “REPEAT 1” disappears.
Playing the CD tracks in random order
–– Shuffle Play
You can play all the tracks on a CD in random order.
1 / u
1
–+  2
2
( P |
p |
=+
3 |
( |
P p |
+ |
|
|||
|
= |
+ |
– |
CD +
–+
1Press FUNCTION repeatedly until “CD” appears then place a CD on the disc tray.
2Press PLAY MODE repeatedly until “SHUFFLE” appears.
CD |
LEVELSYNC |
|
|
SHUFFLE |
DBFB |
C D 1 7 |
7 2 m 3 1 s |
|
|
|
|
3 Press CD (.
Shuffle Play starts. “J” appears, and all the tracks play in random order.
To cancel Shuffle Play
Press PLAY MODE repeatedly until “SHUFFLE” and “PGM” disappear.
Tips
•You can start Shuffle Play during normal play by displaying “SHUFFLE.”
•To skip a track, press CD +.
22
Programming the CD tracks
–– Program Play
You can make a program of up to 24 tracks in the order you want them to be played. You can make a Synchro Recording of the program on the MD (see page 31).
1 |
|
|
1 / u |
|
|
|
|
2 |
|
|
|
– |
+ |
|
|
( |
P |
p |
|
6 |
= |
+ |
|
|
|
|
|
CD p |
|
|
|
|
|
|
3 |
( |
P |
p + |
|
= |
+ |
– |
|
|
|
|
DISPLAY
–+
4
1 Press FUNCTION repeatedly until “CD” appears in the display, then place a CD on the disc tray.
2 Press PLAY MODE repeatedly until “PGM” appears.
CD |
LEVELSYNC |
PGM DBFB
C D 0
3 Press CD + or = until the desired track appears in the display.
CD |
LEVELSYNC |
|
||||||
|
|
|
|
|
PGM DBFB |
|
||
C D 7 |
4 m 0 9 s |
|
||||||
|
|
|
|
|
|
|
|
|
|
|
|
|
|
|
|
|
|
Selected |
|
track |
|
|
||||
|
The playing time |
|||||||
number |
of the selected |
|||||||
|
|
|
|
|
track |
|||
4 Press ENTER/YES.
The track is programmed. “Step” appears, followed by the total number of programmed steps. The number of the last programmed track appears, followed by the total playing time of the program.
CD |
|
|
|
LEVELSYNC |
|
|
|
|
|
|
|
|
|
PGM |
DBFB |
|
|
C D |
7 |
|
|
4 m 0 9 s |
|
|||
|
|
|
|
|
|
|
|
|
|
|
|
|
|
|
|
|
|
|
|
|
|
|
|
|||
The number of the |
The total playing |
|||||||
last programmed |
time of the |
|
|
|
||||
track |
|
|
|
programmed tracks |
||||
5 To program additional tracks, repeat steps 3 and 4.
6 Press CD (.
All the tracks play in the order you selected.
continued
CD The
Player
23

Programming the CD tracks (continued)
To check the total number of programmed tracks
Press DISPLAY in stop mode. “Step” appears, followed by the total number of programmed tracks. The number of the last programmed track appears, followed by the total playing time of the program.
CD |
LEVELSYNC |
|
|
|
|||
|
|
|
|
PGM |
DBFB |
|
|
C D 1 1 |
2 8 m 0 8 s |
|
|||||
|
|
|
|
|
|
|
|
|
|
|
|
|
|
|
|
|
|
|
|
|
|||
The number of the last The total playing |
|||||||
programmed track |
time of the |
||||||
|
|
|
|
programmed tracks |
|||
To check the programmed track number
Press CD + or = repeatedly during the Program Play.
Additional tasks
To |
Do this |
Cancel Program |
Press CD p, then press PLAY |
Play |
MODE repeatedly until |
|
“PGM” and “SHUFFLE” |
|
disappear. |
|
|
Add a track to |
Do steps 3 and 4 with the |
the program |
Program Play stopped. |
|
|
Erase the entire |
Press CD p with the Program |
program |
Play stopped. |
|
|
Tip
The program you made remains after Program Play finishes. To play the same program again, press CD (.
Note
When the total playing time of the programmed tracks exceeds 100 minutes, “- - m - - s” appears in the display.
Using the CD display
You can check the remaining time of the current track or that of the CD.
( P |
p |
=+
(P p +
DISPLAY
= + |
– |
–+
Press DISPLAY repeatedly during play.
Each time you press the button, the display changes as follows:
n Elapsed time of the current track
n
The remaining time of the current track
n
The remaining time of the current CD*
*The remaining time of the program is displayed during Program Play.
To check the total playing time and number of tracks on the CD
The total playing time and number of the tracks are displayed during normal or shuffle play in stop mode.
CD |
LEVELSYNC |
|
|||||
|
|
|
|
|
DBFB |
|
|
C D 1 7 |
7 2 m 3 1 s |
|
|||||
|
|
|
|
|
|
|
|
|
|
|
|
|
|
|
|
|
|
|
|
|
|||
The total number The total playing |
|||||||
of the tracks |
time |
||||||
24
Labeling a CD
–– Disc Memo Function
You can label up to 20 CDs with titles of up to 12 symbols and characters. Whenever you load a labeled CD, the title (disc name) appears in the display. If you label a CD and make a CD-MD Synchro Recording on a new MD, the title is automatically recorded on the MD.
1 / u
1
–+
( P |
p |
=+
( P p +
4,DISPLAY
=+  –
–
2 |
– |
+ |
2,5 |
CURSOR ?
 6
6
3,8 |
CANCEL/NO |
|
1 Press FUNCTION repeatedly until “CD” appears, then place a CD on the disc tray.
Make sure the CD is stopped and the total number of tracks and the playing time appear in the display.
If “SHUFFLE” or “PGM” appears in the display, press PLAY MODE repeatedly until it disappears.
CD |
LEVELSYNC |
|||||
|
|
|
|
|
DBFB |
|
C D 1 7 |
7 2 m 3 1 s |
|||||
|
|
|
|
|
|
|
|
|
|
|
|
|
|
|
|
|
|
|
|
|
The total |
The total |
|||||
number of tracks playing time
2 Press EDIT and press +/– repeatedly until “Name in ?” appears.
|
CD |
LEVELSYNC |
|
|
DISC |
DBFB |
|
|
N a m e |
i n ? |
|
|
|
|
|
|
|
|
|
3 Press ENTER/YES. |
|
|
|
|
The cursor flashes. |
|
|
|
|
|
|
|
CD |
LEVELSYNC |
|
|
DISC |
DBFB |
|
|
|
|
|
Cursor
4 Press CHARACTER repeatedly until the type of character you want appears.
Each time you press the button, the display changes as follows:
A (Upper case) n a (Lower case) n 0
(Numbers) n ! (Symbols)* n (Space)** n A…
* You can use the following symbols.
!"#$%&'() +,–./:;<=>?@_`
**To enter a space
Go to the step 6. You cannot label a blank space for the first letter.
5 Press +/– repeatedly until the desired character appears.
6 Press CURSOR /.
The character you selected in step 5 stops flashing and the cursor shifts to the right.
CD |
LEVELSYNC |
DISC |
DBFB |
A
Cursor
CD The
Player
continued
25

Labeling a CD (continued)
7 Repeat steps 4 through 6 to complete the entire title.
If you enter an incorrect character, press CURSOR ? or / until the character you want to change flashes, then repeat steps 4 through 6.
To erase a character, press CANCEL/NO while the character is flashing. You cannot insert characters between previously inserted characters.
8 Press ENTER/YES to complete the labeling procedure.
The title is memorized into the system and then the original display appears.
To cancel labeling
Press EDIT.
Note
Turn on the system power at least once a month, otherwise the titles are erased from the memory.
To check the titles
Press DISPLAY while playback is stopped.
Each time you press the button, the display changes as follows:
The disc title
˜
The total number of tracks and the total playing time
To erase a disc title
1Press EDIT, then press +/– repeatedly until “Name Erase ?” appears.
2Press ENTER/YES. The disc title flashes.
“No Name” appears if no disc title is stored.
3Press +/– repeatedly until the disc title you want to erase appears.
4Press ENTER/YES again.
“Complete” appears and the disc title is erased.
To cancel erasing
Press CANCEL/NO.
The MD Deck – Playback
Playing the MD tracks repeatedly
— Repeat Play
You can repeat a single track or all the tracks on a disc.
1 / u
–+
( P p |
REPEAT |
=+
( |
P |
p + |
= |
+ |
– |
|
– |
+ |
Press REPEAT during play until “REPEAT” or “REPEAT 1” appears.
MD |
LEVELSYNC |
TRACK |
REPEAT DBFB |
M D 1 |
1 m 3 5 s |
|
|
REPEAT: For all the tracks on the current MD.
REPEAT 1*: For a single track only.
*You cannot repeat a single track during Shuffle Play and Program Play.
To cancel Repeat Play
Press REPEAT until “REPEAT” or “REPEAT 1” disappears.
26
Playing the MD tracks in random order
–– Shuffle Play
You can play the tracks in random order.
1 |
|
|
1 / u |
|
|
|
2 |
||
3 |
– |
+ |
||
|
||||
( P |
p |
|
MD p
=+
MD +
( |
P |
p + |
= |
+ |
– |
–+
1Press FUNCTION repeatedly until “MD” appears, then insert an MD.
2Press PLAY MODE repeatedly until “SHUFFLE” appears in stop mode.
MD |
LEVELSYNC |
|
|
SHUFFLE |
DBFB |
M D 1 7 |
7 2 m 3 1 s |
|
|
|
|
3 Press MD (.
Shuffle Play starts. “J” appears, and all the tracks play in random order.
To cancel Shuffle Play
Press MD p to stop the Shuffle Play, then press PLAY MODE repeatedly until “SHUFFLE” disappears.
Tip
To skip tracks, press MD +.
Programming the MD tracks
–– Program Play
You can make a program of up to 25 tracks in the order you want them to be played.
1 |
|
|
1 / u |
|
|
|
|
2 |
|
6 |
|
– |
+ |
|
|
|
|||
( |
P |
p |
|
|
|
|
|||
3 |
|
|
|
MD p |
= |
+ |
|
|
|
|
( |
P |
p + |
|
DISPLAY
= + |
– |
–+
4
1 Press FUNCTION repeatedly until “MD” appears, then insert an MD.
|
|
|
|
|
|
|
|
|
|
|
The |
|
2 Press PLAY MODE repeatedly until |
||||||||||||
MD |
||||||||||||
“PGM” appears in stop mode. |
|
|
|
|||||||||
|
|
|
|
|||||||||
|
|
|
|
|
|
|
|
|
|
|
Deck |
|
3 Press MD + or = repeatedly |
||||||||||||
|
||||||||||||
until the desired track number |
|
|
|
- |
||||||||
appears in the display. |
|
|
|
|||||||||
|
|
|
Playback |
|||||||||
|
|
|
|
|
|
|
|
|
|
|
||
|
|
MD |
LEVELSYNC |
|
|
|
||||||
|
|
|
|
|
TRACK |
PGM |
DBFB |
|
|
|||
|
M D |
7 |
|
4 m 0 9 s |
|
|
||||||
|
|
|
|
|
|
|
|
|
|
|
|
|
|
|
|
|
|
|
|
|
|
|
|||
|
|
|
|
|
|
|
|
|
|
|
|
|
|
|
Selected track |
The playing |
|
||||||||
|
|
number |
time of the |
|
||||||||
|
|
|
|
|
|
selected track |
|
|||||
continued 27
Programming the MD tracks (continued)
4 Press ENTER/YES.
The track is programmed. “Step” appears, followed by the total number of programmed tracks. The number of the last programmed track appears, followed by the total playing time of the program.
|
MD |
LEVELSYNC |
|
|
||||
|
|
|
|
|
|
PGM |
DBFB |
|
M D |
7 |
|
|
4 m 0 9 s |
||||
|
|
|
|
|
|
|
|
|
|
|
|
|
|
|
|
|
|
|
|
|
|
|
|
|||
The number of the |
The total playing |
|||||||
last programmed |
time of the |
|
|
|||||
track |
|
|
|
|
programmed tracks |
|||
5 To program additional tracks, repeat steps 3 and 4.
6 Press MD (.
All the tracks play in the order you selected.
To check the total number of programmed tracks
Press DISPLAY in stop mode. “Step” appears, followed by the total number of programmed tracks. The number of the last programmed track appears, followed by the total playing time of the program.
|
MD |
LEVELSYNC |
|
|
|
||||
|
|
|
|
TRACK |
PGM |
DBFB |
|
||
M D |
1 1 2 8 m 0 8 s |
|
|||||||
|
|
|
|
|
|
|
|
|
|
|
|
|
|
|
|
|
|
|
|
The last number |
|
of the |
|
|
|||||
|
The total playing |
||||||||
programmed tracks |
time of the |
||||||||
|
|
|
|
|
|
programmed tracks |
|||
To check the programmed track number
Press MD + or = repeatedly during the Program Play.
Additional tasks
To |
Do this |
Cancel Program |
Press MD p to stop the |
Play |
Program Play, then press |
|
PLAY MODE repeatedly until |
|
“PGM” and “SHUFFLE” |
|
disappear. |
|
|
Add a track to |
Do steps 3 and 4 with the |
the program |
Program Play stopped. |
|
|
Erase the entire |
Press MD p with the Program |
program |
Play stopped. |
|
|
Tip
The program you made remains after Program Play finishes. To play the same program again, press MD (.
28
Using the MD display
You can check the remaining time and total playing time of an MD.
1 / u
–+
( P |
p |
=+
(P p +
DISPLAY
= + |
– |
–+
Checking the remaining
time of a disc
Press DISPLAY in stop mode.
Each time you press the button, the display changes as follows:
n The total playing time and the track numbers on the MD
n
The remaining recordable time on the MD
(Only for a recordable MD)
n
Disc title on the MD**
** “No Name” appears if no disc title is stored. To label a disc, see page 39.
Checking the remaining
time of a track
Press DISPLAY during play.
Each time you press the button, the display changes as follows:
n The playing time and the track number of the current track
n
The remaining time and the track number of the current track
n
The track title of the current track*
* “No Name” appears if no track title is stored. To label a disc, see page 39.
MD The
- Deck
Playback
29

The MD Deck – Recording
Before you start recording
MDs (Mini Disc) let you digitally record and play music with high quality sound comparable with the sound of CDs. Another feature of MDs is track marking. The track marking feature lets you quickly locate a specific point or easily edit the recorded tracks. However, depending on the source you record, the recording method varies. Also, the way the track numbers are recorded differs depending on the source.
When the source you record from is:
• This system’s CD player
–The digital signal from the CD is recorded as it is (digital recording).*
–Track numbers are automatically marked as on the original CD.
•This system’s tuner and other analog components
–The analog signal is converted to a digital signal and recorded (analog recording).**
–A track number is marked at the beginning of a recording, but when you turn on the Level Sync function (see page 35), track numbers are automatically marked in sync with the level of the input signal.
*For details on the limitations for digital recording, see page 54.
**This signal is converted because these systems do not use digital signals.
Note on MD track numbers
On an MD, the track number (track sequence), track start and end point information, etc., are recorded in the TOC* area independent of the sound information. You can edit recorded tracks quickly by modifying the TOC information.
* TOC: Table Of Contents
After recording
/Press MD 6 to remove the MD or press 1/u to turn off the system power.
“TOC” starts lighting or flashing. The MD recording is complete only after the recording information is entered to MD.
Note
The MD recording is complete only after all the recording information is entered to TOC at which point TOC stops flashing and goes out. Be careful not to disconnect the power cord or move the system before this point. Before disconnecting the power cord, do the following:
–Remove the MD.
–Press 1/u to turn off the system.
Protecting a recorded MD
•To protect a recorded MD, slide the tab on the side of the MD to open the slot.
In this position, the MD cannot be recorded on. To record on the MD, slide the tab to close the slot.
Tab
Slide the tab
•If the MD is record protected, “MD Protected” appears in the display and the MD cannot be recorded on. Slide the tab to closed position reinsert the MD and try again.
30
 Loading...