


 Loading...
ELECTRONIC CASH REGISTER
MODEL
XE-A137
XE-A147
FULL DETAILED INSTRUCTION MANUAL

CAUTION:
The cash register should be securely fitted to the supporting platform to avoid instability when the drawer is open.
CAUTION:
The socket-outlet shall be installed near the equipment and shall be easily accessible.
VORSICHT:
Die Netzsteckdose muß nahe dem Gerät angebracht und leicht zugänglich sein.
ATTENTION:
La prise de courant murale devra être installée à proximité de l’équipement et devra être facilement accessible.
AVISO:
El tomacorriente debe estar instalado cerca del equipo y debe quedar bien accesible.
VARNING:
Det matande vägguttaget skall placeras nära apparaten och vara lätt åtkomligt.
LET OP:
Het stopcontact dient in de buurt van de kassa en gemakkelijk toegangbaar te zijn.
CAUTION:
For a complete electrical disconnection pull out the AC adapter.
VORSICHT:
Zur vollständigen elektrischen Trennung vom Netz den AC Adapter.
ATTENTION:
Pour obtenir une mise hors-circuit totale, débranchez l’adaptateur secteur.
AVISO:
Para una desconexión eléctrica completa, desenchufar el adaptador de CA.
VARNING:
För att helt koppla från strömmen, dra ut nätadaptern.
LET OP:
Maak de netspanningsadapter los om de stroomtoevoer volledig uit te schakelen.

INTRODUCTION
Thank you very much for your purchase of the SHARP Electronic Cash Register, Model XE-A137/XE-A147. Please read this manual carefully before operating your machine in order to gain full understanding of functions and features.
Please keep this manual for future reference. It will help you if you encounter any operational problems.
CAUTION!
Never install the batteries into the cash register before initializing it. Before you start operating the cash register, you must first initialize it, then install three new alkaline batteries LR6 (“AA” size) on the register. Otherwise, distorted memory contents and malfunction of the cash register will occur. For this procedure, please refer to pages 7 to 8.
IMPORTANT
•Be very careful when removing and replacing the printer cover, as the cutter mounted on it is very sharp.
•Install the cash register in a location not subject to direct sunlight, unusual temperature changes, high humidity, splashing water or dust and sand.
Installation in such locations could cause damage to the cabinet, the electronic components and other precision components.
•Never operate the register with wet hands.
The water could seep into the interior of the register and cause component failure.
•When cleaning your register, use a dry, soft cloth. Never use solvents, such as benzine and/or thinner.
The use of such chemicals will lead to discoloration or deterioration of the cabinet.
•The register plugs into any standard wall outlet (official (nominal) voltage).
Other electrical devices on the same electrical circuit could cause the register to malfunction.
•For protection against data loss, please install three alkaline batteries LR6 (“AA” size) after initializing the cash register. When handling the batteries, please observe the following:
Incorrectly using batteries can cause them to burst or leak, possibly damaging the interior of the cash register.
•RISK OF EXPLOSION IF BATTERY IS REPLACED BY AN INCORRECT TYPE. DISPOSE OF USED BATTERIES ACCORDING TO THE INSTRUCTIONS.
•Be sure that the positive (+) and negative (–) poles of each battery are facing in the proper direction for installation.
•Never mix batteries of different types.
•Never mix old batteries and new ones.
•Never leave dead batteries in the battery compartment.
•Remove the batteries if you do not plan to use the cash register for long periods.
•Should a battery leak, clean out the battery compartment immediately, taking care to avoid letting the battery fluid come into direct contact with your skin.
•For battery disposal, follow the corresponding law in your country.
•For complete electrical disconnection, disconnect the AC adapter.
•Be sure to use the attached AC adapter. Otherwise, an electric shock or fire may be caused.
1

CONTENTS
INTRODUCTION............................................................................................................................................ |
1 |
|
IMPORTANT.................................................................................................................................................. |
1 |
|
CONTENTS.................................................................................................................................................... |
2 |
|
PARTS AND THEIR FUNCTIONS................................................................................................................. |
4 |
|
1 |
External View........................................................................................................................................ |
4 |
2 |
Printer.................................................................................................................................................... |
4 |
3 |
Mode Switch and Mode key.................................................................................................................. |
5 |
4 |
Keyboard............................................................................................................................................... |
5 |
5 |
Display................................................................................................................................................... |
6 |
6 |
Drawer Lock Key................................................................................................................................... |
6 |
PREPARING THE CASH REGISTER............................................................................................................ |
7 |
|
1 |
Initializing the Cash Register................................................................................................................. |
7 |
2 |
Installing Batteries................................................................................................................................. |
8 |
3 |
Installing a Paper Roll........................................................................................................................... |
9 |
HELP FUNCTION........................................................................................................................................ |
10 |
|
BASIC FUNCTION PROGRAMMING.......................................................................................................... |
11 |
|
1 |
Abbreviations and Terminology............................................................................................................ |
11 |
2 |
Prior to Programming........................................................................................................................... |
11 |
3 |
Language Selection............................................................................................................................. |
13 |
4 |
Date and Time Programming.............................................................................................................. |
13 |
5 |
Tax Programming................................................................................................................................ |
14 |
6 |
Department Programming................................................................................................................... |
15 |
7 |
PLU (Price Look-Up) and Subdepartment Programming.................................................................... |
18 |
8 |
Text Programming............................................................................................................................... |
20 |
BASIC SALES ENTRY (Example).............................................................................................................. |
22 |
|
1 |
Basic Sales Entry................................................................................................................................ |
22 |
2 |
PLU Sales Entry.................................................................................................................................. |
23 |
CORRECTION............................................................................................................................................. |
24 |
|
1 |
Cancellation of the Numeric Entry....................................................................................................... |
24 |
2 |
Correction of the Last Entry (direct void)............................................................................................. |
24 |
3 |
Correction of the Next-to-last or Earlier Entry (indirect void)............................................................... |
25 |
4 |
Subtotal Void....................................................................................................................................... |
25 |
5 |
Correction after Finalizing a Transaction (Void mode)........................................................................ |
26 |
FULL SALES REPORT (X or Z REPORT).................................................................................................. |
27 |
|
OTHER BASIC SALES ENTRIES............................................................................................................... |
29 |
|
1 |
Additional Information for BASIC SALES ENTRY............................................................................... |
29 |
2 |
Error Warning...................................................................................................................................... |
29 |
3 |
Starting Cash Memory (SCM) Entry.................................................................................................... |
30 |
4 |
Item Entries......................................................................................................................................... |
31 |
5 |
Display of Subtotal.............................................................................................................................. |
34 |
6 |
Finalization of Transaction................................................................................................................... |
35 |
7 |
Computation of VAT (Value Added Tax)/Tax........................................................................................ |
37 |
OPTIONAL FEATURES............................................................................................................................... |
39 |
|
1 |
Auxiliary Entries................................................................................................................................... |
39 |
2 |
Auxiliary Payment Treatment.............................................................................................................. |
40 |
3 |
Special Printing Function..................................................................................................................... |
42 |
PRIOR TO PROGRAMMING....................................................................................................................... |
43 |
|
AUXILIARY FUNCTION PROGRAMMING.................................................................................................. |
45 |
|
1 |
Miscellaneous Key Programming........................................................................................................ |
45 |
2 |
Other Text Programming..................................................................................................................... |
49 |
2
ADVANCED FUNCTION PROGRAMMING................................................................................................. |
52 |
|
1 |
Register Number and Consecutive Number Programming................................................................. |
52 |
2 |
Various Function Selection Programming 1........................................................................................ |
53 |
3 |
Various Function Selection Programming 2........................................................................................ |
61 |
4 |
EURO Programming........................................................................................................................... |
63 |
5 |
Reading Stored Programs................................................................................................................... |
66 |
READING (X) AND RESETTING (Z) OF SALES TOTALS......................................................................... |
68 |
|
1 |
Summary of Reading (X) and Resetting (Z) Reports.......................................................................... |
68 |
2 |
Daily Sales Totals................................................................................................................................ |
69 |
EJ REPORT READING AND RESETTING................................................................................................. |
70 |
|
EURO MIGRATION FUNCTION.................................................................................................................. |
71 |
|
SD CARD FUNCTION.................................................................................................................................. |
74 |
|
OPERATOR MAINTENANCE...................................................................................................................... |
76 |
|
1 |
In Case of Power Failure..................................................................................................................... |
76 |
2 |
In Case of Printer Error....................................................................................................................... |
76 |
3 |
Cautions in Handling the Printer and Recording Paper....................................................................... |
76 |
4 |
Replacing the Batteries....................................................................................................................... |
77 |
5 |
Replacing the Paper Roll..................................................................................................................... |
78 |
6 |
Removing a Paper Jam....................................................................................................................... |
79 |
7 |
Cleaning the Printer (Printer Head / Sensor / Roller).......................................................................... |
79 |
8 |
Removing the Drawer.......................................................................................................................... |
80 |
9 |
Opening the Drawer by Hand.............................................................................................................. |
80 |
BEFORE CALLING FOR SERVICE............................................................................................................ |
81 |
|
SPECIFICATIONS........................................................................................................................................ |
82 |
|
3

PARTS AND THEIR FUNCTIONS
1 External View
Option battery shutter  (for the XE-A1BT)
(Only for the XE-A147)
Mode switch
Display
Printer cover
Keyboard
Drawer
Cheque slot
Drawer lock
Plug the AC adapter connector into the AC adapter jack, then plug the AC adapter into the wall outlet.
AC adapter
AC adapter connector
AC adapter jack
RS-232 connector (Only for the XE-A147)
SD card slot
(Important: For SD type card SDHC 4GB to 32GB)
Reset switch (Only for the XE-A147)
DO NOT push the reset switch unless instructed to do.
Doing so may damage or delete the data.
2 Printer
The printer is a receipt (one station) type thermal printer, and therefore it does not require any type of ink ribbon or cartridge. The average life of the printer is approximately 5 million lines.
When removing the printer cover, lift up its rear.
When installing the printer cover, hook it on the pawls on the cabinet and shut it.
Caution:The paper cutter is mounted on the printer cover. Be careful not to cut yourself.
Sensor |
Printer head |
Roller
NOTE
Do not attempt to remove the paper with the print roller arm in the hold position. This may result in damage to the printer and printer head.
Print roller arm
4

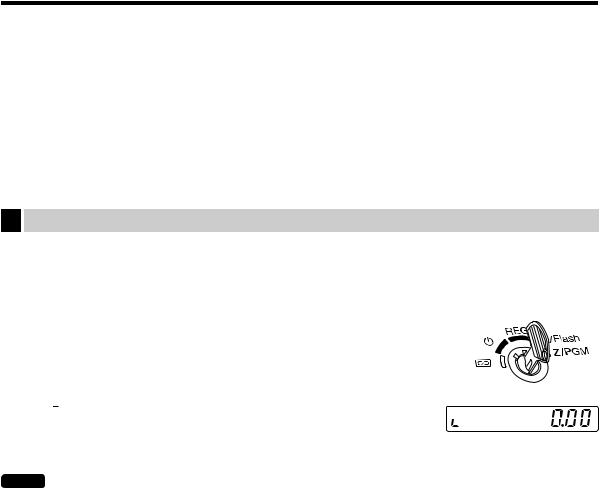
3 Mode Switch and Mode key
Insert the mode key (the same key as drawer lock key) into the mode switch and move the key to get an appropriate mode.
|
|
|
|
|
|
|
|
|
|
|
: |
Turns the display off. No operations are possible. |
|
|
|
|
|
|
|
|
|
|
|||
|
|
|
|
|
|
|
|
|
|
|||
|
|
|
|
|
|
|
|
|
REG: |
Permits transaction entry. |
||
|
|
|
|
|
|
|
|
|
||||
|
|
|
|
|
|
|
|
|
: |
Permits correction after finalizing a transaction. |
||
|
|
|
|
|
|
|
|
|
X/Flash: |
Permits printing of sales reports and displaying the flash reports. |
||
|
|
|
|
|
|
|
|
|
||||
Mode key |
Z/PGM: |
Permits printing and resetting of sales reports and programming. |
||||||||||
|
|
|
|
|
|
|
|
|
|
|
|
|
|
|
|
|
|
|
|
|
|
|
|
|
|
|
|
|
|
|
|
|
|
|
|
|
|
|
|
|
|
|
|
|
|
|
|
|
|
|
|
|
|
|
|
|
|
|
|
|
|
|
|
|
|
|
|
|
|
|
|
|
|
|
|
|
|
|
|
|
|
|
|
|
|
|
|
|
|
|
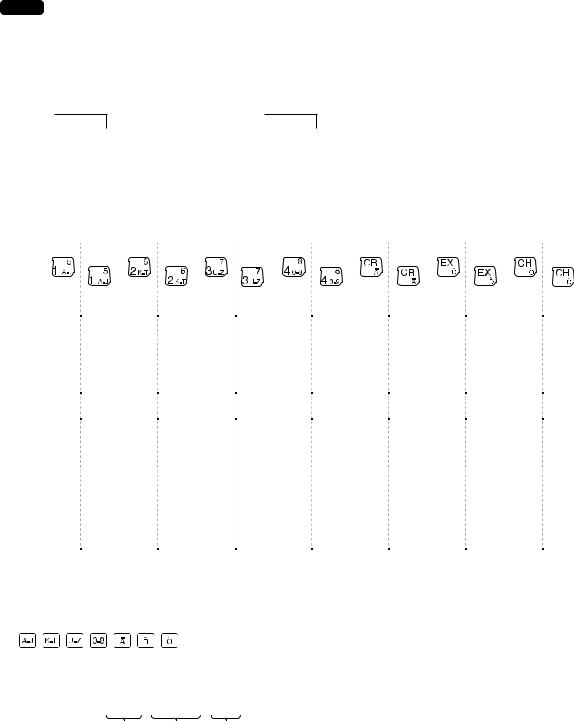
4Keyboard
■Keyboard layout
■ Key names
FPaper feed key
@Multiplication/ receipt switch key
lClear key
0 : Numeric keys
1 9
9
HShift key
p |
PLU/Subdepartment |
|
Total/Amount tender/ |
key |
A No sale key |
||
! $ Department keys |
v |
Void key |
|
c |
Credit key |
E Escape/Help key |
|
V |
Foreign currency |
% |
Percent key |
|
exchange key |
|
|
|
Non-add code/Time |
t |
Paid-out/Value added |
s display/Subtotal key |
tax key |
||
C |
Cheque key |
R |
Receipt print/Received- |
on-account key |
|||
5
5Display
■Operator display
Your cash register is equipped with a front LED (Light-Emitting Diode) display that affords easy visibility of 9 digits for the operator during transaction.
PLU/Subdepartment code Department code Repeat
|
|
|
|
|
|
|
Receipt off (“.”) |
Shift for the character entry (“_”) |
|
|
|
|
DC for the character entry (“_”) |
|
Amount: |
Appears in the far-right eight (max.) positions. When the amount is negative, the minus symbol “-” |
|||
appears before the amount.
Number of repeats for repetitive registrations:
The number of repeats is displayed, starting at “2” and incremental with each repeat. When you have registered ten times, the display will show “0”. (2 → 3 ..... 9 → 0 → 1 → 2 ... )
Receipt function status:
The indicator “.” appears in the receipt off position when the receipt function is in the OFF status.
Time: Appears in the first to fifth positions (using 24-hour format) in the REG or  mode. Press the skey to display the time.
■ Machine state symbols

 : Appears during programming.
 : Appears with an error code when an error is detected. For the details of error codes, please refer to “Error code table”.

 : Appears when the subtotal is displayed or when the amount tendered is smaller than the sales amount.
 : Appears when the Vkey is pressed to calculate a subtotal in foreign currency.
 : Appears when a transaction is finalized by pressing the A, Cor ckey.
 : Appears when the change due amount is displayed.


 : Appears in the far-left three positions at the timing of key entry when the electronic journal (EJ) memory is full. (Depending on programming.)
 : Appears when the voltage of the installed batteries is under the required level. You must replace with new ones within two days. Refer to page 77 for details.
 : Appears when the batteries are not installed, or the installed batteries are dead. You must replace with new ones immediately. Refer to page 77 for details.
 : May appear right below the seventh and eighth places at the timing of finalization of a transaction when the electronic journal (EJ) memory is nearly full.


 : Appears when programmed date (and time) for EURO modification operation has come.


 : Appears when the paper is not set or out.
6 Drawer Lock Key
This key (the same key as mode key) locks and unlocks the drawer. To lock it, turn 90 degrees counterclockwise. To unlock it, turn 90 degrees clockwise.
6
PREPARING THE CASH REGISTER
Unpack the cash register and make sure all accessories are included. For details of accessories, please refer to “SPECIFICATIONS” section.
For installing the cash register, find a stable surface near an AC outlet where the cash register will not subject to water sources or direct sunlight.
For preparing the cash register, please follow the three steps shown below; “1 Initializing the Cash Register” on this page, “2 Installing Batteries” on page 8, and “3 Installing a Paper Roll” on page 9.
1 Initializing the Cash Register
In order to operate the cash register properly, you must initialize it before operating for the first time. Follow this procedure.
1. Insert the mode/drawer lock key into the mode switch and turn it to the REG position.
2. Insert the AC adapter into the AC outlet.
IMPORTANT: This operation must be performed without batteries installed.
3.The cash register has now been initialized. The register display will show “0.00” with “  ”.
”.
NOTE If this does not happen when inserting the AC adapter, then the initialization has not been done successful. (This will occur when the voltage is high because you operated the cash register before starting initialization.) Wait at least one minute after pulling out the AC adapter and reinsert the AC adapter into the AC outlet only after this waiting time has passed.
7
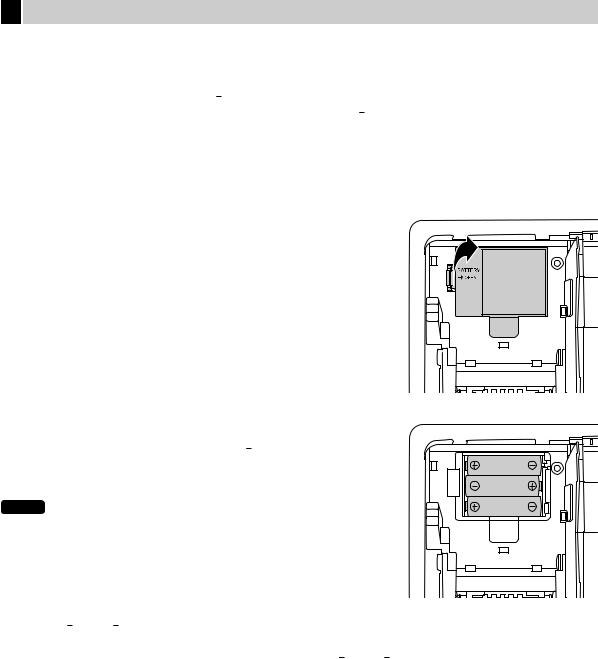
2 Installing Batteries
Three new alkaline batteries LR6 (“AA”size) must be installed in the cash register to prevent the data and userprogrammed settings from being erased from the memory, when the AC adapter plug is accidentally disconnected or in case of power failure. Once installed, the batteries will last approximately one year before needing replacement. At this time, the “  ” symbol will appear on the display to indicate the batteries are low and must be replaced within two days. If the no battery symbol “
  ” appears, you must install the batteries at once. Install three new alkaline batteries LR6 (“AA”size) according to the procedure shown below with the AC adapter plug connected and set the mode switch to the REG position:
1.Push the printer cover forward and detach it.
Be careful with the paper cutter, so as not to cut yourself.
2.Open the battery compartment cover next to the paper roll cradle.
3.Install three new alkaline batteries LR6 (“AA”size) as per the diagram. When the batteries are properly installed “  ” on the display will
disappear.
4. Close the battery compartment cover.
NOTE • Be sure to observe precautions shown on page 1 when handling batteries.
• If you press a key by mistake, an error symbol “


 ” may be displayed. Press the lkey to clear the symbol after installing paper rolls.
Caution: “  ” or “
  ” can be displayed only when the cash register is being turned on. Please be advised that when the cash register is being turned off for a long time, the data in memory
might be cleared without the warning symbols: “  ” or “
  ”.
”.
8
3 Installing a Paper Roll
The register can print receipts. For the printer, you must install the paper roll provided with the register.
NOTE Install the paper roll in the printer. Be careful then to set the roll and cut the paper end correctly.
|
(How to set the paper roll) |
|
(How to cut the paper end) |
|
|
To the printer |
To the printer |
|
|
|
|
|
|
|
|
Incorrect |
Correct |
Correct |
Incorrect |
1. |
Remove the printer cover. |
|
Print roller arm |
|
2. |
Lift up the print roller arm. |
|
||
|
|
|
||
3. Set the paper correctly in the paper roll cradle as per the diagram.
NOTE Before placing a new paper roll in the paper roll cradle, cut off the pasted (taped) part of the paper and confirm that the cut end of the paper is straight.
4. Feed the end of the paper along with the paper positioning guides as per the diagram.
5. While holding down the paper, slowly close the print roller arm, and push down the arm until you hear a click locking the arm.
NOTE If the print roller arm is not securely locked, printing is not done right. If this problem occurs, open the arm, and close the arm
as instructed above.
Paper positioning guides
6. Cut off the excess paper and replace the printer cover.
7. Press the Fkey to make sure the paper end comes out of the printer cover and clean paper appears.
NOTE If the paper end does not come out, open the printer cover, and pass the paper end between the paper cutter and the paper guide of the printer cover, and replace the printer cover.
9
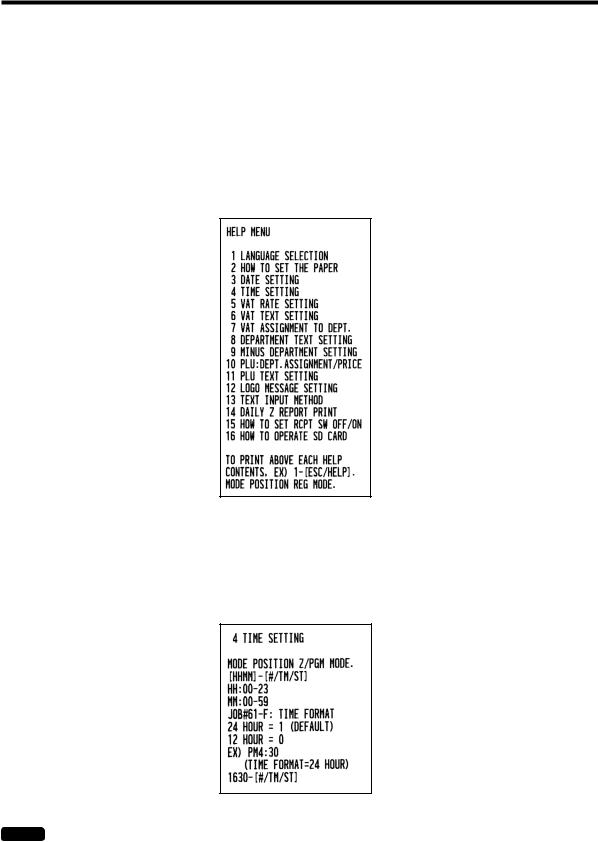
HELP FUNCTION
The help function allows you to print guidance messages for basic programming procedures of the cash register. This function is available in any mode switch position other than  ”. For more details on each programming, refer to “BASIC FUNCTION PROGRAMMING” on pages 11 to 21.
■■Printing the help menu
Press the Ekey to print the help menu. This menu provides a list of the programming procedures for which you can print the guidance messages.
Key operation |
|
E
■■Printing guidance messages
By reference to the help menu above, press the corresponding numeric key and then the Ekey to print the guidance message for each programming procedure.
Key operation |
|
4 E
Sample print of TIME SETTING
NOTE The Ekey works as the error escape function during a transaction. Finalize the transaction to use the key as the help function.
10

BASIC FUNCTION PROGRAMMING
Before starting sales entries, you must first program necessary items so the cash register suits your sales needs. In this manual, there are three sections, BASIC FUNCTION PROGRAMMING (pages 11-21) where required items must be programmed, AUXILIARY FUNCTION PROGRAMMING (pages 45-51) for using all available keyboard keys and ADVANCED FUNCTION PROGRAMMING (pages 52-67) where various optional programming features are provided. Find the required functions and program them accordingly.
1 Abbreviations and Terminology
Dept.: |
Department; a category for merchandise classifications. Every sales item should belong to a |
|
department. |
PLU: |
Price Look Up; a category for merchandise classifications. PLUs are used to call up preset prices by a |
|
code entry. |
VAT: |
Value Added Tax |
X report: Report to read sales data
Z report: Report to read and reset sales data
Receipt ON/OFF function: To print or not to print receipts in the REG mode.
2Prior to Programming
■Procedure for programming
1.Check to see whether a paper roll is present in the machine. If there is not enough paper on a roll, replace it with a new one (refer to “Replacing the Paper Roll” in “OPERATOR MAINTENANCE” chapter for the replacement).
2.Put the mode key in the mode switch and turn it to the Z/PGM position.
3.Program necessary items into the cash register.
Every time you program an item, the cash register will print the setting. Please refer to print samples in each section.
4.If necessary, issue programming reports for your reference.
NOTE • On the key operation example shown in the programming details, numbers such as “221012” indicates the parameter which must be entered using the corresponding numeric keys.
•Asterisks in the tables shown in the programming details indicate default settings.
■Description of special keys
0, 1to 9 Used for numerical number entry.
:Used for character code entry.
lUsed for cancel entry.
sUsed for data decision entry.
AUsed for programming termination entry.
11
■■Guidance for text programming
The register allows you to program texts for department item names, PLU/subdepartment item names, logo messages, foreign and domestic currency symbols, and function texts.
There are two ways for programming text; using character keys on the keyboard or entering character codes with numeric keys on the keyboard.
NOTE For details of entering character codes with numeric keys, please refer to “PRIOR TO PROGRAMMING” section on pages 43-44.
Character entry sequence
Capital letter selection
 W
W  Assigned number (0 to 9)
  H
H  Character entry
Double-size character |
Small letter selection |
Assigned number and character table |
|
|
|
|
|
|
|
|
|
||||||
|
|
|
|
|
|
|
|
|
|
|
|
|
|
|
|
|
|
|
H |
|
H |
|
H |
|
H |
|
H |
|
H |
|
H |
|
|
|
|
|
|
|
|
|
|
|
|
|
|
|
|
|
0 |
A |
a |
K |
k |
U |
u |
0 |
0 |
Ä |
ä |
Ď |
ď |
Ò |
ò |
|
|
|
|
|
|
|
|
|
|
|
|
|
|
|
|
|
1 |
B |
b |
L |
l |
V |
v |
1 |
1 |
Ö |
ö |
È |
è |
Ó |
ó |
|
|
|
|
|
|
|
|
|
|
|
|
|
|
|
|
|
2 |
C |
c |
M |
m |
W |
w |
2 |
2 |
Ü |
ü |
É |
é |
Ô |
ô |
|
|
|
|
|
|
|
|
|
|
|
|
|
|
|
|
|
3 |
D |
d |
N |
n |
X |
x |
3 |
3 |
À |
à |
Ê |
ê |
Õ |
õ |
|
|
|
|
|
|
|
|
|
|
|
|
|
|
|
|
|
4 |
E |
e |
O |
o |
Y |
y |
4 |
4 |
Á |
á |
Ë |
ë |
Š |
š |
|
|
|
|
|
|
|
|
|
|
|
|
|
|
|
|
|
5 |
F |
f |
P |
p |
Z |
z |
5 |
5 |
 |
â |
Ì |
ì |
Ť |
ť |
|
|
|
|
|
|
|
|
|
|
|
|
|
|
|
|
|
6 |
G |
g |
Q |
q |
% |
% |
6 |
6 |
à |
ã |
Í |
í |
Ù |
ù |
|
|
|
|
|
|
|
|
|
|
|
|
|
|
|
|
|
7 |
H |
h |
R |
r |
+ |
+ |
7 |
7 |
Å |
å |
Î |
î |
Ú |
ú |
|
|
|
|
|
|
|
|
|
|
|
|
|
|
|
|
|
8 |
I |
i |
S |
s |
- |
- |
8 |
8 |
Č |
č |
Ñ |
ñ |
Û |
û |
|
|
|
|
|
|
|
|
|
|
|
|
|
|
|
|
|
9 |
J |
j |
T |
t |
! |
! |
9 |
9 |
Ç |
ç |
Ň |
ň |
Ž |
ž |
|
|
|
|
|
|
|
|
|
|
|
|
|
|
|
|
HUsed for the small letter entry.
SUsed for a space entry.
BUsed to delete the last character or figure.
WUsed for the double-size character entry.
, , , , , , |
Used for character entry. |
[ Example ] For entry character “MnH”
2 3 H
3 H 7
7  M n H
M n H
12

3 Language Selection
|
|
|
|
|
|
|
|
|
|
To set "0" |
|
|
|
|
|
s |
|
88 |
|
@ |
|
|
*Language (0 - 4) |
|
|
A |
|||
|
|
|
|
|
|
|||||||||
|
|
|
|
|
|
|||||||||
*Language: 0: English |
1: German |
|
2: French |
|
3: Spanish |
4: Swedish |
||||||||
|
By default, English is set. |
|
|
|
|
|
|
|
|
|
|
|
|
|
|
Key operation example |
|
|
|
|
|
|
|
|
|||||
s88 @
0 A
Caution: When you change the language, the texts such as logo messages and function texts, which you programmed, will be reset to the default settings. The language selection must be made before programming logo messages and function texts.
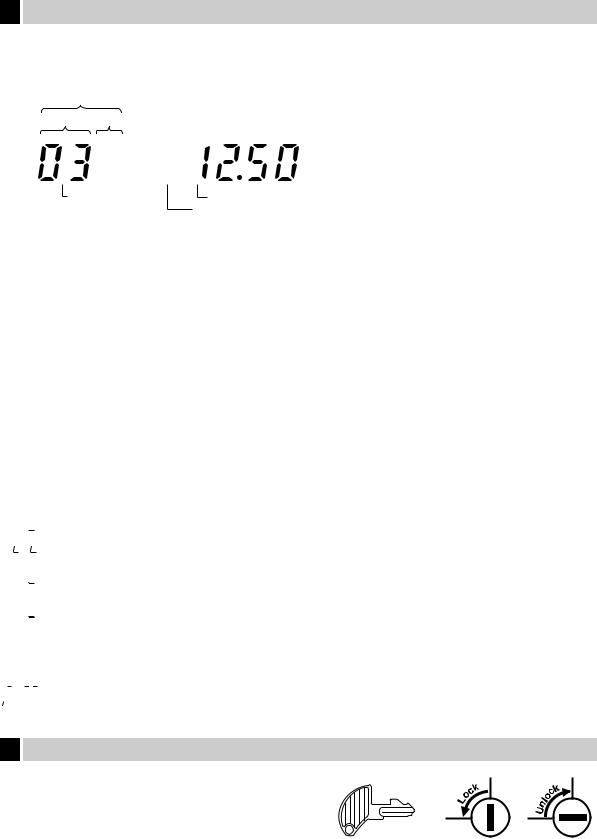
4Date and Time Programming
■Date
For setting the date, enter the date in 6 digits using the day-month-year (DD/MM/YY) format, then press the skey.
Date(DD/MM/YY) |
|
s |
|||
|
|||||
Key operation example |
|
|
|||
221012 |
|
|
|
|
|
(22 October, 2012) |
|
|
|
Date |
|
s
■ Time
For setting the time, enter the time in 4 digits using the 24-hour format. For example, when the time is set to 2:30 AM, enter 230; and when it is set to 2:30 PM, enter 1430.
Time(max. 4 digits in 24-hour format)  s
s
Key operation example |
|
1430
s
Time
13
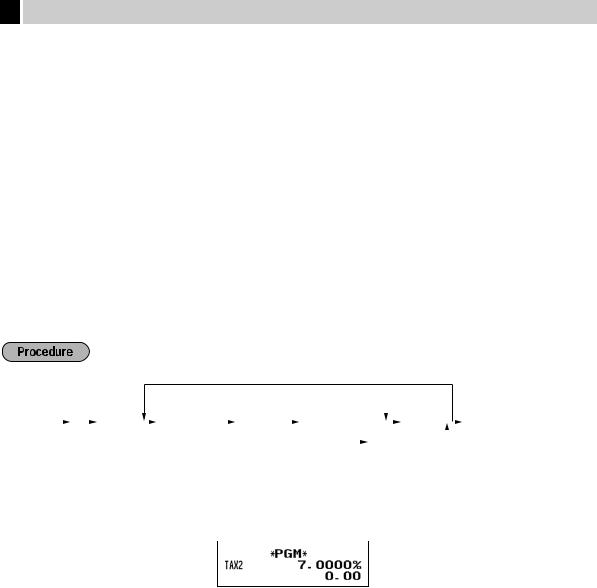
5 Tax Programming
If you program the VAT/tax, the cash register can calculate the sales tax. In the VAT system, the tax is included in the price you enter in the register, and the tax amount is calculated when tendered according to the VAT rate programmed. In the tax system, the tax is calculated when tendered according to the tax rate programmed, and added to the price. The cash register can provide totally 6 kinds of VAT/tax systems (automatic VAT1-4, automatic tax 1-4, manual VAT 1-4, manual VAT 1, manual tax 1-4, and automatic VAT1 and automatic tax 2-4 systems) and 4 kinds of rates. By default, the cash register is pre-programmed as automatic VAT1-4 system.
When you program tax rate(s) and taxable status for each department (by default, VAT1/tax1 is set to taxable.), tax will be automatically added to sales of items assigned to the department according to the programmed tax status for the department and the corresponding tax rate(s).
For details of the tax systems, refer to “Computation of VAT (Value Added Tax)/tax” section. To change the tax system, please refer to “Other programming” of “Various Function Selection Programming 1” section (Job code 69).
■ Tax rate programming
The percent rate specified here is used for tax calculation on taxable subtotals.
To program other kind of tax
To program “0.0000”
s |
|
9 |
|
@ |
|
Tax(1numberto 4) |
|
@ |
|
|
*Tax rate |
|
|
|
|
|
s |
|
|
A |
||||||
|
|
|
|
|
|
|
|
|
|
|
|
|
|
|
||||||||||||
|
|
|
|
|
|
|
|
v |
|
|
|
|||||||||||||||
|
|
|
|
|
|
|
|
|
|
|
|
|
||||||||||||||
*Tax rate: YYYYYYY |
|
|
To delete a tax rate |
|
|
|||||||||||||||||||||
|
|
|
|
|
|
|
|
|
|
|
|
|
||||||||||||||
|
|
|
|
|
|
|
|
|
|
|
|
|
|
|
|
|
|
|
|
|
|
|
|
|
|
|
|
|
|
|
|
|
|
Tax rate=0.0000 to 100.0000 |
|
|
|
|
|
|
|
|
|
|
|
|
|
||||||
|
|
|
|
|
|
|
|
|
|
|
|
|
|
|
|
|
|
|
||||||||
Key operation example |
|
|
|
|
|
|
|
|
|
|
||||||||||||||||
s9 @
2 @
0070000
s A
14
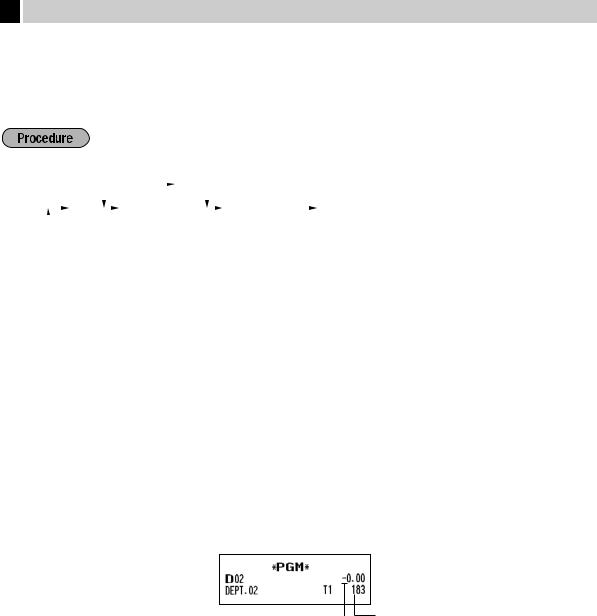
6 Department Programming
Merchandise can be classified into a maximum of 8 departments. Items sold using the department keys can later be printed on a report shown as the quantities sold and sales amounts classified by department. The data is useful for making purchasing decisions and other store operations.
■ Department status
|
|
|
|
|
|
|
For dept. 5 through 8 |
|
|
||||||||||
|
|
|
To set all zeros |
|
H |
|
|
|
|
||||||||||
|
|
|
|
|
|
|
@ |
|
|
|
|
|
|
|
|
|
|
A |
|
|
|
|
|
ABC |
|
|
|
|
|
Dept. key |
|
|
|
||||||
|
|
|
|
|
|
|
|
|
|
|
|
|
|
|
|||||
|
|
|
|
|
|
|
|
|
|
|
|
|
|
|
|||||
|
|
|
|
|
|
|
|
|
|
|
|
|
|
|
|
|
|
||
|
|
|
|
|
|
|
|
|
|
|
|
|
|
|
|
||||
|
|
|
|
To program another department |
|
|
|||||||||||||
Item: |
|
|
|
|
|
|
|
|
|
|
|
|
Selection: |
Entry: |
|||||
A |
|
SICS / Normal |
|
|
|
|
|
|
SICS |
|
1 |
||||||||
|
|
|
|
|
|
|
|
|
|
|
|
|
|
|
Normal* |
|
0 |
||
B |
|
Sign |
|
|
|
|
|
|
|
|
|
|
Negative department |
1 |
|||||
|
|
|
|
|
|
|
|
|
|
|
|
|
|
|
Positive department* |
0 |
|||
C |
|
Type of unit price entry |
|
|
|
|
|
|
Open and preset |
3 |
|||||||||
|
|
|
|
|
|
|
|
|
|
|
|
|
|
|
Preset only |
2 |
|||
|
|
|
|
|
|
|
|
|
|
|
|
|
|
|
Open only* |
1 |
|||
|
|
|
|
|
|
|
|
|
|
|
|
|
|
|
Inhibit department key |
0 |
|||
* Default settings |
|
|
|
|
|
|
|
|
|
|
|
|
|
|
|
||||
SICS (Single Item Cash Sale)
• If an entry of a department programmed for SICS is made first, the sale will be finalized as a cash sale as soon as the department key is pressed. If the entry is made after entering a department not programmed for SICS, it does not finalize and result in a normal sale.
Key operation example |
|
113 @
"A

 Type of unit price entry
SICS / Normal
Sign
15
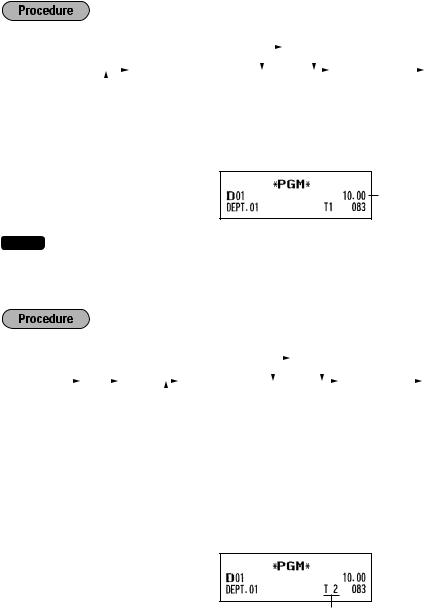
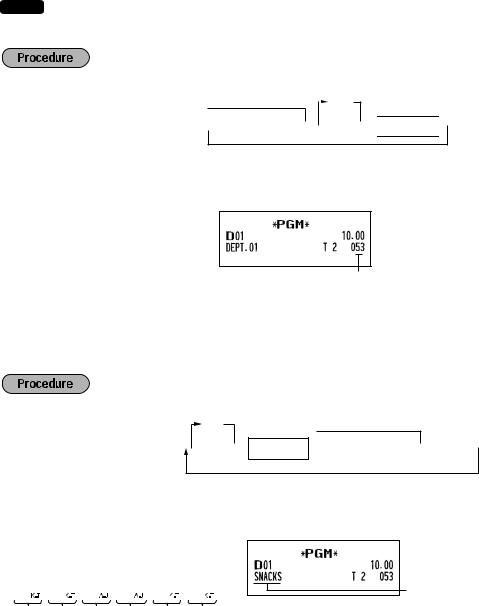
■■Preset unit price
|
|
|
|
|
|
For dept. 5 through 8 |
|
|
|
|||||||||
|
|
|
To program zero |
|
|
H |
|
|
|
|
|
A |
||||||
|
|
|
|
|
|
|
|
|
|
|||||||||
|
|
|
|
|
|
|
|
|
|
|
|
|
|
|
|
|
|
|
|
|
|
|
Unit price (max. 8 digits) |
|
|
|
|
|
|
|
Dept. key |
|
|
||||
|
|
|
|
|
|
|
|
|
|
|
|
|
||||||
|
|
|
|
|
|
|
|
|
|
|
|
|
||||||
|
|
|
|
|
|
|
|
|
|
|
|
|
|
|
|
|
|
|
|
|
|
To program another department |
|
|
|
|
|
|
|
|
|
|
|
||||
Key operation example |
|
|
|
|
|
|
|
|
||||||||||
1000 !
A
Unit price
NOTE If a department is not programmed to allow the entry of preset unit prices in functional programming, the department is automatically changed to allow the entry of preset unit prices by this programming entry.
■■VAT/tax status
|
|
|
|
|
|
|
|
|
|
|
|
For dept. 5 through 8 |
|
|
|
|||||||||
|
|
|
|
|
|
|
|
To program zero |
|
|
|
|
H |
|
|
|
|
|
|
|||||
|
|
|
|
|
|
|
|
|
|
|
|
|
|
|
|
|
|
|
|
|||||
|
|
|
|
|
|
|
|
VAT/tax status |
|
|
|
|
|
|
|
|
|
|
|
|
|
|||
|
s |
|
20 |
|
@ |
|
|
|
|
|
|
|
|
|
|
Dept. key |
|
|
A |
|||||
|
|
|
|
|
|
|
|
|
|
|
|
|
|
|
||||||||||
|
|
|
|
|
|
|
|
|
|
(1 to 4) |
|
|
|
|
|
|
|
|
|
|
|
|
|
|
|
|
|
|
|
|
|
|
|
|
|
|
|
|
|
|
|
|
|
|
|
|
|
||
|
|
|
|
|
|
|
|
|
|
|
|
|
|
|
||||||||||
|
|
|
|
|
|
|
|
To program another department |
|
|
|
|||||||||||||
|
VAT/tax status |
|
Selection: |
|
Entry: |
|
|
|
||||||||||||||||
|
|
|
|
|
VAT/tax 1* |
1 |
e.g. for this number a VAT/tax rate of 7% is assigned |
|||||||||||||||||
|
|
|
|
|
VAT/tax 2 |
2 |
|
|
|
|
|
|
|
|
|
|
|
|
|
|||||
|
|
|
|
|
VAT/tax 3 |
3 |
|
|
|
|
|
|
|
|
|
|
|
|
|
|||||
|
|
|
|
|
VAT/tax 4 |
4 |
|
|
|
|
|
|
|
|
|
|
|
|
|
|||||
|
|
|
|
|
Non VAT/tax |
0 |
|
|
|
|
|
|
|
|
|
|
|
|
|
|||||
|
Key operation example |
|
|
|
|
|
|
|
|
|
|
|||||||||||||
s20 @
2 !
A
VAT/tax status (VAT/tax 2)
16
■■HALO digits (entry digit limit)
Set the number of allowable digits for the maximum entry amount for each department. The limit is effective for operations in the REG mode.
NOTE To activate this function, the programming (job code 62) “HALO function” must be set “Valid (1)” on page 55.
For dept. 5 through 8
To program zero |
|
H |
|
s 28
28  @
@ HALO (0 to 8)
 Dept. key
  A
A
To program another department
Key operation example |
|
s28 @
5 !
A
HALO (entry digit limit)
■■Department text (item label)
For dept. 5 through 8 |
|
H |
To keep current setting |
s 101
101  @
@ Dept. key
  Character entry
  s
s A (max. 12 characters)
To program another department
Key operation example |
|
s101 @
!
8 3
3 0
0 2
2 0
0 8
8 S N A C K S
Text programmed for dept. 1
s A
(Programming SNACKS for dept.1)
For details of the text entry (“SNACKS”), please refer to the “Guidance for text programming” on page 12.
17
7 PLU (Price Look-Up) and Subdepartment Programming
The PLU function allows speedy key entries whereby a price is automatically called up when a code is entered. The subdepartment is a kind of “open PLU”, which requires you to enter a price after the PLU code is entered. PLU/subdepartment setting for 1 through 200 codes are available.
■ Unit price and associated department assignment
To delete the PLU code
|
|
|
|
|
|
|
|
|
v |
|
|
|
|
|
|
|
|
||||
|
|
|
|
|
|
|
|
|
For dept. 5 through 8 |
|
|
|
|||||||||
|
|
|
|
|
|
To program zero |
|
|
H |
|
|
|
|
|
|
||||||
|
|
|
|
|
|
|
|
|
|
|
|
|
|
||||||||
|
|
|
|
p |
|
|
|
|
|
|
|
|
|
|
|
|
|
Associated |
|
|
A |
|
|
PLU code |
|
|
|
|
Unit price |
|
|
|
|
|
|
|
Dept. key |
|
|
||||
|
|
|
|
|
|
|
|
|
|
|
|
|
|
|
|||||||
|
|
|
|
|
|
|
|
(max. 8 digits) |
|
|
|
|
|
|
|
|
|
|
|||
|
|
|
|
|
|
|
|
|
|
|
|
|
|
|
|
||||||
|
|
|
|
|
|
|
|
|
|
|
|
|
|
|
|
|
|
|
|
|
|
|
|
|
|
|
|
|
To program or delete the following PLU code |
|
|
|
|||||||||||
|
|
|
|
|
|
|
|
|
|
|
|
|
|
|
|
|
|
|
|
|
|
|
|
|
|
To program or delete another PLU code |
|
|
|
|
|||||||||||||
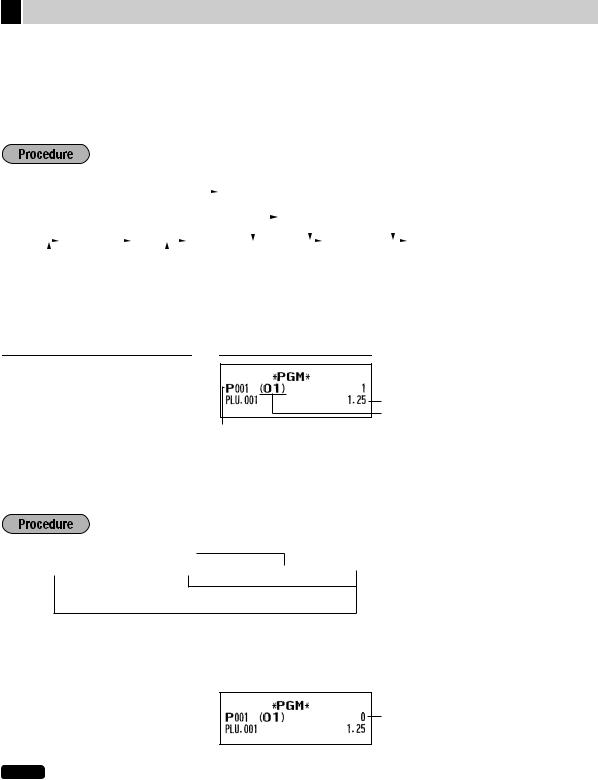
Key operation example
1 p
125 !
A
Unit price Associated dept.
PLU code
■ PLU/subdepartment selection
To program "0"
 PLU code
  p
p *A (0 or 1)
  s
s A
A
To program the following PLU code
To program another PLU code
*A: 0 for subdepartment or 1 for PLU
Key operation example |
|
1 p
0 s PLU/subdept.
A
NOTE When you program the last PLU code, the programming sequence will be complete with a press of the skey.
18
■■PLU text (item label)
To keep current setting
s 102
102  @
@ PLU code
  p
p Character entry
  s
s A
A
(max. 12 characters)
|
|
|
|
|
To program following PLU code |
||
|
|
|
|
|
|
|
|
|
|
|
|
|
To program another PLU code |
||
Key operation example |
|
|
|
|
|||
s102 @ |
|
|
|
|
|
|
|
|
|
|
|
|
|
|
|
1 p |
|
|
|
|
|
|
|
MELON s |
|
|
|
|
|
|
Text |
|
|
|
|
|
|||
|
|
|
|
|
|
||
A |
|
|
|
|
|
|
programmed |
|
|
|
|
|
|
||
|
|
|
|
|
|
for PLU code 1 |
|
(Programming MELON to PLU1) |
|
|
|
|
|
|
|
For details of the text entry (“MELON”), please refer to the “Guidance for text programming” on page 12. (M:2  , E:4
, E:4  , L:1
, L:1  , O:4
, O:4  , N:3
, N:3  )
)
19

8 Text Programming
Please refer to “Guidance for text programming” section as for how to entering characters.
■ Logo messages (6 lines and 30 characters for each line)
The register can print programmed messages on every receipt. On the standard model, a header 3-line and footer 3-line logo message is printed on the receipt. If you want to print in other logo message format, please change the format. For the programming details, refer to “Logo message print format” on page 61.
To keep current setting
s |
|
104 |
|
@ |
|
|
*Line(1 - 6)no. |
|
@ |
|
|
(max.Character30 characters)entry |
|
|
s |
|
|
A |
|
|
|
|
|
|
|
|
|
|
|
|
|||||||||
|
|
|
|
|
|
|
|
|
|
|
|||||||||
|
|
|
|
|
|
|
|
|
|
To program another line |
|
|
|
|
|||||
*Line no.; “Header 3-line message” type : |
1 to 3 |
|
|
|
|
|
|
|
|
|
|
||||||||
“Header 6-line message” type : |
1 to 6 |
|
|
|
|
|
|
|
|
|
|
||||||||
“Header 3-line and footer 3-line message” type: 1 to 6 (1 to 3 as header, 4 to 6 as footer) |
|||||||||||||||||||
Logo message print format (3 types)
|
|
|
|
|
|
|
|
|
|
|
|
|
|
|
|
Header 1st line |
|
|
|
Header 1st line |
|
|
|
Header 1st line |
|
|
|
|
|
Header 2nd line |
|
|
|
Header 2nd line |
|
|
|
Header 2nd line |
|
|
|
|
|
Header 3rd line |
|
|
|
Header 3rd line |
|
|
|
Header 3rd line |
|
|
|
|
|
|
|
|
|
|
Header 4th line |
|
|
|
|
|
|
|
|
|
|
|
|
|
Header 5th line |
|
|
|
|
|
|
|
|
|
|
|
|
|
Header 6th line |
|
|
|
|
|
|
|
|
|
|
|
|
|
|
|
|
|
|
|
|
|
|
|
|
|
|
|
|
|
|
|
Footer 4th line |
|
|
|
|
|
|
|
|
|
|
|
|
|
Footer 5th line |
|
|
|
|
|
|
|
|
|
|
|
|
|
Footer 6th line |
|
|
|
|
|
|
|
|
|
|
|
|
|
|
|
|
|
|
Header 3-line |
|
|
Header 6-line |
|
|
Header 3-line |
|||||
|
|
message |
|
|
message |
|
|
message and |
|||||
|
|
|
|
|
|
|
|
|
|
|
footer 3-line |
||
|
|
|
|
|
|
|
|
|
|
|
message |
||
|
|
|
|
|
|
|
|
|
|
|
(Default setting) |
||
NOTE |
A header 3-line and footer 3-line logo message is preprogrammed when shipped. Please start entering |
||||||||||||
|
|
|
from the first line when you first program a logo message. |
||||||||||
20
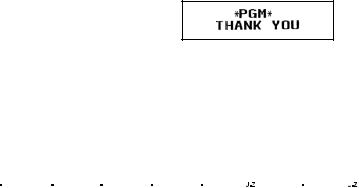
To print the logo message “THANK YOU” using double sized characters and centering on the third line.
Key operation example |
|
s104 @ 3 @
WSWSWS WT WH WA WN WK WSWY WO WU s A
For details of the text entry, please refer to the “Guidance for text programming” on page 12. (T:9  , H:7
, H:7  , A:0
, A:0  , N:3
, N:3  , K:0
, K:0  , Y:4
, Y:4  , O:4
, O:4  , U:0
, U:0  )
)
21
BASIC SALES ENTRY (Example)
1 Basic Sales Entry
Listed below is a basic sales entry example when selling items by cash. For operation details, please refer to “Additional Information for BASIC SALES ENTRY” on page 29.
Mode switch setting
1. Turn the mode switch to the REG position.
Item entries
2.Enter the price for the appropriate department. For example if the price 15.00 EURO, enter “1500” by
numeric keys and then press the appropriate department key.
For department 5 to department 8, press the Hkey first before pressing the department key.
3.Repeat step 2 for all department items.
Displaying subtotals
4. Press the skey to display the amount due.
Finalizing the transaction
5.Enter the amount received from the customer. (You can omit this step if the amount tendered is the same as the subtotal.)
6.Press the Akey, and the change due is displayed and the drawer is opened.
7.Tear off the receipt and give it to the customer with his or her change.
8.Close the drawer.
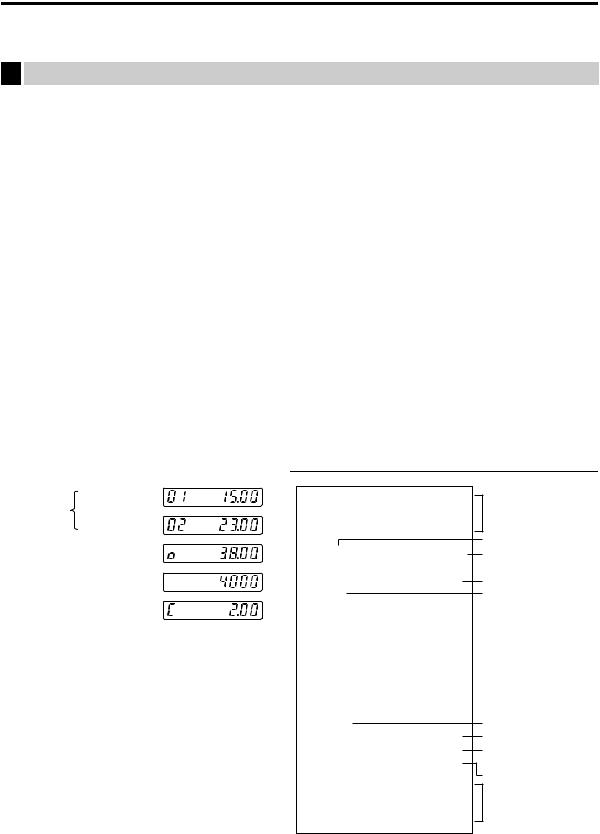
Key operation example |
Operator display |
Item 1500 !
entries
2300 "
Displaying  s subtotal
Amount  4000 tendered
Finalizing  A the transaction
(In this example, tax system is set to automatic VAT 1-4 and the tax1 rate is set to 7%.)
Receipt print
Logo message (Header)
Date/Time
Register number/
Consecutive number
Price
Items
Total quantity Total amount
Cash tendering/amount received
Change
Logo message (Footer)
22

2 PLU Sales Entry
Enter a PLU code using numeric keys and press the pkey.
Key operation example |
|
Operator display |
|
Receipt print |
1 p
71 p
141 p3620 p
A
23
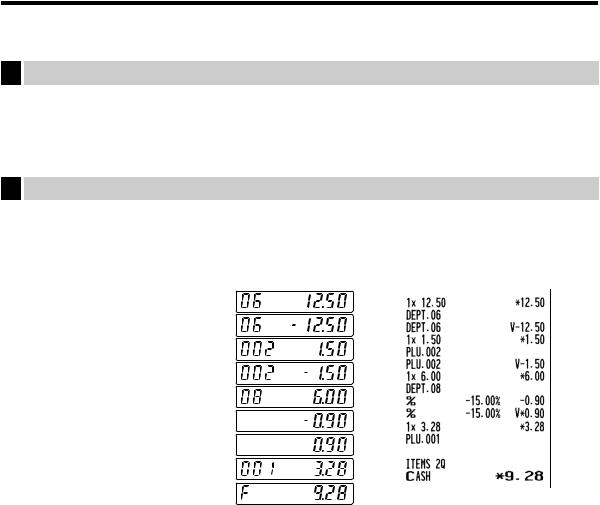
CORRECTION
1 Cancellation of the Numeric Entry
If you make an incorrect numeric entry, you can clear the entry by pressing the lkey only before pressing a department key, PLU/subdepartment key or the %key.
2 Correction of the Last Entry (direct void)
If you make an incorrect entry relating to a department, PLU/subdepartment or percentage (%), you can void this entry by pressing the vkey immediately after the incorrect entry.
Key operation example |
|
Operator display |
|
Receipt print |
1250 H"
v
2 p
v
600 H$
%
v
1 p
A
24
Loading...