


A202-XE
|
|
|
|
|
|
|
|
|
|
|
|
|
|
|
|
|
|
|
|
|
|
|
|
ELECTRONIC CASH REGISTER |
|
|
|
|
|
|
|
ELEKTRONISCHE REGISTRIERKASSE |
|
|
|
|
|
|
|
CAISSE ENREGISTREUSE ELECTRONIQUE |
MODEL |
|
|
|
|
||
CAJA REGISTRADORA ELECTRONICA |
|
|
|
|
|||
MODELL |
|
|
|
|
|||
ELEKTRONISCHE KASSA |
|
|
|
|
|||
MODELE |
|
|
|
|
|||
|
MODELMODELO XE-A202 |
|
|
|
|
||
INSTRUCTION MANUAL |
MANUAL DE INSTRUCCIONES |
|
|
|
|
||
BEDIENUNGSANLEITUNG |
GEBRUIKSAANWIJZING |
|
|
|
|
||
MANUEL D’INSTRUCTIONS |
|
|
|
|
|
|
|
|
|
|
|
|
|
|
|
|
|
|
|
|
|
|
|
|
|
|
|
|
|
|
|
|
|
|
|
|
|
|
|
|
|
|
|
|
|
|
|
A202(Cover2-3) 03.7.5 8:48 AM Page C-2
CAUTION:
The cash register should be securely fitted to the supporting platforms to avoid instability when the drawer is open.
CAUTION:
The socket-outlet shall be installed near the equipment and shall be easily accessible.
VORSICHT:
Die Netzsteckdose muß nahe dem Gerät angebracht und leicht zugänglich sein.
ATTENTION:
La prise de courant murale devra être installée à proximité de l’équipement et devra être facilement accessible.
AVISO:
El tomacorriente debe estar instalado cerca del equipo y debe quedar bien accesible.
VARNING:
Det matande vägguttaget skall placeras nära apparaten och vara lätt åtkomligt.
LET OP:
Het stopcontact dient in de buurt van de kassa en gemakkelijk toegangbaar te zijn.
CAUTION:
For a complete electrical disconnection pull out the mains plug.
VORSICHT:
Zur vollständigen elektrischen Trennung vom Netz den Netzstecker ziehen.
ATTENTION:
Pour obtenir une mise hors-circuit totale, débrancher la prise de courant secteur.
AVISO:
Para una desconexión eléctrica completa, desenchufar el enchufe de tomacorriente.
VARNING:
För att helt koppla från strömmen, dra ut stickproppen.
LET OP:
Trek de stekker uit het stopcontact indien u de stroom geheel wilt uitschakelen.
A202_1 03.7.5 8:06 AM Page 1
INTRODUCTION
Thank you very much for your purchase of the SHARP Electronic Cash Register, Model XE-A202. Please read this manual carefully before operating your machine in order to gain full understanding of functions and features.
Please keep this manual for future reference. It will help you if you encounter any operational problems.
CAUTION!
Never install the batteries into the cash register before initializing it. Before you start operating the cash register, you must first initialize it, then install three new R6 or LR6 batteries (“AA” size) on the register. Otherwise, distorted memory contents and malfunction of the cash register will occur. For this procedure, please refer to page 8.
IMPORTANT
•Be very careful when removing and replacing the printer cover, as the cutter mounted on it is very sharp.
•Install the cash register in a location not subject to direct sunlight, unusual temperature changes, high humidity or splashing water.
Installation in such locations could cause damage to the cabinet and the electronic components.
•Never operate the register with wet hands.
The water could seep into the interior of the register and cause component failure.
•When cleaning your register, use a dry, soft cloth. Never use solvents, such as benzine and/or thinner.
The use of such chemicals will lead to discoloration or deterioration of the cabinet.
•The register plugs into any standard wall outlet (official (nominal) voltage).
Other electrical devices on the same electrical circuit could cause the register to malfunction.
•For protection against data loss, please install three R6 or LR6 batteries (“AA” size) after initializing the cash register. When handling the batteries, please observe the following:
Incorrectly using batteries can cause them to burst or leak, possibly damaging the interior of the cash register.
•Be sure that the the positive (+) and negative (-) poles of each battery are facing in the proper direction for installation.
•Never mix batteries of different types.
•Never mix old batteries and new ones.
•Never leave dead batteries in the battery compartment.
•Remove the batteries if you do not plan to use the cash register for long periods.
•Should a battery leak, clean out the battery compartment immediately, taking care to avoid letting the battery fluid come into direct contact with your skin.
•For battery disposal, follow the corresponding law in your country.
•For complete electrical disconnection, disconnect the main plug.
For Easy Set-up, see
“GETTING STARTED” (page 7).
English
English
1
A202_1 03.7.5 8:06 AM Page 2
CONTENTS |
|
|
INTRODUCTION ............................................................................................................................................ |
1 |
|
IMPORTANT .................................................................................................................................................. |
1 |
|
CONTENTS.................................................................................................................................................... |
2 |
|
PARTS AND THEIR FUNCTIONS................................................................................................................. |
4 |
|
1 |
External View ........................................................................................................................................ |
4 |
2 |
Printer.................................................................................................................................................... |
4 |
3 |
Mode Switch and Mode Keys................................................................................................................ |
5 |
4 |
Keyboard ............................................................................................................................................... |
5 |
5 |
Displays................................................................................................................................................. |
6 |
6 |
Drawer Lock Key ................................................................................................................................... |
6 |
GETTING STARTED...................................................................................................................................... |
7 |
|
FOR THE OPERATOR |
|
|
BASIC SALES ENTRY ................................................................................................................................ |
12 |
|
1 |
Basic Sales Entry Example ................................................................................................................. |
12 |
2 |
Error Warning ...................................................................................................................................... |
13 |
3 |
Item Entries ......................................................................................................................................... |
14 |
|
Single item entries ........................................................................................................................ |
14 |
|
Repeat entries .............................................................................................................................. |
15 |
|
Multiplication entries ..................................................................................................................... |
16 |
|
Single item cash sale (SICS) entry............................................................................................... |
16 |
4 |
Displaying Subtotals............................................................................................................................ |
17 |
5 |
Finalization of Transaction .................................................................................................................. |
17 |
|
Cash or cheque tendering ............................................................................................................ |
17 |
|
Cash or cheque sale that does not require tender entry .............................................................. |
17 |
|
Credit sale .................................................................................................................................... |
18 |
|
Mixed-tender sale ......................................................................................................................... |
18 |
6 |
Computation of VAT (Value Added Tax)/tax ....................................................................................... |
18 |
|
VAT/tax system ............................................................................................................................ |
18 |
OPTIONAL FEATURES............................................................................................................................... |
19 |
|
1 |
Auxiliary Entries................................................................................................................................... |
19 |
|
Percent calculations (premium or discount) ................................................................................. |
19 |
|
Deduction entries.......................................................................................................................... |
20 |
|
Refund entries .............................................................................................................................. |
20 |
|
Non-add code number entries and printing .................................................................................. |
21 |
2 |
Auxiliary Payment Treatment .............................................................................................................. |
21 |
|
Currency exchange ...................................................................................................................... |
21 |
|
Received-on account entries ........................................................................................................ |
22 |
|
Paid-out entries ............................................................................................................................ |
22 |
|
No sale (exchange) ...................................................................................................................... |
23 |
3 |
Automatic Sequence Key (akey) Entries......................................................................................... |
23 |
CORRECTION ............................................................................................................................................. |
23 |
|
1 |
Correction of the Last Entry (direct void)............................................................................................. |
23 |
2 |
Correction of the Next-to-last or Earlier Entry (indirect void) ............................................................... |
24 |
3 |
Subtotal Void ....................................................................................................................................... |
24 |
4 |
Correction of Incorrect Entries not Handled by the Direct or Indirect Void Function ........................... |
24 |
2
A202_1 03.7.5 8:06 AM Page 3
FOR THE MANAGER |
|
|
PRIOR TO PROGRAMMING ...................................................................................................................... |
25 |
|
BASIC FUNCTION PROGRAMMING (For Quick Start) ............................................................................ |
25 |
|
1 |
Date and Time Programming .............................................................................................................. |
25 |
2 |
Tax Programming................................................................................................................................ |
26 |
|
Tax rate programming .................................................................................................................. |
26 |
AUXILIARY FUNCTION PROGRAMMING ................................................................................................. |
27 |
|
1 |
Department Programming ................................................................................................................... |
27 |
2 |
PLU (Price Look-Up) and Subdepartment Programming .................................................................... |
29 |
3 |
Miscellaneous Key Programming........................................................................................................ |
30 |
|
Rate for %, &and V.............................................................................................................. |
30 |
|
Amount for -.............................................................................................................................. |
31 |
|
Percent rate limitation for %and &.......................................................................................... |
31 |
|
Function parameters for %, &and -.................................................................................... |
32 |
|
Function parameters for V......................................................................................................... |
32 |
|
Function parameters for r, R, X, Y, c, band A(when using as TL key) ......... |
33 |
4 |
Text Programming............................................................................................................................... |
34 |
ADVANCED FUNCTION PROGRAMMING ................................................................................................ |
40 |
|
1 |
Register Number and Consecutive Number Programming ................................................................. |
40 |
2 |
Electronic Journal (EJ) Programming.................................................................................................. |
41 |
3 |
Various Function Selection Programming 1 ........................................................................................ |
42 |
|
Function selection for miscellaneous keys ................................................................................... |
43 |
|
Print format ................................................................................................................................... |
43 |
|
Receipt print format ...................................................................................................................... |
44 |
|
Other programming ...................................................................................................................... |
44 |
4 |
Various Function Selection Programming 2 ........................................................................................ |
47 |
|
Power save mode......................................................................................................................... |
47 |
|
Logo message print format........................................................................................................... |
48 |
|
Thermal printer density................................................................................................................. |
48 |
|
Language selection ...................................................................................................................... |
48 |
|
Training clerk specification for training mode ............................................................................... |
49 |
|
AUTO key programming............................................................................................................... |
49 |
5 |
EURO Programming ........................................................................................................................... |
50 |
6 |
Reading Stored Programs................................................................................................................... |
52 |
EURO MIGRATION FUNCTION .................................................................................................................. |
54 |
|
TRAINING MODE ........................................................................................................................................ |
57 |
|
READING (X) AND RESETTING (Z) OF SALES TOTALS ........................................................................ |
58 |
|
EJ REPORT READING AND RESETTING ................................................................................................. |
61 |
|
OVERRIDE ENTRIES .................................................................................................................................. |
62 |
|
CORRECTION AFTER FINALIZING A TRANSACTION (Void mode)....................................................... |
62 |
|
OPERATOR MAINTENANCE...................................................................................................................... |
63 |
|
1 |
In Case of Power Failure..................................................................................................................... |
63 |
2 |
In Case of Printer Error ....................................................................................................................... |
63 |
3 |
Cautions in Handling the Printer and Recording Paper....................................................................... |
63 |
4 |
Replacing the Batteries ....................................................................................................................... |
64 |
5 |
Replacing the Paper Roll..................................................................................................................... |
64 |
6 |
Removing a Paper Jam....................................................................................................................... |
66 |
7 |
Cleaning the Printer (Print Head / Sensor / Roller) ............................................................................. |
67 |
8 |
Removing the Till and the Drawer ....................................................................................................... |
67 |
9 |
Opening the Drawer by Hand.............................................................................................................. |
67 |
10 |
Before Calling for Service.................................................................................................................... |
68 |
|
Error code table ............................................................................................................................ |
68 |
SPECIFICATIONS ....................................................................................................................................... |
69 |
|
3

A202_1 03.7.5 8:06 AM Page 4
PARTS AND THEIR FUNCTIONS
1 External View
Front view |
Rear view |
Operator display |
Customer display |
|
(Pop-up type) |
Printer cover
Receipt paper
AC power cord
Mode switch
Drawer
Keyboard
Drawer lock
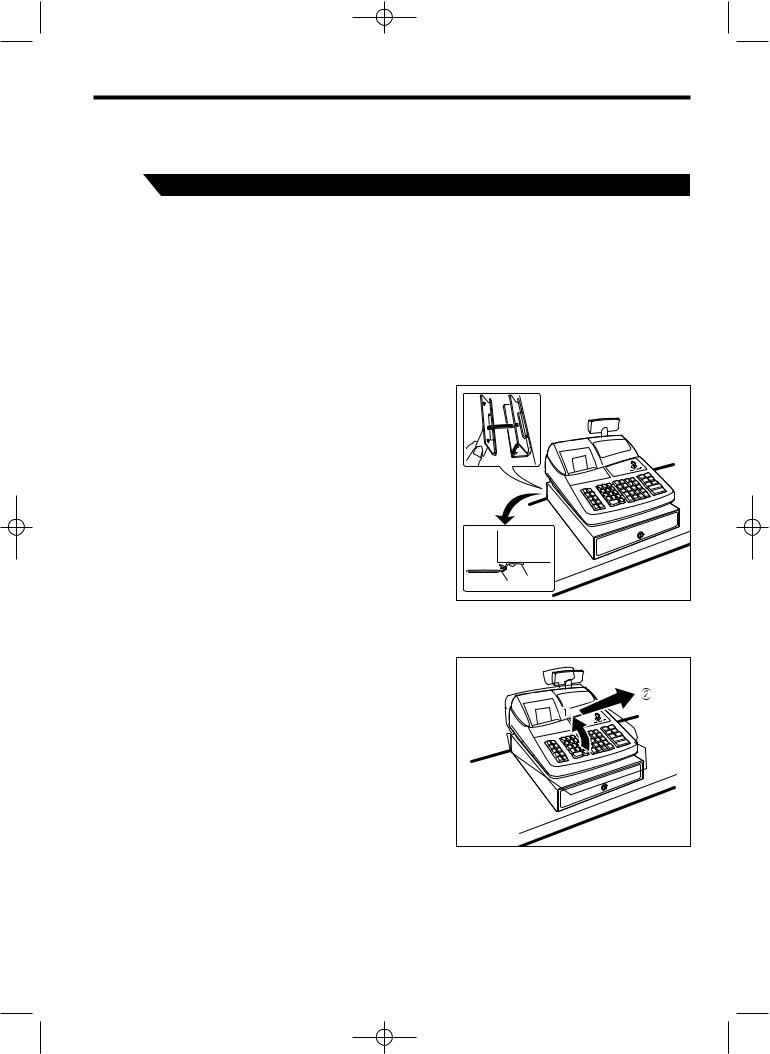
2 Printer
The printer is one station type thermal printer, and therefore it does not require any type of ink ribbon or cartridge.
Lift the rear of the printer cover to remove. To re-install, hook the pawls on the cabinet and close.


 Caution: The paper cutter is mounted on the cover. Be careful not to cut

 yourself.
Take-up spool
Print roller arm
Print roller release rever
Inner cover
Paper roll cradle
Paper positioning guides
Do not attempt to remove the paper roll with the print roller arm is locked. This may result in damage to the printer and print head.
4
A202_1 03.7.5 8:06 AM Page 5
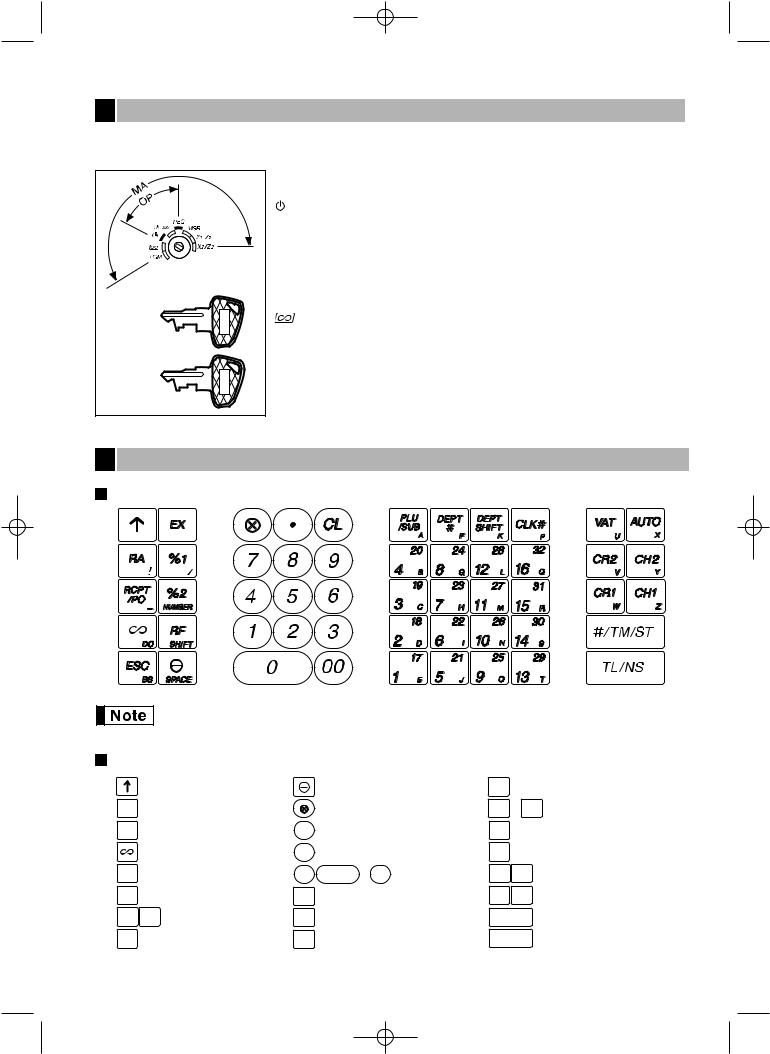
3 Mode Switch and Mode Keys
The mode switch can be operated by inserting one of the two supplied mode keys - manager (MA) and operator (OP) keys. These keys can be inserted or removed only in the “REG” or “  ” position.
|
|
|
The mode switch has these settings: |
|
|
|
|
: |
This mode locks all register operations. (AC power turns off.) |
|
|
|
|
No change occurs to register data. |
|
|
|
OP X/Z: |
To take individual clerk X or Z reports, and to take flash reports. |
|
|
|
|
It can be used to toggle receipt state “ON” and “OFF” by pressing |
|
|
|
|
the Rkey. |
Manager key (MA) |
|
REG: |
For entering sales. |
|
|
PGM: |
To program various items. |
||
|
|
|
||
|
|
MA |
: |
Enters into the void mode. This mode allows correction after |
|
|
|
finalizing a transaction. |
|
|
|
|
|
|
Operator key (OP) |
|
MGR: |
For manager’s entries. The manager can use this mode for an |
|
|
|
override entry. |
||
|
|
OP |
|
|
|
|
X1/Z1: |
To take the X/Z report for various daily totals |
|
|
|
|
||
|
|
|
X2/Z2: |
To take the X/Z report for periodic (weekly or monthly) |
|
|
|
|
consolidation |
4 |
Keyboard |
|
|
|
Keyboard layout
The small characters on the bottom or lower right in each key indicates functions or characters which can be used for character entries for text programming. For details, refer to page 34.
Key names
|
Paper feed key |
|
Discount key |
|
|
RA |
Received-on account key |
|
Multiplication key |
||
RCPT |
Receipt print/Paid-out key |
• |
Decimal point key |
||
/PO |
|||||
|
Void key |
CL |
Clear key |
|
|
ESC |
Escape key |
00 |
0 |
~ 9 |
Numeric keys |
EX |
Foreign currency |
PLU |
PLU/Subdepartment key |
||
exchange key |
/SUB |
||||
|
|
|
|
|
|
%1 |
%2 Percent 1 and 2 keys |
DEPT |
Department code entry key |
||
# |
|||||
RF |
Refund key |
DEPT |
Department shift key |
||
SHIFT |
|||||
CLK# Clerk code entry key
1 |
17 |
~ 16 |
32 |
Department keys |
VAT |
Value added tax key |
|||
AUTO |
Automatic sequence key |
|||
CR1 CR2 |
|
Credit 1 and 2 keys |
||
CH1 |
CH2 |
|
Cheque 1 and 2 keys |
|
#/TM/ST |
|
Non-add code/Time display |
||
|
/Subtotal key |
|||
|
|
|
|
|
|
TL / NS |
|
Total/No sale key |
|
5
A202_1 03.7.5 8:06 AM Page 6
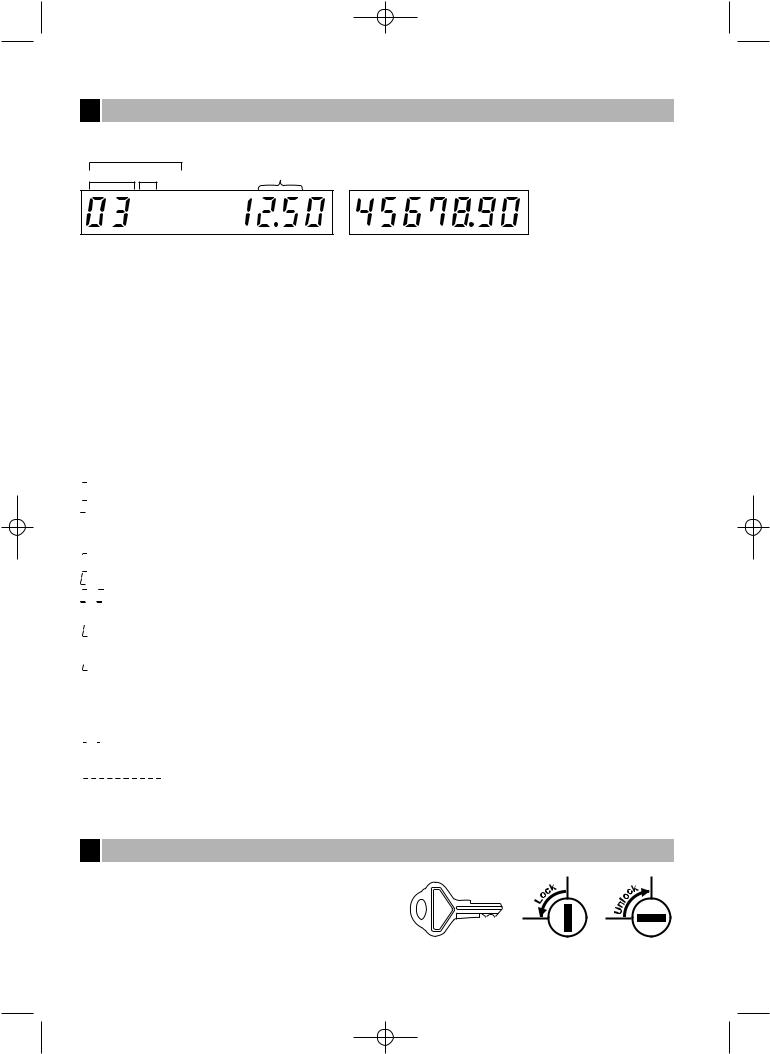
5 Displays
Operator display |
Customer display (Pop-up type) |
PLU/SUB |
|
DEPT REPEAT |
Clerk code |
RCPT |
DC SHIFT NUMBER |
OFF |
|
Amount: Appears in the far-right eight (max.) positions. When the amount is negative, the minus symbol “-” appears before the amount.
Number of repeats for repetitive registrations:
The number of repeats is displayed, starting at “2” and incremental with each repeat. When you have registered ten times, the display will show “0.”(2 → 3 ..... 9 → 0 → 1 → 2 ... )
Receipt function status:
The indicator “_” appears in the RCPT OFF position when the receipt function is in the OFF status.
Time: Appears in the second to sixth positions (using 24-hour format) in the OP X/Z, REG or MGR mode. In the REG or MGR mode, press the skey to display the time.
 Machine state symbols

 : Appears during programming.
 : Appears when an error is detected.

 : Appears when the subtotal is displayed or when the amount tendered is smaller than the sales amount.
 : Appears when the Vkey is pressed to calculate a subtotal in foreign currency.
 : Appears when a transaction is finalized by pressing the A, X, Y, cor bkey.
: Appears when the change due amount is displayed.


 : Appears in the far-left three positions at the timing of key entry when the electronic journal (EJ) memory is full. (Depending on programming.)
: Appears when the voltage of the installed batteries is under the required level. You must replace with new ones within two days. Refer to page 64 for details.
: Appears when the batteries are not installed, or the installed batteries are dead. You must replace with new ones immediately. Refer to page 64 for details.
 : May appear right below the eighth and ninth places at the timing of finalization of a transaction when the electronic journal (EJ) memory is nearly full.
Also appears right below the tenth place when power save mode is effective.


 : Appears when programmed date (and time) for EURO modification operation is come.

 : Appears when the print roller arm is not locked.


 : Appears when the paper is not set or out.
6 Drawer Lock Key
This key locks and unlocks the drawer. To lock it, turn 90 degrees counterclockwise. To unlock it, turn 90 degrees clockwise.
SK1-1
6
A202_1 03.7.5 8:06 AM Page 7
GETTING STARTED
Please follow the procedure shown below. The batteries are not installed and the power is OFF.
1 |
Installing the cash register |
|
|
please |
|
For |
|
water |
|
The |
|
the |
|
Follow |
|
How to
1.
(B)is
2.Peel
3.Hook
4.
you
How to
1.Lift you.
B |
A |
|
7
A202_1 03.7.5 8:06 AM Page 8
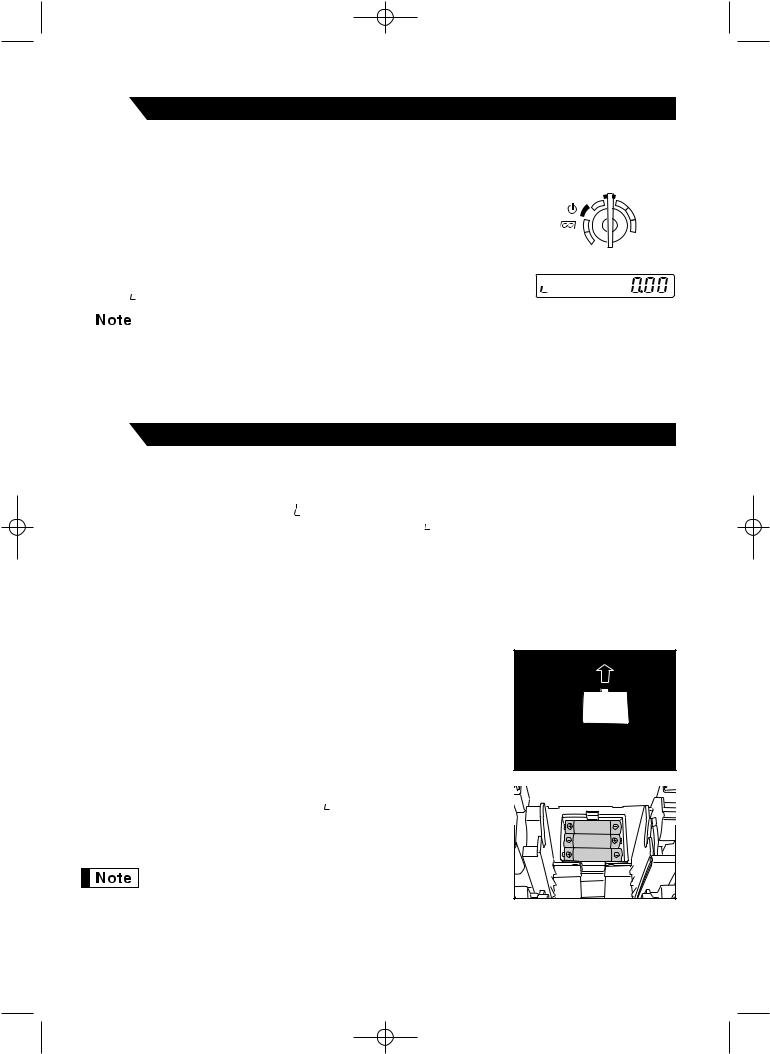
2 |
Initializing the cash register |
|
In order for the cash register to operate properly, you must initialize it before operating for the first time. Follow this procedure.
1. |
Insert the manager (MA) key into the mode switch and turn it to the REG position. |
OPX/Z |
REG |
|||
|
|
|
|
|
MGR |
|
2. |
Insert the plug of the AC power cord into the AC outlet. The buzzer will sound |
|
X1/Z1 |
|||
|
X2/Z2 |
|||||
|
|
|
three times. |
|
||
|
|
|
PGM |
|
||
|
|
|
IMPORTANT: This operation must be performed without batteries installed. |
|
||
3. |
|
|
||||
|
|
|||||
The cash register has now been initialized. The register display will show “0.00” |
|
|||||
|
|
|
with “ ”. |
|
||
|
|
|
|
If the buzzer does not sound when the plug is inserted, the initialization has not been done |
||
|
|
|
|
|||
|
|
|
|
successfully. (This will occur when the voltage is high because you operated the cash register |
||
|
|
|
|
|||
|
|
|
|
before starting initialization.) Wait at least one minute after pulling out the plug and insert the plug |
||
|
|
|
|
again. |
|
|
3 |
Installing batteries |
|
userdisconnected needing
and must once.
Install three connected
1.Lift the
Be
2.Open
3. Install
When
4. Close
8
A202_1 03.7.5 8:06 AM Page 9
4 |
Installing a paper roll |
|
The register register, Install the set to the
1. |
Lift up |
Print roller arm |
|
||
|
|
|
|
|
Print roller |
|
|
release lever |
2. Set a
|
|
To the printer |
To the printer |
|
|
Correct |
Incorrect |
3. |
Feed |
Paper positioning guides |
|
|
the |
|
|
|
the |
|
|
4.While arm, the the be fed
9

A202_1 03.7.5 8:06 AM Page 10
5.When not using the take-up spool (using as receipt paper):
•Cut off the excess paper using the edge of the inner cover, and replace the printer cover. Press the Fkey to make sure the paper end comes out of the printer cover and clean paper
appears.
If the paper end does not come out, open the printer cover, and pass the paper end between the paper cutter and the paper guide of the printer cover, and replace the cover.
When using the take-up spool (using as journal paper):
•Insert the end of the paper into the slit in the spool. (Press the F key to feed more paper if required.)
•Wind the paper two or three turns around the spool shaft.
•Set the spool on the bearing, and press the Fkey to take up excess slack in the paper.
•Replace the printer cover.
When using a paper roll as journal paper, you must change the printing style. Refer to “Print Format” in “Various Function Selection Programming 1” section (Job code 6) for changing the printing style.
5 |
Programming date, time and VAT/tax |
|
Before you
• date
Please
10

A202_1 03.7.5 8:06 AM Page 11
6 |
Programming other necessary items |
|
with optional understand
Decimal
By default, refer to
Rounding
When your and South Norway (Job code “Various
VAT/tax
The cash to 4 rates)
7 |
Starting sales entries |
|
11
A202_2 FOR THE OPERATOR 03.7.5 8:06 AM Page 12
FOR THE OPERATOR
BASIC SALES ENTRY
1 Basic Sales Entry Example
Listed below is a basic sales entry example when selling items by cash. For operation details, please refer to each section.
Mode switch setting
1. Turn the mode switch to the REG position.
Clerk assignment
2.Enter your clerk code. (For example, clerk code is 1. Press the 1and Lkey in this order.) The clerk code 1 is automatically selected just after initialization of
the cash register.
Item entries
REG
OPX/Z MGR
 X1/Z1
X1/Z1
X2/Z2
PGM
3.Enter the price for the first department item. (For example, for 15.00, enter 15:, and press the appropriate department key.)
For department 17 to department 32, press the Dkey first before pressing the department key. For department 33 and above, enter the department code using numeric keys and press the dkey, then enter the price and press the dkey again.
4.Repeat step 3 for all department items.
Displaying subtotals
5. Press the skey to display the amount due.
Finalizing the transaction
6.Enter the amount received from the customer. (You can omit this step if the amount tendered is the same as the subtotal.)
7.Press the Akey, and the change due is displayed and the drawer is opened.
8.Tear off the receipt and give it to the customer with his or her change.
9.Close the drawer.
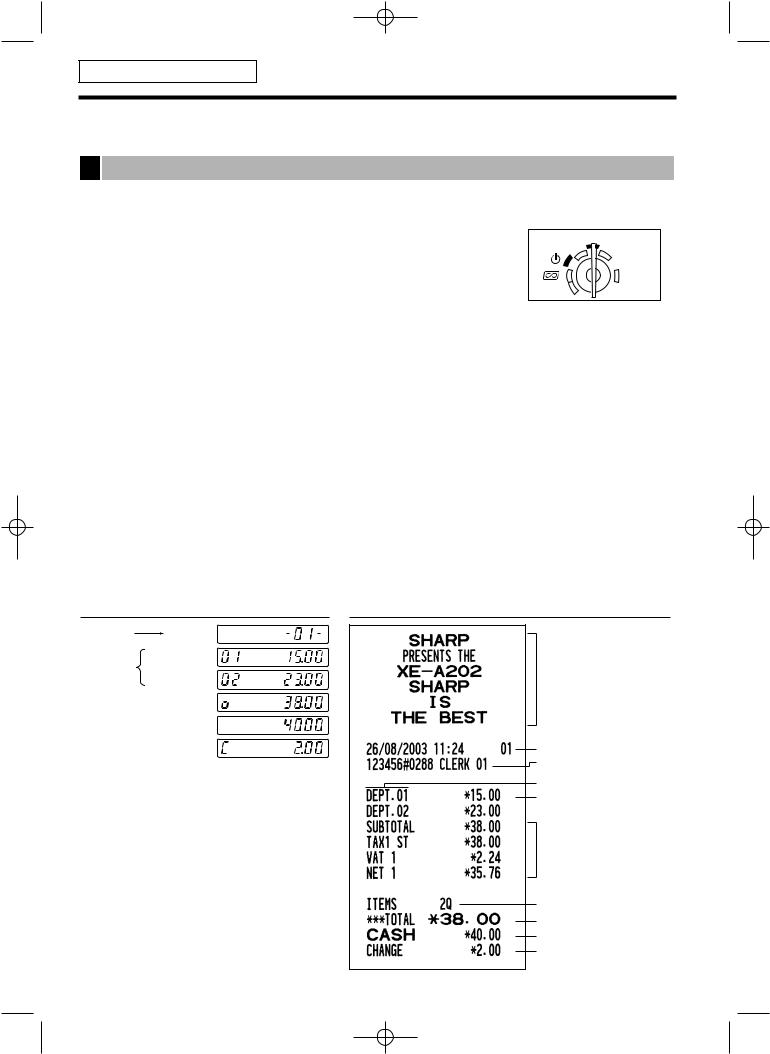
Key operation example
Clerk |
1 L |
assignment |
|
1500 !
Item
entries 2300 "
Displaying  s subtotal
4000
Finalizing  A the transaction
(In this example, tax system is set to automatic VAT 1-4 and the tax rate is set to 6.25%.)
12
Logo message
Date/Time/Clerk code
Register number
/Consecutive number/Clerk name Items
Price
Not printed when non-taxable items only are sold.
Total quantity
Total amount
Cash tendering/amount received
Change
A202_2 FOR THE OPERATOR 03.7.5 8:06 AM Page 13
Clerk assignment
Prior to any item entries, clerks must enter their clerk codes into the register. However, the code entry may not be necessary when the same clerk handles the consecutive transactions.
■ Sign-on (in REG, MGR, |
mode) |
|
■ Sign-off (in REG, MGR, |
mode) |
||||||||
To display the signed-on clerk code |
|
|
|
|
|
|||||||
|
|
|
|
|
|
|
L |
L |
|
L |
|
|
|
|
|
|
|
|
|
|
|
||||
|
|
Clerk code 1 to 20 |
|
|
|
|
|
|||||
|
|
|
|
|
||||||||
|
|
|
|
|
|
|
|
|||||
|
|
|
|
|
|
|
|
|
||||
Receipt ON/OFF function
When you use the printer to issue receipts, you can disable receipt printing in the REG mode to save paper using the receipt ON/OFF function. To disable receipt printing, press the Rkey in the OP X/Z position. This key toggles the receipt printing status ON and OFF.
To check the receipt printing status, turn the mode switch to the OP X/Z position or press the lkey in the REG mode. When the function is in the OFF mode, the receipt off indicator “_” is illuminated.
The register will print reports regardless of the receipt state, so the paper roll must be installed.
To issue a receipt when receipt ON/OFF function is set to OFF:
If your customer wants a receipt after you finalized a transaction with the receipt ON/OFF function being OFF status, press the Rkey. This will produce a receipt. However, if more than 30 items were entered, the receipt will be issued in a summary receipt.
Copy receipt
You can print a copy receipt by pressing the Rkey when the receipt ON/OFF function is in the “ON” status. To realize this function, you must enable the function. Please refer to page 45 (Job code 63).
Power Save Mode
The register will enter into power save mode when no entries are performed based on the pre-programmed time limit (by default, 30 minutes).
When the register goes to the power save mode, all display lights will turn off except the decimal point at the leftmost position. The register will return to the normal operation mode when any key is pressed or a mode is changed with the mode key. Please note when the register is recovered by a key entry, its key entry is invalid. After the recovery, start the key entry from the beginning.
2 Error Warning
In the following examples, your register will go into an error state accompanied with a warning beep and an error symbol “  ” on the display. Clear the error state by pressing the lkey and take the proper action.
Please refer to the error code table on page 68.
•Enter over a 32-digit number (entry limit overflow): Cancel the entry and re-enter the correct number.
•An error in key operation: Clear the error and continue operation.
•An entry beyond a programmed amount entry limit: Check to see if the entered amount is correct. If it is correct, it can be rung up in the MGR mode. Contact your manager.
•An including-tax subtotal exceeds eight digits: Delete the subtotal by pressing the lkey and press the A, X, Y, cor bkey to finalize the transaction.
Error escape function
To quit a transaction due to an error or an unforeseen event, use the error escape function as shown below:
To clear the error state
Transaction  l
l

 E
E E
E
The transaction is voided (treated as a subtotal void) and the receipt is issued by this function. If you have already entered a tendered amount, the operation is finalized as a cash sale.
13
A202_2 FOR THE OPERATOR 03.7.5 8:06 AM Page 14
3 Item Entries
Single item entries
1. Department entries
The cash register provides a maximum of 50 departments for a merchandise classification. Group attributes, such as taxable status, are applied to items when they are entered to the departments.
• When using the department keys (for department 1 to 32)
For department 1 to 16, enter a unit price and press a department key. If you use a programmed unit price, press a department key only.
For department 17 to 32, enter a unit price, press the Dkey and press a department key. If you use a programmed unit price, press the Dkey and press a department key.
When using a programmed unit price
|
|
Unit price *1 |
|
|
*1 |
Less than the programmed upper limit amounts |
|
|
|
|
Department key |
When zero is entered, only the sales quantity is |
|
|
|
*2 |
||||
|
|
(max. 8 digits) |
|
added. |
||
|
|
|
|
D |
|
|
|
|
|
|
*2 |
For the departments 17 through 32, press the |
|
Dkey.
Please note if you press the same key after using the Dkey, it acts as a repeat entry. For example, when you register an item of dept. 17 using the Dkey and then an item of dept. 1 using the preset unit price, you should use the department code entry key described below for the dept. 1 item. If you just press the !key to register dept. 1 item, it will act as a repeat entry of dept. 17 item.
• When using the department code entry key
Enter a department (dept.) code and press the dkey, then enter a unit price and press the dkey again. If you use a programmed unit price, enter a dept. code and press the dkey.
|
|
When using a programmed unit price |
||||||
Dept. code |
|
d |
|
|
Unit price *1 |
|
|
d |
|
|
|
|
|||||
|
|
|
|
|
||||
(1 to 50) |
|
|
|
|
(max. 8 digits) |
|
|
|
 (In case only preset price entry is allowed.)
*1 Less than the programmed upper limit amounts
When zero is entered, only the sales quantity is added.
2. PLU/subdepartment entries
For another merchandise classification, the cash register provides a maximum of 1200 PLUs/subdepartments. PLUs are used to call up preset prices by a code entry. Subdepartments are used to classify merchandise into smaller groups under the departments. Every PLU and subdepartment has a code from 1 to 1200, and should belong to a department to obtain attributes of that department.
By default, the cash register is preprogrammed to be able to use 1 to 200 codes, and these 200 codes are set to PLU mode and zero for unit price.
To extend the number of PLU codes to 1200, please refer to “EJ memory type” on page 41, and for other PLU/subdepartment programming, refer to “PLU and Subdepartment Programming” on page 29.
14
A202_2 FOR THE OPERATOR 03.7.5 8:06 AM Page 15
• PLU entries
PLU code  p
p
• Subdepartment (open PLU) entries
PLU code |
p |
Unit price * |
|
|
(max. 8 digits) |
* Less than the programmed upper limit
pamounts
When zero is entered, only the sales quantity is added.
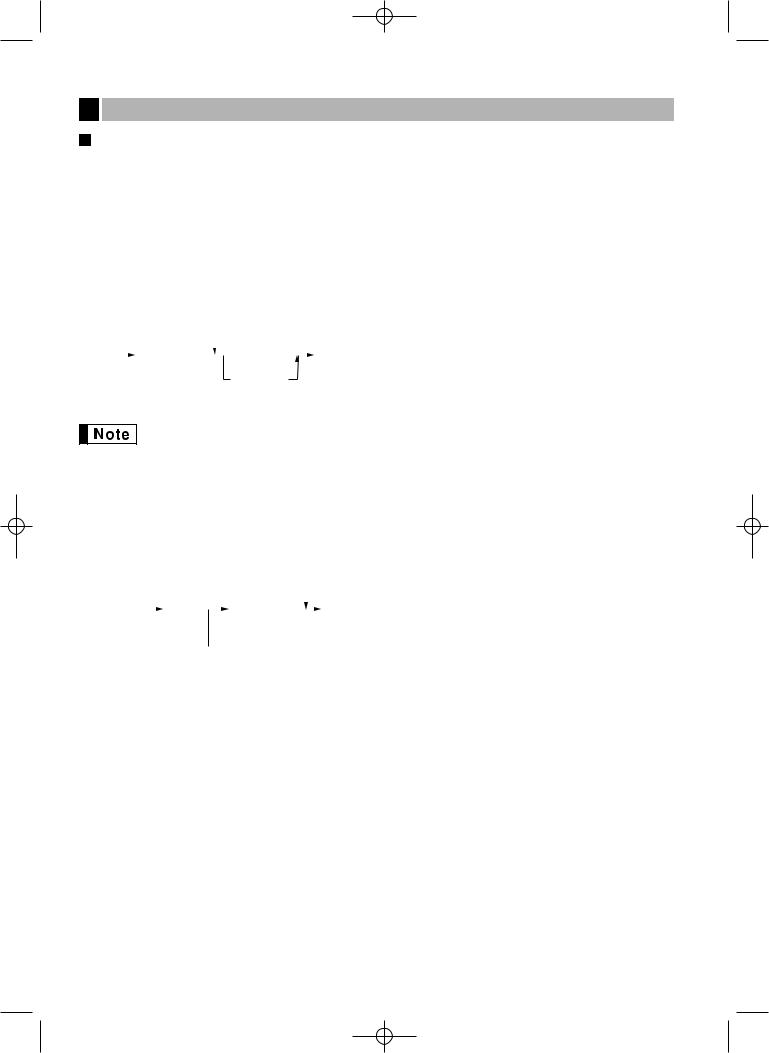
Key operation example |
Department entry
PLU entry
Subdepartment entry
1200 (
500 D!
)
D"
50 d1500 d
33 d 2 p
 11 p1200 p
A
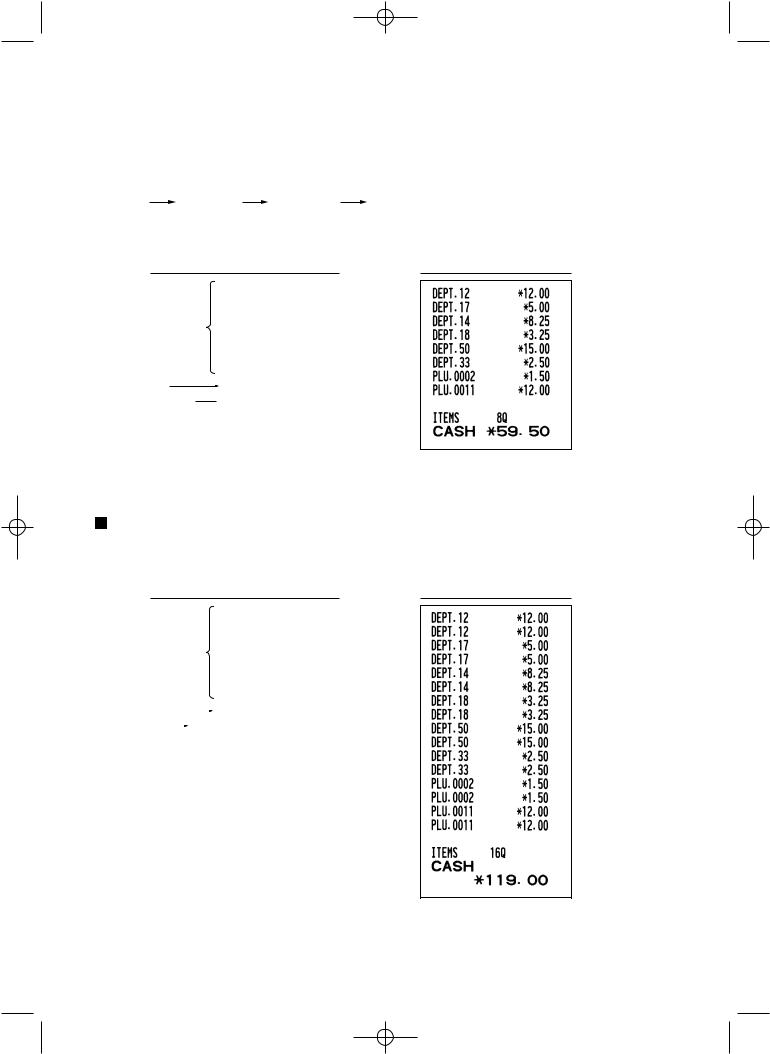
Repeat entries
You can use this function for entering a sale of two or more of the same items. Consecutive pressing of a department key, dkey or pkey is as shown on key operation example below.
Key operation example Print
|
|
|
|
1200 (( |
||
|
|
|
|
500 D!! |
||
Department entry |
|
)) |
||||
D |
"" |
|||||
|
|
|
|
|||
|
|
|
|
50 d1500 dd |
||
|
|
|
|
33 dd |
||
PLU entry |
|
|
|
2 pp |
||
|
|
|
||||
Subdepart- |
|
11 p1200 pp |
||||
|
||||||
ment entry |
|
|
|
A |
||
15
A202_2 FOR THE OPERATOR 03.7.5 8:07 AM Page 16
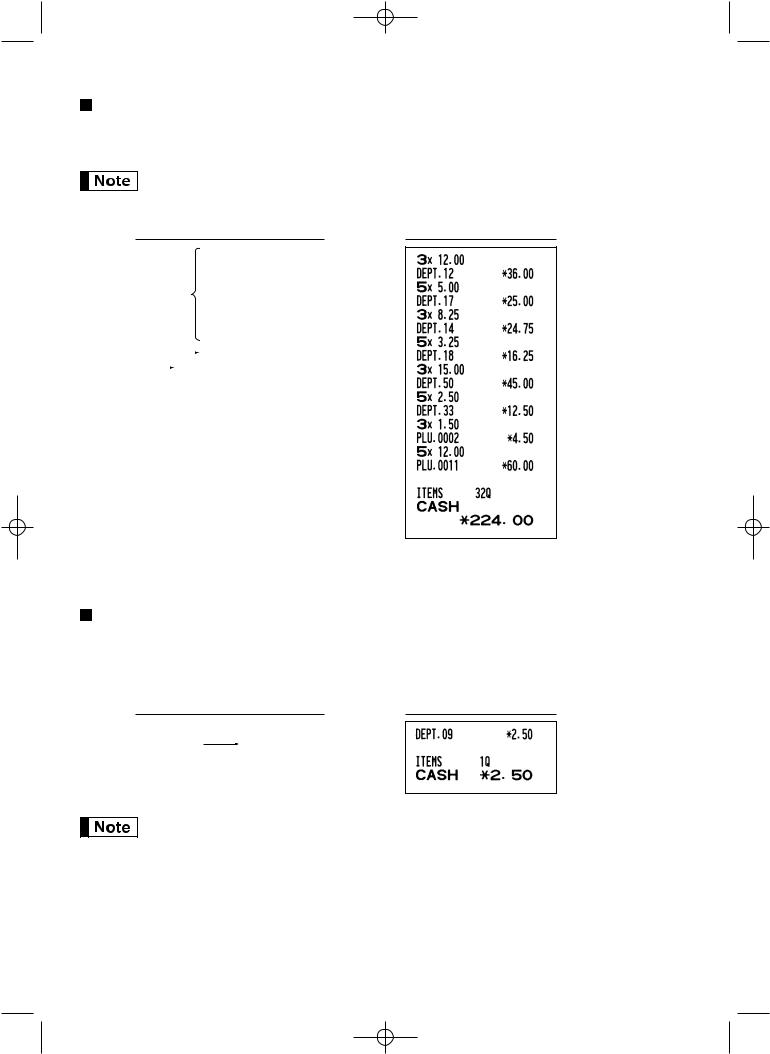
Multiplication entries
When selling a large quantity of items, it is convenient to use the multiplication entry method. Enter quantity using numeric keys and press the @key before starting item entry as shown in the example below.
When programmed to allow fractional quantity entries, you can enter up to four integers and three digit decimal, though the quantity is counted as one for sales reports. To enter a fractional quantity, use the decimal point key between integer and decimal, as 7P5for entering 7.5.
Key operation example Print
|
|
3 @1200 ( |
||||
|
|
|
|
5 @500 D! |
||
Department entry |
3 @) |
|||||
@D" |
||||||
|
|
5 |
||||
|
|
|
|
3 @50 d1500 d |
||
|
|
|
|
|
5 @33 d |
|
PLU entry |
|
|
|
3 @2 p |
||
|
|
|
||||
Subdepart- |
|
5 @11 p1200 p |
||||
|
||||||
ment entry |
|
|
|
A |
||
Single item cash sale (SICS) entry
•This function is useful when a sale is for only one item and is for cash. This function is applicable only to those departments that have been set for SICS or to their associated PLUs or subdepartments.
•The transaction is complete and the drawer opens as soon as you press the department key, dkey or pkey.
Key operation example Print
|
250 |
For finishing |
, |
the transaction |
|
If an entry to a department or PLU/subdepartment set for SICS follows the ones to departments or PLUs/subdepartments not set for SICS, it does not finalize and results in a normal sale.
16
A202_2 FOR THE OPERATOR 03.7.5 8:07 AM Page 17
4 Displaying Subtotals
The subtotal is displayed by pressing the skey. When you press it, the subtotal of all entries which have been made is displayed and the symbol “ ” will light up in the display.
Subtotal will not be printed on a receipt on the current factory setting. If you want to print it, change the setting by programming. Refer to “Receipt print format” (Job code 7) on page 44.
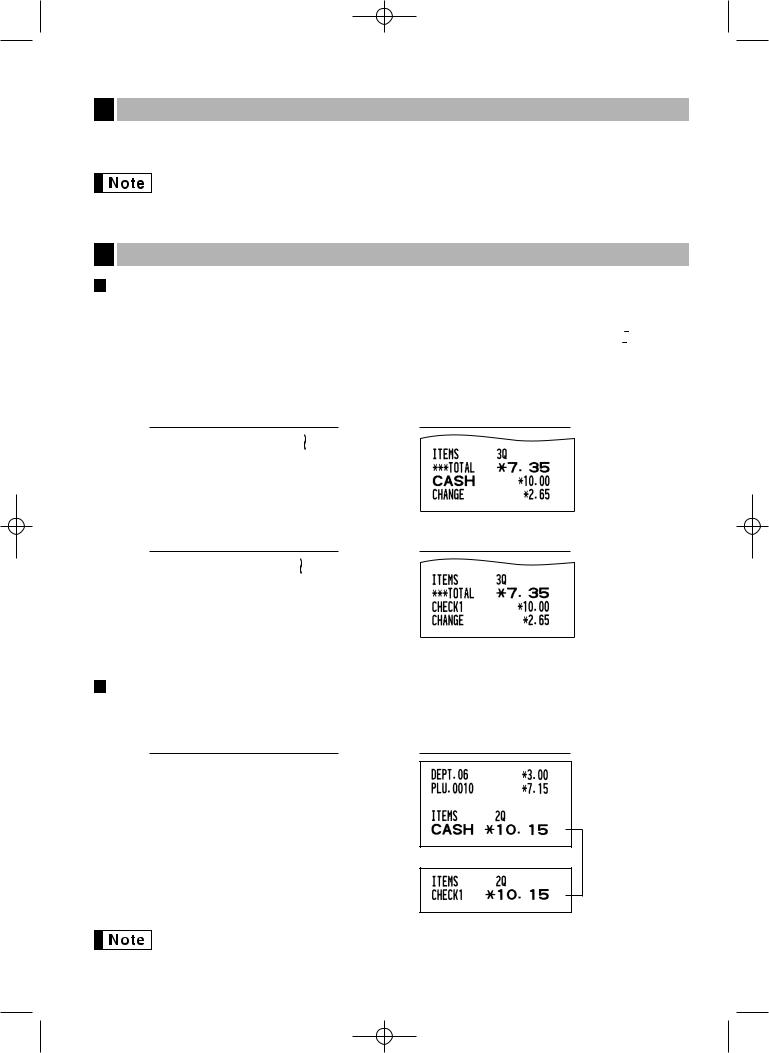
5 Finalization of Transaction
Cash or cheque tendering
Press the skey to get a subtotal, enter the amount tendered by your customer, then press the Akey if it is a cash tender or press a cheque key (Xor Y) if it is a cheque tender. When the amount tendered is greater than the amount of the sale, the register will show the change due amount and the symbol “  ” will light up. Otherwise the register will show a deficit and the symbol “
 ” will light up. You now must make a correct tender entry.
Cash tendering
Key operation example |
s
1000 A
Cheque tendering
Key operation example |
s
1000 X
Cash or cheque sale that does not require tender entry
Enter items and press the Akey if it is a cash sale or press a cheque key if it is a cheque sale. The register will display the total sale amount.
Key operation example |
300 +
10p A
In the case of cheque 1 sale
When programmed not to allow “direct non-tender finalization after tendering” (Job code 63, refer to page 45), you must always enter a tender amount.
17
A202_2 FOR THE OPERATOR 03.7.5 8:07 AM Page 18
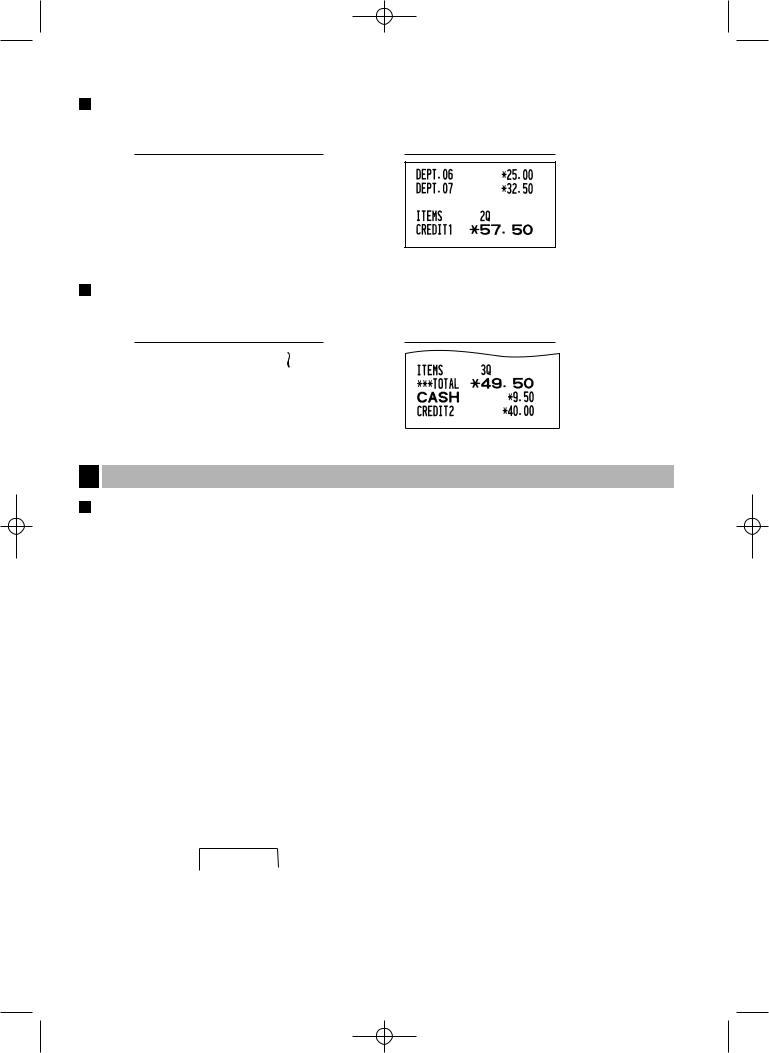
Credit sale
Enter items and press a credit key (cor b).
Key operation example |
2500 +
3250 *
c
Mixed-tender sale
You can perform mixed-tendering of cheque and cash, cash and credit, and cheque and credit.
Key operation example |
s
950 A
b
6 Computation of VAT (Value Added Tax)/tax
VAT/ tax system
The cash register may be programmed for the following six VAT/tax systems. The cash register is preprogrammed as automatic VAT 1-4 system.
Automatic VAT 1-4 system (Automatic operation method using programmed percentages)
This system, at settlement, calculates VAT for taxable 1 through 4 subtotals by using the corresponding programmed percentages.
Automatic tax 1-4 system (Automatic operation method using programmed percentages)
This system, at settlement, calculates taxes for taxable 1 through 4 subtotals by using the corresponding programmed percentages, and also adds the the calculated taxes to those subtotals, respectively.
Manual VAT 1-4 system (Manual entry method using programmed percentages)
 s
s t
t
This system provides the VAT calculation for taxable 1 through 4 subtotals. This calculation is performed using the corresponding programmed percentages when the tkey is pressed just after the skey.
Manual VAT 1 system (Manual entry method for subtotals that uses VAT 1 preset percentages)
To use a programmed rate
 s
s VAT rate
  t
t
This system enables the VAT calculation for the then subtotal. This calculation is performed using the VAT 1 preset percentages when the tkey is pressed just after the skey. For this system, the keyed-in tax rate can be used.
18
A202_2 FOR THE OPERATOR 03.7.5 8:07 AM Page 19
Manual tax 1-4 system (Manual entry method using preset percentages)
 s
s t
t
This system provides the tax calculation for taxable 1 through 4 subtotals. This calculation is performed using the corresponding programmed percentages when the tkey is pressed just after the skey.
After this calculation, you must finalize the transaction.
Automatic VAT 1 and automatic tax 2-4 system
This system enables the calculation in the combination with automatic VAT 1 and automatic tax 2 through 4. The combination can be any of VAT1 corresponding to taxable 1 and any of tax 2 through 4 corresponding to taxable 2 through taxable 4 for each item. The tax amount is calculated automatically with the percentages previously programmed for these taxes.
•The tax status of PLU/subdepartment depends on the tax status of the department which the PLU/subdepartment belongs to.
•VAT/tax assignment symbol can be printed at the fixed right position near the amount on the receipt as follows:
VAT1/tax1  A VAT2/tax2
  B VAT3/tax3
  C VAT4/tax4
  D
D
When the multiple VAT/tax is assigned to a department or a PLU, a symbol of the lowest number assigned to VAT/tax rate will be printed. For programming, please refer to “Various Function Selection Programming 1” (Job code 66) on page 45.
OPTIONAL FEATURES
1 Auxiliary Entries
Percent calculations (premium or discount)
Your register provides the percent calculation for the subtotal and/or each item entry depending on the programming.
• Percentage: 0.01 to 100.00% (Depending on the programming)
Application of preset rate (if programmed) and manual rate entry are available.
Percent calculation for subtotal
Key operation example |
4 @
140 >
570 *
ms
10 %
A
19
A202_2 FOR THE OPERATOR 03.7.5 8:07 AM Page 20
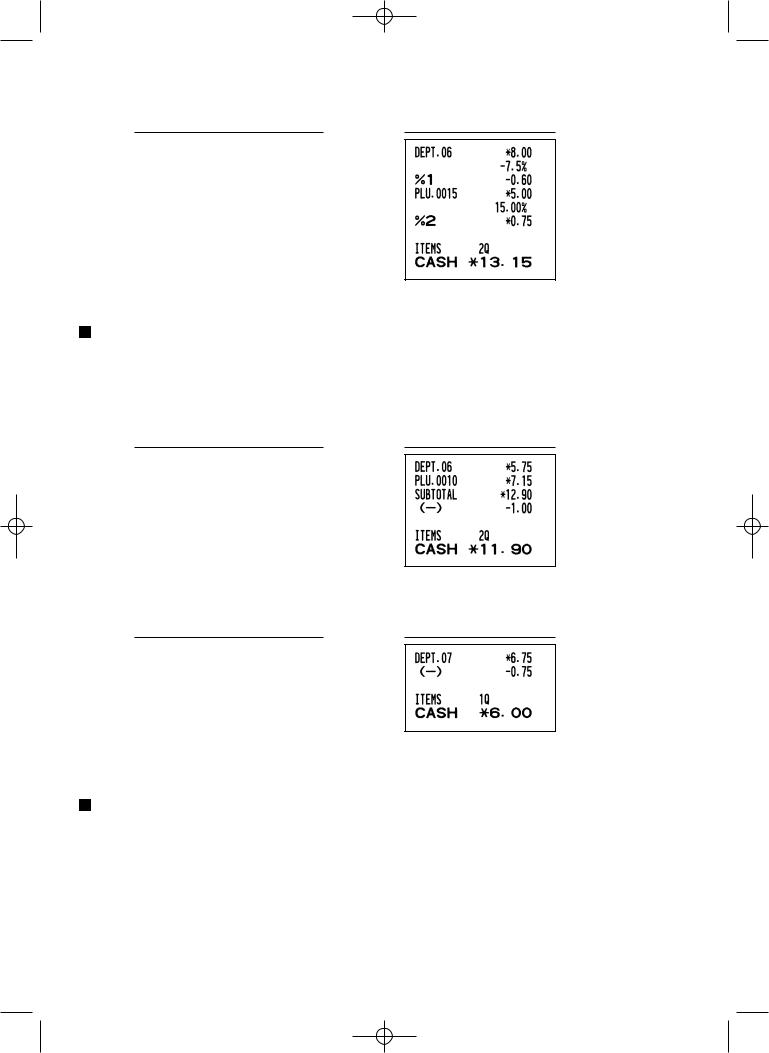
Percent calculation for item entries
Key operation example |
800 +
7 P5 %
15 p
&
A
(When premium and 15% are programmed for the &key)
Deduction entries
Your register allows you to deduct a preset amount or a certain amount manually entered, which are less than a programmed upper limit. These calculations can be after the entry of an item and/or the computation of subtotal depending on the programming.
Deduction for subtotal
Key operation example |
575 +
10 p
ms
100 -
A
Deduction for item entries
Key operation example |
675 *
-
A
(When a deduction amount of 0.75 is programmed.)
Refund entries
For departments 1 to 16, enter the refund amount and press the fkey, and then press the corresponding department key and for departments 17 to 32, enter the refund amount and press the fkey, then press the Dkey and press the corresponding department key (when using the preset price, omit entering the amount). In case of department 33 to 50, enter the department code and press fkey and the dkey, then enter the refund amount and press the dkey if necessary.
For a refund of a PLU item, enter the PLU code and press the fkey, then press the pkey.
For a refund of a subdepartment item, enter the PLU code and press the fkey and pkey, then enter the refund amount and press the pkey.
20
 Loading...