


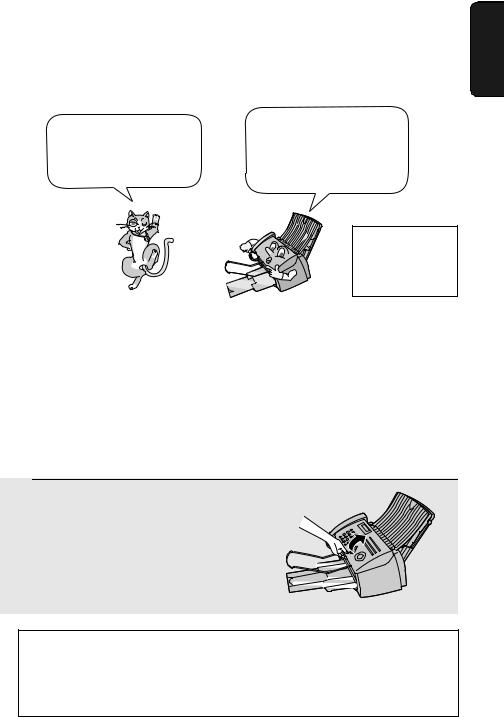
MODEL
UX-B700
FACSIMILE
OPERATION MANUAL
1.Installation
2.Sending Faxes
3. |
Receiving Faxes |
IMPORTANT |
|
4. |
Making Copies |
PLEASE KEEP THE EXTERNAL & INTERNAL PACKAGING SAFE. |
|
5. |
Answering Machine |
PLEASE DO NOT THROW IT AWAY. |
|
|
Connection |
||
|
IN THE UNLIKELY EVENT OF A HARDWARE FAILURE, OUR |
||
6. |
Special Functions |
||
REPAIR CENTRE WILL ASK YOU TO PUT YOUR SHARP |
|||
7. |
Printing Lists |
FACSIMILE IN THIS BOX. |
|
|
|||
8. |
Maintenance |
THANK YOU FOR YOUR ASSISTANCE. |
|
|
|
||
9. |
Troubleshooting |
|

MAINS PLUG WIRING INSTRUCTIONS
This equipment is fitted with a moulded type mains plug which incorporates a detachable fuse cover, under no circumstances should the plug be used without the fuse cover fitted.
In the unlikely event of the socket outlet in your home not being compatible with the plug supplied, cut off the mains plug and fit an appropriate type observing the wiring code below.
DANGER: The fuse from the cut-off plug should be removed and the plug should be disposed of in a safe manner. Under no circumstances should the cut-off plug be inserted into a socket outlet as a serious electric shock may occur.
If you are not sure how to do this, get help from a qualified electrician.
IMPORTANT
The wires in this mains lead are coloured in accordance with the following code:
GREEN-AND-YELLOW: Earth
BLUE: Neutral
BROWN: Live
As the colours of the wires in the mains lead of this apparatus may not correspond with the coloured markings identifying the terminals in your plug, proceed as follows:The wire which is coloured GREEN-AND-YELLOW must be connected to the terminal in the plug which is marked by the letter E, or by the safety earth symbol  or coloured green or green-and-yellow.The wire which is coloured BLUE must be connected to the terminal which is marked with the letter N or coloured black.The wire which is coloured BROWN must be connected to the terminal which is marked with the letter L or coloured red. This apparatus must be protected by a 13A fuse in the mains plug or distribution board.
"WARNING: THIS APPARATUS MUST BE EARTHED"
This equipment complies with the requirements of Directive 1999/5/EC.
Dieses Gerät entspricht den Anforderungen der EU-Richtlinie 1999/5/EG.
Cet appareil est conforme aux exigences de la directive 1999/5/CE.
Este aparato satisface las exigencias de las Directiva 1999/5/CE.
Quest’apparecchio è conforme ai requisiti delle direttiva 1999/5/CE.
Dit apparaat voldoet aan de eisen van de richtlijn 1999/5/EG.
Este equipamento obedece às exigências da directiva 1999/5/CE.
Η συσκευή αυτή ανταποκρίνεται στις απαιτήσεις των οδηγια 1999/5/ΕK.
Denna utrustning uppfyller kraven enligt direktiv 1999/5/EC.
Dette udstyr overholder kravene i direktiv 1999/5/EF.
Dette produktet oppfyller kravene i direktiv 1999/5/EC.
Tämä laite täyttää direktiivi 1999/5/EY.
This is a facsimile product operating in British and Irish analogue public switched telephone networks which follow the TBR21 Standard.
The Declaration of Conformity can be viewed at the following URL address.
http://www.sharp.de/doc/UX-B700.pdf

Introduction
Welcome, and thank you for choosing a SHARP inkjet fax machine! The features and specifications of your inkjet fax are shown below..
Automatic dialling |
Rapid Key Dialling: 18 numbers |
|
Speed Dialling: 81 numbers |
Print cartridge |
Initial cartridge |
|
Approx. yield 300 pages at 4% coverage* |
|
Replacement cartridge: SHARP UX-C70B |
|
Approx. yield 600 pages at 4% coverage* |
Memory size** |
1.8 MB (approx. 100 average pages) |
Modem speed |
14,400 bps with auto fallback to lower speeds. |
Transmission time** |
Approx. 6 seconds (only when ECM is on) |
Scanning Resolution |
Horizontal: 8 lines/mm |
|
Vertical: |
|
Standard: 3.85 lines/mm |
|
Fine /Halftone: 7.7 lines/mm |
|
Super fine: 15.4 lines/mm |
Print resolution |
600 × 600 dpi |
Automatic document |
20 pages max. (A4 size, 80 g/m2 paper) |
feeder |
|
Recording system |
Thermal inkjet |
Halftone (grayscale) |
64 levels |
Compression scheme |
MR, MH, MMR |
*When Ink Save mode is enabled.
**Based on Sharp Standard No. 1 Chart at standard resolution, excluding time for protocol signals (i.e., ITU-T phase C time only).
1
Paper tray capacity |
Approx. 200 A4-size sheets |
(60 - 80 g/m2 paper) |
(at room temperature; maximum stack height |
|
should not cover the line on the tray) |
Compatibility |
ITU-T (CCITT) G3 mode |
Input document size |
Automatic feeding: |
|
Width: 148 to 210 mm / Length: 140 to 297 mm |
|
Manual feeding: |
|
Width: 148 to 210 mm / Length: 140 to 600 mm |
Effective scanning width |
210 mm max. |
Effective printing width |
203 mm max. |
Contrast control |
Automatic/Dark selectable |
Reception modes |
TEL / FAX / A.M. / TEL/FAX |
Copy function |
Single/Multi/Sort (99 copies/page) |
Telephone function |
Yes (cannot be used if power fails) |
Applicable telephone line |
Public switched telephone network (TBR21) / PBX |
Display |
16-digit LCD display |
Power requirements |
230V AC, 50 Hz |
Operating temperature |
15 - 32°C |
Humidity |
25 - 80% RH |
Power consumption |
Standby: 5.0 W |
|
Maximum: 35 W |
Dimensions (without |
Width: 372 mm |
attachments) |
Depth: 259 mm |
|
Height: 203 mm |
Weight (without |
Approx. 5.0 kg |
attachments) |
|
As a part of our policy of continuous improvement, SHARP reserves the right to make design and specification changes for product improvement without prior notice. The performance specification figures indicated are nominal values of production units. There may be some deviations from these values in individual units.
2
Important safety information
Do not disassemble this machine or attempt any procedures not described in this manual. Refer all servicing to qualified service personnel.
Do not install or use the machine near water, or when you are wet. For example, do not use the machine near a bath tub, wash bowl, kitchen sink or laundry tub, in a wet basement, or near a swimming pool. Take care not to spill any liquids on the machine.
Unplug the machine from the telephone socket and then the power outlet and consult a qualified service representative if any of the following situations occur:
-Liquid has been spilled into the machine or the machine has been exposed to rain or water.
-The machine produces odors, smoke, or unusual noises.
-The power cord is frayed or damaged.
-The machine has been dropped or the housing damaged.
Do not allow anything to rest on the power cord, and do not install the machine where people may walk on the power cord.
This machine must only be connected to a 230 V, 50 Hz, earthed (3-prong) outlet. Connecting it to any other kind of outlet will damage the machine and invalidate the warranty.
Never insert objects of any kind into slots or openings on the machine. This could create a risk of fire or electric shock. If an object falls into the machine that you cannot remove, unplug the machine and consult a qualified service representative.
Do not place this machine on an unstable cart, stand or table. The machine could be seriously damaged if it falls.
Never install telephone wiring during a lightning storm.
Never install telephone sockets in wet locations unless the socket is specifically designed for wet locations.
Never touch bare telephone wires or terminals unless the telephone line has been disconnected at the network interface.
Use caution when installing or modifying telephone lines.
Avoid using a telephone (other than a cordless type) during an electrical storm. There may be a remote risk of electric shock from lightning.
Do not use a telephone to report a gas leak in the vicinity of the leak.
The power outlet must be installed near the equipment and must be easily accessible.
3

Table of Contents
A Look at the Operation Panel |
6 |
1. Installation |
8 |
|
|
Unpacking Checklist . . . . . . . . . . . . . . . . . . . . . . . . . . . . . . . . . . . . . . 8 Attachments . . . . . . . . . . . . . . . . . . . . . . . . . . . . . . . . . . . . . . . . . . . . 9 Loading Printing Paper . . . . . . . . . . . . . . . . . . . . . . . . . . . . . . . . . . . 13 Connecting the Power Cord . . . . . . . . . . . . . . . . . . . . . . . . . . . . . . . 14 Installing the Print Cartridge . . . . . . . . . . . . . . . . . . . . . . . . . . . . . . . 15 Connecting the Telephone Line Cord. . . . . . . . . . . . . . . . . . . . . . . . 21 Entering Your Name and Fax Number . . . . . . . . . . . . . . . . . . . . . . . 23 Setting the Date and Time . . . . . . . . . . . . . . . . . . . . . . . . . . . . . . . . 25 Setting the Reception Mode . . . . . . . . . . . . . . . . . . . . . . . . . . . . . . . 27 Flash Select Setting for PBX . . . . . . . . . . . . . . . . . . . . . . . . . . . . . . 28 Volume Adjustment . . . . . . . . . . . . . . . . . . . . . . . . . . . . . . . . . . . . . 29
2. Sending Faxes |
31 |
Transmittable Documents. . . . . . . . . . . . . . . . . . . . . . . . . . . . . . . . . 31 Loading the Document . . . . . . . . . . . . . . . . . . . . . . . . . . . . . . . . . . . 32 Adjusting the Resolution and Contrast . . . . . . . . . . . . . . . . . . . . . . . 34 Sending a Fax by Normal Dialling . . . . . . . . . . . . . . . . . . . . . . . . . . 37 Sending a Fax by Automatic Dialling . . . . . . . . . . . . . . . . . . . . . . . . 38 Batch Page Numbering . . . . . . . . . . . . . . . . . . . . . . . . . . . . . . . . . . 49 Sending a Fax From Memory . . . . . . . . . . . . . . . . . . . . . . . . . . . . . . 50
3. Receiving Faxes |
55 |
Using TEL/FAX Mode. . . . . . . . . . . . . . . . . . . . . . . . . . . . . . . . . . . . 55 Using FAX Mode . . . . . . . . . . . . . . . . . . . . . . . . . . . . . . . . . . . . . . . 57 Using TEL Mode. . . . . . . . . . . . . . . . . . . . . . . . . . . . . . . . . . . . . . . . 58 Optional Reception Settings . . . . . . . . . . . . . . . . . . . . . . . . . . . . . . . 60 Substitute Reception to Memory . . . . . . . . . . . . . . . . . . . . . . . . . . . 63
4. Making Copies |
64 |
4

|
|
Table of Contents |
5. |
Answering Machine Connection |
66 |
|
Connecting an Answering Machine . . . . . . . . . . . . . . |
. . . . . . . . . . . 66 |
|
Using the Answering Machine Connection . . . . . . . . . |
. . . . . . . . . . . 67 |
|
Optional A.M. Mode Settings . . . . . . . . . . . . . . . . . . . |
. . . . . . . . . . . 68 |
6. |
Special Functions |
72 |
|
Caller ID (Requires Subscription to Service) . . . . . . . |
. . . . . . . . . . . 72 |
|
Blocking Reception of Unwanted Faxes . . . . . . . . . . . |
. . . . . . . . . . . 77 |
|
PBX operations . . . . . . . . . . . . . . . . . . . . . . . . . . . . . . |
. . . . . . . . . . . 78 |
|
Polling (Requesting a Fax Transmission) . . . . . . . . . . |
. . . . . . . . . . . 79 |
7. |
Printing Lists |
84 |
8. |
Maintenance |
89 |
|
Cleaning the Machine . . . . . . . . . . . . . . . . . . . . . . . . . |
. . . . . . . . . . . 89 |
|
Improving Print Quality . . . . . . . . . . . . . . . . . . . . . . . . |
. . . . . . . . . . . 92 |
9. |
Troubleshooting |
97 |
|
Problems and Solutions . . . . . . . . . . . . . . . . . . . . . . . |
. . . . . . . . . . . 97 |
|
Messages and Signals . . . . . . . . . . . . . . . . . . . . . . . . |
. . . . . . . . . . 102 |
|
Clearing Paper Jams . . . . . . . . . . . . . . . . . . . . . . . . . |
. . . . . . . . . . 105 |
Quick Reference Guide |
108 |
|
Index |
109 |
|
5
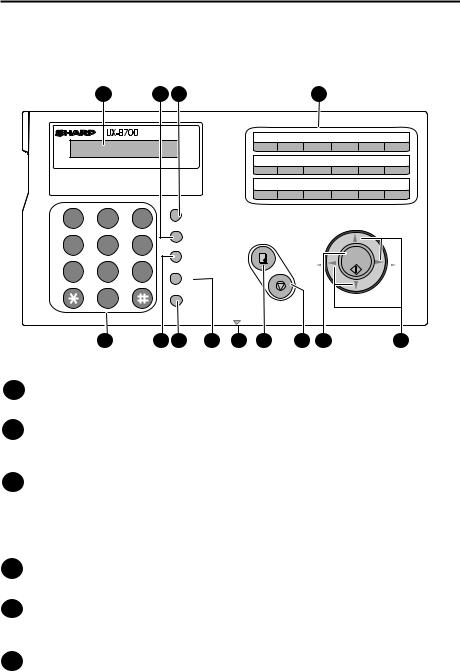
A Look at the Operation Panel
|
1 |
2 |
3 |
|
|
4 |
|
|
|
|
|
TEL |
FAX |
01 |
02 |
03 |
04 |
05 |
06 |
|
|
TEL/FAX |
A.M. |
07 |
08 |
09 |
10 |
11 |
12 |
BUSINESS INKJET FACSIMILE |
13 |
14 |
15 |
16/POLL |
17/G1 |
18/G2 |
|||
|
ABC |
DEF |
RESOLUTION/ |
|
|
|
|
|
|
1 |
2 |
3 |
|
|
|
|
|
|
|
RECEPTION MODE |
|
|
|
|
UP |
|
|||
|
|
|
|
|
|
||||
GHI |
JKL |
MNO |
FUNCTION |
COPY/HELP |
|
|
|
|
|
4 |
5 |
6 |
|
|
|
|
|
||
|
|
|
|
START/ |
|
||||
|
|
|
SPEED DIAL |
|
|
Z |
A |
||
PQRS |
TUV |
WXYZ |
|
|
MEMORY |
||||
|
|
|
|||||||
7 |
8 |
9 |
R |
|
|
REDIAL |
|
|
|
|
|
|
|
|
|
||||
|
0 |
|
SPEAKER |
|
|
|
|
DOWN |
|
|
|
|
STOP |
|
|
|
|
||
|
|
|
|
|
|
|
|
|
|
PANEL RELEASE
5 |
6 |
7 |
8 |
9 |
10 |
11 |
12 |
13 |
1Display
This displays messages and prompts to help you operate the machine.
2FUNCTION key
Press this key followed by the arrow keys to select special functions and settings.
3RESOLUTION / RECEPTION MODE key
When a document is in the feeder, press this key to adjust the resolution for faxing or copying. At any other time, press this key to select the reception mode (an arrow in the display will point to the currently selected reception mode).
4Rapid Dial Keys
Press one of these keys to dial a fax number automatically.
5Number keys
Use these keys to dial numbers, and enter numbers and letters when storing auto-dial numbers.
6SPEED DIAL key
Press this key to dial a fax or voice number using an abbreviated 2-digit Speed Dial number.
6
7SPEAKER key
Press this key to listen to the line and fax tones through the speaker when faxing a document.
Monitoring phone conversations
When speaking through the handset, you can press  SPEAKER to allow a third person to listen to the conversation through the speaker. (To turn off the speaker, press the key again.)
To adjust the volume of the speaker when monitoring a conversation, press
UP |
for low (the volume setting reverts to low each time the |
for high or |
|
DOWN |
|
handset is replaced). |
|
Note that the speaker cannot be used for speaking; it is only for listening.
To avoid feedback (a loud howling sound), be sure to turn off the speaker (press  SPEAKER once again) before you replace the handset.
8R key
If you are on a PBX, use this key to transfer calls and make enquiry calls. If the PBX is a flash-type PBX, use the key to dial out.
9PANEL RELEASE
Grasp here and pull up to open the operation panel.
10COPY/HELP key
When a document is in the feeder, press this key to make a copy of a document. At any other time, press this key to print out the Help List, a quick reference guide to the operation of your fax machine.
11STOP key
Press this key to cancel an operation before it is completed.
12START/MEMORY key
Press this key after dialling to begin fax transmission. Press this key before dialling to send a fax through memory. The key can also be pressed in the date and time display to show the percentage of memory currently used.
13Arrow keys
Use these keys to scroll through and select settings, and to search for autodial numbers.
7
1. Installation
Unpacking Checklist
Before setting up, make sure you have all of the following items.
If any are missing, contact your dealer or retailer.
Paper tray |
Paper tray |
Document tray Document |
|
cover |
|
exit support |
cartridge |
Handset |
Handset |
Telephone |
Extension |
Operation |
Rapid Key |
|
cord |
line cord |
phone adapter |
manual |
labels |
8
Attachments
Points to keep in mind when setting up
Attachments
1. Installation
Do not place the machine in direct sunlight.
About condensation
Do not place the |
Keep dust away from |
machine near heaters |
the machine. |
or air conditioners. |
|
If the machine is moved from a cold to a warm place, it is possible that condensation may form on the scanning glass, preventing proper scanning of documents for transmission. To remove the condensation, turn on the power and wait approximately two hours before using the machine.
Removing the packing tape
1 Open the print compartment cover.
•Press as shown and pull the cover toward you.
2 Remove the tape.
9
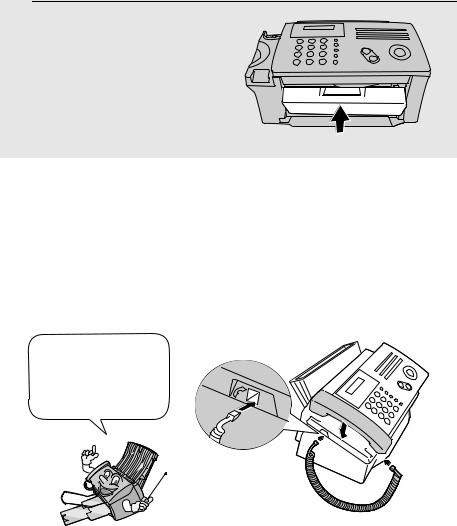
Attachments
3 Close the printer cover.
Connecting the handset
Connect the handset as shown and place it on the handset rest.
♦The ends of the handset cord are identical, so they will go into either socket.
Make sure the handset cord goes into the socket marked with a handset symbol on the side of the machine!
Use the handset to make ordinary phone calls, or to transmit and receive faxes manually.
10
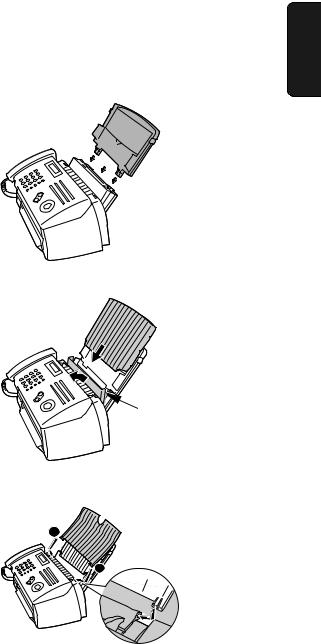
Attaching the paper trays
Attach the paper tray.
Attachments
1. Installation
Pull the paper plate toward you and attach the paper tray cover.
Paper plate
Attach the document tray.
2
 1
1
11
Attachments
Pull out the received document tray.
Attach the document exit support.
12
Loading Printing Paper
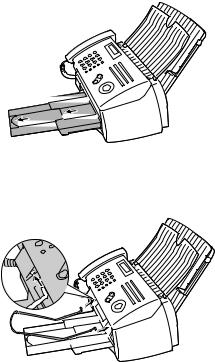
Loading Printing Paper
You can load up to 200 sheets of A4-size, 60 - 80 g/m2 paper in the paper tray (at room temperature; maximum stack height should not be higher than the line on the tray).
1 Pull the paper plate toward you, and
remove the paper tray cover from the paper tray.
2 Pull the paper plate toward you and insert the stack of paper into the tray, PRINT SIDE UP.
•If paper remains in the tray, take it out and combine it into a single stack with the new paper.
The stack should not be higher than this line
Be sure to load the paper so that printing takes place on the print side of the paper. Printing on the reverse side may result in poor print quality.
3 Pull the paper plate toward you and replace the paper tray cover.
1. Installation
13
Connecting the Power Cord
Connecting the Power Cord
Plug the power cord into a 230 V, 50 Hz, earthed (3-prong) AC outlet.
Caution!
♦Make sure you have removed all of the packing tape before plugging in the power cord (see page 9). Plugging in the power cord without doing so may damage the machine.
♦The power outlet should be installed near the equipment and be easily accessible.
The machine does not have a power on/off switch, so the power is turned on and off by simply plugging in or unplugging the power cord.
“CHECK CARTRIDGE” normally appears in the display the first time you plug in the machine. This message appears until you install the print cartridge.
Note: If your area experiences a high incidence of lightning or power surges, we recommend that you install surge protectors for the power and telephone lines. Surge protectors can be purchased at most telephone specialty stores.
14
Installing the Print Cartridge
Installing the Print Cartridge
The initial starter print |
When replacing the print |
|
cartridge, use a SHARP |
||
cartridge included with |
||
UX-C70B cartridge. One |
||
your fax can print about |
||
cartridge can print about |
||
300 A4-size pages. |
||
600 A4r-size pages. |
||
|
The above yields are at 4% coverage in INK SAVE mode.
Caution!
Do not open the print compartment cover of the machine while it is printing. If opened while printing, printing will stop.
Note: Keep ink cartridges sealed in their packages until you are ready to install them. It is recommended that you do not use a cartridge that has been left unused for a long time after opening, as the print quality may be considerably degraded.
♦Make sure the power cord of the machine is plugged in and paper is loaded before installing or replacing the print cartridge.
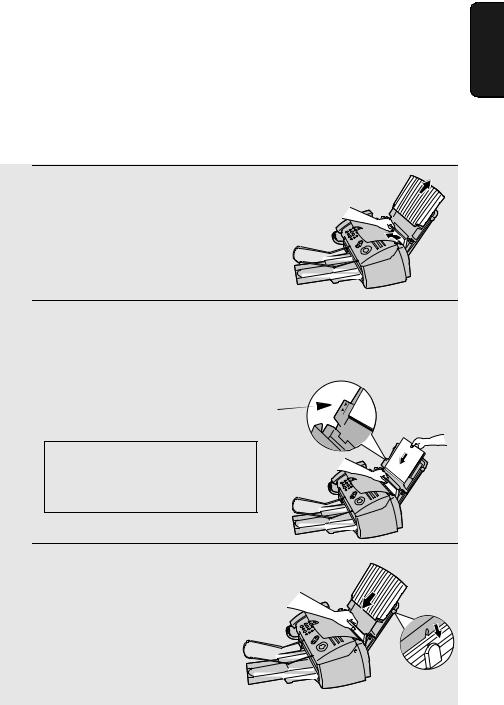
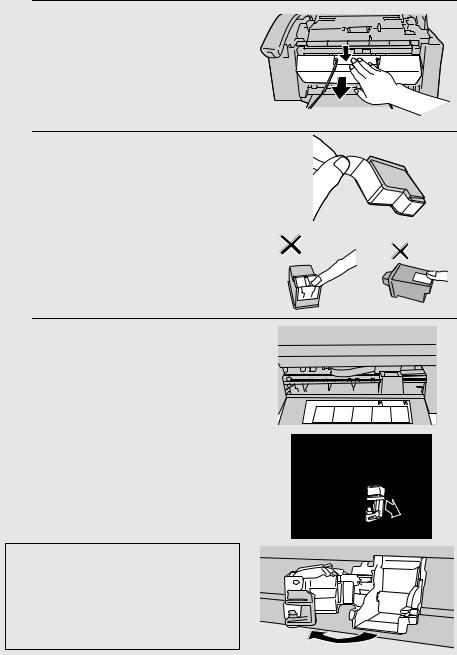
1 Open the operation panel.
If PRINTER ERROR or PRINTER ERROR/CHECK PAPER appears...
In the event that the display shows either of the above messages, you must clear the error before installing the print cartridge. The error can usually be cleared by opening and closing the print compartment cover (see Step 2), or if a paper jam has occurred, by removing the paper jam (see page 106).
1. Installation
15
Installing the Print Cartridge
2
3
Open the print compartment cover.
• Press as shown and pull the cover toward you.
Remove only the tape from the the new cartridge.
•Important: Make sure you remove all of the tape.
• CAUTION! DO NOT touch the gold contact area of the cartridge.
4 Make sure the cartridge holder is between the “CARTRIDGE EXCHANGE AREA” arrows on the label, and then pull the green lever and open the cartridge holder cover.
•If you are replacing the cartridge, remove the old cartridge. If you are going to use the old cartridge again, place it in an air-tight container.
• CAUTION! DO NOT touch the contact area inside the carriage carrier.
Note: If the print compartment cover is left open for approximately 30 minutes with a cartridge installed, the cartridge will automatically return to its home position. To make the cartridge return to the CARTRIDGE EXCHANGE AREA when this has happened, close the cover and then open it again.
16

5 Insert the new print cartridge into the cartridge holder.
6 Place your index finger on the tab as shown and close the cartridge holder cover with your thumb. Make sure the cover clicks into place.
7 Close the print compartment cover.
8 Close the operation panel, pressing
down firmly on both front corners to make sure it clicks into place.
Installing the Print Cartridge
Display:
CHANGE CARTRIDGE
1=NEW, 2=OLD
1. Installation
17

Installing the Print Cartridge
9 Press |
1 |
(NEW) if the cartridge you |
Display when “1” is selected: |
||||
installed is new. |
|
|
|
|
|
||
|
NEW CART.: OK? |
|
|||||
|
|
|
|
|
|||
Press |
2 |
(OLD) if the cartridge you |
|
|
|
|
|
|
|
|
|
|
|||
installed is old. |
|
|
|
|
|
||
|
OK: PRESS START |
|
|||||
|
|
|
|
|
|
|
|
If you select the wrong number by mistake,
press  and repeat the selection.
|
|
|
STOP |
|
|
|
|
|
|
|
|
|
|
|
|
|
|
|
|
|
|
|
|
|
|
|
|
|
|
10 Press |
START/ |
|
|
|
|
|
|||
MEMORY . |
|
|
|
|
|
||||
|
|
If you selected “OLD” in the previous |
|
|
|
|
|
||
|
|
step, this completes the installation |
|
|
|
|
|
||
|
|
procedure. (Note: If you find that print |
|
|
|
|
|
||
|
|
quality is not satisfactory after |
|
|
|
|
|
||
|
|
reinstalling the old cartridge, align the |
|
Display when “NEW” is |
|||||
|
|
cartridge as explained on page 92.) |
|
selected: |
|||||
|
|
|
|
|
|
|
|
|
|
|
|
If you selected “NEW”, the display will |
|
ALIGN CARTRIDGE |
|
||||
|
|
|
|
|
|
|
|||
|
|
show the alternating messages at |
|
|
|
|
|
||
|
|
right. Continue with the following steps |
|
|
|
|
|
||
|
|
1=PRINT,2=SET |
|
||||||
|
|
to align the print cartridge. |
|
|
|||||
|
|
|
|
|
|
|
|||
|
|
|
|
|
|
||||
|
|
|
|
|
|
|
|
|
|
11 Press |
1 to print an alignment page. (To enter an alignment value |
||||||||
|
|
without printing an alignment page, press |
2 .) |
|
|
|
|
||
18
Installing the Print Cartridge
12 In the alignment page that the machine prints, locate the line that comes closest to forming a completely straight line.
In this example, “15” comes |
After the alignment page is |
||
closest to forming a straight line. |
|||
printed, the display shows: |
|||
|
|
|
|
|
ENTER (0-30) 15 |
|
|
|
|
|
|
|
|
|
|
13 Press the number keys to enter the number of the straightest line.
Example: 1 5
• If you make a mistake, press  and then repeat the entry.
STOP
START/
14 Press MEMORY .
1. Installation
19
Installing the Print Cartridge
Note: If at any time the display shows the alternating messages at right, check the printing paper. If the tray is empty, add paper. If there is paper in the tray, take it out and then reinsert it.
START/
When you are finished, press MEMORY .
ADD PAPER &
PRESS START KEY
Ink save mode
If you wish to use less ink or speed up ink drying time when printing faxes and copies, turn on ink save mode. If you prefer a higher quality image, turn off ink save mode.
♦ Ink save mode is initially turned off.
1 |
Press |
FUNCTION once and |
twice. |
Display: |
PRINT SET-UP |
|
|
||||||
2 |
Press |
once and |
twice. |
|
INK SAVE MODE |
|
|
|
|||||
3 |
Press |
once. |
|
|
1=YES, 2=NO |
|
|
|
|
||||
4 |
Press |
|
to turn on ink save mode, or |
|
The display briefly shows |
|
1 |
|
your selection, then: |
||||
|
2 to turn it off. |
|
|
ALIGN CART. |
||
5 |
Press |
STOP |
to return to the date and time display. |
|
||
20
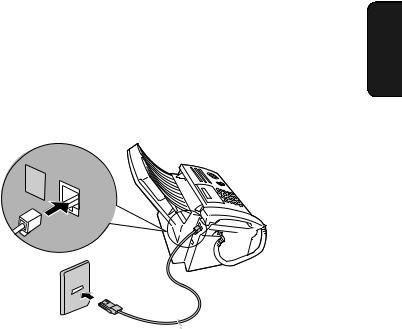
Connecting the Telephone Line Cord
Connecting the Telephone Line Cord
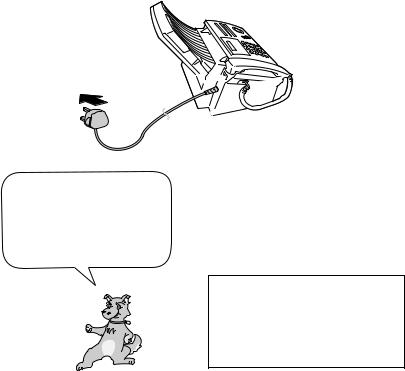
Insert one end of the line cord into the socket on the back of the machine marked TEL. LINE. Insert the other end into a wall telephone socket.
L. |
|
SET |
TEL. |
|
|
|
LINE |
1. Installation
Comments:
♦The fax machine is not designed for use on a line which has call waiting, call forwarding, or certain other special services offered by your telephone company. If you attempt to use the fax machine in conjunction with any of these services, you may experience errors during transmission and reception of facsimile messages.
♦The fax machine is not compatible with digital telephone systems.
21
Connecting the Telephone Line Cord
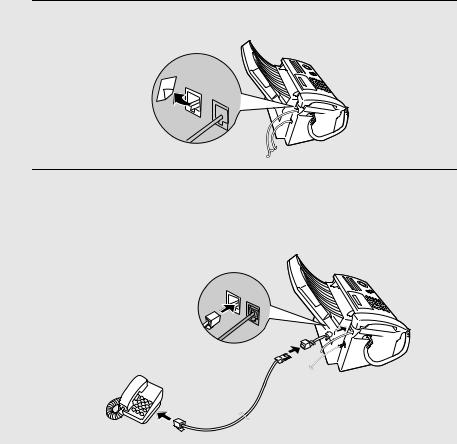
Extension phone (optional)
If desired, you can connect an extension phone to the TEL. SET socket on the fax machine.
♦ To connect an answering machine to the fax machine, see page 66.
1 Remove the seal covering the TEL. SET socket.
TEL. |
|
SET |
TEL. |
|
LINE |
2 Connect the extension phone line to the TEL. SET socket using the provided adapter.
• Eire: Insert the extension phone line directly into the TEL. SET socket.
TEL. |
|
SET |
TEL. |
|
LINE |
22
Entering Your Name and Fax Number
Entering Your Name and Fax Number
Before you can begin sending faxes, you must enter your
Once you enter this
name and fax (telephone)
information, it will
number. You also need to set
automatically appear at
the date and time.
the top of each fax page you send.
1. Installation
 FUNCTION
01 |
02 |
03 |
04 |
05 |
06 |
07 |
08 |
09 |
10 |
11 |
12 |
13 |
14 |
15 |
16/POLL |
17/G1 |
18/G2 |
1 |
2 |
3 |
START/ |
|
MEMORY |
||||
|
|
|
||
4 |
5 |
6 |
|
|
7 |
8 |
9 |
|
|
|
0 |
|
|
STOP
1
2
Press |
FUNCTION once and |
Display: |
twice. |
||
|
|
ENTRY MODE |
Press |
once. |
OWN NUMBER SET |
3 Press |
once. |
ENTER FAX # |
23
Entering Your Name and Fax Number
4 Enter your fax number by pressing the number keys (max. 20 digits).
•To insert a space between digits, press  . To enter a “+”, press
  .
.
•To clear a mistake, press  SPEAKER .
5
6
START/
Press MEMORY .
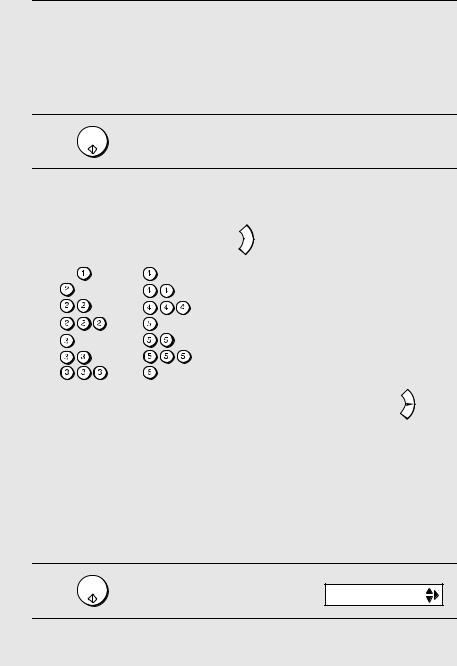
Enter your name by pressing number keys for each letter as shown in the chart below. Up to 24 characters can be entered.
Example: SHARP = 7777 44 2 777  7
7
SPACE = |
G = |
A = |
H = |
B = |
I = |
C = |
J = |
D = |
K = |
E = |
L = |
F = |
M = |
N = 

O = 

 P =
P = 
Q = 

R = 

 S =
S = 


T = 
U = 

V = 

 W =
W = 
X = 

Y = 

 Z =
Z = 


♦ To enter two letters in succession that require the same key, press |
after |
entering the first letter. |
|
♦To clear a mistake, press  SPEAKER .
♦To enter a lower case letter, continue pressing the key for the letter until the lower case letter appears. To enter one of the following symbols, press
 or
or  repeatedly: . / ! " # $ % & ’ ( ) + + , - : ; < = > ? @ [ ¥ ] ^ _ ' { |
} ) (
|
|
Display: |
7 |
START/ |
|
Press MEMORY . |
SECURITY |
8 Press  to return to the date and time display.
STOP
24

Setting the Date and Time
Setting the Date and Time
The date and time appear in the display and are printed at the top of every page you fax. Set the date and time as shown below.
 FUNCTION
01 |
02 |
03 |
04 |
05 |
06 |
07 |
08 |
09 |
10 |
11 |
12 |
13 |
14 |
15 |
16/POLL |
17/G1 |
18/G2 |
1 |
2 |
3 |
START/ |
4 |
5 |
6 |
MEMORY |
|
|||
7 |
8 |
9 |
|
|
0 |
|
|
STOP
1 |
Press |
FUNCTION once and |
twice. |
Display: |
|
ENTRY MODE |
|
||
2 |
|
|
|
|
|
|
|
|
|
|
|
|
|
|
|
|
|
|
|
Press |
once and |
|
3 times. |
|
|
|
DATE&TIME SET |
|
|
|
|
|
|
|
|
||||
|
|
|
|
|
|
|
|
|
|
3 |
|
|
|
The currently set date |
|
|
|
||
|
|
|
|
DATE 15-08-2005 |
|
||||
Press |
. |
|
appears (example): |
|
|
||||
4 |
|
|
|
|
|
|
|
|
|
Enter a two-digit number for the day (“01” to “31”). |
|
|
|
||||||
|
Example: the 5th 0 |
5 |
|
|
|
|
DATE 05-08-2005 |
|
|
|
|
|
|
||||||
|
• To correct a mistake, press |
to move the cursor back to the mistake and |
|||||||
then enter the correct number.
5 Enter a two-digit number for the month (“01” for January, “02” for February, “12” for December, etc.).
Example: January 0 |
1 |
|
|
DATE 05-01-2005 |
|
|
1. Installation
25
Setting the Date and Time
6 Enter the year (four digits). |
|
|
|
The currently set time |
|
||
|
|
|
appears (example): |
|
|||
|
Example: 2005 2 |
0 |
0 5 |
|
|
|
|
|
|
|
TIME 12:19 |
|
|||
|
|
||||||
|
|
|
|
|
|
|
|
|
|
|
|
|
|
|
|
7 Enter a two-digit number for the hour (“01” to “23”) and a two-digit number for the minute (“00” to “59”).
|
Example: 9:25 0 |
9 |
2 |
5 |
05-JAN 09:25 |
8 |
START/ |
|
|
|
ANTI JUNK # |
Press MEMORY to start the clock. |
|
||||
9 Press  to return to the date and time display.
STOP
26

Setting the Reception Mode
Setting the Reception Mode
Your fax has four modes for receiving incoming faxes:
FAX mode:
Select this mode when you only want to receive faxes on your line. The fax machine will automatically answer all calls on two rings and receive incoming faxes.
TEL mode:
This mode is the most convenient for receiving phone calls. Faxes can also be received; however, all calls must first be answered by picking up the fax's handset or an extension phone connected to the same line.
TEL/FAX mode:
This mode is convenient for receiving both faxes and voice calls. When a call comes in, the fax will detect whether it is a voice call (including manually dialled faxes), or an automatically dialled fax. If it is a voice call, the fax will make a special ringing sound to alert you to answer. If it is an automatically dialled fax, reception will begin automatically.
A.M. mode:
Use this mode only if you have connected an answering machine to the fax (see Chapter 5). Select this mode when you go out to receive voice messages in your answering machine and faxes on your fax machine.
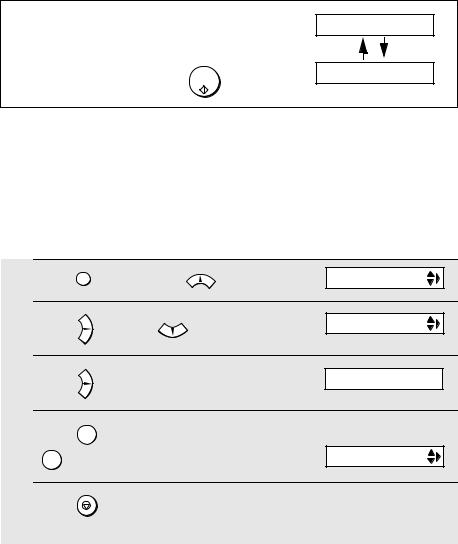
Setting the reception mode
Make sure a document is not loaded in the document feeder, and then
press |
RESOLUTION/ |
until the arrow in the display points to the desired mode. |
|||||||
|
|
RECEPTION MODE |
|
|
|
|
|
|
|
|
|
RESOLUTION/ |
|
|
|
|
|
|
TEL FAX |
|
|
|
|
|
|
|
|
|
|
|
|
RECEPTION MODE |
|
|
|
|
|
|
05-JAN 10:30 |
|
|
|
|
|
|
|
|
|
TEL/FAX A.M. |
|
|
01 |
02 |
03 |
04 |
05 |
06 |
|
TEL FAX |
|
|
07 |
08 |
09 |
10 |
11 |
12 |
RESOLUTION/ |
05-JAN 10:30 |
|
|
|
|
|
|
|
|
RECEPTION MODE |
TEL/FAX A.M. |
|
|
13 |
14 |
15 |
16/POLL |
17/G1 |
18/G2 |
|
|
1 |
2 |
3 |
|
|
|
|
|
|
TEL FAX |
|
|
|
|
|
|
05-JAN 10:30 |
|||
|
|
|
|
|
|
|
|
|
|
4 |
5 |
6 |
|
|
|
|
|
|
TEL/FAX A.M. |
7 |
8 |
9 |
|
|
|
|
|
|
TEL FAX |
|
|
|
|
|
|
|
|
|
|
|
0 |
|
|
|
|
|
|
|
05-JAN 10:30 |
|
|
|
|
|
|
|
|
|
|
|
|
|
|
|
|
|
|
|
TEL/FAX A.M. |
For more information on receiving faxes in FAX, TEL and TEL/FAX modes, see Chapter 3, Receiving Faxes. For more information on using A.M. mode, see Chapter 5.
1. Installation
27

Flash Select Setting for PBX
Flash Select Setting for PBX
Note: This setting is normally only used in Germany. In other countries, you can try changing the setting if you encounter difficulty with the default setting.
If your fax machine is connected to a PBX and the PBX uses the “Flash” method to connect to an outside line, you must select the appropriate Flash Select setting depending on whether your PBX line is a normal telephone line or an ISDN line (or other high-speed line).
1
2
Press |
FUNCTION once and |
3 times |
Display: |
|
OPTION SETTING |
||||
|
|
|
||
Press |
once and |
7 times. |
FLASH SELECT |
|
|
3 Press |
once. |
1: SHORT TIME |
|
4 Select |
1 |
(SHORT TIME) if your PBX |
line is a normal telephone line. |
||
Select |
2 |
(LONG TIME) if your PBX |
line is an ISDN line (or other highspeed line).
The display briefly shows your selection, then:
FAX SIGNAL RX
5 Press  to return to the date and time display.
STOP
28
 Loading...