


WARNING FCC Regulations state that any unauthorized changes or modifications to this equipment not expressly approved by the manufacturer could void the user’s authority to operate this equipment.
Note: This equipment has been tested and found to comply with the limits for a Class B digital device, pursuant to Part 15 of the FCC Rules.
These limits are designed to provide reasonable protection against harmful interference in a residential installation.
This equipment generates, uses and can radiate radio frequency energy and, if not installed and used in accordance with the instructions, may cause harmful interference to radio communications. However, there is no guarantee that interference will not occur in a particular installation. If this equipment does cause harmful interference to radio or television reception, which can be determined by turning the equipment off and on, the user is encouraged to try to correct the interference by one or more of the following measures:
Reorient or relocate the receiving antenna.
Increase the separation between the equipment and the receiver.
Connect the equipment into an outlet on a circuit different from that to which the receiver is connected.
Consult the dealer or an experienced radio/TV technician for help.
NOTE The laser component of the UX-1000/1100 is rated Class 1 and complies with 21 CFR 1040.10 and 1040.11 of the CDRH standards. This means that the machine does not produce hazardous laser radiation.
ABOUT THE TELEPHONE CONSUMER PROTECTION ACT OF 1991
"The Telephone Consumer Protection Act of 1991 makes it unlawful for any person to use a computer or other electronic device to send any message via a telephone facsimile machine unless such message clearly contains in a margin at the top or bottom of each transmitted page or on the first page of the transmission the following information:
(1)The date and time of transmission.
(2)Identification of either the business, business entity or individual sending the message.
(3)Telephone number of either the sending machine, business, business entity or individual.
In order to program this information into your facsimile machine, please refer to the appropriate instructions in the operation manual."
As an ENERGY STAR® partner, SHARP has deter-
mined that this product meets the ENERGY STAR® guidelines for energy efficiency.
FOR YOUR RECORDS
Please record the model number and serial number below, for easy reference, in case of loss or theft. These numbers are located on the rear side of the unit.
Space is also provided for other relevant information.
Model Number ____________________________________________________________
Serial Number ____________________________________________________________
Date of Purchase __________________________________________________________
Place of Purchase _________________________________________________________

Quick Reference Guide
Installation
TEL. |
|
SET |
TEL. |
|
LINE |
EXT. |
|
PHONE |
TEL. |
|
LINE |
1.Connect the handset as shown.
2.Plug one end of the telephone line into the TEL. LINE jack on the rear of the fax, and the other end into your telephone wall jack.
3.Plug the power cord into a grounded, 120 V outlet.
Installation with an answering machine and/or extension telephone
4.Remove the seal covering the TEL. SET jack on the rear of the fax. Connect an extension telephone or answering machine to the TEL. SET jack.
5.If desired, connect an extension phone to the answering machine.
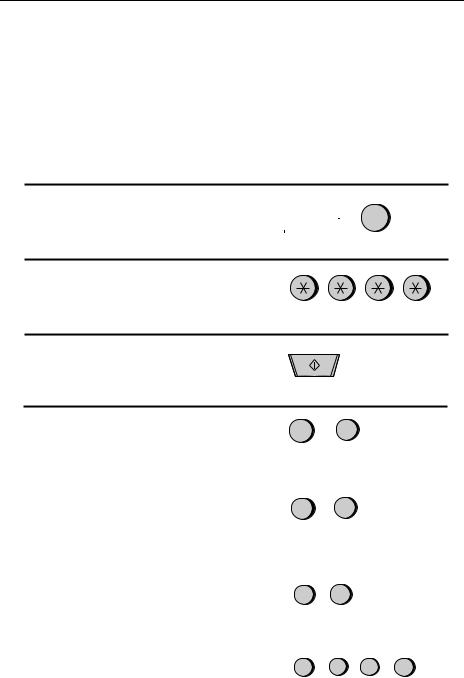
Entering your name and number
FCC regulations require your name and fax number to appear on all documents you send. To program your fax to do this automatically, follow the steps below:
1. Press the FUNCTION key and then press
"3":
FUNCTION
3
ENTRY MODE will appear in the display.
2.Press the "#" key twice: 

OWN NUMBER SET will appear in the display.
START
3. Press the START key:
4.Enter your fax number (max. of 20 digits) by pressing the number keys.
♦If you make a mistake, press the HOLD/SEARCH key to move the cursor back to the mistake, then enter the correct number or letter. (To move the cursor forward, press the SPEAKER key.)
START
5.Press the START key: 
6.Enter your name by pressing the appropriate number keys as shown below. Press each key one or more times until the desired letter appears in the display.
|
ABC |
DEF |
DIAL |
Deletes high- |
|
|
SPEED |
|
|||
1 |
2 |
3 |
|
lighted letter |
|
GHI |
JKL |
MNO |
REDIAL |
Upper/lower |
|
4 |
5 |
6 |
|
case shift key |
|
PQRS |
TUV |
WXYZ |
HOLD/ |
Moves cursor to |
|
7 |
8 |
9 |
SEARCH |
||
|
|||||
|
the left. |
||||
|
|
|
|
0 |
SPEAKER |
Moves cursor to |
|
||
|
the right. |
|
|
|
Press either key one or more times to select and enter a symbol.
♦Enter a space with the "1" key.
♦To enter two letters in succession which require using the same key, press the SPEAKER key after entering the first letter.
Example: To enter "ABZ Co.", press:
"2" twice for the letter A,
Press SPEAKER to move the cursor to the right,
"2" three times for the letter B,
"9" five times for the letter Z,
"1" twice for a space,
"2" four times for the letter C,
Press REDIAL for a lower case letter, "6" four times for the letter o,
"#" once for a period.
7. When finished, press the START key and then the STOP key. START STOP
(See Pages 14-15 of your operation manual.)

Quick Reference Guide
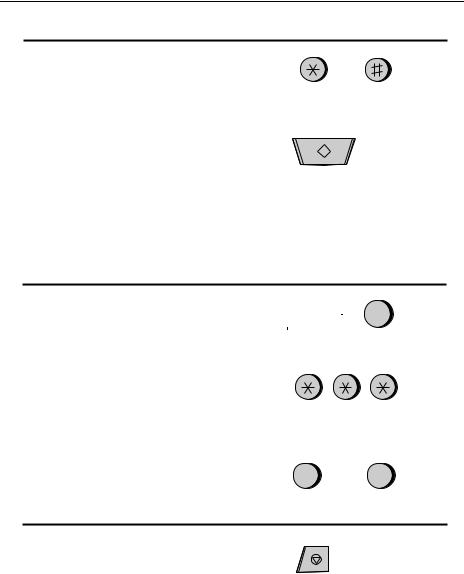
Setting the date and time
To set the date and time, press the following
keys: FUNCTION
3
DATE & TIME SET will appear in the display.
START
Press the START key:
Enter two digits for the Month (01 through 12). Enter two digits for the Day (01 through 31). Enter two digits for the Year (00 through 99). Enter two digits for the Hour (01 through 12). Enter two digits for the Minute (00 through 59).
Press the "*" key for A.M. or the "#" key for P.M.
When finished, press the START key and
then the STOP key: |
START |
STOP |
(See Page 17 of your operation manual.)
Storing and clearing numbers for automatic dialing
To store a new number or change an existing number, press the following sequence of keys:
FUNCTION 3
FAX/TEL # MODE will appear in the display.
1.Press the "1" key: 1
2.Enter a 2-digit number (from "01" to "99") by pressing the number keys. This will be the Speed Dial number.
3.Enter the full telephone/fax number.
START
4. Press the START key:
5.Enter the name of the location by pressing number keys (max. of 20 characters).
START
6.Press the START key: 
7.Return to Step 3 to store another number, or press STOP to exit.
To clear a Speed Dial number, press the fol-
lowing sequence of keys: FUNCTION
3
Press "2" and then enter the 2-digit Speed
Dial number.
STOP
START
Press: 
(See Pages 22-24 of your operation manual.)
Sending documents
Place your document (up to 20 pages) face down in the document feeder.
Normal Dialing
S P E A K E R
1. Lift the handset or press
2.Dial the fax number by pressing the number keys.
3.Wait for the reception tone (if a person answers, ask them to press their Start key).
4.Press your START key and then replace the handset.
Rapid Key Dialing
Press the appropriate Rapid Key (if the Rapid Key is from 20 to 38, press the SHIFT key first). Transmission will begin.
Speed Dialing
SPEED
DIAL
1. Press the SPEED DIAL key:
2.Enter the Speed Dial number by pressing the number keys.
START
3. Press: 
Direct Keypad Dialing
1. Enter the fax number by pressing the number keys.
START
2. Press:
(See Pages 32-34 of your operation manual.)

Quick Reference Guide
Receiving Documents
Press the RECEPTION |
RECEPTION |
|
MODE |
||
MODE key until "AUTO" |
|
|
|
|
|
or "MANU" appears in the |
|
|
display. |
|
|
|
|
|
|
|
|
AUTO reception: The fax will automatically answer after four rings and receive the incoming document.
MANUAL reception: Lift the handset when the fax rings. If you hear a fax tone, wait until RECEIVING appears in the display, then hang up (if RECEIVING doesn’t appear, press the START key). If the calling party talks to you, press your START key to begin reception.
(See Pages 37-38 of your manual.)
Loading paper
1. Insert the paper tray into the fax if not yet installed.
2. Remove the paper cover if it is on the tray. (For legal paper, flip up the tray externder.)
3. Pull the paper release plate toward you.
♦If any paper remains in the tray, take it out and
combine it into a single stack with the new paper.
4. Insert the stack of |
|
paper into the tray. |
|
Replace the tray |
|
cover and then push |
|
the paper release |
LEGAL |
|
LETTER |
plate back down. |
|
5. Press the following sequence of keys:
FUNCTION
6
Press "1" if you loaded letter size paper, or "2" if you loaded legal size paper.
STOP
When finished, press:
Installing the imaging film
1. Press the release marked OPEN and open the print compartment cover.
2. Insert two of the gears into the ends of the spool with film.
3.Hold the empty spool so that the end with
only one slot is on the left, and lower the spools into the printing compartment so that the gears fit into the slots on each side of the compartment.
4. Cut the band holding the spools together with scissors, and remove it. Insert the remaining gear into the right end of the empty spool and the flange into the left end of the empty spool.
5. Pull the empty spool toward the back of the compartment, unwinding the leader from the spool with film. Insert the empty spool into the compartment so that the gear and spool fit into the slots on each side of the compartment.
6. Wind the film slightly to remove slack and then close the printer compartment cover.
7.If you replaced the film, press the following sequence of keys (this is not necessary for the sample film included with the fax):
FUNCTION |
START |
6
(See pages 9-10 of your manual.) |
(See Pages 2-5 of your operation manual.) |
Quick Reference Guide
FUNCTION key menu
The following chart shows the layout of the functions and settings accessed by pressing the FUNCTION key. First press the FUNCTION key, the appropriate numeric key as shown, and then "#" or "*" until the desired item appears.
Instructions for making each setting appear in the display. If you have any difficulty, refer to the detailed instructions on the page shown below the setting.
FUNCTION
|
|
|
|
|
|
|
|
|
|
|
|
|
|
|
|
|
|
|
|
|
|
|
2 |
|
|
|
|
|
|
1 |
|
3 |
4 |
|
|||||
|
Timer Mode |
Listing Mode |
Entry Mode |
Optional Settings |
|||||
|
Send Mode |
Activity Report |
Fax/Tel Num- |
Fine Resolution |
Fax Reception |
||||
(66) |
|
(77) |
|
bers for Auto |
Priority |
When TAD |
|||
|
Poll Mode |
Timer List |
Dialing |
(73) |
Fails |
||||
|
(22) |
|
|
(52, 75) |
|||||
(66) |
|
(79) |
|
|
Number of |
||||
|
|
Own Number |
|
||||||
|
|
|
Telephone |
Rings in Auto |
Distinctive Ring |
||||
|
|
|
and Name Set |
Mode |
(20, 75) |
||||
|
|
|
Number List |
||||||
|
|
|
(14) |
|
(73) |
|
|||
|
|
|
(80) |
|
|
Fax Signal Re- |
|||
|
|
|
|
Polling Secu- |
Recall Wait In- |
||||
|
|
|
Passcode List |
ceive |
|||||
|
|
|
rity Select |
terval |
(75) |
||||
|
|
|
(80) |
|
|||||
|
|
|
|
(64) |
|
(74) |
|
||
|
|
|
Option Setting |
|
Junk Number |
||||
|
|
|
Passcode Num- |
|
|||||
|
|
|
Recall Times |
Check |
|||||
|
|
|
List |
||||||
|
|
|
bers for Polling |
(74) |
(76) |
||||
|
|
|
(80) |
|
|||||
|
|
|
|
(65) |
|
|
|
||
|
|
|
|
|
|
Tel/Fax Re- |
Polling |
||
|
|
|
Anti Junk |
Date and Time |
|||||
|
|
|
mote Number |
(76) |
|||||
|
|
|
Number List |
||||||
|
|
|
Set |
(74) |
|
||||
|
|
|
(81) |
|
Caller ID |
||||
|
|
|
|
(17) |
|
Remote Recep- |
|||
|
|
|
|
|
|
(76) |
|||
|
|
|
Program and |
Daylight Saving |
|||||
|
|
|
tion Select |
|
|||||
|
|
|
Group List |
Auto Cover |
|||||
|
|
|
(18) |
|
(74) |
||||
|
|
|
(81) |
|
|
Sheet |
|||
|
|
|
|
Store Junk |
Transaction Re- |
||||
|
|
|
Caller ID List |
(76) |
|||||
|
|
|
Number |
port Print Select |
|
||||
|
|
|
(82) |
|
Activity Report |
||||
|
|
|
Print Setup List |
(57) |
|
(74) |
Auto Print |
||
|
|
|
Priority Call |
|
|||||
|
|
|
Dial Mode |
(76) |
|||||
|
|
|
(82) |
|
|||||
|
|
|
|
Number |
(74) |
|
|||
|
|
|
|
|
ECM (76) |
||||
|
|
|
|
|
(55) |
|
|
||
|
|
|
|
|
|
|
|
||

Quick Reference Guide
5 |
6 |
7 |
Cover Sheet |
Print Set-up |
Program/Group |
Cover Sheet |
Initialize Film |
Program Entry |
Header |
(5) |
Mode |
(30) |
Reception Ratio |
(68) |
|
|
|
|
(39) |
Gr ou p Entry |
|
2 in 1 Print |
Mode |
|
(25) |
|
|
(39) |
|
|
|
|
|
Paper Type Set |
|
|
(10) |
|
|
Paper Size Set |
|
|
(10) |
|
|
Copy Cut-off |
|
|
(42) |
|

Introduction
Welcome to the UX-500/510 and thank you for choosing Sharp! In addition to providing you with the ease and convenience of plain-paper printing, the UX500/510 features a variety of special functions designed to increase the range and power of your communications.
This manual gives you easy-to-follow instructions for installing and using the UX-500/510. The Table of Contents will show you where instructions for using each feature are located. While you may not need to read every section in detail at first, we recommend you at least look them over briefly.
If you have any questions or problems which cannot be solved by reading this manual, please contact Sharp’s Customer Information Center. The number is 1- 800-BE SHARP.
Important:
•This facsimile machine is not designed for use on a line which has call waiting, call forwarding, or certain other special services offered by your telephone company. If you attempt to use the fax machine in conjunction with any of these services, you may experience errors during transmission and reception of facsimile messages.
•This fax machine is not compatible with digital telephone systems. No other fax machines may be connected to the same line.
Note: The illustrations in this manual show the UX-500.
Important safety information
•If your facsimile equipment is not operating properly, you should immediately remove it from your telephone line, as it may cause harm to the telephone network.
•The power outlet must be installed near the equipment and must be easily accessible.
•Never install telephone wiring during a lightning storm.
•Never install telephone jacks in wet locations unless the jack is specifically designed for wet locations.
•Never touch bare telephone wires or terminals unless the telephone line has been disconnected at the network interface.
•Use caution when installing or modifying telephone lines.
•Avoid using a telephone (other than a cordless type) during an electrical storm. There may be a remote risk of electric shock from lightning.
•Do not use a telephone to report a gas leak in the vicinity of the leak.
•Do not install or use the machine near water, or when you are wet. Take care not to spill any liquids on the machine.

Table of Contents
1 |
Installation |
1 |
|
Unpacking Checklist . . . . . . . . . . . . . . . . . . . . . . . . . . . . . . . . . . . . . . . |
. 1 |
|
Loading the Imaging Film . . . . . . . . . . . . . . . . . . . . . . . . . . . . . . . . . . . |
2 |
|
Connections. . . . . . . . . . . . . . . . . . . . . . . . . . . . . . . . . . . . . . . . . . . . . . . |
6 |
|
Attachments. . . . . . . . . . . . . . . . . . . . . . . . . . . . . . . . . . . . . . . . . . . . . . . |
8 |
|
Loading Printing Paper . . . . . . . . . . . . . . . . . . . . . . . . . . . . . . . . . . . . . . |
9 |
2 |
Initial Settings |
11 |
|
Setup Guide . . . . . . . . . . . . . . . . . . . . . . . . . . . . . . . . . . . . . . . . . . . . . . |
11 |
|
A Look at the Operation Panel . . . . . . . . . . . . . . . . . . . . . . . . . . . . . . . |
12 |
|
Entering Your Name and Fax Number . . . . . . . . . . . . . . . . . . . . . . . . . |
14 |
|
Entering Letters for Names. . . . . . . . . . . . . . . . . . . . . . . . . . . . . . . . . . |
15 |
|
Setting the Date and Time. . . . . . . . . . . . . . . . . . . . . . . . . . . . . . . . . . . |
17 |
|
Selecting the Reception Mode . . . . . . . . . . . . . . . . . . . . . . . . . . . . . . . |
19 |
|
Distinctive Ring . . . . . . . . . . . . . . . . . . . . . . . . . . . . . . . . . . . . . . . . . . |
20 |
|
Storing Numbers for Automatic Dialing . . . . . . . . . . . . . . . . . . . . . . . |
22 |
|
Volume Adjustment . . . . . . . . . . . . . . . . . . . . . . . . . . . . . . . . . . . . . . . |
26 |
3 |
Sending Documents |
27 |
|
Transmittable Documents . . . . . . . . . . . . . . . . . . . . . . . . . . . . . . . . . . . |
27 |
|
Loading the Document . . . . . . . . . . . . . . . . . . . . . . . . . . . . . . . . . . . . . |
28 |
|
Optional Transmission Settings . . . . . . . . . . . . . . . . . . . . . . . . . . . . . . |
29 |
|
Dialing and Transmission . . . . . . . . . . . . . . . . . . . . . . . . . . . . . . . . . . . |
32 |
4 |
Receiving Documents |
37 |
|
Using Auto Mode . . . . . . . . . . . . . . . . . . . . . . . . . . . . . . . . . . . . . . . . . |
37 |
|
Using Manual Mode . . . . . . . . . . . . . . . . . . . . . . . . . . . . . . . . . . . . . . . |
37 |
5 |
Making Copies |
40 |
6 |
Making Telephone Calls |
43 |

7 |
Answering Machine Hookup |
45 |
|
Using the Hookup . . . . . . . . . . . . . . . . . . . . . . . . . . . . . . . . . . . . . . . |
. 45 |
|
Optional Hookup Settings . . . . . . . . . . . . . . . . . . . . . . . . . . . . . . . . . |
. 51 |
8 |
Special Functions |
53 |
|
Caller ID . . . . . . . . . . . . . . . . . . . . . . . . . . . . . . . . . . . . . . . . . . . . . . . . |
53 |
|
Blocking Reception of Unwanted Faxes . . . . . . . . . . . . . . . . . . . . . . . |
57 |
|
Memory . . . . . . . . . . . . . . . . . . . . . . . . . . . . . . . . . . . . . . . . . . . . . . . . . |
59 |
|
Broadcasting . . . . . . . . . . . . . . . . . . . . . . . . . . . . . . . . . . . . . . . . . . . . . |
61 |
|
Polling (Requesting a Fax Transmission). . . . . . . . . . . . . . . . . . . . . . . |
63 |
|
Timer Operations . . . . . . . . . . . . . . . . . . . . . . . . . . . . . . . . . . . . . . . . . |
66 |
|
Entering and Using Programs . . . . . . . . . . . . . . . . . . . . . . . . . . . . . . . . |
68 |
9 |
Optional Settings |
73 |
10 |
Printing Reports and Lists |
77 |
11 |
Maintenance |
83 |
12 |
Troubleshooting |
85 |
|
Problems and Solutions. . . . . . . . . . . . . . . . . . . . . . . . . . . . . . . . . . . . . |
85 |
|
Messages and Signals . . . . . . . . . . . . . . . . . . . . . . . . . . . . . . . . . . . . . . |
88 |
|
Clearing Paper Jams . . . . . . . . . . . . . . . . . . . . . . . . . . . . . . . . . . . . . . . |
90 |
Specifications |
92 |
|
FCC Regulatory Information |
96 |
|
Guia de Consulta Rapida |
97 |
|
Index |
100 |
|
Chapter
1
Installation
Unpacking Checklist
After unpacking your fax, make sure you have all the items shown below. If any are missing, contact your dealer or retailer.
Rapid key Paper tray labels cover
|
|
Operation |
Paper tray |
|
manual |
|
|
|
|
|
Handset cord |
Handset |
|
Telephone |
|
|
line cord |
3 gears and |
|
Original document |
|
support (located |
|
1 flange |
|
|
|
between box and |
|
|
|
|
|
Sample |
packing case) |
|
|
|
|
imaging film |
|
Points to keep in mind when setting up
♦The fax must be installed on a level surface.
♦Keep the fax away from air conditioners, heaters, direct sunlight, and dust.
♦Provide easy access to the front, back, and sides of the fax. In particular, keep the area in front of the fax clear, or the original document may jam as it comes out after scanning.
♦If the fax is moved from a cold to a warm place, it is possible that condensation may form on the reading glass, preventing proper scanning of documents for transmission. To remove the condensation, turn on the power and wait approximately two hours before using the fax.
♦If your area experiences a high incidence of lightning or power surges, we recommend that you install surge protectors for the power and telephone lines. Surge protectors can be purchased at most telephone specialty stores.
1
Chapter 1 Installation
Loading the Imaging Film
The printer unit in your fax creates printed text and images by applying heat to the imaging film, which causes ink to be transferred from the film to the page. Follow the steps below to install or replace the imaging film.
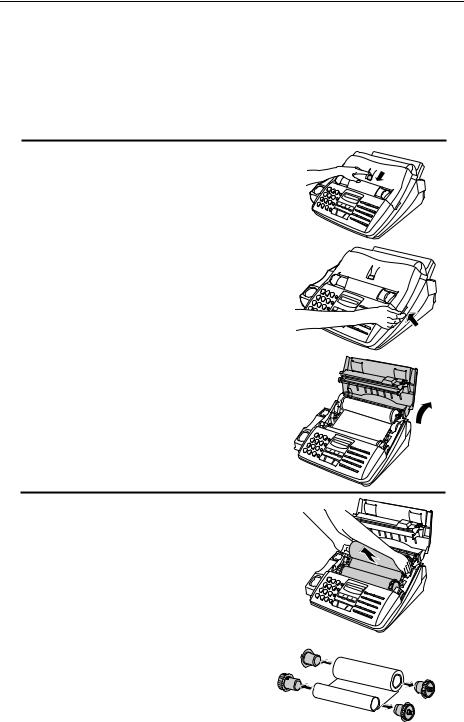
1 Press the release marked OPEN and open the print compartment cover.
• Caution! The printing head (the strip of metal on the underside of the cover) applies heat to the printing film. It may be hot if a document has just been printed.
2 If you are replacing the imaging film, take the old film out of the printing compartment and remove the three (3) green gears and the green flange from the ends of the spools.
DO NOT DISCARD THE GREEN GEARS AND THE GREEN FLANGE!
2

Chapter 1 Installation
3 Take the new film out of its package, and insert two of the gears provided with the fax into the ends of the spool with film. Make sure that the two tabs on the gears fit properly into the slots in the ends of the spool.
• Do not yet remove the band which holds the spools together.
2 tabs
4 Hold the empty spool so that the end with only one slot is on the left, and lower the spools into the front of the printing compartment. The gears in the ends of the spool with film should fit into the slots on each side of the printing compartment.
5 Cut the band which holds the spools to- |
1 tab |
|
gether with scissors, and remove it. Insert |
|
|
the remaining gear into the right end of |
2 tabs |
|
the empty spool and the flange into the |
||
|
||
left end of the empty spool. Make sure |
|
|
the tabs on the gear and the flange fit into |
|
|
the slots in the ends of the spool (the gear |
|
|
has two tabs and the flange has one tab). |
|
|
Flange |
Gear |
3

Chapter 1 Installation
6 Pull the empty spool toward the back of the compartment, unwinding the film as you pull.
7 Insert the empty spool into the back of the compartment so that the gear and the flange fit into the slots on the sides of the compartment.
•Make sure that the gear engages with the gear below it.
8 Wind the film slightly (rotate the gear on the right side of the empty spool) so that there is no slack in the film. Make sure that both edges of the film wind onto the spool evenly.
4

Chapter 1 Installation
9 Close the print compartment cover, making sure it clicks into place.
• Caution! Close the cover slowly to make sure it doesn’t pinch your fingers.
10 If you replaced the film, initialize the |
|
new film by pressing the FUNCTION |
|
key, the "6" key, and the "#" key on the |
FUNCTION |
operation panel. Make sure that INITIAL- |
|
|
|
IZE FILM appears in the display, and |
|
then press the START key. (Do not per- |
|
form this step if you installed the initial |
|
sample roll of film.) |
|
6
START
When to replace the imaging film
The sample roll of imaging film provided with your fax is capable of printing approximately 65 pages of letter size paper. When it is used up, FILM END will appear in the display. Replace it with the following imaging film, which is available at your dealer or retailer.
UX-15CR Imaging Film
One roll of UX-15CR imaging film is capable of printing approximately 500 pages of letter size paper when printed continuously.
Caution!
The text of documents printed with the imaging film is visible on the used film. If confidential information has been printed, dispose of the film appropriately.
5
Chapter 1 Installation
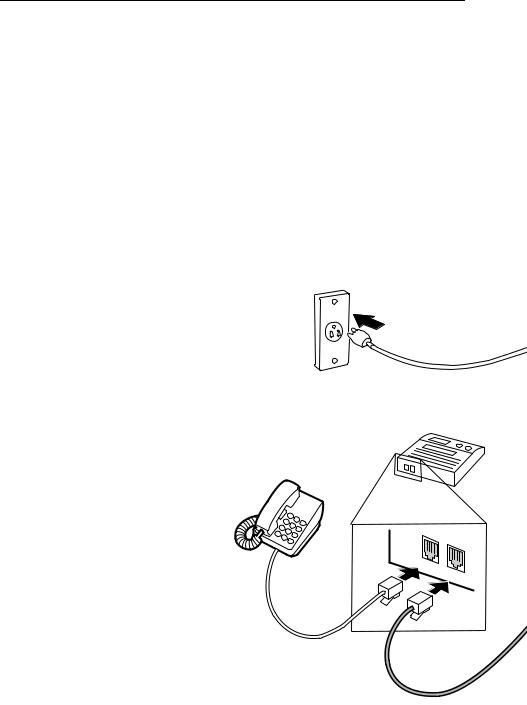
Connections
Connect the power cord, telephone line cord, and handset as shown below. If desired, you can also connect an answering machine or an extension telephone to your fax.
♦Connecting an answering machine to the fax will allow you to receive both voice and fax messages on the same line while you are out. For details on using this feature, see Chapter 7. (Note: Do not connect an answering machine to your fax if you will be using the distinctive ring feature described in Chapter 2.)
♦You can connect an extension phone to the fax to make and receive calls like any other extension phone on your line. For details on receiving faxes from an extension phone, see Chapter 4, "Receiving Documents".
1 Plug the power cord into a 120 V, |
AC outlet |
60 Hz, grounded (3-prong) outlet. |
|
Caution: Do not plug the power |
|
cord into any other kind of outlet. |
|
This will damage the machine and |
|
is not covered under the warranty. |
Answering |
|
machine |
2 To connect an answering machine or extension phone to the fax, first remove the seal covering the TEL.
SET jack on the fax, and then insert the line for the answering machine or the extension phone into the TEL. SET jack. For an answering machine, the other end of the line should be connected to the answering machine’s telephone line jack, not its extension phone jack.
If desired, you can connect an answering machine to the fax first, and then connect an extension phone to the answering machine’s extension phone jack.
Extension telephone
EXT.
PHONE TEL.
LINE
6

Chapter 1 Installation
3 Connect the handset as shown and place it on the handset rest.
TEL. |
|
SET |
TEL. |
|
LINE |
Comments:
Handset
4 Insert one end of the telephone line cord into the TEL. LINE jack. Insert the other end into a standard (RJ11C) single-line telephone wall jack.
Be sure to insert the telephone line cord into the TEL. LINE jack. Do not insert it into the TEL. SET jack.
Wall jack
•Your fax is set for touch-tone dialing. If you are on a pulse dial (rotary) line, you must set the fax for pulse dialing by changing Option Setting 8. This procedure is described in Chapter 9, "Optional Settings".
•If you intend to use a computer fax modem on the same phone line, you must reset Option Setting 13 to OFF in order to prevent transmission and reception errors. This procedure is described in Chapter 9, "Optional Settings".
7
Chapter 1 Installation
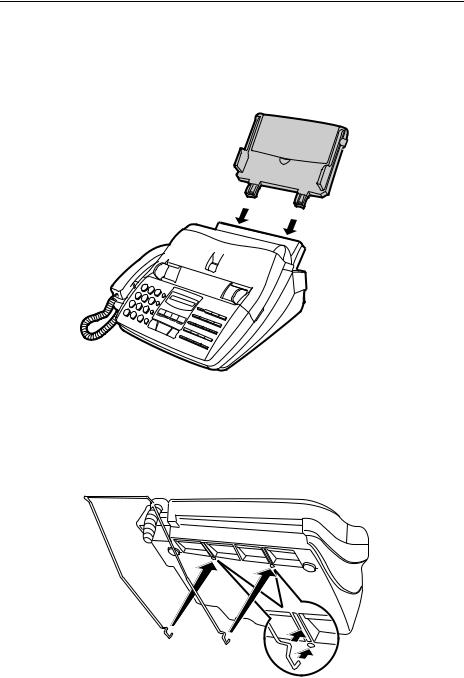
Attachments
Insert the paper tray into the back of the fax as shown.
If desired, attach the original document support by inserting the ends into the holes in the bottom of the fax as shown.
8

Chapter 1 Installation
Loading Printing Paper
The paper tray holds the paper on which received documents and copies are printed. Up to 200 sheets of letter or legal size paper from 16 to 20 lbs. (60 to 75 g/m2) can be loaded in the tray. Less sheets can be loaded when using heavier paper. The maximum allowed paper weight is 24 lbs. (90 g/m2).
Note: When receiving or copying documents, do not allow more than 100 pages to collect in the received document outlet. Otherwise, the outlet may become obstructed, causing paper jams.
1 Remove the paper cover if it is on the paper tray.
•If you are going to load legal size paper, flip up the paper tray extender.
2 Fan the paper, and then tap the edge against a flat surface to even the stack.
3 Pull the paper release plate toward you and insert the stack of paper into the tray, print side down.
•If paper remains in the tray, take it out and combine it into a single stack with
the new paper before adding the new paper.
9

Chapter 1 Installation
4 Replace the paper cover on the paper
tray and then push the paper release |
LETTER |
|
plate back down. |
||
LEGAL |
||
• Important: Be sure to replace the pa- |
|
|
per cover before you push the paper |
|
|
release plate down. |
|
5 Your fax has been set at the factory to scale the size of the printed image to letter size paper. If you have loaded legal paper, you must change this setting to legal. Press the FUNCTION key, the "6" key, the "*" key twice, and then press "1" to select letter, or "2" to select legal. When finished, press the STOP key. Be sure to change this setting every time you change the paper size.
FUNCTION
6
Letter Legal
1 or 2
STOP
6 Your fax has been set at the factory to |
FUNCTION |
6 |
|
|
print on regular paper. If you have |
|
|
|
|
|
|
|
||
loaded high quality thermal transfer pa- |
|
|
|
|
per, you must change this setting to |
|
Regular |
|
High quality |
HIGH QUALITY. Press the FUNC- |
|
|
|
|
TION key, the "6" key, the "*" key |
|
1 |
or |
2 |
three times, and then press "1" to select |
|
|
|
|
|
regular, or "2" to select high quality pa- |
|
|
per. When finished, press the STOP key. |
STOP |
|
Be sure to change this setting again if |
|
|
you change back to regular paper. |
|
|
10
Chapter
2
Initial
Settings
Setup Guide
Before you can begin using your fax, there are some settings that must be made with the keys on the operation panel. Some of the settings are required for basic use of your fax, others may or may not be necessary depending on how you want to use the fax. The procedures for making the settings are described in this chapter in the order shown below (with the exception of Caller ID).
Required settings:
♦Entering your name and fax/telephone number in the fax
♦Setting the fax to the current date and time
♦Selecting the reception mode
Settings which may be necessary:
♦Distinctive ring: If you subscribe to a distinctive ring service from your telephone company (this is a service which allows you to use several different devices, each with its own phone number and ring pattern, on one line), you will want to select a ring pattern for your fax.
♦Storing numbers for automatic dialing: Automatic dialing allows you to dial a full fax or phone number by simply pressing a Rapid Key, or by pressing the SPEED DIAL key and entering a 2-digit number. To use automatic dialing, you must store the desired fax and phone numbers in the fax.
♦Volume: Adjustment of the volume of the speaker, handset, and ringer.
♦Caller ID: If you subscribe to a Caller ID service from your telephone company, the fax will display and retain information which the telephone company provides about each call. To use this feature, set Option Setting 16 as described in Chapter 9, "Optional Settings". For information on using Caller ID, see "Caller ID" in Chapter 8.
11

Chapter 2 Initial Settings
A Look at the Operation Panel
Before you make the settings, take a moment to familiarize yourself with the operation panel.
REDIAL key
Press this key to automatically redial the last number dialed.
SPEED DIAL key
Press this key to dial a 2-digit Speed Dial number.
Number keys
Use these keys to dial numbers, and enter numbers and letters during number/name storing procedures.
|
ABC |
DEF |
SPEED |
|
1 |
2 |
3 |
DIAL |
|
|
||||
GHI |
JKL |
MNO |
REDIAL |
|
4 |
5 |
6 |
||
|
||||
PQRS |
TUV |
WXYZ |
HOLD/ |
|
|
|
|
SEARCH |
7 8 9
SPEAKER
0
HOLD/SEARCH key
Press this key to search for an automatic dialing number, or, during a phone conversation, press this key to put the other party on hold.
SPEAKER key
Press this key to dial a number without picking up the handset.
12

Chapter 2 Initial Settings
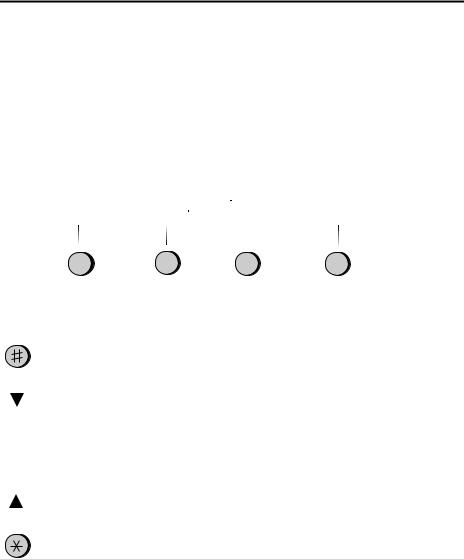
VOLUME keys
Press these keys to adjust the volume of the handset when the handset is lifted, the volume of the speaker when the SPEAKER key has been pressed, or the volume of the ringer at all other times.
Display
This displays various messages during operation and programming.
FUNCTION key
Press this key to select various special functions.
RESOLUTION key
Press this key to adjust the resolution and contrast before sending or copying a document.
DOWN |
UP |
VOLUME |
RECEPTION |
|
|
|
MODE |
FUNCTION RESOLUTION |
MEMORY |
||||||||
|
|
|
|
|
|
|
|
|
|
|
|
|
|
|
|
|
|
|
|
|
|
|
|
COPY/ |
START |
STOP |
|||||||||
|
HELP |
||||||||||
|
|
|
|
|
|
|
|
|
|
|
|
|
|
|
|
|
|
|
|
|
|
|
|
|
|
|
|
|
|
|
|
|
|
|
|
|
|
|
01 |
02 |
03 |
||
|
|
|
|
|
|
|
|
|
SHIFT |
20 |
21 |
22 |
|||
|
|
|
|
|
|
|
|
|
|
|
|
|
|
|
|
|
|
|
|
|
|
|
|
|
04 |
|
05 |
06 |
07 |
||
|
|
|
|
|
|
|
|
|
23 |
|
24 |
25 |
26 |
||
|
|
|
|
|
|
|
|
|
|
|
|
|
|
|
|
|
|
|
|
|
|
|
|
|
|
|
|
|
|
||
|
08 |
|
09 |
10 |
11 |
||
|
|
|
|
|
|
||
|
27 |
|
28 |
29 |
30 |
||
|
|
|
|
|
|
|
|
|
|
|
|
|
|
|
|
|
|
|
|
|
|
|
|
|
|
|
|
|
|
||
|
12 |
|
13 |
14 |
15/POLL |
||
|
|
|
|
|
|
||
|
31 |
|
32 |
33 |
34 |
||
|
|
|
|
|
|
|
|
|
|
|
|
|
|
|
|
|
|
|
|
|
|
|
|
|
|
|
|
|
|
|
|
|
16/P1 |
|
17/P2 |
|
18/G1 |
19/G2 |
|
|
|
|
|
|
|
||
|
35 |
|
36 |
37 |
38 |
||
|
|
|
|
|
|
|
|
|
|
|
|
|
|
|
|
|
|
|
|
|
|
|
|
MEMORY key
Press this key to scan a document into memory before transmitting it.
Rapid Dial Keys
Press one of these keys to dial a fax or voice number automatically. To dial the bottom number on a Rapid Key, press the SHIFT key before pressing the Rapid Key. (Note that you must attach the Rapid Key labels.)
COPY/HELP key
When a document is in the feeder, press this key to make a copy. At any other time, press this key to print out the Help List, a quick reference guide to the operation of your fax.
START key
Press this key to send or receive a document.
RECEPTION MODE key
Press this key to select the mode of reception.
STOP key
Press this key to stop operations before they are completed.
13

Chapter 2 Initial Settings
Entering Your Name and Fax Number
To have your name and fax/telephone number printed at the top of every page you transmit, program them by pressing the panel keys as shown below.
♦You must program your name and fax number in order to comply with the Consumer Protection Act of 1991 (see inside of front cover).
♦If you make a mistake, press the HOLD/SEARCH key to move the cursor back to the mistake, then enter the correct number or letter. (To move the cursor forward, press the SPEAKER key.)
1 |
Press the FUNCTION key and then the |
FUNCTION |
3 |
|
"3" key. ENTRY MODE will appear in |
|
|
|
the display. |
|
|
2 |
|
|
|
Press the "#" key two times. |
|
|
|
|
OWN NUMBER SET will appear in the |
|
|
|
display. |
|
|
3
4
START |
|
|
|
Press the START key. |
|
|
|
Enter your fax number (max. of 20 dig- |
|
|
|
its) by pressing the number keys. (To in- 5 5 5 |
1 2 |
3 |
4 |
sert a space between digits, press the "#" |
(Example) |
|
key. To insert a "+", press the "*" key.) |
||
|
5
6
START
Press the START key.
Note that there are letters marked above each of the number keys. Enter your name by pressing the appropriate number key for each letter several times until the letter appears in the display. (Max. of 24 characters.) For example, to enter "S" press "7" five times. See the following page for more details.
(Example: SHARP)
S: |
7 |
7 |
7 |
7 |
7 |
H: |
4 |
4 |
4 |
|
|
A: |
2 |
2 |
|
|
|
R: |
7 |
7 |
7 |
7 |
|
|
S P E A K E R |
(Move cursor) |
|
||
|
|
|
|||
P: |
7 |
7 |
|
|
|
7 Press the START key and then the
STOP key.
START |
STOP |
14

Chapter 2 Initial Settings
Entering Letters for Names
Names are programmed by pressing the number keys. You will notice that letters are marked above each of the number keys "2" through "9". To enter a letter (or number), press the appropriate key one or more times until the letter appears in the display (the number will appear first, followed by the letters in the order marked above the key). The keys used for entering letters and editing are shown below.
Comments:
•To enter two letters in succession which require using the same key, press the SPEAKER key after entering the first letter to move the cursor to the right.
•To change a letter, move the cursor using the HOLD/SEARCH key or the SPEAKER key to the letter and enter the desired letter. The new letter will replace the old one.
Space
Press this key twice to enter a space.
Letters and numbers
To enter a letter or number, press the appropriate key repeatedly until the desired number/letter appears in the display (the number appears first, then the letters in the order marked above the key).
|
ABC |
DEF |
SPEED |
|
1 |
2 |
3 |
DIAL |
|
|
||||
GHI |
JKL |
MNO |
REDIAL |
|
4 |
5 |
6 |
||
|
||||
PQRS |
TUV |
WXYZ |
HOLD/ |
|
7 |
8 |
9 |
SEARCH |
|
|
SPEAKER
0
Symbols
Press either key repeatedly until the desired symbol appears (see the symbol list on the following page).
Delete
Press this key to delete the letter highlighted by the cursor (if the cursor is to the right of the last letter entered, it will backspace and delete the last letter).
Shift
Press this key once to change case (press it again to change back).
Cursor left
Press this key to move the cursor to the left.
Cursor right
Press this key to move the cursor to the right.
15

Chapter 2 Initial Settings
Symbol list
To enter a symbol from the list below, press the "#" key or the "*" key repeatedly until the desired symbol appears.
# → ← *
. / ! " # $ % & ’ ( ) + + , - : ; < = > ? @ [ ¥ ] ^ _ p { | } → ←
Example
The following is an example of entering the name "ABC Co. #1".
♦ The cursor in the display is indicated below by a rectangle:
Step |
Press these keys: |
|
|
Display |
|
|
|
|
|||
|
ABC |
ABC |
|
|
|
A |
|
|
|
|
|
1 |
2 |
2 |
|
|
|
|
|
|
|
|
|
|
|
|
|
|
|
|
|
|
|||
2 |
S P E A K E R |
|
|
|
|
A |
|
|
|
|
|
|
|
|
|
|
|
|
|
|
|
||
|
ABC |
ABC |
ABC |
|
|
A |
B |
|
|
|
|
3 |
2 |
2 |
2 |
|
|
|
|
|
|
||
4 |
S P E A K E R |
|
|
|
|
A |
B |
|
|
|
|
|
|
|
|
|
|
|
|
|
|||
|
ABC |
ABC |
ABC |
ABC |
|
A |
B |
C |
|
|
|
5 |
2 |
2 |
2 |
2 |
|
|
|
|
|||
6 |
1 |
1 |
|
|
|
A |
B |
C |
|
|
|
|
ABC |
ABC |
ABC |
ABC |
|
A |
B |
C |
C |
|
|
7 |
2 |
2 |
2 |
2 |
|
|
|
||||
|
|
|
|
|
|
|
|||||
|
R E D I A L |
MNO |
MNO |
MNO |
MNO |
A |
B |
C |
C |
o |
|
8 |
6 |
6 |
6 |
6 |
|
||||||
|
|
||||||||||
9 |
|
|
|
|
|
A |
B |
C |
C |
o . |
|
10 |
1 |
1 |
|
|
|
A |
B |
C |
C |
o . |
|
11 |
|
|
|
|
|
A |
B |
C |
C |
o . |
# |
12 |
1 |
|
|
|
|
A |
B |
C |
C |
o . |
# 1 |
13 |
START |
|
|
|
|
|
|
|
|
|
|
|
|
|
|
|
|
|
|
|
|
|
|
16
Chapter 2 Initial Settings
Setting the Date and Time
The date and time appear in the display and reports, and are printed at the top of every page you transmit. Set the date and time by pressing the keys on the operation panel as shown below.
♦To correct a mistake, press the SPEED DIAL key to move the cursor back to the mistake, and then enter the correct number.
1 Press the FUNCTION key and then the |
FUNCTION |
3 |
|
"3" key. ENTRY MODE will appear in |
|||
|
|||
the display. |
|
|
|
|
|
2 Press the "*" key four times.
DATE & TIME SET will appear in the display.
3 Press the START key.
START
4 |
|
Enter a two-digit number for the month |
0 |
1 |
|
|
|
|
|
("01" for January, "02" for February, |
|
|
|
||
|
|
|
|
|
|
|
|
|
|
"12" for December, etc.). |
|
|
(Example: January) |
||
5 |
|
|
|
|
|
|
|
|
Enter a two-digit number for the day |
0 |
5 |
|
|
|
|
|
|
("01" to "31"). |
|
|
|
|
|
|
|
|
|
|
(Example: the 5th) |
||
|
|
|
|
|
|
|
|
6 Enter the last two digits of the year. |
9 |
7 |
|
|
|
||
|
|
(Note: In the year 2000, "00" will appear |
|
|
|
||
|
|
for the year.) |
|
|
(Example: 1997) |
||
7 |
|
|
|
|
|
|
|
|
Enter a two-digit number for the hour |
0 |
9 |
2 |
5 |
|
|
|
|
("01" to "12") and a two-digit number |
|
|
|
|
|
|
|
for the minute ("00" to "59"). |
|
|
(Example: 9:25) |
||
17
Chapter 2 Initial Settings
8 Press "*" to select A.M., or "#" to select |
|
or |
|
|
P.M. |
|
|
|
|
|
|
9 Press the START key and then the |
START |
||
|
STOP key. |
|
|
|
|
|
|
Daylight Saving Time
If desired, you can have the clock in your fax move forward and backward automatically at the beginning and end of Daylight Saving Time. To turn on this function, press the panel keys as follows:
1 |
Press the FUNCTION key and then the |
FUNCTION |
3 |
|
|
"3" key. ENTRY MODE will appear in |
|
|
|
|
|
|
||
|
the display. |
|
|
|
|
|
|
|
|
2 |
Press the "*" key three times. |
|
|
|
|
DAYLIGHT SAVING will appear in the |
|
|
|
|
display. |
|
|
|
3 |
|
|
|
|
Press "1" to turn on the Daylight Saving |
Yes |
|
No |
|
|
Time function, or "2" to turn it off. |
1 |
or |
2 |
|
|
|||
4 Press the STOP key.
STOP
18

Chapter 2 Initial Settings
Selecting the Reception Mode
Your fax has two modes for receiving incoming calls and faxes:
AUTO mode: In AUTO mode, the fax will automatically answer all calls after four rings and receive the incoming document.
MANUAL mode: In MANUAL mode, you must answer all calls, including fax messages, using the fax’s handset or an extension phone connected to the same line.
If you only intend to receive fax messages on the line connected to your fax machine, select AUTO mode. In this case, you will probably want to change the number of rings your fax waits before answering to one or two rings. This is done by setting Option Setting 2 as described in Chapter 9, "Optional Settings".
If you intend to receive both fax messages and voice calls on the line connected to your fax machine, you can use either AUTO or MANUAL mode. In the case of AUTO mode, you must answer incoming calls before the fax does, but the fax will be able to receive fax messages at times when you are unable to answer personally. For more information on using AUTO and MANUAL modes, see Chapter 4, "Receiving Documents".
Setting the reception mode
|
RECEPTION |
|
Set the mode of reception with the |
|
MODE |
RECEPTION MODE key on the panel. |
|
|
•To select AUTO, press the key until "AUTO" appears in the display.
•To select MANUAL, press the key until "MANU" appears in the display.
19

Chapter 2 Initial Settings
Distinctive Ring
Distinctive ring is a service offered by some local telephone companies which allows you to use up to four different telephone numbers, each with a different ring pattern, on your regular single line. If you subscribe to a distinctive ring service you can set your fax to automatically answer when it detects one of
those ring patterns, allowing you to use the number corresponding to that pattern as an exclusive fax number.
Important:
•To use distinctive ring, you must subscribe to a distinctive ring service from your local phone company. Do not make this setting if you do not subscribe to a distinctive ring service.
•Your fax may not be compatible with some distinctive ring services.
When using this feature, you must set the reception mode of your fax to AUTO as described in "Selecting the Reception Mode" in this chapter. When your designated fax number is dialed, your fax will automatically answer and begin reception after two rings. Note that other devices on the same line will also ring until your fax answers. If one of your other numbers is dialed, the fax will ring; however, it will not answer.
To use distinctive ring, select one of the ring patterns below for your fax by pressing the panel keys as shown on the following page. The selections are as follows:
1. RING PATTERN 1: |
Two short rings. |
2. RING PATTERN 2: |
One short, one long, and one short ring. |
3. RING PATTERN 3: |
Two short rings and one long ring. |
4. STANDARD RING: |
Your standard (normal) ring pattern. |
5. OFF SETTING: |
Answer all ring patterns (this turns distinctive ring |
|
off). |
Your fax has been set to "5" at the factory.
20
 Loading...