


MODEL
UX-CC500
FACSIMILE |
|
|
NUAL |
ION |
MA |
OPERAT |
|
1.Installation
2.Using the Cordless Handset
3.Using the Answering System
4.Sending Faxes
5.Receiving Faxes
6.Making Copies
7.Special Functions
8.Printing Lists
9.Maintenance
10.Troubleshooting
F R O M S H A R P M I N D S
C O M E S H A R P P R O D U C T S TM
To ensure Sharp quality, look for the Sharp Genuine Supplies Logo on Your business products. We provide a full line of supplies that are designed and tested to maximize the life and performance of all Sharp products.
SharpPlace
congratulations on the purchase of your new Sharp Product!
For your convenience, Genuine Sharp Supplies, Accessories, and additional Sharp Products can be purchased from the Authorized Sharp Reseller where you purchased your product or on-line at:
www.SharpPlace.com
visit SharpPlace to enter periodic contests and drawings!
C 2002 Sharp Electronics Corporation
Design and specifications are subject to change without notice.

WARNING - FCC Regulations state that any unauthorized changes or modifications to this equipment not expressly approved by the manufacturer could void the user’s authority to operate this equipment.
Note: This equipment has been tested and found to comply with the limits for a Class B digital device, pursuant to Part 15 of the FCC Rules.
These limits are designed to provide reasonable protection against harmful interference in a residential installation.
This equipment generates, uses and can radiate radio frequency energy and, if not installed and used in accordance with the instructions, may cause harmful interference to radio communications. However, there is no guarantee that interference will not occur in a particular installation. If this equipment does cause harmful interference to radio or television reception, which can be determined by turning the equipment off and on, the user is encouraged to try to correct the interference by one or more of the following measures:
-Reorient or relocate the receiving antenna.
-Increase the separation between the equipment and the receiver.
-Connect the equipment into an outlet on a circuit different from that to which the receiver is connected.
-Consult the dealer or an experienced radio/TV technician for help.
IMPORTANT NOTICE Fax machine
FCC Radiation Exposure Statement:
This equipment complies with FCC radiation exposure limits set forth for at uncontrolled equipment.
This equipment should be installed and operated with minimum distance at least 20cm between the radiator and persons body (excluding extremities: hands, wrists, feet and legs) and must not be co-located or operated with any other antenna or transmitter.
Cordless handset
For body worn operation, this phone has been tested and meets FCC RF exposure gudelines when used with an accessory that contains no metal and that positions the handset a minimum of 1.5cm from the body.
Use of other accessories may not ensure compliance with FCC RF exposure guidelines.
ABOUT THE TELEPHONE CONSUMER PROTECTION ACT OF 1991
"The Telephone Consumer Protection Act of 1991 makes it unlawful for any person to use a computer or other electronic device to send any message via a telephone facsimile machine unless such message clearly contains in a margin at the top or bottom of each transmitted page or on the first page of the transmission the following information:
(1)The date and time of transmission.
(2)Identification of either the business, business entity or individual sending the message.
(3)Telephone number of either the sending machine, business, business entity or individual.
In order to program this information into your facsimile machine, please refer to the appropriate instructions in the operation manual."
As an ENERGY STAR partner, SHARP has determined that this product meets the ENERGY
STAR guidelines for energy efficiency.

Introduction
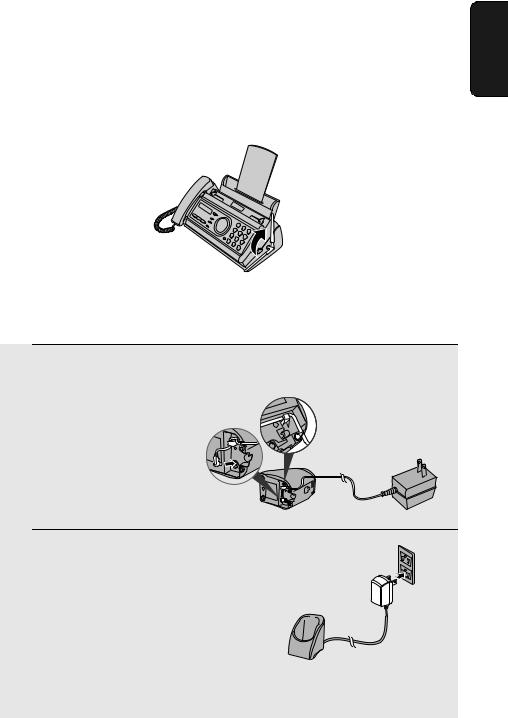
Welcome, and thank you for choosing a SHARP UX-CC Series fax machine and cordless handset!
In addition to the cordless handset that comes with the fax machine, you can purchase up to three accessory cordless handsets. The cordless handsets can be used as an intercom system, and each cordless handset has its own personal box in the answering system.
Fax machine and general specifications.
Automatic dialing |
Common book: 40 numbers |
|
Private book: 5 numbers (each cordless |
|
handset has 1 private book) |
Imaging film |
Initial starter roll (included with machine): |
|
32 ft. (10 m) (approx. 30 letter-size pages) |
|
Replacement roll (not included): |
|
UX-5CR 164 ft. (50 m) (one roll yields |
|
approx. 150 letter-size pages) |
Memory size* |
448 KB (approx. 24 average pages with no |
|
voice messages recorded, or 20 minutes of |
|
voice messages (including OGMs) with no |
|
faxes in memory) |
Modem speed |
14,400 bps with automatic fallback to lower |
|
speeds. |
Transmission time* |
Approx. 6 seconds (only when ECM is on) |
Resolution |
Horizontal: 203 pels/inch (8 pels/mm) |
|
Vertical: |
|
Standard: 98 lines/inch (3.85 lines/mm) |
|
Fine /Halftone: 196 lines/inch (7.7 lines/mm) |
|
Super fine: 391 lines/inch (15.4 lines/mm) |
Automatic document feeder 10 pages max. (letter/A4, 20 lb paper) |
|
Recording system |
Thermal transfer recording |
Display |
16-digit LCD display |
*Based on Sharp Standard No. 1 Chart at standard resolution in Sharp special mode, excluding time for protocol signals (i.e., ITU-T phase C time only).
1
Halftone (grayscale) |
64 levels |
Compression scheme |
MR, MH, MMR |
Applicable telephone line |
Public switched telephone network |
Paper tray capacity |
Letter: Approx. 50 sheets (20-lb. copier paper |
|
at room temperature; maximum stack height |
|
should not be higher than the line on the tray) |
|
Legal: 5 sheets |
|
Recommended paper weight: 20-lb. Copy |
|
Bond |
Compatibility |
ITU-T (CCITT) G3 mode |
Input document size |
Automatic feeding: |
|
Width: 5.8 to 8.5" (148 to 216 mm) |
|
Length: 5.5 to 11" (140 to 279 mm) |
|
Manual feeding: |
|
Width: 5.8 to 8.5" (148 to 216 mm) |
|
Length: 5.5 to 23.6" (140 to 600 mm) |
Effective scanning width |
8.3" (210 mm) max. |
Effective printing width |
8.3" (210 mm) max. |
Contrast control |
Automatic/Dark selectable |
Reception modes |
TEL/FAX/TAD |
Copy function |
Single / Multi (99 copies/page) |
Telephone function |
Yes (cannot be used if power fails) |
Power requirements |
120 V AC, 60 Hz |
Operating temperature |
41 - 95° F (5 - 35° C) |
Humidity |
25 - 85% RH |
Power consumption |
Standby: 4.3 W |
|
Maximum: 100 W |
Dimensions (without |
Width: 13.9" (353 mm) |
attachments) |
Depth: 7.6" (193 mm) |
|
Height: 6.9" (174 mm) |
Weight (without |
Approx. 6.2 lbs. (2.8 kg) |
attachments) |
|
2
Cordless handset specifications
Frequency |
2.4 GHz (2.405 to 2.475 GHz) |
Dimensions |
Width: 1.8" (46 mm) |
|
Depth: 1.7" (42 mm) |
|
Height: 7.1" (180 mm) (not including antenna) |
Weight |
Approx. 0.3 lbs. (115 g) (without battery) |
Battery |
3.6 V Ni-MH battery; capacity: 850 mAh |
Power consumption |
Approx. 1.0 W (in standby mode) |
Initial charging |
Approx. 10 hours for initial charge |
Battery life |
Approx. 4 hours (240 minutes) (at room temp.) |
Battery life in standby |
Approx. 3 days with one full charge (at room |
mode |
temperature) |
|
Battery life (both normal and in standby mode) |
|
may vary depending on usage, range from |
|
base machine, and environmental conditions |
|
such as temperature. |
Accessory cordless handset UX-K01 (up to 3 handsets can be added)
As a part of our policy of continuous improvement, SHARP reserves the right to make design and specification changes for product improvement without prior notice. The performance specification figures indicated are nominal values of production units. There may be some deviations from these values in individual units.
Important: This fax machine is not designed for use on a line which has call waiting, call forwarding, or certain other special services offered by your telephone company. If you attempt to use the fax machine in conjunction with any of these services, you may experience errors during transmission and reception of facsimile messages. The fax machine is not compatible with digital telephone systems.
Important safety information
Do not disassemble this machine or attempt any procedures not described in this manual. Refer all servicing to qualified service personnel.
Do not install or use the machine near water, or when you are wet. For example, do not use the machine near a bath tub, wash bowl, kitchen sink or laundry tub, in a wet basement, or near a swimming pool. Take care not to spill any liquids on the machine.
Unplug the machine from the power outlet and telephone jack and consult a qualified service representative if any of the following situations occur:
-Liquid has been spilled into the machine or the machine has been exposed to rain or water.
3
-The machine produces odors, smoke, or unusual noises.
-The power cord is frayed or damaged.
-The machine has been dropped or the housing damaged.
Do not allow anything to rest on the power cord, and do not install the machine where people may walk on the power cord.
This machine must only be connected to a 120 V, 60 Hz, grounded (3-prong) outlet. Connecting it to any other kind of outlet will damage the machine and invalidate the warranty.
Never insert objects of any kind into slots or openings on the machine. This could create a risk of fire or electric shock. If an object falls into the machine that you cannot remove, unplug the machine and consult a qualified service representative.
Do not place this machine on an unstable cart, stand or table. The machine could be seriously damaged if it falls.
Never install telephone wiring during a lightning storm.
Never install telephone jacks in wet locations unless the jack is specifically designed for wet locations.
Never touch bare telephone wires or terminals unless the telephone line has been disconnected at the network interface.
Use caution when installing or modifying telephone lines.
Avoid using a telephone (other than a cordless type) during an electrical storm. There may be a remote risk of electric shock from lightning.
Do not use a telephone to report a gas leak in the vicinity of the leak.
The power outlet must be installed near the equipment and must be easily accessible.
Battery
Use only the battery specified in this manual. Use only the provided charger to charge the battery.
Do not open or mutilate the battery pack. Corrosive fluid may leak out and cause injury or burns to the eyes and skin. The fluid may be toxic if swallowed. In case of contact with eyes, flush with clean water (do not rub), and seek medical attention immediately.
Do not store or carry the battery with other metal objects such as keys or pins. These may short the battery and cause it to overheat.
Do not allow the battery to become wet.
Do not dispose of the battery in a fire or heat the battery. The battery may explode.
Health care facilities and equipment
Radio frequency energy emitted from the cordless handset equipment may cause medical equipment to malfunction. Verify that any personal medical equipment you are using is adequately shielded from external radio frequency energy before using the cordless handset equipment. Do not use the cordless handset equipment in health care facilities where such use is prohibited.
4

Table of Contents
A Look at the Operation Panel |
7 |
1. Installation |
12 |
|
|
Unpacking Checklist . . . . . . . . . . . . . . . . . . . . . . . . . . . . . . . . . . . . . 12
Setting Up. . . . . . . . . . . . . . . . . . . . . . . . . . . . . . . . . . . . . . . . . . . . . 13
Loading the Imaging Film . . . . . . . . . . . . . . . . . . . . . . . . . . . . . . . . . 22
Loading Printing Paper . . . . . . . . . . . . . . . . . . . . . . . . . . . . . . . . . . . 24
Entering Your Name and Fax Number . . . . . . . . . . . . . . . . . . . . . . . 26
Setting the Date and Time . . . . . . . . . . . . . . . . . . . . . . . . . . . . . . . . 28
Setting the Reception Mode . . . . . . . . . . . . . . . . . . . . . . . . . . . . . . . 30
Volume Adjustment - Fax Machine. . . . . . . . . . . . . . . . . . . . . . . . . . 31
Volume Adjustment - Cordless Handset. . . . . . . . . . . . . . . . . . . . . . 32
2. Using the Cordless Handset |
34 |
Making a Phone Call . . . . . . . . . . . . . . . . . . . . . . . . . . . . . . . . . . . . 34
Receiving a Phone Call . . . . . . . . . . . . . . . . . . . . . . . . . . . . . . . . . . 35
Receiving a Fax Using the Cordless Handset . . . . . . . . . . . . . . . . . 36
Storing and Using Auto-Dial Numbers . . . . . . . . . . . . . . . . . . . . . . . 36
Redial . . . . . . . . . . . . . . . . . . . . . . . . . . . . . . . . . . . . . . . . . . . . . . . . 41
Using the Intercom Feature . . . . . . . . . . . . . . . . . . . . . . . . . . . . . . . 41
Transferring Calls . . . . . . . . . . . . . . . . . . . . . . . . . . . . . . . . . . . . . . . 44
3. Using the Answering System |
47 |
Recording an Outgoing Message . . . . . . . . . . . . . . . . . . . . . . . . . . . 48 Setting a Passcode for a Personal Box . . . . . . . . . . . . . . . . . . . . . . 49 Operating the Answering System . . . . . . . . . . . . . . . . . . . . . . . . . . . 50 Optional Answering System Settings . . . . . . . . . . . . . . . . . . . . . . . . 56 Transfer Function . . . . . . . . . . . . . . . . . . . . . . . . . . . . . . . . . . . . . . . 59 Remote Operations . . . . . . . . . . . . . . . . . . . . . . . . . . . . . . . . . . . . . 62
4. Sending Faxes |
69 |
Transmittable Documents. . . . . . . . . . . . . . . . . . . . . . . . . . . . . . . . . 69 Loading the Document . . . . . . . . . . . . . . . . . . . . . . . . . . . . . . . . . . . 70 Adjusting the Resolution and Contrast . . . . . . . . . . . . . . . . . . . . . . . 71 Sending a Fax by Normal Dialing . . . . . . . . . . . . . . . . . . . . . . . . . . . 73
5

Table of Contents
Sending a Fax by Automatic Dialing . . . . . . . . . . . . . . . . . . . . . . . . . 74 Sending a Fax From Memory . . . . . . . . . . . . . . . . . . . . . . . . . . . . . . 81
5. Receiving Faxes |
83 |
Using FAX Mode . . . . . . . . . . . . . . . . . . . . . . . . . . . . . . . . . . . . . . . . 83 Using TEL Mode . . . . . . . . . . . . . . . . . . . . . . . . . . . . . . . . . . . . . . . . 84 Optional Reception Settings . . . . . . . . . . . . . . . . . . . . . . . . . . . . . . . 86 Substitute Reception to Memory. . . . . . . . . . . . . . . . . . . . . . . . . . . . 88
6. |
Making Copies |
89 |
7. |
Special Functions |
91 |
Caller ID (Requires Subscription to Service) . . . . . . . . . . . . . . . . . . 91 Distinctive Ring (Requires Subscription to Service) . . . . . . . . . . . . . 97 Blocking Reception of Unwanted Faxes . . . . . . . . . . . . . . . . . . . . . . 98
8. Printing Lists |
99 |
9. Maintenance |
103 |
Replacing the Cordless Handset Battery . . . . . . . . . . . . . . . . . . . |
. 106 |
10. Troubleshooting |
108 |
Problems and Solutions . . . . . . . . . . . . . . . . . . . . . . . . . . . . . . . . . |
108 |
Messages and Signals . . . . . . . . . . . . . . . . . . . . . . . . . . . . . . . . . . |
114 |
Clearing Paper Jams . . . . . . . . . . . . . . . . . . . . . . . . . . . . . . . . . . . |
119 |
Ordering Parts. . . . . . . . . . . . . . . . . . . . . . . . . . . . . . . . . . . . . . . . . |
121 |
FCC Regulatory Information . . . . . . . . . . . . . . . . . . . . . . . . . . . . . . |
122 |
Quick Reference Guide |
125 |
Guía de referencia rápida |
127 |
Index |
129 |
6
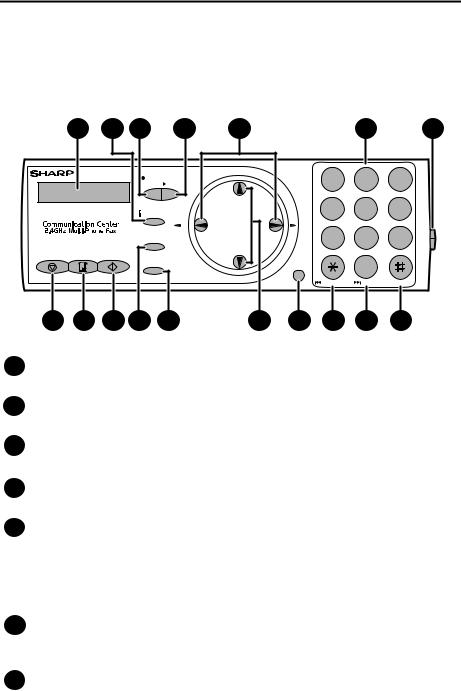
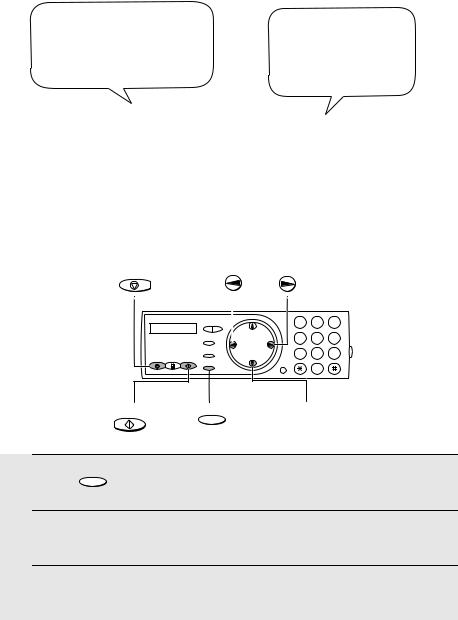
A Look at the Operation Panel
Fax machine
1 |
2 |
3 |
4 |
|
TEL FAX |
REC/ |
PLAY |
|
|
MEMO |
|
|
TAD |
|
|
|
|
INTERCOM |
Z |
|
|
|
|
|
|
RESOLUTION/ |
REDIAL |
|
|
RECEPTION MODE |
|
STOP COPY/HELP START/MEMORY
FUNCTION
5 |
6 |
7 |
UP |
ABC |
DEF |
|
2 |
3 |
||
1 |
|||
GHI |
JKL |
MNO |
|
4 |
5 |
6 |
|
A |
TUV |
WXYZ |
|
PQRS |
7 8 9
|
SPEAKER |
0 |
|
DOWN |
REPEAT |
SKIP |
DELETE |
|
8 |
9 |
10 |
11 |
12 |
13 |
14 |
15 |
16 |
17 |
1Display
This displays messages and prompts to help you operate the machine.
2INTERCOM key
Press this key to page or locate the cordless handset.
3REC/MEMO key
Press this key to record an outgoing message, phone conversation, or memo.
4PLAY key
Press this key to play recorded messages.
5Left and right arrow keys
Auto-dial numbers: When sending a fax or making a phone call, press these keys to scroll through your auto-dial numbers, the “REVIEW CALLS” list (only available if you have Caller ID), and the last number dialed (redial).
FUNCTION key settings: Press the right arrow key after scrolling with the up and down arrow keys to select a FUNCTION key setting.
6Number keys
Use these keys to dial numbers, and enter numbers and letters when storing auto-dial numbers.
7Panel release
Press this release to open the operation panel.
7

8STOP key
Press this key to cancel an operation before it is completed.
9COPY/HELP key
When a document is in the feeder, press this key to make a copy of a document. At any other time, press this key to print out the Help List, a quick reference guide to the operation of your fax machine.
10START/MEMORY key
Press this key after dialing to begin fax transmission. Press this key before dialing to send a fax through memory. The key can also be pressed in the date and time display to show the percentage of memory currently used.
11RESOLUTION / RECEPTION MODE key
When a document is in the feeder, press this key to adjust the resolution for faxing or copying. At any other time, press this key to select the reception mode (an arrow in the display will point to the currently selected reception mode).
12FUNCTION key
Press this key followed by the arrow keys to select special functions and settings.
13UP and DOWN arrow keys
Enlarge/reduce setting: When making a copy of a document, press these keys to select an enlarge/reduce setting.
Volume setting: When a document is not in the feeder, press these keys to change the handset volume when the handset is lifted, the speaker volume when the SPEAKER key has been pressed, or the ringer volume at any other time.
FUNCTION key settings: Press these keys after pressing the FUNCTION key to scroll through the FUNCTION MODE settings.
14SPEAKER key
Press this key to listen to the line and fax tones through the speaker when faxing a document.
Note: This is not a speakerphone. You must pick up the handset to talk with the other party.
15REPEAT key
Press this key while listening to a message to play it again.
16SKIP key
Press this key while listening to a message to skip to the next message.
17DELETE key
Press this key to erase recorded messages.
8
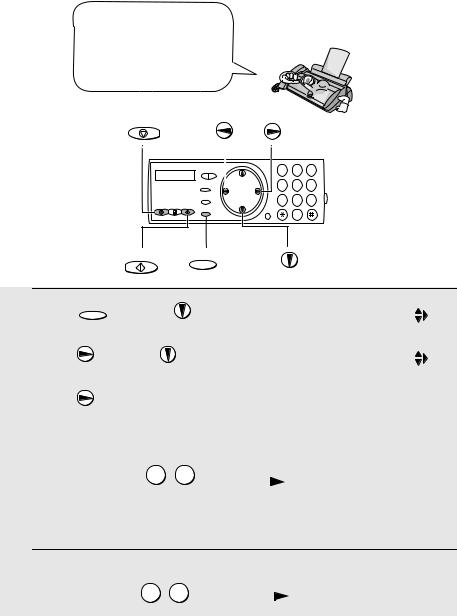
Cordless handset
1
2 |
|
|
|
12 |
|
|
|
|
|
|
|
||
3 |
|
|
|
13 |
|
|
4 |
|
|
|
14 |
|
|
|
FUNCTION |
UP |
REMOTE |
22 |
||
|
/PAUSE |
|
/FLASH |
|
||
5 |
REVIEW |
START |
SEARCH |
|
|
|
|
|
|
||||
6 |
TALK |
DOWN |
OFF |
15 |
|
|
|
|
|
|
|||
7 |
1 |
2ABC |
3DEF |
16 |
23 |
|
4GHI |
5JKL |
6MNO |
||||
8 |
|
|||||
|
|
|||||
|
RECEPTION |
|
17 |
|
||
9 |
7PQRS |
8TUV |
9WXYZ |
|
||
PLAY |
PLAY NEW |
STOP |
18 |
|
||
|
|
0 |
|
|
||
|
REPEAT |
SKIP |
DELETE |
|
||
10 |
INTER |
REDIAL |
HOLD |
19 |
|
|
|
|
|||||
|
COM |
|
|
|
||
|
|
|
|
|
||
|
|
|
ERASE |
|
|
|
11 |
|
|
|
20 |
|
|
|
|
|
|
21 |
|
1 Antenna
2Display
This displays messages and prompts to help you use the cordless handset.
3UP and DOWN arrow keys
Receiver volume: When talking on the cordless handset, press these keys to adjust the receiver volume. This also adjusts the volume when using a headset (purchased separately) connected to the cordless handset.
Ringer volume: When not talking on the cordless handset, press these keys to adjust the cordless handset ringer volume.
Scroll through numbers: Press these keys to scroll when searching for an auto-dial number or reviewing received calls (only available when you have Caller ID).
4FUNCTION/PAUSE key
Press this key to after pressing  SEARCH to store a new auto dial number. When entering an auto-dial number, press this key to insert a pause between digits.
9

5TALK key
Press this key to make or answer a call.
6REVIEW (left) arrow key
Press the REVIEW arrow key and then the UP or DOWN arrow key to scroll through your 30 most recent calls (only available if you have Caller ID). This key can also be used to move the cursor left when entering or editing an autodial number or name.
7Number keys
Use these keys to dial numbers, and enter numbers and letters when storing auto-dial numbers.
8PLAY NEW key
|
|
REMOTE |
|
|
Press this key after pressing |
/FLASH |
to listen to new messages recorded in the |
|
personal box corresponding to the cordless handset. |
||
9 |
PLAY key |
|
|
|
|
REMOTE |
|
|
Press this key after pressing |
/FLASH |
to listen to all messages recorded in the |
personal box corresponding to the cordless handset.
10REPEAT key
Press this key while listening to a message to play it again.
11INTERCOM key
Press this key to page the fax machine or another cordless handset.
12START key
Press this key to start fax reception from the cordless handset, or to complete entries when storing, editing, or deleting auto-dial numbers.
13REMOTE/FLASH key
Press this key to perform remote operations on the fax machine. The key is also used to access special services from your phone company that require subscription (contact your phone company for details).
14OFF key
Press this key to end a call.
15SEARCH (right) arrow key
Press the SEARCH arrow key and then the UP or DOWN arrow key to scroll through your auto-dial numbers. This key can also be used to move the cursor right when entering or editing an auto-dial number or name.
10

16 RECEPTION key
REMOTE
Press this key after pressing /FLASH to change the reception mode on the fax machine.
17STOP key
Press this key to stop playback of messages.
18DELETE
Press this key while listening to a message to delete it. To delete all your messages, press this key after playback ends (while the display shows
REMOTE MODE), followed by START .
19HOLD/ERASE key
Hold: Press this key during a call to put the other party on hold.
Erase: Press this key to delete a phone number when searching through your recently received calls (only when you have Caller ID), or when searching through your auto-dial numbers. Press the key to delete a digit or character when storing or editing an auto-dial number.
20SKIP key
Press this key while listening to your messages to skip to the next message.
21REDIAL key
Press this key to redial the last number dialed using the cordless handset.
22Headset jack
This jack lets you connect a headset (purchased separately) to the cordless handset.
23Battery cover
Remove this cover to install or replace the handset battery.
11
1. Installation
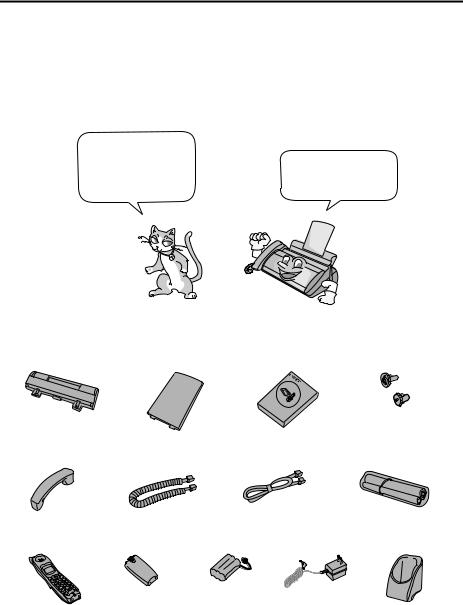
Unpacking Checklist
Before setting up, make sure you have all of the following items.
If any are missing, contact your dealer or retailer.
Paper tray |
Paper tray |
Operation |
Gears (2) |
|
extension |
manual |
|
Handset |
Handset |
Telephone |
Imaging film |
|
cord |
line cord |
(initial starter roll) |
Cordless |
Battery |
Battery |
AC adapter |
Cordless |
handset |
cover |
pack |
|
handset charger |
12

Setting Up
Setting Up
Selecting a location for the fax machine
To maximize the talking range of the cordless handset, we recommend installing the fax machine in a high and central location away from obstructions such as walls.
|
|
|
|
Do not place the |
|
|
Do not place the |
Keep dust away from |
Keep the area |
||||
machine in direct |
machine near |
the machine. |
around the |
|||
sunlight. |
heaters or air |
|
machine clear. |
|||
|
|
|
|
conditioners. |
|
|
13
1. Installation

Setting Up
Connecting the power cord
Plug the power cord into a 120 V, 60 Hz, grounded AC (3-prong) outlet.
Caution!
Do not plug the power cord into any other kind of outlet. This will damage the machine and is not covered under the warranty.
The machine does not have a power on/off switch, so the power is turned on and off by simply plugging in or unplugging the power cord.
14
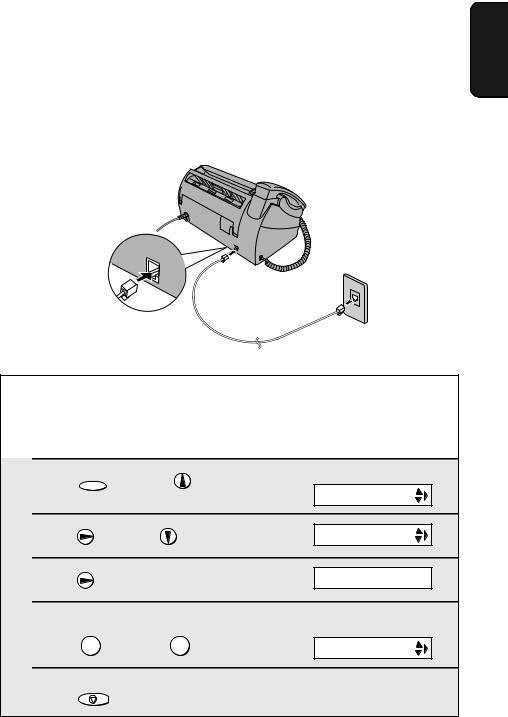
Setting Up
Connecting the telephone line cord
Insert one end of the line cord into the jack on the back of the machine marked TEL. LINE. Insert the other end into a standard (RJ11C) single-line wall telephone jack.
1. Installation
TEL.LINE
Setting the dial mode
The fax machine is set for tone dialing. If you are on a pulse dial line, you must set the fax machine for pulse dialing. Press the panel keys as follows:
1
2
3
4
5
Press FUNCTION |
once and |
once. |
Display: |
|
|
||||
|
|
|
|
OPTION SETTING |
Press |
once and |
twice. |
DIAL MODE |
|
Press |
once. |
|
1=TONE, 2=PULSE |
|
Select the dial mode: |
|
The display briefly shows |
||
|
your selection, then: |
|||
|
|
|
|
|
TONE: |
1 |
PULSE: 2 |
|
DISTINCTIVE |
Press |
STOP |
to exit. |
|
|
|
|
|
||
15
Setting Up
Note: If your area experiences a high incidence of lightning or power surges, we recommend that you install surge protectors for the power and telephone lines. Surge protectors can be purchased at most telephone specialty stores.
About condensation
If the machine is moved from a cold to a warm place, it is possible that condensation may form on the scanning glass, preventing proper scanning of documents for transmission. To remove the condensation, turn on the power and wait approximately two hours before using the machine.
Attach the paper tray and paper tray extension
Attach the paper tray.
Attach the paper tray extension.
|
Insert |
|
Click! |
horizontally |
|
and rotate up |
||
|
Note: The paper tray extension has a top side and a bottom side. If the tabs do not go into the holes, turn the support over.
16
Setting Up
Raising the base antenna
Raise the base antenna to ensure clear communication with the cordless handset.
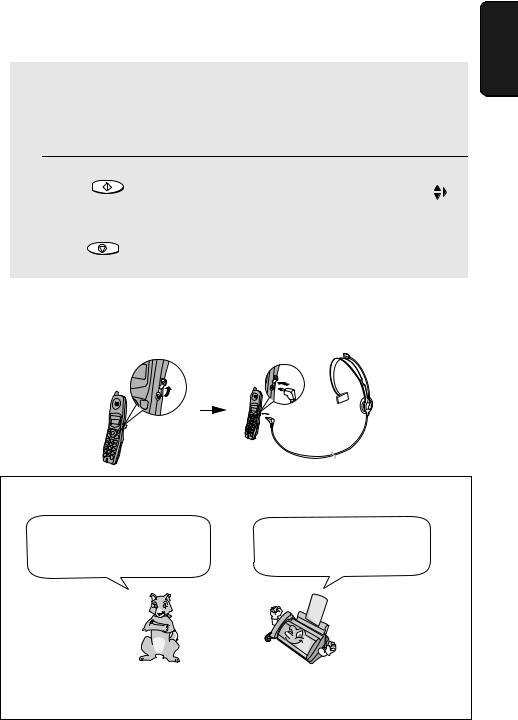
Connecting the cordless handset charger
1 Connect the AC adapter to the cordless
handset charger.
Fit the cord into the holders.
2 Plug the AC adapter into a standard
120 V AC outlet.
Important: Never cover the charger and AC adapter with a blanket, cloth, or other material. Excessive heating may result and cause fire.
1. Installation
17

Setting Up
Installing the battery and charging the cordless handset
1 Connect the battery connector , and then place the battery pack in the cordless handset.
• Place the wires as shown.
 Black
Black
Red
Red
 Black
Black
2 Place the battery cover on the cordless
handset, making sure it snaps firmly into place.
• Make sure the wires are not caught or pinched by the cover.
3 Place the cordless handset in the
charger with the dial pad facing forward.
•Important! The dial pad must face forward, or the battery will not charge.
•The battery charges automatically while the cordless handset is in the charger. While charging, the display shows CHARGING. When charging is completed, the display shows IN CHARGER.
•The cordless handset and charger may feel warm while charging. This is normal.
Charge the battery at least 10 hours the first time!
The battery cannot be overcharged. When not using the cordless handset, keep it in the charger to ensure that it is always charged.
18
Setting Up
When the battery needs charging, LOW BATTERY will appear in the display and you will hear beeps during a phone conversation. If you need to continue
the conversation, press INTERCOM to transfer the call to the fax machine. Place the
cordless handset in the charger and let it charge.
Note: If the battery is extremely low, nothing may appear in the display during the first several minutes that the cordless handset is in the charger. The battery will begin to charge normally after several minutes.
To ensure that the battery charges properly, wipe the charger contacts once a month with a cotton swab.
Talking range
The talking range of the cordless handset is approximately 1200 ft. (400 m) (line of sight). If you hear noise or interference while talking on the cordless handset, move closer to the fax machine.
♦When outside the talking range, OUT OF RANGE appears in the display. If you move out of the talking range while talking on the cordless handset, the handset will beep and you may hear interference.
Aluminum sash Metal Reinforced concrete
Large metal objects, metal structures, and thick walls reduce the
talking range.
1. Installation
19

Setting Up
Entering a name for the cordless handset
You can enter a name for the cordless handset in the fax machine.
♦The fax machine will transmit the name that you enter to your cordless handset. The name will appear in the cordless handset’s display.
1 Press FUNCTION once and |
3 times on |
Fax machine display: |
|
|
|
|
|||
|
the fax machine. |
|
ENTRY MODE |
|
|
|
|
|
|
2
3
Press |
once and |
once. |
HS NAME SET |
Press |
once. |
|
1=SET, 2=CLEAR |
4 |
|
|
|
|
|
Press |
1 |
to select SET. |
SELECT HS NO. |
|
|
5 |
|
|
|
|
|
Press |
|
. (“1” is the ID number of the |
|
|
|
1 |
SELECT ID NO. 1 |
|
|||
cordless handset that came with the fax machine.)
6 Enter the name by pressing number keys for each letter as shown in the chart below. Up to 10 characters can be entered.
Example: BILL = 22 444 555 |
|
555 |
|
SPACE = |
G = |
N = |
U = |
A = |
H = |
O = |
V = |
B = |
I = |
P = |
W = |
C = |
J = |
Q = |
X = |
D = |
K = |
R = |
Y = |
E = |
L = |
S = |
Z = |
F = |
M = |
T = |
|
♦To enter two letters in succession that require the same key, press  after entering the first letter.
♦To clear a mistake, press SPEAKER .
20
Setting Up
♦To enter a lower case letter, continue pressing the key for the letter until the lower case letter appears.
♦To enter one of the following symbols, press  or
or  repeatedly:
. / ! " # $ % & ’ ( ) + + , - : ; < = > ? @ [ ¥ ] ^ _ ' { | }) (
7 |
Press START/MEMORY to store the name. |
Display: |
|||||
|
|
|
|||||
OWNNUMBER SET |
|
|
|||||
|
|
|
|
|
|
|
|
|
|
|
|
|
|
|
|
|
|
|
|
|
|
|
|
8 |
|
|
|
The handset number |
|
|
|
|
STOP |
|
HANDSET1 |
|
|||
Press |
to exit. |
and name appear in |
|
||||
|
BILL |
|
|||||
|
the standby display of |
|
|||||
|
|
|
|
|
|
|
|
|
|
|
|
the cordless handset |
|
|
|
|
|
|
|
|
|
|
|
Connecting a headset
You can connect a headset (purchased separately) to the headset jack. Remove the cap and insert the connector as shown.
1. Installation
Accessory cordless handsets
You can use up to 3 additional UX-K01 cordless handsets with the fax machine.
Please purchase accessory UX-K01 handsets at your dealer or retailer.
For information on setting up an accessory cordless handset for use with the fax machine, see the manual that accompanies the accessory handset.
21
Loading the Imaging Film
Loading the Imaging Film
Your fax uses a roll of imaging film to create printed text and images. The print head in the fax applies heat to the imaging film to transfer ink to the paper. Follow the steps below to load or replace the film.
The initial starter roll of imaging film included with your fax can print about 30 letter-size pages.
When replacing the film, use a roll of Sharp UX5CR imaging film. One roll can print about 150 letter-size pages.
Use only Sharp Genuine
Supplies with this logo:
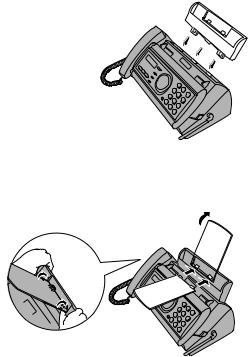
1 Remove the paper from the paper tray
and open the operation panel (press).
 2
2
If you are loading the imaging film for |
|
the first time, go to Step 4. |
1 |
2 Remove the used film and empty spool.
3 Remove the two green gears from the
spools.
DO NOT DISCARD THE TWO GREEN GEARS!
22
Loading the Imaging Film
4 Remove the new roll of imaging film from its packaging.
• Cut the band that holds the rolls together.
5 Insert the green gears.
1 slot
Make sure the
gears fit into the slots in the ends
of the rolls.
2 slots
6 Insert the film into the print |
Fit ends of rolls |
compartment. |
onto hubs |
Thick roll to rear
7 Rotate the front gear as shown until the film is taut.
8 Close the operation panel (press down
on both sides to make sure it clicks into place).
1. Installation
23
Loading Printing Paper
Loading Printing Paper
You can load letter or legal size paper in the paper tray. Recommended paper weight is 20-lb. Copy Bond. The maximum number of sheets is as follows:
Letter size: Approx. 50 sheets (20-Ib. copier paper at room temperature; maximum stack height should not be higher than the line on the tray)
Legal size: 5 sheets
1
2
Fan the paper, and then tap the edge
against a flat surface to even the stack. Make sure the stack edges are even.
Insert the stack of paper into the tray, PRINT SIDE DOWN.
•If paper remains in the tray, take it out and combine it into a single stack with the new paper.
•Be sure to load the paper so that printing takes place on the print side of the paper. Printing on the reverse side may result in poor print quality.
•GENTLY LOAD PAPER INTO THE PAPER TRAY.
•DO NOT FORCE IT DOWN INTO THE FEED SLOT.
The stack should not
be higher than this line
Note: Do not use paper that has already been printed on, or paper that is curled.
Note: If at any time the display shows the alternating messages at right, check the printing paper. If the tray is empty, add paper. If there is paper in the tray, take it out and then reinsert it.
When you are finished, press START/MEMORY .
ADD PAPER &
PRESS START KEY
24

Loading Printing Paper
1 |
Press FUNCTION |
once and |
once. |
||
2 |
Press |
|
once and |
twice. |
|
3 |
Press |
|
once. |
|
|
4 |
Select the paper size: |
The display briefly shows |
|||
your selection, then: |
|||||
|
LETTER: |
1 |
LEGAL: |
2 |
|
5 |
Press |
STOP |
to return to the date and time display. |
||
|
|
||||
Print contrast setting
Your fax has been set at the factory to print at normal contrast. If desired, you can change the print contrast setting to LIGHT.
1 |
Press FUNCTION once and |
once. |
|
2 |
|
|
|
Press |
once and |
3 times. |
|
3 |
|
|
|
Press |
once. |
|
|
4 |
|
|
|
Select the print contrast: |
|
||
|
NORMAL: |
LIGHT: |
|
5 |
|
|
|
Press |
to return to the date and time display. |
||
|
|
|
|
1. Installation
25
Entering Your Name and Fax Number
Entering Your Name and Fax Number
Before you can begin sending faxes, you must enter your name and fax (telephone) number. You also need to set the date and time.
Important!
Once you enter this information, it will automatically appear at the top of each fax page you send.
FCC regulations require that your name, telephone/fax number, and the date and time appear on each fax message you send. Enter your name and fax number here and set the date and time as explained in the following section to have the fax machine include this information automatically at the top of your fax messages.
STOP
1 2 3
4 5 6
7 8 9
0
START/MEMORY FUNCTION
1 Press FUNCTION once and  3 times.
2 Press  once.
once.
3 Press  once.
once.
26
Entering Your Name and Fax Number
4 |
Enter your fax number by pressing the number keys (max. 20 digits). |
|
|
• To insert a space between digits, press |
. |
|
• To clear a mistake, press SPEAKER . |
|
5 |
|
|
Press START/MEMORY to enter the fax number in memory. |
||
6 |
|
|
Enter your name by pressing number keys for each letter as shown in |
||
|
the chart below. Up to 24 characters can be entered. |
|
|
Example: SHARP = 7777 44 2 777 |
7 |
A = 
B = 

C = 


D = 
E = 

♦To enter two letters in succession that require the same key, press  after entering the first letter.
♦To clear a mistake, press SPEAKER .
♦To enter a lower case letter, continue pressing the key for the letter until the
lower case letter appears. To enter one of the following symbols, press  or
or  repeatedly: . / ! " # $ % & ’ ( ) + + , - : ; < = > ? @ [ ¥ ] ^ _ ' { | }) (
7 |
Display: |
Press START/MEMORY . |
DATE&TIME SET
8 Press |
STOP |
to return to the date and time display. |
|
1. Installation
27
Setting the Date and Time
Setting the Date and Time
The date and time appear in the display and are printed at the top of every page you fax. Set the date and time as shown below.
STOP
1 2 3
4 5 6
7 8 9
0
START/MEMORY FUNCTION
1
2
3
4
Press FUNCTION once and |
3 times. |
Display: |
ENTRY MODE |
|
|
|
|
|
|
||
|
|
|
|
|
|
|
|
|
|
|
|
Press |
once and |
once. |
|
|
|
|
DATE&TIME SET |
|
|||
|
|
|
|
|
|
|
|
|
|
|
|
|
|
|
|
|
|
Press |
. |
The currently set date |
|
|
|
DATE 08-15-2002 |
|
||||
appears (example): |
|
||||
|
|
|
|
|
|
|
|
|
|
|
|
Enter a two-digit number for the month (“01” for January, “02” for February, “12” for December, etc.).
Example: January 0 |
1 |
|
|
DATE 01-15-2002 |
|
|
|
|
|
|
|
|
|
|
•To correct a mistake, press  to move the cursor back to the mistake and then enter the correct number.
5 Enter a two-digit number for the day (“01” to “31”).
Example: the 5th 0 |
5 |
|
|
DATE 01-05-2002 |
|
28
 Loading...