


TE-T56U
Tea maker Operation Manual
Machine à thé
Manuel d'utilisation
CONTENTS
Important Safeguards …………………E-1
Information You Need to Know ………E-2 Parts and Handling………………………E-3 Features of the Tea Maker ……………E-7 Before Use ………………………………E-8 Grinding the Tea Leaves ………………E-9 Making Hot Tea ………………………E-11
Making a Latte ……………………E-15 Making Cold Tea …………………E-16 Care and Cleaning ………………E-17 Troubleshooting……………………E-23 Specifications………………………E-23
For Customer Assistance ………E-25 Limited Warranty …………………E-26
TABLE DES MATIÈRES
Informations Importantes Relatives À La Sécurité …F-1
Informations Que Vous Devez Connaître …F-2 Pièces et Manipulation …………………F-3
Caractéristiques de la Machine à thé …F-7 Avant Toute Utilisation …………………F-8 Moudre les Feuilles de Thé ……………F-9 Faire du Thé Bouillant …………………F-11
Faire un Latte ……………………F-15 Faire du Thé Glacé ………………F-16 Entretien et Nettoyage ……………F-17 Dépannage ………………………F-23 Spécifications ……………………F-23 Aide à la Clientèle ………………F-25 Garantie Limitée …………………F-26
…………………J-1
………J-2………………J-3……………J-7
……………………J-8………………………………J-9……………………J-11
………………………J-15………………J-16……………………………J-17…………………………J-23…………………………………J-23
E-25 27
FRANÇAIS ENGLISH
I M P O R T A N T S A F E G U A R D S
When using electrical appliances, basic safety precautions should always be followed to reduce the risk of fire, electric shock, and/or injury to persons, including the following:
1.Read all instructions.
2.Do not touch hot surfaces. Use handles or knobs.
3.To protect against fire, electric shock and injury to persons do not immerse cord, plugs, or appliance in water or other liquid.
4.Close supervision is necessary when this appliance is used by or near children.
5.Unplug from outlet when not in use and before cleaning. Allow to cool before putting on or taking off parts, and before cleaning the appliance.
6.Do not operate any appliance with a damaged cord or plug or after the appliance malfunctions, or has been damaged in any manner.
Contact a SHARP AUTHORIZED SERVICER.
7.The use of accessory attachments not recommended by the appliance manufacturer may result in fire, electric shock or injury to persons.
8.Do not use outdoors.
9.Do not let cord hang over edge of table or counter, or touch hot surfaces.
10.Do not place on or near a hot gas or electric burner, or in a heated oven.
11.To disconnect, press “STOP” and remove plug from wall outlet.
12.Do not use this appliance for other than intended use.
13.Be certain lids are securely in place before operating appliance.
14.Scalding may occur if the lids are removed during the brewing cycle.
15.The Tea Container is designed for use with this appliance. It must never be used on a range top.
16.Do not set a hot Tea Container on a wet or cold surface.
17.Do not use a cracked Tea Container or a Tea Container having a loose or weakened handle.
18.Do not clean Tea Container with cleansers, steel wool pads, or other abrasive materials.
19.Check Tea Mortar for presence of foreign objects before using.
SAVE THESE INSTRUCTIONS
For Household Use Only
WARNING
RISK OF FIRE OR ELECTRIC SHOCK
DO NOT OPEN
WARNING: TO REDUCE THE RISK OF FIRE OR ELECTRIC SHOCK,
DO NOT REMOVE COVER (OR BACK)
NO USER-SERVICEABLE PARTS INSIDE
REPAIR SHOULD BE DONE BY AUTHORIZED SERVICE PERSONNEL ONLY
E-1
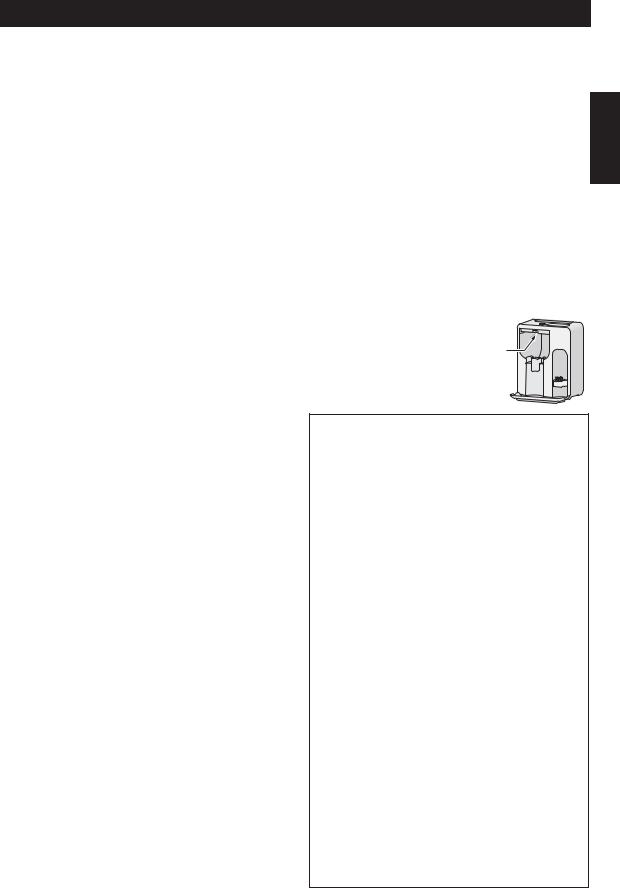
I N F O R M A T I O N Y O U N E E D T O K N O W
Please make reading this Operation Manual your first step prior to using your tea maker.
This important booklet explains exactly how the appliance works and what you need to know to operate it successfully.
Electrical Requirements
The electrical power input requirement should be a protected 15amp 120Vac 60 Hz electrical outlet. It is recommended that a separate circuit serving only this appliance be provided.
This appliance has a polarized plug (one blade is wider than the other). To reduce the risk of electric shock, this plug is intended to fit into a polarized outlet only one way. If the plug does
not fit fully in the outlet, reverse the plug. If it still does not fit, contact a qualified electrician.
Do not attempt to modify the plug in any way.
Extension Cord
A short power-supply cord is provided to reduce the risks resulting from becoming entangled in or tripping over a longer cord.
Longer extension cords may be used if care is exercised.
If a long extension cord is used, its designated electrical rating must be at least equal to the electrical rating of the appliance. The extension cord should also be positioned so that it does not hang over a countertop or tabletop where it can be pulled on by children or tripped over.
Additional Important Safeguards
1.Do not touch the plug with wet hands when inserting or removing from the outlet.
Plug securely into the electric wall socket and remove by gripping the plug.
Never pull on just the cord when unplugging from the wall.
2.Put fresh cold water in the water reservoir.
Do not put hot water or any other liquids like milk, in the water reservoir, except as instructed in the operation manual to clean the appliance.
With regular use, hard water may clog your tea maker. Carry out descaling is recommended. See page E-20.
3.The appliance should not be left unattended during operation.
4.Do not place anything on the top of appliance during operation.
5.Do not attempt to move the appliance when it contains hot liquids. Allow the appliance to cool completely before moving. Remove the Tea Mortar and tea container before moving.
6.Do not operate the appliance if the water reservoir is cracked and/or leaking water. Contact a SHARP AUTHORIZED SERVICER.
7.Do not try to adjust or repair the appliance yourself.
8.To prevent burns when the water is boiling:
a.Do not touch the tea container.
b.Do not put your hands and face directly next to the steam outlet.
9.Do not place or use the appliance under direct sunlight.
10.Do not place or use the appliance anywhere water may splash onto it.
11.Do not insert any objects in the air intake openings.
12. Accessible parts (e.g.: tea container, hot water supply port)
will become hot during use. Do not touch them during or immediately after operation.
Changes or modifications to the appliance not expressly approved by the party responsible for compliance could void the user’s authority to operate the appliance.
NOTE: This appliance has been tested and found to comply with the limits for a Class B digital device, pursuant to part 15 of the FCC Rules. These limits are designed to provide reasonable protection against harmful interference in a residential installation.
This appliance generates, uses and can radiate radio frequency energy and, if not installed and used in accordance with the instructions, may cause harmful interference to radio communications.
However, there is no guarantee that interference will not occur in a particular installation.
If this appliance does cause harmful interference to radio or television reception, which can be determined by turning the appliance off and on, the user is encouraged to try to correct the interference by one or more of the following measures:
Reorient or relocate the receiving antenna.Increase the separation between the appliance
and receiver.
Connect the appliance into an outlet on a circuit different from that to which the receiver is connected.
Consult the dealer or an experienced radio/TV technician for help.
ENGLISH
E-2
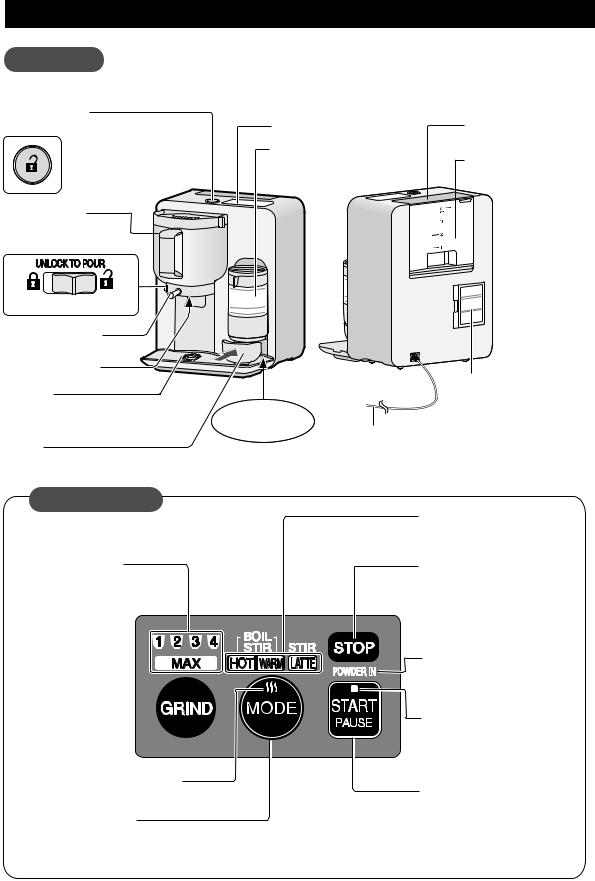
P A R T S A N D H A N D L I N G
Main Unit
|
FRONT VIEW |
BACK VIEW |
Tea container |
|
|
removal button |
Control panel |
Lid |
|
Tea mortar |
Water reservoir |
|
(See page E-5) |
|
|
|
Tea container (container*)
Tea pouring lever lock
LOCK  UNLOCK
Tea pouring lever
Tea pouring port |
|
|
|
Cup Tray |
|
Air filter |
|
|
(Air intake openings) |
||
(A Drip Tray sits under the Cup Tray) |
Set the |
||
|
|||
|
saucer here. |
Power-supply cord |
|
|
|
||
Saucer |
|
||
|
|
* The operation manual will refer to the tea container as 'container' for short.
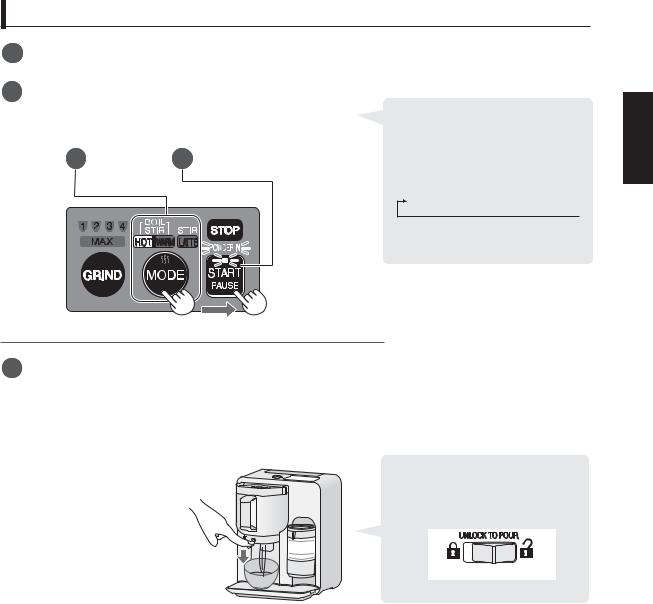
Control Panel
Quantity lamp
Indicates the total amount of tea leaves for grinding.
GRIND button 
Press to select the quantity of
tea leaves for grinding.
Water boiling indicator
Flashes while water is boiling.
MODE button
Press to select your mode. (Hot, Warm, Latte)
Mode lamp
Indicates your selected mode (Hot, Warm, Latte)
STOP button
Press the STOP button to cancel any mistakes made during programming, or to stop an operation. Also press when turning the Tea maker o .
POWDER IN indicator
Flashes when powdered tea should be added.
START indicator
Flashes when ready. Remains lit while operating.
START/PAUSE button
Press to start an operation. To pause, press again during the operation.
E-3

P A R T S A N D H A N D L I N G
Water Reservoir
Removal
Water |
|
|
|
level |
|
Handle |
Installation |
|
Grip the handle while holding the main unit with your other hand.
Securely insert the water reservoir into the main unit.
NOTES: |
|
1. Water level markings indicate water needed for |
|
the corresponding cups of brewed tea. |
|
2.Do not fill the water reservoir over the MAX mark (4)
3.Do not add any liquid (milk, etc.) other than fresh cold
water into the water reservoir. |
Water |
|
MAX |
|
|||
4. Do not add water into the water reservoir during the |
|
|
|
boiling process. (Exceeding the maximum number of |
|
|
|
cups will cause the tea container to overflow.) |
|
|
|
5. Do not pour water into the water reservoir while it is in main unit.
6. Do not remove the water reservoir from the main unit after it has been filled with water. 7. After use, empty the water reservoir and wash the water reservoir and lid.
Tea Container
|
Inside the container, there are 2 kinds |
||
Lid |
of lines, (cold tea) and (latte) |
||
NOTES: |
|
||
Lid cover |
|
||
(Do not remove) |
1. The markings indicate water/ milk |
||
Rubber seal |
required for the corresponding cups |
||
(Do not remove) |
of brewed tea. |
||
Rotary blade |
2. Do not fill the container over line 4 for |
||
(with a magnet) |
cold tea, and line 3 for latte. |
||
(See page E-18) |
3. Do not put any ice in the container. |
||
Handle |
4. Do not pour water/milk into the container |
||
while it is inserted in the main unit. |
|||
|
|||
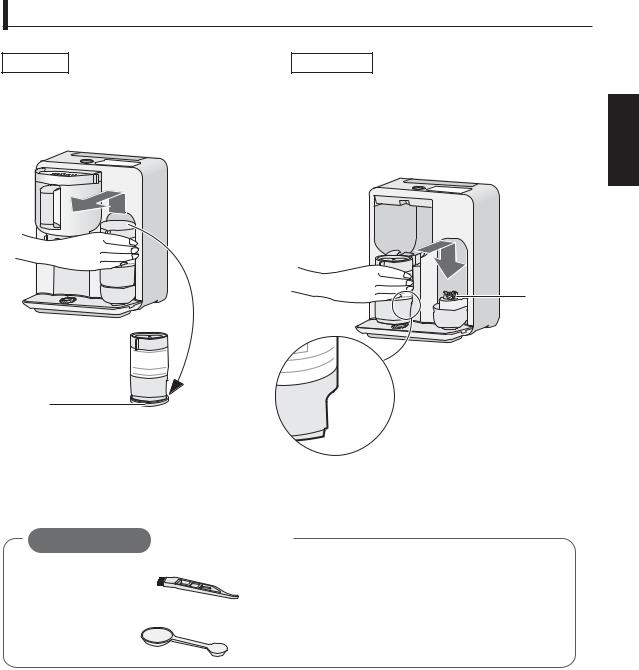
Removal |
|
Lid / Lid cover |
|
Hold down the tea container |
|
Adding the powdered tea |
|
removal button, and |
|
1. Keep the container secure in |
|
carefully pull the container |
|
the main unit. Slide the lid |
|
toward you. |
|
cover to reveal an oval |
|
|
|
opening on the right side. |
|
Installation |
|
2. Add the powdered tea |
|
|
into the container through |
||
Push the container in until |
|
the opening. |
|
|
Lid cover |
||
you feel it click into place. |
|
||
|
Adding the powdered tea to water/milk |
||
|
|
||
|
|
(for cold tea and latte) |
|
|
|
1. Remove the |
|
|
|
container from |
|
NOTE: |
|
the main unit. |
|
To prevent scalding yourself, do not remove |
2. Open the lid. Add the |
||
the container while the water is boiling or |
|
liquid and the powdered |
|
immediately after. |
|
tea into the container. |
|
|
|
3. Return the lid to its |
|
|
|
original position. |
|
ENGLISH
E-4
P A R T S A N D H A N D L I N G
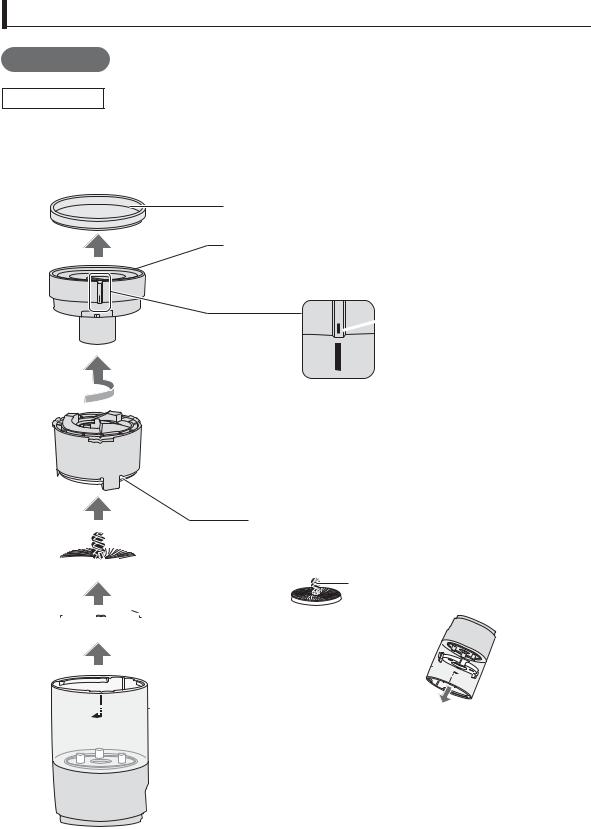
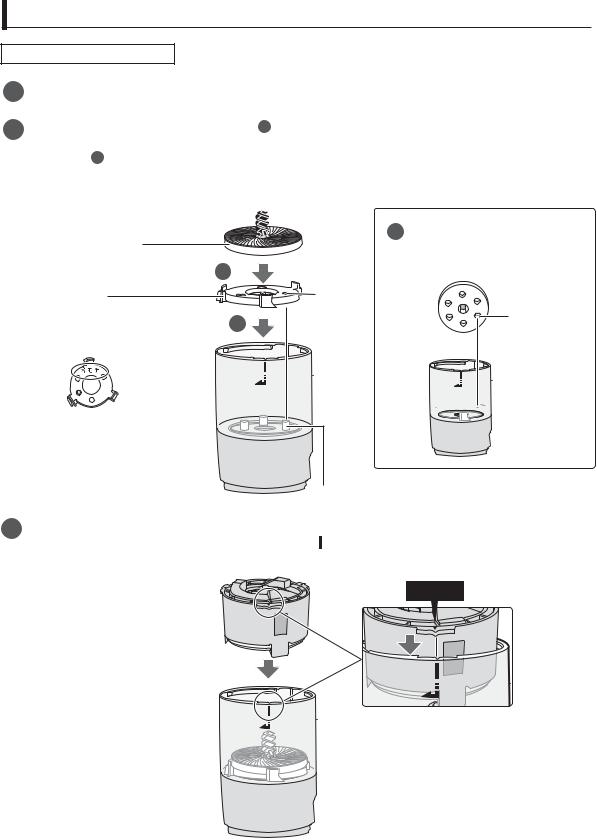
Tea Mortar
Disassembly
When disassembling the Tea Mortar, remove each part in the following numerical order. (For assembly, see page E-21)
Lid
Grinding adjustment dial (dial*)
Rotate the dial counter-clockwise until it clicks. (The ridge of the dial should align with the white line of the tea case)


 Ridge of the dial
 White line of the tea case
Upper mortar unit
Upper mortar (NOT removable)
Lower mortar
Shaft (NOT removable)
Spatula
To remove the spatula, turn the tea case upside down.
 Tea case
* The operation manual will refer to Grinding Adjustment Dial as ‘dial’ for short.
E-5
P A R T S A N D H A N D L I N G
Removal
Lift the Tea Mortar up and away from the main unit.
 Lid
Lid
Installation
Face the Tea Mortar in the correct direction and place it securely onto the receiver unit.
(Make sure to remove anything left on the receiver unit and bottom of the Tea Mortar)
Receiver unit
ENGLISH
Lid
After grinding, remove the lid first. Use the lid to cover the bottom of the Tea Mortar and catch the excess powdered tea.
Face in
Correct direction
Accessories |
(one of each included) |
|
Cleaning brush |
Operation manual |
Menu book |
(for the Tea Mortar) |
(with warranty) |
|
|
Large (for tea leaves) |
|
Tea spoon
 Small (for powdered tea)
Sound ON/OFF
You can mute the Tea Maker.
First, make sure that the Tea Maker is plugged in.
To mute the tea maker, press and hold the START button until it beeps.
To cancel the mute setting, press and hold the START button until it beeps.
NOTES:
1.The sound setting will be stored in memory even if AC power is interrupted or disconnected.
2.Alarm sounds will remain active even when in the sound OFF setting.
E-6
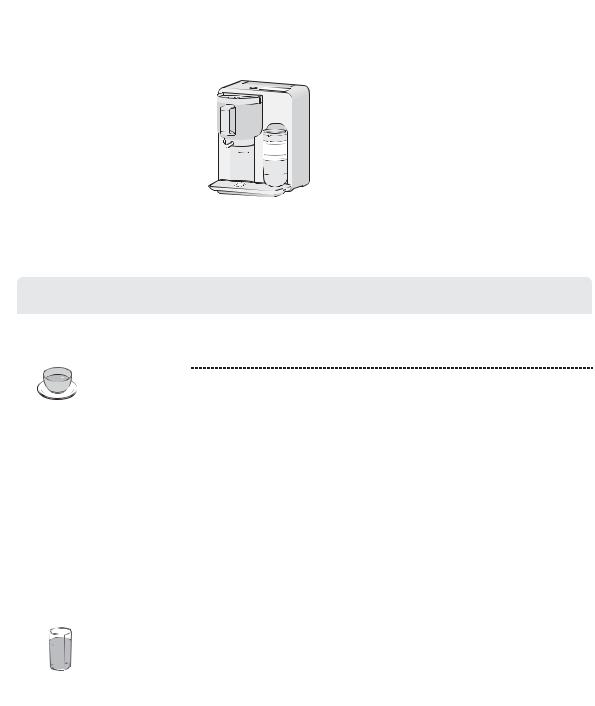
F E A T U R E S O F T H E T E A M A K E R
Stir (Tea container)  For making tea with hot/cold
water or warm/cold milk
 Boil (Water reservoir)
For boiling fresh cold water
 Grind (Tea Mortar)
For making powdered tea from tea leaves. Adjusting the dial can make two kinds
of powdered tea.
Dial Settings
FINE: For drinking
COARSE: For cooking
Drink |
Quantity* |
Time |
Things to prepare |
|||
|
|
|
|
|
|
|
Hot tea |
1 to 4 cups |
Boil and stir: |
Powdered tea** (0.02 - 0.085oz/0.6 - 2.4g) |
|||
|
|
|
|
3-5 min |
Water (Fill the water reservoir to the |
|
|
|
|
|
desired water level) |
||
|
|
|
|
|
||
|
|
|
|
Grind, boil and stir: |
Tea leaves** (0.035 - 0.1oz/1.0 - 2.8g) |
|
|
|
|
|
3 min 30 sec - |
Water (Fill the water reservoir to the |
|
|
|
|
|
7 min 25 sec |
desired water level) |
|
|
|
|
|
|
|
|
|
|
|
~ For Authentic Matcha ~ |
Matcha Powder (0.1oz/3.0g) |
||
|
|
|
1 cup |
Boil and stir: |
ater (Fill the water reservoir to the |
|
|
|
|
|
Approx. 3 min |
water level 1) |
|
|
|
|
|
|
|
|
Latte |
1 to 3 cups |
Stir: |
Powdered tea** (0.07 - 0.2 oz/2 - 6g) |
|||
|
|
|
|
Approx. 1 min 30 sec |
Milk (Pour into the container to the |
|
|
|
|
|
|
desired [Latte] line) |
|
|
|
|
|
|
DO NOT USE THE WATER RESERVOIR. |
|
|
|
|
|
|
|
|
|
|
|
|
|
Use whole milk. Low fat and skim milk |
|
|
|
|
|
|
cannot produce sufficient foam. |
|
|
|
|
|
|
|
|
Cold tea |
1 to 4 cups |
Stir: |
Powdered tea** (0.02 - 0.085oz/0.6 - 2.4g) |
|||
|
|
|
|
Approx. 1 min 30 sec |
Cold water (Pour in the container to the |
|
|
|
|
|
|
desired [Cold tea] line) |
|
|
|
|
|
|
DO NOT USE THE WATER RESERVOIR. |
|
|
|
|
~ For Authentic Matcha ~ |
Matcha Powder (0.1oz/3.0g) |
|
|
|
|
|
1 cup |
Stir: |
Cold water (Pour in the container to |
|
|
|
|
|
Approx. 1 min 30 sec |
[Cold tea] line 1) |
|
|
|
|
|
|
|
|
* 1 cup (Level/line 1): Approx. 5.1oz/150mL, 2 cups (Level/line 2): Approx. 9.6oz/285mL3 cups (Level/line 3): Approx. 14.2oz/420mL, 4 cups (Level/line 4): Approx. 19oz/560mL
** In case of green tea. The quantity will vary depending on a type of tea leaves.
You can make hot tea while grinding tea leaves. (See page E-13)
Moreover, you can make latte and cold tea while grinding tea leaves.
The appliance has no heat-retention function. Flavors will be ideal just after the drink is made.
You can try various ideas from our menu book including teas, lattes, savory dishes and sweet desserts.
E-7

|
|
B E F O R E U S E |
|
|
|
Before First Use |
|
|
|
1. |
Carefully unpack your tea maker, and remove all packing materials. |
|
|
|
2. |
Place the tea maker on a flat and sturdy surface. |
|
|
|
|
|
|||
3. |
Clean the container and insert it into the main unit. |
|
ENGLISH |
|
4. |
Clean the water reservoir. Fill it to the MAX mark with fresh cold water. Do not fill over the MAX mark. |
|
||
|
|
|||
|
|
Set the lid and insert into the main unit. |
|
|
5. |
Press the MODE button once, and press the START button. |
|
|
|
6. |
When 4 beeps sound, place a cup on the cup tray under the container. Unlock the tea pouring lever. |
|
|
|
|
|
Hold down the tea pouring lever and fill the cup. Discard the water. |
|
|
|
|
|
|
|
7. |
Repeat pouring and discarding hot water, until it no longer flows from the tea pouring port. |
|
|
|
Points to Remember
Tea Leaves
●A Japanese tea, Chinese tea, and black tea are fit for use. The following items may cause mechanical failure:
Tea made of anything other than tea leaves (e.g.: barley tea, black bean tea)Tea that includes anything other than tea leaves (e.g.: brown rice tea)
Long tea leaves that cannot be ground by the Tea Mortar. (They can be used if cut into short pieces)Tea leaves already ground into powdered form.
For more information, please refer to the attached menu book.
● Store the tea leaves in a tea caddy. Metallic tea caddies are recommended.
● Do not attempt to grind wet tea leaves.
Water Reservoir
●Do not place on or near a gas or electric burner, or on any other high temperature surface. Heat will cause it to warp or melt.
●After use, empty the water reservoir and wash the water reservoir and lid.
Tea Container
●Do not use with a gas or electric burner, or in microwave oven.Heat will cause it to warp or melt.
●Set the lid and lid cover correctly when making a drink. Otherwise, the contents in the container may splash out during stirring.
●The inside of the container is coated with fluorine. Do not scratch the coating to extend its lifespan.
● The rotary blade has a magnet at its base. Do not place the cup close to items that are sensitive to magnets.
Tea Mortar
● The upper and lower mortars are made of ceramic. Extreme shocks will break them.Handle with care.
● After cleaning, always dry thoroughly.
E-8
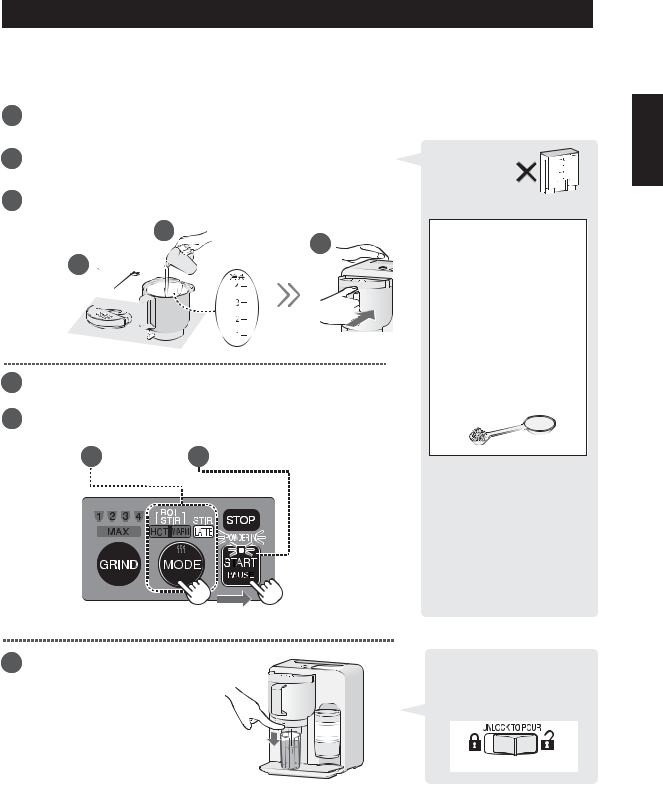
G R I N D I N G T H E T E A L E A V E S
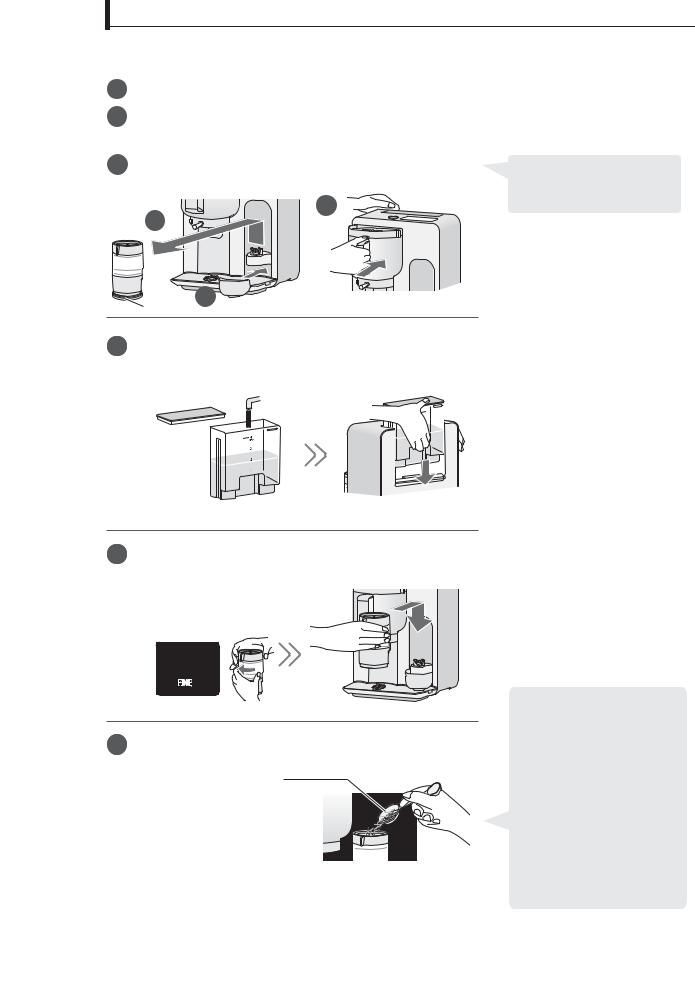
* Suppose you want to grind tea leaves for 2 cups of tea.
1 |
Set the saucer. |
2 |
|
2 |
Remove the lid of the Tea Mortar. |
||
|
|||
|
Then remove the Tea Mortar |
|
|
|
and place it on the lid. |
|
|
|
|
Lid |
|
3 |
Set the dial to FINE and place the |
|
|
|
Tea Mortar on the receiver unit. |
|
(Initial setting of the mortar is COARSE)
1 
If you are using powdered tea for cooking, set the dial to COARSE.
34 Add tea leaves slowly into the Tea Mortar using the large spoon. Place the lid on the Tea Mortar.
Large tea spoon
|
Tea leaves |
Grinding |
||
Quantity |
|
|||
|
|
|
||
|
|
Powdered tea* |
Time |
|
|
|
|
||
(1 cup) |
1/2 spoonful |
Approx. 0.02 oz/0.6 g |
Approx. 1 min 40 sec |
|
(2 cups) |
Slightly less than |
Approx. 0.04 oz/1.2 g |
Approx. 3 min 15 sec |
|
1 spoonful |
||||
|
|
|||
|
|
|
||
(3 cups) |
Slightly more than |
Approx. 0.06 oz/1.8 g |
Approx. 4 min 50 sec |
|
1 spoonful |
||||
|
|
|||
|
|
|
||
(4 cups) |
1 1/2 spoonful |
Approx. 0.08 oz/2.4 g |
Approx. 6 min 25 sec |
|
|
||||
(Grind more) |
3 1/2 spoonful |
Approx. 0.21oz/6.0 g |
Approx. 15 min |
|
|
|
|
||
* With green tea, quantity will vary depending on the type of tea leaves.
E-9
G R I N D I N G T H E T E A L E A V E S
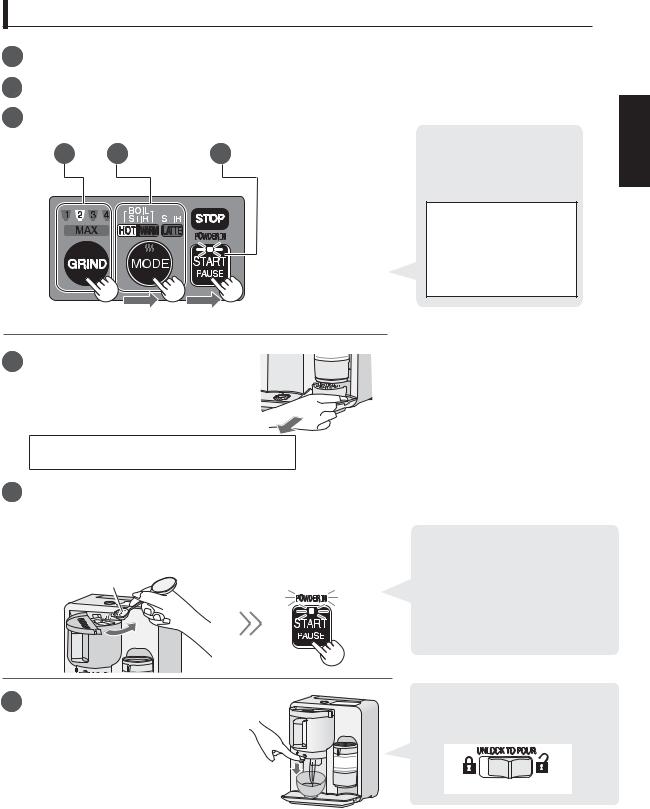
35 |
Plug the unit into an outlet. Select the quantity |
|
by pressing the GRIND button twice. |
36 |
Press the START button once. The Tea Mortar will |
|
begin grinding the tea leaves. The ground tea powder |
will collect in the saucer.
● |
The quantity lamp will |
||
|
|||
|
|||
|
change every time you |
||
|
press the GRIND button. |
||
|
1→2→3→4→ → off |
|
|
|
|
||
|
|
|
|
35 36
×2 ×1
37 After grinding is complete, 4 beeps will sound and the Tea Mortar will stop automatically.
Tap the lid of Tea Mortar and pull out the saucer.
If there are tea leaves still left in the Tea Mortar, press the GRIND
button once and the START button once.
●If you press the GRIND button during operation, the flashing quantity lamp will indicate the remaining time.
0 to 1 min 39 sec
1 min 40 sec - 3 min 14 sec
3 min 15 sec - 4 min 49 sec
4 min 50 sec - 6 min 24 sec
6 min 25 sec -
15min
●Tap the lid of the Tea Mortar to clear the powdered tea from the bottom of the Tea Mortar.
●If you do not immediately use the powdered tea, store in a sealed container and refrigerate. Using the powdered tea soon after grinding is recommended.
After use, disconnect the plug from the outlet and carry out any cleaning or maintenance.
Issues with grinding tea leaves continually
Sometimes quantity lamps will flash and alert sounds will sound when pressing the GRIND button. This means that cooling time is necessary to avoid overheating the mechanical components.
See page E-24 and allow the Tea Mortar to cool down.
NOTE:
Do not re-grind already powdered tea in the Tea Mortar.
ENGLISH
E-10
M A K I N G H O T T E A
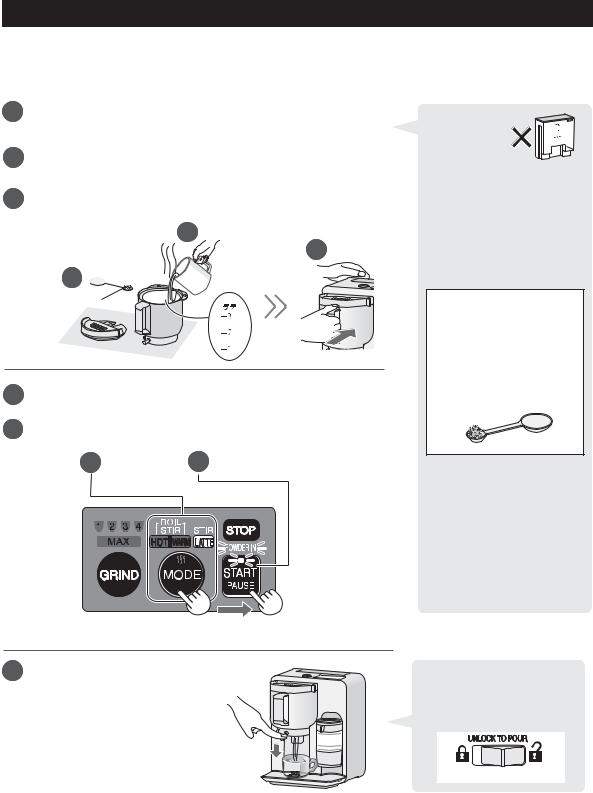
There are two methods for making hot or warm tea:
1.Boil and stir: Making tea with powdered tea ground in advance.
2.Grind, boil and stir: Boiling water while grinding tea leaves.
The temperature of the warm tea is about 59 - 68°F (15 - 20 ) less than the hot tea.
1.Boil and stir:
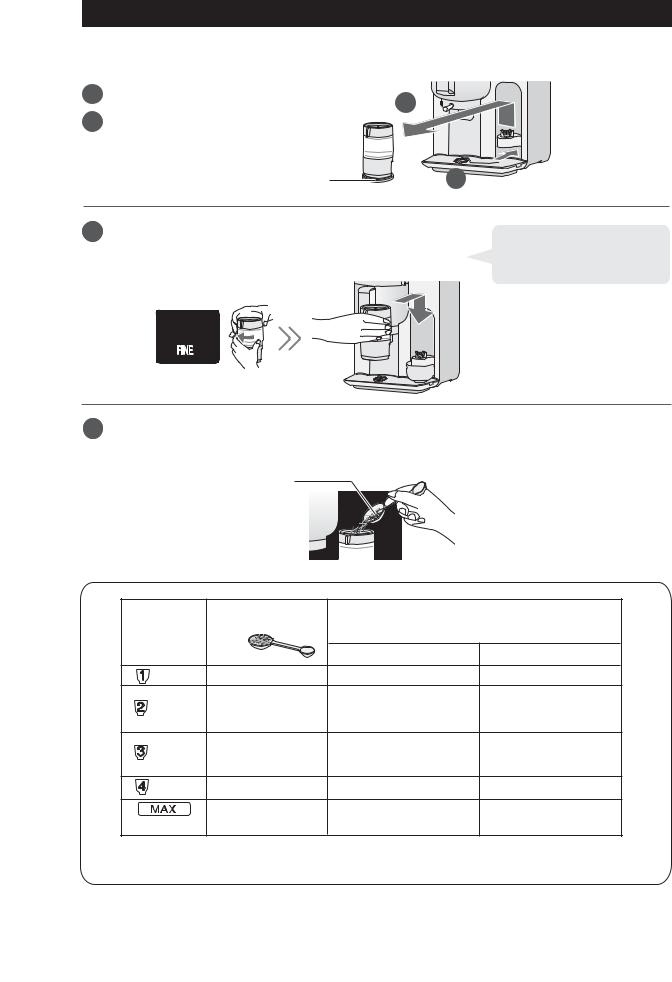
* Suppose you want to make 2 cups of hot tea.
13 |
Ensure the container is empty, and insert it into the main unit. |
32 Fill the water reservoir to water level 2 with fresh cold water, and insert it into the main unit.
3 |
Open the lid cover of the container by sliding it clockwise. |
|
Using the small tea spoon, add powdered tea into the tea |
container through the oval opening.
43 Close the lid cover.
●Wipe off any moisture before inserting the container.
[ Amount of powdered tea* ]
In the case of green tea
1 cup… 1 tea spoon
2 cups… 2 tea spoons
3 cups… 3 tea spoons
4 cups… 4 tea spoons
In the case of Authentic Matcha
1 cup... 5 tea spoons
Measure powdered tea with small heaping tea spoons.
*Amount will vary depending on the type of tea leaves. See the attached menu book.
●Adjust the amount of powdered tea according to taste.
E-11
M A K I N G H O T T E A
35 |
Plug the unit into an outlet. Select HOT |
||||||||||||||||
|
by pressing the MODE button once. |
||||||||||||||||
36 |
Press the START button once. The tea maker |
||||||||||||||||
|
will start to heat the water. The boiled water |
||||||||||||||||
|
will automatically empty into the container and |
||||||||||||||||
|
be stirred with powdered tea. |
||||||||||||||||
|
35 |
|
|
36 |
|
|
|
|
|
|
|
|
|
|
|||
|
|
|
|
|
|
|
|
|
|
|
|
|
|
|
|
|
|
|
|
|
|
|
|
|
|
|
|
|
|
|
|
|
|
|
|
|
|
|
|
|
|
|
|
|
|
|
|
|
|
|
|
|
|
|
|
|
|
|
|
|
|
|
|
|
|
|
|
|
|
|
|
●To make warm tea, press the MODE button twice at step 5.
●The mode lamp will change
every time you press the MODE button.
HOT→WARM→LATTE→OFF
●The time varies depending on the water temperature.
x1 x1
73 After making tea, 4 beeps will sound and the tea maker will stop automatically.
Put a tea cup on the cup tray under the container. Unlock the tea pouring lever lock.
Hold down the tea pouring lever and pour the tea.
After using, disconnect the plug from the outlet, and carry out any cleaning or maintenance.
●Before pouring tea, unlock the tea pouring lever lock. After pouring tea, lock it again for your safety.
LOCK  UNLOCK
NOTE:
All water in the water reservoir will automatically empty into the container. If the container is not empty prior to brewing, it may overflow.
ENGLISH
E-12
M A K I N G H O T T E A
2.Grind, boil and stir:
*Suppose you want to grind tea leaves and make 2 cups of hot tea at the same time.
1
2
Set the saucer.
Remove the lid of the Tea Mortar. Then remove the Tea Mortar and place it on the lid.
3 Ensure the container is empty, and insert it into the main unit.
3
2
●Wipe off any moisture before inserting the container.
Lid |
1 |
43 |
Fill the water reservoir to water level 2 with fresh cold |
|
water, and insert it into the main unit. |
53 |
Set the dial to FINE and place the |
|
Tea Mortar on the receiver unit. |
(Initial setting of the mortar is COARSE)
36 Add tea leaves slowly into the Tea Mortar using the large spoon. Place the lid on the Tea Mortar.
Large tea spoon
●To measure the amount of tea leaves, see page E-9.
●When using the appliance for the first time, or after cleaning/maintenance, the resulting volume of powdered tea will be less than usual.
When you want to grind one or two spoonfuls of tea leaves, increase the quantity of tea leaves by one tea spoonful.
E-13
M A K I N G H O T T E A
37 |
Plug the unit into an outlet. Select quantity |
||||||||||||||
|
by pressing the GRIND button twice. |
||||||||||||||
38 |
Select HOT by pressing the MODE button once. |
||||||||||||||
39 |
Press the START button once. The Tea Mortar will |
||||||||||||||
|
start to grind the tea leaves, and water will be heated. |
||||||||||||||
|
73 |
83 |
|
93 |
|||||||||||
|
|
|
|
|
|
|
|
|
|
|
|
|
|
|
|
|
|
|
|
|
|
|
|
|
|
|
|
|
|
|
|
|
|
|
|
|
|
|
|
|
|
|
|
|
|
|
|
|
|
|
|
|
|
|
|
|
|
|
|
|
|
|
|
x2 x1 x1
● |
To make warm tea, |
|
|
|
press the MODE button |
|
twice at step 8. |
[ Time until the tea is made ]
 …Approx. 2 min
 …Approx. 3 min 20 sec
 …Approx. 5 min
 …Approx. 6 min 40 sec
  …Approx. 15 min 30 sec
103 |
After grinding is complete, 4 beeps |
|
will sound and the Tea Mortar will |
|
stop automatically. Tap the lid of |
|
the Tea Mortar and pull out the |
|
saucer. |
|
“POWDER IN” will flash and indicate the time to |
|
add the powdered tea into the container. |
113 |
When "POWDER IN" is flashing, open the lid cover of |
|
the container by sliding it clockwise. |
Using the small tea spoon, add the powdered tea into the container through the oval opening. Close the lid cover and then press the START button once. The tea maker will begin to stir the hot water and powdered tea.
Small tea spoon
x1
● |
The surface of the container |
|
|
|
will be hot. When you add |
|
the powdered tea to the |
|
container, take care not to |
|
burn yourself. |
● Press the START button within |
|
|
30 minutes of when “POWDER |
|
IN” is flashing. |
123 After making tea, 4 beeps will sound and the tea maker will stop automatically.
Put a tea cup on the cup tray under the container. Unlock the tea
pouring lever lock. Hold down the tea pouring lever and pour the tea.
After use, disconnect the plug from the outlet and carry out any cleaning or maintenance.
●Before pouring tea, unlock the tea pouring lever. After pouring tea, lock it again for your safety.
LOCK  UNLOCK
NOTE:
All water in the Water Reservoir will automatically empty into the container. If there is any liquid in the container prior to brewing, it may overflow.
ENGLISH
E-14
M A K I N G A L A T T E
You can make a latte by stirring milk with powdered tea ground in advance.
* Suppose you want to make one cup of green tea latte.
13 |
Open the lid of the container. Pour in the desired amount |
|
|
of warm milk (for 1 cup, pour to line1 of [latte]) |
|
23 |
Add powdered tea in the container using the small spoon |
|
|
(for 1 cup, add 3-4 heaping spoons) |
|
3 |
Close the lid and insert the container into the main unit. |
|
|
13 |
3 |
|
|
|
32 
Small tea spoon
43 |
Plug the unit into an outlet. Select LATTE |
||||||||||||||||
|
by pressing the MODE button 3 times. |
||||||||||||||||
53 |
Press the START button once. The tea maker will begin |
||||||||||||||||
|
to stir. |
|
|
|
|
|
|
|
|
|
|
|
|
|
|
||
|
34 |
|
|
35 |
|
|
|
|
|
|
|
|
|
||||
|
|
|
|
|
|
|
|
|
|
|
|
|
|
|
|
|
|
|
|
|
|
|
|
|
|
|
|
|
|
|
|
|
|
|
|
|
|
|
|
|
|
|
|
|
|
|
|
|
|
|
|
|
|
|
|
|
|
|
|
|
|
|
|
|
|
|
|
|
|
|
|
● Do not use the water reservoir.
●When you pour warm milk into the container, take care not to burn yourself.
●Cold milk that has been stored in a refrigerator is also acceptable.
[ Amount of powdered tea* ]
In the case of green tea
1 cup… 3 - 4 tea spoons
2 cups… 6 - 7 tea spoons
3 cups…10 tea spoons
Measure the quantity of powdered tea using small heaping tea spoons.
*Amount will vary depending on the type of tea leaves. See the attached menu book.
●Adjust the amount of powdered tea according to taste.
●Pour milk into the container first to make a smooth textured latte.
x3 x1
63 After making the latte, 4 beeps will sound and the tea maker will stop automatically.
Put a tea cup on the cup tray under the container.
Unlock the tea pouring lever. Hold down the tea pouring lever to pour the tea.
●
Before pouring tea, unlock the tea pouring lever lock. After pouring tea, lock it again.
LOCK  UNLOCK
After use, disconnect the plug from the outlet and carry out any cleaning or maintenance.
NOTES:
1.You can scoop out any remaining foam in the container to top off your latte. Do not use a metallic spoon.
2.Do not use milk that has been stored at room temperature.
3.The quality of foam will vary depending on the temperature, or the types of tea leaves or milk.
E-15
M A K I N G C O L D T E A
You can make cold tea by stirring cold water with powdered tea ground in advance.
* Suppose you want to make one cup of cold green tea.
13 |
Open the lid of the container. Pour in the desired amount |
|
of cold water (for 1 cup, pour to line1 of [cold tea]) |
23 |
Add powdered tea into the container using the small spoon |
|
(for 1 cup, add 1 heaping tea spoon) |
●Do not use the water reservoir.
3
34
35
Close the lid and insert the container into the main unit.
31 |
3 |
|
32 
Small tea spoon
Plug the unit into an outlet. Select LATTE by pressing the MODE button 3 times.
Press the START button once.
The tea maker will begin to stir.
[ Amount of powdered tea* ]
In the case of green tea
1 cup… 1 tea spoon
2 cups… 2 tea spoons
3 cups… 3 tea spoons
4 cups… 4 tea spoons
In the case of Authentic Matcha
1 cup... 5 tea spoons
Measure the quantity of powdered tea using heaping small tea spoons.
43 53
* Amount will vary depending on the type of tea leaves. See the attached menu book.
● Adjust the amount of powdered tea according to taste.
● Pour water into the container first to make a smooth textured cold tea.
x3 |
x1 |
63 After making tea, 4 beeps will sound |
|
and the tea maker will stop |
|
automatically. Put a tea cup |
|
|
|
on the cup tray under |
|
the container. |
|
Unlock the tea pouring lever. |
|
Hold down the tea pouring lever |
|
to pour the tea. |
|
●
Before pouring tea, unlock the tea pouring lever. After pouring tea, lock it again for your safety.
LOCK  UNLOCK
After use, disconnect the plug from the outlet and carry out any cleaning or maintenance.
ENGLISH
E-16
C A R E A N D C L E A N I N G
Before cleaning, turn the Tea Maker o . Unplug and allow it to cool completely.
An authorized service representative should perform any other servicing, except for specific cases detailed in the operation manual.
CAUTION: Do not use commercial cleaners, abrasive, harsh cleaners, solutions that contain sodium hydroxide, or scouring pads on any part of the tea maker.
Dishwashers cannot be used to clean your tea maker.
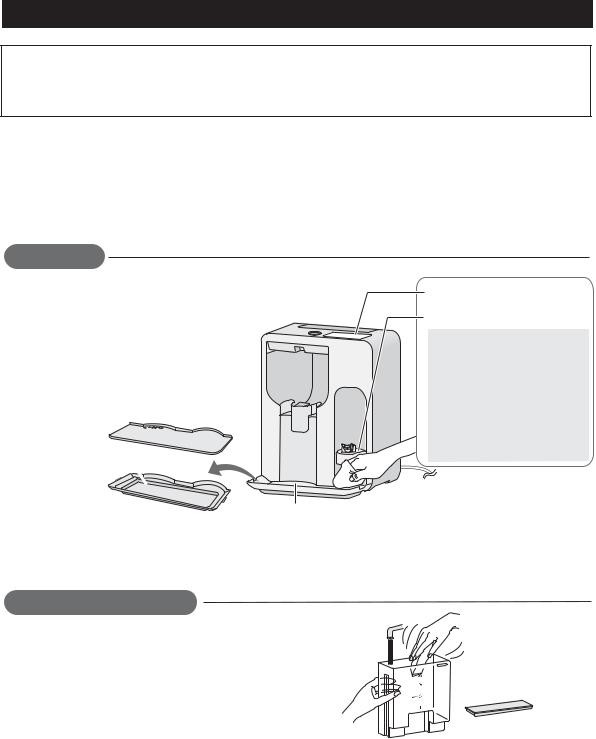
Main Unit
After Use
Using a soft cloth moistened only with water, gently wipe the panel until it becomes clean. Avoid using excessive amounts of water. Do not use any sort of chemical or abrasive cleaner. Remove the cup tray and drip tray. Wipe the base plate.
Cup tray 


Drip tray

Control panel
Receiving unit
Take extreme care when cleaning the control panel and receiver units. Using a cloth moistened only with water, gently wipe until they become clean. Avoid using excessive amounts of water. Do not use any sort of chemical or abrasive cleaner.
Base plate
Water Reservoir / Lid
After Use
After use, wash in a mild soap or detergent solution with a damp soft cloth or sponge. Rinse and dry. Do not wash in the dishwasher. Do not use harsh cleaners, sharp metal scrapers, or stiff brushes on the water reservoir and lid.
E-17
C A R E A N D C L E A N I N G
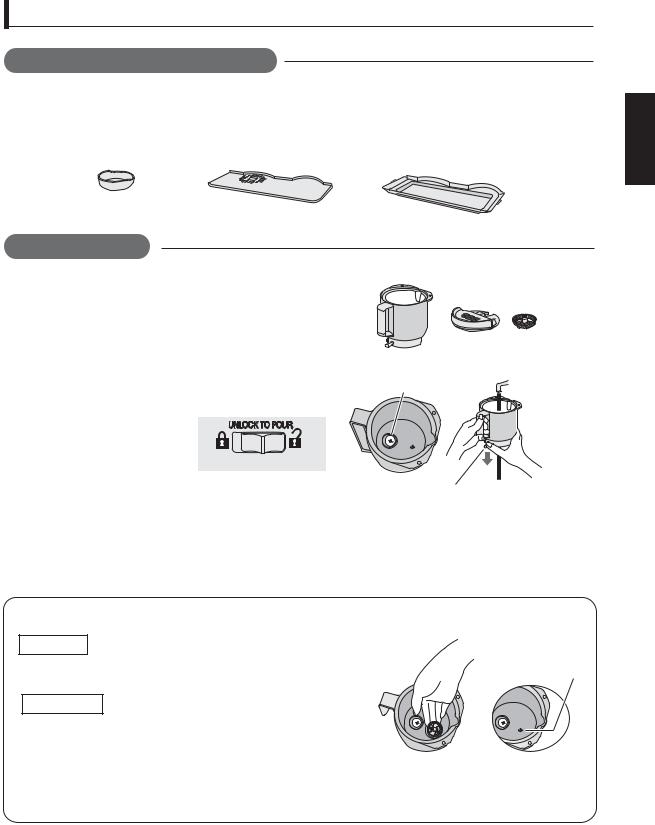
Saucer / Cup Tray / Drip Tray
After Use
Wash with warm or cold water using a soft sponge and then let dry. For heavier spills and dirt, use a mild soap or detergent solution.
Saucer |
Cup tray |
Drip tray |
ENGLISH
Tea Container
After Use
Wash with warm or cold water using a soft sponge and then let dry. Remove the rotary blade in the container.
For heavier spills and dirt, use a mild soap or detergent solution. For tea stains, use oxygen bleach.
Clean around the rubber seal with running water while holding down the tea pouring lever. Any remaining dirt may cause water leakage. Make sure to unlock the tea pouring lever before cleaning.
 UNLOCK
NOTES:
Container
Rotary
Lid Blade
Rubber seal
Tea pouring lever
1.If the rubber seal is removed, unlock the tea pouring lever, hold down the lever, and securely re-attach the rubber seal to the bottom of the container. Then fill the container with water to check whether any water leakage occurs.
2.Do not remove the rubber seal and the lid cover by force.
Rotary Blade |
|
Removal |
|
Carefully pull out the rotary blade. (It may be firmly attached to the |
Projection |
container) |
|
Installation
Carefully push the rotary blade onto the projection that is at the bottom of the container.
NOTE:
To prevent misplacement or accidental swallowing, do not forget to reinstall the rotary blade after cleaning.
E-18
C A R E A N D C L E A N I N G
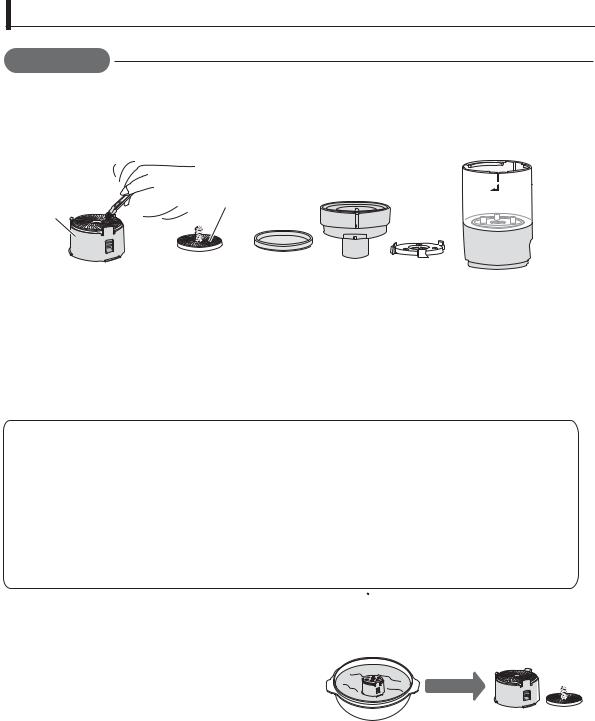
Tea Mortar
After Use
Disassemble the Tea Mortar. (See page E-5) Remove the remaining powdered tea using the supplied cleaning brush. After cleaning, re-assemble the parts. (See page E-21)
Upper
mortar 

 Lower mortar unit
NOTE:
Never separate the upper mortar unit and lower mortar with force.
Monthly Maintenance
Disassemble the Tea Mortar. (See page E-5) Remove the remaining powdered tea using the supplied cleaning brush. Then wash in a mild soap or detergent solution with a soft sponge. Rinse and dry thoroughly.
In the following cases, carry out maintenance before a month has passed:
●The upper mortar unit and lower mortar seem to be clogged, and powdered tea is not coming out smoothly.
●When you wish to grind a different type or flavor of tea leaf.
●All quantity lamps are flashing and the appliance stops grinding. (upper mortar unit and lower mortar may be stuck together)
●An unusual sound is being produced during grinding.
●The Tea Mortar is extremely dirty.
●You will not use the appliance for a long period of time.
When the Upper Mortar unit and Lower Mortar are stuck together |
ether. |
|
|
||
Removing them by force may cause damage to |
|
|
the appliance. Immerse them in warm water and |
|
|
wait until they can be taken apart easily. |
2 to 3min |
|
(standing time: 2 to 3 min.) |
||
|
After they are separated, remove the powdered tea using the supplied cleaning brush, then wash and
dry thoroughly. After drying, re-assemble the parts. (See page E-21)
IMPORTANT:
Air dry the Tea Mortar (8 hours or more) even after removing moisture with a dry cloth. If any moisture remains, powdered tea may become clogged on the surface of upper and lower tea mortars. This will reduce the amount of powdered tea produced.
Special note for cleaning the Tea Mortar:
When drying, do not use electric dish dryers or microwave ovens, etc. Such devices may cause damage to components.
E-19
C A R E A N D C L E A N I N G
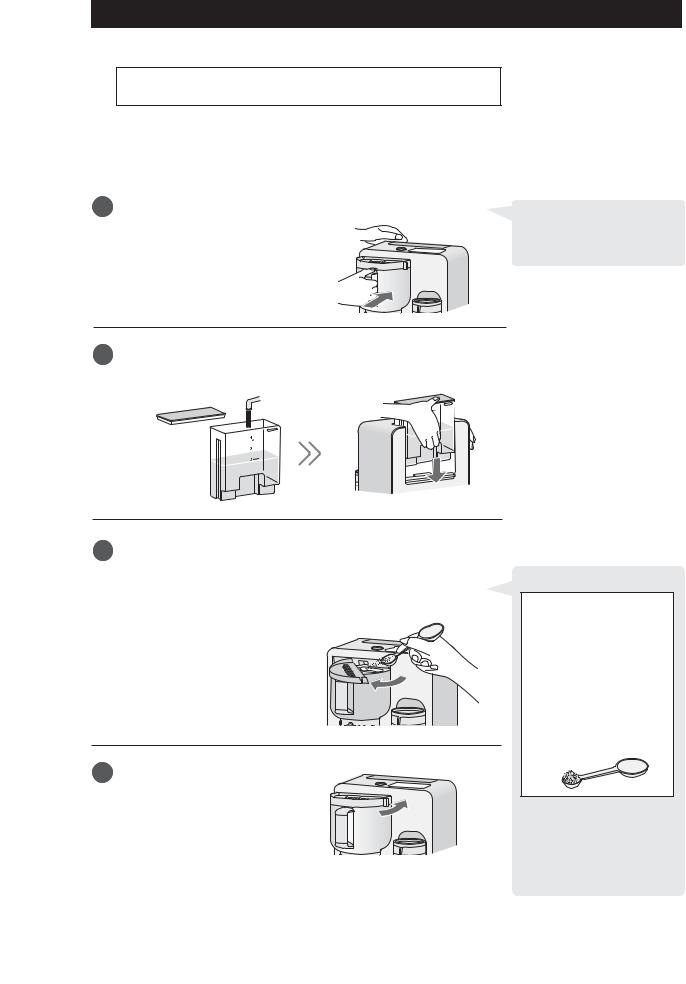
Air Filter
Monthly Maintenance
Remove the air filter panel from the back of the main unit. Wash in warm or cold water, and wipe dry. Reinstall on the main unit immediately.
Removal
Tab
Push the tab to the right.
Installation
Slits Tabs
Insert the 2 tabs of the air filter panel into the corresponding slits on main unit. Press the air filter until it snaps into place.
Descaling
(Boiling time : Approx. 5 min)
After frequent use, mineral content from water may build up in the pipe or other parts of the appliance. This is called "scale". If scale becomes an issue, water will begin taking longer to boil or remain in the water reservoir. Remove any scale build-up with the following method:
1. Fill the water reservoir to the MAX mark with fresh cold water. Do not fill past the MAX mark.
2. Dissolve 1 tablespoon of pure citric acid crystals in the water. Stir well. Set the lid and insert into the main unit.
3. Insert the empty container into the main unit. Plug in.
4.Press the MODE button once, and then press the START button.
5. When 4 beeps sound, remove the container and discard the hot water.
6. Fill the water reservoir to the MAX mark with fresh cold water, and set the lid. Insert the water reservoir into the main unit.
7. Insert the empty container into the main unit.
8. Press the MODE button once, and then press the START button. 9. When 4 beeps sound, remove the container and discard
the hot water.
10. Repeat steps 6 to 9 two or three times. After use, disconnect the plug from the outlet.
WARNING:
The container and its lid will become hot. To PREVENT BURNS, remove while using potholders.
NOTES:
1.Frequency of descaling will vary depending on the hardness of the water. If you use hard water (high in mineral content), regular descaling is recommended.
2.Pure citric acid is available at numerous drugstores.
ENGLISH
E-20
C A R E A N D C L E A N I N G
Assembling the Tea Mortar
1 |
Position the “ [front]” side of the spatula face-up and insert it into the tea case. |
|
Make sure to align the holes of the spatula with the protrusions of the tea case. |
2 |
Insert the lower mortar into the tea case. ( 2 -a) Align the holes on the bottom of the |
|
lower mortar with the protrusions, rotating the lower mortar slowly until it fits |
securely. ( 2 -b)
Lower mortar
Spatula
Make sure to face the “ (front)” of the spatula upward
2 -b
2 |
-a |
Bottom of the lower mortar |
|
||
|
|
Hole |
|
1 |
Hole |
|
|
 Protrusion
Tea case 
 Protrusion
3 Place the upper mortar unit onto the lower mortar.
Align "▼" of the upper mortar unit with the white line “ ” of the tea case.
Match
Upper mortar unit 
NOTE:
There are three ▼ on the upper mortar unit. Match any of them with the white line “ ” of the tea case.
E-21
C A R E A N D C L E A N I N G
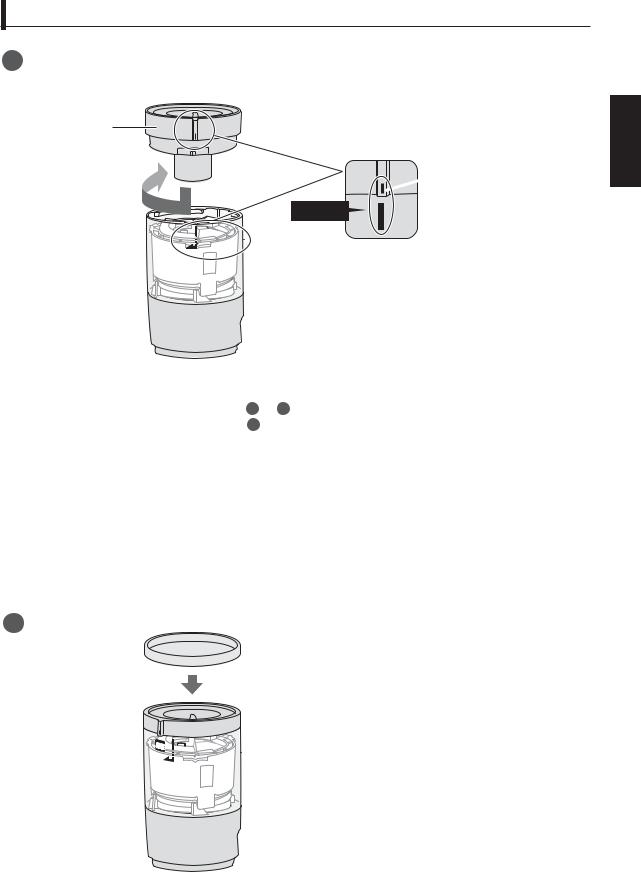
4 Insert the dial into the tea case so that the ridge of the dial align with the white line on the tea case. Then press the dial into the tea case and turn the dial clockwise.
Dial
 Ridge of the dial
Match
 White line of the tea case
NOTES:
1. If you cannot insert the dial, then steps 1 to 3 have not been carried out properly.
Re-assemble the Tea Mortar from step 1 while paying attention to the following:
●Spatula: Make sure that “ [front]” is face-up.
●Lower Mortar: Make sure to align the holes on the bottom with the protrusions of
the tea case.
●Upper Mortar unit: Make sure it is in the correct position.
2.We recommended setting the dial to “COARSE” when you store the Tea Mortar. (This prevents the upper mortar unit and lower mortar from sticking together.)
5 Set the lid.
Lid 
ENGLISH
E-22

T R O U B L E S H O O T I N G
The following situations are normal and are not signs that the tea maker is malfunctioning.
PROBLEM |
ANSWER |
|
|
The Tea Mortar is making |
● When grinding for the first time or right after cleaning the Tea Mortar, |
a squeaking sound. |
hearing a squeaking sound is common. |
|
|
The Tea Mortar suddenly stops |
● Check that you are using an appropriate type of tea leaves. |
during grinding. An unusual |
Disassemble the Tea Mortar. See page E-5. Remove the remaining |
sound is coming out of the |
powdered tea using the supplied cleaning brush. |
Tea Mortar. |
After cleaning, re-assemble the parts. See page E-21. |
|
See page E-19 for the details of maintenance for the Tea Mortar. |
|
|
No sound when buttons are |
● Sound is turned OFF. See page E-6 to turn sound back on. |
pressed. No beeps when |
|
operations are completed. |
|
|
|
The tea maker boils water slowly. |
● Follow step-by-step instructions for descaling. |
The water reservoir does not fully |
See page E-20. |
empty out during use. |
|
|
|
There is no powdered tea in |
● It will take about 30 seconds for powdered tea to come out after |
the saucer. |
pressing the START button. |
|
● Remove the tea leaves in the Tea Mortar. Shorten any long tea leaves |
|
prior to re-grinding. |
|
● Make sure the assembly of the spatula in the Tea Mortar is correct. |
|
● Disassemble the Tea Mortar. See page E-5. Remove the remaining |
|
powdered tea using the supplied cleaning brush. |
|
After cleaning, re-assemble the parts. See page E-21. |
|
See page E-19 for the details of maintenance for the Tea Mortar. |
|
|
Coarse powdered tea comes |
● Check the dial setting. |
out. |
● Fineness of the powdered tea will vary depending on the type of tea |
|
|
|
leaves. |
|
|
There are lumps in the latte/ |
● Make sure to add liquid prior to adding the powdered tea. |
cold tea. |
|
|
|
Quantity of the powdered tea |
● When using a new Tea Mortar, or after a cleaning, the resulting |
coming out from the Tea Mortar |
amount of powdered tea may be less than usual. |
is less than usual. |
● Quantity will vary depending on the type of tea leaves. |
|
If you still require service, disconnect the plug from the outlet and CONTACT YOUR NEAREST SHARP
AUTHORIZED SERVICER.
S P E C I F I C A T I O N S
AC Line Voltage: |
Single phase 120V, 60Hz, AC only |
AC Power Required: |
940 W |
Main unit |
910 W |
Tea mortar |
30 W |
Outside Dimensions (WxHxD): |
9 1/4” x 11 3/4” x 8 7/8” |
|
233 mm x 296 mm x 225 mm |
Weight: |
Approx. 6.6 lbs. / 3.0 kg |
E-23
 Loading...