


R-24ST/2B34 ENGLISH 28/3/01 10:00 am Page A
Important 
R-24ST / R-2B34
MICROWAVE OVEN
OPERATION MANUAL WITH COOKBOOK
ENGLISH
800 W (IEC 60705)

R-24ST/2B34 ENGLISH 28/3/01 10:00 am Page B
Dear Customer,
Congratulations on acquiring your new microwave oven, which from now on will make your kitchen chores considerably easier.
You will be pleasantly surprised by the kinds of things you can do with a microwave. Not only can you use it for rapid defrosting or heating up of food, you can also prepare whole meals.
In our test kitchen our microwave team has gathered together a selection of the most delicious international recipes which are quick and simple to prepare.
Be inspired by the recipes we have included and prepare your own favourite dishes in your microwave oven. There are so many advantages to having a microwave oven which we are sure you will find exciting:
●Food can be prepared directly in the serving dishes, leaving less to wash up.
●Shorter cooking times and the use of little water and fat ensure that many vitamins, minerals and
characteristic flavours are preserved.
We advise you to read the cookery book guide and operating instructions carefully. You will then easily understand how to use your oven.
Enjoy using your microwave oven and trying out the delicious recipes.
OPERATION MANUAL
This operation manual contains important information which you should read carefully before using your microwave oven.
IMPORTANT: There may be a serious risk to health if this operation manual is not followed or if the oven is modified so that it operates with the door open.

R-24ST/2B34 ENGLISH 28/3/01 10:00 am Page 1


 CONTENTS


OVEN AND ACCESSORIES . . . . . . . . . . . . . . . . . . . . . . . . . . . . . . . . . . . . . . . . . . . . .2 CONTROL PANELS . . . . . . . . . . . . . . . . . . . . . . . . . . . . . . . . . . . . . . . . . . . . . . . . . . .3 IMPORTANT SAFETY INSTRUCTIONS . . . . . . . . . . . . . . . . . . . . . . . . . . . . . . . . . . . . .4-6 INSTALLATION . . . . . . . . . . . . . . . . . . . . . . . . . . . . . . . . . . . . . . . . . . . . . . . . . . . . . .6 BEFORE OPERATION . . . . . . . . . . . . . . . . . . . . . . . . . . . . . . . . . . . . . . . . . . . . . . . . . .7 SETTING THE CLOCK . . . . . . . . . . . . . . . . . . . . . . . . . . . . . . . . . . . . . . . . . . . . . . . . .7 MICROWAVE POWER LEVEL . . . . . . . . . . . . . . . . . . . . . . . . . . . . . . . . . . . . . . . . . . . .8 MANUAL OPERATION . . . . . . . . . . . . . . . . . . . . . . . . . . . . . . . . . . . . . . . . . . . . . . . . .8 OTHER CONVENIENT FUNCTIONS . . . . . . . . . . . . . . . . . . . . . . . . . . . . . . . . . . . . .9-10 EXPRESS MENU, EXPRESS COOK & EXPRESS DEFROST OPERATION . . . . . . . . . . . . .11-12 EXPRESS MENU, EXPRESS COOK & EXPRESS DEFROST CHARTS . . . . . . . . . . . . . . . .13-15 RECIPES FOR EXPRESS MENUS . . . . . . . . . . . . . . . . . . . . . . . . . . . . . . . . . . . . . . .16-17 CARE AND CLEANING . . . . . . . . . . . . . . . . . . . . . . . . . . . . . . . . . . . . . . . . . . . . . . .18 SERVICE CALL CHECK . . . . . . . . . . . . . . . . . . . . . . . . . . . . . . . . . . . . . . . . . . . . . . . .18 WHAT ARE MICROWAVES . . . . . . . . . . . . . . . . . . . . . . . . . . . . . . . . . . . . . . . . . . . . .19 SUITABLE OVENWARE . . . . . . . . . . . . . . . . . . . . . . . . . . . . . . . . . . . . . . . . . . . . . . . .19 TIPS AND ADVICE . . . . . . . . . . . . . . . . . . . . . . . . . . . . . . . . . . . . . . . . . . . . . . . .20-22 TABLES AND RECIPES . . . . . . . . . . . . . . . . . . . . . . . . . . . . . . . . . . . . . . . . . . . . . .23-29 SERVICE ADDRESSES . . . . . . . . . . . . . . . . . . . . . . . . . . . . . . . . . . . . . . . . . . . . . .30-35 SPECIFICATIONS . . . . . . . . . . . . . . . . . . . . . . . . . . . . . . . . . . . . . . . . . . . . . . . . . . . .36
ENGLISH
1

R-24ST/2B34 ENGLISH 28/3/01 10:00 am Page 2


 OVEN
OVEN AND ACCESSORIES


1
2
3 |
|
|
|
7 |
6 |
5 |
4 |
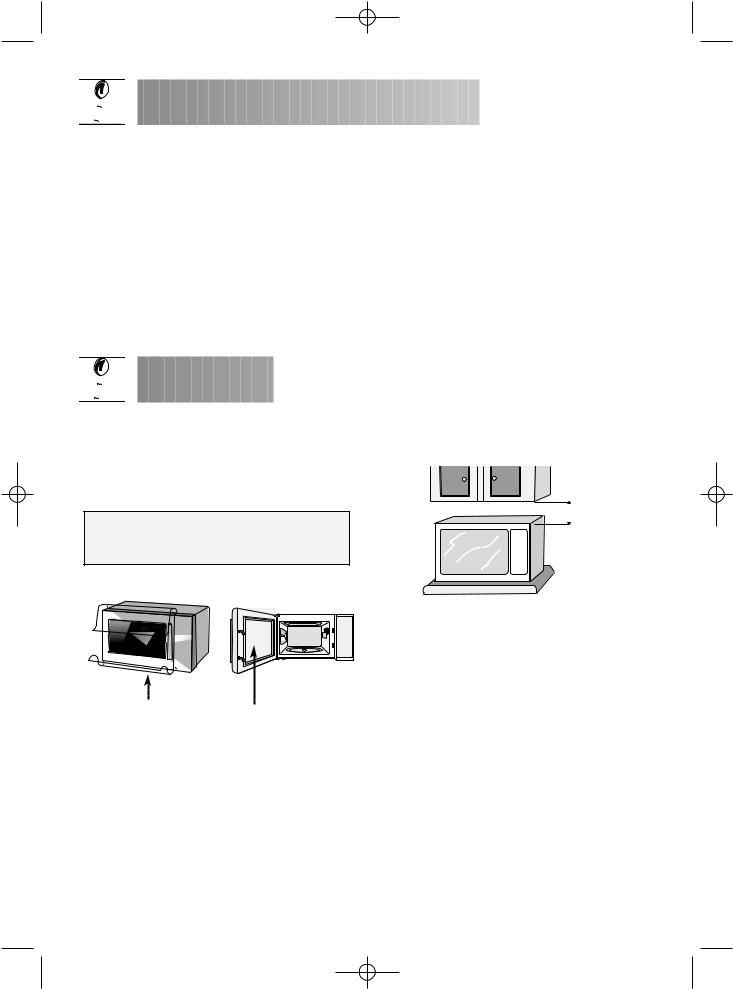
1Control panel
2Oven lamp
3 |
Door opening handle |
|
|
4 |
Waveguide cover |
|
|
5 |
Seal packing |
|
|
6 |
Oven cavity |
|
|
7 |
Door seals and sealing surfaces |
|
|
8 |
Ventilation openings |
|
|
9 |
Outer cabinet |
10 |
|
10 |
Power cord |
||
|
ACCESSORIES:
Check to make sure the following accessories are provided:
(11)Turntable (12) Roller stay (13) Seal packing
•Place the roller stay in the seal packing on the floor of the cavity.
•Then place the turntable on the roller stay.
•To avoid turntable damage, ensure dishes or containers are lifted clear of the turntable rim when removing them from the oven.
NOTE: When you order accessories, please mention two items: part name and model name to your dealer or SHARP authorised service agent.
9 |
8 |
11
12
13
2

R-24ST/2B34 ENGLISH 28/3/01 10:00 am Page 3


 CONTROL
 PANELS


CONTROL PANEL
1Digital Display
2Indicators
The appropriate indicator will flash or light up, just above each symbol according to the instruction.
1When an indicator is flashing, press the suitable button (having the same symbol) or do the necessary
operation.
2 |
|
Stir |
|
|
|
|
|
Turn over |
3 |
|
Weight |
|
Portion |
|
|
|
|
|
|
Microwave power level |
|
|
Cooking in progress |
4 |
3 |
EXPRESS DEFROST button |
|
Press to select one of the 5 automatic programmes. |
|
|
|
|
|
4 EXPRESS COOK (Express Menu & Express |
|
5 |
|
Cook) buttons |
6 |
|
Press to select one of the 7 automatic programmes. |
5 |
STOP button |
|
76 +1min/START button
7 MICROWAVE POWER LEVEL button
8 TIMER/WEIGHT/PORTION knob
8
ENGLISH
3
R-24ST/2B34 ENGLISH 28/3/01 10:00 am Page 4


 IMPORTANT SAFETY INSTRUCTIONS


IMPORTANT SAFETY INSTRUCTIONS: READ CAREFULLY AND KEEP FOR FUTURE REFERENCE
To avoid the danger of fire.
The microwave oven should not be left unattended during operation. Power levels that are too high, or cooking times that are too long, may overheat foods resulting in a fire.
The R-24ST is not designed to be built into a kitchen unit.
For the R-2B34, please refer to the Building-in Kit instructions.
The electrical outlet must be readily accessible so that the unit can be unplugged easily in an emergency.
The AC power supply must be 230V, 50Hz, with a minimum 10A distribution line fuse, or a minimum 10A distribution circuit breaker.
It is recommended that a separate circuit serving only this appliance be provided.
Do not place the oven in areas where heat is generated. For example, close to a conventional oven. Do not install the oven in an area of high humidity or where moisture may collect.
Do not store or use the oven outdoors.
If food being heated begins to smoke, DO NOT OPEN THE DOOR. Turn off and unplug the oven and wait until the food has stopped smoking. Opening the door while food is smoking may cause a fire
Use only microwave-safe containers and utensils. See Page 19.
Do not leave the oven unattended when using disposable plastic, paper or other combustible food containers.
Clean the waveguide cover, the oven cavity, the turntable and roller stay after use. These must be dry and free from grease. Built-up grease may overheat and begin to smoke or catch fire.
Do not place flammable materials near the oven or ventilation openings. Do not block the ventilation openings.
Remove all metallic seals, wire twists, etc., from food and food packages. Arcing on metallic surfaces may cause a fire.
Do not use the microwave oven to heat oil for deep frying. The temperature cannot be controlled and the oil may catch fire.
To make popcorn, use only special microwave popcorn makers.
Do not store food or any other items inside the oven. Check the settings after you start the oven to ensure the oven is operating as desired.
See the corresponding hints in operation manual and the cookery book section.
To avoid the possibility of injury
WARNING:
Do not operate the oven if it is damaged or malfunctioning. Check the following before use:
a)The door; make sure the door closes properly and ensure it is not misaligned or warped.
b)The hinges and safety door latches; check to make sure they are not broken or loose.
c) The door seals and sealing surfaces; ensure that they have not been damaged.
d)Inside the oven cavity or on the door; make sure there are no dents.
e) The power supply cord and plug; ensure that they are not damaged.
Never adjust , repair or modify the oven yourself. It is hazardous for anyone other than a competent person to carry out any service or repair operation which involves the removal of a cover which gives protection against exposure to microwave energy.
Do not operate the oven with the door open or alter the door safety latches in any way.
Do not operate the oven if there is an object between the door seals and sealing surfaces.
Do not allow grease or dirt to build up on the door seals and adjacent parts. Follow instructions for “Care and Cleaning”, Page 18.
Individuals with PACEMAKERS should check with their doctor or the manufacturer of the pacemaker for precautions regarding microwave ovens.
To avoid the possibility of electric shock
Under no circumstances should you remove the outer cabinet.
Never spill or insert any objects into the door lock openings or ventilation openings. In the event of a spill, turn off and unplug the oven immediately, and call an authorised SHARP service agent.
Do not immerse the power supply cord or plug in water or any other liquid.
4

R-24ST/2B34 ENGLISH 28/3/01 10:00 am Page 5


 IMPORTANT
 SAFETY
 INSTRUCTIONS


Do not let the power supply cord hang over the edge of a table or work surface.
Keep the power supply cord away from heated surfaces, including the rear of the oven.
Do not attempt to replace the oven lamp yourself or allow anyone who is not an electrician authorised by SHARP to do so. If the oven lamp fails, please consult your dealer or an authorised SHARP service agent.
If the power supply cord of this appliance is damaged, it must be replaced with a special cord. The exchange must be made by an authorised SHARP service agent.
To avoid the possibility of explosion and sudden boiling:
WARNING: Liquids and other foods must not be heated in sealed containers since they are liable to explode.
Never use sealed containers. Remove seals and lids before use. Sealed containers can explode due to a build up of pressure even after the oven has been turned off.
Take care when microwaving liquids. Use a widemouthed container to allow bubbles to escape.
Never heat liquids in narrow necked containers such as baby bottles, as this may result in the contents erupting from the container when heated and cause burns.
To prevent sudden eruption of boiling liquid and possible scalding:
1.Stir liquid prior to heating/reheating.
2.It is advisable to insert a glass rod or similar utensil into the liquid whilst reheating.
3.Let liquid stand in the oven at the end of cooking time to prevent delayed eruptive boiling.
Do not cook eggs in their shells, and whole hard boiled eggs should not be heated in microwave ovens since they may explode even after microwave cooking has ended. To cook or reheat eggs which have not been scrambled or mixed, pierce the yolks and the whites, or the eggs may explode. Shell and slice hard boiled eggs before reheating them in the microwave oven.
Pierce the skin of such foods as potatoes, sausages and fruit before cooking, or they may explode.
To avoid the possibility of burns
Use pot holders or oven gloves when removing food from the oven to prevent burns.
Always open containers, popcorn makers, oven cooking bags, etc., away from the face and hands to avoid steam burns.
To avoid burns, always test food temperature and stir before serving and pay special attention to the temperature of food and drink given to babies, children or the elderly.
Temperature of the container is not a true |
|
|
indication of the temperature of the food or drink; |
|
|
always check the food temperature. |
|
|
Always stand back from the oven door when opening |
|
|
it to avoid burns from escaping steam and heat. |
|
|
Slice stuffed baked foods after heating to release |
|
|
steam and avoid burns. |
|
|
Keep children away from the door to prevent them |
|
|
burning themselves. |
|
|
To avoid misuse by children |
|
|
WARNING: Only allow children to use |
|
|
the oven without supervision when |
|
|
adequate instructions have been given |
|
|
so that the child is able to use the oven |
|
|
in a safe way and understands the |
|
|
hazards of improper use. |
|
|
Do not lean or swing on the oven door. Do not |
|
|
play with the oven or use it as a toy. |
|
|
Children should be taught all important safety |
|
|
instructions: use of pot holders, careful removal of |
|
|
food coverings; paying special attention to |
|
|
packaging (e.g. self-heating materials) designed to |
|
|
make food crisp, as they may be extra hot. |
|
|
Other warnings |
|
|
Never modify the oven in any way. |
|
|
Do not move the oven while it is in operation. |
|
|
This oven is for home food preparation only and |
|
|
may only be used for cooking food. It is not |
|
|
suitable for commercial or laboratory use. |
|
|
To promote trouble-free use of your oven |
|
|
and avoid damage. |
|
|
Never operate the oven when it is empty. |
|
|
When using a browning dish or self-heating |
|
|
material, always place a heat-resistant insulator |
|
|
such as a porcelain plate under it to prevent |
ENGLISH |
|
damage to the turntable and roller stay due to heat |
||
|
||
stress. The preheating time specified in the dishes |
|
|
instructions must not be exceeded. |
|
|
Do not use metal utensils, which reflect microwaves |
|
|
and may cause electrical arcing. Do not put cans |
|
|
in the oven. |
|
5
R-24ST/2B34 ENGLISH 28/3/01 10:00 am Page 6


 IMPORTANT SAFETY INSTRUCTIONS


Use only the turntable and the roller stay designed for this oven. Do not operate the oven without the turntable.
To prevent the turntable from breaking:
(a)Before cleaning the turntable with water, leave the turntable to cool.
(b)Do not put hot foods or hot utensils on a cold turntable.
(c)Do not put cold foods or cold utensils on a hot turntable.
Do not place anything on the outer cabinet during operation.
NOTE:
If you are unsure how to connect your oven, please consult an authorised, qualified electrician. Neither the manufacturer nor the dealer can accept any liability for damage to the oven or personal injury resulting from failure to observe the correct electrical connection procedure.
Water vapour or drops may occasionally form on the oven walls or around the door seals and sealing surfaces. This is a normal occurrence and is not an indication of microwave leakage or a malfunction.


 INSTALLATION


1.Remove all packing materials from the inside of the oven cavity. Discard the loose polythene sheet from between the door and cavity. Remove the feature sticker, if attached, from the outside of the door.
Do not remove the protective film attached to the inside of the door.
|
|
REMOVE |
DO NOT REMOVE |
4.Ensure there is a minimum free space above the oven of 15 cm (R-24ST only):
 15 cm
15 cm
5.Securely connect the plug of the oven to a standard earthed (grounded) household electrical outlet.
R-2B34: Please refer to the Building-in Kit Instructions supplied.
2.Check the oven carefully for any signs of damage.
3.Place the oven on a flat, level surface strong enough to support the oven’s weight plus the heaviest item likely to be cooked.
6

R-24ST/2B34 ENGLISH 28/3/01 10:00 am Page 7


 BEFORE OPERATION


Plug in the oven.
1.The oven display will flash:
2.Touch the STOP button the display will show:
x1
To set the clock, see below.
Using the STOP button
Use the STOP button to:
1.Erase a mistake during programming.
2.Stop the oven temporarily during cooking.
3.Cancel a programme during cooking, touch twice.


 SETTING
 THE
THE CLOCK
CLOCK


There are two setting modes: 12 hour clock and 24 hour clock.
1.To set the 12 hour clock, hold the MICROWAVE POWER LEVEL button down for 3 seconds.  will appear in the display.
2.To set the 24 hour clock, press the MICROWAVE POWER LEVEL button once more after Step 1, in the example below  will appear in the display.
To set the clock, follow the example below.
Example:
To set the 24 hour clock to 23:35
x1 and hold for 3 secs.
1. Choose the clock function. |
Choose the 24 hour |
2. Set the hours. Rotate the |
3. Press the MICROWAVE |
(12 hour clock) |
clock. |
TIMER/WEIGHT/PORTION |
POWER LEVEL button |
|
|
knob until the correct hour is |
to change from hours to |
|
|
displayed (23). |
minutes. |
x1and hold |
x1 |
x1 |
|
for 3 secs. |
|
|
|
4. Set the minutes. Rotate the |
5. Press the MICROWAVE POWER |
Check the display. |
|
TIMER/WEIGHT/PORTION |
LEVEL button to start the clock. |
||
|
|||
knob until the correct minute is |
|
|
|
displayed (35). |
|
|
x1
NOTE:
1.You can rotate the TIMER/WEIGHT/PORTION knob clockwise or counter-clockwise.
2.Press the STOP button if you make a mistake during programming.
3.If the electrical power supply to your microwave oven is interrupted, the display will intermittently
show  after the power is reinstated. If this occurs during cooking, the programme will be erased. The time of day will also be erased.
4.When you want to reset the time of day, follow the above example again.
ENGLISH
7
R-24ST/2B34 ENGLISH 28/3/01 10:00 am Page 8


 MICROWAVE
 POWER LEVEL


Your oven has 5 power levels. To choose the power level for cooking, follow the advice given in the recipe section. Generally the following recommendations apply:
100 P (800 W) used for fast cooking or reheating e.g. soup, casseroles, canned food, hot beverages, vegetables, fish, etc.
70 P (560 W) used for longer cooking of dense foods such as roast joints, meat loaf and plated meals, also for sensitive dishes such as cheese sauce and sponge cakes. At this reduced setting, the sauce will not boil over and food will cook evenly without over cooking at the sides.
50 P (400 W) for dense foods which require a long cooking time when cooked conventionally, eg. beef dishes, it is advisable to use this power setting to ensure the meat will be tender.
30 P (240 W) to defrost, select this power setting, to ensure that the dish defrosts evenly. This setting is also ideal for simmering rice, pasta, dumplings and cooking egg custard.
10 P (80 W) For gentle defrosting, eg. cream gateaux or pastry.
P = Percentage.
To set the power, touch the MICROWAVE POWER LEVEL button until the desired level is displayed. If MICROWAVE POWER LEVEL button is touched once,  will be displayed. If you miss your desired level, continue touching the MICROWAVE POWER LEVEL button until you reach the level again. If the level is not selected, the level 100 P is automatically set.


 MANUAL OPERATION


Your oven can be programmed for up to 90 minutes. (90.00) The input unit of cooking (defrosting) time varies from 10 seconds to five minutes. It depends on the total length of the cooking (defrosting) time as shown on the table.
Cooking time |
Increasing unit |
0-5 minutes |
10 seconds |
5-10 minutes |
30 seconds |
10-30 minutes |
1 minute |
30-90 minutes |
5 minutes |
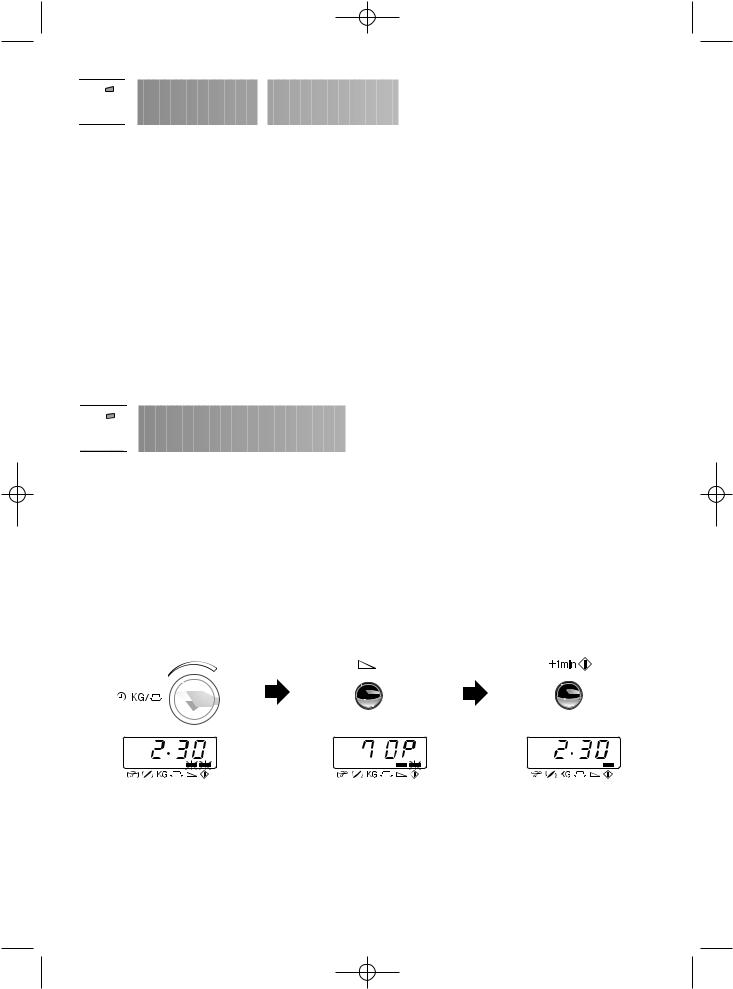
Example:
Suppose you want to heat soup for 2 minutes and 30 seconds on 70 P microwave power.
1. Enter the desired cooking time by |
2. Choose desired power |
3. Press the +1min/ |
rotating the TIMER/WEIGHT/ |
by pressing the |
START button to |
PORTION knob clockwise. |
MICROWAVE POWER |
begin cooking. |
(2 min. & 30 sec.) |
LEVEL button twice. |
|
x2 |
x1 |
|
Check the display. |
NOTE:
1.When the door is opened during the cooking process, the cooking time on the digital display stops automatically. The cooking time starts to count down again when the door is closed and the +1min/START button is pressed.
2.If you wish to know the power level during cooking, press the MICROWAVE POWER LEVEL button. As long as your finger is touching the MICROWAVE POWER LEVEL button, the power level will be displayed.
3.You can rotate the TIMER/WEIGHT/PORTION knob clockwise or counterclockwise. If you rotate the knob counterclockwise, the cooking time will decrease from 90 minutes by degrees.
8
R-24ST/2B34 ENGLISH 28/3/01 10:00 am Page 9


 OTHER CONVENIENT FUNCTIONS


1. MULTIPLE SEQUENCE COOKING
A maximum of 3 sequences can be input, consisting of manual cooking time and mode.
Example: |
|
To cook: 5 minutes on 100 P power |
(Stage 1) |
16 minutes on 30 P power |
(Stage 2) |
STAGE 1 |
|
1. Enter the desired cooking time |
2. Choose the desired power level |
by rotating TIMER/WEIGHT/ |
by pressing the MICROWAVE |
PORTION knob. |
POWER LEVEL button once. |
x1
STAGE 2 |
|
|
|
|
|
|
|
|
|
|
4. Choose the desired power |
||||||||||
3. Enter desired time by |
||||||||||
rotating TIMER/WEIGHT/ |
level by pressing the |
|||||||||
PORTION knob. |
MICROWAVE POWER |
|||||||||
|
|
|
|
|
LEVEL button four times. |
|||||
5.Press the +1min/ START button once to begin cooking.
x4 |
x1 |
Check the display.
(The oven will begin to cook for 5 minutes on 100 P, and then for 16 minutes on 30 P).
ENGLISH
9
R-24ST/2B34 ENGLISH 28/3/01 10:00 am Page 10


 OTHER
OTHER CONVENIENT
 FUNCTIONS


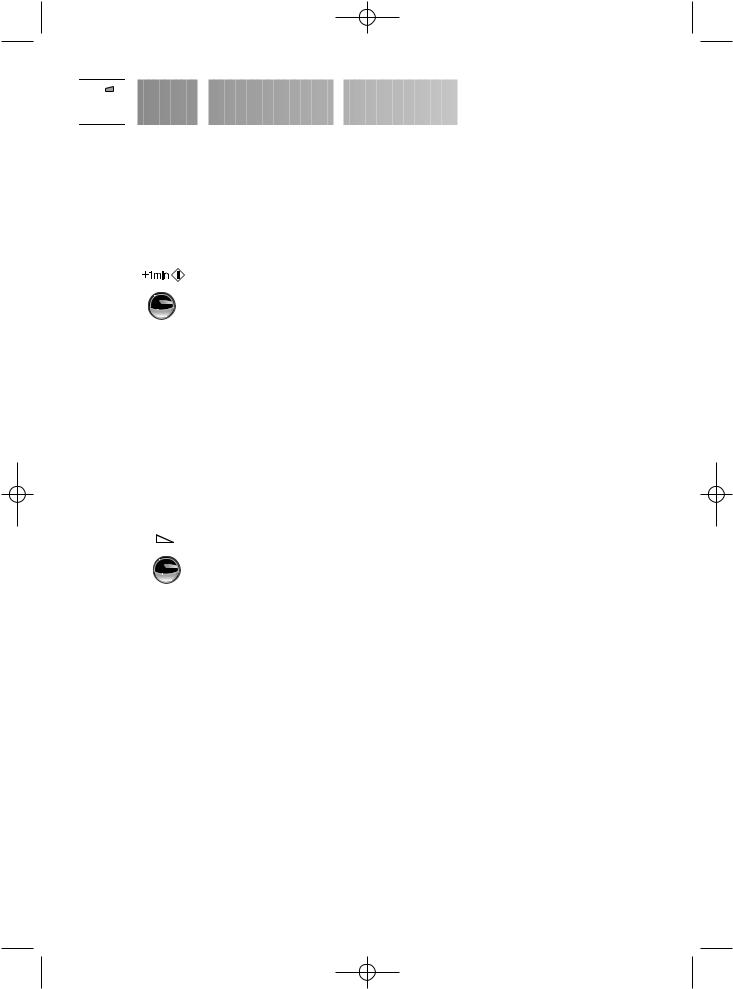
2.MINUTE PLUS FUNCTION
The +1min/START button allows you to operate the two following functions:
a.Direct start
You can directly start cooking on 100 P microwave power level for 1 minute by pressing the
+1min/START button.
NOTE:
To avoid the misuse by children the +1min/START button can be used only within 3 minute after preceding operation, i.e., closing the door, pressing the STOP button or cooking completion.
b.Extend the cooking time
You can extend the cooking time for multiples of 1 minute if the button is pressed while the oven is in operation.
3.TO CHECK THE POWER LEVEL
To check the microwave power level during cooking press the MICROWAVE POWER LEVEL button.
x1
As long as your finger is touching the MICROWAVE POWER LEVEL button the power level will be displayed.
The oven continues to count down although the display shows the power level.
10
 Loading...