


®
R-995DST
R-995D(W)
Convection Microwave Oven
OPERATION MANUAL WITH COOKING GUIDE
Read all instructions carefully before using the oven

CONTENTS |
|
OPERATION |
|
Important Safety Instructions................................. |
1 |
Special Notes for Microwave.................................. |
2 |
Installation Instructions........................................... |
3 |
Specifications......................................................... |
3 |
Oven Diagram........................................................ |
4 |
Operation of Control Panel..................................... |
5 |
Control Panel Display......................................... |
5 |
Touch Control Panel Layout............................... |
5 |
Before Operating.................................................... |
6 |
Getting Started................................................... |
6 |
Clock Setting...................................................... |
6 |
Stop/Clear.......................................................... |
6 |
Clean the Oven Before First Use........................... |
6 |
Manual Operation............................................... |
7-9 |
Microwave.......................................................... |
7 |
Grill..................................................................... |
7 |
Convection......................................................... |
8 |
Mix Cooking....................................................... |
9 |
Automatic Operation....................................... |
10-11 |
Notes for Automatic Operation......................... |
10 |
Auto Menu........................................................ |
10 |
Sensor Cook.................................................... |
11 |
Convenience Cook........................................... |
11 |
Weight Defrost.................................................. |
11 |
Other Convenient Features............................ |
12-13 |
Less or More Time Adjustment........................ |
12 |
+1min. Function................................................ |
12 |
Multiple Sequence Cooking............................. |
12 |
Demonstration Mode........................................ |
12 |
Info................................................................... |
13 |
Timer ............................................................... |
13 |
Care and Cleaning .............................................. |
14 |
Service Call Check............................................... |
14 |
COOKING GUIDE |
|
|
Helpful Hints .................................................. |
|
15-16 |
Microwave Cooking.......................................... |
|
15 |
Convection Cooking......................................... |
|
16 |
Mix Cooking..................................................... |
|
16 |
Grilling ............................................................. |
|
16 |
Cookware and Utensil Guide............................... |
|
17 |
Auto Menu Guide........................................... |
|
18-19 |
Sensor Cook Guide.............................................. |
|
20 |
Convenience Cook Guide.................................... |
|
21 |
Weight Defrost Guide........................................... |
|
22 |
Manual Cooking Chart................................... |
|
23-26 |
Defrost Times for Meat..................................... |
|
23 |
Fresh Vegetable............................................... |
|
24 |
Rice & Pasta..................................................... |
|
25 |
Porridge............................................................ |
|
25 |
Scrambled Egg................................................. |
|
25 |
Reheating/Defrosting Convenience Food |
........26 |
|
Recipes.......................................................... |
|
27-32 |
Fish.................................................................. |
|
27 |
Pork.................................................................. |
|
28 |
Chicken............................................................ |
|
29 |
Vegetarian........................................................ |
|
30 |
Beef.................................................................. |
|
31 |
Desserts........................................................... |
|
32 |
Warranty............................................................... |
|
33 |
Quick Reference Guide.......................... |
Back cover |
|

IMPORTANT SAFETY INSTRUCTIONS
IMPORTANT SAFETY INSTRUCTIONS: READ CAREFULLY AND KEEP FOR FUTURE REFERENCE
1.This oven is designed to be used on a benchtop, on a shelf or built-in with a Sharp built-in kit. We do not recommend installing the oven under the benchtop or any other appliances. The appliance must not be placed in a cupboard. The appliance must not be installed behind a decorative door in order to avoid overheating. See page 3 for the installation. The oven door and the top of the oven may become hot during cooking. Place or mount the oven so that the bottom of the oven is 85 cm or more above the floor. Keep children away from the door to prevent them from burning themselves.
2.Ensure there is a minimum of free space above the oven of 40 cm. See page 3 for the other necessary spaces.
3.This appliance is intended to be used in household and similar applications such as:
•staff kitchen areas in shops, offices and other working environments;
•farm houses;
•by clients in hotels, motels and other residential environments;
•bed and breakfast type environments
It is not suitable for commercial, laboratory use.
4.The microwave oven is intended for heating food and beverages. Drying of food or clothing and heating of warming pads, therapeutic devices (eg. wheat bags), slippers, sponges, damp cloth and similar may lead to risk of injury, ignition or fire.
5.This appliance is not intended for use by persons (including children) with reduced physical, sensory or mental capabilities, or lack of experience and knowledge, unless they have been given supervision or instruction concerning use of the appliance by a person responsible for their safety.
6.Children should be supervised to ensure that they do not play with the appliance.
7.WARNING: Only allow children to use the oven without supervision when adequate instructions have been given so that the child is able to use the oven in a safe way and understands the hazards of improper use.
8.WARNING: When the appliance is operated in the combination mode (Mix Cooking), Convection Cooking, Grilling or Automatic Operations (except Weight Defrost), children should only use the oven under adult supervision due to the temperature generated.
9.WARNING: Accessible parts may become hot during use.To avoid burns young children should be kept away.
10.WARNING: If the door or door seals are damaged, the oven must not be operated until it has been repaired by an authorised SHARP service agent or microwave technician.
11.WARNING: Never adjust, repair or modify the oven yourself. It is hazardous for anyone other than an authorised SHARP service agent or microwave technician to carry out any service or repair operation which involves the removal of a cover which gives protection against exposure to microwave energy.
12.If the power supply cord of this appliance is damaged, it must be replaced by a service centre approved by SHARP in order to avoid a hazard.
13.WARNING: Liquids and other foods must not be heated in sealed containers since they are liable to explode.
14.Microwave heating of beverages can result in delayed eruptive boiling, therefore care must be taken when handling the container.
15.Eggs in their shell and whole hard-boiled eggs should not be heated on microwave modes since they may explode, even after microwave heating has ended. To cook or reheat eggs which have not been scrambled or mixed on microwave modes, pierce the yolks and the whites, or the eggs may explode. Shell and slice hard boiled eggs before reheating them on microwave modes.
16.Utensils should be checked to ensure that they are suitable for use in the oven. See Page 18. Use only microwave safe containers and utensils on microwave modes.
17.Metallic containers for food and beverages are not allowed during microwave modes.
18.The contents of feeding bottles and baby food jars must be stirred or shaken and the temperature checked before consumption, in order to avoid burns.
19.The door, outer cabinet, oven cavity, dishes and accessories will become very hot during operation. Care should be taken to avoid touching these areas. To prevent burns, always use thick oven gloves. Before cleaning make sure they are not hot.
20.When heating food in plastic or paper containers, keep an eye on the oven due to the possibility of ignition.
21.If smoke is observed, switch off or unplug the appliance and keep the door closed in order to stifle any flames.
22.The oven should be cleaned regularly and any food deposits removed.
23.Cleaning and user maintenance shall not be performed by children without supervision.
24.Failure to maintain the oven in a clean condition could lead to deterioration of the surface that could adversely affect the life of the appliance and possibly result in a hazardous situation.
25.Do not use harsh abrasive cleaners or sharp metal scrapers to clean the oven door glass since they can scratch the surface, which may result in shattering of the glass.
26.The appliance must not be cleaned with a steam cleaner.
27.See instructions for cleaning door seals, cavities and adjacent parts on page 14.
28.Handle with care when removing items from the oven so that the turntable does not displace.
Other warnings
1.To reduce the risk of fire in the oven cavity:
a.Do not overcook food.
b.Remove wire twist-ties from paper or plastic bags before placing bag in the oven.
c.Do not heat oil or fat for deep frying. The temperature of the oil cannot be controlled.
1

2.To reduce the risk of an explosion or delayed eruptive boiling, care should be taken when handling the container. Your oven is capable of heating food and beverages very quickly with microwave, therefore it is very important that you select the appropriate cooking time and power level for the type and quantity of food to be heated. If you are unsure of the cooking time and power level required, begin with low cooking times and power levels until the food is sufficiently heated evenly throughout.
Additionally:
a.Do not place sealed containers in the oven. Babies bottles fitted with a screw cap or teat are considered to be sealed containers.
b.Do not use excessive amount of time.
c.When boiling liquids in the oven, use a wide-mouthed container.
d.Do not heat for longer than recommended time. See REHEATING-FOOD CHART in the attached cookbook.
e.Stand at least for 20 seconds at the end of cooking to avoid delayed eruptive boiling of liquids.
f.Stir the liquid before and during cooking. Use extreme care when handling the container or inserting a spoon or other utensil into the container.
3.Never operate the oven whilst any object is caught or jammed between the door and the oven.
4.Handle with care when removing items from the oven so that the utensil, your clothes or accessories do not touch the latches.
5.Never poke an object, particularly a metal object, through a grille or between the door and the oven while the oven is operating.
6.Never tamper with or deactivate the latches.
7.Always use oven gloves to prevent burns when handling utensils that are in contact with hot food. Enough heat from the food can transfer through utensils to cause skin burns.
8.If the oven lamp fails please cousult your dealer or a qualified service technician trained by SHARP.
9.Avoid steam burns by directing steam away from the face and hands. Slowly lift the furthest edge of a dish's cover including microwave plastic wrap etc., and carefully open popcorn and oven cooking bags away from the face.
10.Make sure that the power supply cord is undamaged, and that it does not run under the oven or over any hot surfaces or sharp edges.
11.Do not place anything on the outer cabinet.
12.Do not store food or any other items inside the oven.
13.Make sure the utensil does not touch the interior walls during cooking.
14.Do not operate the oven without a load (i.e. an absorbing material such as food or water) in the oven cavity except when conditioning or cleaning the heater elements as described in the operation manual.
SPECIAL NOTES FOR MICROWAVE
|
|
DO |
|
DON’T |
Popcorn |
* |
Use specially bagged popcorn for the |
* Pop popcorn in regular brown bags or |
|
|
|
microwave oven. |
|
glass bowls. |
|
* Listen while popping corn for the pop- |
* |
Exceed maximum time on popcorn |
|
|
|
ping to slow to 1-2 seconds. |
|
package. |
|
|
|
|
|
Baby food |
* |
Transfer baby food to small dish and |
* |
Heat disposable bottles. |
|
|
heat carefully, stirring often. Check for |
* |
Overheat baby bottles. |
|
|
suitable temperature to prevent burns. |
|
Only heat until warm. |
|
* |
Remove the screw cap and teat before |
* |
Heat bottles with nipples on. |
|
|
warming baby bottles. After warming |
|
|
|
|
shake thoroughly. Check for suitable |
* |
Heat baby food in original jars. |
|
|
temperature. |
|
|
General |
* |
Food with filling should be cut after |
* Heat or cook in closed glass jars or air |
|
|
|
heating, to release steam and avoid |
|
tight containers. |
|
|
burns. |
* |
Overcook oysters. |
|
* |
Use a deep bowl when cooking liquids |
* Dry nuts or seeds in shells. |
|
|
|
or cereals to prevent boiling over. |
* Heat or dry wood, herbs, wet papers, |
|
|
|
|
|
clothes or flowers. |
|
|
|
|
|
Canned foods |
* |
Remove food from can. |
* Heat or cook food while in cans. |
|
|
|
|
|
|
Sausage rolls, |
* |
Cook for the recommended time. (These |
* |
Overcook as they may catch fire. |
Pies, Christmas |
|
foods have high sugar and / or fat con- |
|
|
pudding |
|
tents.) |
|
|
|
|
|
|
|
Meats |
* |
Use a microwave proof roasting rack to |
* Place meat directly on the turntable for |
|
|
|
collect drained juices. |
|
cooking. |
2

INSTALLATION INSTRUCTIONS
1.Remove all packing materials from the oven cavity, (do not remove the waveguide cover), and the feature sticker from the outside of the door, if there is one. Check the unit for any damage, such as a misaligned door, damaged door seals around the door or dents inside the oven cavity or on the door. If there is any damage, please do not operate the oven until it has been checked by a SERVICE CENTRE APPROVED BY SHARP and repaired, if necessary.
2.Accessories provided
1) Turntable tray 2) Roller stay 3) Low rack 4) High rack 5) Square tray 6) Operation manual
3.Since the door may become hot during cooking, you should place or mount the oven so that the bottom of the oven is 85 cm or more above floor. You should also keep children away from the door to prevent them burning themselves.
4.Place the roller stay, with the engraved word "Top" facing up, securely with in the three pins on the coupling, then fit the turntable on the roller stay. (See OVEN DIAGRAM on page 4) Make sure the turntable and roller stay are centrally located and locked together. NEVER operate the oven without the roller stay and turntable.
5. This oven is designed to be used on a benchtop, on a shelf or built-in. The appliance must not be placed in a cupboard. It should not be installed in any area where heat and steam are generated, for example, next to a conventional oven unit. The oven should be installed so as not to block ventilation openings. When the oven is mounted on a kitchen benchtop, allow a space of at least 40 cm on the top, 10 cm on both sides and 5cm at the rear of the oven for adequate air circulation. When installing on a shelf, the minimum dimension of the shelf should be 750mm(W) x 768mm(H) x 587mm(D), and allow a space of at least 5cm at the rear of the oven for adequate air circulation. When building the oven into a cabinet or wall, a Sharp built-in kit model number EBR-99ST [Stainless Steel] for R-995DST and Sharp built-in kit model numbers EBR-9900(W)[White] or EBR-99ST [Stainless Steel] for R-995D(W) is available which enable the microwave oven to be integrated within a kitchen, the kit is available from your retailer. Do not build-in the appliance under the benchtop or any other appliances. Read carefully the installation instructions for the built-in kit before installation. This built-in kit has been tested according to Australian Standards. Sharp does not recommend the use of any other built-in kit. If the oven is to be positioned near a conventional oven, ensure that adequate space is allowed, and a suitable heat shield is incorporated between the two to prevent damage to the oven and the built-in kit caused by heat.
Please note the final colour of the built-in kit may vary against the appliance.
WARNING: The electrical outlet must be readily accessible so that the unit can be unplugged easily in an emergency.
6.Neither the manufacturer nor the distributors can accept any liability for damage to the machine or personal injury for failure to observe the correct electrical connecting procedure.
The A.C. voltage must be single phase • 230V-240V, 50Hz
7.This appliance must be earthed.
8.Operate the oven from a general purpose domestic outlet. If a generator is used, do not operate the oven with non-sinusoidal outputs.
9.Before using GRILL and CONVECTION HEATING ELEMENTS for the first time, operate the oven without food for 20 minutes on grill and then at convection 250°C. This will allow the oil that is used for rust protection to be burned off.
SPECIFICATIONS
Model Name |
R-995DST |
|
R-995D(W) |
|
|
|
|
AC Line Voltage |
Single phase 230-240V, 50Hz |
||
|
|
||
Input |
Microwave (STEADY): 1.40kW |
||
|
Microwave (INITIAL): 1.83kW |
||
|
Convection: 2.15 kW (at 240V) / 1.98 kW (at 230V) |
||
|
Grill: 1.50kW (at 240V) / 1.38 kW (at 230V) |
||
|
|
||
Output Power |
Microwave : 1000 W* (IEC test procedure) |
||
|
|
||
Microwave Frequency |
2450 MHz**(Class B/Group 2) |
||
|
|
||
Outside Dimensions (WxHxD) |
550mm x 368mm x 537mm |
||
|
|
|
|
Depth with the door open |
|
954mm |
|
|
|
||
Cooking Uniformity |
Turntable (ø362mm tray) system |
||
|
|
|
|
Weight |
|
Approx. 19 kg |
|
|
|
|
|
Sharp Built in Kit model number |
EBR-99ST |
|
EBR-9900(W) or EBR-99ST |
|
|
|
|
*When tested in accordance with AS/NZS 2895.1.2007
**This is the classification of ISM (Industrial, Scientific and Medical) equipment described in the International Standard CISPR11.
3

OVEN DIAGRAM
1 |
2 |
20 |
3 |
|
|
|
|
4 |
|
|
|
|
5 |
15 |
|
|
|
|
|
|
|
|
6 |
16 |
10 |
9 |
8 |
7 |
|
11 |
|
|
|
|
|
|
|
17 |
18 |
|
|
|
|
|
12 |
|
|
|
19 (x2) |
|
|
13 |
|
|
|
|
|
<Rack + Turntable> |
|
14 |
|
|
|
|
<Figure A>
rail 1 rail 2
Square tray
1.Grill heating element
2.Convection heating element
3.Oven lamp
4.Control panel
5.Shelf rail (rail 1)
6.Shelf rail (rail 2)
7.Waveguide cover (Do not remove)
8.Oven cavity
9.Coupling
10.Door seals and sealing surfaces
11.Door opening handle
12.Ventilation openings
13.Outer cabinet
14.Power supply cord
15.Turntable
16.Roller stay
17.Low rack (height: 4 cm)
18.High rack (height: 15.5 cm)
19.Square tray (x2)
20.Menu label
•Place the roller stay into the coupling in the centre of the oven floor, ensuring you place it TOP side up, (TOP is engraved on one side). It should be able to freely rotate around the coupling.
•Place the turntable on to the roller stay.
•Place the high/low racks onto the turntable if necessary. These racks are used for cooking in Convection, Mix or Grill mode.
•Use the square tray for convection only. See page 8. When using one square tray, place it at rail 2 as shown in the figure A.
•Do not substitute similar types of racks or square trays for these specially designed ones.
NOTES:
•Always operate the oven with the turntable and roller stay fitted correctly. This promotes thorough even cooking. A badly fitted turntable may rattle, may not rotate properly and damage the oven.
•The turntable rotates clockwise or counter clockwise. The rotary direction may change each time you start the oven. This does not affect cooking performance.
•When you order accessories, please mention two details: part name and model name to your dealer or SHARP authorised service facility.
4

OPERATION OF CONTROL PANEL
The operation of the oven is controlled by pressing the appropriate keys arranged on the surface of the control panel.
A 'beep' sound should be heard each time you press the control panel to make a correct entry.
When starting and stopping the cooking/timer, the response sounds of the START key and the STOP key are different from the others.
In addition an audible signal will sound for approximately 2 seconds at the end of the cooking cycle, or 4 times when an action is required during a cooking programme.
Control Panel Display
The display shows useful information including cooking time and cooking mode.
 : COOK indicator
: INFO indicator
 : LESS/MORE indicators
|
|
1 |
SENSOR COOK key |
|
|
|
|
Press to select Sensor Cook menus. |
|
|
|
2 |
CONVENIENCE COOK key |
|
|
|
|
Press to select Convenience Cook menus. |
|
Touch Control Panel Layout |
|
3 |
WEIGHT DEFROST key |
|
|
|
Press to select Weight Defrost menus. |
||
|
|
4 |
AUTO MENU keys |
|
|
|
|
Press to cook 8 popular menus. |
|
1 |
|
5 |
LESS/MORE keys |
|
|
|
|
Press to alter the cooking result for Auto Menu, |
|
2 |
3 |
|
Sensor Cook, Convenience Cook, and |
|
|
|
|
Weight Defrost modes. |
|
|
|
|
Press to increase/decrease the time in one minute |
|
|
|
|
increments during cooking. |
|
|
|
6 |
WEIGHT keys |
|
|
|
|
Press to increase/decrease the weight. |
|
4 |
|
7 |
TIME keys |
|
|
|
|
Press to enter time. |
|
|
|
8 |
MICROWAVE key |
|
|
|
|
Press to select microwave power setting. |
|
|
|
|
If not pressed, 100% is automatically selected. |
|
|
|
9 |
CONVECTION key |
|
|
5 |
|
Press to select Convection mode. |
|
|
10 |
GRILL key |
||
|
|
|||
|
|
|
Press to select Grill mode. |
|
|
6 |
11 |
MIX GRILL key |
|
|
|
Press to select Mix Grill mode. |
||
|
|
|
||
|
|
12 |
MIX CONVECTION key |
|
|
7 |
|
Press to select Mix Convection mode. |
|
|
|
13 |
TIMER/CLOCK key |
|
8 |
|
|
Press to set Timer or Clock. |
|
9 |
14 |
INFO key |
||
|
||||
10 |
|
|
Press to set Delay Start or Child Lock. |
|
|
|
15 |
STOP/CLEAR key |
|
11 |
12 |
|
Press to clear during programming. |
|
|
|
|
Press once to stop operation of the oven during |
|
|
|
|
cooking; press twice to cancel cooking programme. |
|
13 |
14 |
16 |
START/+ 1min. key |
|
|
Press once to cook for 1 minute on 100% microwave |
|||
|
|
|
||
|
|
|
cooking or increase by 1 minute multiples each time |
|
15 |
16 |
|
this key is pressed during Microwave, Convection, |
|
|
|
|
Grill or Mix cooking. Press to start the oven after |
|
|
|
|
setting programmes. |
5
BEFORE OPERATING
•Before operating your oven, make sure you read and understand this operation manual completely.
•Before the oven can be used, follow these procedures:
1.See below for getting started.
2.Follow directions on the right side for cleaning the oven before first use.
Stop/Clear
Use the STOP/CLEAR to:
1.Clear if you make a mistake during programming.
2.Stop the oven temporarily during cooking.
3.Cancel a programme during cooking, press twice.
Getting Started
|
PROCEDURE |
||||
1 |
Plug the oven into a power point. |
||||
|
“MICRO-, WAVE, OVEN” will appear on the |
||||
|
display. |
||||
2 |
Press STOP/CLEAR. |
|
|
|
|
|
|
|
|
||
|
|
|
|
|
|
The display will show “.0”.
Clock Setting
* To enter the present time of day 11:34 (AM or PM).
PROCEDURE
1 Press TIMER/CLOCK twice.
x 2
2 Enter the hours by pressing TIME.
x 1 |
x 1 |
3 Press TIMER/CLOCK.
4 Enter the minutes by pressing TIME.
x 3 |
x 4 |
5 Press TIMER/CLOCK.
CLEAN THE OVEN BEFORE FIRST USE
You may detect smoke or a burning smell when using the grill and convection for the first time, this is normal and not a sign that the oven is out of order. To avoid this problem, when first using the oven, heat the oven without food for 20 minutes on grill and then on convection 250°C.
PREPARATION
Ventilate the room.
PROCEDURE
1 |
Ensure that no food is in the oven. |
|
|
|
|
|
|||||
|
|
|
|
|
|||||||
|
Enter the time by pressing TIME. |
|
|
|
|
|
|
|
|||
|
|
|
|
|
|
|
|
|
|
|
|
|
|
|
|
|
|
|
|
|
|
|
|
|
|
|
|
|
|
|
|
|
|
x 2 |
|
2 |
Select GRILL or |
|
|
|
or |
|
|
|
|
|
|
|
|
|
|
|
|
|
|
||||
3 |
CONVECTION. |
|
|
|
|
|
|
|
|||
|
|
|
|||||||||
|
|
|
|||||||||
|
|
|
|
|
|
|
|
|
|
|
|
Press START. |
|
|
|
|
|
|
|
||||
|
|
|
|
|
|
|
|||||
|
|
|
|
|
|
|
|
|
|
|
|
|
|
|
|
|
|
|
|
|
|
|
|
WARNING:
Accessible parts (e.g. oven door, oven cavity, dishes and accessories) will become hot when in use.
To prevent burns, always use thick oven gloves.
This is a 12-hour clock. If the clock is set, when cooking is complete, the display will show the correct time of day. If the clock has not been set, the display will only show “.0” when cooking is complete.
If you wish to know the time of day during the cooking, delay start or timer mode, press TIMER/CLOCK.
As long as your finger is pressing TIMER/CLOCK, the time of day will be displayed.
6
MANUAL OPERATION
Microwave
Microwave is fast and convenient for cooking, reheating and defrosting.
First enter the cooking time then select the power level. This mode can be programmed for up to 99 minutes 50 seconds.
There are 6 different power levels.
Display |
Power level |
Examples |
100P |
100% |
Raw meat, Vegetables, |
|
|
Rice or Pasta |
70P |
70% |
Delicate Food such as Eggs |
50P |
50% |
or Seafood. |
30P |
30% |
Defrost, Softening butter |
10P |
10% |
Keep food warm |
0P |
0% |
|
This variable cooking control allows you to select the rate of microwave cooking.
If a power level is not selected, then 100% is automatically used.
1 layer cooking only.
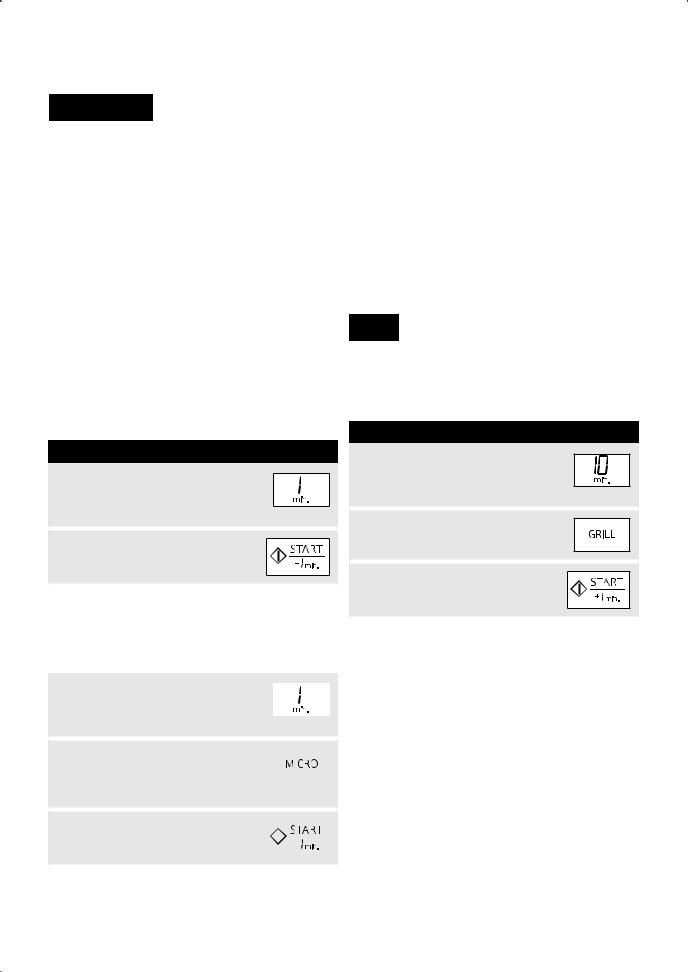
* Suppose you want to cook for 5 minutes on 100%.
PROCEDURE
1 Enter the cooking time by pressing TIME (5.00)
x 5
2 Press START.
To change the microwave power level, press MICROWAVE until the desired power level is displayed.
* Suppose you want to defrost for 5 minutes on 30%.
|
PROCEDURE |
|
|
|
|
|
|
|
|
1 |
Enter the cooking time by |
|
|
|
|
|
|
|
|
|
|
|
|
|
|
|
|||
|
pressing TIME (5.00) |
|
|
|
|
|
|
|
|
|
|
|
|
|
|
|
|
|
|
|
|
|
|
|
|
|
|
|
|
|
|
|
|
|
|
|
x 5 |
||
2 |
Change the power level by |
|
|
|
|
|
|
|
|
|
|
|
|
|
|
|
|||
|
pressing MICROWAVE until the |
|
|
|
|
|
|
|
|
|
|
|
|
|
|
|
|
||
|
|
|
|
|
|
|
|
||
|
desired microwave power level is |
|
|
|
|
|
|
|
|
|
|
|
|
|
x 4 |
||||
|
displayed (30P) |
|
|
|
|
||||
3 |
Press START. |
|
|
|
|
|
|
|
|
|
|
|
|
|
|
|
|
||
|
|
|
|
|
|
|
|
|
|
|
|
|
|
|
|
|
|
|
|
WARNING:
1.Never use the square tray for microwave cooking as this may cause arcing.
2.After cooking and opening the door, the display may show “NOW COOLING”.
NOTES:
1.When the door is opened during the cooking process, the cooking time on the digital display stops automatically. The cooking time starts to count down again when the door is closed and START is pressed.
2.If you wish to know the power level during cooking, press MICROWAVE. As long as your finger is pressing MICROWAVE, the power level which you have input will be displayed.
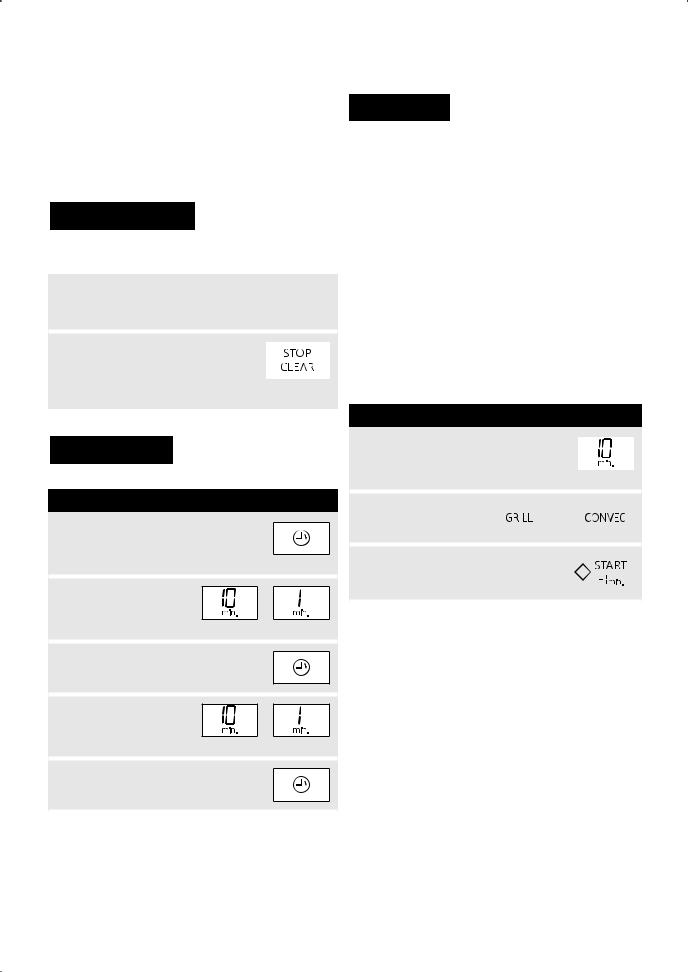
Grill
The grill heating element at the top of the oven cavity has one power setting only. This mode can be programmed for up to 99 minutes 50 seconds.
* Suppose you want to cook for 10 minutes on Grill.
PROCEDURE
1 Enter the cooking time by pressing TIME (10.00)
x 1
2 Press GRILL.
3 Press START.
WARNING:
The oven door, outer cabinet, oven cavity, accessories and dishes will become hot. Use thick oven gloves when adding or removing foods to prevent burns.
NOTES:
1.The high or low racks are recommended when grilling. It is not recommended to use the square tray for grilling.
2.You may detect smoke or a burning smell when using the grill for the first time, this is normal and not a sign that the oven is out of order.
(Please see CLEAN THE OVEN BEFORE FIRST USE on page 6)
3.After cooking and opening the door, the display may show “NOW COOLING”.
7
 MANUAL OPERATION
Convection
Your oven can be used as a conventional oven using the convection facility and 10 pre-set oven
temperatures (250, 230, 220, 200, 190, 180, 160, 130, 100, 40°C)
Preheating is recommended for better results (especially when using the square tray).
Convection can be programmed for up to 99 minutes 50 seconds.
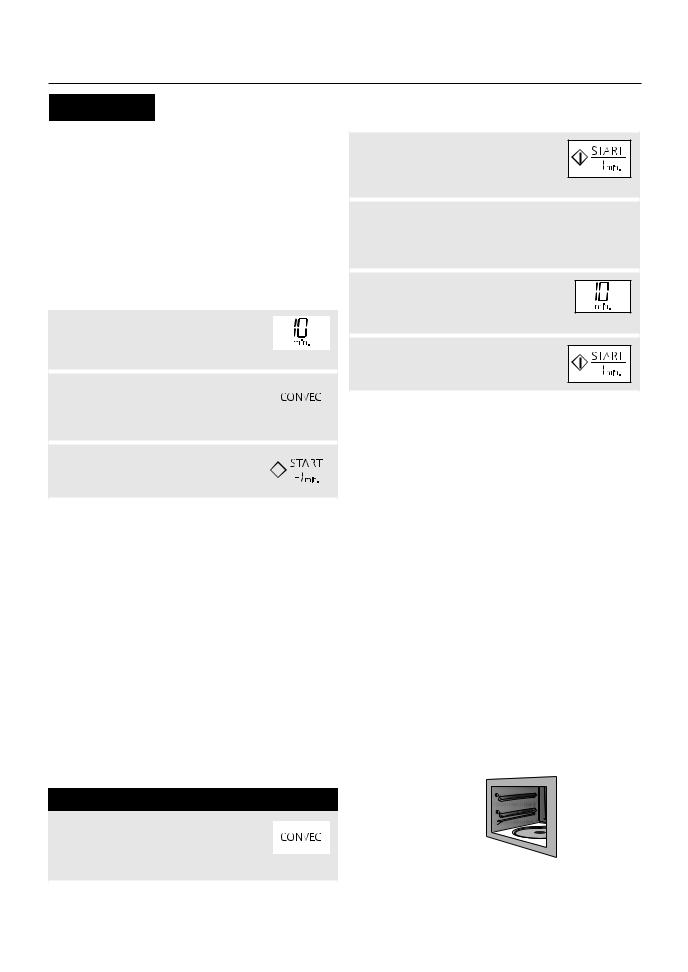
TO COOK WITHOUT PREHEATING
* Suppose you want to cook at 250°C for 20 minutes.
|
PROCEDURE |
|
|
|
|
|
|
|
|
1 |
Enter the cooking time by |
|
|
|
|
|
|
|
|
|
|
|
|
|
|
|
|||
|
pressing TIME (20.00) |
|
|
|
|
|
|
|
|
|
|
|
|
|
|
|
|
|
|
|
|
|
|
|
|
|
x 2 |
||
2 |
Select the desired cooking |
|
|
|
|
|
|
|
|
|
|
|
|
|
|
|
|||
|
temperature by pressing |
|
|
|
|
|
|
|
|
|
CONVECTION until the desired |
|
|
|
|
|
|
|
|
|
|
|
|
|
x 1 |
||||
|
temperature is displayed (250°C) |
|
|
|
|
||||
3 |
Press START. |
|
|
|
|
|
|
|
|
|
|
|
|
|
|
|
|
||
|
|
|
|
|
|
|
|
|
|
|
|
|
|
|
|
|
|
|
|
WARNING:
The oven door, outer cabinet, oven cavity, accessories and dishes will become hot. Use thick oven gloves when adding or removing foods to prevent burns.
NOTES:
1.After cooking and opening the door, the display may show “NOW COOLING”.
2.You may detect smoke or a burning smell when using convection for the first time. This is normal and is not a sign that the oven is out of order.
(See CLEAN THE OVEN BEFORE FIRST USE on page 6.)
3.If you wish to know the oven temperature during cooking, press CONVECTION. As long as your finger is pressing CONVECTION, the temperature which you have input will be displayed.
TO COOK WITH PREHEATING
*Suppose you want to preheat to 200°C and cook for 20 minutes at 200°C.
PROCEDURE
1 |
Enter the desired preheat |
|
|
||
|
temperature by pressing |
|
|
CONVECTION until the desired |
|
|
x 4 |
|
|
temperature is displayed (200°C) |
2 Press START to start preheating.
The display will show “PREHEAT”.
When the preheated temperature has been reached the audible signal sounds, the display will show 200°C. Open the door and place the food inside the oven. Close the door.
3 Enter the cooking time by pressing TIME (20.00)
x 2
4 Press START.
NOTES FOR PREHEATING:
1.When the oven is preheated the turntable should be in the oven.
2.After preheating, if you want to cook at a different temperature press CONVECTION until the desired setting appears on the display.
In the example above, to change the temperature you would press CONVECTION after entering the cooking time.
3.When the oven reaches the programmed preheating temperature, it will automatically hold at the preheated temperature for 30 minutes.
After 30 minutes, the selected convection programme will be cancelled.
4.If you press CONVECTION during preheating, the actual oven temperature will be displayed. If the oven temperature is below 40°C, “LO” will be displayed.
SPECIAL NOTES FOR SQUARE TRAY:
1.When using one square tray, place it at rail 2. Refer to the figure A on page 4.
2.When using the square tray, leave the turntable in the oven.
3.When using the square tray, rotate the square tray or the container on it 180° halfway to achieve better results.
Shelf rails
rail 1  rail 2
8
 MANUAL OPERATION
Mix Cooking
Your oven has 2 mix cooking modes combining the heat of the grill or convection with microwave power. To select the mix cooking mode, choose the cooking time, then press MIX GRILL or MIX CONVECTION to select the desired setting. Mix cooking can be programmed for up to 99 minutes 50 seconds.
Cooking mode |
Preset programme |
||||
Mix Grill |
|
|
|
|
Grill |
|
|
|
|
||
|
|
|
|
|
Microwave 30% or 10%* |
|
|
|
|
|
|
|
|
|
|
|
|
|
|
|
|
|
|
|
|
|
|
|
|
Mix |
|
|
|
|
Convection 40°C - 250°C** |
|
|
|
|
||
Convection |
|
|
|
|
(select from 10 temperatures) |
|
|
|
|
||
|
|
|
|
|
Microwave 30% or 10%* |
|
|
|
|
|
|
NOTES:
*The microwave power can be chosen by pressing MICROWAVE.
**To adjust the convection temperature, press CONVECTION until the desired temperature appears on the display.
TO COOK WITH MIX GRILL
*Suppose you want to cook for 20 minutes on Mix Grill using 10% microwave power and grill.
|
PROCEDURE |
|
|
|
|
|
|
|
|
1 |
Enter the cooking time by |
|
|
|
|
|
|
|
|
|
|
|
|
|
|
|
|||
|
pressing TIME (20.00) |
|
|
|
|
|
|
|
|
|
|
|
|
|
|
|
|
|
|
|
|
|
|
|
|
|
|
|
|
|
|
|
|
|
|
|
x 2 |
||
2 |
Press MIX GRILL. |
|
|
|
|
|
|
|
|
|
|
|
|
|
|
|
|||
|
|
|
|
|
|
|
|||
3 |
Change the power level by |
|
|
|
|
|
|
|
|
|
|
|
|
|
|
|
|||
|
|
|
|
|
|
|
|||
|
|
|
|
|
|
|
|||
|
|
|
|
|
|
|
|||
|
pressing MICROWAVE until the |
|
|
|
|
|
|
|
|
|
|
|
|
|
|
|
|
||
|
desired microwave power level is |
|
|
|
|
|
|
|
|
|
|
|
|
|
x 2 |
||||
|
displayed (10P) |
|
|
|
|
||||
4 |
Press START. |
|
|
|
|
|
|
|
|
|
|
|
|
|
|
|
|
||
|
|
|
|
|
|
|
|
|
|
|
|
|
|
|
|
|
|
|
|
TO COOK WITH MIX CONVECTION
*Suppose you want to cook for 20 minutes on Mix Convection using 10% microwave power and 200°C convection.
|
PROCEDURE |
|
|
|
|
|
|
1 |
Enter the cooking time by |
|
|
|
|
|
|
|
|
|
|
|
|||
|
pressing TIME (20.00) |
|
|
|
|
|
|
|
|
|
|
|
|
|
|
|
|
|
|
|
|
|
|
|
|
|
|
|
|
x 2 |
|
2 |
Press MIX CONVECTION. |
|
|
|
|
|
|
|
|
|
|
|
|
||
|
|
|
|
|
|
||
|
|
|
|
|
|
|
|
|
|
|
|
|
|
|
|
3 |
Change the power level by |
|
|
|
|
|
|
|
|
|
|
|
|||
|
pressing MICROWAVE until the |
|
|
|
|
|
|
|
|
|
|
|
|
||
|
|
|
|
|
|
||
|
desired microwave power level is |
|
|
|
|
|
|
|
|
|
|
x 2 |
|||
|
displayed (10P) |
|
|
|
|||
|
|
|
|
|
|
|
|
4 |
Select the desired cooking |
|
|
|
|
|
|
|
|
|
|
|
|||
|
temperature by pressing |
|
|
|
|
|
|
|
CONVECTION until the desired |
|
|
|
|
|
|
|
|
|
x 4 |
||||
|
temperature is displayed (200°C). |
|
|
||||
5 |
Press START. |
|
|
|
|
|
|
|
|
|
|
|
|
||
|
|
|
|
|
|
|
|
|
|
|
|
|
|
|
|
WARNING:
1.The oven door, outer cabinet, oven cavity, accessories and dishes will become hot. Use thick oven gloves when adding or removing foods to prevent burns.
2.Never use the square tray for mix cooking as this may cause arcing.
NOTES:
1.After cooking and opening the door, the display may show “NOW COOLING”.
2.If you wish to know the power level during cooking, press MICROWAVE. As long as your finger is pressing MICROWAVE, the power level which you have input will be displayed.
3.If you wish to know the oven temperature during mix convection cooking, press CONVECTION.
As long as your finger is pressing CONVECTION, the temperature which you have input will be displayed.
9
 Loading...