


SM-R382
User Manual
www.samsung.com
About this manual
You can use the Gear Live as a companion device to Android™ mobile devices with Android version 4.3 or higher. This user manual is specially designed to explain apps and features that are available when the Gear Live is connected to a mobile device.
•Please read this manual before using the Gear Live to ensure safe and proper use.
•Descriptions are based on the Gear Live’s default settings.
•Images and screenshots may differ in appearance from the actual product.
•Content may differ from the final product, or from software provided by service providers or carriers, and is subject to change without prior notice. For the latest version of the manual, refer to the Samsung website, www.samsung.com.
•Available features and additional services may vary by Gear Live, software, or service provider.
•Apps and their functions may vary by country, region, or hardware specifications. Samsung is not liable for performance issues caused by apps from any provider other than Samsung.
•Samsung is not liable for performance issues or incompatibilities caused by edited registry settings or modified operating system software. Attempting to customise the operating system may cause the Gear Live or apps to work improperly.
•Software, sound sources, wallpapers, images, and other media provided with the Gear Live are licensed for limited use. Extracting and using these materials for commercial or other purposes is an infringement of copyright laws. Users are entirely responsible for illegal use of media.
•Default apps that come with the Gear Live are subject to updates and may no longer be supported without prior notice. If you have questions about an app provided with the Gear Live, contact a Samsung Service Centre. For user-installed apps, contact service providers.
•Modifying the Gear Live’s operating system or installing softwares from unofficial sources may result in Gear Live malfunctions and data corruption or loss. These actions are violations of your Samsung licence agreement and will void your warranty.
2

About this manual
Instructional icons
Warning: situations that could cause injury to yourself or others
Caution: situations that could cause damage to your device or other equipment
Note: notes, usage tips, or additional information
Copyright
Copyright © 2014 Samsung Electronics
This guide is protected under international copyright laws.
No part of this guide may be reproduced, distributed, translated, or transmitted in any form or by any means, electronic or mechanical, including photocopying, recording, or storing in any information storage and retrieval system, without the prior written permission of Samsung Electronics.
Trademarks
•SAMSUNG and the SAMSUNG logo are registered trademarks of Samsung Electronics.
•Bluetooth® is a registered trademark of Bluetooth SIG, Inc. worldwide.
•All other trademarks and copyrights are the property of their respective owners.
3
Table of Contents
Getting started
6About Gear Live
6Package contents
7Device layout
8Button
10 Charging the battery
13Wearing the Gear
14Replacing the strap
17Turning the Gear on and off
18Notices for using Bluetooth
19Connecting the Gear to a mobile device
Basics
22 Using the touch screen
24 Using the Home screen
27Viewing incoming calls
28Switching to standby mode
28Adjusting the brightness of the display
28Changing the clock type
29Upgrading the Gear
Useful features
30 |
Note |
30 |
Messages |
31Email
32Agenda
32Reminder
33Alarm
33Timer
34Stopwatch
34Navigate
34Start
35Media controller
Using health management features
36 Health management features
39Pedometer
40Heart Rate
Settings
42Adjust brightness
42Always-on screen
42Airplane mode
43Power off
43 Restart
43Reset device
44Change watch face
44About
4

Table of Contents
Android Wear
45Launching Android Wear
45Disconnecting the Gear
46Connecting a new Gear
46 Configuring the Gear settings
46 Using additional options
Troubleshooting
5

Getting started
About Gear Live
When you connect the Gear Live (also referred to as Gear) to your mobile device, you can use voice commands to access the Gear’s various features. Connect the Gear to your mobile device to monitor your health and use the Gear’s features more conveniently. You can also view Google Now information when you need it most.
To connect your Gear to a mobile device, install the Android Wear app on the mobile device. Download the Android Wear app from Play Store.
Package contents
Check the product box for the following items:
•Gear
•Charging dock
•Quick start guide
•The items supplied with the Gear and any available accessories may vary depending on the region or service provider.
•The supplied items are designed only for this Gear and may not be compatible with other devices.
•Appearances and specifications are subject to change without prior notice.
•You can purchase additional accessories from your local Samsung retailer. Make sure they are compatible with the Gear before purchase.
•Other accessories may not be compatible with your Gear.
•Use only Samsung-approved accessories. Malfunctions caused by using unapproved accessories are not covered by the warranty service.
•Availability of all accessories is subject to change depending entirely on manufacturing companies. For more information about available accessories, refer to the Samsung website.
6
Getting started
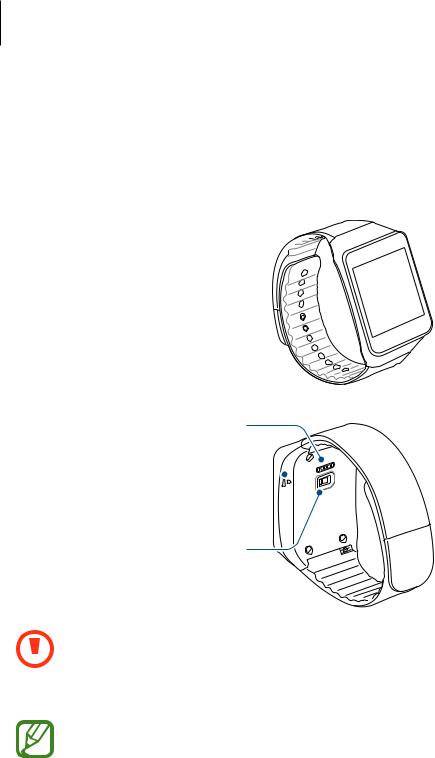
Device layout
Gear
 Touch screen
Charging terminals
Microphone
Power button 

Heart rate sensor
|
• |
Humidity and liquids may damage your Gear. Keep your Gear dry. |
|
• |
Ensure that the strap is kept clean. Contact with contaminants, such as dust and |
|
||
|
||
|
|
dye, can cause stains on the strap that may not be fully removed. |
•Do not use a screen protector. This causes touch screen sensor malfunctions.
•Do not allow water to contact the touch screen. The touch screen may malfunction in humid conditions or when exposed to water.
•If the speaker is wet, sound may be distorted. Ensure that the speaker is dry.
7
Getting started
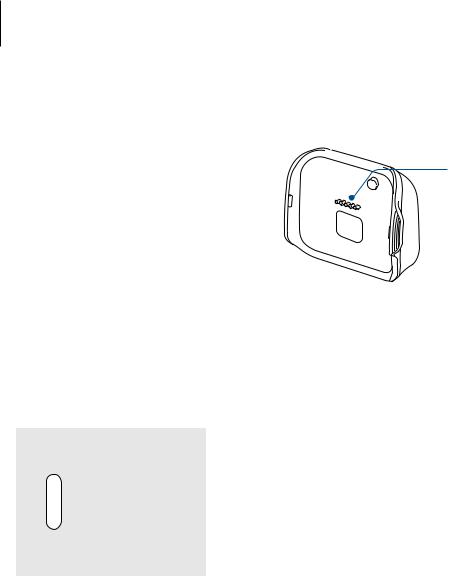
Charging dock

 Charging terminals

 Multipurpose jack
Button
Button |
Function |
|
|
• |
Press and hold to turn the Gear on. |
|
• |
Press to switch to standby mode while using the Gear. |
Power |
• |
Press to open the Home screen from standby mode. |
|
• |
Press and hold to launch Settings while using the Gear. |
|
• |
Press and hold for more than 7 seconds to reset the Gear. |
8

Getting started
Maintaining water and dust resistance
The device may be damaged if water or dust enters the device. Follow these tips carefully to prevent damage to the device and to maintain the waterand dust-resistant performance of the device.
•Do not immerse the device in water deeper than 1 m and keep it submerged for more than 30 minutes.
•Do not expose the device to water moving with force, such as water running from a tap, ocean waves, or waterfalls.
•If the device or your hands are wet, dry them thoroughly before handling the device.
•If the device is exposed to freshwater, dry it thoroughly with a clean, soft cloth. If the device is exposed to any liquid other than freshwater, rinse the device with freshwater immediately and dry it thoroughly with a clean, soft cloth. Failure to rinse the device in freshwater and dry it as instructed may cause the device to suffer from operability or cosmetic issues.
•If the device is dropped or receives an impact, the waterand dust-resistant features of the device may be damaged.
•The touch screen and other features may not work properly if the device is used in water or in other liquids.
•Your device has been tested in a controlled environment and shown to be waterand dust-resistant in certain circumstances (meets requirements of classification IP67 as described by the international standard IEC 60529 - Degrees of Protection provided by Enclosures [IP Code]; test conditions: 15 - 35°C, 86 - 106 kPa, 1 metre, for 30 minutes). Despite this classification, your device is not impervious to water damage in any situation.
9
Getting started
Charging the battery
Charge the battery before using the Gear for the first time. A computer can be also used to charge the Gear by connecting them via the USB cable.
Use only Samsung-approved chargers, batteries, and cables. Unapproved chargers or cables can cause the battery to explode or damage the Gear.
• |
When the battery power is low, the battery icon appears empty. |
• |
If the battery is completely discharged, the Gear cannot be turned on immediately |
|
when the charger is connected. Allow a depleted battery to charge for a few |
|
minutes before turning on the Gear. |
• |
The charging dock provided with the Gear is used for charging the Gear’s battery. |
Take care not to lose the dock.
1 Confirm the location of the charging terminals on the Gear and the charging dock.
 Charging terminals
Charging dock
10

Getting started
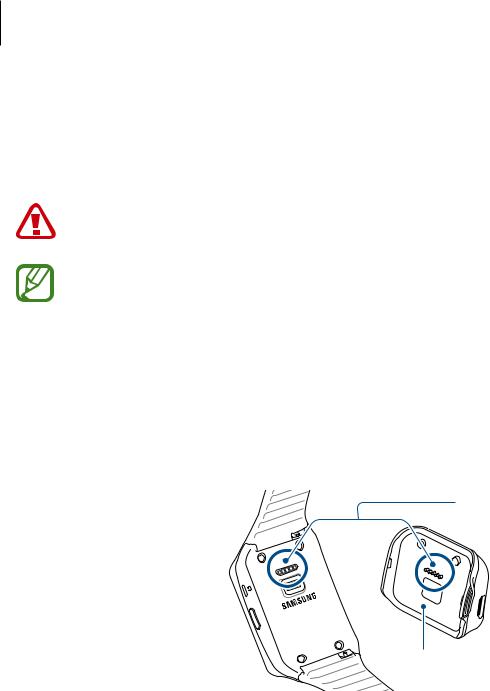
2 Place the Gear on the charging dock with the charging terminals facing each other.
3 Plug the small end of the charger cable into the multipurpose jack of the charging dock. Then, plug the large end of the charger into an electric socket.
11
Getting started
4 After fully charging, disconnect the Gear from the charging dock.
Connecting the charger improperly may cause serious damage to the Gear. Any damage caused by misuse is not covered by the warranty.
•While charging, some features are not available.
•If the Gear receives an unstable power supply while charging, the touch screen may not function. If this happens, unplug the charger from the Gear.
•While charging, the Gear may heat up. This is normal and should not affect the Gear’s lifespan or performance. If the battery gets hotter than usual, the charger may stop charging.
•If the Gear is not charging properly, take the Gear and the charger to a Samsung Service Centre.
•To save energy, unplug the charger when not in use. The charger does not have a power switch, so you must unplug the charger from the electric socket when not in use to avoid wasting power. The charger should remain close to the electric socket and easily accessible while charging.
12

Getting started
About using the battery
•Battery operating time is affected by device usage patterns and the condition of the battery.
•The battery is a consumable item. Battery life can be reduced when multiple apps or features are running simultaneously. Also, even if the device is not being used, battery life may be reduced.
•The battery is consumable and the useful charge will get shorter over time.
Wearing the Gear
1 Release the pin from the strap.
Do not bend the strap excessively. Doing so may damage the device.
13

Getting started
2 Place the strap around your wrist, fit the strap to your wrist, and then fasten it with the pin.

 Pin
Pin
To measure your heart rate more accurately with the Gear, wear the Gear firmly around your lower arm just above the wrist. Refer to Wearing the Gear for details.
Replacing the strap
Detach the strap from the Gear to replace it with a new one.
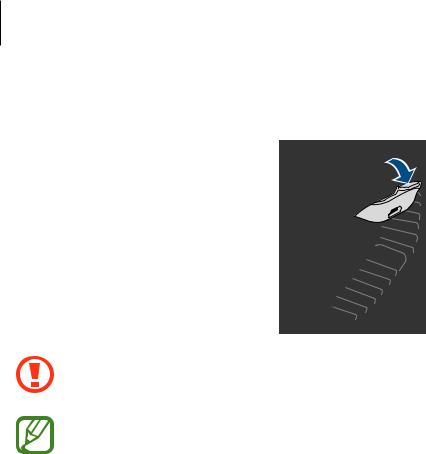
1 Slide the latch on the strap as shown in the image below.
14
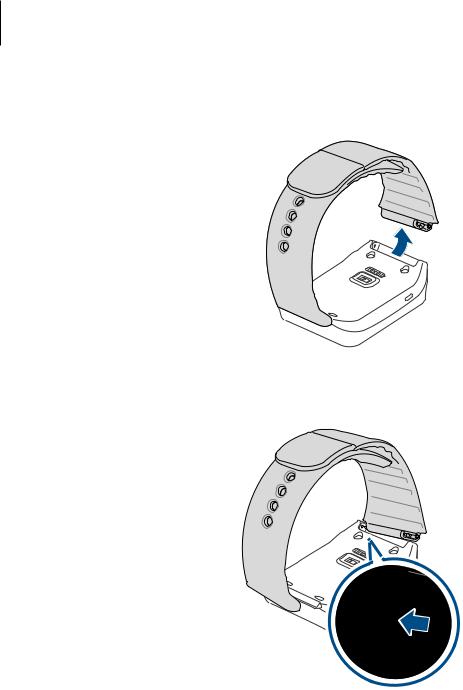
Getting started
2 Detach the end of the strap from the Gear.
3 On the new strap, insert one side of the pin into the recess at the side of the Gear.
15
 Loading...