


SM-J600F SM-J600F/DS SM-J600FN SM-J600FN/DS SM-J600G SM-J600G/DS SM-J600GF/DS
User Manual
English. 05/2018. Rev.1.0 |
www.samsung.com |
Table of Contents
Basics
4Read me first
6Device overheating situations and solutions
9 Device layout and functions
12 Battery
14 SIM or USIM card (nano-SIM card)
20 Memory card (microSD card)
24Turning the device on and off
25Initial setup
27 Samsung account
29Transferring data from your previous device
34 Understanding the screen
44 Notification panel
46 Entering text
Apps and features
49 Installing or uninstalling apps
51 Bixby
59 Phone
64 Contacts
68 Messages
70 Internet
72Email
73Camera
85Gallery
90Multi window
93Samsung Pay mini
93Samsung Members
94Samsung Notes
95Calendar
96Samsung Health
100Voice Recorder
101My Files
101Clock
103Calculator
104Radio
105Game Launcher
108SmartThings
112Sharing content
113Google apps
2

Table of Contents
Settings
115 Introduction
115Connections 116 Wi-Fi 119 Bluetooth
121 Data saver
121 NFC and payment (NFC-enabled models)
124 Mobile Hotspot and Tethering
125 SIM card manager (dual SIM models)
125 More connection settings
127Sounds and vibration
128 Dolby Atmos (surround sound)
128Notifications
129Display
130 Blue light filter
130Changing the screen mode or adjusting the display colour
132 Screensaver
132Wallpapers and themes
133Advanced features 135 Dual Messenger
136 Device maintenance
140 Apps
140Lock screen 141 Smart Lock
141Biometrics and security
143 Face recognition
146 Fingerprint recognition
149 Samsung Pass
153 Secure Folder
157Cloud and accounts 158 Backup and restore
158Google
159Accessibility
160General management
161Software update
162User manual
162 About phone
Appendix
163 Troubleshooting
169 Removing the battery
3
Basics
Read me first
Please read this manual before using the device to ensure safe and proper use.
rDescriptions are based on the device’s default settings.
rSome content may differ from your device depending on the region, service provider, model specifications, or device’s software.
rContent (high quality content) that requires high CPU and RAM usage will affect the overall performance of the device. Apps related to the content may not work properly depending on the device’s specifications and the environment that it is used in.
rSamsung is not liable for performance issues caused by apps supplied by providers other than Samsung.
rSamsung is not liable for performance issues or incompatibilities caused by edited registry settings or modified operating system software. Attempting to customise the operating system may cause the device or apps to work improperly.
rSoftware, sound sources, wallpapers, images, and other media provided with this device are licensed for limited use. Extracting and using these materials for commercial or other purposes is an infringement of copyright laws. Users are entirely responsible for illegal use of media.
rYou may incur additional charges for data services, such as messaging, uploading and downloading, auto-syncing, or using location services depending on your data plan. For large data transfers, it is recommended to use the Wi-Fi feature.
rDefault apps that come with the device are subject to updates and may no longer be supported without prior notice. If you have questions about an app provided with the device, contact a Samsung Service Centre. For user-installed apps, contact service providers.
4

Basics
rModifying the device’s operating system or installing softwares from unofficial sources may result in device malfunctions and data corruption or loss. These actions are violations of your Samsung licence agreement and will void your warranty.
rDepending on the region or model, some devices are required to receive approval from the Federal Communications Commission (FCC). If your device is approved by the FCC,
you can view the FCC ID of the device. To view the FCC ID, launch the Settings app and tap About phone Status.
rDepending on the region, you can view the regulatory information on the device. To view the information, launch the Settings app and tap About phone Regulatory information.
Instructional icons
Warning: situations that could cause injury to yourself or others
Caution: situations that could cause damage to your device or other equipment
Notice: notes, usage tips, or additional information
5

Basics
Device overheating situations and solutions
When the device heats up while charging the battery
While charging, the device and the charger may become hot. During wireless charging or fast charging, the device may feel hotter to the touch. This does not affect the device’s lifespan or performance and is in the device’s normal range of operation. If the battery becomes too hot, the charger may stop charging.
Do the following when the device heats up:
rDisconnect the charger from the device and close any running apps. Wait for the device to cool down and then begin charging the device again.
rIf the lower part of the device overheats, it could be because the connected USB cable is damaged. Replace the damaged USB cable with a new Samsung-approved one.
rWhen using a wireless charger, do not place foreign materials, such as metal objects, magnets, and magnetic stripe cards, between the device and the wireless charger.
The wireless charging or fast charging feature is only available on supported models.
When the device heats up during use
When you use features or apps that require more power or use them for extended periods, your device may temporarily heat up due to increased battery consumption. Close any running apps and do not use the device for a while.
The following are examples of situations in which the device may overheat. Depending on the functions and apps you use, these examples may not apply to your model.
rDuring the initial setup after purchase or when restoring data
rWhen downloading large files
6

Basics
rWhen using apps that require more power or using apps for extended periods
–When playing high-quality games for extended periods
–When recording videos for extended periods
–When streaming videos while using the maximum brightness setting
–When connecting to a TV
rWhile multitasking (or, when running many apps in the background)
–When using Multi window
–When updating or installing apps while recording videos
–When downloading large files during a video call
–When recording videos while using a navigation app
rWhen using large amount of data for syncing with the cloud, email, or other accounts
rWhen using a navigation app in a car while the device is placed in direct sunlight
rWhen using the mobile hotspot and tethering feature
rWhen using the device in areas with weak signals or no reception
rWhen charging the battery with a damaged USB cable
rWhen the device’s multipurpose jack is damaged or exposed to foreign materials, such as liquid, dust, metal powder, and pencil lead
rWhen you are roaming
Do the following when the device heats up:
rKeep the device updated with the latest software.
rConflicts between running apps may cause the device to heat up. Restart the device.
rDeactivate the Wi-Fi, GPS, and Bluetooth features when not using them.
rClose apps that increase battery consumption or that run in the background when not in use.
rDelete unnecessary files or unused apps.
rDecrease the screen brightness.
rIf the device overheats or feels hot for a prolonged period, do not use it for a while. If the device continues to overheat, contact a Samsung Service Centre.
7

Basics
Device limitations when the device overheats
When the device heats up, the features and performance may be limited or the device may turn off to cool down. The feature is only available on supported models.
rIf the device becomes hotter than usual, a device overheating message will appear. To lower the device’s temperature, the screen brightness and the performance speed will be limited and battery charging will stop. Running apps will be closed and you will only be able to make emergency calls until the device cools down.
rIf the device overheats or feels hot for a prolonged period, a power off message will appear. Turn off the device, and wait until it cools down.
Precautions for operating environment
Your device may heat up due to the environment in the following conditions. Use caution to avoid shortening the battery’s lifespan, damaging the device, or causing a fire.
rDo not store your device in very cold or very hot temperatures.
rDo not expose your device to direct sunlight for extended periods.
rDo not use or store your device for extended periods in very hot areas, such as inside a car in the summertime.
rDo not place the device in any areas that may overheat, such as on an electric heating mat.
rDo not store your device near or in heaters, microwaves, hot cooking equipment, or high pressure containers.
rNever use a damaged charger or battery.
8

Basics
Device layout and functions
Package contents
Refer to the quick start guide for package contents.
rThe items supplied with the device and any available accessories may vary depending on the region or service provider.
rThe supplied items are designed only for this device and may not be compatible with other devices.
rAppearances and specifications are subject to change without prior notice.
rYou can purchase additional accessories from your local Samsung retailer. Make sure they are compatible with the device before purchase.
rUse only Samsung-approved accessories. Using unapproved accessories may cause the performance problems and malfunctions that are not covered by the warranty.
rAvailability of all accessories is subject to change depending entirely on manufacturing companies. For more information about available accessories, refer to the Samsung website.
9

Basics
Device layout
|
Speaker |
Front camera |
Proximity sensor |
|
Flash |
|
Speaker |
Volume key |
Power key |
|
|
|
Touchscreen |
SIM card tray 
Single SIM models:  Memory card tray
Dual SIM models:
SIM card / Memory card tray
 Multipurpose jack
Rear camera |
Flash |
 GPS antenna
Fingerprint recognition  sensor
NFC antenna (NFC-enabled models)
 Main antenna
Earphone jack
 Microphone
10
Basics
When using the speakers, such as when playing media files or using speakerphone, do not place the device close to your ears.
rConnectivity problems and battery drain may occur in the following situations:
–If you attach metallic stickers on the antenna area of the device
–If you attach a device cover made with metallic material to the device
–If you cover the device’s antenna area with your hands or other objects while using certain features, such as calls or the mobile data connection
rUsing a Samsung-approved screen protector is recommended. Unapproved screen protectors may cause the sensors to malfunction.
rDo not cover the proximity sensor area with screen accessories, such as a screen protector or stickers. Doing so may cause the sensor to malfunction.
rDo not allow water to contact the touchscreen. The touchscreen may malfunction in humid conditions or when exposed to water.
Hard keys
Volume key |
Power key |
Key |
Function |
||
Power |
r Press and hold to turn the device on or off. |
||
r |
Press to turn on or lock the screen. |
||
|
|||
|
|
|
|
Volume |
r |
Press to adjust the device volume. |
|
|
|
|
|
11
Basics
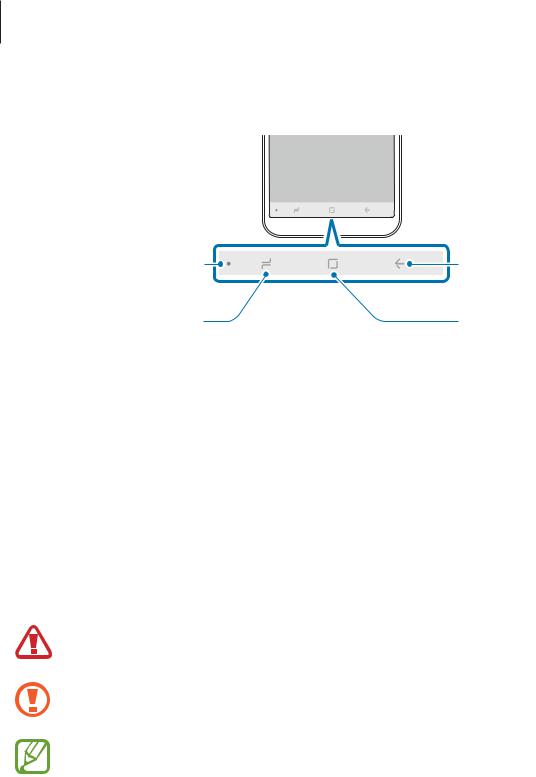
Soft buttons
Show and hide button
Back button |
Recents button |
Home button |
When you turn on the device, the soft buttons will appear at the bottom of the screen. The soft buttons are set to the Recents button, Home button, and Back button by default. Refer to Navigation bar (soft buttons) for more information.
Battery
Charging the battery
Charge the battery before using it for the first time or when it has been unused for extended periods.
Use only Samsung-approved chargers, batteries, and cables. Unapproved chargers or cables can cause the battery to explode or damage the device.
Connecting the charger improperly may cause serious damage to the device. Any damage caused by misuse is not covered by the warranty.
To save energy, unplug the charger when not in use. The charger does not have a power switch, so you must unplug the charger from the electric socket when not in use to avoid wasting power. The charger should remain close to the electric socket and easily accessible while charging.
1 Connect the USB cable to the USB power adaptor.
12
Basics
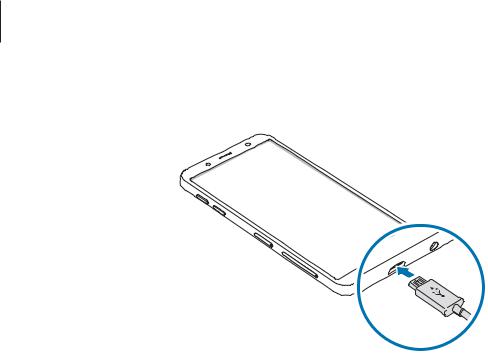
2 Plug the USB cable into the device’s multipurpose jack.
3 Plug the USB power adaptor into an electric socket.
4After fully charging, disconnect the charger from the device. Then, unplug the charger from the electric socket.
Reducing the battery consumption
Your device provides various options that help you conserve battery power.
rOptimise the device using the device maintenance feature.
rWhen you are not using the device, turn off the screen by pressing the Power key.
rActivate power saving mode.
rClose unnecessary apps.
rDeactivate the Bluetooth feature when not in use.
rDeactivate the Wi-Fi feature when not in use.
rDeactivate auto-syncing of apps that need to be synced.
rDecrease the backlight time.
rDecrease the screen brightness.
13

Basics
Battery charging tips and precautions
rWhen the battery power is low, the battery icon appears empty.
rIf the battery is completely discharged, the device cannot be turned on immediately when the charger is connected. Allow a depleted battery to charge for a few minutes before turning on the device.
rIf you use multiple apps at once, network apps, or apps that need a connection to another device, the battery will drain quickly. To avoid losing power during a data transfer, always use these apps after fully charging the battery.
rUsing a power source other than the charger, such as a computer, may result in a slower charging speed due to a lower electric current.
rThe device can be used while it is charging, but it may take longer to fully charge the battery.
rIf the device receives an unstable power supply while charging, the touchscreen may not function. If this happens, unplug the charger from the device.
rWhile charging, the device and the charger may heat up. This is normal and should not affect the device’s lifespan or performance. If the battery gets hotter than usual, the charger may stop charging.
rIf you charge the device while the multipurpose jack is wet, the device may be damaged. Thoroughly dry the multipurpose jack before charging the device.
rIf the device is not charging properly, take the device and the charger to a Samsung Service Centre.
SIM or USIM card (nano-SIM card)
Installing the SIM or USIM card
Insert the SIM or USIM card provided by the mobile telephone service provider.
For dual SIM models, you can insert two SIM or USIM cards so you can have two phone numbers or service providers for a single device. In some areas, data transfer speeds may be slower if two SIM cards are inserted in the device than when one SIM card is inserted.
14
Basics
Use caution not to lose or let others use the SIM or USIM card. Samsung is not responsible for any damages or inconveniences caused by lost or stolen cards.
Some LTE services may not be available depending on the service provider. For more information about service availability, contact your service provider.
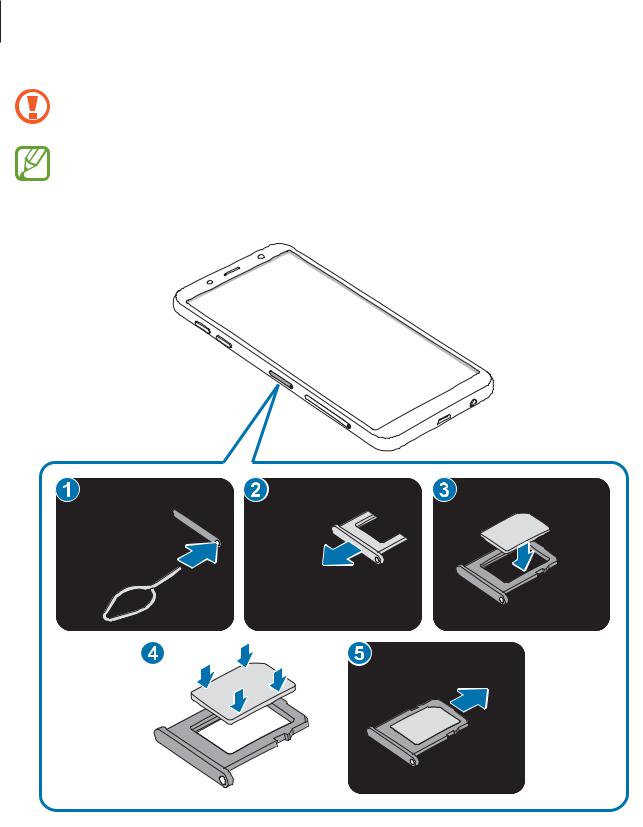
Single SIM models:
15
Basics
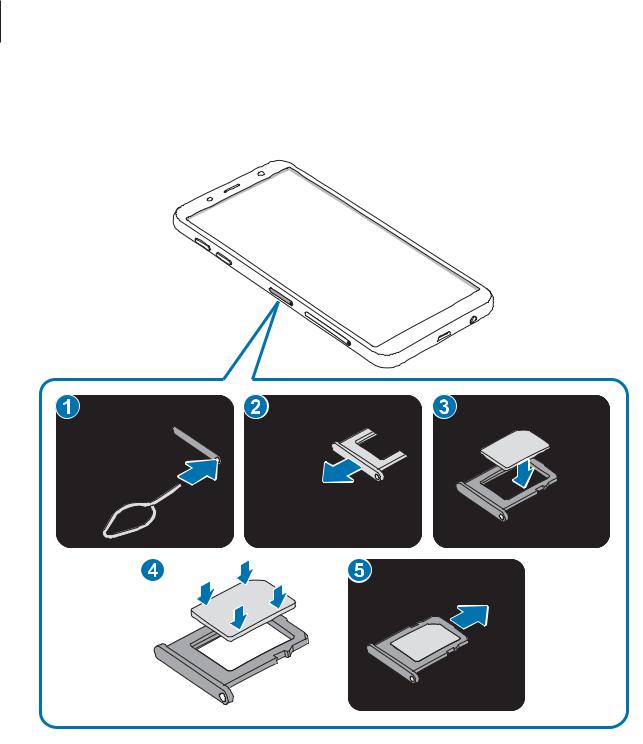
Dual SIM models:
–SIM card tray 1:
16

Basics
– SIM card tray 2:
1 |
Insert the ejection pin into the hole on the tray to loosen the tray. |
||
|
|
Ensure that the ejection pin is perpendicular to the hole. Otherwise, the device may |
|
|
|
be damaged. |
|
|
|
||
2 |
|||
Pull out the tray gently from the tray slot. |
|||
17
Basics
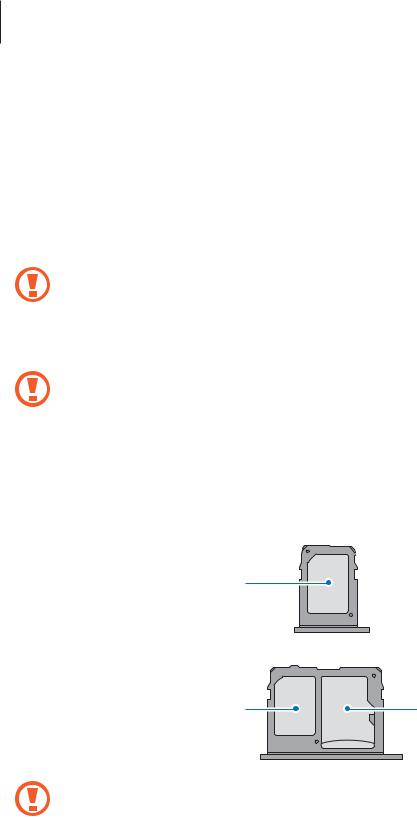
3Single SIM models: Place the SIM or USIM card on the SIM card tray with the goldcoloured contacts facing downwards.
Dual SIM models: Place the SIM or USIM card on the tray with the gold-coloured contacts facing downwards. Place the primary SIM or USIM card on the tray 1 and the secondary SIM or USIM card on the tray 2.
4 Gently press the SIM or USIM card into the tray to secure it.
If the card is not fixed firmly into the tray, the SIM card may leave or fall out of the tray.
5 Insert the tray back into the tray slot.
r If you insert the tray into your device while the tray is wet, your device may be damaged. Always make sure the tray is dry.
r Fully insert the tray into the tray slot to prevent liquid from entering your device.
Correct card installation
Dual SIM models:
Nano-SIM card
Nano-SIM card |
microSD card |
Use only a nano-SIM card.
18

Basics
Removing the SIM or USIM card
1
2
3
4
Insert the ejection pin into the hole on the tray to loosen the tray. Pull out the tray gently from the tray slot.
Remove the SIM or USIM card.
Insert the tray back into the tray slot.
Using dual SIM or USIM cards (dual SIM models)
If you insert two SIM or USIM cards, you can have two phone numbers or service providers for a single device.
Activating SIM or USIM cards
Launch the Settings app and tap Connections SIM card manager. Select a SIM or USIM card and tap the switch to activate it.
Customising SIM or USIM cards
Launch the Settings app, tap Connections SIM card manager, and then select a SIM or USIM card to access the following options:
rIcon: Change the icon of the SIM or USIM card.
rName: Change the display name of the SIM or USIM card.
rNetwork mode: Select a network type to use with the SIM or USIM card.
Setting preferred SIM or USIM cards
When two cards are activated, you can assign voice calls, messaging, and data services to specific cards.
Launch the Settings app, tap Connections SIM card manager, and then set the feature preferences for your cards in PREFERRED SIM CARD.
19

Basics
Memory card (microSD card)
Installing a memory card
Your device’s memory card capacity may vary from other models and some memory cards may not be compatible with your device depending on the memory card manufacturer and type. To view your device’s maximum memory card capacity, refer to the Samsung website.
r Some memory cards may not be fully compatible with the device. Using an incompatible card may damage the device or the memory card, or corrupt the data stored in it.
rUse caution to insert the memory card right-side up.
rThe device supports the FAT and the exFAT file systems for memory cards. When inserting a card formatted in a different file system, the device will ask to reformat the card or will not recognise the card. To use the memory card, you must format it. If your device cannot format or recognise the memory card, contact the memory card manufacturer or a Samsung Service Centre.
rFrequent writing and erasing of data shortens the lifespan of memory cards.
rWhen inserting a memory card into the device, the memory card’s file directory appears in the My Files SD card folder.
20
Basics
21
Basics
1 Insert the ejection pin into the hole on the tray to loosen the tray.
Ensure that the ejection pin is perpendicular to the hole. Otherwise, the device may be damaged.
2 Pull out the tray gently from the tray slot.
When you remove the tray from the device, the mobile data connection will be disabled.
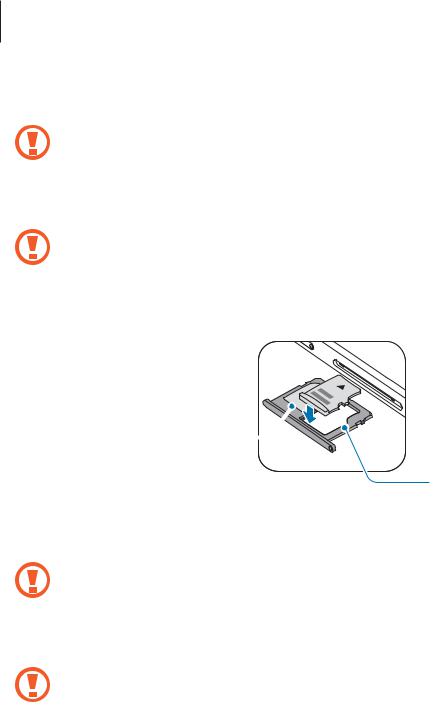
3 Place a memory card on the tray 2 with the gold-coloured contacts facing downwards.
Tray 1 
Tray 2
4 Gently press the memory card into the tray to secure it.
If the card is not fixed firmly into the tray, the memory card may leave or fall out of the tray.
5 Insert the tray back into the tray slot.
r If you insert the tray into your device while the tray is wet, your device may be damaged. Always make sure the tray is dry.
r Fully insert the tray into the tray slot to prevent liquid from entering your device.
22

Basics
Removing the memory card
Before removing the memory card, first unmount it for safe removal.
Launch the Settings app and tap Device maintenance Storage  Storage settingsSD card UNMOUNT.
1
2
3
4
Insert the ejection pin into the hole on the tray to loosen the tray.
Pull out the tray gently from the tray slot.
Remove the memory card.
Insert the tray back into the tray slot.
Do not remove external storage, such as a memory card or USB storage, while the device is transferring or accessing information, or right after transferring data. Doing so can cause data to be corrupted or lost or cause damage to the external storage or device. Samsung is not responsible for losses, including loss of data, resulting from the misuse of external storage devices.
Formatting the memory card
A memory card formatted on a computer may not be compatible with the device. Format the memory card on the device.
Launch the Settings app and tap Device maintenance Storage  Storage settingsSD card Format.
Before formatting the memory card, remember to make backup copies of all important data stored in the memory card. The manufacturer’s warranty does not cover loss of data resulting from user actions.
23
Basics
Turning the device on and off
Press and hold the Power key for a few seconds to turn on the device.
When you turn on your device for the first time or after performing a data reset, follow the onscreen instructions to set up your device.
To turn off the device, press and hold the Power key, and then tap Power off.
Follow all posted warnings and directions from authorised personnel in areas where the use of wireless devices is restricted, such as aeroplanes and hospitals.
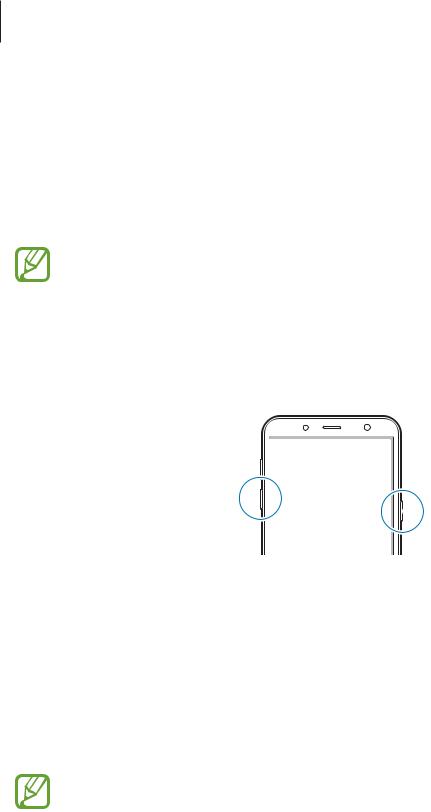
Restarting the device
If your device is frozen and unresponsive, press and hold the Power key and the Volume Down key simultaneously for more than 7 seconds to restart it.
Volume Down key 
 Power key
Emergency mode
You can switch the device to emergency mode to reduce battery consumption. Some apps and functions will be restricted. In emergency mode, you can make an emergency call, send your current location information to others, sound an emergency alarm, and more.
Activating emergency mode
To activate emergency mode, press and hold the Power key, and then tap Emergency mode.
The usage time left shows the time remaining before the battery power runs out. Usage time left may vary depending on your device settings and operating conditions.
Deactivating emergency mode
To deactivate emergency mode, tap  Turn off Emergency mode. Alternatively, press and hold the Power key, and then tap Emergency mode.
24
Basics
Initial setup
When you turn on your device for the first time or after performing a data reset, follow the onscreen instructions to set up your device.
The initial setup procedures may vary depending on the device’s software and your region.
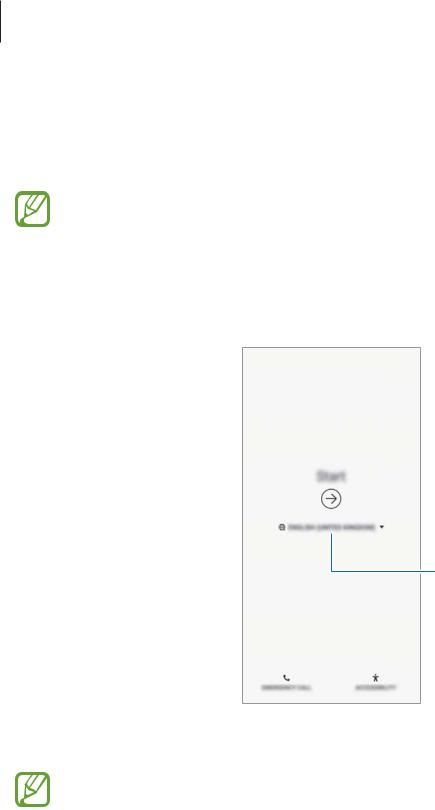
1
2
Turn on the device.
Select your preferred device language and select  .
.
Select a language.
3 Select a Wi-Fi network and connect to it.
If you do not connect to a Wi-Fi network, you may not be able to set up some device features during the initial setup.
4 Follow the on-screen instructions to proceed the initial setup.
5Set a screen lock method to protect your device. You can protect your personal information by preventing others from accessing your device. To set the screen lock method later, tap No, thank you.
25

Basics
6Sign in to your Samsung account. You can enjoy Samsung services and keep your data up to date and secure across all of your devices. Refer to Samsung account for more information.
7Select features you want to use and complete the initial setup. The Home screen will appear.
26

Basics
Samsung account
Introduction
Your Samsung account is an integrated account service that allows you to use a variety of Samsung services provided by mobile devices, TVs, and the Samsung website. Once your Samsung account has been registered, you can keep your data up to date and secure across your Samsung devices with Samsung Cloud, track and control your lost or stolen device, see tips and tricks from Samsung Members, and more.
Create your Samsung account with your email address.
To check the list of services that can be used with your Samsung account, visit account.samsung.com. For more information on Samsung accounts, launch the Settings app and tap Cloud and accounts Accounts Samsung account  Help.
Help.
Registering your Samsung account
Registering a new Samsung account
If you do not have a Samsung account, you should create one.
1
2
3
Launch the Settings app and tap Cloud and accounts Accounts Add account. Tap Samsung account CREATE ACCOUNT.
Follow the on-screen instructions to complete creating your account.
27

Basics
Registering an existing Samsung account
If you already have a Samsung account, register it to the device.
1
2
Launch the Settings app and tap Cloud and accounts Accounts Add account. Tap Samsung account SIGN IN.
3Enter your email address and password, and then tap SIGN IN.
If you forget your account information, tap Find ID or Reset password. You can find your account information when you enter the required information.
If you want to verity your Samsung account password via your biometric data, such as fingerprints, tap Verify identity with biometrics instead of password using Samsung Pass. Refer to Samsung Pass for more information.
4
5
Read and agree to the terms and conditions and tap AGREE.
Tap DONE to finish registering your Samsung account.
Removing your Samsung account
When you remove your registered Samsung account from the device, your data, such as contacts or events, will also be removed.
1
2
3
Launch the Settings app and tap Cloud and accounts Accounts.
Tap Samsung account  Remove account.
Tap REMOVE, enter your Samsung account password, and then tap REMOVE ACCOUNT.
28

Basics
Transferring data from your previous device
You can restore your data, such as images, contacts, messages, and apps from Samsung Cloud. You can also copy them from your previous device via Smart Switch.
rThis feature may not be supported on some devices or computers.
rLimitations apply. Visit www.samsung.com/smartswitch for details. Samsung takes copyright seriously. Only transfer content that you own or have the right to transfer.
Smart Switch
Transfer data between mobile devices via Smart Switch. To use Smart Switch, launch the
Settings app and tap Cloud and accounts Smart Switch. If you do not have the app, download it from Galaxy Apps or Play Store.
Transferring data from a mobile device
Transfer data from your previous device to your device wirelessly via Wi-Fi Direct.
1On the previous device, launch Smart Switch.
If you do not have the app, download it from Galaxy Apps or Play Store.
2
3
On your device, launch the Settings app and tap Cloud and accounts Smart Switch.
Place the devices near each other.
29

Basics
4
5
6
On the previous device, tap WIRELESS SEND.
On your device, tap WIRELESS RECEIVE and select the previous device type. Follow the on-screen instructions to transfer data from your previous device.
Transferring data using external storage
Transfer data using external storage, such as a microSD card.
1
2
Transfer data from your previous device to external storage. Insert or connect the external storage device to your device.
3On your device, launch the Settings app and tap Cloud and accounts Smart SwitchEXTERNAL STORAGE RESTORE.
4 Follow the on-screen instructions to transfer data from external storage.
30
 Loading...