


User guide.

S M A R T P H O N E
User Manual
Please read this manual before operating your device and keep it for future reference.
Table of Contents
Special Features. . . . . . . . . . . . . . . . . . . . . . . . . . . . . |
. 1 |
Side Speaker. . . . . . . . . . . . . . . . . . . . . . . . . . . . . . . . |
. 2 |
Getting Started. . . . . . . . . . . . . . . . . . . . . . . . . . . . . . |
3 |
Set Up Your Device . . . . . . . . . . . . . . . . . . . . . . . . . . . . |
. .4 |
Assemble Your Device.. . . . . . . . . . . . . . . . . . . . . . . |
.5 |
Start Using Your Device. . . . . . . . . . . . . . . . . . . . . |
. 10 |
Set Up Your Device. . . . . . . . . . . . . . . . . . . . . . . . . . |
. 11 |
Learn About Your Device.. . . . . . . . . . . . . . . . . . . . . . |
.15 |
Front View. . . . . . . . . . . . . . . . . . . . . . . . . . . . . . . . . |
. 16 |
Back View. . . . . . . . . . . . . . . . . . . . . . . . . . . . . . . . . . |
.18 |
Home Screen. . . . . . . . . . . . . . . . . . . . . . . . . . . . . . . |
.19 |
Notification Panel. . . . . . . . . . . . . . . . . . . . . . . . . . |
22 |
Navigation . . . . . . . . . . . . . . . . . . . . . . . . . . . . . . . . . |
28 |
Entering Text. . . . . . . . . . . . . . . . . . . . . . . . . . . . . . . |
30 |
Multi Window. . . . . . . . . . . . . . . . . . . . . . . . . . . . . . |
33 |
Emergency Mode .. . . . . . . . . . . . . . . . . . . . . . . . . . |
35 |
Apps . . . . . . . . . . . . . . . . . . . . . . . . . . . . . . . . . . . . . . . . . . |
37 |
Using Apps. . . . . . . . . . . . . . . . . . . . . . . . . . . . . . . . . |
38 |
Applications Settings. . . . . . . . . . . . . . . . . . . . . . . |
. 41 |
Calculator. . . . . . . . . . . . . . . . . . . . . . . . . . . . . . . . . . |
43 |
Calendar. . . . . . . . . . . . . . . . . . . . . . . . . . . . . . . . . . . |
44 |
Camera and Video. . . . . . . . . . . . . . . . . . . . . . . . . . |
47 |
VZW_J327V_EN_UM_TN_QE2_052217_FINAL
Clock . . . . . . . . . . . . . . . . . . . . . . . . . . . . . . . . . . . . . . |
52 |
Connections . . . . . . . . . . . . . . . . . . . . . . . . . . . . . . . . . |
100 |
Contacts . . . . . . . . . . . . . . . . . . . . . . . . . . . . . . . . . . . |
55 |
Wi Fi. . . . . . . . . . . . . . . . . . . . . . . . . . . . . . . . . . . . . |
. 101 |
Email . . . . . . . . . . . . . . . . . . . . . . . . . . . . . . . . . . . . . . |
62 |
Bluetooth. . . . . . . . . . . . . . . . . . . . . . . . . . . . . . . . . |
104 |
Gallery . . . . . . . . . . . . . . . . . . . . . . . . . . . . . . . . . . . . |
65 |
Data Usage.. . . . . . . . . . . . . . . . . . . . . . . . . . . . . . . |
107 |
Google Apps.. . . . . . . . . . . . . . . . . . . . . . . . . . . . . . . |
69 |
Airplane Mode.. . . . . . . . . . . . . . . . . . . . . . . . . . . . |
109 |
Message+. . . . . . . . . . . . . . . . . . . . . . . . . . . . . . . . . . |
.72 |
Mobile Hotspot. . . . . . . . . . . . . . . . . . . . . . . . . . . . |
109 |
Messages .. . . . . . . . . . . . . . . . . . . . . . . . . . . . . . . . . |
.75 |
Tethering. . . . . . . . . . . . . . . . . . . . . . . . . . . . . . . . . |
. 112 |
My Files . . . . . . . . . . . . . . . . . . . . . . . . . . . . . . . . . . . |
80 |
Mobile Networks. . . . . . . . . . . . . . . . . . . . . . . . . . |
. 112 |
Phone. . . . . . . . . . . . . . . . . . . . . . . . . . . . . . . . . . . . . |
82 |
Location. . . . . . . . . . . . . . . . . . . . . . . . . . . . . . . . . . |
. 113 |
S Health. . . . . . . . . . . . . . . . . . . . . . . . . . . . . . . . . . . |
. 91 |
Nearby Device Scanning. . . . . . . . . . . . . . . . . . . . |
.115 |
Samsung Gear. . . . . . . . . . . . . . . . . . . . . . . . . . . . . . |
93 |
Printing. . . . . . . . . . . . . . . . . . . . . . . . . . . . . . . . . . . |
.115 |
Samsung Notes.. . . . . . . . . . . . . . . . . . . . . . . . . . . . |
94 |
Virtual Private Networks (VPN) . . . . . . . . . . . . . |
.115 |
Verizon Apps . . . . . . . . . . . . . . . . . . . . . . . . . . . . . . . |
96 |
Sounds and Vibration.. . . . . . . . . . . . . . . . . . . . . . . . |
. 117 |
Settings . . . . . . . . . . . . . . . . . . . . . . . . . . . . . . . . . . . . . . |
98 |
Sound Mode. . . . . . . . . . . . . . . . . . . . . . . . . . . . . . . |
.118 |
How to Use Settings. . . . . . . . . . . . . . . . . . . . . . . . |
99 |
Easy Mute. . . . . . . . . . . . . . . . . . . . . . . . . . . . . . . . . |
.118 |
Table of Contents |
|
iii |
|
Vibrations. . . . . . . . . . . . . . . . . . . . . . . . . . . . . . . . . |
.118 |
Home Screen. . . . . . . . . . . . . . . . . . . . . . . . . . . . . . |
128 |
Volume . . . . . . . . . . . . . . . . . . . . . . . . . . . . . . . . . . . |
.119 |
Easy Mode. . . . . . . . . . . . . . . . . . . . . . . . . . . . . . . . |
128 |
Ringtone. . . . . . . . . . . . . . . . . . . . . . . . . . . . . . . . . . |
120 |
Icon Frames . . . . . . . . . . . . . . . . . . . . . . . . . . . . . . . |
129 |
Notification Sounds. . . . . . . . . . . . . . . . . . . . . . . . |
.121 |
Status Bar. . . . . . . . . . . . . . . . . . . . . . . . . . . . . . . . . |
129 |
Do Not Disturb. . . . . . . . . . . . . . . . . . . . . . . . . . . . |
. 121 |
Screen Timeout. . . . . . . . . . . . . . . . . . . . . . . . . . . . |
129 |
System Sounds . . . . . . . . . . . . . . . . . . . . . . . . . . . . |
.122 |
Screen Saver. . . . . . . . . . . . . . . . . . . . . . . . . . . . . . |
130 |
Key-Tap Feedback. . . . . . . . . . . . . . . . . . . . . . . . . |
. 122 |
One-Handed Mode.. . . . . . . . . . . . . . . . . . . . . . . . |
130 |
Sound Quality and Effects . . . . . . . . . . . . . . . . . . |
123 |
Wallpapers and Themes . . . . . . . . . . . . . . . . . . . . . . |
.131 |
Notifications. . . . . . . . . . . . . . . . . . . . . . . . . . . . . . . . |
124 |
Wallpapers. . . . . . . . . . . . . . . . . . . . . . . . . . . . . . . . |
.132 |
Block App Notifications. . . . . . . . . . . . . . . . . . . . |
125 |
Themes . . . . . . . . . . . . . . . . . . . . . . . . . . . . . . . . . . . |
.132 |
Customize App Notifications. . . . . . . . . . . . . . . . |
125 |
Icons. . . . . . . . . . . . . . . . . . . . . . . . . . . . . . . . . . . . . |
.132 |
Smart Alert. . . . . . . . . . . . . . . . . . . . . . . . . . . . . . . |
125 |
Device Maintenance.. . . . . . . . . . . . . . . . . . . . . . . . . |
133 |
Display. . . . . . . . . . . . . . . . . . . . . . . . . . . . . . . . . . . . . . |
.126 |
Battery. . . . . . . . . . . . . . . . . . . . . . . . . . . . . . . . . . . |
134 |
Screen Brightness......................... |
. 127 |
Storage . . . . . . . . . . . . . . . . . . . . . . . . . . . . . . . . . . . |
134 |
Screen Zoom and Font. . . . . . . . . . . . . . . . . . . . . |
. 127 |
Emergency Mode . . . . . . . . . . . . . . . . . . . . . . . . . . |
.137 |
Table of Contents |
|
iv |
|
Language and Input.. . . . . . . . . . . . . . . . . . . . . . . |
.137 |
Credential Storage. . . . . . . . . . . . . . . . . . . . . . . . . |
146 |
Date and Time. . . . . . . . . . . . . . . . . . . . . . . . . . . . . |
139 |
Advanced Security Settings.. . . . . . . . . . . . . . . . |
.147 |
Reset . . . . . . . . . . . . . . . . . . . . . . . . . . . . . . . . . . . . . |
140 |
Accounts . . . . . . . . . . . . . . . . . . . . . . . . . . . . . . . . . . . . |
148 |
Factory Data Reset.. . . . . . . . . . . . . . . . . . . . . . . . |
140 |
Add an Account.. . . . . . . . . . . . . . . . . . . . . . . . . . . |
149 |
Software Update.. . . . . . . . . . . . . . . . . . . . . . . . . . |
. 141 |
Backup and Restore.. . . . . . . . . . . . . . . . . . . . . . . |
.151 |
Lock Screen and Security . . . . . . . . . . . . . . . . . . . . . |
142 |
Google Settings. . . . . . . . . . . . . . . . . . . . . . . . . . . |
. 151 |
Set a Screen Lock . . . . . . . . . . . . . . . . . . . . . . . . . . |
143 |
Accessibility. . . . . . . . . . . . . . . . . . . . . . . . . . . . . . . . . |
153 |
Unknown Sources.. . . . . . . . . . . . . . . . . . . . . . . . . |
144 |
Vision.. . . . . . . . . . . . . . . . . . . . . . . . . . . . . . . . . . . . |
154 |
Secure Folder.. . . . . . . . . . . . . . . . . . . . . . . . . . . . . |
144 |
Hearing. . . . . . . . . . . . . . . . . . . . . . . . . . . . . . . . . . . |
.155 |
Secure Startup. . . . . . . . . . . . . . . . . . . . . . . . . . . . |
144 |
Dexterity and Interaction. . . . . . . . . . . . . . . . . . . |
.155 |
Encrypt SD Card . . . . . . . . . . . . . . . . . . . . . . . . . . . |
144 |
More Accessibility Settings . . . . . . . . . . . . . . . . . |
156 |
Set Up SIM Card Lock.. . . . . . . . . . . . . . . . . . . . . . |
145 |
Accessibility Services. . . . . . . . . . . . . . . . . . . . . . |
. 157 |
View Passwords. . . . . . . . . . . . . . . . . . . . . . . . . . . |
145 |
Other Settings. . . . . . . . . . . . . . . . . . . . . . . . . . . . . . . |
158 |
Security Update Service . . . . . . . . . . . . . . . . . . . . |
145 |
About Phone . . . . . . . . . . . . . . . . . . . . . . . . . . . . . . |
159 |
Phone Administration. . . . . . . . . . . . . . . . . . . . . . |
146 |
Help. . . . . . . . . . . . . . . . . . . . . . . . . . . . . . . . . . . . . . |
159 |
Table of Contents |
|
v |
|
Phone Assistance App. . . . . . . . . . . . . . . . . . . . . . |
160 |
Getting Help. . . . . . . . . . . . . . . . . . . . . . . . . . . . . . . . |
.161 |
Videos . . . . . . . . . . . . . . . . . . . . . . . . . . . . . . . . . . . . |
162 |
Simulators . . . . . . . . . . . . . . . . . . . . . . . . . . . . . . . . |
162 |
Tips.. . . . . . . . . . . . . . . . . . . . . . . . . . . . . . . . . . . . . . |
162 |
Samsung Support.. . . . . . . . . . . . . . . . . . . . . . . . . |
162 |
Verizon Glossary. . . . . . . . . . . . . . . . . . . . . . . . . . . |
162 |
Legal.. . . . . . . . . . . . . . . . . . . . . . . . . . . . . . . . . . . . . . . . |
163 |
Legal Information.. . . . . . . . . . . . . . . . . . . . . . . . . |
164 |
Table of Contents |
vi |
|
Special Features
Learn about your mobile device’s special features.

Side Speaker
This device features the speaker on the side of the device.
Speaker

Special Features |
2 |
Getting Started
Learn about your mobile device hardware, assembly procedures, and how to get started using your new device.
Set Up Your Device
Learn howto set upyourdevice forthefirsttime.
Assemble Your Device
This section helpsyouto assembleyourdevice.
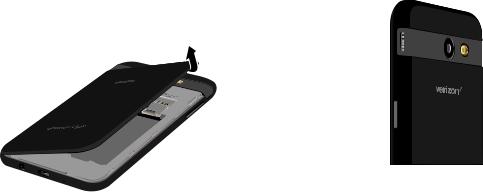
Remove the Back Cover
►► Liftthe coverup andtothe left ofthe device.
Caution: When removing the back cover, use the slot next to the Volume key to gently lift the
coveroff. Pulling onthe Speaker(located nexttothe Powerbutton) maycause damage.
Do not pull
on Speaker

Warning: Do not bend ortwistthe back cover excessively. Using excessive force on the cover during removal orinstallation of an internal component can cause the material to break.
Set Up Your Device |
5 |
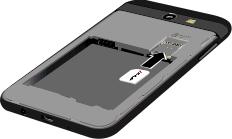
Install the SIM Card
When you subscribe to a cellular network, you are providedwith a plug-in SIM card. During activation, yourSIM card is loadedwithyoursubscription details.
Warning: Please be carefulwhen handlingthe SIM card to avoid damaging it. Keep all SIM cards out of reach of small children.
►► Carefullyslidethe SIM card intothe SIM card slot.
•Make surethatthe card’s gold contactsface down into the device and that the card is positioned as shown.
Install an Optional Memory Card
You can install a microSD™ memorycard (not included) to add more memoryspacetoyourdevice.
Amemorycard can be installed at anytime. It is not necessaryto install it priorto usingthe device.
Set Up Your Device |
6 |

►► Slide the memory card into the slot with the gold contacts facing down.
Install the Battery
The battery is installed in the back of the device.
1.Insertthe batteryintothe opening onthe back of the device, making sure the connectors align.
2. Gentlypress downto securethe battery.
Set Up Your Device |
7 |
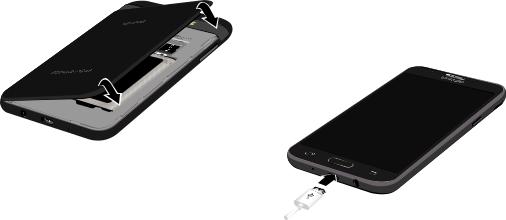
Replace the Back Cover
The back covershould be replaced before using the device.
1.Placethe back coverontothe back ofthe device and press down.
2.Press alongthe edge ofthe back coveruntilyou have a secure seal.
Charge the Battery
Yourdevice is powered bya rechargeable, standard Li-Ion battery.AUSB charger(charging head and USB cable) is includedwiththe deviceforchargingthe battery from any standard outlet.
The batterycomes partiallycharged. You can usethe device while charging.
1.Insertthe USB cable intothe USB charger/ Accessoryport.
Set Up Your Device |
8 |

Caution: Use only charging devices and batteries approved bySamsung. Samsung accessories are designed for your device to maximize battery life. Using other accessories may void your warranty and may cause damage.
2.Connectthe USB cabletothe charging head, and then plugthe charging head into a standard outlet.
3.Unplugthe charging headfromthe outlet and removethe USB cablefromthe devicewhen charging is complete.
When to Charge the Battery
When the battery is low and only a few minutes of operation remain,the device sounds awarningtone at regular intervals.
Inthis condition,yourdevice conserves its remaining batterypowerbydimmingthe screen.
When the battery level becomes too low, the device automatically turns off.
For a quick check of your battery level:
►► Viewthe batterycharge indicatorlocated inthetop right cornerofyourdevice’s display.Asolid color ( 

 ) indicates afull charge.
You can also chooseto displaya percentagevalue. Viewing a percentagevalue can provide a betteridea of the remaining charge on the battery. For more information, see “Battery”onpage134.
While charging, the device and the charger may become hot. This does not affectthe device’s lifespan orperformance and is inthe device’s normal range of operation.
The chargermaystop charging ifthe batterybecomes too hot.
Set Up Your Device |
9 |
Ifthe device heats upwhile chargingthe battery:
1.Disconnectthe chargerfromthe device and close anyrunning apps.
2.Wait for the device to cool down, and then begin charging the device again.
•Ifthe lowerpart ofthe device overheats, checkfordamagetothe connected USB cable. Replacethe damaged USB cablewith a new Samsung approved cable.
Start Using Your Device
Turn Your Device On or Off
The instructions belowexplain howtoturnyourdevice on or off.
To turn the device on:
►► Press and holdthe Power key until the device turns on.
To turn the device off:
1.Press and holdthe Power key.
2.Tap Power off, and confirm if prompted.
Set Up Your Device |
10 |
Lock or Unlock Your Device
Useyourdevice’s screen lockfeaturesto secureyour device.
Bydefault,the device locks automaticallywhenthe screen times out.
To lock the device:
►► Pressthe Power key.
The default Screen lock onyourdevice is Swipe. To choose a more secure screen lock, see
“SetaScreenLock”onpage143.
To unlock the device:
►► Pressthe Power key or Home key, and then drag your finger across the screen.
Restart the Device
Ifyourdevice stops respondingtotaps orfinger gestures andyou are unabletoturn it off,you can restart your device.
►► Press and holdthe Power key and the
Volumedownkeyatthe sametimeformorethan seven seconds.
Set Up Your Device
Use the Setup Wizard
The first time you turn your device on, a Welcome screen is displayed. It guidesyouthroughthe basics of setting upyourdevice.
Followthe promptsto choose a default language, connectto aWi-Fi® network, set up accounts, choose location services, learn aboutyourdevice’sfeatures, and more.
Set Up Your Device |
11 |
Google Account
Yournewdevice usesyourGoogle™ Account to fully utilize its Android™ features, including Gmail™ and the
Google Play™ store.
When you turn on your device for the first time, set upyourexisting GoogleAccount orcreate a new GoogleAccount.
– or –
To create a newGoogleAccount orset upyour GoogleAccount onyourdevice at anytime, use
Accounts settings.
1.From a Home screen,tap  Apps >
  Settings.
2.Tap Accounts.
3.Tap  Addaccount > Google.
Factory Reset Protection
When you sign in to a Google Account on your device,
FactoryReset Protection is activated. FactoryReset Protection (FRP) prevents otherpeoplefrom using your device if it is reset to factory settings without your permission. Forexample, ifyourdevice is lost orstolen and afactorydata reset is performed, onlysomeone withyourGoogleAccount username and password can use the device.
Youwill not be ableto accessthe device afterafactory data reset ifyou do not haveyourGoogleAccount username and password. Formore information, see
“FactoryDataReset”onpage140.
Set Up Your Device |
12 |

Caution: Before shippingyourdevice backto Samsung |
Samsung Account |
|
ortaking ittoyournearest Samsung-authorized service |
Create a Samsung account for access to Samsung |
|
center, you should remove your Google Account before |
content and apps onyourdevice.Whenyouturn on |
|
resetting the device back to factory settings. For more |
||
yourdeviceforthefirsttime, set upyourexisting |
||
information, visit: samsung.com/us/support/frp. |
||
Samsung account or create a new Samsung account. |
||
|
Enable Factory Reset Protection
Adding a Google Account to your device automatically activatesthe FactoryReset Protection (FRP) security feature.
Disable Factory Reset Protection
To disable FRP, remove all GoogleAccountsfromthe device.
1.From a Home screen,tap Apps >
  Settings.
2.Tap Accounts > Google.
•Ifyou have morethan one GoogleAccount set up onyourdevice,tapthe GoogleAccountyou want to remove.
3.Tap  Moreoptions > Remove account.
Set Up Your Device
– or –
To create a newSamsung account orset upyour
Samsung account on your device at any time, use Accounts settings.
1.From a Home screen,tap Apps >
  Settings.
2.Tap Accounts.
3.Tap Addaccount > Samsungaccount.
13
Add an Email Account
Usethe Email apptoviewand manage allyouremail accounts in one app.
When you turn on your device for the first time, set upyourexisting email account orcreate a newemail account.
– or –
To create a newemail account orset upyouremail account on your device at any time, use Accounts settings.
1.From a Home screen,tap  Apps >
  Settings.
2.Tap Accounts.
3.Tap  Addaccount > Email.
Transfer Data from Your Old Device
Easilytransferyourphotos,videos, music, apps and more with Samsung Smart Switch™.
Get started today at samsungsmartswitch.com.
Set Up Your Voicemail
You can accessyourvoicemailfrom a Home screen.
1.Fromthe Home screen,tap Phone, and touch and hold the

 1 key.
2.Followthetutorialto create a password, record a greeting, and record your name.
For more information on voicemail, see
“Voicemail”onpage89.
Set Up Your Device |
14 |
Learn About Your Device
Learn some of the key features of your mobile device, including the screens and icons, as well as how to navigate the device and enter text using the keyboard.

Front View
Microphone |
|
|
|
|
|
|
|
|
Earpiece |
|
|
|
|
|
|
|
|
|
|||
Front camera |
|
|
|
|
|
|
|
|
Proximity sensors |
|
|
|
|
|
|
|
|
|
|||
|
|
|
|
|||||||
|
|
|
|
|
||||||
Volume keys |
|
|
|
|
|
|
|
|
|
Power key |
|
|
|
|
|
|
|
|
|
||
|
|
|
|
|
|
|
|
|
|
|
|
|
|
|
|
|
|
|
|
||
Recent apps |
|
|
|
|
Back |
|
|
|
|||||
Home key |
|
|
|
|
|
|
|
|
|
|
|
|
|
Devices and software are constantly evolving — the illustrations you see here are for reference only.
Learn About Your Device |
16 |
•Proximity sensor
-- Turns off the screen and disables touch functionality when the device is in close proximity to the human body.
-- Turns the screen back on and enables touch functionality when the device is outside a specific range from the human body.
•Power key
-- Briefly press to turn on or off the screen.
-- Press and hold to select a power control option.
•Home key
-- Press and hold to launch Google.
-- Press twice to launch the camera.
•Volume keys
-- Adjust the volume for ringtones, calls, or notifications.
-- In the camera app, press a volume key to take a photo.
Learn About Your Device |
17 |
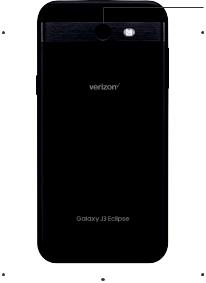
Back View
 Rear camera
Speaker |
|
|
|
Flash |
|
|
|
Headset jack |
|
|
|
|
Microphone |
|
|
|
|
USB charger/Accessory port
Devices and software are constantly evolving — the illustrations you see here are for reference only.
Learn About Your Device |
18 |
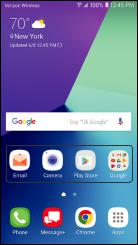
Home Screen
 Status bar
 App shortcuts
 Home screen indicator
Devices and software are constantly evolving — the illustrations you see here are for reference only.
Learn About Your Device |
19 |
Status Bar
The Status bar at the top of the Home screen provides device information (such as network status, battery charge, and time) on the right side and notification alerts on the left.
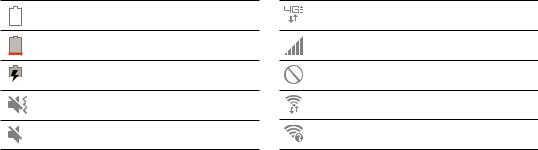
Status Icons
Battery full
Battery low
Battery charging
Vibrate mode
Mute mode
4G LTE™ active
Signal strength
Network not available
Wi-Fi active
Wi-Fi available
Learn About Your Device |
20 |

Notification Icons
Missed call
Call in progress
Call on hold
New email
New Gmail
New voicemail
New message
File download in progress
File upload in progress
GPS active
App updates available
App updates complete
Learn About Your Device |
21 |

Notification Panel
 Settings
Quick settings
 View all
Notification cards
Devices and software are constantly evolving — the illustrations you see here are for reference only.
Learn About Your Device |
22 |

View the Notification Panel
You can access the Notification panel from any
Home screen.
1.Drag the Status bar down to display the
Notification panel.
2.Swipe down the list to see notification details.
•To open an item, tap it.
•To clear a single notification, drag the notification left or right.
•To clear all notifications, tap Clear all.
3.Drag upward from the bottom of the screen or tap  Back to close the Notification panel.
Quick Settings
In addition to notifications, the Notification panel also provides quick access to device functions such as Wi-Fi, allowing you to quickly turn them on or off.
To view additional Quick settings and customize the Quick settings that display:
1.Drag the Status bar down to display the
Notification panel.
2.Drag  View all downward.
•Tap a setting to turn it on or off.
•Tap  Moreoptionsto edit Quick settings orto changethe button layout.
3.Drag  View all upward to close the
Quick settings.
Learn About Your Device |
23 |
 Loading...