


user manual manual de usario
DTA800B1
www.1800customersupport.com/RCA
It is important to read this instruction book prior to using your new product for the rst time. Es importante leer este manual antes de usar por vez primera su equipo.
FCC information
RCA
DTA800B1
Equipment tested for compliance as a complete unit
This device complies with part 15 of the FCC Rules. Operation is subject to the following two conditions:
(1) This device may not cause harmful interference, and (2) this device must accept any interference received, including interference that may cause undesired operation.
This equipment has been tested and found to comply with the limits for a Class B digital device, pursuant to part 15 of the FCC Rules. These limits are designed to provide reasonable protection against harmful interference in a residential installation. This equipment generates, uses and can radiate radio frequency energy and, if not installed and used in accordance with the instructions, may cause harmful interference to radio communications.
However, there is no guarantee that interference will not occur in a particular installation. If this equipment does cause harmful interference to radio or television reception, which can be determined by turning the equipment o and on, the user is encouraged to try to correct the interference by one or more of the following measures:
•Reorient or relocate the receiving antenna.
•Increase the separation between the equipment and receiver.
•Connect the equipment into an outlet on a circuit di erent from that to which the receiver is connected.
•Consult the dealer or an experienced radio/TV technician for help.
WARNING: Changes or modi cations to this unit not expressly approved by the party responsible for compliance could void the user's authority to operate the equipment.
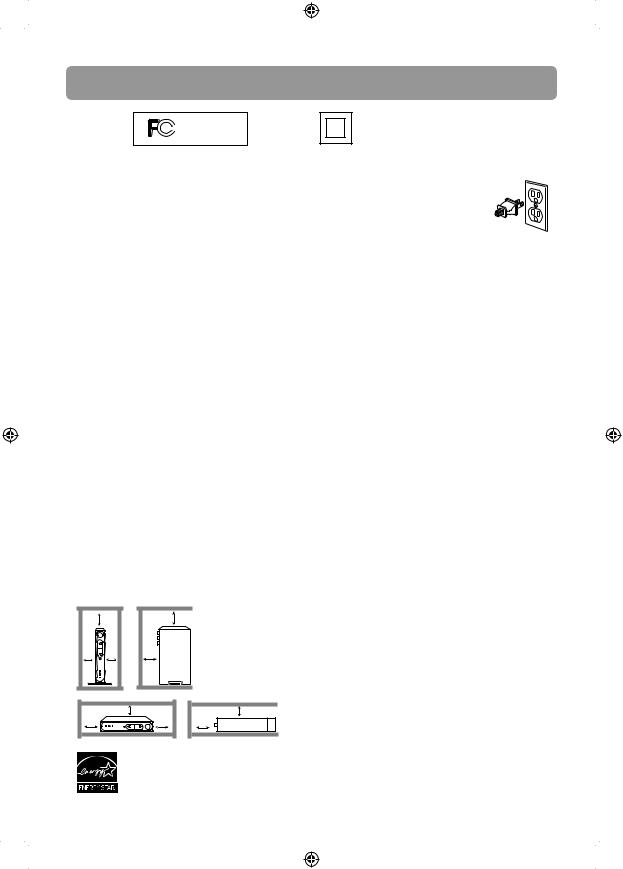
Ventilation
Y ou must adequately ventilate the product. M ake sure there is adequate space around the unit to provide proper air flow for ventilation. See diagram.
7 cm |
|
7 cm |
|
10 cm |
10 cm |
10 cm |
|
|
|
7 cm |
7 cm |
10 cm |
|
10 cm |
10 cm |
This converter box has earned the
ENERGY STAR.
2
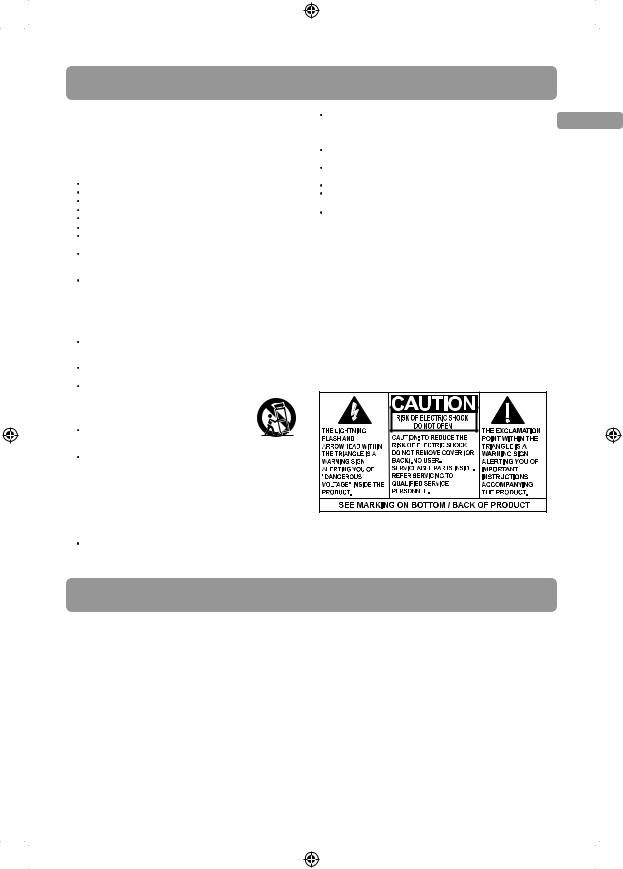
This symbol indicates that this product incorporates double insulation between the hazardous mains voltage and user accessible parts.
For your safety
The AC power plug is polarized (one
blade is wider than the other) and only ts into AC power outlets one way. If the plug won’t go into the
outlet completely, turn the plug over
and try to insert it the other way. If it still won’tt, contact a quali ed electrician to change the outlet, or use a di erent one. Do not attempt to bypass this safety feature.
Removing the power plug is the only way to completely remove power from your product. Make sure the power plug remains easily accessible.
For your records
Keep your sales receipt for proof of purchase to obtain warranty parts and service.
In the event that service should be required, you may need both the model number and the serial number. In the space below, record the date and place of purchase, and the serial number:
Date of Purchase :
Place of Purchase :
Serial No. :
Important battery precautions
Any battery may present a risk of re, explosion, or chemical burn if abused. Do not try to charge a battery that is not intended to be recharged, do not incinerate, and do not puncture.
•Non-rechargeable batteries, such as alkaline batteries, may leak if left in your product for a long period of time. Remove the batteries from the product if you are not going to use it for a month or more.
•If your product uses more than one battery, do not mix types and make sure they are inserted correctly. Mixing types or inserting incorrectly may cause them to leak.
•Discard any leaky or deformed battery immediately. They may cause skin burns or other personal injury.
•Do not expose batteries to excessive heat (for example, by leaving them in sunlight or close to re).
•Please help to protect the environment by recycling or disposing of batteries according to federal, state, and local regulations.
DTA800B1_IB_EN_E_V3
Important safety instructions
Please read and save for future reference
Some of the following information may not apply to your particular product; however, as with any electronic product, precautions should be observed during handling and use.
Read these instructions. K eep these instructions. Heed all warnings.
Follow all instructions.
Do not use this apparatus near water. Clean only with dry cloth.
Do not block any ventilation openings. Install in accordance with the manufacturer´s instructions.
Do not install near any heat sources such as radiators, heat registers, stoves, or other apparatus (including amplifiers) that produce heat.
Do not defeat the safety purpose of the polarized or grounding-type plug. A polarized plug has two blades with one wider than the other. A grounding type plug has two blades and a third grounding prong. The wide blade or the third prong are provided for your safety. If the provided plug does not fit into your outlet, consult an electrician for replacement of the obsolete outlet.
Protect the power cord from being walked on or pinched particularly at plugs, convenience receptacles, and the point where they exit from the apparatus.
Only use attachments/accessories specified by the manufacturer.
Use only with the cart, stand, tripod, bracket, or table speci ed by the manufacturer, or sold with the
apparatus. W hen a cart is used, use caution
when moving the cart/apparatus combination to avoid injury from tip-over.
Unplug this apparatus during lightning storms or when unused for long periods of
time.
Refer all servicing to qualified service personnel. Servicing is required when the apparatus has been damaged in any way, such as power-supply cord or plug is damaged, liquid has been spilled or objects have fallen into the apparatus, the apparatus has been exposed to rain or moisture, does
not operate normally, or has been dropped.
Always leave sufficient space around the product for |
EN |
ventilation. Do not place product in or on a bed, rug, in a |
|
bookcase or cabinet that may prevent air flow through vent |
|
openings. |
|
Do not place lighted candles, cigarettes, cigars, etc. on the |
|
product. |
|
Connect power cord only to AC power source as marked on |
|
the product. |
|
Care should be taken so that objects do not fall into the product. |
|
Do not attempt to disassemble the cabinet. This product |
|
does not contain customer serviceable components. |
|
W here the main plug or an appliance coupler is used as the |
|
disconnect device,the disconnect device shall remain readily |
|
operable. |
|
If your product operates on |
|
batteries |
|
Adhere to the following precautions:
A . Any battery may leak electrolyte if mixed with a different battery type, if inserted incorrectly, or if all batteries are not replaced at the same time.
B.Any battery may leak electrolyte or explode if disposed of in fire or an attempt is made to charge a battery not intended to be recharged.
C.Discard leaky batteries immediately. Leaking batteries can cause skin burns or other personal injury. W hen discarding batteries, be sure to dispose of them in the proper manner, according to your state/provincial and local regulations.
D.Battery shall not be exposed to excessive heat such as sunshine, re or the like.
Additional safety information
Apparatus shall not be exposed to dripping or splashing and no objects filled with liquids, such as vases, shall be placed on the apparatus.
WARNING :TO PREVENT FIRE OR ELECTRICAL
SHOCK HAZARD, DO NOT EXPOSE THIS PRODUCT TO RAIN OR MOISTURE.
Contents |
|
Box contents ................................... |
4 |
Setting up ......................................... |
4 |
Program the supplied remote |
|
control ............................................... |
6 |
General controls ............................ |
7 |
Menu settings ................................. |
8 |
Display 16:9 contents .................. |
11 |
Watching non-digital over-the-air |
|
TV broadcasts ................................. |
12 |
Closed captioning on the |
|
Converter Box .................................. |
12 |
More information ......................... |
13 |
3
DTA800B1_IB_EN_E_V3

Box contents
The following items are included:
RCA Digital TV Converter Box |
RF coaxial cable |
|
||
Quick Start |
User Manual |
+ |
- |
|
Guide |
(this booklet) |
+ |
- |
|
|
|
2 AAA Batteries |
Remote control |
|
Setting up
Step 1: Installation
The Converter Box can be installed either horizontally or vertically. The left side of the Converter Box can be rotated as a stand for vertical installation.
Bottom view
Vertical installation (recommended)
Step 2: Connections
Option 1: Basic connection to TV
TV
ANTENNA |
|
AUDIO IN |
|
VIDEO IN |
L |
R |
2 |
|
(Optional) |
4 |
5 |
AC120V |
|
|
|
|
|
60Hz |
ANTENNA IN |
OUTPUT CH3 |
CH4 VIDEO L AUDIO |
R |
SMART ANTENNA IN |
AC~120V |
|
TO TV |
|
|
|
|
1 |
|
3 |
|
|
|
From antenna |
|
|
|
|
|
Tip: Using the optional Audio/Video cable  connection provides better picture quality
  in case your TV set has Audio/Video input available.
4
Horizontal installation
1Connect your existing antenna cable to the ANTENNA IN jack of the Converter Box.
2Connect the RF coaxial cable (supplied) from the OUTPUT TO TV jack of the Converter Box to the ANTENNA jack of the TV set.
3Slide the CH3/CH4 selector on the back of the Converter Box to the channel that is not in use in your area. The Converter Box will send its video signal to either Channel 3 or 4 on your TV.
4Connect the Audio/Video cables (not supplied) from the Audio /Video OUT jacks (yellow, white, red) of the Converter Box to the Audio/Video IN jacks on the TV set. If there are more than two sets of Audio/Video jacks on the TV set, connect only either INPUT1 or INPUT2 to those of your converter box.
5Connect the AC power cable of the Converter Box to a suitable wall outlet.
Note: You may choose to connect the RF coaxial  cable to TV, or Audio/Video cables to TV,
  or both the RF coaxial cable and AV cables to TV.
DTA800B1_IB_EN_E_V3
Setting up (continue)
Option 2: If you also need to connect your VCR
TV
ANTENNA |
3 |
|
|
|
|
|
|
|
|
|
|
|
4 |
|
|
|
|
ANTENNA OUT |
|
|
|
VCR |
|
|
|
|
|
|
|
|
CH4 CH3 |
|
|
|
6 |
ANTENNA IN |
|
|
|
|
|
2 |
5 |
|
|
AC120V |
|
|
|
|
|||
ANTENNA IN |
OUTPUT CH3 |
CH4 VIDEO |
L AUDIO R |
SMART ANTENNA IN |
AC~120V |
|
TO TV |
|
|
|
|
Back of the RCA converter box
1
From antenna
Note:  The SMART ANTENNA IN jack lets you connect
  a Smart Antenna. Refer to the antenna’s user manual
for proper connection.
Smart Antenna provides improved reception. For more information, please consult your TV dealer.
1 Connect your existing antenna cable to the ANTENNA IN jack
of the Converter Box. |
EN |
|
2Connect the RF coaxial cable* (supplied) from the OUTPUT TO TV jack of the Converter Box to the ANTENNA IN jack of the VCR.
3Connect the RF coaxial cable* (not supplied) from the ANTENNA OUT jack of the VCR to the ANTENNA IN jack of the TV set.
4Slide the CH3/CH4 selector on the back of the VCR to the channel that is not in use in your area. The VCR will send its video signal to either Channel 3 or 4 on your TV.
5Slide the CH3/CH4 selector on the back of the Converter Box to the channel that is not being used by the VCR; e.g., if you set the VCR selector to CH3, slide the Converter Box selector to CH4.
6Connect the AC power cable of the Converter Box to a suitable wall outlet.
*You can also use Audio/Video cables (similar to option 1) if the connection jacks are available on the VCR and TV.
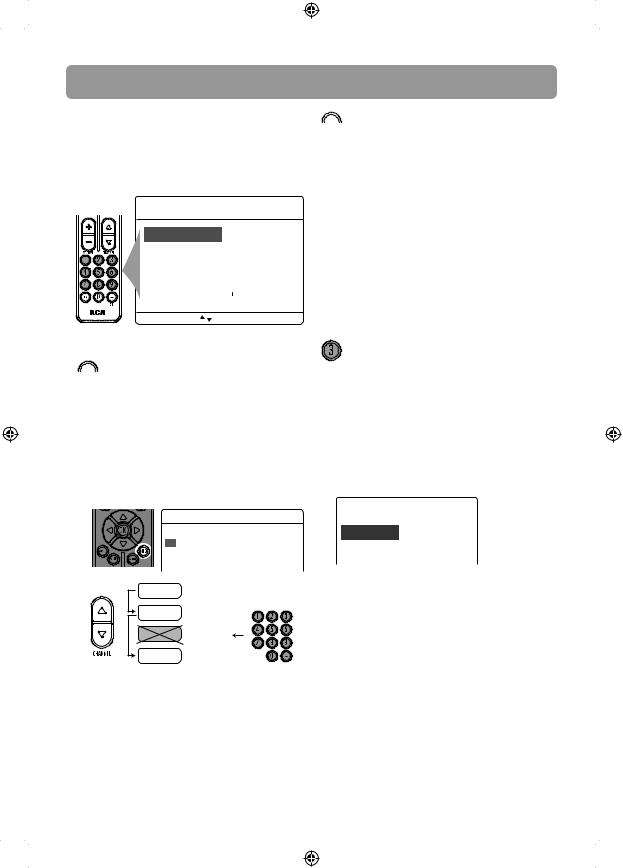
Step 3: Initial setup of the Converter Box
1.Press BOX  on the remote control to turn on the
Converter Box. The green indicator on front panel will turn ON.
•Make sure your TV is on the correct channel (either 3 or 4) or INPUT or VIDEO mode.
Refer to your TV manual for further instructions.
•The following screen can be seen on your TV when the correct channel is chosen.
Language
Choose the language to be used in the menu system.
English - 1 Menu text is displayed in English.
Español - 2 El texto del menú se exhibe en español.
Français - 3 Le texte des menus est affiché en français.
2.Press 1 (for English), 2 (for Spanish) or 3 (for French) to select the menu language.
Language
Choose the language to be used in the menu system.
English - 1 Menu text is displayed in English.
Español - 2 El texto del menú se exhibe en español.
Français - 3 Le texte des menus est affiché en français.
3. Press 1 to start automatic channel search.
Channel Scan
Channel scan will search for channels available in your area. You may have to re-adjust the antenna and retry the scan to capture all available channels.
Begin - 1 Start channel search.
•If you cannot see the above screen on your TV set, check if :
a)the converter box has been turned on,
b)your TV is on the correct channel (either 3 or 4) or INPUT
or VIDEO mode. Refer to your TV manual for further instructions.
c)you have correctly connected the TV set with the Converter Box.
•If you still do not see the above screen, follow the following steps to reset the Converter Box to factory reset status:
-From the “No Signal” screen, press MENU key ;
-Press “5”, “6”, “2” then you should see the above screen and please continue the setup.
•When the scan nishes, the Channel List menu displays the found channels.
•Reposition the antenna and perform the automatic channel scan again if you cannot nd all available channels by pressing MENU key.
•The Converter Box is also compatible with Smart Antennas which can provide improved reception over standard indoor
antennas.
•If a Smart Antenna is connected, press 1 for Quick Scan or 2 for Full Scan. A full scan with Smart Antenna may take around 40-50 minutes.
5
DTA800B1_IB_EN_E_V3 

Setting up (continue)
4. The Channel List is displayed once scanning is nished. Press  or
or to select channel and OK to start viewing.
Channel List
Channel |
|
What's on Now |
What's on Next |
|
2-1 |
KTVU |
Stored |
Current program |
Next program |
2-2 |
KTVU |
Stored |
Current program |
Next program |
4-1 |
KRON Stored |
Current program |
Next program |
|
•You may also hide unwanted channels, refer to “Channel List” on page 8 for details.
Your Converter Box is now ready for use!
Tip:
To continue to view non-digital TV broadcasts,  if available, press the BOX
  on your remote to place the Converter Box in stand-by mode (amber light), then switch your TV to channel 3 or 4 (depending on which channel the Converter ‘s CH3/CH4 selector switch is set to).
You must have the RF coaxial cable connected to your TV input, in order to watch non-digital TV broadcasts.
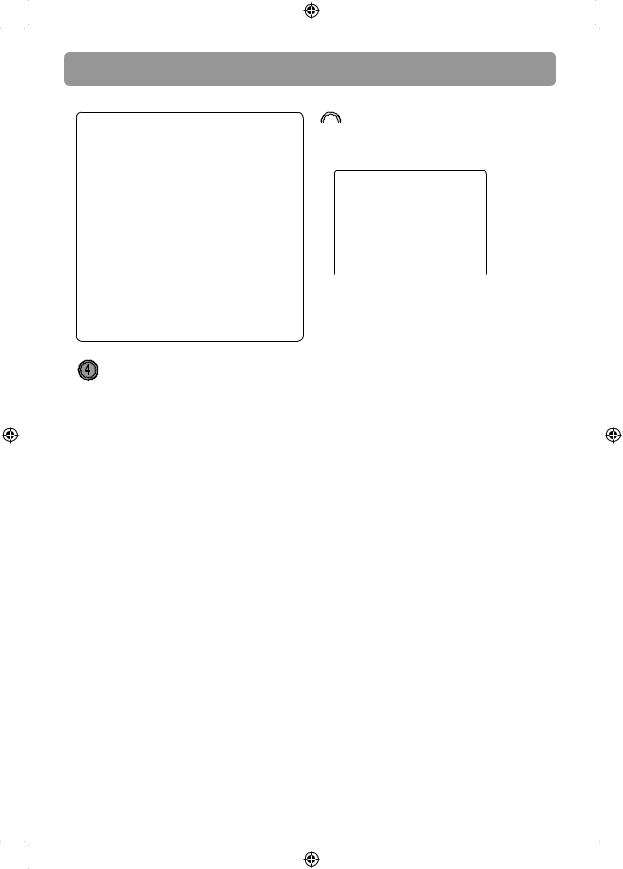
Program the supplied remote control
You can control TV sets of all major brands after programming the Converter Box remote control with the PGM key. RCA
TV sets can be controlled directly without programming. Refer to the steps below and the separate Program Code lea et to guide you through the programming.
1.Refer to the Program Code at the last page of this booklet. Look for the brand of your TV set and a 3-digit program code next to it. There may be more than one program code available. Choose any one of them.
Program codes/Códigos de programa
Admiral 002, 128, 183, 189
Advent 191, 258, 260, 275
Adventura 129
2.Press PGM on the remote control. The signal indicator on it remains lit.
signal indicator
3.Enter the 3-digit program code with the number keys. Press OK for con rmation. The signal indicator will be o when the program is done.
4. Press the volume keys on this remote control to check if they can adjust the volume of your TV set.
• If you fail to control your TV set, 


 repeat steps 2 to 4 to program again. Try another program code if there is more
than one for your TV brand.
•If the signal indicator remains lit after blinking four times, you may have entered the wrong code. Repeat steps 3 to 4 to program again. Make sure you have correctly entered the code.
•You can still use your TV remote control to turn on your TV set, select input source and control the volume.
6
DTA800B1_IB_EN_E_V3
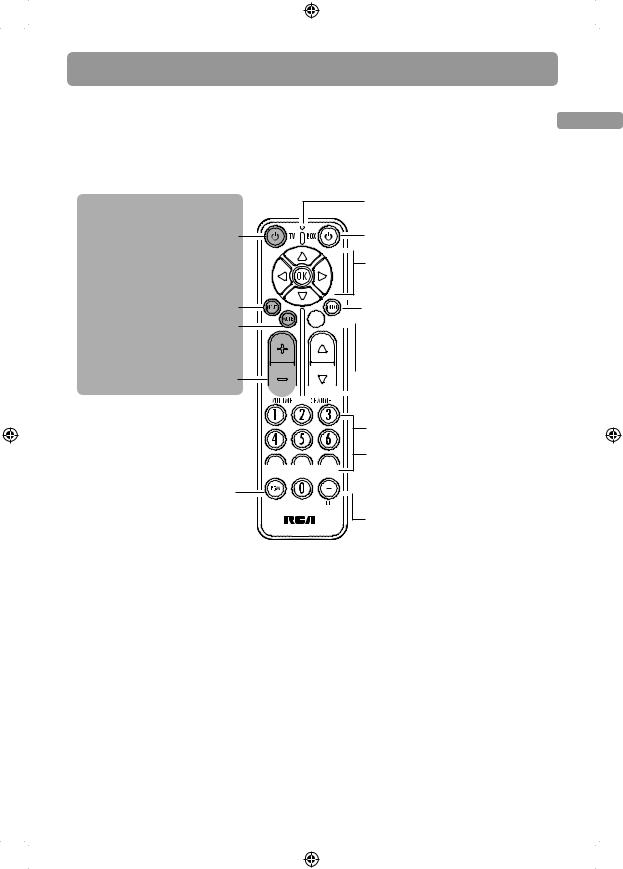
General controls
• The keys on the Converter Box remote control are divided into two parts. The keys
shown in white in the diagram below control the Converter Box, while the grey keys EN control your TV set.
•You can control TV sets of all major brands after programming this remote control with the PGM key. RCA TV sets can be controlled directly without programming. Refer to “Program the supplied remote control” section for details.
TV controls ONLY
Turns the TV on or o
Selects CH3, CH4 or AV INPUT channels on the TV
Mutes or restores sound output from the TV (if the TV
supports this function)
Adjusts the TV volume
Programs the remote control so that it can control your TV set. Refer to “Program the supplied remote control” for details
Signal indicator
Turns the converter box on or o
 Navigates through the converter box menus (e.g., to move right, press
  )
)
Press OK to con rm menu selections


 Shows or hides channel information
(it is possible to receive some programs from di erent time zones, the time information might be wrong in this case)


 Shows or hides the main menu


 Selects the previous or next channel
Selects channels by inputting the channel number
Shortcut keys to access functions 


 in the main menu
 Displays closed captioning from the converter box
Inputs a dash (e.g., 12-1) while selecting an ATSC channel with the
number keys (0-9)
Insert 2 “AAA” batteries prior to use.
7
DTA800B1_IB_EN_E_V3
Menu settings
The main menu lets you access more features of the converter box. Press MENU to show or hide the menu. When the menu is displayed, press the number keys on the remote control to access the corresponding menu item directly.
Main Menu
Channel List - 1 See what's on and what's next.
AV Settings - 2 Adjust audio and video settings.
Ratings - 3 Set V-Chip rating limits.
Closed Captioning - 4 Captions Fonts and Colors.
Settings - 5 Con guration.
[Menu] Exit, [ |
] Move, [OK] Choose |
Shortcut keys
 Shortcut key
Channel List
•Lists the available TV channels and the programs playing on each channel.
•To change channels, select a channel number and press OK.
•To skip past a channel when pressing the CHANNEL button, select “Stored” next
to the channel name and then press OK . The status changes to “Skipped”.
|
Channel List |
|
|
|
|
Channel |
|
What's on Now |
What's on Next |
|
2-1 KTVU |
Stored |
Current program |
Next program |
|
2-2 KTVU |
Stored |
Current program |
Next program |
|
4-1 KRON Stored |
Current program |
Next program |
|
12-1 |
Stored |
|
||
12-2 |
Stored |
|
||
|
|
|||
12-3 |
Skipped |
|
||
|
|
|||
12-4 |
Stored |
|
||
|
|
|||
Select |
|
|
|
|
“Stored” |
|
|
Select any channels |
|
channels |
|
including “Skipped” ones |
||
8
 Shortcut key
AV Settings
•Change the video display and sound output formats.
•Press 1 for Picture or 2 for Audio Controls.
–Picture : Press 1 for Widescreen or 2 for Fullscreen .
– Audio Controls : Press 1 for Stereo, or 2 for Alternate Audio (for bilingual programs). When Alternate Audio
is selected, press OK on the remote control to switch between main and alternate languages while watching TV.
Shortcut key
Ratings
•This feature enables you to restrict access to certain TV programs whose content may be deemed unsuitable for your children. Viewing is restricted unless
the password (initial default password: 0000) that you have chosen is entered. Password is also required before entering the rating menu.
•Three sub-menus are available:
Ratings
Lock/Unlock - 1 Turn ON/OFF rating enforcement
Rating Limits - 2 Set rating limits
Change PIN - 3 Change password number
•Press 1 for Lock/Unlock: to activate or deactivate the rating feature.
–Lock/Unlock : Press 1 to select OFF (to de-activate the rating feature, even
if you have de ned certain settings in the Rating Limits menu) or press
2 to select ON (to activate the rating feature) or press 3 to select ON/ Enable (to activate the rating feature and enable downloadable ratings).
DTA800B1_IB_EN_E_V3
Menu settings
• Press 2 for Rating Limits
Rating Limits
TV Shows - 1 TV shows and made for TV Movies
Movies - 2 Motion picture movies
Custom - 3 Downloaded rating systems
–Rating Limits: Press 1 for TV Shows , press 2 for Movies , press 3 for Custom (only available when ON/Enable is selected in Lock/Unlock menu)
•TV Shows: To change the TV parental ratings by pressing OK against desired rating level. A padlock icon tells you whether or not a rating level is locked.
TV-Y |
|
|
|
|
TV-Y7 |
|
|
|
FV |
TV-G |
|
|
|
|
TV-PG |
D |
L |
S |
V |
TV-14 |
D |
L |
S |
V |
TV-MA |
|
L |
S |
V |
–In the above example, all TV programs rated above TV-PG require the password for viewing.
•Movies: To change the movie
parental ratings by pressing OK against desired rating level. A padlock icon tells you whether or not a rating level is locked.
G - 1
PG - 2
PG-13 - 3
R - 4
NC-17 - 5
–In the above example, all movies rated PG or above require the
password for viewing.
•Custom: To update the current TV
show and Movies ratings when new releases are available.
–Press the corresponding number key to select the program restrictions. They include: Entire Audience (1), Dialogue (2), Language (3), Sex (4), Violence (5), Children (6), Fantasy violence (7), MPAA (8).
• Press 3 for Change PIN |
EN |
|
• To change the password for ratings. |
||
|
||
• The initial default password is “0000”, |
|
|
you must change it and create your own |
|
|
password to activate the rating settings. |
|
|
After the rating settings are done, do |
|
|
not forget to activate them by selecting |
|
|
ON in the Lock/Unlock menu. |
|
Parental Controls, popularly known as the “V-Chip,” depend on information sent by broadcasters about speci c programs. Two ratings systems are available for you to use to screen inappropriate content for your family.
TV shows can be rated by broadcasters based on the following Age and Content-based Guidelines:
•TV-Y (All Children – This program is designed to be appropriate for all children.)
•TV-Y7 (Directed to Older Children – This program
is designed for children age 7 and above.) The program may contain fantasy violence (FV).
•TV-G (General Audience – Most parents would  this program suitable for all ages.)
•TV-PG (Parental Guidance Suggested – This
program contains material that parents may  unsuitable for younger children.) The program may contain one or more of the following: moderate violence (V), some sexual situations (S), infrequent coarse language (L), or some suggestive dialogue
(D).
•TV-14 (Parents Strongly Cautioned – This program contains some material that many parents would
 nd unsuitable for children under 14 years of age.) Parents are strongly urged to exercise greater care in monitoring this program and are cautioned against letting children under the age of 14 watch unattended. This program contains one or more of the following: intense violence (V), intense sexual situations (S), strong coarse language (L), or intensely suggestive dialogue (D).
•TV-MA (Mature Audience Only – This program is designed to be viewed by adults and therefore may be unsuitable for children under 17.) This program contains one or more of the following: graphic violence (V), explicit sexual activity (S), or crude indecent language (L).
9
DTA800B1_IB_EN_E_V3
Menu settings
Some programmers use the Movie Ratings (MPAA) System to rate TV shows on the same scale as motion pictures:
•A G -rated motion picture contains nothing in theme, language, nudity, sex, violence or other matters that would o end parents whose younger children view the motion picture.
•A PG -rated motion picture should be investigated by parents before they let younger children attend.
•A PG-13 rating is a sterner warning to parents to determine whether their children under age 13 should view the motion picture, as some material might not be suited for them.
•An R -rated motion picture contains some adult material.
•An NC-17 rated motion picture is one that
most parents would consider too adult for their children.
For more information about TV ratings, visit: www.PauseParentPlay.org
Shortcut key
Closed Captioning
•Lets you change the closed caption appearance (size, font, text color, text opacity, background color, background, edge e ect and edge color).
•Press 1 (Font Options) to change font size, color and e ects, 2 (Back Options) to change background size, color and e ects or 3 (Default) to reset to default settings.
•Only digital closed captions can be changed.
•For more information, see “Advantages of closed captioning on the Converter Box”.
10
 Shortcut key
Settings
• Five sub-meus are available:
Settings
Channel Scan - 1 |
Search for valid channels. |
Language - 2 |
Select language used in menu. |
Power Saver - 3 |
Turns off power automatically. |
Antenna - 4 |
Signal strength meter. |
Time Zone - 5 |
Setting of local time. |
System Reset - 6 |
Return system to factory settings. |
• Press 1 for Channel Scan
–To start automatic channel scan.
–To scan more channels (Scan Add) after adjusting your antenna
–Enable the “Scan Add” option if you only want to scan more channels with keeping
existing channel list.
• Press 2 for Language
– To select the menu language.
• Press 3 for Power Saver
–An energy saving feature to turn o the converter box automatically after 4
(default), 8 or 12 hours according to your selection. Select OFF to de-activate this feature.
–The timer is only active when the converter box remains idle (i.e. no key activation). Once any “Box” key is pressed, the timer will be reset.
–If you have set up timer recordings for TV programs, make sure the converter box will not turn o automatically before the recordings nish.
• Press 4 for Antenna
–To show the signal strength for receiving broadcast from a TV station. If signal is weak, you may need to reposition the antenna.
• Press 5 for Time Zone
–To select your local time zone
–To enable or disable Daylight Saving Time.
• Press 6 for System Reset
– To restore all settings to factory defaults.
DTA800B1_IB_EN_E_V3 
 Loading...