


RCD147
EN
FCC information
This device complies with Part 15 of the FCC Rules.
Operation is subject to the following two conditions: (1)
This device may not cause harmful interference, and (2)
this device must accept any interference received,
including interference that may cause undesired
operation.
In accordance with FCC requirements, changes or
modifications not expressly approved by Thomson Inc.
could void the user’s authority to operate this product.
This device generates and uses radio frequency (RF)
energy, and if not installed and used properly, this
equipment may cause interference to radio and television
reception.
If this equipment does cause interference to radio or
television reception (which you can determine by
turning the equipment off and on), try to correct the
interference by one or more of the following measures:
• Reorient the receiving antenna (that is, the antenna
for the radio or television that is "receiving" the
interference).
• Move the unit away from the equipment that is receiving
interference.
• Plug the unit into a different wall outlet so that the
unit and the equipment receiving interference are on
different branch circuits.
If these measures do not eliminate the interference, please
consult your dealer or an experienced
radio/television technician for additional suggestions.
Also, the Federal Communications Commission has
prepared a helpful booklet, "How To Identify and Resolve
Radio TV Interference Problems." This booklet is available
from the U.S. Government Printing Office, Washington,
DC 20402. Please specify stock number 004-000-00345-4
when ordering copies.
This product complies with DHHS Rules 21 CFR Subchapter
J. Applicable at the date of manufacture.
Technical Information
Product: Portable CD Radio with Digital Radio
Brand: RCA
Model: RCD147
Electrical Consumption
Power Supply: 120V ~ 60Hz
Power Consumption: 18 Watts
IMPORTER
Comercializadora Thomson de México,
S.A. de C.V.
Álvaro Obregón No. 151. Piso 13.
Col. Roma. Delegación Cuauhtémoc
C.P. 06700. México, D.F.
Telefono: 52-55-11-020360
RFC: CTM-980723-KS5
For Your Safety
The AC power plug is polarized (one
blade is wider than the other) and
only fits into AC power outlets one
way. If the plug won’t go into the
outlet completely, turn the plug over
and try to insert it the other way. If
it still won’t fit, contact a qualified
electrician to change the outlet, or use a different one.
Do not attempt to bypass this safety feature.
CAUTION: TO PREVENT ELECTRIC SHOCK, MATCH WIDE
BLADE OF PLUG TO WIDE SLOT, FULLY INSERT.
For Your Records
In the event that service should be required, you may need
both the model number and the serial number. In the
space below, record the date and place of purchase, and
the serial number:
Model No.
Date of Purchase
Place of Purchase
Serial No.
Service Information
This product should be serviced only by those specially
trained in appropriate servicing techniques. For
instructions on how to obtain service, refer to the
warranty included in this Guide
WARNING:
TO PREVENT FIRE
OR ELECTRICAL
SHOCK HAZARD,
DO NOT EXPOSE THIS PRODUCT
TO RAIN OR MOISTURE.
SEE MARKING ON BOTTOM / BACK OF PRODUCT
CAUTION
RISK OF ELECTRIC SHOCK
DO NOT OPEN
THE EXCLAMATION
POINT WITHIN THE
TRIANGLE IS A
WARNING SIGN
ALERTING YOU OF
IMPORTANT
INSTRUCTIONS
ACCOMPANYING
THE PRODUCT.
THE LIGHTNING
FLASH AND ARROW-
HEAD WITHIN THE
TRIANGLE IS A
WARNING SIGN
ALERTING YOU OF
"DANGEROUS
VOLTAGE" INSIDE
THE PRODUCT.
CAUTION: TO REDUCE THE
RISK OF ELECTRIC SHOCK,
DO NOT REMOVE COVER
(OR BACK). NO USER-
SERVICEABLE PARTS IN-
SIDE. REFER SERVICING
TO QUALIFIED SERVICE
PERSONNEL.

EN
Contents
FCC information
Before you begin ................................... 1
General controls ..................................... 2
Remote Control Battery
Installation ................................................. 3
Display .................................................... 3
Settings ................................................... 4
Setting Clock .............................................. 4
Setting the Date ........................................ 4
Volume Control ......................................... 4
Boosting Bass ............................................. 4
Preset Equalizer Curves ............................. 4
Radio ....................................................... 5
Tuning to a Station ................................... 5
Setting Preset Manually ............................ 5
Auto Preset ................................................ 5
Using Preset ............................................... 5
Before you begin
Note: Look in the battery compartment to
find the AC power cord.
AC Power (For North America)
Plug the power supply
cord into the AC power
jack on the back of the
unit, and into an AC
power supply outlet that
accepts the plug supplied
with your unit.
Battery Power
You can insert 6 D-sized alkaline batteries (not
supplied) and you can take your stereo just
about anywhere.
3 “AA” batteries (not supplied) are needed to
keep radio station memory.
1. Open the battery compartment door (located
at the bottom of the unit) by pushing the tab
in the direction of the arrow and then lifting
1
the door open and off the cabinet.
2. Before inserting the batteries, observe the
polarities (that is, + and -) of the battery,
then relate the polarities to the engraved
diagram on the battery compartment door.
Now insert the batteries.
3. After installation of the batteries, the lid to
cover the batteries. Lightly push it close with
a snap.
Note that the AC line cord must be
unplugged from the jack on the back of
the unit to operate on batteries.
IMPORTANT: Be sure to remove batteries when
storing the set for more than 30 days. Leaky
batteries can badly damage the system. Be sure
to dispose of leaky, weak or dead batteries
properly according to federal, state, and local
regulations. To prevent injury or damage, do
not reverse batteries and do not mix battery
type.
CD Player ................................................ 6
Notes on CD-R/RW .................................... 6
Loading Disc ............................................... 6
Playback ..................................................... 6
Skip/Search ................................................. 6
Pause Playback ........................................... 6
Stop Playback ............................................. 6
Clock/CD Remain ....................................... 6
Play Mode .................................................. 7
Programming ............................................. 7
Exit Program Mode ................................... 7
Clearing Program List ............................... 7
Displaying the Program List ..................... 7
Troubleshooting tips .............................. 8
Maintenance ........................................... 9
More Information ................................ 10
U.S. Limited Warranty ......................... 11
Canadian Warranty .............................. 13
EN
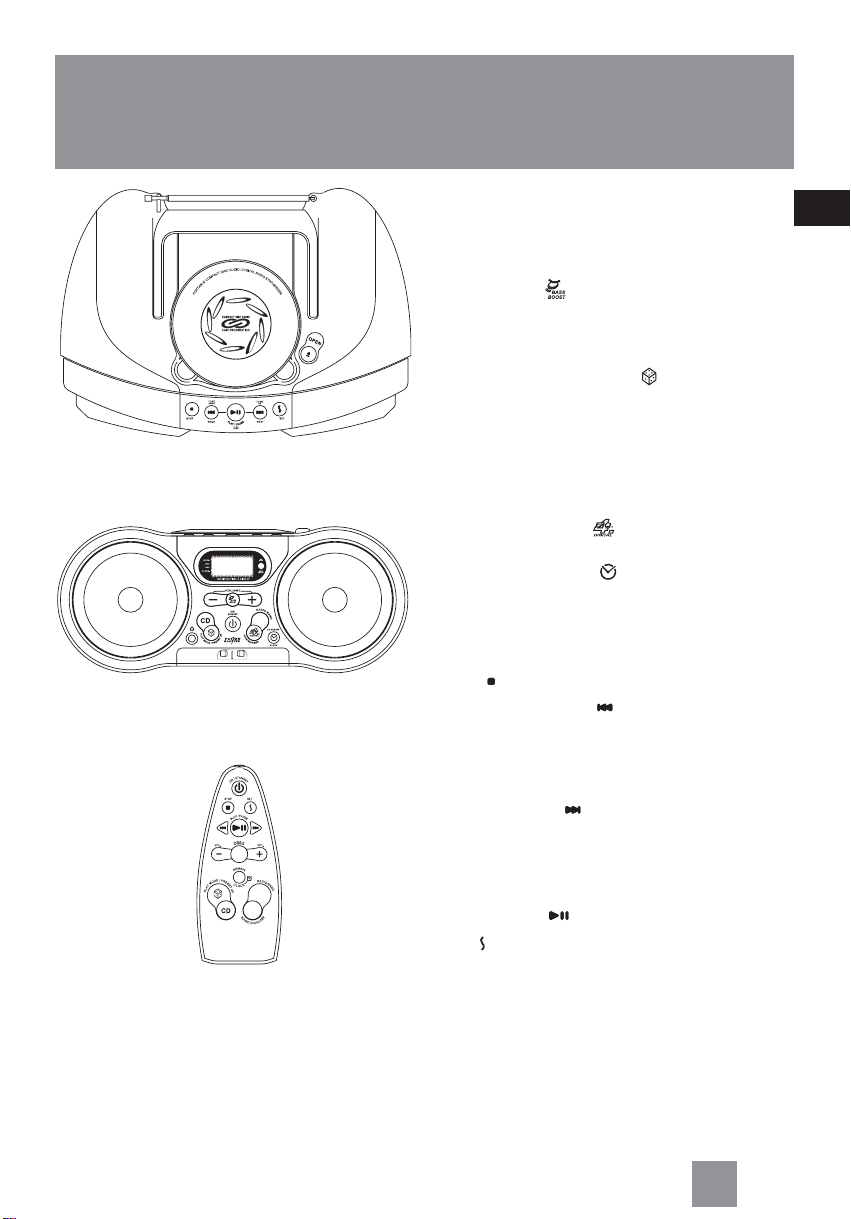
Top View
Front View
Remote Control
General Controls
2
ON / STANDBY – Press to turn on the unit or
go to standby.
VOLUME - / VOLUME + – Increases or
decreases output volume.
BASS BOOST (DBBS on the remote
control) – Turns on/ off digital bass boost
system.
CD – Selects CD function.
PLAY MODE / PRESET UP / – In CD mode -
Selects repeat and random playback options
(repeats 1 track / repeat disc / random
playback); In tuner mode - accesses the next
preset radio channels.
RADIO/BAND – Selects radio function or selects
between AM and FM band.
SOUND EQUALIZER – Selects among
sound effects (Flat / Jazz / Pop / Rock / Classic).
CD REMAIN / CLOCK – Selects between
displaying track elapse time and CD remain
time during CD playback; displays clock time,
date in CD or radio mode
OPEN – opens the CD compartment door.
STOP – Stops CD playback.
TUNE DOWN / BACK - In CD mode -
searches backwards through tracks, skips to the
previous track. In Tuner mode - Tunes down
radio frequency; In clock and date setting mode
- moves backwards when setting time and date.
TUNE UP / NEXT - In CD mode - searches
forwards through track, skips to the next track.
In Tuner mode - Tunes up radio frequency; In
clock and date setting mode - moves forward
when setting time and date.
PLAY / PAUSE – Starts or pauses CD play.
SET – In CD mode - enters program mode; In
tuner mode - sets radio preset channels; enters
clock and date setting mode.
POWER BOOST – Toggles the power boost
function on or off.
OFF /ON
EN
3
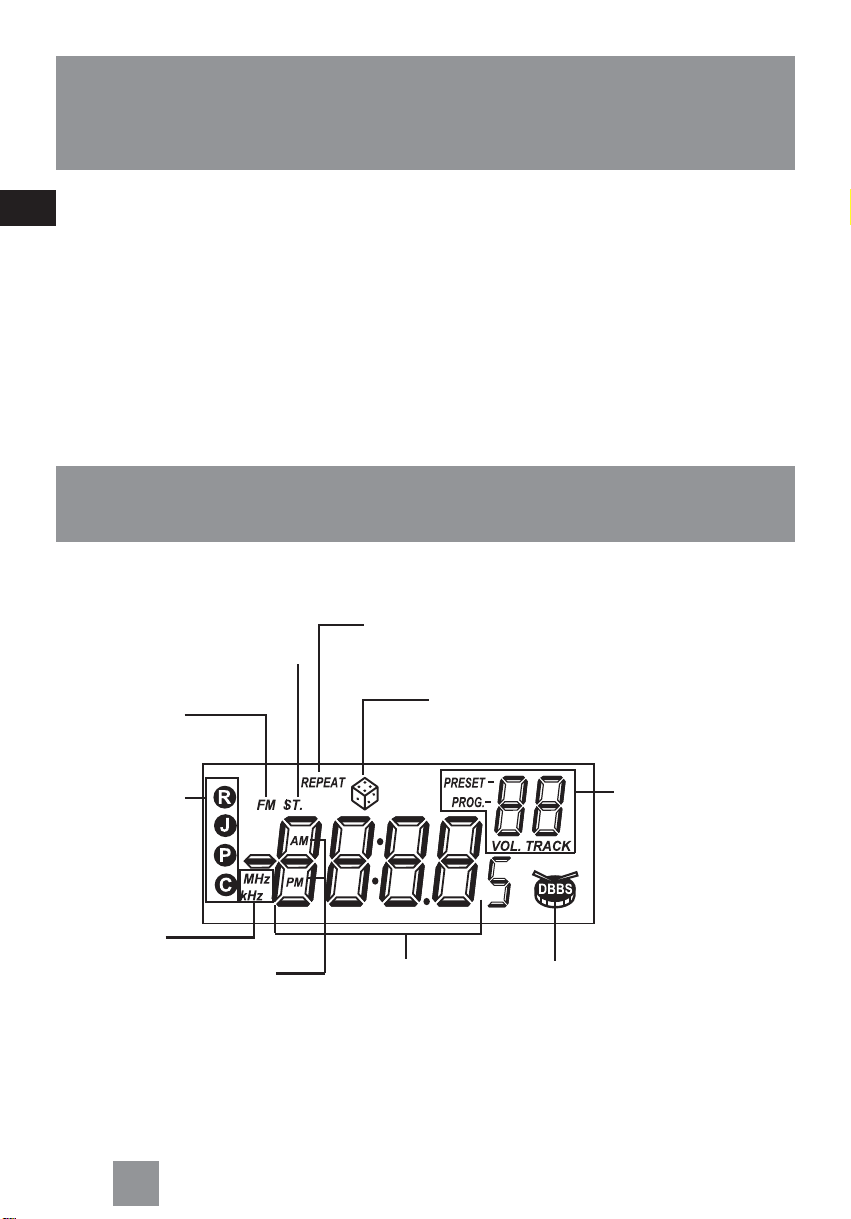
- Volume level when
adjusting volume
In CD mode
- Track number (shows
during disc playback)
- Program location
In Tuner mode
- Preset location
Random
playback
Repeat mode
- REPEAT - repeat whole disc
- flashing REPEAT - repeat
current track
FM stereo
signal is
detected.
- AM / PM indicator
- AM Radio Band
Digital Bass
Boost System
Showing clock, date, elapsed/
remaining playback time,
radio frequency, preset tuner
station, etc.
Preset EQ settings
Rock, Jazz, Pop,
Classic, Flat
Tuner
frequency unit
FM Radio Bands
General Controls
Remote Control Battery
Installation
The remote control must be inserted with 2
“AAA” or “UM-4” or “R03” batteries prior to
use. Follow the steps below to ensure correct
installation.
1. Remove the battery compartment door
(located at the back of the remote control)
by pushing the door in the direction of the
arrow marked OPEN and lifting it off the
cabinet.
2. Before inserting the batteries, observe the
polarities (that is, + and -) of the battery,
then relate the polarities to the engraved
diagram inside the battery compartment.
Now insert the batteries.
3. After installation of the batteries, replace
and fit the battery compartment door to
cover the batteries. Lightly push it close
with a snap.
Display

EN
Settings
4
Setting Clock
1. Press SET when clock time is shown on
display.
The Hour digits flash.
2. Press TUNE DOWN/BACK or TUNE UP/
NEXT to set the hour.
3. Press SET to shift to minute digits.
4. Press TUNE DOWN/BACK or TUNE UP/
NEXT to set minutes.
5. Press SET to confirm settings.
Setting the Date
1. Press CD REMAIN / CLOCK repeatedly
until the date is showing on the display.
2. Press SET . The year digits flash.
3. Press TUNE DOWN/BACK or TUNE UP/
NEXT to set the year.
4. Repeat steps 2 and 3 to set the month and
day.
5. Press SET to confirm settings.
Volume Control
Press VOLUME + / - on the main unit to adjust
volume.
Boosting the Bass
Press BASS BOOST on the main unit or
DBBS on the remote control to turn on the
digital bass boost system. Press again for de-
selection.
Preset Equalizer Curves
Press the SOUND EQUALIZER button to
toggle among the different sound effects.
FLAT,
ROCK,
JAZZ,
POP,
CLASS.
Boosting the Power
Slide POWER BOOST knob to “ON” position on
the main unit to activate the power boost
function which will enhance the output power
of the unit.
Year
Month Day
NoteNote
NoteNote
Note:
Clock time in 12 (AM/PM) hour
format.
TipTip
TipTip
Tip:
If you are in CD or tuner mode,
press
CD REMAIN/CLOCK CD REMAIN/CLOCK
CD REMAIN/CLOCK CD REMAIN/CLOCK
CD REMAIN/CLOCK until
clock time is displayed.
NoteNote
NoteNote
Note:
When the POWER BOOST
function is activated, the unit will
consume more power than normal operation.
Thus the batteries life might be shortened
when using DC power.
 Loading...