


2161-4
DECT 6.0 1.9GHz
Digital Modulation
Cordless Phone
with Caller ID
Please read this manual before operating
product for the first time.
Visit the RCA web site at www.rca4phones.com
Model 2161/2161-2/2161-3/2161-4
Equipment Approval Information
Your telephone equipment is approved for connection to the Public
Switched Telephone Network and is in compliance with parts 15 and 68,
FCC Rules and Regulations and the Technical Requirements for Telephone
Terminal Equipment published by ACTA.
1 Notication to the Local Telephone Company
On the bottom of this equipment is a label indicating, among other
information, a product identifier in the format US:AAAEQ##TXXXX and
Ringer Equivalence Number (REN) for the equipment. You must, upon
request, provide this information to your telephone company.
The REN is useful in determining the number of devices you may connect
to your telephone line and still have all of these devices ring when
your telephone number is called. In most (but not all) areas, the sum
of the RENs of all devices connected to one line should not exceed 5.
To be certain of the number of devices you may connect to your line
as determined by the REN, you should contact your local telephone
company.
A plug and jack used to connect this equipment to the premises wiring
and telephone network must comply with the applicable FCC Part 68
rules and requirements adopted by the ACTA. A compliant telephone
cord and modular plug is provided with this product. It is designed to
be connected to a compatible modular jack that is also compliant. See
installation instructions for details.
Notes
• This equipment may not be used on coin service provided by the
telephone company.
• Party lines are subject to state taris, and therefore, you may not be
able to use your own telephone equipment if you are on a party line.
Check with your local telephone company.
• Notice must be given to the telephone company upon permanent
disconnection of your telephone from your line.
• If your home has specially wired alarm equipment connected to the
telephone line, ensure the installation of this product does not disable
your alarm equipment. If you have questions about what will disable
alarm equipment, consult your telephone company or a qualified
installer.
US Number is located on the cabinet bottom.
REN Number is located on the cabinet bottom.
2 Rights of the Telephone Company
Should your equipment cause trouble on your line which may harm the
telephone network, the telephone company shall, where practicable,
notify you that temporary discontinuance of service may be required.
Where prior notice is not practicable and the circumstances warrant
such action, the telephone company may temporarily discontinue service
immediately. In case of such temporary discontinuance, the telephone
company must: (1) promptly notify you of such temporary discontinuance;
(2) aord you the opportunity to correct the situation; and (3) inform
you of your right to bring a complaint to the Commission pursuant to
procedures set forth in Subpart E of Part 68, FCC Rules and Regulations.
The telephone company may make changes in its communications
facilities, equipment, operations or procedures where such action is
required in the operation of its business and not inconsistent with FCC
Rules and Regulations. If these changes are expected to aect the use
or performance of your telephone equipment, the telephone company
must give you adequate notice, in writing, to allow you to maintain
uninterrupted service.
Interference Information
This device complies with Part 15 of the FCC Rules and the Industry
Canada licence-exempt RSS standard(s). Operation is subject tothe
following two conditions: (1) This device may not cause harmful
interference-; and (2) This device must accept any interference received,
including interference that may cause undesired operation.
Visit the RCA web site at www.rca4phones.com
Please do not send any products to the Indianapolis address listed in this
manual or on the carton. This will only add delays in service for your
product.
2161
Printed in China
17-08
This equipment has been tested and found to comply with the limits
for a Class B digital device, pursuant to Part 15 of the FCC Rules. These
limits are designed to provide reasonable protection against harmful
interference in a residential installation.
This equipment generates, uses, and can radiate radio frequency energy
and, if not installed and used in accordance with the instructions, may
cause harmful interference to radio communications. However, there is
no guarantee that interference will not occur in a particular installation.
Privacy of Communications may not be ensured when using this product.
If this equipment does cause harmful interference to radio or television
reception, which can be determined by turning the equipment o and on,
the user is encouraged to try to correct the interference by one or more
of the following measures:
• Reorient or relocate the receiving antenna (that is, the antenna for
radio or television that is “receiving” the interference).
• Reorient or relocate and increase the separation between the
telecommunications equipment and receiving antenna.
• Connect the telecommunications equipment into an outlet on a circuit
dierent from that to which the receiving antenna is connected.
If these measures do not eliminate the interference, please consult
your dealer or an experienced radio/television technician for additional
suggestions. Also, the Federal Communications Commission has
prepared a helpful booklet, “How To Identify and Resolve Radio/
TV Interference Problems.” This booklet is available from the U.S.
Government Printing Oce, Washington, D.C. 20402.Please specify stock
number 004-000-00345-4 when ordering copies.
Notice : The changes or modifications not expressly approved by the
party responsible for compliance could void the user's authority to
operate the equipment.
Hearing Aid Compatibility (HAC)
This telephone system meets FCC standards for Hearing Aid Compatibility.
FCC RF Radiation Exposure Statement
This equipment complies with FCC RF radiation exposure limits set forth
for an uncontrolled environment. This equipment should be installed
and operated with a minimum distance of 20 centimeters between
the radiator and your body. This transmitter must not be co-located or
operated in conjunction with any other antenna or transmitter.
For body worn operation, this phone has been tested and meets the FCC
RF exposure guidelines when used with the belt clip supplied with this
product. Use of other accessories may not ensure compliance with FCC
RF exposure guidelines.
Information for DECT Product
This telephone is compliant with the DECT 6.0 standard
which operates in the 1.92GHz to 1.93GHz frequency
range. Installation of this equipment is subject to
notification and coordination with UTAM.Any relocation
of this equipment must be coordinated through and
approved by UTAM. UTAM may be contacted at 1-800-42 9-8826.
Industry Canada (I.C.) Notice
This product meets the applicable Industry Canada technical
specifications.
Le présent materiel est conforme aux specifications techniques
applicables d'Industrie Canada.”
The Ringer Equivalence Number is an indication of the maximum number
of terminals allowed to be connected to a telephone interface. The
termination on an interface may consist of any combination of devices
subject only to the requirement that the sum of the Ringer Equivalence
Numbers of all the devices does not exceed five.
L'indice d'équivalence de la sonnerie (IES) sert à indiquer le nombre
maximal de terminaux qui peuvent être raccordés à une interface
téléphonique. La terminaison d'une interface peut consister en une
combinaison quelconque de dispositifs, à la seule condition que la
somme d'indices d'équivalence de la sonnerie de tous les dispositifs
n'excède pas 5.''
This Class B digital apparatus complies with Canadian ICES-003.
Cet appareil numérique de la classe B est conforme à la norme NMB-003
du Canada.
This device complies with Industry Canada licence-exempt RSS
standard(s).
Le présent appareil est conforme aux CNR d'Industrie Canada applicables
aux appareils radio exempts de licence.
IMPORTANT SAFETY INSTRUCTIONS
When using your telephone equipment, basic safety precautions should
always be followed to reduce the risk of fire, electric shock and injury to
persons, including the following:
• Do not use this product near water for example, near a bathtub,
washbowl, kitchen sink or laundry tub, in a wet basement or near a
swimming pool.
• Avoid using a telephone (other than a cordless type) during an
electrical storm. There may be a remote risk of electric shock from
lightning.
• Do not use the telephone to report a gas leak in the vicinity of the leak.
• Use only the power cord and batteries indicated in this manual. Do not
dispose of batteries in a fire. They may explode. Check with local codes
for possible special disposal instructions.
SAVE THESE INSTRUCTIONS
IMPORTANT: Because cordless phones operate on
electricity, you should have at least one phone in your
home that isn’t cordless, in case the power in your home
goes out.
Before You Begin
Battery
compartment
Base
cover
Handset
AC Power
adaptor
Telephone
line cord
Handset
battery pack
Parts Checklist (for 2161 single handset model)
Make sure your package includes the items listed here.
For Model 2161-2 there will be ONE additional handset , charge cradle,
battery pack and cover than shown above.
For Model 2161-3 there will be TWO additional handsets, charge cradles,
battery packs and covers than shown above.
For Model 2161-4 there will be THREE additional handsets, charge
cradles, battery packs and covers than shown above.
Telephone Jack Requirements
To use this phone, you need an RJ11C type
modular telephone jack, which might look like
the one pictured here, installed in your home. If
you don’t have a modular jack, call your local
phone company to find out how to get one
installed.
Modular
telephone
line jack
Wall plate
Installation
Digital Security System
Your cordless phone uses a digital security system to protect against
false ringing, unauthorized access, and charges to your phone line.
INSTALLATION NOTE: Some cordless telephones operate at
frequencies that may cause or receive interference with nearby
TVs, microwave ovens, and VCRs. To minimize or prevent such
interference, the base of the cordless telephone should not be
placed near or on top of a TV, microwave ovens, or VCR. If such
interference continues, move the cordless telephone farther away
from these appliances.
Certain other communications devices may also use the 1.9GHz
DECT frequency for communication, and, if not properly set, these
devices may interfere with each other and/or your new telephone.
If you are concerned with interference, please refer to the owner’s
manual for these devices on how to properly set channels to
avoid interference. Typical devices that may use the 1.9GHz DECT
frequency for communication include wireless audio/video senders,
wireless computer networks, multi-handset cordless telephone
systems, and some long-range cordless telephone systems.
Important safety instructions
• Use only the power supply listed in the user instructions.
• Use only the batteries listed in the user instructions.
• Do not allow the charging contacts or the battery to come into contact
with metal objects.
• Do not open the handset, base station or charger as you could be
exposed to high voltages.
• Do not allow the charger to come into contact with liquids.
• Risk of explosion if battery is replaced by an incorrect type.
• Dispose of used batteries according to the instructions.
• Always use the cables provided with the product.
• For pluggable equipment, the socket-outlet shall be installed near the
equipment and shall be easily accessible.
• This equipment is not designed to make emergency calls when
the power fails. An alternative has to be made available to allow
emergency calls.
• Do not expose the phone to excessive heat caused by heating
equipment or direct sunlight.
• Do not drop your phone or allow objects to fall on your phone.
• Do not use any cleaning agents containing alcohol, ammonia,
benzene, or abrasives as
• these may harm the set.
• Do not use the product in places where there are explosive hazards.
• Do not let small metal objects come into contact with the product. This
can deteriorate audio quality and damage the product.
• Active mobile phones in the vicinity may cause interference.
• Metallic objects may be retained if placed near or on the handset
receiver.
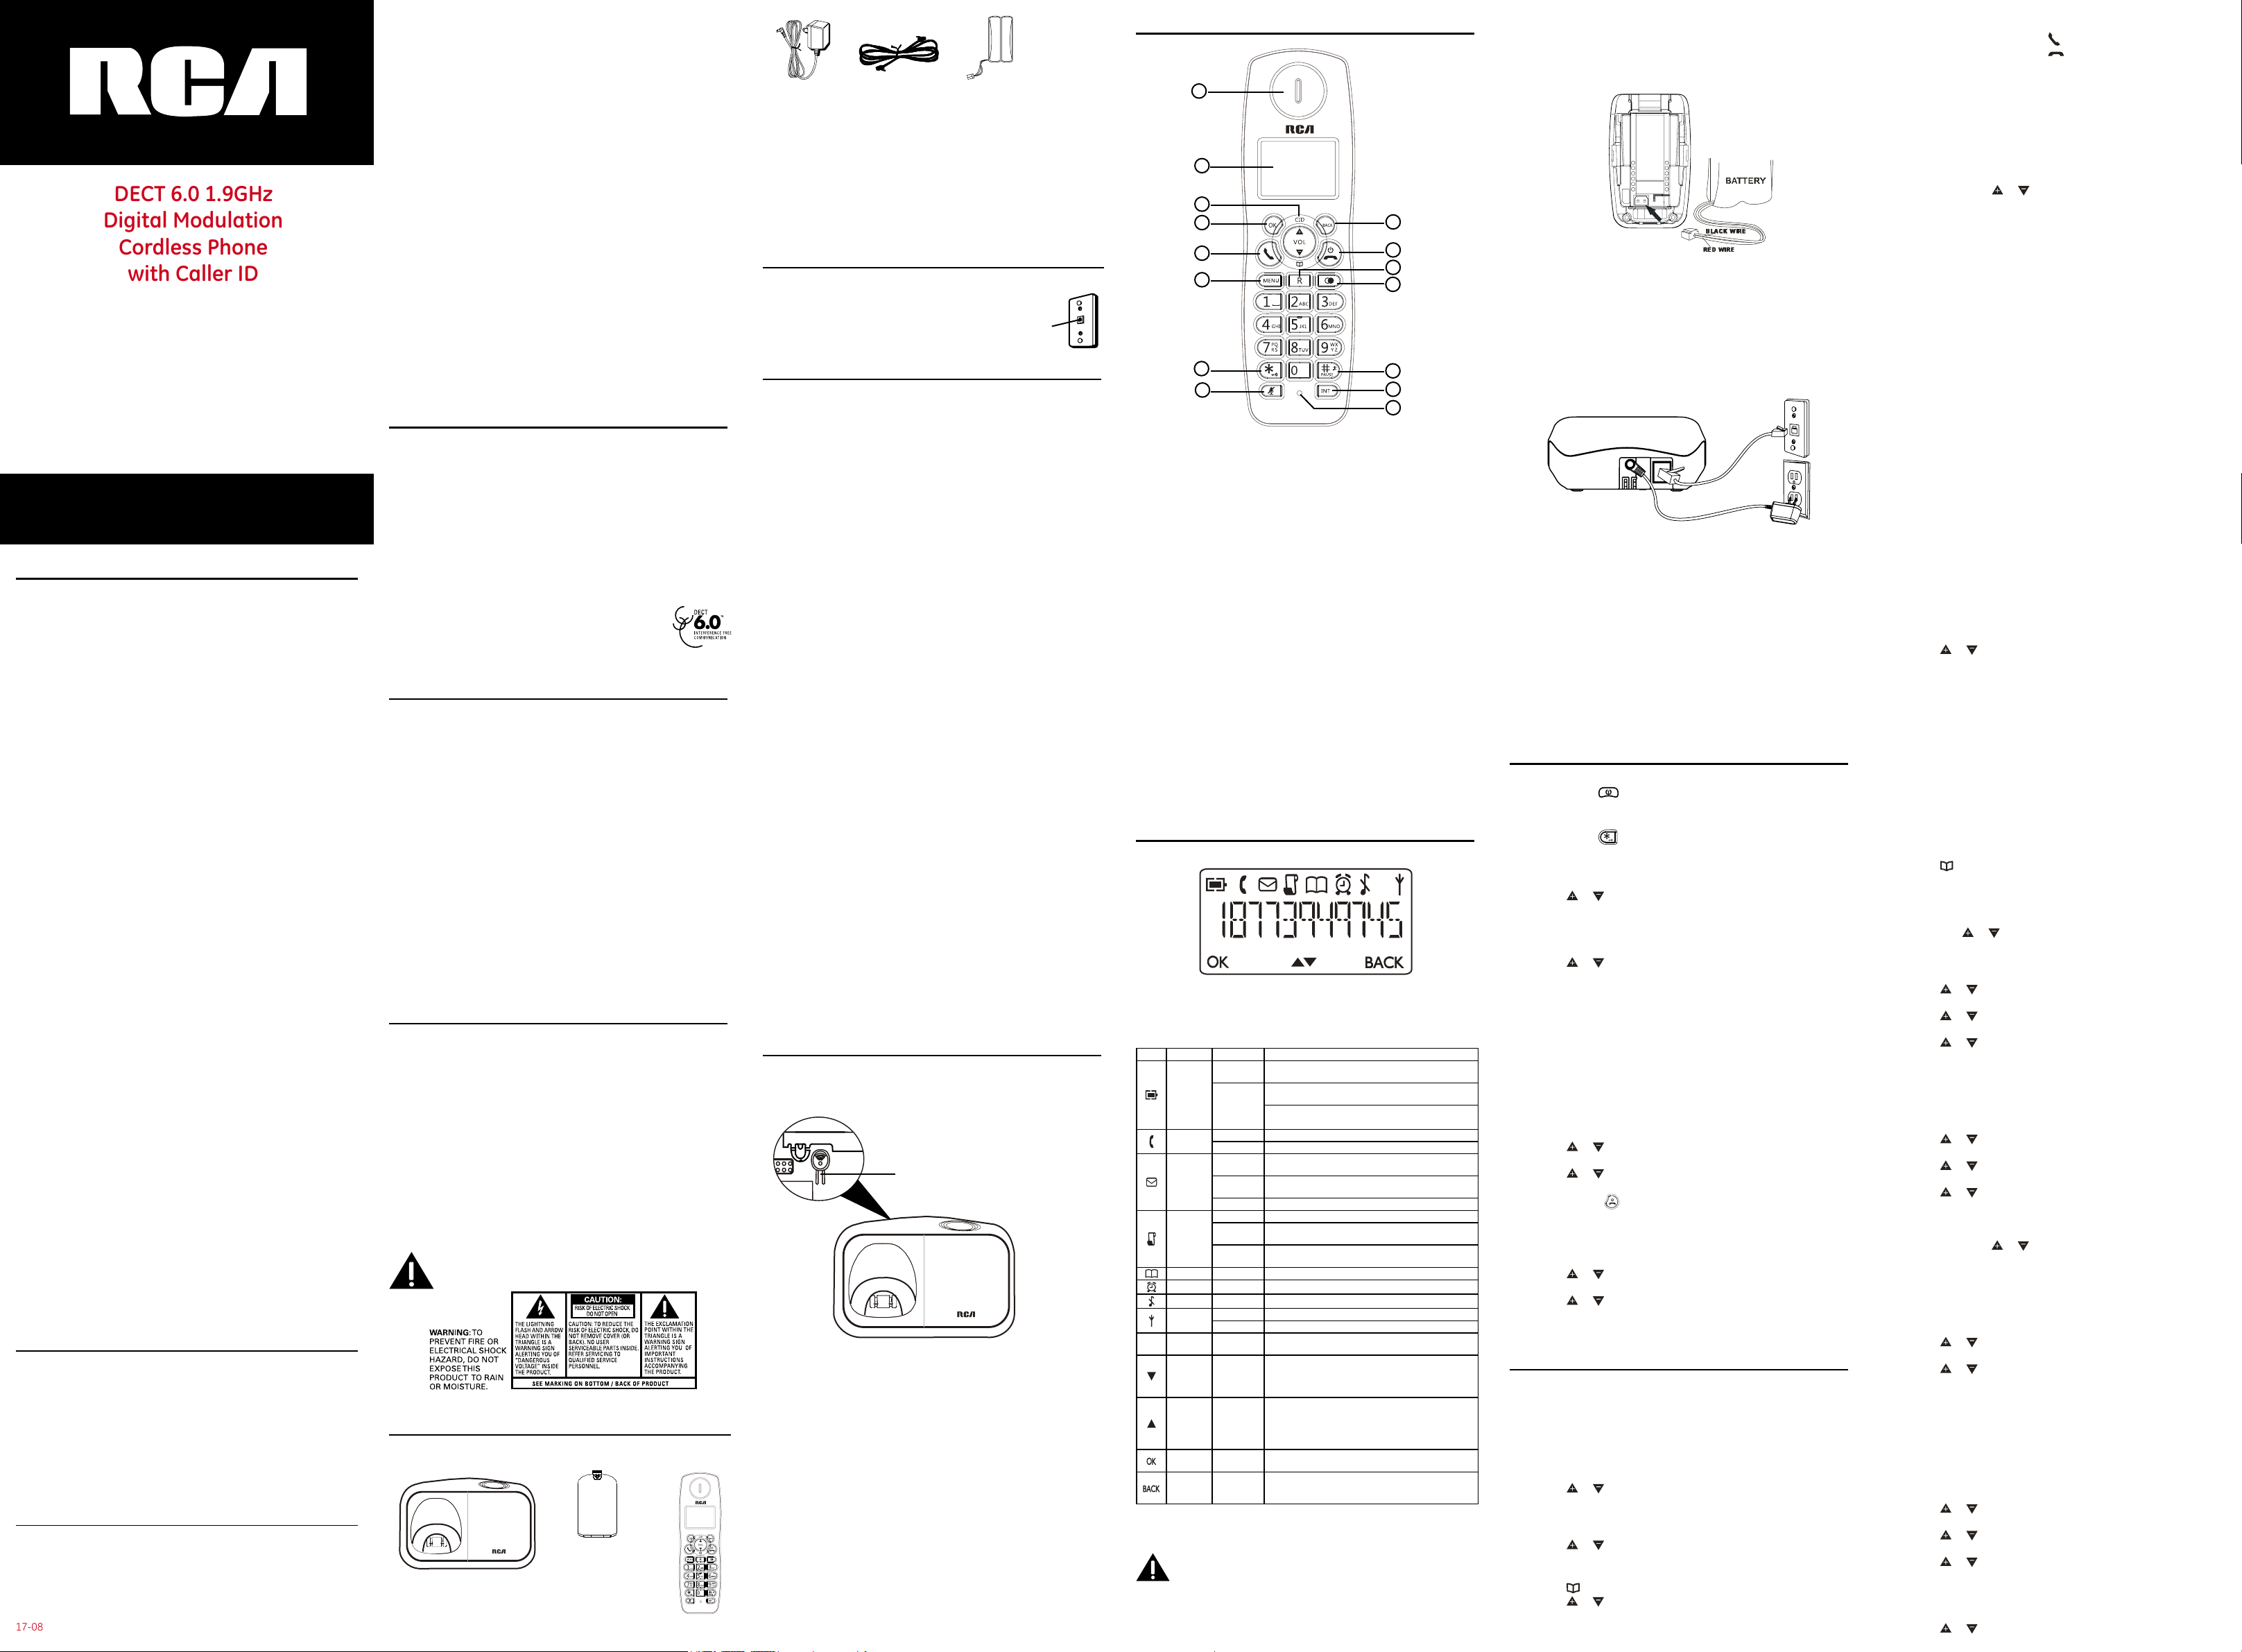
Base Unit Overview
CID Version
Handset locator Button
• Press to locate the missing handset
Handset Overview
1
2
3
4
5
9
10
11
6
7
8
12
13
14
15
1. Earpiece
2. Display
3. (Up) / Calls Button
• Press to increase volume and view CID.
(Down) / (Phonebook) Button
• Press to decrease volume and access Phonebook.
4. OK Button
Press to confirm your operation
5. Talk Button
• Press to make a call and to receive a call.
6. Menu Button
• . Press to access to main menu.
7. */(Key Lock) Button
Press to insert a * when dailing
• Long press to activate or deactivate the key lock.
8. Mute Button
• Press to mute the microphone and press again to un-mute.
9. Back Button
• Press to cancel a menu entry.
• Press to backspace the digit(s) or character(s).
• Press and hold to toggle between handset name and date/time in idle mode.
10. (End) / (On/O) Button
• Press to end a call.
• Press and hold to turn the handset on/o.
• Press to exit the menu/operation.
11. R (Flash) Button
• Press to ash the phone line.
12. Redial Button
• Press to enter redial list and dial the recent number.
13. #/ (Ringer ON/OFF) Button
• Press to insert a pause.
• Long press to turn the ringer on/o.
14. Int Button
• Press to make a intercom call.
• Press to make a conference call.
15. Microphone
Display Icons and Symbols
Icon Name Behaviour Description
1. Steady on
Battery
Phone
SMS / MWI
Call log
Phonebook Steady on
Alarm Steady on
Ringer O Steady on
Antenna
Digits on
--
right
Downward Steady on
Upward Steady on
OK Steady on
Back Steady on
2. Blinking
1. Blinking 1. Blinking when receiving incoming call;
2. Steady on 2. Steady ON during a call
1. Blinking
2. Steady on
3. O 3. No VMWI and no SMS in the SMS box
1. Blinking when there is new VMWI in call log
2. Steady on
3. O
1. Blinking 1. Blinking when handset is out of range or not subscribed
2. Steady on 2. Steady ON when handset is linked with base
Steady on
Installing the Phone
Installing the Handset Battery
NOTE: You must connect the handset battery before use.
Nickel metal Hydride battery (Ni-MH) battery (Brand name:
CORUN Ni-MH AAA300 or GREPOW AAA300mAh 300mAH
NiMH 2.4V rechargeable batteries), that is compatible with
this unit.
1. Displayed steady for capacity indication (Full = more than
1 hour talk time remains);
Animating when battery is being charged or when it
remains less than 1 hour talk time
When battery is discharge (few minutes talk time remain),
associated with battery low tone.
1. Blinking when new VMWI ( CID icon is also blinking ) or
new SMS
2. When there are old received SMS messages in the SMS
box
There are new records in the call log or when the user is
reviewing the new call log,
When call log empty, or there are old records in the call
log, call log icon will be o
Turns on during phonebook review mode.
Turn ON when alarm is activated
Display when ringer volume is set o
Turns on when there is more digit(s) on the right for
display.
Turns on when there is more menu option(s)Turns on
when there is more phonebook or CID record(s) for
viewing during phonebook or CID review mode.Turns on
during call to indicate that the audio level can be reduced
Turns on when there is more menu option(s)Turns on
when there is more phonebook or CID record(s) for
viewing during phonebook or CID review mode.Turns
on during call to indicate that the audio level can be
increased
Turns on when confirmation of selection or programming
is available
Turns on during phonebook editing mode to cancel
the last digit.Turns on during menu mode when user is
allowed to go back to the previous state or previous step.
1. Locate battery and battery door which are packaged together inside a
plastic bag and are separate from the handset.
2. Locate the battery compartment on the back of the handset.
NOTE: To ensure proper battery installation, the connector is keyed
and can be inserted only one way.
3. Plug the battery pack cord into the jack inside the compartment.
4. Insert the battery pack.
5. Close the battery compartment by pushing the door up until it snaps
into place.
Base Station
1. Choose an area near an electrical outlet and a telephone wall jack
(RJ11C), and place your cordless telephone on a level surface, such as
a desktop or tabletop, or you may mount it on the wall.
2. Plug one end of the telephone line cord into the TEL LINE jack on the
back of the base and the other end into a modular jack.
3. Plug the AC power converter into the electrical outlet and the DC
connector into the jack on the back of the base.
4. Place the handset in the base cradle. The battery icon on the LCD
blinking, verifying the battery is charging.
5. Allow the phone to charge for 16 hours prior to first use. If you don’t
properly charge the phone, battery performance is compromised.
CAUTION: To reduce risk of personal injury, re, or damage use only
the power adaptor (Tenpao: S003GU0600050 or S003GB0600050
input AC 100-240V ~50-60Hz, output DC 6V/500mA) listed in
the user’s guide. This power adaptor is intended to be correctly
orientated in a vertical or oor mount position.
Operation
Switching ON/OFF
Press and hold the button for more than 2 seconds to switch on/o
the handset in idle mode.
To Lock/Unlock the Keypad
Press and hold the button for 1 second to lock/unlock the keypad in
idle mode.
Set Time and Date
1. Press the Menu button to enter menu selection.
2. Press the
OK button to select.
3. Press the OK button to select DATE/TIME. The last stored date is
displayed. Enter the current date (YY-MM-DD), press the OK button,
then enter the time (HH-MM).
4. Press the or buttons to select AM or PM (if the time is in 12
HOURS format) and then press the OK button to confirm. The unit will
make an audible tone to confirm.
When the handset is OFF, it cannot be used for making calls including
emergency calls. There will be no ringing during an incoming call. To
answer a call, you will need to switch it back on. It may take some time
for the handset to re-establish a radio link with the base unit. Incoming
calls can still be answered even if the keypad is locked.
If you subscribe to the Caller Display service, the time and date will be set
automatically when you receive a call, but you may still need to set the
correct year.
or buttons to select CLOCK&ALARM and then press the
Change your Handset’s Name
1. Press the Menu button to enter menu selection.
2. Press the or buttons to select PERSONAL SET and then press the
OK button to select.
3. Press the or buttons to select HANDSET NAME and then press
the OK button to select. The current handset name is displayed.
4. Press the Back or
buttons to delete the characters one by one.
Enter the new name (maximum 10 characters) and then press the OK
button to confirm. The unit will make an audible tone to confirm.
Change the Display Language
1. Press the Menu button to enter menu selection.
2. Press the or buttons to select PERSONAL SET and then press the
OK button to select.
3. Press the or buttons to select LANGUAGE and then press the OK
button to select.
Once the display language is set, the option menus on the handset will
switch to display in the selected language immediately.
Using Your Phone
Make a Call
Pre-dialing
Dial the number (maximum 24 digits) and then press the Talk button.
Direct Dialing
Press the Talk button to take the line and then dial the number.
Call from Redial List
1. Press the Redial button in idle mode.
2. Press the or buttons to an entry in the redial list and then press
the Talk button.
Call from the Call Log
1. Press the Calls button in idle mode.
2. Press the or buttons to an entry in the call list and then press the
Talk button.
Call from the Phonebook
1. Press the button in idle mode.
2. Press the or buttons to an entry in the phonebook and then press
the Talk button.
Answer and End a Call
1. When the phone rings, press the button.
2. To end a conversation, press the
button.
You need to subscribe to Caller Line Identification service to be able to
see the caller’s number or name in the call log.
• When the handset rings during an incoming call, please do not hold
the handset too close to your ear as the volume of the ringing tone
may damage your hearing.
• You can simply place the handset back on its base station or charging
cradle to end a call. Make sure that you have not deactivated the auto
hang-up feature.
Adjust the Earpiece Volume
During a call, press the or buttons to select from VOLUME 1 to
VOLUME 5.
Mute/Un-mute Microphone
1. When the microphone is muted, the handset displays MUTE ON, and
your caller cannot hear you.
2. During a call, press the Mute button to turn on/o the microphone.
Paging
1. The paging feature enables you to locate a missing handset if the
handset is in range and contains charged batteries.
2. Press the Handset Locator Button located at the back of the base unit.
All the registered handsets will start to ring.
3. Once retrieved, press any button on the handset or the Handset
Locator Button again to end the paging.
Call Waiting
If you have subscribed to Call Waiting service, the earpiece will emit
an audible tone to inform you that there is a second incoming call. The
number or name of the second caller will also be displayed on your
phone if you have subscribed to Caller Line Identification service (CLI).
Please contact your network provider for more information about this
service.
Private Phonebook
Your phone can store up to 50 phonebook memories. Each phonebook
entry can have a maximum of 24 digits for the phone number and 12
characters for the name.
Enter Characters
When you select a field in which you can enter text, you can enter the
letters that are printed on the keys by pressing the relevant key once or
several times.
For example, press the “2” button once to insert the letter “A” press it
twice to insert the letter “B”, and so on... Spaces and other symbols can
be entered using the “1” or “0” buttons.
Store a Contact in the Phonebook
1. Press the Menu button to enter menu selection.
2. Press the or buttons to select PHONEBOOK and then press the
OK button to select.
3. Press the OK button again to enter NEW ENTRY.
4. Enter the name of the contact (maximum 12 characters). To edit, press
the Back button to delete the last character entered. Press the OK
button to confirm the name entry.
5. Enter the number of the contact (maximum 24 digits) and then press
the OK button to confirm. The unit will make an audible tone to
confirm.
• You cannot store a new phonebook entry when the memory is full. In
this case, you have to delete existing entries to make space for new
entries.
• When storing the number, enter the full number including the STD (area)
code if you subscribe to caller display, otherwise it will not display the
name when there is an incoming call.
Access Phonebook
1. Press the button in idle mode to browse the phonebook entries.
Alternatively, you can press the Menu button, to display PHONEBOOK
and then press the OK button to select.
2. Press the or buttons to select LIST and then press the OK button to
confirm. The phonebook entries will be listed in alphabetical order, and
you can press or buttons to scroll through the stored entries.
3. Press the OK button to view the details of the selected entry.
Modify a Phonebook Entry
1. Press the Menu button to enter menu selection.
2. Press the
or buttons to select PHONEBOOK and then press the
OK button to select.
3. Press the
or buttons to select EDIT ENTRY and then press the OK
button to select.
4. Press the or buttons to select an entry to edit and then press
the OK button. The current name is displayed. Edit the name and then
press the OK button to confirm.
5. Edit the number and then press the OK button to confirm. The unit will
make an audible tone to confirm.
Delete a Phonebook Entry
1. Press the Menu button to enter menu selection.
2. Press the
or buttons to select PHONEBOOK and then press the
OK button to select.
3. Press the
or buttons to select DELETE and then press the OK
button to select.
4. Press the or buttons to select an entry to delete and then press
the OK button.
5. Press the OK button again to confirm. The unit will make an audible
tone to confirm.
Instead of pressing the
or buttons to browse the phonebook entries,
you can press the numeric key corresponding to the first letter of the
entry you wish to locate. For example, pressing “2” will show the entries
starting with “A”. Pressing “2” again will show the entries starting with “B”,
and so on...
Delete all Entries from the Phonebook List
1. Press the Menu button to enter menu selection.
2. Press the
OK button to select.
3. Press the or buttons to select DELETE ALL and then press the OK
button to select.
4. Press the OK button again to confirm. The unit will make an audible
tone to confirm.
or buttons to select PHONEBOOK and then press the
Direct Access Memory
There are 2 direct access memories (Keys 1 & 2) in addition to the
phonebook memory. A long press on the keys in idle mode will
automatically dial the stored phone number.
Add/Edit Direct Access Memory
1. Press the Menu button to enter menu selection.
2. Press the
OK button to select.
3. Press the
OK button to select.
4. Press the or buttons to select KEY 1 or KEY 2 and then press the
OK button. The stored name is displayed, or NO NUMBER if it is empty.
If there is no number stored for the selected key or if you want to
change the name or number currently stored, press the Menu button
to enter the direct memory menu to add/edit the name or number.
5. Press the or buttons to select EDIT NUMBER and then press the
or buttons to select PHONEBOOK and then press the
or buttons to select DIRECT MEM. And then press the
 Loading...