


 Loading...
 ®
®
CAMCORDER
Video Camcorder
Model Pro807
Owner’s Manual
8
Product Registration.............. |
Inside Front Cover |
|
Safety Precautions........................................... |
|
1-3 |
Optional Accessories ....................................... |
|
4-7 |
• Accessory Order Form ................................... |
|
5-6 |
Using an Optional Tripod.................................. |
|
7 |
First-Time Operation.................................... |
|
8-13 |
Remote Control ........................................... |
|
14-15 |
Powering Your Camcorder ........................ |
|
16-19 |
RCA Video Cassettes ....................................... |
|
20 |
Special Features |
|
|
• Camera Edit ..................................................... |
|
21 |
• Quick Review .................................................. |
|
21 |
• Flying Erase Head ........................................... |
|
21 |
• Earphone Jack.................................................. |
|
21 |
• AUTO LOCK Switch ....................................... |
|
21 |
• Tape Positioning .............................................. |
|
21 |
• Microphone...................................................... |
|
21 |
• Tally Light ....................................................... |
|
21 |
Recording Features |
|
|
• Date and Time Display............................... |
|
22-23 |
• Electronic Viewfinder ..................................... |
|
23 |
• Displays in Viewfinder .............................. |
|
24-25 |
• Power Zooming ............................................... |
|
25 |
• Focusing Your Camcorder .............................. |
|
26 |
• Preset Program Modes..................................... |
|
27 |
• Time Counter with Memory Stop.................... |
28 |
|
Recording and Traveling Tips ........................ |
29 |
|
Care and Maintenance..................................... |
|
30 |
Playback Features |
|
|
• Viewfinder Playback ....................................... |
|
31 |
• Playback on TV ( or VCR) Using |
|
|
Antenna Connections ................................ |
|
32-33 |
• Playback on TV (or VCR) Using |
|
|
AUDIO/VIDEO IN Jacks .......................... |
|
34-35 |
Trouble Checks ........................................... |
|
36-37 |
Design Specifications........................................ |
|
38 |
Limited Warranty ............................................ |
|
39 |
Index (Alphabetical) ................................... |
|
40-41 |

Product Registration
Mail Your Registration Card Today
A Product Registration Card is packed with your camcorder. Please fill out the card and return it immediately.
Your prompt submission of this card confirms your right to the protection available under the terms and conditions of the warranty and also allows us to contact you should it ever become necessary.
With your card on file, we can also help you in the event of loss or theft by verifying your ownership. If you did not receive a Product Registration Card, please contact your dealer.
Attach Sales Receipt Here and File For Future Reference
To obtain warranty parts and service, you must show your sales receipt (or other evidence of purchase) to your Authorized RCA Compact Camcorder Servicenter.
Tape or staple your sales receipt to this manual so you will have it handy should service ever be
needed. Do not mail your sales receipt to us. File it at home with your owner’s manual for future reference.
Record Vital Information Here.
No other RCA camcorder has the same serial number as yours. You will find the serial number and model number on the bottom of your camcorder.
Make sure both numbers are recorded below so that you will have them in case your camcorder is stolen or you need a complete description for identification.
Model No. Pro807
Serial No.
Purchase Date:
Purchased From:
IMPORTANT SAFETY INSTRUCTIONS
Important Safety Instructions for AC Adapter/Charger
Before using the AC adapter/charger, read all instructions and cautionary markings on
(1) AC adapter/charger, (2) battery, and
(3) product using battery.
Caution: To reduce risk of injury, charge only rechargeable batteries type AV608 or AV8MM. Other types of batteries may burst causing personal injury and damage.
Do not expose the adapter/charger to moisture of any kind.
Use of an attachment not recommended or sold by the battery charger manufacturer may result in a risk of fire, electric shock, or injury to persons.
To reduce risk of damage to electric plug and cord, pull out the cord with the plug rather than the cord when disconnecting the adapter/charger from the wall outlet.
Make sure the cord is located so that it will not be stepped on, tripped over, or otherwise subjected to damage or stress.
Use of an improper extension cord could result in a risk of fire and electric shock. If an extension cord must be used, make sure that:
1.Pins on the plug of the extension cord are the same number, size, and shape as those of the plug on the adapter/charger.
2.Extension cord is properly wired and in good electrical condition, and
3.Wire size below is met:
Minimum |
Length of Extension |
AWG Size |
Cord in Feet |
18 |
Equal to or less than 100 |
16 |
Equal to or less than 150 |
Do not operate adapter/charger with a damaged cord or plug. Replace it immediately.
Do not operate adapter/charger if it has received a sharp blow, been dropped, or otherwise damaged in any way. Take it to a qualified serviceman.
Do not disassemble charger. Take it to an Authorized RCA Compact Camcorder Servicenter when service or repair is required. Incorrect reassembly may result in a risk of electric shock. To reduce risk of electric shock, unplug charger from outlet before attempting any maintenance or cleaning.
Be sure to save these operating instructions for future reference.

Safety Precautions
Your video camcorder’s AC adapter/charger will operate on 100-240 volts AC, 50/60 Hz, and has a polarized plug. Because one blade of the plug is wider than the other, the plug fits in the wall socket only one way.
Do not defeat the safety feature of this plug. If you need an extension, use a polarized cord.
CAUTION: To prevent electric shock, match wide blade of plug to wide slot, fully insert.
MISE EN GARDE: Pour prévenir les chocs électriques, introduire la lame la plus large de la fiche dans la borne correspondante de la prise et pousser jusqú au fond.
CAUTION: To reduce the risk of electric shock, do not remove the cover or back. No user-serviceable parts are inside. If you spill liquid on the camcorder or AC adapter/charger, disconnect the AC adapter/charger’s power cord to prevent possible fire or shock hazard and consult authorized service personnel. Moisture can damage internal parts. Refer all service to Authorized RCA Compact Camcorder Servicenter personnel only.
Caution: Maintain electrical safety. Powerline-operated equipment or accessories connected to this unit should bear the UL listing mark or CSA certification mark on the accessories themselves and should not have been modified so as to defeat the safety features. This will help avoid any potential hazard from electric shock or fire. If in doubt, contact qualified service personnel.
WARNING: To prevent fire or shock hazard, do not expose camcorder or AC adapter/charger to rain or moisture.
Caution: Avoid operating your camcorder immediately after moving it from a cold location to a warm location. Give the camcorder 1-1/2 to 2 hours to reach a stable temperature before inserting a video cassette. When moved from a cold area to a warm location, moisture may condense on the head drum inside the machine. This moisture could cause the tape to stick to the headwheel and damage the headwheel or tape.
|
|
CAUTION |
|
|
MISE EN GARDE |
||
|
|
|
|
|
|
|
|
|
|
RISK OF ELECTRIC SHOCK |
|
|
|
RISQUE DE CHOC ELECTRIQUE |
|
|
|
DO NOT OPEN |
|
|
|
NE PAS OUVRIR |
|
|
|
|
|
|
|
|
|
|
|
|
|
|
|
|
|
The symbol of a lightning flash within a triangle is intended to alert the user to the presence of uninsulated “dangerous voltage” within the product’s enclosure and which may be of sufficient magnitude to constitute a risk of electric shock.
An exclamation point within a triangle is intended to alert the user to the presence of important operating and maintenance (service) instructions in the literature accompanying the product.
FCC Warning: Any unauthorized changes or modifications to this equipment may void the user’s authority to operate.
Caution: The unauthorized recording of television programs and other materials may infringe the rights of others.
1

IMPORTANT SAFEGUARDS
In addition to the careful attention devoted to quality standards in the manufacture of your video product, safety is a major factor in the design of every instrument. However, safety is your responsibility too.
These pages list important information that will help to assure your enjoyment and proper use of a camcorder, adapter/charger and accessory equipment. Please read them carefully before operating your video products.
Installation
1.Read and Follow Instructions—All the safety and operating instructions should be read before the video product is operated. Follow all operating instructions.
2.Retain Instructions—The safety and operating instructions should be retained for future reference.
3.Heed Warnings—Comply with all warnings on the video product and in the operating instructions.
4.Polarization—This video product is equipped with a polarized alternating-current line plug (a plug having one blade wider than the other). This plug will fit into the power outlet only one way. This is a safety feature. If you are unable to insert the plug fully into the outlet, try reversing the plug. If the plug still fails to fit, contact your electrician to replace your obsolete outlet. To prevent electric shock, do not use this polarized plug with an extension cord, receptacle, or other outlet unless the blades can be fully inserted without blade exposure. If you need an extension cord, use one with a polarized plug.
5.Power Sources—This video product should be operated only from the type of power source indicated on the marking label. If you are not sure of the type of power supply to your home, consult your video dealer or local power company. For video products intended to operate from battery power, or other sources, refer to the operating instructions.
6.Overloading—Do not overload wall outlets or extension cords as this can result in a risk of fire or electric shock. Overloaded AC outlets, extension cords, frayed power cords, damaged or cracked wire insulation, and broken plugs are dangerous. They may result in a shock or fire hazard. Periodically examine the cord, and if its appearance indicates damage or deteriorated insulation, have it replaced by your service technician.
7. Power-Cord Protection—Power-supply cords should be routed so that they are not likely to be walked on or pinched by items placed upon or
against them, paying particular attention to cords at plugs, convenience receptacles, and the point where they exit from the video product.
8.Ventilation—Slots and openings in the video products are provided for ventilation to ensure reliable operation of the video product and to protect them from overheating. These openings must not be blocked or covered. The openings should never be blocked by placing the video product on a bed, sofa, rug, or other similar surface. This video product should never be placed near or over a radiator or heat register. This video product should not be placed in a built-in installation such as a bookcase or rack unless proper ventilation is provided or the video product manufacturer’s instructions have been followed.
9.Attachments—Do not use attachments unless recommended by the video product manufacturer as they may cause hazards.
Caution: Maintain electrical safety. Powerline operated equipment or accessories connected to this unit should bear the UL listing mark or CSA certification mark on the accessory itself and should not be modified so as to defeat the safety features. This will help avoid any potential hazard from electrical shock or fire. If in doubt, contact qualified service personnel.
10.Water and Moisture—Do not use this video product near water—for example, near a bath tub, wash bowl, kitchen sink or laundry tub, in a wet basement, or near a swimming pool and the like.
11.Accessories—Do not place this video product on an unstable cart, stand, tripod, bracket, or table. The video product may fall, causing serious injury to a child or adult as well as serious damage to the video product. Use this video product only with a cart, stand, tripod, bracket, or table recommended by the manufacturer or sold with the video product. Any mounting of the product should follow the manufacturer’s instructions and use a mounting accessory recommended by the manufacturer.
11A A video product and cart combination should be moved with care. Quick stops, excessive force, and uneven surfaces may cause the video product and cart combination to overturn.
2

IMPORTANT SAFEGUARDS (continued)
12.Outdoor Antenna Grounding—If an outside antenna or cable system is connected to the video product, be sure the antenna or cable system is grounded so as to provide some protection against voltage surges and built-up static charges. Section 810 of the National Electrical Code, ANSI/NFPA No. 70-1984 (Section 54 of Canadian Electrical Code, Part 1) provides information with respect to proper grounding of the mast and supporting structure, grounding of the lead-in wire to an antennadischarge unit, size of grounding conductors, location of antenna-discharge unit, connection to grounding electrodes, and requirements for the grounding electrode. See example below.
Example of Antenna Grounding
ELECTRIC SERVICE EQUIPMENT
ANTENNA
LEAD IN
WIRE
GROUND CLAMP
ANTENNA DISCHARGE UNIT
(NEC SECTION 810-20)
 GROUNDING CONDUCTORS (NEC SECTION 810-21)
GROUND CLAMPS
POWER SERVICE GROUNDING ELECTRODE SYSTEM
(NEC ART 250, PART H)
13.Power Lines—An outside antenna system should not be located in the vicinity of overhead power lines, other electric light or power circuits, or where it can fall into such power lines or circuits. When installing an outside antenna system, extreme care should be taken to keep from touching or approaching such power lines or circuits as contact with them might be fatal. Installing an outdoor antenna can be hazardous and should be left to a professional antenna installer.
Use
14.Cleaning—Unplug this video product from the wall outlet before cleaning. Do not use liquid cleaners or aerosol cleaners. Use a damp cloth for cleaning.
15.Object and Liquid Entry—Never push objects of any kind into this video product through openings as they may touch dangerous voltage points or “short-out” parts that could result in a fire or electric shock. Never spill liquid of any kind on the video product.
16.Lightning—For added protection for this video product during a lightning storm, or when it is left unattended and unused for long periods of time, unplug it from the wall outlet and disconnect the antenna or cable system. This will prevent damage to the video product due to lightning and power line surges.
Service
17.Servicing—Do not attempt to service this video product yourself as opening or removing covers may expose you to dangerous voltage or other hazards. Refer all servicing to qualified service personnel.
18.Conditions Requiring Service—Unplug this video product from the wall outlet and refer servicing to qualified service personnel under the following conditions.
A.When the power-supply cord or plug is damaged.
B.If liquid has been spilled, or objects have fallen into the video product.
C.If the video product has been exposed to rain or water.
D.If the video product does not operate normally by following the operating instructions. Adjust only those controls that are covered by the operating instructions. Improper adjustment of other controls may result in damage and will often require extensive work by a qualified technician to restore the video product to its normal operation.
E.If the video product has been dropped or the case has been damaged.
F.When the video product exhibits a distinct change in performance—this indicates a need for service.
19.Replacement Parts—When replacement parts are required, have the service technician verify that the replacements he uses have the same safety characteristics as the original parts. Use of replacements specified by the video product manufacturer can prevent fire, electric shock, or other hazards.
20.Safety Check—Upon completion of any service or repairs to this video product, ask the service technician to perform safety checks recommended by the manufacturer to determine that the video product is in safe operating condition.
3
Optional Accessories
We invite you to take a look at some great ideas for sparking creativity and adding to the fun of using your 8mm camcorder. These pages have a selection of accessories to help make your memorable moments look and sound even better.
These accessories are designed to make the process of recording and watching your videos more enjoyable.
To order accessories, contact your local Dealer.
If a dealer is not nearby, all accessories are available through toll-free ordering or by using the order form on page 5.
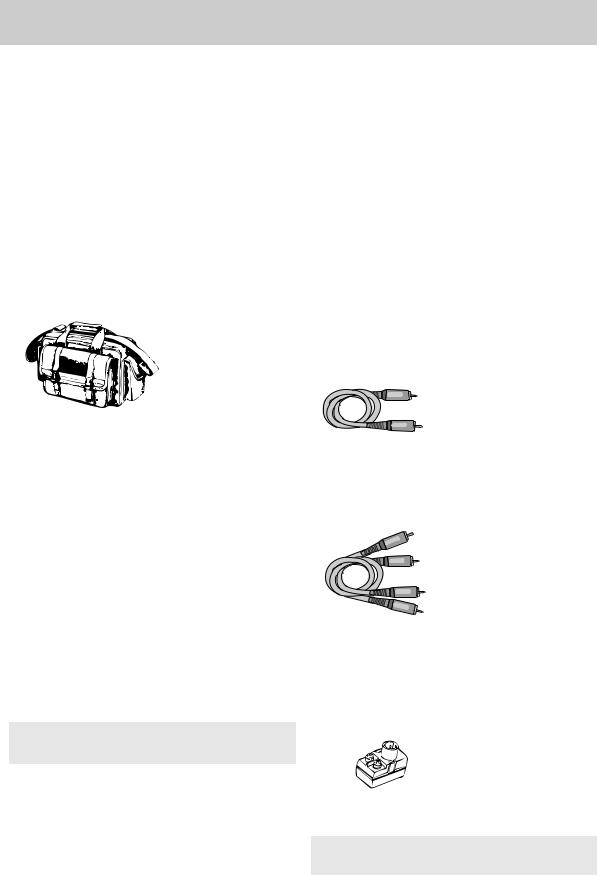
AC025A Soft Carrying Case
Custom compact soft case designed
especially to provide
protection and utility
for your RCA 8mm
camcorder and most


 accessories. Rugged fabric lined with soft non-abrasive material and generous padding. Has three outside pockets with storage for lens filters, adapters, batteries, and tapes.
DCC05 Adapter/Charger
This DC car cord adapter/charger enables you to operate your camcorder from your car, truck, or RV by plugging the car cord
directly into the vehicle’s cigarette lighter socket. It will also charge the AV608 battery supplied with the camcorder or the AV8MM long play battery. The DCC05 is specially designed to convert power from a 24-volt or 12-volt battery to a 6-volt output.
Caution: Do not use any other RCA car cord with this camcorder. It may damage the camcorder.
Rechargeable Batteries
These rechargeable nickelcadmium batteries are specifically
AV608 AV8MM designed for long life.
The AV608 can power your camcorder up to one hour, and the AV8MM up to two hours (depending on how much you use zoom and pause). Both can be recharged with the AC adapter/charger that came with your camcorder. Initial charging and recharging takes approximately one hour for the AV608 or two hours for the AV8MM.
Audio/Video Cables
These cables are shielded for connecting AUDIO and VIDEO jacks. They have RCA-type phono plugs on each end.
AH069G (3-ft)
AH070G (5-ft)
Monaural VCR Dubbing Cable
This is a double cable that lets you connect the
AUDIO and VIDEO jacks of monaural components. It can be used to connect your camcorder to a TV monitor (or VCR). The cable is color coded and shielded with RCA-type
AH075G (6-ft)
phono plugs on each end.
193983 Cable Transformer
The 193983 is used to connect a standard 300ohm antenna twin-lead to a standard round 75-ohm connector on the RF output
adapter.
193983
All specifications and descriptions of accessories are subject to change without notice.
4
Optional Accessories Accessory Order Form
VCC1000 Video Color Control
Center
The VCC1000 is actually two accessories in one. The color control center allows you to adjust the color intensity, tint, white balance, and sharpness of tapes being dubbed. This is especially helpful when the original tape was produced in poor lighting conditions or poor color settings. The second feature, the character generator, lets you create titles that can be recorded on your tapes. This lets you add a professional and/or personal touch to your home videos.
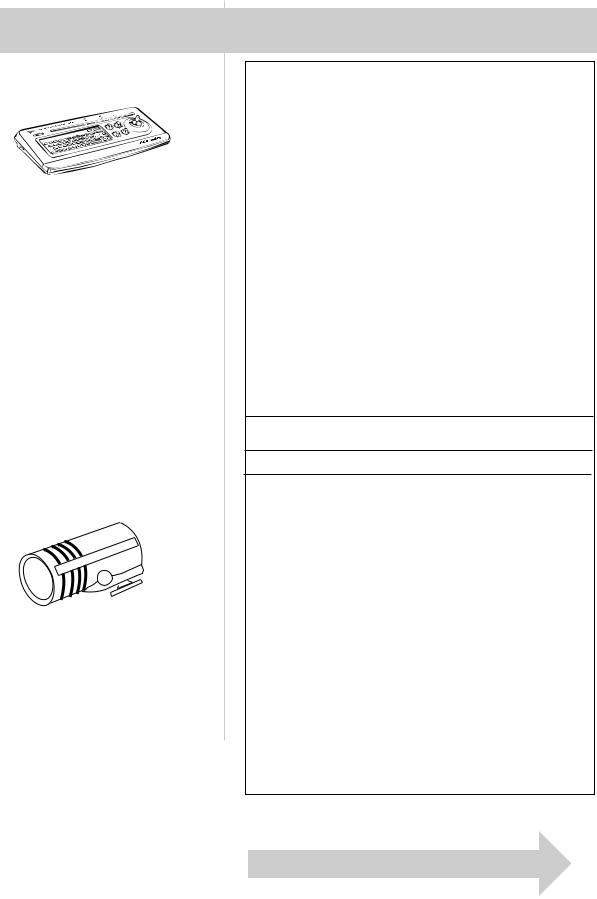
VDC88 Color Enhancement
Light
This ultra compact 15-watt video light is cordless, light in weight, and includes a rechargeable battery. It mounts on the top of the camcorder and fits on a standard accessory shoe. The VDC88 provides excellent soft, lush fill light. The VDC88 uses one 15-watt (VDC090) replacement bulb. The rechargeable battery BP1000 can be charged with the VDC085 battery charger.
Detach Here
Order Form for Pro807
|
|
Description |
|
Part No. |
Price |
|
Qty. |
|
Total |
|||
|
|
|
|
|
||||||||
|
|
|
|
|
|
|
|
|
|
|
|
|
|
|
Soft Camcorder Case |
|
AC025A |
$ 59.95 |
|
|
|
|
|
|
|
|
|
|
|
|
|
|
|
|
|
|
|
|
|
|
Super Lightweight Tripod |
|
AC035 |
$ 69.95 |
|
|
|
|
|
|
|
|
|
|
|
|
|
|
|
|
|
|
|
|
|
|
Gold-Tipped Audio/Video Cable (3-ft.) |
|
AH069G |
$ |
5.99 |
|
|
|
|
|
|
|
|
|
|
|
|
|
|
|
|
|
|
|
|
|
Gold-Tipped Audio/Video Cable (5-ft.) |
|
AH070G |
$ |
7.99 |
|
|
|
|
|
|
|
|
|
|
|
|
|
|
|
|
|
|
|
|
|
Gold-Tipped Dubbing Cable (6-ft.) |
|
AH075G |
$ 10.99 |
|
|
|
|
|
|
|
|
|
|
|
|
|
|
|
|
|
|
|
|
|
|
Rechargeable Battery |
|
AV608 |
$ 49.95 |
|
|
|
|
|
|
|
|
|
|
|
|
|
|
|
|
|
|
|
|
|
|
Rechargeable Battery |
|
AV8MM |
$ 59.95 |
|
|
|
|
|
|
|
|
|
|
|
|
|
|
|
|
|
|
|
|
|
|
RF Output Adapter |
|
CRF800 |
$ 49.95 |
|
|
|
|
|
|
|
|
|
|
|
|
|
|
|
|
|
|
|
|
|
|
AC Adapter/Charger |
|
CPS800 |
$189.95 |
|
|
|
|
|
|
|
|
|
|
|
|
|
|
|
|
|
|
|
|
|
|
DC Car Cord Adapter/Charger |
|
DCC05 |
$169.95 |
|
|
|
|
|
|
|
|
|
|
|
|
|
|
|
|
|
|
|
|
|
|
DC Cable for Adapter/Charger |
|
DCC100 |
$ 14.95 |
|
|
|
|
|
|
|
|
|
|
|
|
|
|
|
|
|
|
|
|
|
|
Video Control Center |
|
VCC1000 |
$349.90 |
|
|
|
|
|
|
|
|
|
|
|
|
|
|
|
|
|
|
|
|
|
|
Color Enhancement Light |
|
VDC88 |
$ 79.95 |
|
|
|
|
|
|
|
|
|
Replacement Bulb (15 watt) |
|
|
|
|
|
|
|
|
|
|
|
|
for VDC88 |
|
VDC090 |
$ 12.95 |
|
|
|
|
|
|
|
|
|
Extra Battery for VDC88 |
|
BP1000 |
$ 29.95 |
|
|
|
|
|
|
|
|
|
Charger for BP1000 |
|
VDC085 |
$ 18.95 |
|
|
|
|
|
|
|
|
|
|
|
|
|
|
|
|
|
|
|
|
|
|
Replacement Remote Control |
|
211026 |
$ 49.95 |
|
|
|
|
|
|
|
|
|
|
|
|
|
|
|
|
|
|
|
|
|
|
RF Connecting Cable |
|
213003 |
$ 11.95 |
|
|
|
|
|
|
|
|
|
|
|
|
|
|
|
|
|
|
|
|
|
|
Shoulder Strap |
|
213004 |
$ 13.95 |
|
|
|
|
|
|
|
|
|
|
|
|
|
|
|
|
|
|
|
|
|
|
Prices are subject to change without notice. |
|
|
|
|
|
|
|
|
||
|
|
Total Merchandise ($10 Minimum Order) |
. . . . . . . . . |
$. __________ |
|
|
||||||
Sales Tax. . . . . . . . . . . . . . . . . . . . . . . . . . . . . . . . . . . . $__________
We are required by law to collect the appropriate sales tax for each individual state, county, and locality to which the merchandise is being sent.
Shipping, Handling, and Insurance. . . . . . . . . . . . . . . . |
$ |
|
5.00 |
Total Amount Enclosed. . . . . . . . . . . . . . . . . . . . . . . $__________
Use VISA or MasterCard preferably. Money order or check must be in U.S. currency only. No COD or CASH.
•All accessories are subject to availability.
•Where applicable, we will ship a superseding model.
Please complete other side also
5
Accessory Order Form (continued)
|
|
|
|
|
|
|
|
|
|
|
o |
Maste Ca d by |
|
|
|
|
|
|
|
|
|
|
|
|
|
|
|||||||||||||||
|
|
|
|
|
|
|
|
|
|
|
|
|
|
|
|
|
|
|
|
|
|
|
|
|
|||||||||||||||||
|
|
|
|
|
|
|
|
|
|
|
|
filling in below |
|
|
|
|
|
|
|
|
|
|
|
|
|
|
|||||||||||||||
|
|
|
|
|
|
Charge your order on your VISA |
|
|
|
|
|
|
|
|
|
|
|
|
|
|
|||||||||||||||||||||
|
|
|
|
|
|
|
|
|
|
or MasterCard by |
|
|
|
|
|
|
|
|
|
|
|
|
|
|
|||||||||||||||||
|
USE YOUR CREDIT CARD |
|
|
|
|
|
|
|
|
|
|
|
|
|
|
||||||||||||||||||||||||||
|
|
|
|
|
|
|
|
|
|
|
filling in below |
|
|
|
|
|
|
|
|
|
® |
|
|
||||||||||||||||||
|
IMPORTANT: Copy complete account number |
|
|
|
|
|
|
|
|
|
|
|
|
|
|
||||||||||||||||||||||||||
|
|
|
|
|
|
|
from your VISA card |
|
|
|
|
|
|
|
|
|
|
|
|
|
|
||||||||||||||||||||
|
USE YOUR CREDIT CARD |
|
|
|
|
|
|
|
|
|
|
|
|
|
|
||||||||||||||||||||||||||
|
|
|
|
|
|
|
|
|
|
|
|
|
|
|
|
|
|
|
|
|
|
|
|
|
|
|
|
|
|
|
|
|
|
|
|
|
® |
|
|
|
|
|
IMPORTANT: Copy complete account number |
|
|
|
|
|
|
|
|
|
|
|
|
|
|
||||||||||||||||||||||||||
|
|
|
|
|
|
from your VISA card |
|
|
|
|
|
|
|
|
|
|
|
|
|
|
|||||||||||||||||||||
|
|
|
|
|
|
|
|
|
|
|
|
|
|
|
|||||||||||||||||||||||||||
|
|
|
|
|
|
|
|
|
|
|
|
|
|
|
|
|
|
|
|
|
|
|
|
|
|
|
|
|
|
|
|
|
|
|
|
|
|
|
|
|
|
|
|
|
|
|
|
|
|
My |
card |
|
expires: |
|
|
|
|
|
|
|
|
|
|
|
|
|
|
|
|
|
|
|
|
|
|
|
|
||||||
|
|
|
|
|
|
|
|
|
|
|
|
|
|
|
|
|
|
|
|
|
|
|
|
|
|
|
|
|
|
|
|
|
|
|
|
|
|
|
|
|
|
|
|
|
|
|
|
|
My card expires: |
|
|
|
|
|
|
|
|
s |
|
r |
|
|
r TM |
||||||||||||||||||||
|
|
|
|
|
|
|
|
|
|
|
|
|
|
|
|
|
|
|
|
|
|
|
|
||||||||||||||||||
|
|
|
|
|
|
|
|
|
|
|
|
|
|
|
|
|
|
|
|
|
|
|
|
|
|
|
|
|
|
|
|
|
|
|
|
||||||
|
IMPORTANT: Copy complete account number |
|
|
|
|
|
|
|
|
||||||||||||||||||||||||||||||||
|
|
|
|
|
|
|
|
|
|
|
|
|
|
|
|||||||||||||||||||||||||||
|
|
|
|
|
|
|
from your MasterCard |
|
|
|
|
|
|
|
|
|
|
|
|
|
|
||||||||||||||||||||
|
|
|
|
|
s |
r |
r TM |
|
|||||||||||||||||||||||||||||||||
|
IMPORTANT: Copy complete account number |
|
|
|
|
|
|||||||||||||||||||||||||||||||||||
|
|
|
|
|
|
|
|
|
|
|
|
|
|
|
|||||||||||||||||||||||||||
|
|
Copy |
Number |
|
from your MasterCard |
|
|
|
|
|
|
|
|
|
|
|
|
|
|
||||||||||||||||||||||
|
|
|
|
|
|
|
|
|
|
|
|
|
|
|
|||||||||||||||||||||||||||
|
|
|
|
|
|
|
|
|
|
|
|
|
|
|
|
|
|
|
|
|
|
|
|
|
|
|
|
|
|
|
|
|
|
|
|
|
|
|
|||
|
|
|
|
|
|
|
|
|
|
|
|
|
|
|
|
My card |
|
|
|
|
|
|
|
|
|
|
|
|
|
|
|
|
|||||||||
|
|
|
above your |
|
|
|
|
|
|
|
|
|
|
|
|
|
expires: |
|
|
|
|
|
|
|
|
|
|
|
|
|
|
|
|
||||||||
|
|
|
|
|
|
|
|
|
|
|
|
|
|
|
|
|
|
|
|
|
|
|
|
|
|
|
|
|
|
|
|
|
|||||||||
|
|
|
name on |
|
|
|
|
|
|
|
|
|
|
|
|
|
|
|
|
|
|
|
|
|
|
|
|
|
|
|
|
|
|||||||||
|
|
MasterCard |
|
|
|
|
|
|
|
|
|
My card |
|
|
|
|
|
|
|
|
|
|
|
|
|
|
|
|
|
|
|||||||||||
|
Copy Number |
|
|
|
|
|
|
|
|
|
|
|
|
|
|
|
|
|
|
|
|
|
|
|
|
|
|
||||||||||||||
|
|
above your |
|
|
|
|
|
|
|
|
|
expires: |
|
|
|
|
|
|
|
|
|
|
|
|
|
|
|
|
|
||||||||||||
|
|
|
|
|
|
|
|
|
|
|
|
|
|
|
|
|
|
|
|
|
|
|
|
|
|
|
|||||||||||||||
|
|
|
name on |
|
|
|
|
|
|
|
|
|
|
|
|
|
|
|
|
|
|
|
|
|
|
|
|
|
|
|
|
|
|||||||||
|
|
MasterCard |
|
|
|
|
|
|
|
|
|
|
|
|
|
|
|
|
|
|
|
|
|
|
|
|
|
|
|
|
|
||||||||||
AUTHORIZED SIGNATURE
Prices are subject to change without notice.
AUTHORIZED SIGNATURE
Prices are subject to change without notice.
|
PLEASE |
Print or type your name and |
|||||||
|
address clearly. This will be your |
||||||||
|
PLEASE |
mailing label. |
|||||||
|
Print or type your name and |
||||||||
|
address clearly. This will be your |
||||||||
|
|
|
|
|
A complete and correct order will |
||||
|
|
|
|
|
mailing label. |
||||
|
|
|
|
|
save you days of waiting. |
||||
|
|
|
|
|
A complete and correct order will |
||||
|
|
|
|
|
save you days of waiting. |
||||
|
Name: |
|
|
|
|
|
|||
|
Street: |
|
|
|
|
|
|||
Name: |
|
|
|
|
|
|
|||
|
|
Apt: |
|||||||
Street: |
|
|
|||||||
|
|
|
|
|
|
||||
|
City: |
|
Apt: |
|
|
||||
|
|
|
|
|
|
|
|
||
|
State: |
|
Zip: |
||||||
City: |
|
|
|
|
|
|
|
||
State: |
|
|
Zip: |
|
|
||||
Please make sure that both sides of this form have been filled out completely.
•Allow 8 weeks for deliver.
•All accessories are subject to availability.
•Where applicable, we will ship a superseding model.
Detach Here
To order accessories, contact your local Dealer.
If a dealer is not nearby, you can also follow the directions below to order by telephone or direct-by-mail.
United States Orders
To place your order by phone, have your Visa or MasterCard ready and call the toll-free number listed below between 8AM and 8PM Eastern Standard Time.
Use this number only to place an order for accessory items listed on this order form.
1 – 800 – 338 – 0376
Most times your order will be shipped UPS within 72 hours of receipt. If ever it is not possible to ship within 30 days, we will notify you with an update on your order and an option to cancel.
To place your order by mail, detach and mail the completed order form with credit card information, money order, or check in U.S. currency (made payable to Thomson Consumer Electronics, Inc.) to the following address:
RCA Video Accessories
PO Box 8419
Ronks, PA 17573
For more information on these accessories (or current prices), write to the following address:
Video Accessories Customer Service Thomson Consumer Electronics, Inc. Distributor & Special Products
2000 Clements Bridge Rd
Deptford, NJ 08096-2088
Canadian Orders
For Canada inquiries, please call one of these toll-free numbers for information about accessories:
English: 1 – 800 – 668 – 5518 French: 1 – 800 – 668 – 5507
International Orders
This offer is valid only in the 50 United States. For international orders, please send your request for a price quotation (not an order) to:
International Customer Service Thomson Consumer Electronics, Inc. Distributor & Special Products
2000 Clements Bridge Rd Deptford, NJ USA 08096-2088
6

Optional Tripod
AC035 Super Lightweight Tripod
This tripod’s fluid-effect head provides smooth camera pan and tilt. The quick-release mount makes it easy to attach or remove the camcorder. The grooved, tubular 3-section leg design folds down to 23-1/2" when not in use and weighs only 3-1/2 lbs. Rubber feet allow for sure footing.
Using an Optional Tripod
Mounting the camcorder on a tripod, such as AC035 will keep the camcorder steady and produce excellent video results.
|
F.FWD. |
|
REW |
FOCUS |
|
|
PLAY |
ON |
STOP |
OFF |
|
|
SEL. |
+ |
MODELOCK |
AUTO |
|
– |
|
MANUAL |
FOCUS |
|
PULL
BATTERY
Caution: Before using a tripod, make sure it is stable enough to hold the camcorder without falling over.
When attaching your camcorder to a tripod, be careful not to force the tripod screw into the camcorder’s tripod mounting hole.
The tripod screw should not protrude into the camcorder more than approximately three-eighth (3/8) inch. Forcing the screw could damage the mounting hole on the bottom of the camcorder.
7

First-Time Operation
Thank you for choosing an RCA camcorder.
You have selected a precision-engineered camcorder designed to give you years of performance and enjoyment.
Although your camcorder is very simple to use, it is important that you read and carefully follow the instructions in this manual until you are completely familiar with the proper operating procedures.
If you should experience a problem, always refer first to “Trouble Checks” on pages 36-37. Many times a simple solution is all that is needed, and it could save you a costly service call. If your camcorder should require service during the warranty period, refer to page 39 for a description of what we will do and instructions on how to request service.
1. Unpack the camcorder and accessories.
Make sure you remove all the accessories and information papers that came packed with the camcorder.
•Save the packing materials and box in case you ever need to ship or store your camcorder.
•The items shown below are packed with your camcorder. If any of the items are missing or appear damaged, contact your RCA dealer immediately.
COUNTERMEM 
RES.
ADJ. |
DATE/TIME |
|
PULL
. |
BATTERY |
F.FWD |
|
|
REW |
FOCUS |
|
|
PLAY |
ON |
STOP |
OFF |
|
|
SEL. |
+ |
MODELOCK |
AUTO |
|
– |
|
MANUAL |
FOCUS |
|
Camcorder: Model Pro807
Rechargeable
6-Volt Battery
Stock No. AV608
WARNING: NICKEL CADMIUM BATTERY MUST BE DISPOSED OF PROPERLY.
RECORD
STOP
|
START |
+ |
- |
|
STOP |
||
REW |
PLAY |
F.FWD |
|
SCENE SEARCH
–STILL +
DISPLAY |
COUNTER |
+ |
- |
|
|
RESET |
MEMORY |
|
|
Remote
Control
Batteries (size “AA” 1.5 volt)
Remote Control
Stock No. 211026
REFRESH
CHARGE
POWER
AC Adapter/Charger |
DC Connecting Cord |
RF Output Adapter |
RF Connecting Cable |
Stock No. CPS800 |
Stock No. DCC100 |
Stock No. CRF800 |
Stock No. 213003 |
Shoulder Strap
Stock No. 213004
Clock Battery:
3-Volt Micro Lithium Cell (such as Maxell No. CR2025 available from most local drug stores and camera shops)
Caution: Lithium battery. Must be disposed of properly.
Never handle punctured or leaking batteries. May cause burns or personal injury.
Can cause death or injury if swallowed. Keep out of hands of children. If swallowed,
consult a physician immediately for emergency treatment.
8
First-Time Operation (continued)
2. Attach a power supply to the camcorder.
Attach a power supply to the camcorder–either the adapter/charger or charged battery.
Adapter/Charger
OPEN 
DC OUT
Jack
REFRESH
CHARGE
POWER
To AC 100-240V,
50/60 Hz
REC
START/
STOP
POWER ON
SAVE
DC
DC IN 6.5V
Jack
 DC Power
Cord
POWER
Indicator Jack
Connect one end of the DC power cord into the DC OUT jack on the adapter/charger. Plug the other end of the DC power cord into the DC IN 6.5V jack on the back of the camcorder. Plug the adapter/charger’s plug into an operating outlet. The POWER indicator on the adapter/charger will light. Details are on page 16.
Charged Battery*
3.Remove the lens cap and attach it to the lens cap holder on the camcorder.
|
|
|
OPEN |
|
|
|
PUSH |
Pull on tab to |
REC |
|
Attach to |
START/ |
|
||
|
STOP |
|
|
remove the lens |
SAVEPOWER |
|
lens cap |
cap. |
ON |
holder. |
|
|
|
Pull on the tab on the side of the lens cap to remove it. Then pull it straight, rotate it down, and attach it to the lens cap holder on the side of the camcorder.
4.Attach the shoulder strap.
1.Unfasten one end of the shoulder strap from the buckle. Make sure you leave the buckle on the strap.
2.Thread one end of the shoulder strap through one of the shoulder strap rings (located on the top and bottom of the camcorder).
Attach charged battery to camcorder.
Make sure the camcorder’s POWER switch is in the OFF position. Match the line on the battery to the line on the camcorder. Hold the battery flush against the camcorder and slide it in the direction of the arrow until a click is heard.
Details are on page 17.
*The battery must be charged before it can be used the first time.
Shoulder |
PUSH |
REC |
|
|
START/ |
|
STOP |
strap |
SAVEPOWER ON |
rings |
|
3.Thread the strap back into the buckle. Pull on the strap and make sure it is securely fastened before using the shoulder strap to support the camcorder.
4.Repeat steps 1-3 for the other end of the shoulder strap.
(continued on next page)
9

First-Time Operation (continued)
5. Adjust the hand strap.
Adjust the hand strap so it is snug around your hand when you place your thumb on the thumb trigger and your middle and index fingers on the power zoom buttons.
1.Unsnap the flap and open the adjustment strap
2.Put your hand in the hand strap.
3.Pull the adjustment strap to tighten.
4.Snap the flap closed.
6.Turn on the camcorder.
Because your camcorder is both a camera and a VCR, it performs two completely separate groups of functions. The position of the POWER
(CAM (camera) /OFF/PLAY) switch tells the camcorder whether you want to record (CAM), play back tapes (PLAY), or turn off the camcorder’s power (OFF). Some of the controls operate differently depending on the position of the POWER switch.
•Press and hold the small button on the POWER switch while sliding it to the CAM position.
8. Insert a cassette in the camcorder.
OPEN Button |
Cassette |
|
Compartment |
||
|
||
EJECT Button |
Cover |
|
|
||
|
Cassette |
|
|
Compartment |
1.Slide the OPEN button and completely open the cassette compartment cover.
2.Press the EJECT button to open the cassette compartment.
3.Insert a cassette only one way with the record-protect (safety) tab facing up and the tape window facing out.
4.Gently press on the side of the cassette compartment where it is labeled PUSH (as shown above) until it locks into place.
5.After the cassette compartment is fully retracted, close the cassette compartment cover.
Note: If the cassette you load into the cassette compartment has been rewound in a different unit, the cassette compartment may open again. Make sure the cassette compartment is completely retracted before closing the cassette compartment cover.
7. Place the ON/POWER SAVE lever in the ON position.
The camcorder also has an ON/POWER SAVE lever to conserve battery power when recording.
•During recording, place the ON/POWER SAVE lever in the ON position. The camcorder will not record unless this lever is in the ON position.
•Place the ON/POWER SAVE lever in the POWER SAVE position during recording breaks. The camcorder will enter the “standby mode”.
Important Note: The dew indicator  will appear in the electronic viewfinder when there is excessive moisture in the camcorder. Remove the cassette from the camcorder and let it dry naturally.
9.Set AUTO LOCK switch in the AUTO LOCK position.
10.Pull out the electronic viewfinder and adjust the eyepiece focus control for your vision.
•Pull the electronic viewfinder out into the operating position.
•If the image in the viewfinder is blurry, adjust the eyepiece focus control for your vision.
Details are on page 23.
10
First-Time Operation (continued)
POWER (CAM/OFF/PLAY) Switch
Tally Light |
|
RES |
|
|
COUNTERMEM |
|
|
. |
|
ADJ. |
DATE/TIME |
|
|
Electronic Viewfinder in Operating Position (PULL out here )
PULL
|
. |
|
F.FWD |
|
REW |
FOCUS |
|
|
PLAY |
ON |
STOP |
|
|
OFF |
|
|
. |
|
SEL |
+ |
MODELOCK |
AUTO |
|
– |
|
MANUAL |
FOCUS |
|
Eyepiece Focus
Control
 BATTERY
REW (Rewind) Button |
|
PLAY Button |
OPEN Button |
|
AUTO LOCK |
|
STOP Button Switch |
EJECT Button |
|
(located under the |
|
cassette compart- |
|
ment cover) |
Power Supply  (Adapter/Charger
or Charger Battery)
|
POWER |
Lens Cap |
|
|
on Strap |
|
. ADJ |
|
|
DATE/TIME |
|
|
. RES |
|
MEM |
COUNTER |
OPEN |
|
|
PUSH |
REC |
|
Earphone |
|
Jack |
|
STOP |
|
|
START/ |
|
|
POWER |
|
ON/POWER |
ON |
SAVE Lever |
|
SAVE |
|
|
|
|
Thumb |
|
|
Trigger |
11. Start and stop recording.
Start and stop recording by pressing and releasing the thumb trigger. You do not have to hold the thumb trigger to record. The REC indicator appears in the viewfinder when the camcorder is recording.
Notes: The tally light flashes during record-pause and goes off when the camcorder is recording or the , ON/POWER SAVE lever is placed in the POWER SAVE position.
If you do not record within five minutes, the camcorder will automatically shut off to prevent excessive tape wear. To resume recording press the thumb trigger twice.
Any material recorded on the tape will automatically be erased if you record over it.
To monitor the audio being recorded, attach an optional earphone to the earphone jack.
12. Play back what you have recorded.
•Press the thumb trigger to stop recording.
•Place the POWER switch in the PLAY position.
•Press the REW (rewind) button to rewind the tape.
•Then press the PLAY button to play back the tape in the electronic viewfinder.
•Press the STOP button when you are finished playing back the tape.
•Details on viewfinder playback are on page 31.
11

First-Time Operation (continued)
13.Review all of the camcorder’s operating controls.
The page number(s) where detailed information on each control can be found are listed for your convenience.
POWER (CAM (camera)/OFF/PLAY)
Switch (pages 10-11)
Accessory Shoe
Remote Control
Sensor (page 14)
Power Zoom Buttons (W and T)
(page 25)
COUNTERMEM
RES.
. |
DATE/TIME |
ADJ |
|
Eyepiece Focus Control
(pages 10-11, 23)
PULL
Microphone 


 (page 21)

Tally Light (pages 11, 15, 21)
|
. |
|
F.FWD |
|
REW |
FOCUS |
|
|
PLAY |
ON |
STOP |
|
|
OFF |
|
|
. |
|
SEL |
+ |
MODELOCK |
AUTO |
|
|
|
– |
|
MANUAL |
FOCUS |
|
Electronic Viewfinder (PULL here to extend)
(pages 10-11, 23-25, 31)
BATTERY
BATTERY Eject Lever
(page 18)
F.FWD. (Fast Forward) Button (pages 21, 31, 33, 35)
REW (Rewind) Button (pages 21, 31, 33, 35)
Lens (page 30)
FOCUS ON/OFF Button (pages 25, 26)
Also Still (ll ) Button
(pages 31, 33, 35)
MANUAL FOCUS + and –
Button (pages 24-25, 26)
Clock Battery Compartment (page 22)
Output Jacks (Yellow Video, DC, and White Audio) (Located behind cover) (pages 32, 34)
PLAY Button
(pages 11, 24, 31, 33, 35)
AUTO LOCK Switch (pages 10, 12, 21, 27)
STOP Button
(pages 11, 21, 31, 33, 35)
Also MODE SEL. (Select) Button
(pages 24, 27)
12
Loading...