


|
User manual |
|
Manuel d'utilisation |
|
Manual de usuario |
|
|
Streaming media box |
|
Boîtier multimédia en continu |
DBA936 |
Reproductor de medios de comunicación audiovisual |
www.RCAav.com |
It is important to read this instruction book prior to using your new product for the first time. Il est important de lire ce manuel d’instructions avant d’utiliser l’appareil pour la première fois.
Es importante que lea este libro de instrucciones antes de usar su producto nuevo por primera vez.
Safety Instructions
It's important to read this instruction prior to using your new product for the first time.
CAUTION |
RISK OF ELECTRIC SHOCK |
DO NOT OPEN |
The lightning flash with an arrowhead symbol, within the equilateral triangle, is intended to alert the user to the presence ofuninsulated“dangerousvoltage”withintheproduct’senclosure that may be of sufficient magnitude to cause an electric shock.
The exclamation point within the equilateral triangle is intended to alert the user to the presence of important operating and maintenance (servicing) instructions in this owner’s manual.
WARNING:
TO REDUCE THE RISK OF ELECTRIC SHOCK, DO NOT REMOVE COVER (OR BACK). NO USERSERVICEABLE PARTS INSIDE.REFER SERVICINGTO QUALIFIED SERVICE PERSONNEL.
WARNING:
TO PREVENT FIRE OR SHOCK HAZARD,DO NOT EXPOSETHIS APPLIANCETO RAIN OR MOISTURE.DO NOT PLACE OBJECTS FILLED WITH LIQUIDS ON OR NEARTHIS UNIT.
Safety Precautions
This device complies with Part 15 of the FCC Rules. Operation is subject to the following two conditions:
(1) This device may not cause harmful interference, and (2) this device must accept any interference received, including interference that may cause undesired operation.
This equipment has been tested and found to comply with the limits for a Class B digital device,pursuant to Part 15 of FCC Rules. These limits are designed to provide reasonable protection against harmful interference in a residential installation.This equipment generates,uses,and can radiate radio frequency energy and,if not installed and used in accordance with the instructions,may cause harmful interference to radio communications.
However,there is no guarantee that interference will not occur in a particular installation.If this equipment does cause harmful interference to radio or television reception, which can be determined by turning the equipment off and on, the user is encouraged to try to correct the interference by one or more of the following measures:
•Reorient or relocate the receiving antenna.
•Increase the separation between the equipment and receiver.
•Connecttheequipmentintoanoutletonacircuitdifferentfromthattowhichthereceiverisconnected.
•Consult the dealer or an experienced radio/TV technician for help.
WARNING: Changes or modifications not expressly approved by the party responsible for compliance could void the user’s authority to operate the equipment.
FCC RF Radiation Exposure Statement :
This equipment complies with FCC radiation exposure limits set forth for an uncontrolled environment. This equipment should be installed and operated with minimum distance 20 cm between the radiator and your body. End users must follow the specific operating instructions for satisfying RF exposure compliance.This transmitter must not be co-located or operating in conjunction with any other antenna or transmitter.
CAUTION: Regulations of the FCC and FAA prohibit airborne operation of radio-frequency wireless devices because their signals could interfere with critical aircraft instruments.
HDMI,theHDMIlogoandHigh-DefiinitionMultimediaInterfacearetrademarksorregistered trademarks of HDMI Licensing, LLC.
EN - 1

General Controls Reference Guide
Unit
1 2 3 4 5
|
|
|
|
|
|
|
|
|
|
|
|
|
|
|
|
|
|
|
|
6 |
7 |
8 |
9 |
|
|||||
|
|
|
|
|
|
|
|
|
|
Accessories
• |
AC adapter ................................................................. |
x1 |
• |
Wireless mouse (with USB receiver) ............. |
x1 |
• |
Batteries (AAA type) ............................................. |
x2 |
1.DC IN power jack
2.Composite VIDEO out jack
3.Analog audio out jacks
4.LAN jack
5.HDMI out jack
6.SD card slot
7.Power indicator
8.ON/STANDBY Button
9.USB1 / USB2 ports
Remark:
USB2 port is designed for PC.
To Install Batteries on the wireless mouse
1. Open the battery door. 2. Insert two AAA batteries (included).
Battery Replacement
When the batteries become weak, the operating of the mouse is greatly reduced and you will need to replace them.
Notes:
•If the mouse is not going to be used for a long time,remove the batteries to avoid corrosion damage caused by battery leakage.
•Do not mix old and new batteries. Do not mix ALKALINE, standard (CARBON-ZINC) or rechargeable (NICKEL-CADMIUM) batteries.
•Always remove batteries as soon as they become weak.
•Weak batteries can leak and severely damage the mouse.
WARNING:
Do not dispose of batteries in a fire. batteries may explode or leak.
CAUTION:
Danger of explosion if battery is incorrectly replaced.Replace only with the same or equivalent type.
EN - 2

1 Connecting to aTV
A. Using an HDMI cable (for best connection)
Connect an HDMI cable (not included) to the HDMI OUT jack on your player and to the HDMI IN jack
on yourTV.
Notes:
• Do not tilt the connector when inserting it into the HDMI jack, and make sure the shapes of the jack and the connector are matched. 


•When using non-HDCP compatibleTV,the image will not display properly.
•An HDMI cable carries both video and audio signals. If you want to useTV speakers,you do not need to make an additional audio connection if you are using an HDMI cable.
|
High |
|
Definition |
|
TV |
HDMI cable |
|
(not included) |
HDMI IN |
B. Using an A/V cable
Connect the yellow connectors on an A/V cable (notincluded)totheVIDEOjackonyourplayerand theVIDEO IN jack on yourTV.Connect the red and white connectors to the AUDIO OUT jacks on your player and L/R AUDIO IN jacks on yourTV.
Standard |
R |
|
L |
|
|
|
|
|
|
Definition |
|
|
|
|
VIDEO IN |
AUDIO IN |
|
|
|
(Yellow) |
(Red) |
(White) |
(Yellow) |
(Red) |
|
|
|
|
(White) |
2 |
AV cable (not included) |
Connecting to an Audio System |
Using an Analog Audio cable
Connect an audio cable (not included) to the red and white AUDIO OUT jacks on your player and to theAUDIOINjacksonyourAVreceiveroramplifier.
3 Connecting toYour Network
Audio cable
(not included)
Your player can be connected to your home network:
•By connecting an Ethernet cable to the LAN jack on your unit and to a wired hub or router. Using a wired network provides the best performance, because the attached devices connect directly to the network and are not subject to radio frequency interference.
•By connecting the unit to your Wi-Fi network.
A. Connecting your player to a wired router
Connect an Ethernet cable to the LAN jack on the back of your player and to an Ethernet jack on a hub or broadband router.
Notes:
• Do not connect a modular phone cable to the LAN jack.
• Whenpluggingorunpluggingthecable, hold the connector on the end of the cable.When unplugging,do not pull on the cable. Press down the lock tab and pull the connector out of the jack.
EN - 3

B. Connecting your player to a wireless access point or router
Your player has an integrated Wi-Fi device |
|
|
and antenna. No physical connection |
|
|
to the wireless router is necessary. Place |
Modem Port |
|
your player within range of your wireless |
|
|
|
|
|
network. During configuration of your |
Wireless access point |
Unit |
player for network access, you may need |
|
|
|
|
|
to enter a password if your network has |
|
|
security turned on. |
|
|
Note:
Do not place anything on the top of your unit. Placing objects on the top of your unit may interfere with the wireless signal, or cause the unit to overheat.
C. Connection Status
To check your network connection status, select the Setup menu from Home Menu, then select Setup ->
Wi-Fi or Ethernet.You can check the status of Wi-Fi or Ethernet.
4 Connnection to other devices
A.USB device
Insert the USB device into USB port, after system automatically detected USB device, then it can work.
Go to Media menu and click Music,Video or Photo app to play.
B. SD card device
Insert the SD card into SD card slot, after system automatically detected SD device, then it can work.
Go to Media menu and click Music,Video or Photo app to play.
5 Powering up & Initial setup
Operating with the wireless mouse
Before operation of this unit, please operate the wireless mouse first.
1. |
Remove the |
wireless |
mouse’s |
|
USB receiver |
from the battery |
|
|
compartment. |
|
|
2. |
Insert USB receiver into USB1 or 2. |
||
3. |
Switch “ON” the mouse. |
USB receiver |
|
After connection of this unit
1.When plug in the power to the unit,it will turn ON automatically.GREEN indicator lights up when on.
Notes:
•Short press the button the unit to turn it on Standby Mode, then the RED indicator lights up.
•Press and hold the button to shut down the unit.
2.There is a POWER icon added in the Home menu,you can use the mouse to click the POWER icon to shut down the unit.
3.You can press the  button on the unit to turn it ON.
RCA Streaming Media Box
EN - 4
Additional Information of Setting Screen Scale Setting
To optimizes your viewing screen, go to the setting of Setup menu and select Screen Scale Slide the selector to the right or left to adjust the picture to fit yourTV screen.
Closing Apps
Sometimes the performance of theTV Box will slow down and this can be caused by having too many Apps open.It is best to close down the Apps you are no longer using.
Click on the recent app icon (double rectangle icon) in the task manager bar located on the bottom left side of the screen.Once a list of apps show up,click,hold and drag to the left/right to close the app.You can also use a task manager (must download) to close all the apps at once or disconnect the AC adapter from the device to stop all apps.
DLNA streaming from smartphones, tablets or computers
You need to download a DLNA compatible app to your smartphone or tablets, in order to play media files from your smartphone or tablets to the unit.
Your need to enable DLNA function on your computer,in order to play media files from your computer to the unit.
Go to Media menu and click File Sharing app,it will show the network device,which is DLNA compatible and connected to the same Wi-Fi network.
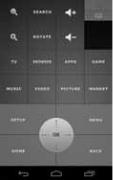
You can control the unit with your Android phone or tablet
1.Open“Smart Remote”in the Apps menu.
2.Confirm the“Remote control by Wi-Fi device.
3.Downloadandinstallthe“Smart Phone Remote”app onyourAndroid phone or tablet.
(Before you use Smart Phone Remote, make sure Android phone or tablet and RCA Streaming Media Box are connected with the same Wi-Fi network.)
4.Open the “Smart Phone Remote” app on your Android phone or tablet.
5.Touch the Search icon.
6.You will find the“RCA DBA936” device.
7.Press and choose “Connect Device”. If the connection is success, you will see the right screen.
EN - 5
Troubleshooting
Player does not work
•Unplug the AC power adapter,wait at least ten seconds,then plug it back in.
•Ensure the AC adapter is securely inserted into the unit’s power jack and an AC outlet. The unit’s GREEN power indicator should turn on within ten seconds of the Player’s AC Adapter being plugged in.
•See troubleshooting tips below.
The wireless mouse does not work properly
Check the following:
•The batteries are inserted correctly.
•The batteries are fresh.
•Ensure the mouse is switched to ON.
The Player has a poor or intermittent connection to the Wi-Fi access point (eg wireless router)
•Thewirelesscommunicationmaybeinterruptedfromhouseholddevicesthatareusingradiofrequencies.
Move the unit away from them.
•The Access Point is located too far from the unit.
My Wi-Fi network is not displayed on the“Network List”
•The access point or wireless LAN router may not broadcast its SSID.
-Manuallyenteryouraccesspoint’sSSIDbyADDNETWORKintheSettingsMenuoftheunit.
-Or set your access point to broadcast its SSID.
•YourWi-Finetworkmaynotbesettothefrequencyrangeorrangeofchannelsthatthisunitcansupport. Try adjusting the frequency range and/or channel of your network.
Player doesn’t display video on my TV screen
•SelecttheappropriatevideoinputmodeontheTVsothepicturefromtheunitappearsontheTVscreen.
•Make sure your HDMI cable or RCA cable is securely inserted in both the unit and yourTV.
•YourTV may not support the resolution you have set on the unit Change the resolution to match your TV’s resolution.
•The unit’s HDMI OUT cable is not securely connected to your unit or yourTV.
The picture noise appears“noisy” or degraded
•The unit may be set to a HDMI resolution that’s higher than your TV’s. Change the resolution to match
yourTV’s resolution.
The Player has“frozen” or stopped working
•To reset the unit,unplug the AC power adapter,wait at least ten seconds,and then plug it back in.
•Make sure your mouse is functioning properly.
My Player seems to shut down by itself, is there a problem?
•No,inordertosaveyoupower,theunitwillshutdownafterprolongedperiodsoninactivity-don’tworry, it won’t shut down while you’re using it.”
Important Information Relating to Network Services
All information, data, documents, communications, downloads, files, text, images, photographs, graphics, videos, webcasts, publications, tools, resources, software, code, programs, applets, widgets, applications, products and other content (“Content”) and all services and offerings (“Services”) provided or made available by or through any third party (each a“Service Provider”) is the sole responsibility of the Service Provider from whom it originated.
The availability of and access to Content and Services furnished by the Service Provider through this device are subject to change at any time, without prior notice, including, but not limited to the suspension, removal or cessation of all or any part of the Content or Services.
Should you have any inquiry or problem related to the Content or Services, you may refer to the Service Provider’s website for the most up-to-date information. AVC Multimedia is neither responsible nor liable for customer service related to the Content and Services.Any question or request for service relating to the Content or Services should be made directly to the respective Content and Service Providers.
Please note that AVC Multimedia is not responsible for any Services provided by the Service Provider or any changes to, removal of, or cessation of such Services and does not warrant or guaranty the availability of or access to such Content or Services.
EN - 6
 Loading...