


Wireless Portable Phone Jack
Conector para Teléfono Portátil Inalámbrico
VOIP/MODEM
VOIP/MÓDEM
PHONE
TELÉFONO
SATELLITE
SATÉLITE
User’s Guide |
RC940 |
Guía del Usuario

Important Safety Precautions
This symbol is intended to alert you to the presence of uninsulated dangerous voltage within the system’s enclosure that might be of sufficient magnitude to constitute a risk of electric shock. Do not open the system’s case.
This symbol is intended to inform you that important operating and maintenance instructions are included in the literature accompanying the system.
Read and follow precautions when installing and using the Wireless Phone Jack System.
•Read and understand all instructions.
•Follow all warnings and instructions marked on the system and in this guide.
•Unplug this system from the wall outlet before cleaning. Do not use liquid or aerosol cleaners. Use a damp cloth for cleaning.
•Do not use this system near water; for example, near a bath tub, washbowl, kitchen sink, or laundry tub, in a wet basement, or in or near a swimming pool.
•This system should never be placed near or over a heat radiator or register. This system should not be placed in a built-in installation unless proper ventilation is provided.
•This system should only be operated from the type of power source indicated in this guide and on the system’s label. If you are not sure of the type of power supplied to your home or building, consult your local power company.
•Never spill liquid of any kind on the system.
•To reduce the risk of electric shock, do not disassemble this system, but take it to a qualified service facility when service or repair is required.
•Opening or removing the covers might expose you to dangerous voltages or other risks. Incorrect reassembly can cause electric shock when the system is subsequently used.
•Unplug the system from the wall outlet and refer servicing to a qualified service facility under the following conditions:
A.When the AC plug is damaged.
B.If liquid has been spilled into the system.
C.If the system has been exposed to rain or water.
D.If the system does not operate normally by following the operating instructions.
E.If the system has been dropped or the cabinet has been damaged.
F.If the system exhibits a distinct change in performance.
•Avoid using a telephone, other than a cordless phone, during an electrical storm. There is a remote risk of electric shock from lightning.
•Do not use the telephone to report a gas leak in the area of the leak.
FCC Information
We designed your Wireless Phone Jack System to conform to federal regulations and you can connect it to most phone lines. However, each device you connect directly to the phone line draws power from it. This power draw is the device’s ringer equivalence number, or REN. The REN is shown on the base unit’s label.
If you connect more than one phone or other device directly to the phone line, add up all the RENs. If the total is more than five (or three in rural areas), your phones may not ring. If ringer operation is impaired, remove a device from the line. Your Wireless Phone Jack utilizes RJ-11 phone connectors.
Note: Your Wireless Phone Jack System has a REN of 0.1B, and so does not affect your phone’s ability to ring. Also, the phone you plug into the extension unit does not place any load on the telephone line. However, the phone you plug into the base unit does affect the total REN. If your Wireless Phone Jack System causes problems on the phone line, the telephone company can disconnect your service. The phone company tries to notify you in advance. If advance notice is not practical, the telephone company notifies you as soon as possible and advises you of your
right to file a complaint with the FCC.
Caution: Changes or modifications not expressly approved by the party responsible for compliance could void the user's authority to operate the equipment.
2

FCC Part 68 & Class B Notices
Your Wireless Phone System complies with Part 68 of FCC Rules. You must, upon request, provide the FCC registration number and the REN to your telephone company. These numbers are shown on the label on the base unit.
This equipment complies with the limits for a Class B digital device as specified in Part 15 of FCC Rules.
These limits provide reasonable protection against radio and TV interference in a residential area.
However, your equipment might cause TV or radio interference even when it is operating properly. To eliminate interference you can try one or more of the following corrective measures:
•Reorient or relocate the receiving antenna
•Increase the distance between the system and the radio or TV
•Use outlets on different electrical circuits for the equipment and the radio or TV
Read the Troubleshooting section of this manual for directions on remedying the problem.
Lightning
Your Wireless Phone Jack System has built-in protection circuits to reduce the risk of damage from surges in the telephone line. These protection circuits meet or exceed the FCC requirements. However, lightning striking the telephone or power lines can damage your system. Lightning damage is not common. Nevertheless, if you live in an area that has severe electrical storms, we
suggest that you unplug the system during storms to reduce the possibility of damage.
Important Notes On Operation
•Do not plug Phone Jacks into power strips or surge protectors.
•Phone Jack Extension does not operate during a power outage.
•Phone Jack System can only be used for single phone line.
•Be sure to plug Base unit (two jacks on side) in first before Extension unit (one jack on side).
•If you cannot get a dial tone, unplug both phone jacks and reset units following the section titled “Troubleshooting”on page 10.
•It is very important that directions are followed in order. In the event of a problem unplug both units, remove all cords and start again.
Industry Canada Equipment Notice
The Industry Canada label identifies certified equipment. This certification means that the equipment meets certain telecommunications network protective, operational and safety requirements as prescribed in the appropriate Terminal Equipment Technical Documents(s). The Department does not guarantee the equipment will operate to the user’s satisfaction.
Before installing this equipment, users should ensure that it is permissible to be connected to the facilities of the local telecommunications company. The equipment must also be installed using an acceptable method of connection. The customer should be aware that compliance with the above conditions may not prevent degradation of service in some situations.
Repairs to certified equipment should be coordinated by a representative designated by the supplier. Any repairs or alterations made by the user to this equipment , or equipment
malfunctions, may give the telecommunications company cause to request the user to disconnect the equipment.
Users should ensure for their own protection that the electrical ground connections of the power utility, telephone lines and internal metallic water pipe system, if present, are connected together.
This precaution may be particularly important in rural areas.
Caution: Users should not attempt to make such connections themselves, but should contact the appropriate electric inspection authority, or electrician, as appropriate.
Product Registration
Please register your product online as soon as possible. Registering your product allows us to contact you if needed.
Product Information
Keep your sales receipt to obtain warranty parts and service and for proof of purchase. Attach it here and record the serial and model numbers in case you need them. These numbers are located on the product.
Model No.:_________________________________________
Purchase Date:_____________________________________
Dealer/Address/Phone:______________________________
English
3
Getting Started
Unpacking
Carefully remove units from packaging. If there is any visible damage, DO NOT attempt to operate the equipment. Notify your dealer or shipping carrier immediately. Keep this guide for future use.
What's In the Package?
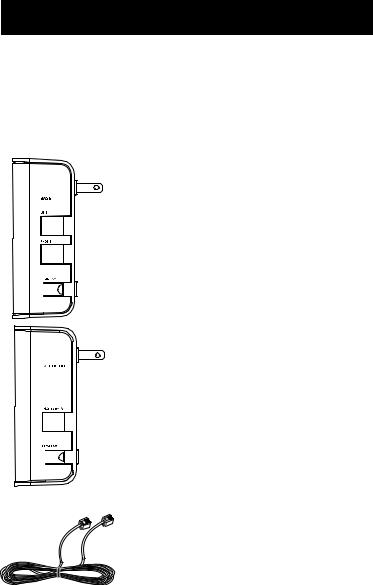
•Base Unit
The base unit has two modular telephone jacks and a PROGRAM button on its right
side. Its front has an indicator light.
This is the unit you plug your existing phone or VoIP line into.
NOTE: Install the Base Unit FIRST to ensure proper performance.
•Extension Unit
The extension unit has one modular
telephone jack and a PROGRAM button on its right side. Its front has an indicator light as well.
This is the unit that can be moved from location to location to create a phone, modem, or VoIP jack in an electrical outlet.
• Telephone Cord (6’)
A 6 ft. telephone cord is provided to connect the base unit to the existing wall phone jack.
4
Installation for Phone, Fax/Modem, & Satellite
Follow these steps to use the RC940 with a regular phone, fax/modem, or satellite receiver.
NOTE: For installation with a VoIP service, see page 7.
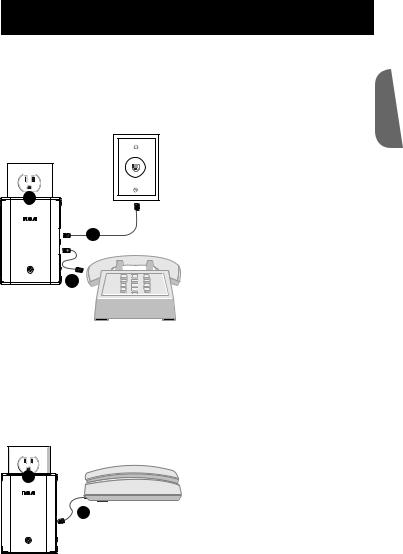
Installing the Base Unit |
|
|
1. Plug the base unit into an |
|
electrical outlet near an |
|
existing wall phone jack. The |
|
indicator light on the front of |
1 |
the base turns red. |
|
|
Important: The base and |
|
extension units work best |
2 |
when plugged directly into an |
|
electrical outlet. Do not plug |
|
them into a surge protector, |
3 |
plug strip, or extension cord. |
|
English
2.Plug one end of the provided telephone cord into the LINE jack on the right side of the base unit, and the other end into any existing wall phone jack. The base unit's indicator light should turn green.
3.If you want to use a phone at this jack, plug it into the PHONE jack on the side of the base unit.
Installing and Testing the Extension Unit
|
|
1. Plug the extension unit into an |
1 |
|
electrical outlet where you want |
|
a new phone jack. The indicator |
|
|
|
light on the extension unit blinks |
|
2 |
red. As soon as the extension |
|
and base units recognize each |
|
|
|
|
|
|
other, the extension unit's |
|
|
indicator light turns green. |
2.To make sure you've completed the installation successfully, plug a handset or cordless phone into the PHONE/DATA jack on the extension unit.
Important: If your phone requires power to operate, don't forget to plug its power adapter in! The extension unit provides the phone signal to the connected phone, not power.
continues on next page...
5
Note: The indicator lights on the base and extension units blink green when the handset connected to the extension unit is taken off its hook.
3.Pick up the handset and listen for a dial tone. If you hear one, you've successfully set up the base and extension units. If you do not hear a dial tone, see the Troubleshooting section in this manual for possible solutions.
If you're using the extension unit for an additional telephone, congratulations: you've completed the installation! If you want to use the extension jack with a satellite receiver, modem, or fax, see the instructions that follow for your device.
Connecting to a Satellite Receiver
After installing the base and extension units, follow these steps to connect the extension unit to a satellite receiver.
1.Disconnect the phone you used to test for dial tone from the extension unit.
2.Plug the telephone line cord from your satellite receiver into the
PHONE/DATA jack on the side of the extension unit.
If the indicator light on the extension unit stays green, your satellite receiver is now connected to your phone line. If it turns red, see the
Troubleshooting section in this manual for possible solutions.
Connecting to a Modem or Fax
After installing the base and extension units, follow these steps to connect the extension unit to a modem or fax.
1.Disconnect the phone you used to test for dial tone from the extension unit.
2.Plug the telephone line cord from your modem or fax into the PHONE/DATA jack on the side of the extension unit.
If the indicator light on the extension unit stays green, your modem or fax is now ready to operate. If it turns red, see the Troubleshooting section in this manual for possible solutions.
Note: Under certain circumstances where static is present in your telephone line, the RC940 may not filter or remove such static. This condition can affect modem or fax machine performance. Try installing the base unit and/or the extension unit in another electrical outlet.
6

Installation for VoIP Service
Follow these steps to use the RC940 with a VoIP service.
NOTE: You must subscribe to a VoIP service with decoder box in order to use the RC940 for an additional VoIP line. The RC940 will not work with VoIP without a decoder box.
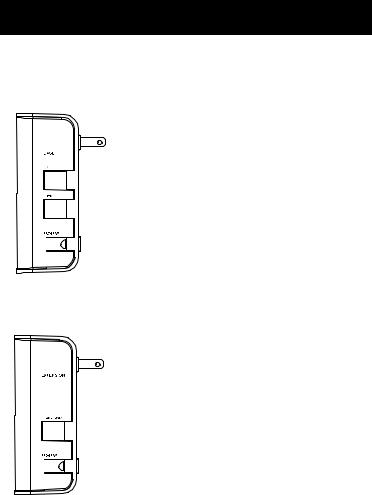
Installing the Base Unit
VOIP decoder box |
1. Plug the base unit into an |
|
electrical outlet near your VoIP |
1 |
decoder box. The indicator |
light on the front of the base |
|
|
turns red. |
2 |
Important: The base and |
|
extension units work best |
|
when plugged directly into an |
3 |
electrical outlet. Do not plug |
|
them into a surge protector, |
|
plug strip, or extension cord. |
English
2.Plug one end of the provided telephone cord into the LINE jack on the right side of the base unit, and the other end into phone output of the VoIP decoder box. The base unit's indicator light should turn green.
3.Plug the phone you use with the decoder box into the PHONE jack on the side of the base unit.
Installing and Testing the Extension Unit
|
1. Plug the extension unit into |
|
|
an electrical outlet where |
|
1 |
you want a new VoIP jack. |
|
The indicator light on the |
||
|
||
|
extension unit blinks red. As |
|
2 |
soon as the extension and base |
|
|
units recognize each other, the |
|
|
extension unit's indicator light |
|
|
turns green. |
2.To make sure you've completed the installation successfully, plug a handset or cordless phone into the PHONE/DATA jack on the extension unit.
Important: If your phone requires power to operate, don't forget to plug its power adapter in! The extension unit provides the phone signal to the connected phone, not power.
continues on next page...
7
Note: The indicator lights on the base and extension units blink green when the handset connected to the extension unit is taken off its hook.
3.Pick up the handset and listen for a dial tone. If you hear one, you've successfully set up the base and extension units. If you do not hear a dial tone, see the Troubleshooting section in this manual for possible solutions.
Programming Additional Extension Units
Follow these steps to add extension units to your current setup.
Note: If your first extension unit's indicator light remains red, follow these steps to get the extension and base units to recognize each other.
1.Press the PROGRAM button on the right side of the base unit. The indicator on the front of the base unit begins to flash
orange. The base unit is now in program mode, which allows newly added extension units to get the current link code.
NOTES:
•If the base unit's indicator light turns solid red before it begins to flash orange, you need to press the PROGRAM button on all extension units while the base is in program mode.
•Make sure neither the base nor extension unit is plugged into a surge protector, plug strip, or extension cord.
2.Press the PROGRAM button on the right side of the added extension unit (or,
if you're not adding an extension, the
unit with a solid red indicator light). The indicator light on the extension unit flashes red, then turns solid green.
If you are adding more than one extension unit, press the PROGRAM button on each added extension unit.
8
 Loading...