


SATELLITE RECEIVER
USER'S GUIDE

SAFETY INFORMATION
WARNING |
|
|
|
TO REDUCE THE RISK OF ELECTRIC SHOCK, DO NOT REMOVE |
|
|
|
WARNING |
|||
|
|
COVER (OR BACK). NO USER SERVICEABLE PARTS INSIDE. |
|||
|
|
|
|
||
To reduce risk of fire or |
|
|
RISK OF ELECTRIC SHOCK |
REFER SERVICING TO QUALIFIED SERVICE PERSONNEL. |
|
|
|
|
|
|
|
shock hazard, do not |
|
|
DO NOT OPEN |
|
|
|
|
|
|
This symbol indicates |
|
|
|
This symbol indicates |
|||
expose this receiver to |
|
|
|||
rain or moisture. |
|
|
“dangerous voltage” inside the |
important instructions |
|
|
|
|
product that presents a risk of |
accompanying the product. |
|
|
|
|
electric shock or personal injury. |
|
|
|
|
||||
|
|
|
|
|
|
Cautions |
|
|
Do not stack electronic components or other objects on top of |
||
|
|
the DSS® Receiver. The slots on top of the receiver must be left |
|||
uncovered to allow proper airflow to the unit. Blocking the airflow to the unit could impair performance or damage your receiver and other components.
Do not stack the DSS® receiver on top of a “hot component” such as an audio power amplifier.
FCC Regulations state that unauthorized changes or modifications to this equipment may void the user’s authority to operate it.
The RF remote control complies with part 15 of the FCC Rules. Operation is subject to the following two conditions: 1) The RF remote control may not cause harmful interference and; 2) The RF remote control must accept any interference received, including interference that may cause undesired operation.
Note to Cable TV Installer: |
This reminder is provided to call your attention to Article 820-40 of the |
|
National Electrical Code (Section 54 of the Canadian Electrical Code, |
|
Part 1) which provides guidelines for proper grounding and, in |
|
particular, specifies that the cable ground shall be connected to the |
|
grounding system of the building as close to the point of cable entry as |
|
practical. |
Note to Satellite Dish Installer: |
This reminder is provided to call your attention to Article 810 and in |
|
particular article 810-15 of the National Electrical Code which covers |
|
proper installation and grounding of television receiving equipment as |
|
well as to article 820-40 of the National Electrical Code which specifies |
|
that the satellite dish cable ground shall be connected to the |
|
grounding system of the building as close to the point of cable entry as |
|
practical. |
|
|
IMPORTANT NOTICE: |
This device incorporates an anticopy process technology that is |
|
protected by U.S. patents and other intellectual property rights. The |
|
anticopy process is licensed for non-commercial, home use only. Reverse |
|
engineering or disassembly is prohibited. |
|
|
Care and Cleaning: |
Use a soft cloth or dusting attachment of your vacuum cleaner to dust |
|
your DSS® receiver. Remove dust from the ventilation holes on the top |
|
and bottom. |
|
Plastic surfaces are easily scratched and can be marred by alcohol and |
|
various solvents. Avoid excessive use of oil-based furniture polishes |
|
since the materials used in the cabinet will accumulate more dust. A |
|
non-abrasive, anti-static cleaner/polisher is recommended. |

TABLE OF CONTENTS
First Things First ................................................... |
3 |
What is the DSS® System? ............................................................... |
4 |
What’s in the Box ............................................................................ |
5 |
Using This Manual ........................................................................... |
6 |
The Point and Select Method ................................................... |
7 |
Connecting Your DSS® Receiver to Your TV ................................... |
8 |
Things to Know Before Connecting Components .................. |
8 |
Jacks and Cables ........................................................................ |
9 |
Connecting the VCR Controller .................................................... |
14 |
Choosing a DSS® Output Channel ................................................ |
16 |
Connecting a Compatible D-VHS VCR .......................................... |
18 |
Ordering DSS® Programming ........................................................ |
18 |
Program Guides .................................................. |
19 |
Anatomy of a Program Guide ...................................................... |
20 |
Anatomy of The Channel Banner ................................................. |
21 |
Using the GUIDE Button ............................................................... |
22 |
Getting Around in the Guides ...................................................... |
22 |
Tuning to a Program ............................................................... |
23 |
The Other Program Guides ........................................................... |
23 |
Sorting the Guides ....................................................................... |
25 |
The Menu System ............................................... |
31 |
Using the Menu System ................................................................ |
32 |
Exit and Help ........................................................................... |
32 |
Menu Descriptions .................................................................. |
33 |
The Program Guide ....................................................................... |
34 |
Anatomy of a Program Guide ................................................ |
34 |
The Mailbox ................................................................................... |
35 |
How to tell when you have mail ............................................ |
35 |
Checking your mail ................................................................. |
35 |
Pay-Per-View Programs ................................................................. |
36 |
Purchasing and Previewing .................................................... |
36 |
Tuning to a PPV Program ....................................................... |
36 |
Using the Program Guide for PPV Programs ......................... |
37 |
Using the Attractions Guide ................................................... |
38 |
Using the Purchases Menu ..................................................... |
39 |
Reviewing and Canceling an Upcoming Purchase ................ |
39 |
Spending Limits ....................................................................... |
40 |
Timers Feature ............................................................................... |
41 |
Profiles ........................................................................................... |
43 |
Creating a Profile Channel List .............................................. |
43 |
Setting the Ratings Limit ........................................................ |
44 |
1

TABLE OF CONTENTS
Viewing Hours ......................................................................... |
45 |
Setting Up Spending Limits .................................................... |
45 |
Locking a User’s Profile........................................................... |
46 |
Locking the System ................................................................. |
46 |
Choosing Your Profile ............................................................. |
47 |
Options .......................................................................................... |
48 |
Look and Feel .......................................................................... |
49 |
System Options ....................................................................... |
50 |
Alternate Audio ...................................................................... |
51 |
Alternate Data ........................................................................ |
51 |
The Dish Pointing Menu Screen ................................................... |
52 |
Using the On-Screen Signal Meter ........................................ |
53 |
Home Control ................................................................................ |
54 |
Fetch Menu .................................................................................... |
56 |
Reference............................................................. |
57 |
Parts of the DSS® System ............................................................... |
58 |
World View.............................................................................. |
58 |
Home View .............................................................................. |
59 |
Controls and Buttons .................................................................... |
60 |
Front Panel Controls ............................................................... |
60 |
Back Panel Controls ................................................................ |
61 |
Remote Control Buttons ......................................................... |
62 |
Programming the Remote Control .............................................. |
63 |
Programming the Remote to Control Your TV ..................... |
64 |
Programming the Remote to Control Your VCR ................... |
64 |
Programming the Remote to Control Other Devices ........... |
65 |
Using the Remote Buttons to Control a Device .................... |
65 |
Remote Codes ......................................................................... |
66 |
Glossary .......................................................................................... |
68 |
Troubleshooting ............................................................................ |
70 |
Running the System Test ............................................................... |
70 |
Appendix A: Warranty Information .................. |
71 |
Appendix B: FCC Regulations ............................ |
74 |
Appendix C: Accessories .................................... |
75 |
Index .................................................................... |
77 |
DSS® is a registered trademark of DIRECTV, Inc., a unit of Hughes Electronics Corp.
StarSight-Licensed: The manufacture and sale of the television schedule feature of this product was licensed under one or more of the following patents of StarSight Telecast, Inc.; U.S. Patent Nos. 4,706,121; 4,977,455; 5,151,789; 5,335,277: and 5,353,121.
2

FIRST THINGS FIRST
READ THE FIRST TWO CHAPTERS
The first two chapters of the manual introduce you to your DSS® system, and show you how to use the on-screen guides and menus.
In First Things First, you’ll learn:
•how to use this manual
•how to use the menu system and guides
•different ways to connect the receiver to your TV
•how to connect the VCR controller
•how to set the output channel
•how to send the DSS® signal to multiple TVs
•how to connect a D-VHS VCR
•how to order programming
Program Guides details the items and features associated with the different guides.
THE REST OF THE MANUAL
The rest of the book includes menu information, reference information such as remote codes, a glossary, and an index.
1 FIRST THINGS FIRST
2 PROGRAM GUIDES
3 THE MENU SYSTEM
4 REFERENCE
5 APPENDICES
3

FIRST THINGS FIRST
WHAT IS THE DSS® SYSTEM?
You’ve purchased the DSS® Digital Satellite System, so you already know a lot of the great things it offers. You know that the DSS® system uses the latest satellite technology to deliver television programming to your home. And you know that the transmissions are digital, so the quality of the picture and audio rivals that of laser discs and CDs. You know the dish is small—18 inches wide—and that it often can be installed in a matter of hours. (See the DSS® System Installer Guide for specific information.)
Those are the some of the things you probably know about the DSS® system. But what about the things you don’t know? For instance...
•The DSS® system works like your TV. Pick up the DSS® remote and push the DSS1 button. Press the Channel Up/ Down buttons to scan through the channels. Press the number keys to go directly to a channel.
•There is an on-screen program guide. The program guide is like a TV listing in the newspaper. It is designed to help you select regular programs and pay-per-view events. You can also sort the guide to list only specific types of programs. You can select Sports, for example, and your guide will show current and upcoming sports programs only. Or Movies. Or News.
•There is the on-screen Menu System that allows you to customize your system. You can set up your system, build channel lists, preview coming attractions, set spending limits, and receive mail from your program providers.
•There are three types of On-line Help to assist you in learning how to use the DSS® system: Context-Sensitive Help (at the bottom of most menu screens), Help buttons, and the
About DSS menu.
4
FIRST THINGS FIRST
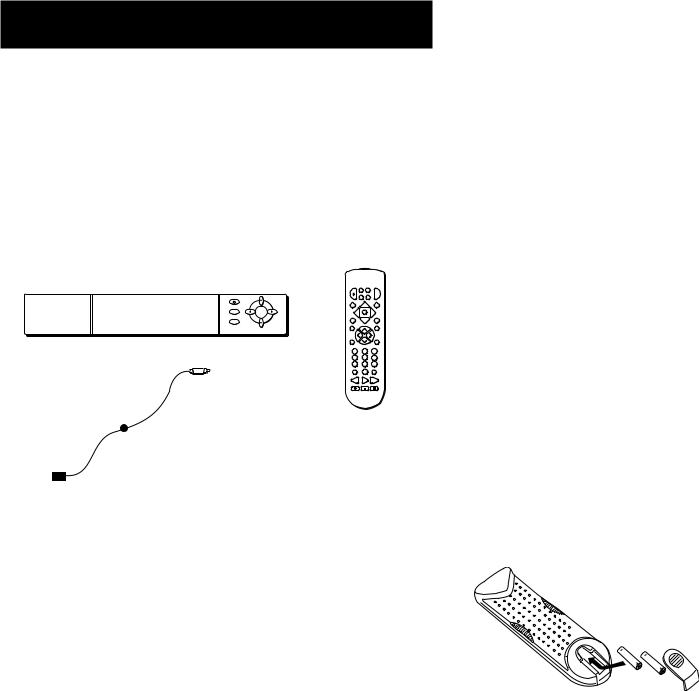
WHAT’S IN THE BOX
The following items come with your DSS® receiver:
•Receiver (with access card inserted)
•Remote Control
•VCR Controller
ON/OFF
INFO
MENU
SELECT
ANTENNA
Receiver
POWER |
VCR DSS1 |
TV |
|
|
AUX |
DSS2 |
|
GUIDE |
|
|
FETCH |
|
MENU |
|
|
|
S |
|
|
WHO |
ELECT |
CLEAR |
|
INFO |
CH+ |
|
ALT. AUD |
L |
|
|
V |
O |
|
|
O |
V |
|
|
L |
MUTE |
CH- |
|
GO BACK |
1 |
2 |
3 |
|
4 |
5 |
6 |
|
7 |
8 |
9 |
|
INPUT |
0 |
ANTENNA |
|
|
|
|
|
REVERSE |
PLAY |
FORWARD |
|
RECORD |
STOP |
|
PAUSE |
Remote Control
VCR Controller
INSTALLING BATTERIES IN THE REMOTE
CONTROL
Follow these steps whenever you need to install or change the batteries in your DSS® remote.
1.Remove the cover from the battery compartment.
2.Insert batteries as shown in the battery compartment, matching the + and - end of each battery.
3.Replace the cover.
Programming the Remote
Depending on your equipment you may need to program the remote to control other devices. Check out “Programming the Remote” in the Reference section.
5

FIRST THINGS FIRST
USING THIS MANUAL
There are a couple of conventions used in this manual that might help you read it.
•Words that appear in ALL CAPS indicate the name of a button.
•The names of on-screen menu options are shown in italics.
IMPORTANT NOTE ABOUT THIS USER’S
MANUAL
This manual assumes that your DSS® system has been installed, meaning:
1.The DSS® satellite dish antenna has been installed, correctly pointed at the satellite, and connected to your DSS® receiver.
2.The DSS® receiver is connected to your television and to a telephone line.
3.The access card is installed in your DSS® receiver.
Your access card has been matched to your receiver, and should already be installed when you take the receiver out of the packing box. The access card should only be taken out of the DSS® receiver when you are issued a new card by your programming providers.
4.The DSS® remote control has batteries and can be programmed to control both your DSS® receiver and your TV (if your TV is remote-controllable).
If your system has not been installed, refer to the satellite dish Installer's Guide for information regarding proper installation. Then, refer to the next section, Connecting Your DSS® Receiver to Your TV. See your dealer for specific information regarding professional installation or the purchase of a Self-Installer’s Kit.
6
FIRST THINGS FIRST
THE POINT AND SELECT METHOD
Point and Select is the two-step method you use to navigate through the menu system and program guides. Once you know how to point and select, you can explore the menus to learn more about how your DSS® system works.
1. POINT
You point by pressing the arrow keys on the remote or front panel. Pressing the arrow keys moves the on-screen highlight to different items in the program guide and the menu screens. Pressing an arrow once moves the highlight one space in the direction of the arrow.
For example, to point down (that is, to move the highlight toward the bottom of the screen), press the down arrow. To point right, press the right arrow.
|
EN |
M U |
|
E |
T |
S |
LEC |
|
|
ARROW KEYS
CLEAR
2. SELECT
Once you have pointed to an item on the screen, select it by pressing the MENU•SELECT button on the remote or front panel. Selecting an item tells the menu system to go ahead and make the change you have indicated.
For example, the instructions in the User’s Manual might tell you to Point to the Exit button and press MENU•SELECT.
Once you’ve got the hang of the Point and Select rule, you can use any part of the DSS® system.
Don’t worry about getting stuck inside a menu. Pressing the CLEAR button on the remote takes you out of the menu system and back to the program you were watching.
7

FIRST THINGS FIRST
CONNECTING YOUR DSS® RECEIVER TO
YOUR TV
During the satellite dish antenna installation, the receiver may have been connected to your TV with just a coaxial cable for the system test. Depending on what components you have, another connection may provide better picture and audio quality. The following sections provide cable and connection information to help you decide what connection is best for you.
THINGS TO KNOW BEFORE CONNECTING
COMPONENTS
Protect Your Components from Power Surges
•Connect all components before plugging any power cords into the wall outlet.
•Always turn off the DSS® receiver, TV and other components before you connect or disconnect any cables.
Position Cables Correctly to Avoid Audio Hum or Interference
•Insert all cable plugs firmly into their jacks.
•Place the audio/video cables to the sides of the TV’s back panel instead of straight down the middle after you connect your components.
•Try not to coil any twin-lead cables and keep them away from the audio/video cables as much as possible.
•Make sure all antennas and cables are properly grounded. Refer to the Safety Tips sheet packed with your unit.
Protect Your Components from Overheating
•Do not block ventilation holes in any of the components. Arrange the components so that air can circulate freely.
•Do not stack components.
•Allow adequate ventilation when placing your components in a stand.
•Place an amplifier or DSS® receiver on the top shelf of the stand so heated air rising from it will not flow around other components.
8
FIRST THINGS FIRST
JACKS AND CABLES
S-Video Jack and Cable
The S-Video jack provides the best picture quality for your DSS® system.
This jack is available on many TVs and is used in conjunction with |
S-Video Jack |
audio cables to connect the DSS® receiver to your TV. Remember |
|
also to connect the left and right audio cables because the |
|
S-video jack carries only the picture signal, not the sound. |
|
Audio/Video Jacks and Cables (RCA-type)
The audio/video jacks provide very good picture and stereo sound quality, and should be used if your TV has no S-Video jack.
Theses jacks are used for most audio/video connections between |
Audio/Video Jacks |
|
|
|
|
|
|
components. The DSS® receiver audio/video jacks are color coded |
|
|
|
(yellow for video, red for right audio, and white for left audio). If |
|
|
|
your TV has only one input for audio (mono), connect it to the |
|
|
|
right (red) audio jack on the DSS® receiver. |
|
|
|
RF Jacks and Coaxial Cables (F-type)
The RF jacks provide good picture and mono sound quality, and are to be used if audio/video connections are not available for your TV.
These jacks are required for antenna or cable-TV connections. |
RF Jack |
|
|
|
|
|
|
|
|
|
|
|
|
|
|||
The RF jacks on the DSS® receiver are labeled IN FROM ANT and |
|
|
|
|
|
|
|
|
OUT TO TV. The coaxial cable supplied with your DSS® system is |
|
|
|
|
|
|
|
|
used to connect the RF jacks between the DSS® receiver and your |
|
|
|
|
|
|
|
|
TV’s antenna input. |
|
|
|
|
|
|
|
|
|
|
|
|
|
|
|
|
|
VCR Controller Jack and Cable
The VCR controller cable plugs into a jack on the DSS® receiver’s |
VCR Controller Jack |
|
back panel. The other end of the cable affixes to your VCR’s |
|
|
|
|
|
remote sensor. |
|
|
Digital Audio/Video (DAV) Jack and Cable
The digital audio/video cable connects the DSS® receiver to a |
|
|
|
compatible D-VHS VCR. This connection lets you record and play |
Digital Audio/Video Jack |
||
back digital programming with virtually no loss in picture and |
|
|
|
sound quality. |
|
|
|
9
FIRST THINGS FIRST
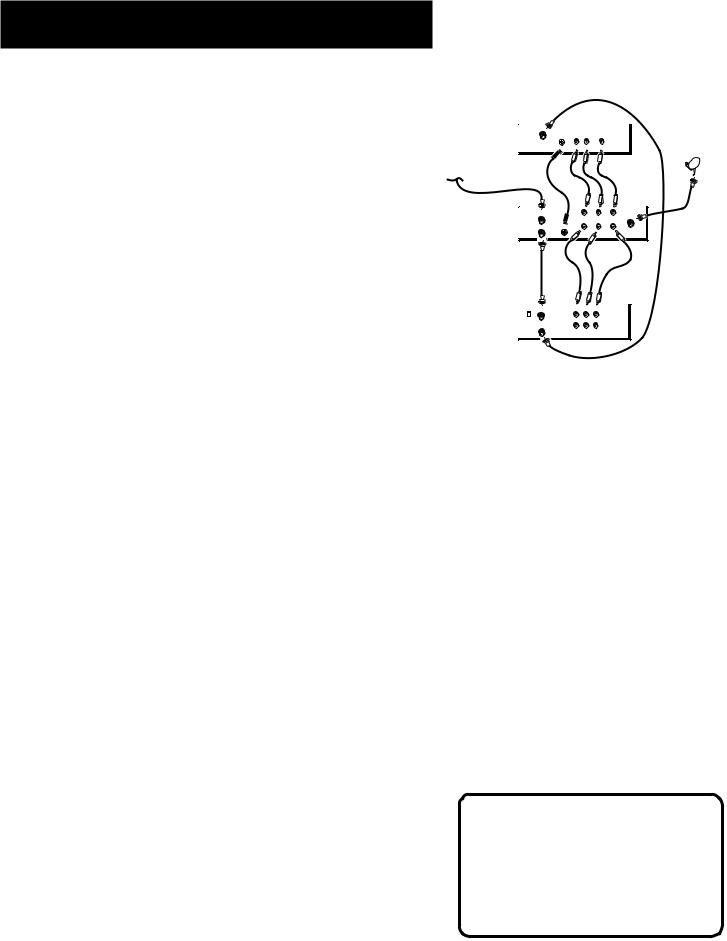
CONNECTION A
BEST PICTURE AND SOUND QUALITY
To use this connection you must have:
•TV with separate RF, audio/video, and S-Video inputs (jacks)
•VCR with RF and audio/video inputs
•Coaxial, audio/video, and S-Video cables
TV
 IN
IN
VIDEO
CABLE
OR
OFF-AIR ANTENNA
DSS |
IN FROM ANT |
|
|
RECEIVER |
VIDEO |
R |
AUDIO |
|
L |
||
|
OUT TO TV S- |
|
IN |
|
|
|
|
|
|
|
AUDIO |
To connect TV, VCR and antenna or cable box: |
VCR |
CH4 |
IN FROM ANT |
VIDEO AUDIO |
|
|
CH3 |
|
|
|
|
|
|
R L |
|
|
|
OUT TO TV |
|
|
|
|
|
VIDEO OUT AUDIO OUT |
1. Connect coaxial cables as shown.
2.Connect audio/video cables as shown.
3.Connect S-Video cable as shown.
To receive DSS® programming:
1.Tune TV to receive the S-Video output from the DSS® receiver.
2.Tune DSS® receiver to desired channel.
To receive off-air programming (no cable box):
1.Turn off VCR and DSS® receiver.
2.Tune TV to desired channel.
SATELLITE  DISH
DISH
To receive off-air programming (with cable box):
1.Turn off VCR and DSS® receiver.
2.Tune TV to cable box output channel (usually CH2, CH3, or CH4).
3.Tune cable box to desired channel.
To record DSS® programming:
1.Tune TV to receive S-Video output from DSS® receiver.
2.Tune DSS® receiver to desired channel.
3.Set your VCR to record on line input.
To view VCR programming:
1. Tune TV to VCR output channel (usually CH3 or CH4).
CAUTION
Do not stack electronic components or other objects on top of the DSS® receiver. See Safety Information, inside front cover.
10
FIRST THINGS FIRST
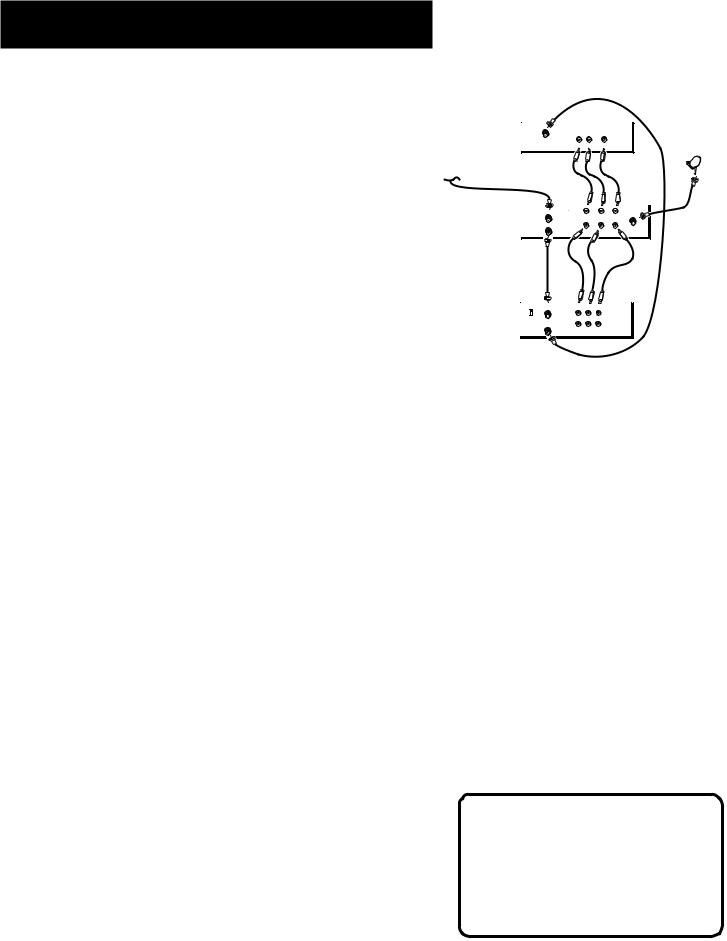
CONNECTION B
VERY GOOD PICTURE AND SOUND QUALITY
To use this connection you must have:
•TV with separate RF and audio/video inputs (jacks)
•VCR with RF and audio/video inputs
•Coaxial and audio/video cables
TV |
|
IN |
|
VIDEO |
R AUDIO L |
CABLE |
SATELLITE |
DISH |
|
OR |
|
OFF-AIR ANTENNA |
|
DSS |
IN FROM ANT |
|
|
RECEIVER |
VIDEO |
R |
AUDIO |
|
L |
||
|
OUT TO TV |
|
SATELLITE IN |
|
VIDEO |
R |
L |
|
|
|
AUDIO |
To connect TV, VCR and antenna or cable box:
1.Connect coaxial cables as shown.
2.Connect audio/video cables as shown.
To receive DSS® programming:
1.Tune TV to receive line output from DSS® receiver (often called Input 1).
2.Tune DSS® receiver to desired channel.
VCR |
CH3 |
IN FROM ANT |
VIDEO IN AUDIO IN |
|
CH4 |
|
|
R L
OUT TO TV
VIDEO OUT AUDIO OUT
To receive off-air programming (no cable box):
1.Turn off VCR and DSS® receiver.
2.Tune TV to desired channel.
To receive off-air programming (with cable box):
1.Turn off VCR and DSS® receiver.
2.Tune TV to cable box output channel (usually CH2, CH3, or CH4).
3.Tune cable box to desired channel.
To record DSS® programming:
1.Tune TV to record line output from DSS® receiver (Input1).
2.Tune DSS® receiver to desired channel.
3.Set your VCR to record on line input.
To view VCR programming:
1. Tune TV to VCR output channel (usually CH3 or CH4).
CAUTION
Do not stack electronic components or other objects on top of the DSS® receiver. See Safety Information, inside front cover.
11

FIRST THINGS FIRST
CONNECTION C
GOOD PICTURE AND SOUND QUALITY
To use this connection you must have:
•TV with RF input (jack)
•VCR with RF and audio/video inputs
•Coaxial and audio/video cables
To connect TV, VCR, and antenna or cable box:
1. Connect coaxial cables and audio/video cables as shown.
To receive DSS® programming:
•Tune TV to channel 3 or 4 (depending on how you set the CH3/CH4 switch on the back of the receiver).
TV
IN
 SATELLITE
DISH
DSS |
IN FROM ANT |
AUDIO |
RECEIVER |
VIDEO R |
|
|
L |
|
|
OUT TO TV |
IN |
CABLE |
|
|
|
AUDIO |
|
OR |
|
|
OFF-AIR ANTENNA |
|
|
VCR |
CH3 |
IN FROM ANT VIDEO |
AUDIO |
|
|
CH4 |
|
R |
L |
|
|
OUT TO TV |
||
|
|
|
|
|
|
|
VIDEO OUT AUDIO OUT |
||
To receive off-air programming (no cable box):
1.Turn off VCR and DSS® receiver.
2.Tune TV to desired channel.
To receive cable programming (with cable box):
1.Turn off VCR and DSS® receiver.
2.Tune TV to cable box output channel (usually CH2, CH3, or CH4).
3.Tune cable box to desired channel.
To record DSS® programming:
1.Tune TV to the channel on which you receive the DSS® signal.
2.Tune DSS® receiver to desired channel.
3.Set VCR to record on line input.
To view VCR programming:
1.Tune TV to VCR output channel (usually CH3 or CH4).
2.Turn DSS® receiver off.
CAUTION
Do not stack electronic components or other objects on top of the DSS® receiver. See Safety Information, inside front cover.
12

FIRST THINGS FIRST
CONNECTION D
GOOD PICTURE AND SOUND QUALITY
To use this connection you must have:
•TV with RF input
•Coaxial cables
To connect TV and antenna or cable box:
1. Connect coaxial cables as shown.
To receive DSS® programming:
•Tune TV to channel 3 or 4 (depending on how you set the CH3/CH4 switch on the back of the receiver.
To receive off-air programming (no cable box):
1.Turn off DSS® receiver.
2.Tune TV to desired channel.
TV |
|
|
|
|
|
|
SATELLITE |
|
|
|
DISH |
|
|
|
CABLE |
DSS |
|
|
OR |
IN FROM ANT |
|
OFF-AIR ANTENNA |
|
RECEIVER |
VIDEO |
R |
AUDIO |
|
L |
||
|
OUT TO TV |
|
SATELLITE IN |
|
VIDEO |
R |
|
|
L |
||
|
|
|
AUDIO |
To receive cable programming (with cable box):
1.Turn off DSS® receiver.
2.Tune TV to cable box output channel (usually CH2, CH3, or CH4).
3.Tune cable box to desired channel.
CAUTION
Do not stack electronic components or other objects on top of the DSS® receiver. See Safety Information, inside front cover.
13
FIRST THINGS FIRST
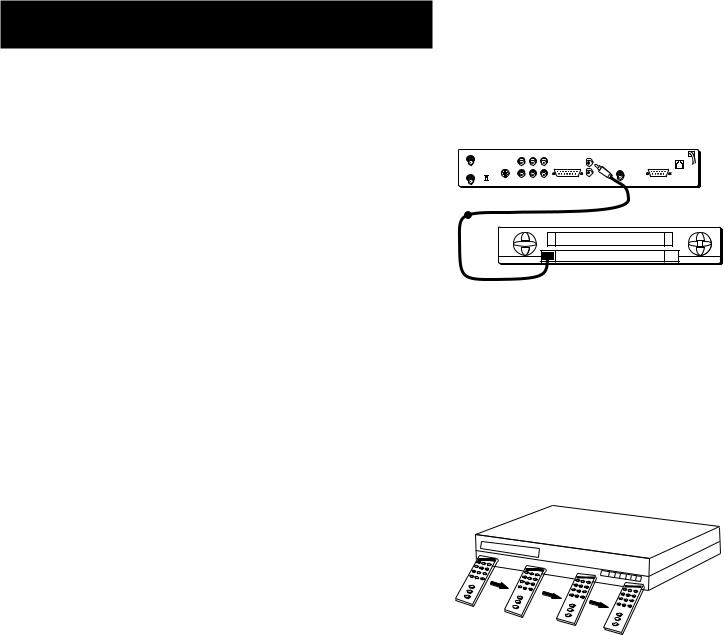
CONNECTING THE VCR CONTROLLER
In order for the DSS® receiver and VCR to communicate, you need to attach the VCR Controller to the back of the receiver.
1.Plug the VCR Controller into the VCR CONTROL jack on the back of the DSS® receiver.
2.Affix the other end to the remote sensor on your VCR.
LOCATING THE VCR’S INFRARED REMOTE
CONTROL SENSOR
The VCR Controller must be affixed directly over the infrared remote sensor on your VCR.
Some VCRs label the infrared remote sensor, and others do not. If your VCR is labeled, affix the VCR controller directly over the sensor.
Using the VCR Remote to Locate the Remote Sensor
For VCRs that do not label the remote sensor, you need to use the VCR’s remote to locate the sensor before affixing the VCR controller.
1.Hold the remote control so that it is touching the front of the VCR.
2.Slowly move the remote over the front of the VCR while pressing the remote power button on and off.
3.When your VCR turns off or on, you have located the sensor.
To test the VCR controller, use a piece of clear tape to temporarily attach the VCR controller to the spot where you think the sensor is located, and then follow the steps described under “Selecting a VCR Type.”
Back of DSS Receiver
OUT |
|
|
|
|
VCR CONTROL |
PHONE JACK |
TO |
|
|
|
|
|
|
TV |
|
|
|
|
|
|
|
S-VIDEO |
VIDEO |
R AUDIO L |
WIDE BAND DATA |
SATELLITE IN |
LOW SPEED DATA |
IN |
CH3 |
|
|
|
REMOTE IN |
|
FROM |
CH4 |
|
|
|
|
|
ANT |
|
|
|
|
|
Front of VCR
REMOTE SENSOR
VCR
14
FIRST THINGS FIRST
SELECTING A VCR TYPE
When you connect a VCR Controller, you need to tell the DSS® receiver which VCR brand you are using.
1.Press MENU•SELECT on the remote to bring up the Main menu.
2.Point to Options and press MENU•SELECT.
3.Point to System Options and press MENU•SELECT.
4.Point to Set VCR Type and press MENU•SELECT.
The Set VCR Type screen lets you enter a code for your VCR.
5.Use the arrows or digit keys to input the correct code for your VCR brand. The VCR codes are located in the “Reference” section of this book.
6.Follow the on-screen instructions to ensure that you are using the correct code. If the VCR automatically stops, then you know that the receiver and the VCR are communicating.
•Some VCR brands may not be capable of being controlled by the DSS® receiver.
15

FIRST THINGS FIRST
CHOOSING A DSS® OUTPUT CHANNEL
If you are using the OUT TO TV jack to send the signal to a TV, you need to know about the agile modulator. The agile modulator allows you to select the television channel you want to use when you output the DSS® signal from the OUT TO TV jack on the back of the receiver.
SELECTING AN OUTPUT CHANNEL
The default setting is channel 14 (off-air) and 65 (cable). Try to get a signal on these TV channels first. If you want to change the output channel:
1.Press MENU•SELECT to bring up the Main menu.
2.Point to and select Options.
3.Point to and select System Options.
4.Select Output Channel to begin the procedure, and follow the on-screen displays to select a new output channel.
In the first screen, you indicate whether you are getting local channels from cable service or off-air broadcasts, and in the screens that follow, you select an available output channel.
Select Output Channel to begin the procedure for changing your output channel.
You can select an off-air channel between UHF channels 14-69; or a cable channel from 65-94 or 100-125 (they use the same channel band). Go through your channels and find one within this range which currently does not have programming.
•If you can find three channels in a row that aren’t being used, choose the middle channel.
What Does the Agile
Modulator Do?
The agile modulator gives you more channels from which to choose an output channel. This should allow you to choose a channel not already being used by an off-air (antenna) broadcast station, or your local cable service.
Resetting the Agile
Modulator
To reset the output channel to the default (UHF channel 14 or cable channel 65), simultaneously press the DISPLAY button and the LEFT ARROW button ( ) on the front of the receiver.
16
FIRST THINGS FIRST
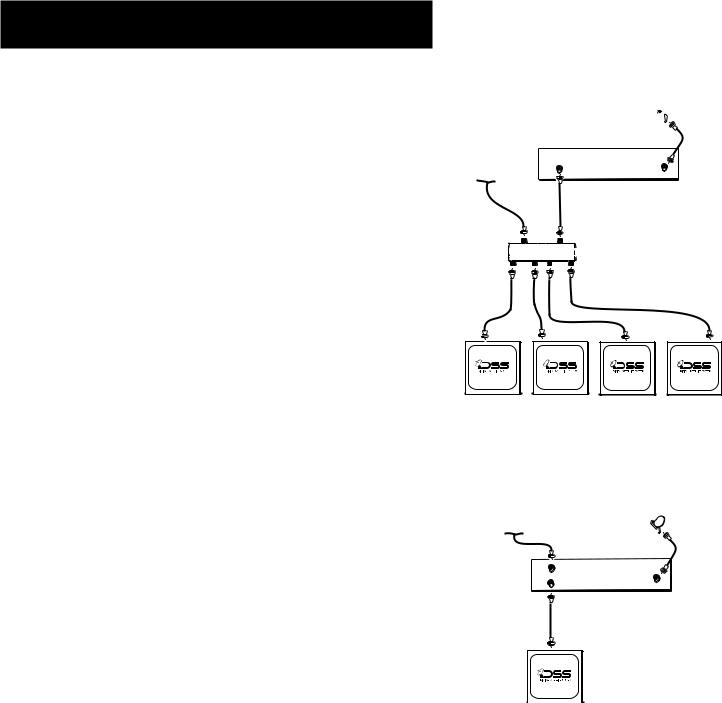
SENDING THE DSS® SIGNAL TO MULTIPLE TVS
The most important feature of the agile modulator is that it creates a unique DSS® television channel. This unique channel can be combined with other TV channels on your antenna or cable system. Combining the signals and distributing them to all the televisions in your home lets you watch DSS® programming or local programming on any television connected to your system by simply changing channels on the TV.
The simplified drawing at the right shows how cable or off-air signals and the DSS® output channel can be combined and routed through a whole-house distribution system (sold separately). Although not shown in detail, a whole-house distribution system consists of signal splitter/combiners and amplifiers to boost both the DSS® output channel and off-air or cable channels.
SINGLE TV OUTPUT
Although the agile modulator is designed for a whole-house distribution system, you may still need to set the output channel even if you are running a signal from the OUT TO TV jack to only one television. The default setting is channel 14 (off-air) and 65 (cable). Try to get a signal on these channels first; then go to Output Channel in the Options menu to change the agile modulator setting.
 SATELLITE
DISH
OFF-AIR ANTENNA |
OUT |
DSS |
|
OR |
SATELLITE IN RECEIVER |
||
TO |
|||
CABLE TV SIGNAL |
TV |
WHOLE-HOUSE
DISTRIBUTION SYSTEM
TVs IN YOUR HOME
OFF-AIR ANTENNA
OR
CABLE TV SIGNAL  SATELLITE DISH
IN |
|
FROM |
DSS |
ANT |
|
OUT |
RECEIVER |
TO |
SATELLITE IN |
TV |
|
TV |
17
FIRST THINGS FIRST
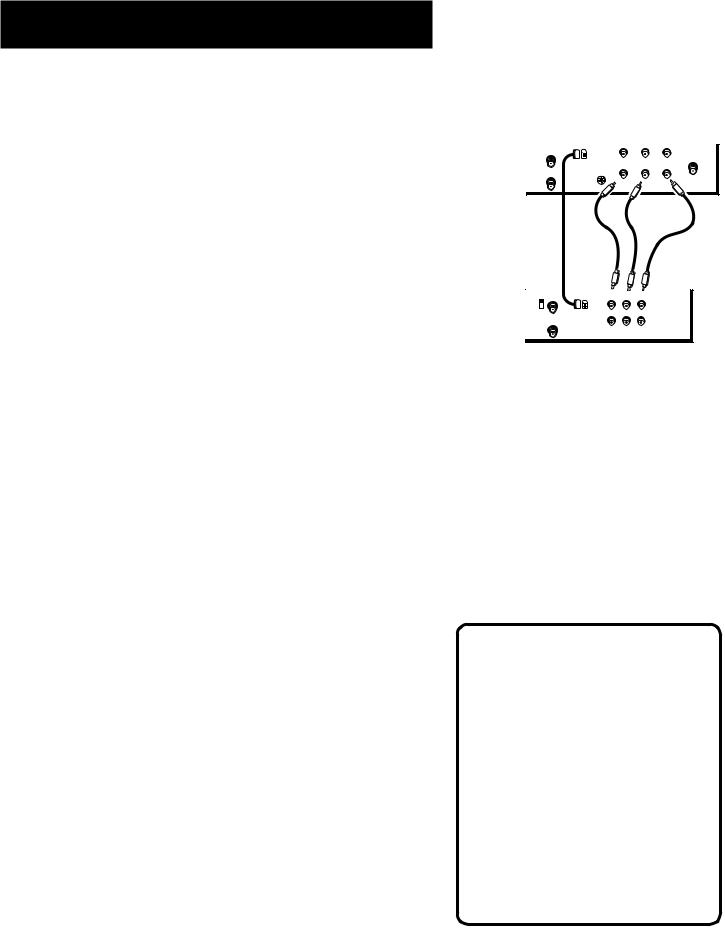
CONNECTING A COMPATIBLE D-VHS VCR |
|
|
The DSS® receiver can send a digital signal to a compatible D-VHS |
DSS |
|
|
||
VCR. The D-VHS VCR can then record and playback recordings |
RECEIVER |
|
through the DSS® receiver. If you have a D-VHS VCR you must |
|
|
connect both devices so they can send and receive digital signals. |
|
|
1) Connect a digital audio/video (DAV) cable as shown. |
|
|
2) Connect RCA type audio/video cables as shown. |
|
|
The D-VHS VCR and DSS® receiver communicate through the DAV |
D-VHS |
|
cable. It is not necessary to connect the VCR controller or enter |
||
VCR |
||
the VCR type described earlier in this section. |
||
|
IN FROM ANT |
|
|
|
|
|
D-VHS |
VIDEO |
R |
L |
|
|
|
AUDIO |
|
|
|
S-VIDEO |
|
|
OUT TO TV |
|
|
IN |
|
|
|
|
||
|
|
|
|
|
|
|
|
|
AUDIO |
IN FROM ANT D-VHS VIDEO IN AUDIO |
|
CH3 |
|
CH4 |
|
R |
L |
OUT TO TV
VIDEO OUT AUDIO OUT
INTERACTIVE SETUP
If you self-installed your satellite dish antenna, you may have already used the interactive setup to find the dish pointing coordinates, acquire and fine-tune the signal, and run a system test.
If you need to run the interactive setup again, select Options from the Main menu, then select Interactive Setup.
If you just want to check your dish pointing coordinates, or run the signal strength meter, select Dish Pointing from the Main menu.
ORDERING DSS® PROGRAMMING
After you have installed your system, you should contact the service providers, DIRECTV and USSB to receive DSS® programming.
Programming with DIRECTV: |
Call 1-800-347-3288 |
Programming with USSB: |
Call 1-800-204-USSB |
When you order programming, you need to know your Access Card number. To get the number, select Options from the Main menu, then System Options, and then select System Test.
Wait for the system to run all of it’s tests. The Access Card number is displayed at the end of the system test.
Write the Access Card number in the space below for easy reference:
________________________________
18
PROGRAM GUIDES
WHAT IS A PROGRAM GUIDE?
A program guide is an on-screen programming schedule. There are several types of guides, each presenting the schedule in a different format.
Using the program guide is easy as long as you remember the Point and Select rule. Point to items on the screen by pressing the arrow keys on the remote or front panel. Then, press MENU•SELECT to tune to that program.
1 FIRST THINGS FIRST
2 PROGRAM GUIDES
3 THE MENU SYSTEM
4 REFERENCE
5 APPENDICES
19
PROGRAM GUIDES
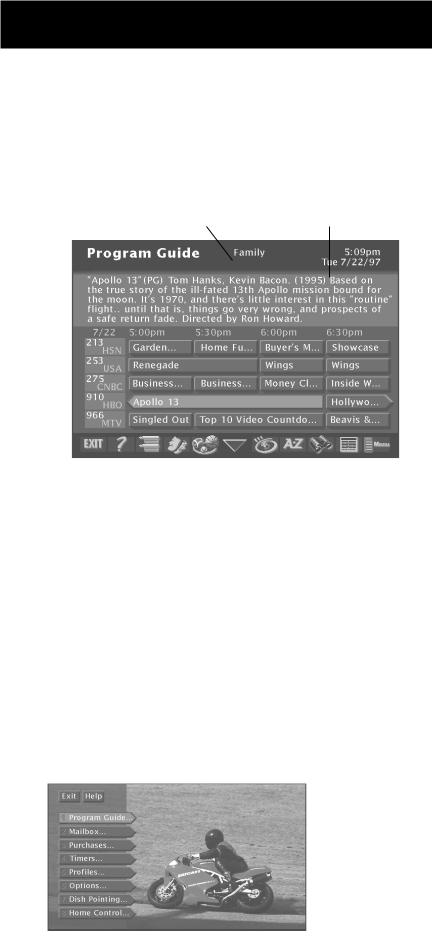
ANATOMY OF A PROGRAM GUIDE
The following diagram shows you the kind of information you will see in the program guides.
“Family” is one of five |
Program titles |
selectable Profiles |
and information |
Returns you to |
|
|
|
|
|
|
|
|
|
|
|
|
|
|
|
|
|
|
Takes you to |
|
|
|
|
|
|
|
|
|
|
|
|
|
|
|
|
|
|
||
|
|
|
|
|
|
|
|
|
|
|
|
|
|
|
|
||||
previous screen |
|
|
|
|
|
|
|
|
|
|
|
|
|
|
the Main menu |
||||
Help gives you |
|
|
|
|
|
|
|
|
|
|
|
|
Displays more |
||||||
|
|
|
|
|
|
|
|
|
|
|
|
||||||||
more information |
|
|
|
|
|
|
|
|
|
|
|
|
|
sorting options |
|||||
Sort the guide by: |
|
|
|
|
|
|
|
|
|
Searches guide for |
|||||||||
|
|
|
|
|
|
|
|
|
|||||||||||
|
|
|
|
|
|
|
|
|
specific information |
||||||||||
Topics, Movies, or Sports |
|
|
|
|
|
||||||||||||||
|
|
|
|
|
|
|
|
|
|
|
|
|
Sorts the current guide |
||||||
|
|
Scrolls through |
|
|
|||||||||||||||
|
|
|
|
alphabetically by title |
|||||||||||||||
|
|
the guide |
|
|
|||||||||||||||
|
|
|
|
|
|
|
|
|
|
|
|||||||||
|
|
|
|
|
|
|
|
|
|
|
|
|
|
|
|||||
|
|
|
|
|
|
|
Shows all available programs |
||||||||||||
BRINGING UP THE PROGRAM GUIDES
You can access the program guides by pressing MENU•SELECT on the remote and selecting Program Guide, or by using the GUIDE button on the remote.
20

PROGRAM GUIDES
ANATOMY OF THE CHANNEL BANNER
Some of the items you select in the guides can also be selected in the channel banner.
Program titles |
“Family” is one of five |
and information |
selectable Profiles |
Takes you to |
|
|
|
|
|
|
|
|
Use Home Control |
||
the Main menu |
|
|
|
|
|
|
|
or Data Port |
|||
Locks and unlocks |
|
|
|
|
|
|
Read mail from |
||||
the system |
|
|
|
|
|
|
|
|
program providers |
||
|
|
|
|
|
|
|
|
||||
Sorts the guide |
|
|
|
|
|
Searches guide for |
|||||
alphabetically by title |
|
|
|
|
specific information |
||||||
|
|
|
|
|
|
|
|
||||
The channel banner appears whenever you tune to a channel, exit a guide, or press INFO on the remote. Use the arrow buttons and MENU•SELECT to choose an item.
On-screen icons represent frequently used menu items. Some icons also change appearance to show the item’s status.
Green Unlock icon The system is unlocked. Spending, viewing and other limits can be accessed and changed.
Yellow Unlock icon A password has been entered to override family or profile limits. No limits can be accessed or changed.
Red Lock icon No limits can be accessed or changed. A password is required to override limits or access the system.
Highlighted Scout (binoculars) icon A Scout has found program information.
Highlighted Mail icon indicates a message in your mailbox.
Home Control or Data Port icons The icon changes appearence depending on how the Low Speed Data port is used.
21

PROGRAM GUIDES
USING THE GUIDE BUTTON
Each press of the GUIDE button takes you to an alternate type of program guide.
The Detail Guide
The Detail Guide shows five channels in a time-and-channel format, with program information for the highlighted program.
The Grid Guide
The Grid Guide shows seven channels in a time-and-channel format.
The SurfGuide
The SurfGuide displays a half-hour format. Press the right arrow button to extend the SurfGuide to a one-hour format.
GETTING AROUND IN THE GUIDES
This section describes how to change channels and move around the program guide.
Point to Channels with the number keys (0-9)
You can point quickly to any channel in the program guide by entering the channel number with the number keys (0-9). For example, to point to channel 228, press the numbers 2-2-8 on the remote. To point to channel 530, press 5-3-0.
Scrolling Channel By Channel
The programs that you see on the TV screen make up one section—or page—of the total program guide. You can scroll to other sections using the arrows: point to other times with the left and right arrows; point to other channels with the up and down arrows.
Scrolling Page By Page
If you want to scroll up or down through the program guide faster, press the Channel Up/Down buttons on the remote control. The highlight scrolls a page at a time.
By default, the Detail Guide appears when you press GUIDE on the remote. You can change the default guide from the Detail Guide to the Grid Guide or SurfGuide.
Select Options from the Main menu. Select Look and Feel, then set the Default Guide.
22
PROGRAM GUIDES
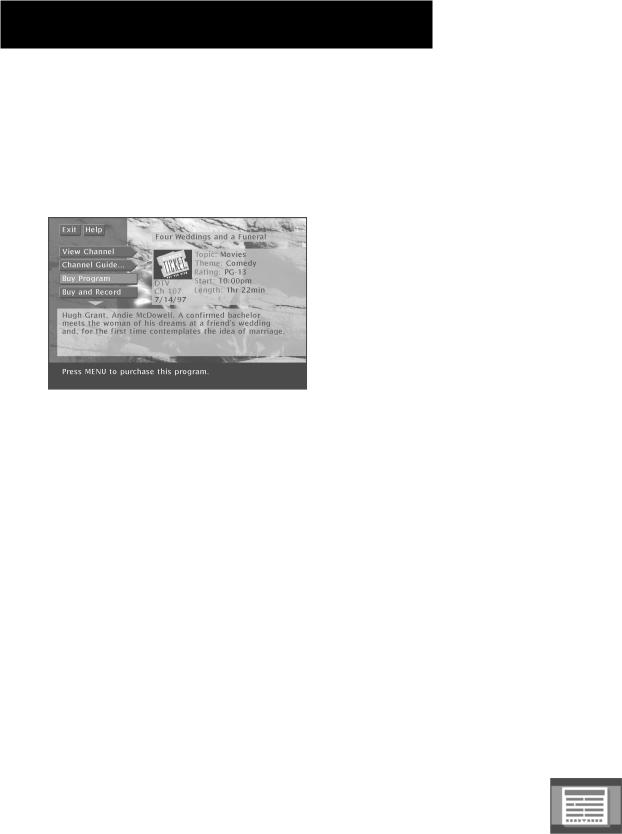
TUNING TO A PROGRAM
To tune directly to a current program listed in the guide, point to the program and press MENU•SELECT.
To see information about a program in the guide, press INFO.
The Program Details screen appears and gives you several options.
Then, you can select:
•View Channel to tune to that channel
•Channel Guide to see a program lineup for that channel
•Record Program to set a timer to record the program
•Buy Program to purchase the program
•Buy and Record to purchase the program and set up a timer to record the program. (Some Buy and Record programs may have a different purchase price.)
•Other Times to see what other times the program is available.
The options available to you may vary according to the type of program you select.
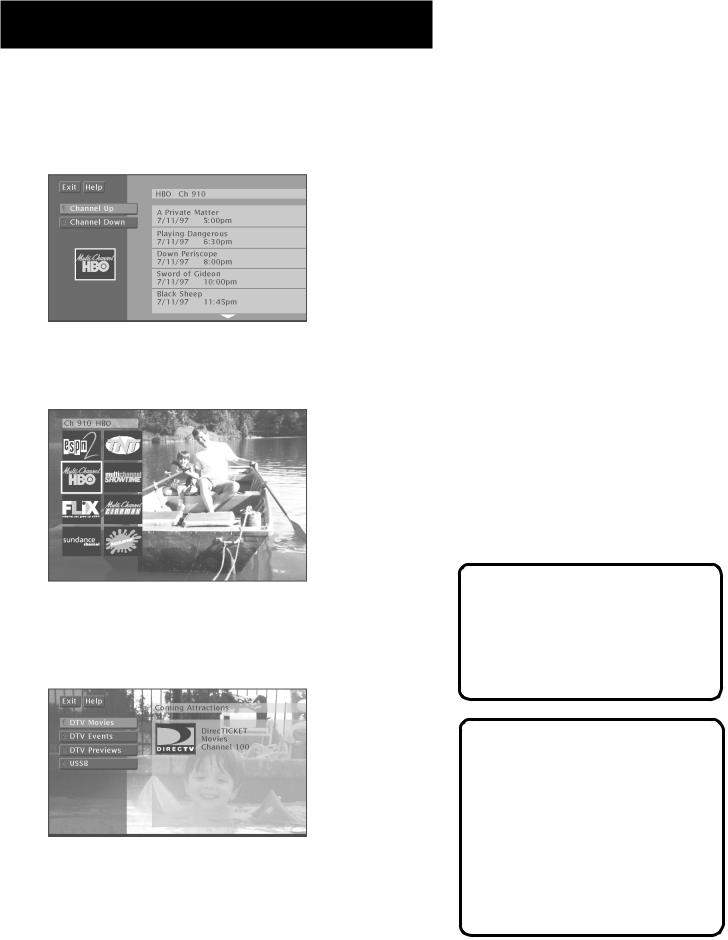
THE OTHER PROGRAM GUIDES
Besides the Detail Guide, Grid Guide, and SurfGuide, there are a few more guides: the Channel Guide, the Logo Guide and the Attractions Guide.
You can access these guides by selecting the Other Guides button |
Other Guides button |
at the bottom of the Detail Guide and Grid Guide. |
|
23
PROGRAM GUIDES
The Channel Guide
Displays a channel’s programming schedule in a channel-by- channel format.
The Logo Guide
Displays channel logos for the current user’s profile.
The Attractions Guide
Displays a list of channels that show coming attractions and special events information.
You can point to any program and tune to that channel, get more information, or set a timer to record.
Just press the MENU•SELECT, INFO, or RECORD buttons
Exiting A Program Guide
There are three ways to exit a guide:
•Point to a channel and press MENU•SELECT.
•Point to Exit and press MENU•SELECT.
•Press CLEAR or GO BACK on the remote.
24
PROGRAM GUIDES
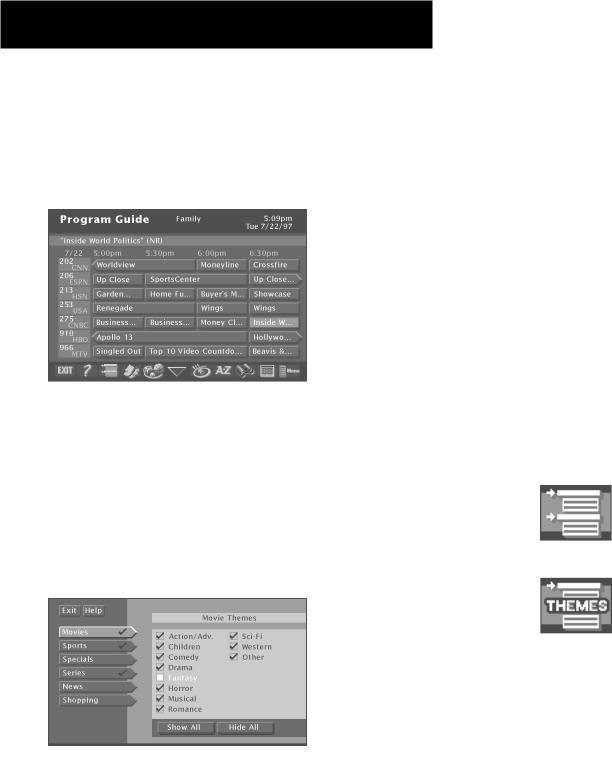
SORTING THE GUIDES
Sorting the guide is a way of organizing the guide to show only the types of programs that interest you. There are several onscreen buttons that sort the guide in different ways.
The Sorting buttons appear at the bottom of the
Grid Guide and Detail Guide.
Topics
The Topics button sorts the guide according to the current user’s preferences. Select the Topics button to sort the guide.
The Topics button changes to the Topics Themes button. Press the Topics Themes button to edit the current user’s themes preferences. These preferences are saved in each user’s profile.
Checkmark the themes that interest you.
Select the categories, and checkmark the themes you would like to appear when you select the Topics button in the guides. Programming that fits the description of checkmarked themes will appear in the guide when you sort by the Topics button.
Topics button
Topics Themes button
25
 Loading...