


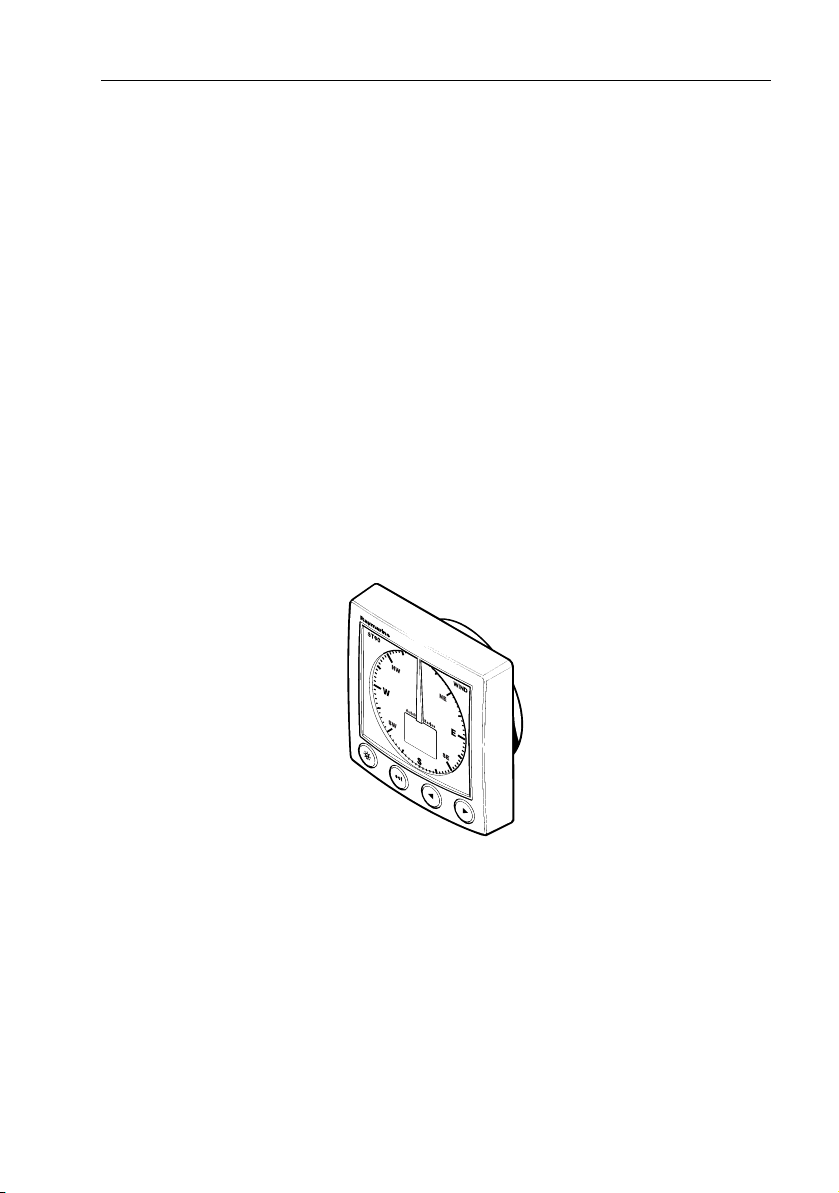
ST60
Table of contents
 Loading...
ST60 Club
House Wind
Instrument
Owner’s
Handbook
Document number: 81148_4
Date: 1 April 2004

Raymarine, ST60 and SeaTalk are trademarks of Raymarine Limited
© Handbook cont ents c opyright Raymarine Limited 2004

Preface i
Preface
Important information
Safety notices
WARNING: Product installation & operation
This equipment must be installed and operated in accordance
with the Raymarine instructions provided. Failure to do so could
result in personal injury, damage to your property and/or poor
product performance.
WARNING: Electrical safety
Make sure you have switched off the power supply before you
start installing this product.
WARNING:
The ST60 Club House Wind is intended only for fixed, shore-based
use and is not suitable for use on boats.
EMC conformance
All Raymarine equipment and accessories are designed to the best industry
standards for use in the recreational marine environment.
The design and manufacture of Raymarine equipment and accessori es conform to
the appropriate Electromagnetic Compatibility (EMC) standards, but correct
installation is required to ensure that performance is not compromised.
Handbook information
To the best of our knowledge, the information in this handbook was correct when
it went to press. However, Raymarine cannot accept liability for any inaccuracies
or omissions it may contain.
In addition, our policy of continuous product improvement may change
specifications without n otice. Therefore, Raymarine cannot ac cept liability for any
differences between the product and the handbook.

ii ST60 Club House Wind Instrument Owner’s Handbook

Preface iii
Contents
Preface ......................................................................................................................i
Important information ..................................................................................... i
Safety notices .......................................................................................... i
EMC conformance ................................................................................... i
Handbook information ............................................................................ i
Contents................................................................................................... iii
Introduction .................................................................................................... v
Mounting options ........................................................................................... v
Parts supplied ................................................................................................ vi
Chapter 1: Operation & Maintenance ................................................................1
1.1 Getting started ....................................................................................... 1
Calibration requirements ....................................................................... 1
1.2 Normal operation ................................................................................... 1
Pointer ................................................................................................... 1
Digital display ........................................................................................ 1
Beaufort wind speed ........................................................................ 1
Maximum wind speed ..................................................................... 2
Wind speed alarms .......................................................................... 2
Switching alarms on and off ...................................................... 3
Setting alarm thresholds ............................................................ 3
Display illumination ............................................................................... 3
1.3 Maintenance .......................................................................................... 3
Servicing and safety ............................................................................... 3
Instrument ............................................................................................. 4
Transducer ............................................................................................. 4
Cabling ................................................................................................... 4
1.4 Troubleshooting ..................................................................................... 4
Preliminary procedures .......................................................................... 4
Fixing faults ............................................................................................ 5
Technical support ................................................................................... 5
World wide web ............................................................................... 5
Telephone help line .......................................................................... 5
Help us to help you ........................................................................... 5
Chapter 2: Installation .........................................................................................7
2.1 Planning your installation ...................................................................... 7
Site requirements ................................................................................... 7
Wind Vane ....................................................................................... 7
Instrument ....................................................................................... 8
EMC installation guidelines .................................................................... 9
Suppression ferrites ......................................................................... 9

iv ST60 Club House Wind Instrument Owner’s Handbook
Connections to other equipment .................................................... 10
2.2 Installation procedure .......................................................................... 10
Unpacking ............................................................................................10
Fitting the instruments ......................................................................... 10
Surface mounting ...........................................................................11
Flush Mounting ..............................................................................12
Fitting the low-profile bezel ...................................................... 12
Flush mounting procedure ....................................................... 13
Bracket Mounting Kit .....................................................................14
Connections at the instrument ............................................................. 14
Power supply connections ..............................................................15
Linearization ......................................................................................... 16
Fitting the Wind Vane ...........................................................................16
Running transducer cable ...............................................................18
Chapter 3: Calibration ........................................................................................ 21
3.1 Introduction .......................................................................................... 21
EMC conformance ................................................................................21
3.2 User calibration .................................................................................... 21
Leaving User calibration .......................................................................22
3.3 Intermediate calibration .......................................................................22
3.4 Dealer calibration .................................................................................23
Response settings .................................................................................23
Wind speed ...........................................................................................23
Boat show mode ................................................................................... 25
Factory defaults ....................................................................................25
Leaving Dealer calibration .................................................................... 25
Preface v
Introduction
Thank you for purchasing a Raymarine prod uct. We are sure your ST60 instrument
will give you many years of trouble-free operation.
This handbook describes how to install and use the Raymarine ST60 Club House
Wind instrument, which is intended for use ashore (e.g. in clubhouses or homes)
to show local wind conditions. The instrument is constructed in a rugged weather
proofed case and uses a sensitive and stable, combined analog and digital
display, to display the wind information.
The ST60 Club House Wind instrument is not suitable for use on
boats.
The ST60 Club House Wind instrument gives:
• Wind speed.
• Wind Angle.
• Maximum wind speed.
The ST60 Club House Wind instrument also gives high and low wind speed alarm
indications.
Mounting options
If you do not want to surface mount your ST60 instrument, options are available
for:
• Flush mounting. If you have ordered the flush mounting option a low-profile
bezel and four fixing screws are also provided.
• Bracket mounting.
D4514-2
vi ST60 Club House Wind Instrument Owner’s Handbook
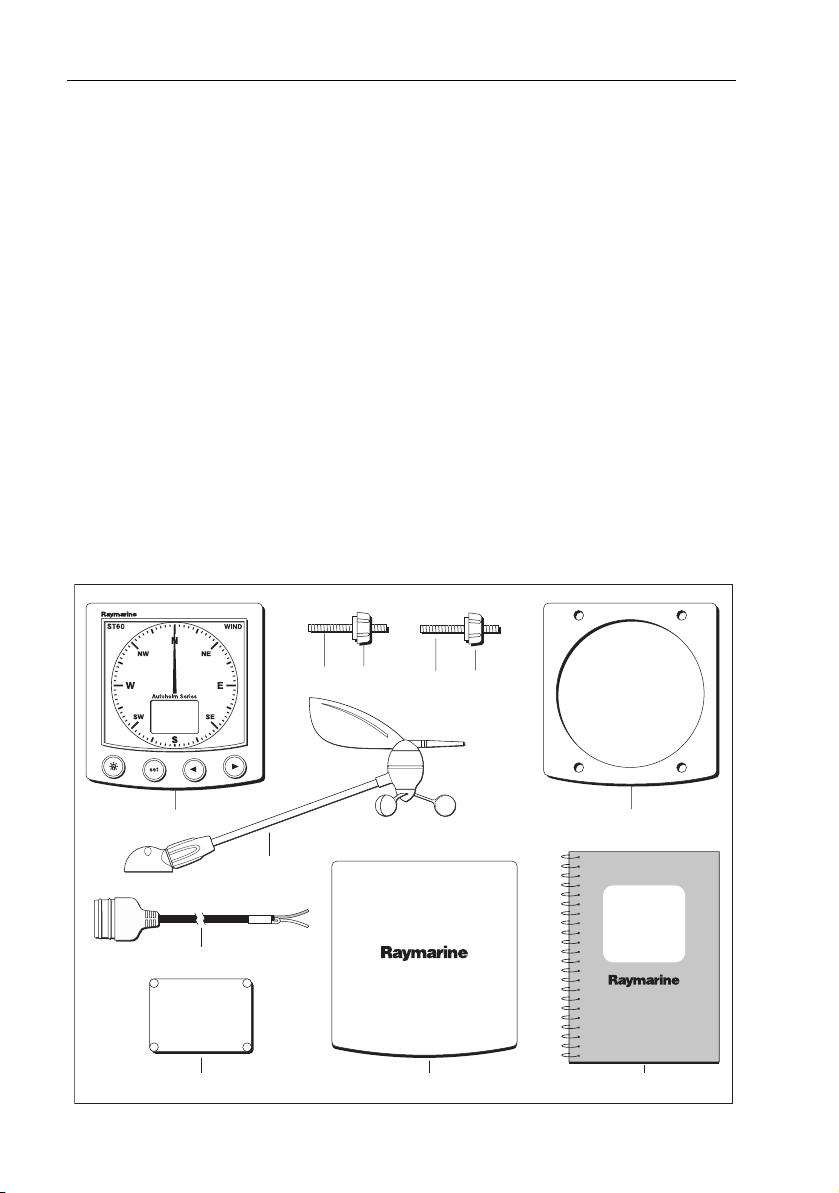
Parts supplied
Unpack your ST60 instrument and check that the following items are present:
• Item 1, ST60 Club House Wind instrument, fitted with standard bezel for sur-
face mounting.
• Item 2, Fixing studs (2).
• Item 3, Thumb nuts (2).
• Item 4, Gasket.
• Item 5, Wind Vane.
• Item 6, Power cable.
• Item 7, Instrument Cover.
• Item 8, Junction Box.
• Item 9, Owner’s Handbook. A Warranty document and fitting templates are
included in this Handbook.
Spare spade terminals are also provided, to re-terminate transducer cables if they
have to be cut to facilitate installation.
Note:
The above packing list is for an ST60 Wind system.
D4503-3
4
32
32
6
8
1
7 9
ST60 Club
House Wind
Instrument
Owner's
Handbook
5

Chapter 1: Operation & Maintenance 1
Chapter 1: Operation & Maintenance
1.1 Getting started
This handbook describes how to operate, maintain and install the Raymarine
ST60 Club House Wind instrument. This instrument shows the wind speed and
direction.
CAUTION: Calibration requirement
The ST60 Club House Wind instrument is calibrated to factory
(default) settings when first supplied. To ensure optimum
performance, this product must be calibrated before use. Do NOT
use the product until it has been calibrated using the procedures
in
Chapter 3, Calibration
.
Calibration requirements
Your ST60 instrument is calibrated to factory (default) settings when first installed
and must therefore be calibrated before use, in accordance with th e procedures in
Chapter 3, Calibration
.
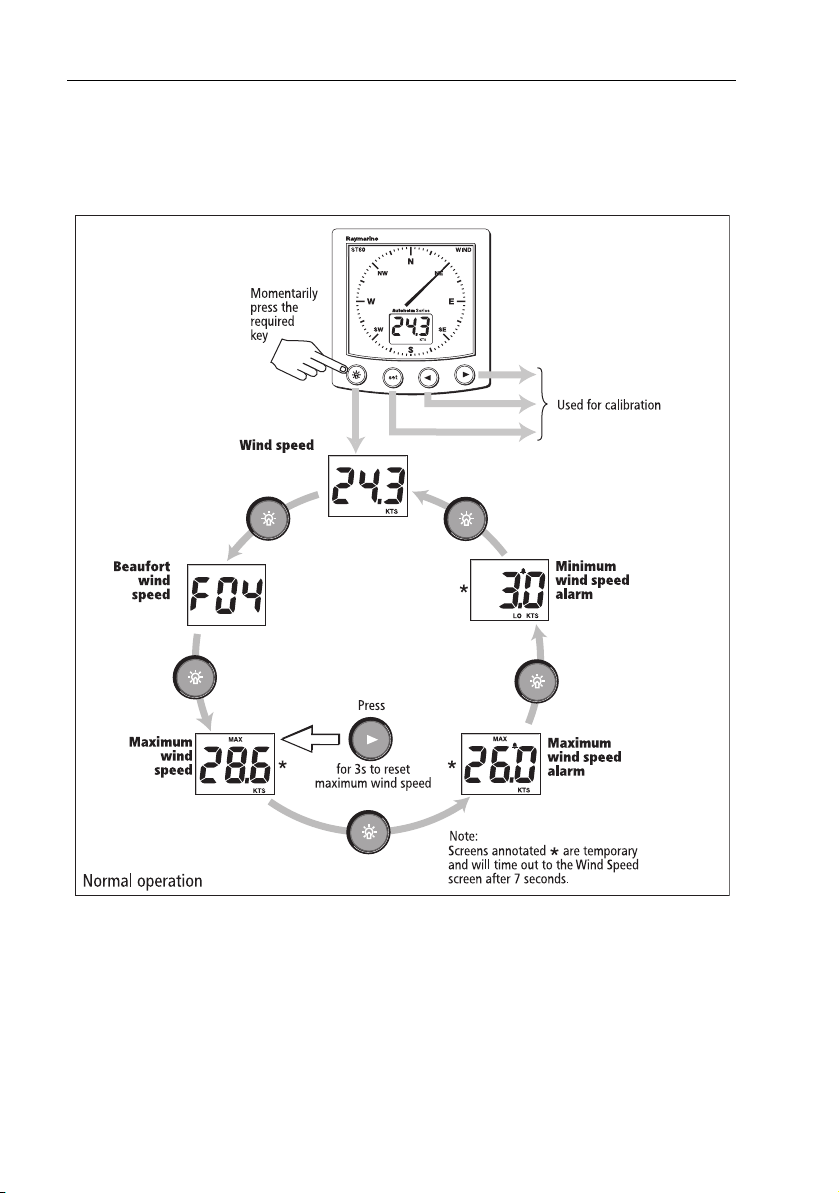
1.2 Normal operation
The information on the ST60 Club House Wind instrument is presented by a
pointer and a digital display.
Pointer
The pointer shows the wind direction.
Digital display
The digital display normally shows the wind speed in either knots or meters per
second. You can use the key to select other information (see the
Normal
operation
flow chart), displayed as follows:
• Beaufort wind speed.
• Maximum wind speed.
• Maximum wind speed alarm.
• Minimum wind speed alarm.
Beaufort wind speed
The appropriate Beaufort wind ‘force’ number, up to F12.
2 ST60 Club House Wind Instrument Owner’s Handbook
Maximum wind speed
The maximum wind speed is reset at power up and can also be reset manually by
pressing the
> key for 3 seconds.
Wind speed alarms
An alarm condition occurs when the wind speed either exceeds the maximum
wind speed alarm threshold or falls below the minimum wind speed alarm
threshold. An alarm condition is indicated by a flashing alarm icon on the digital
display and an audible alarm at the instrument.
Pressing any key will cancel an alarm.
D4504-2

Chapter 1: Operation & Maintenance 3
Switching alarms on and off
Use the key to select either the maximum or minimum wind speed alarm
screen as required, then press the
> key for approximately one-second, to toggle
the alarm either on (i.e. so the alarm threshold value is displayed) or OFF, as
required.
Setting alarm thresholds
To set a wind speed alarm threshold:
1. Use the key to select either the maximum or minimum wind speed alarm
screen, as required.
2. Momentarily press both the
< and > keys to enter the threshold adjust mode
(indicated by the displayed value flashing).
3. Press either the
< key or the > key to set the required wind speed.
4. Momentarily press both the
< and > keys to leave the threshold adjust mode
(indicated by the displayed value flashing).
Display illumination
When the instrument is first powered up, the display illumination is set to its
lowest (courtesy) level, to facilitate initial access to the keys.
To adjust the level of display illumination:
1. Hold down the key for approximately one second, to enter the illumina-
tion-adjust mode.
2. There are four preset illumination levels. Momentarily press the key to
cycle through these levels until you reach the level you want.
3. Press any other key to leave the illumination-adjust mode.
Note:
The digital display will return to normal operation 7 seconds after the last key press.
1.3 Maintenance
Servicing and safety
• Raymarine equipment should be serviced only by authorized Raymarine ser-
vice technicians. They will ensure that service procedures and replacement
parts used will not affect performance. There are no user serviceable parts in
any Raymarine product.
• Some products generate high voltages, so never handle the cables/connec-
tors when power is being supplied to the equipment.

4 ST60 Club House Wind Instrument Owner’s Handbook
• When powered up, all electrical equipment produces electromagnetic fields.
These can cause adjacent pieces of electrical equipment to interact with one
another, with a consequent adverse effect on operation. In order to minimize
these effects and enable you to get the best possible performance from your
Raymarine equipment, guidelines are given in the installation instructions, to
enable you to ensure minimum interaction between different items of equip-
ment, i.e. ensure optimum Electromagnetic Compatibility (EMC).
• Always report any EMC-related problem to your nearest Raymarine dealer.
We use such information to improve our quality standards.
• In some installations, it may not be possible to prevent the equipment from
being affected by external influences. In general this will not damage the
equipment but it can lead to spurious resetting action, or momentarily may
result in faulty operation.
Instrument
Certain atmospheric conditions may cause condensation to form on the
instrument window. This will not harm the instrument and can be cleared by
increasing the illumination setting to Level 3.
Periodically clean your ST60 instrument with a soft damp cloth. Do NOT use
chemical and abrasive materials to clean the instrument.
Transducer
If the windvane is removed from its mounting block for any reason, fit the
blanking cover (supplied) to the windvane mounting block connector.
Cabling
Examine all cables for chafing or other damage to the outer shield and, where
necessary, replace and re-secure.
1.4 Troubleshooting
Preliminary procedures
Changes in the electronic environment may adversely affect the operation of your
ST60 equipment. If a you appear to have a problem, first ensure that the EMC
requirements (see
Chapter 2, Installation & Calibration
) are still being met before
further investigating the problem.
Loading...