

Page 1

OWNER’S MANUAL
Cat. No.
20-147
PRO-2056 50-Channel
Home/Mobile Scanner
Please read before using this equipment.
Page 2

FEATURES
y
g
y
y
Your new RadioShack PRO-2056 5 0Channel Home/Mobile Scanner lets
you in on all the action. You can quickly tune to over 2 ,000 preprogrammed
frequencies and search over 20,000
frequencies that include those used by
police and fire departments, ambulance services, aircraft communications, amateur radio services, and
transportation services. The secret to your scanner’s ability to
scan so many frequencies is its
cus to m- designed microprocessor —
a tiny, built-in computer.
Your scanner is preprogrammed for
convenience. By pressing a single button, you can quickly scan those frequencies most widely used by public
service an d other agenc ies. The sca nner even lets you group speci al or i nt eresting freq uencies into their o wn bank.
The scanner is com pact and v ersatile.
You can use it in your home o r mount
it in your vehicle.
Your scanner has these special features:
H
perScan
™
and HyperSearch
™
—
so you can scan up to 100 channels
per second and search up to 100 steps
(frequency intervals) per second, providing faster scan and search speed
than many other scanners.
Service Search
— at the press of a
button, lets you scan preset frequencies in separate police, fire/emergency, marine, and air service search
banks, to make it easy to quickly identify calls. You can also add frequencies to channels in the police and fire/
emergency service search banks.
Band Search
— lets you search for
transmissions within 11 preset frequency ranges, so you can quickly
find interesting frequencies.
PRIVATE Bank
— lets you store up to
20 frequencies that you find while
scanning or searching, so you can
group unusual or special frequencies
together for fast access.
One-Touch Weather Scannin
—
quickly tunes to National Weather Service broadcasts, so you can keep current on important weather information.
Lock-Out Function
— lets you lock
out specif i ed channels, so you can skip
over those channels whi l e s canning.
Memor
Backup
— keeps the frequencies stored in m em ory f or up t o 5
days during a power loss.
Backlit Displa
— makes the display
easy to read in low light conditions.
© 1997 Tandy Corporation.
RadioShack, HyperScan, and HyperSearch are trademarks used by Tandy Corporation.
InstaClear is a registered t rademark used by Ford Mo tor Company.
ElectriClear is a registered trademark used by Libbey, Owens, Ford, and Delco-Remy.
All Rights Reserv ed .
2
Page 3

External Speaker Jack — makes it
easy to connect an optional external
speaker or headphones to the scanner.
We recommend you record your scanner’s serial number here. The number
is on the scanner’s back panel.
Two Powe r Options — you can power the scanner from standard AC power with the supplied AC adapter or
your vehicle’s battery with the supplied DC power cord or DC cigarettelighter power cord.
Frequency Guide — this manual lists
currently known frequencies by state
and local area, so you can quickly
tune to local frequencies.
Your PRO-2056 scanner can receive
all of these frequencies:
• 29–54 MHz (10-Meter Amateur
Radio, VHF Lo, 6-Meter Amateur
Radio)
• 108–136.975 MHz (Aircraft)
• 137–174 MHz (Government, 2Meter Amateur Radio, VHF Hi)
• 406–512 MHz (70-Centimeter
Amateur Radio, UHF “T” Band,
Government)
Serial Number:_______________
FCC NOTICE
Your scanner might caus e T V or radi o
interference even when it is operating
properly. To determine whether your
scanner is causing the interference,
turn off your scanner. If the interference goes away, your scanner is
causing it. Try to eliminate the interference by:
• Moving your scanner away from
the TV or radio
• Connecting your scanner to an
outlet that is on a different electr ical circuit from the TV or radio
• Contacting your local RadioShack store for help
In addition, your scanner is preprogrammed with these weather service
frequencies:
• 162.4000 MHz
• 162.4250 MHz
• 162.4500 MHz
• 162.4750 MHz
• 162.5000 MHz
• 162.5250 MHz
• 162.5500 MHz
3
Page 4

SCANNING LEGALLY
Your scanner covers frequencies
used by many different groups including police and fire departments, ambulance services, government agencies,
private companies, amateur radio services, military operations, pager services, and wireline (telephone and
telegraph) service providers. It is legal
to listen to almost every tran smission
your scanner can receive. However,
there are some transmissions you
should never intentionally listen to.
These include:
• Telephone conversations (either
cellular, cordless, or other private
means of telephone signal transmission)
• Pager transmissions
• Any scrambled or encrypted
transmissions
According to the Electronic Communications Privacy Act (ECPA), you are
subject to fines and possible imprisonment for intentionally listening to, using, or divulging the contents of such a
transmission unless you have the consent of a party to the communication
(unless such activity is otherwise illegal). We encourage responsibl e, legal
scanner use.
4
Page 5

CONTENTS
g
Preparation............................................................................................................ 7
Connecting an Antenna ................................................................................... 7
Connecting the Telescoping Antenna........................................................ 7
Connecting the Window-Mount Anten na................................................... 7
Connecting an External Antenna............................................................... 8
Mounting the Scanner in Your Vehicle ............................................................. 9
Connecting Power from Your Vehicle’s Battery....................................... 10
Using the Scanner as a Base Station ............................................................ 11
Using the Supplied AC Adapter............................................................... 11
Memory Backup............................................................................................. 11
Connecting an External Speaker or Headphones.......................................... 12
Listening Safely........................................................................................12
Understandin
Banks............................................................................................................. 13
Service Search Banks............................................................................. 13
PRIVATE Bank......................................................................................... 14
Channels........................................................................................................ 14
Search Bands ................................................................................................ 15
A Look at the Front Panel.............................................................................. 17
A Look at the Display......................................................................................18
Operation............................................................................................................. 19
Turning On the Scanner/
Setting Volume and Squelch.......................................................................... 19
Using Service Search .................................................................................... 19
Using Band Search........................................................................................ 20
Monitoring a Frequency ................................................................................. 20
Storing Frequencies into Channels................................................................ 21
Clearing Frequencies from Channels ............................................. ....... ....... . 22
Special Features................................................................................................. 23
Using Memolock ............................................................................................ 23
Delay .............................................................................................................. 23
Locking Out Channels and Frequencies........................................................ 23
Removing a Lockout from All Channels and Frequencies
within a Bank .......................................................................................... 24
Listening to Weather Broadcasts................................................................... 24
Your Scanner............................................................................ 13
5
Page 6

A General Guide to Scanning............................................................................ 25
Guide to Frequencies..................................................................................... 25
US Weather Frequencies ................................................. .. ....... .......... .... 25
Other Weather Frequencies .................................................................... 25
Ham Radio Frequencies ......................................................................... 25
Birdie Frequencies .................................................................................. 25
Guide to the Action Bands.............................................................................. 26
United States Broadcast Bands ............................................................ .. 26
Typical Band Usage .. .............................................................................. 26
Primary Usage ........................................................................................ 27
Specified Intervals.......................................................................................... 28
Band Allocation............................................................................................... 28
Frequency Conversion................................................................................... 32
Troubleshooting.................................................................................................. 33
Care and Maintenance........................................................................................ 34
Replacing the Fuses....................................................................................... 35
Replacing the Fuse in the DC Power Cord ............................................. 35
Replacing the Fuse in the DC Cigarette-Lighter Power Cord ................. 35
Specifications...................................................................................................... 36
Notes.................................................................................................................... 38
Frequency Guide................................................................................................. 39
6
Page 7

PREPARATION
y
g
CONNECTING AN
ANTENNA
Connecting the Telescoping
Antenna
The supplied telescoping antenna
helps your scanner receive st rong local signals. To install this antenna,
hold the antenna so it stands straight
up, then gently push the antenna’s
plug onto the
ner’s back panel.
The scanner’s sensitivity dep ends on
the antenna’s length and various en vironmental conditions. Based on the
frequencies of the transmissions you
want to hear, adjust the antenna’s
length.
Frequenc
(MHz)
29–108 Extend fully
108–174 Extend three
174–512 Extend two
ANT
ANT Jack
segments
segments
jack on the scan-
Antenna Len
th
Connecting the WindowMount Antenna
You can install the supplied windowmount antenna on the inside of your vehicle’s windshi eld. Foll ow these steps to
install the window -mount antenna .
Caution:
mount antenna on a windshield that
has a plastic coating designed to protect passengers during an accident. If
you use the antenna on this type of
windshield, you might permanently
damage the windshield’s surface.
1. Select a location for the window-
Do not use the window-
mount antenna. Follow these
mounting guidelines when selecting a location.
• The antenna’s clear wire receives signals. Mount it vertically against the far right (passenger) side of the windshield.
• Choose a location that does not
block the driver’s view of the
road.
• Some vehicles have Insta-
®
Clear
or ElectriClear® defogging windshields, which have
metal coatings that interfere
with signals. General Motor’s
APV vans have a solar shield
that keeps the vehicle cooler
during the summer, which also
interferes with signals. If you
install a window-mount an ten na
in a vehicle with any of these
features, the scanner probably
will not detect weak signals.
7
Page 8

2. Clean the selected windshield
area, position the antenna’s clear
wire on the windshield, then press
firmly on both suction cups to
secure it in place.
3. Route the antenna’s black cable
down the edge of t he windshield,
around the edge of the dash, and
underneath it. Be sure the cable
does not interfere with the vehicle’s pedals or other moving parts.
4. Align the slots around the
antenna’s connector with the ta bs
on the
antenna’s connector and turn it
clockwise until it locks int o place.
ANT
jack. Then push the
Connecting an External
Antenna
ANT
The
ner makes it easy to use the scanner
with a variety of antennas. Instead of
one of the supplied antennas, you can
attac h a diff er en t one, suc h as an ex te rnal mobi l e ant enn a o r ou t door ba se s tation antenna. Your local RadioShack
store sells a variety of antennas.
When deciding on an antenna and its
location, consider the following:
Always use 50-ohm coaxial cable,
such as RG-58 or RG-8, to connect
an outdoor antenna. For lengths over
50 feet, use RG-8 low-loss dielectric
coaxial cable. If the coaxial cable’s
connector does not fit in the
you might also need a PL-259-to-B NC
antenna plug adapter, such as Cat.
No. 278-120. Your local RadioShack
store carries a wide variety of coaxial
antenna cable and connectors.
jack on the back of the scan-
• The location of the antenna
should be as high as possible.
• The antenna and antenna cable
should be as far as possible from
sources of electrical noise (appliances, other radios, and so on).
• The antenna should be vertical for
the best performance.
ANT
jack,
Follow the installation instructions supplied with the antenna, route the antenna cable to the s canner, then connect
it to the
back of the scanner.
8
ANT
BNC-type jack on the
Page 9

Warning : Use extreme caution when
installing or removing an outdoor antenna. If the antenna starts to fall, let it
go! It could contact overhead power
lines. If the antenna touches a power
line, contact with the antenna, mast,
cable or guy wires can cause electrocution and death! Call the power company to remove the antenna. Do not
attempt to do so yourself.
Caution: Do not run the cable over
sharp edges or objects that move.
MOUNTING THE
SCANNER IN YOUR
VEHICLE
The most common m ounting location
for this scanner is under your vehicle’s
dashboard. If you use this scanner in
a vehicle, mount it securely to avoid
damage to the scanner or vehicle, or
injury to anyone in the vehicle during
sudden starts or stops.
Note: Mobile use of this scanner is
unlawful or requires a perm it in some
areas. Check the laws in your area.
• Wires and cables will not interf ere
with vehicle’s pedals or other
moving parts
• The scanner is not directly in front
of any heating vents
Follow these steps to mount the scanner in your vehicle.
1. Choose a mounting location, then
use the mounting bracket as a
template to mark the positions for
the mounting screw holes.
(add corrected illus F6)
2. In the m ar k ed loc ations, dr ill h oles
slightly smaller than the supplied
screws. Take care not to drill into
or damage objects behind the
mounting surface.
3. Attach the mounting bracket to the
mounting location using the supplied screws and lock washers.
When you choose a mounting location, be sure:
• You can easily reach the scanner
• All wires and cables will reach
their connection points
(add correc t ed illus F7)
9
Page 10

4. Attach the scanner to the mounting bracket using the supplied
mounting knobs.
(add corrected illus F8)
Connecting Power from Your
Vehicle’s Battery
3. Insert the power cord’s barrel plug
into the
of the scanner.
To connect the supplied DC cigarettelighter power cord, insert its barrel
plug into the
of the scanner, then plug the power
cord into your vehicle’s cigarettelighter socket.
DC 13.8V
DC 13.8V
jack on the back
jack on the back
Depending on if your scanner is permanently installed in y our v ehicle, you
can power it using either the DC po wer cord or the DC cigarette-lighter
power cable (both supplied).
Follow these steps to connect the supplied DC power cord.
(add corrected illus F9. Add
callouts ‘Positive (+)’ and
‘Negative (-)’ to respective
wires)
1. Connect the power cord’s black
wire to your vehicle battery’s negative (
of the vehicle’s frame that is not
insulated from the frame by a
plastic part.
2. Connect the power cord’s red wire
(with in-line fuse) to a source of
voltage that turns on and off with
the ignition switch, such as a
spare accessory terminal in your
vehicle’s fuse box.
) terminal or to a metal part
–
(add corrected illus F10)
Cautions:
• Unplug the power cord from your
vehicle’s cigarette-lighter socket
when you turn off the ignition. This
prevents vehicle battery drain if
you leave the scanner on when
you turn off the ignition.
• Always unplug the power cord
from your vehicle’s cigarettelighter socket before you unplug
its barrel plug from the scanner.
If the scanner does not operate
Note:
when you turn it on, remove the power
cord from your vehicle’s cigarettelighter socket and check the socket for
debris. Also, check the fuse in the
power cord you are using (see “Replacing the Fuses” on Page 35) and
your vehicle’s fuse block.
10
Page 11
USING THE SCANNER
AS A BASE STATION
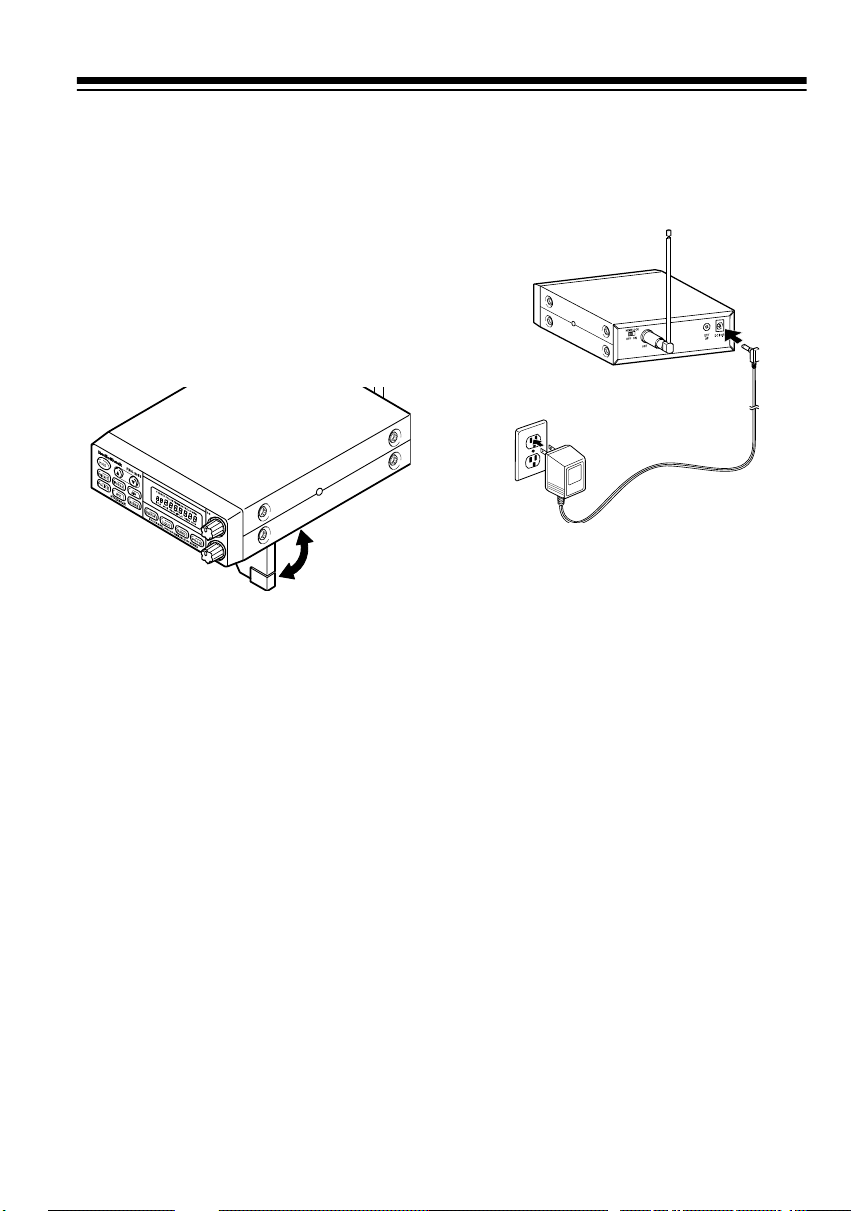
You can place this scanner on a desk,
shelf, or table to use i t as a base s tation.
Your scanner’s front feet f old up and
down. Adjust them to give you the
best view of the display.
Plug the adapter’s barrel plug into the
scanner’s
the adapter’s power module into a
standard AC outlet.
DC 13.8V
jack. Then plug
Using the Supplied AC
Adapter
Cautions:
• Use only the supplied AC adapter.
Using a different adapter can
damage your scanner and could
present a safety hazard.
• To prevent electric shock, the
plug’s blades are polarized and fit
only one way. If the plug does not
fit easily, turn it over and try again.
Do not force it into the AC outlet.
• When you finish using the AC
adapter, disconnect it from the AC
outlet first. Then disconnect it from
the scanner.
Warning:
er’s polarized plug with an extension
cord, receptacle, or other outlet unless
the blades can be fully inserted to prevent blade exposure.
Do not use the AC adapt-
MEMORY BACKUP
When you first power the scanner,
MEMO LOSS
until you program the scanner. The
memory backup circuit begins to function a few minutes after you supply
power to the scanner. How long the
scanner will maintain channels stored
in memory depends on how long power has been supplied to the scanner.
(memory loss) appears
11
Page 12

If power is continuously supplied to
the scanner for at least 24 hours, the
memory backup circuit maintains the
channels stored in m em ory f or up t o 5
days. If power is disconnected and the
memory backup circuit becomes too
weak to save the scanne r’s programming,
when power is reconnected until you
reprogram the scanner.
MEMO LOSS
appears again
Caution:
volume all the way up while using
headphones. The headphones could
be damaged.
Note:
or headphones disconnec ts the scanner’s internal speaker.
Do not turn the scanner’s
Plugging in an external speaker
Listening Safely
CONNECTING AN
EXTERNAL SPEAKER
OR HEADPHONES
In a noisy area, an extension speaker
or pair of monaural headp hones (Cat.
No. 21-549 or 20-210) might provide
more comfortable listening . Use an 8ohm external speaker capable of ha ndling 3 watts of power.
Plug the speaker cable’s or headphones’
jack on the back of the scanner.
1
/8-inch plug into the
(add corrected illus F13. Add
external speaker and callout
EXT SP and arrow to jack)
EXT SP
To protect your hearing, follow these
guidelines when you use headphones.
• Do not listen at extremely high
volume levels. Extended high-volume listening can lead to permanent hearing loss.
• Set the volume to the lowest setting before you begin listening.
After you begin listening, adjust
the volume to a comfortable level.
• Once you set the volume, do not
increase it. Over time, your ears
adapt to the volume level, so a
volume level that does not cause
discomfort might still damage your
hearing.
12
Page 13

UNDERSTANDING YOUR SCANNER
y
Once you understand a few simple
terms we use in this manual and familiarize yourself with your scanner’s features, you can put the scanner to work
for you. You simply determine the communications you want to hear, then set
the scanner to scan those frequencies.
A
frequenc
station (expressed in kHz or MHz). To
find active frequencies, you can use
the
search
bands
quencies. When you find a f requency,
you can store it into a permanent
memory location called a
which is grouped with other channel s
in your scanner’s
banks
then
scan
the scanner finds an ac tive f requenc y,
it stays there until the transmission
ends.
is the tuning location of a
function to search
, which are preset ranges of fre-
service search
and
PRIVATE
these channels. E ach time
bank. You can
search
channel
BANKS
you can easily scan the frequencies
typically used by a particular agency.
Your scanner has the following service search banks.
• POLICE (contains 739 preset frequencies)
• FIRE/EMG (contains 197 preset
frequencies)
• MARINE (contains 90 preset frequencies)
• AIR (contains 1,160 preset fre-
,
quencies)
Your scanner also has 7 preset
weather frequencies.
You can scan through any service
search bank simply by pressing that
bank’s button, or the weather frequencies by pressing
you want to scan frequencies where
you are likely to hear police calls,
POLICE
press
WX
. For example, if
.
Service Search Banks
The FCC (Federal Communications
Commission) allocates frequency
ranges for the exclusive use of public
service agencies such as police departments, fire departments, the U.S.
Coast Guard, the Federal Aviation Administration (FAA), and the National
Oceanic and Atmospheric Adm inistration (NOAA).
Many of the frequencies used by
these agencies are grouped into this
scanner’s service search banks, so
Notes:
• You cannot use the
to search for new frequencies in
the service search banks.
• You cannot change or clear any of
the preset frequencies in the service search banks, but you can
store frequencies into ch annels in
the POLICE and FIRE/EMG service search banks (see “Channels” on Page 14).
SEARCH
key
13
Page 14

PRIVATE Bank
Your scanner has one PRIVATE bank.
This bank contains 20 channels. You
can store frequencies from any search
band (see “Search Bands” on
Page 15), service search bank, or any
weather frequency into these channels, then scan the channels by press-
PRIVATE
ing
Notes:
• You cannot use the
to search for new frequencies in
the PRIVATE bank.
• You cannot scan the PRIVATE
bank until you have stored frequencies in its channels (see
“Storing Frequencies into Channels” on Page 21).
.
SEARCH
key
CHANNELS
The scanner has 50 empty channels
where you can store frequencies you
find while scanning the banks or
searching through the search bands
— 20 in the POLICE bank, 10 in the
FIRE/EMG bank, and 20 in the PRIVATE bank.
• Frequencies you assign to
POLICE channels becom e part of
the POLICE service search bank.
For example, the police department might use four temporary
frequencies while providing security for a parade. If these frequen-
cies are included in any search
band (or even another service
search bank), you could store
them in Channels 1
POLICE service search bank.
• Frequencies you assign to FIRE/
EMG channels become part of the
FIRE/EMG service search bank.
For example, the fire department
might use three frequencies to
communicate with paramedic
units only during disaster drills. If
these frequencies are included in
any search band (or even another
service search bank), you could
store them in Channels 1
FIRE/EMG service search bank.
• The MARINE and AIR service
search banks contain no channels.
You can also replace frequencies
you stored in these channels with
different frequencies, or you can
clear stored frequencies from t he
channels.
Good references for active frequencies are the RadioShack
4 of the
–
3 of the
–
Police Call
Radio Guide Including Fire and Emergency Services
quency Directory
Frequency Directory
these directories every year, so be
sure to get a current copy.
Aeronautical Fre-
,
, and
. We update
Maritime
14
Page 15

SEARCH BANDS
Your scanner has 11 preprog rammed search bands. Each band c overs a specific
range of frequencies which you can se arch for specific broadcasts by using the
SEARCH
tween 29.000 and 30.000 MHz for specific broadcasts.
This table shows the search ba nd range displayed by the scanner and the typical
usage, frequency coverage, and step rate for each search band range.
and
BAND
keys. For example, you can search through all freque ncies be-
Search
Band
Range
29–30
30–50
50–54
108–137
137–144
144–148
148–174
406–420
420–450
450–470
470–512
T ypical Usage
10-Meter Amateur Radi o 29.0000–30.0000 5.0
VHF Lo 30.0000–50.0000 5.0
6-Meter Amateur Radio 50.0000–54.0000 5.0
Aircraft 108.0000–136.9750 25.0
Government 137.0000–144.0000 5.0
2-Meter Amateur Radio 144.0000–148.0000 5.0
VHF Hi 148.0000–174.0000 5.0
Government 406.0000–420.0000 12.5
70-Centimeter Amateur Radio 420.0000–450.0000 12.5
UHF Lo 45 0.0000–470.0000 12.5
UHF “T” Band 470.0000–512.0000 12.5
Frequency Coverage
(MHz)
Step
Rate
(kHz)
Notes:
• Your scanner searches at the preset frequency step rate (5, 12.5, or 25 kHz) for
each search band.
• You cannot change the frequency step rate.
15
Page 16

While searching through a search
band, you might hear a frequency
that you want to store with other frequencies of the same type, so you
can scan them all together. You can
store any frequency into a channel in
the POLICE or FIRE/EMG service
search banks or the PRIVATE bank.
See “Storing Frequencies into Channels” on Page 21.
Notes:
• Some of the frequencies in the
search bands are also i ncluded in
the scanner’s service search
banks.
• When you store a frequency in a
channel, that frequency also
remains in the search band.
• You cannot change or clear any of
the frequencies in the search
bands.
16
Page 17

A LOOK AT THE FRONT PANEL
A quick glance at this section will help you better understand each key’s function.
HOLD
— stops scanning or searching.
s and t — moves up or down through
frequencies and channels or changes
the search direction.
FIRE/EMG, AIR, POLICE, MARINE
—
scans the preset frequencies in the
named service search bank. See
“Service Search Banks” on Page 13.
PRIVATE
— scans the freq uenc ies you
stored in the PRIVATE bank’s channels. See “PRIVATE Bank” on
Page 14.
WX
— scans through the prepro-
grammed weather frequencies.
SEARCH
— searches for active frequencies within a selected band
range, starting from the lowest frequency. See “Using Band Search” on
Page 20.
L/OUT
— locks out selected frequen-
cies or channels.
BAND
— selects any of the 11 search
bands to search.
PROG
— programs frequencies into
channels.
SQ
— adjusts the scanner’s squelch.
OFF/VOLUME
— turns the scanner on
or off and adjusts the volume.
17
Page 18

g
A LOOK AT THE DISPLAY
The display has indicat ors that show t he sc anner’ s operat ing mod e. A good look at
the display will help you understand your scann er ’s operati on.
PRIVATE
the frequencies you s tored in the PRIVATE bank’s channels.
— appears when you scan
POLICE, FIRE/EMG, AIR, MRN
— appear when you scan the preset
frequencies in the named service
search bank.
WX
— appears when you scan the pre-
set weather frequencies.
HOLD
— appears when you press
HOLD
to stop scanning or searching.
SCAN
channels until a frequency appears.
SRCH
search to show the search direction.
Search Band Ran
pear instead of a frequency to show
which of the scanner’s 11 search
bands you selected.
— appears when you scan
s or t — appears during a
e Numbers
— ap-
L/O
— appears when you lock out a
channel or frequenc y or manually select a locked-out channel or frequency
(see “Locking Out Channe ls and Frequencies” on Page 23).
MEMO LOSS
turn on the scanne r until you program
the scanner, and when you turn on the
scanner after a power loss when the
scanner’s memory backup circuit is
too weak to save the scanner’s programming.
Error
incorrect entry.
Prg-Loc
program the scanner while
MEMOLOCK OFF/ON
“Using Memolock” on Page 23).
CH
— flashes when you program the
scanner.
Channel Number
left side of the display to show which of
the scan bank channels t he scanner is
tuned to.
— appears when you first
— appears when you make an
— appears when y ou t ry t o
is set to ON (see
— appears on the
18
Page 19

OPERATION
TURNING ON THE
SCANNER/SETTING
VOLUME AND SQUELCH
Make sure the scanner’s anten-
Note:
na is connected before you turn it on.
1. Turn
2. Turn
3. Turn
Notes:
• If the scanner picks u p unwanted,
•If
•
SQ
fully clockwise.
OFF/VOLUME
it clicks and you hear a hissing
sound.
SQ
counterclockwise until
the hissing sound stops.
partial, or very weak transmissions, turn
decrease the scanner ’s sensitivity
to these signals. If you want to listen to a weak or distant station,
turn
SQ
hear a hissing sound, the scanner
does not scan properly.
OFF/VOLUME
broadcast volume and the vol ume
SQ
SQ
clockwise.
is adjusted so you always
clockwise until
counterclockwise to
adjusts both the
of the beep you hear when you
press the scanner’s keys.
USING SERVICE
SEARCH
To scan a service se arch bank, press
any of these buttons:
•POLICE
FIRE/EMG
•
•AIR
• MARINE
To scan the PRIVATE bank, press
PRIVATE
You cannot scan the PRIVATE
Note:
bank until you have stored frequencies in it. See “Storing Frequencies
into Channels” on Page 21.
The scanner scans through all nonlocked channels (see “Locking Out
Channels and Frequencies” on
Page 23) in the bank you selected,
SCAN
scrolls, and the bank’s name
appears at the top of the display.
The scanner scans the channels with-
in the bank from the lowest to the
highest channel number. If the scanner detects a broadcast, it stops on
the channel. When the broadcast
ends, the scanner continues to scan
higher channels in the bank. When the
scanner finishes scanning all channels in the bank, it returns to the lowest channel in the bank and starts
scanning again.
.
19
Page 20

USING BAND SEARCH
Follow these steps to search for transmissions within any of the scanner’s
11 search bands.
1. Be sure
set to
on Page 23).
2. Press
3. Repeatedly press
see the search band you want to
search.
SRCH
search band appears. T hen, after
about 3 seconds,
SRCH
start s to auto maticall y search the
frequencies in the band. When the
scanner finds a transmission, it
stops on that frequency and the
frequency’s number appears until
the transmission stops, then the
scanner starts searching again.
You can change the direction of either
an automatic or manual search by
pressing the opposite arrow key (s or
t) once.
MEMOLOCK OFF/ON
OFF
(see “Using Memolock”
SEARCH
and the range for each
.
BAND
SRCH
t appears, and the s canner
is
until you
s or
range. Hold down s or t to quickly step
through the frequencies. Press
SEARCH
to return to automatic search.
MONITORING A
FREQUENCY
When the scanner displays a specific
frequency while scanning the banks or
searching the s earch bands, you can
continuously monitor that frequency.
This is useful if you hear an emergency broadcast on a frequency and do
not want to miss any details (even
though there might be periods of silence).
To monitor a frequency while it appears during scanning or searching,
HOLD
press
scanner stays on the frequency.
To contin ue scan ning a ban k, pre ss
a service search bank button,
PRIVATE
or
searching a search band, press
SEARCH
searching a search band, press s or t.
. To continue manually
HOLD
until
. To continue automatica lly
appears. The
WX,
To manually search the search band,
HOLD
press
automatically searching the frequen-
HOLD, SRCH
cies.
frequency within the band you selected appear.
Repeatedly press s to search from the
lower to the upper range, or t to
search from the upper to the lower
20
after the scanner starts
SRCH
s or
t, and a
Page 21

STORING FREQUENCIES
INTO CHANNELS
1. When the scanner displays a fr equency you want to store while
scanning the banks or searching
the search bands, press
CH
flashes, and
HOLD
quency number appear.
2. Press
PRIVATE, POLICE
EMG
to store the frequency into a
channel. For example, if you want
to store the frequency in one of
the channels in the POLICE service search bank, press
If the search bank you selected
has an empty channel, the frequency number flashes alternately
with the lowest empty channel
number and
000.0000
search bank you selected has no
empty channels, the frequency
number flashes alternately with
the channel number of the last
channel where you stored a frequency.
PROG
and the fre-
FIRE/
, or
POLICE
.
. If the
press
from Step 1.
3. Press
SEARCH
PROG
then start again
to store the frequency in the displayed channel.
Or, repeatedly press s or t, select
a channel number, then press
.
PROG
. The scanner displays the
channel number where you stored
the frequency.
Note:
If you select a channel with
a frequency already stored in it,
the scanner replaces the frequency with the new one.
To cancel storing the frequency,
BAND
press
4. Repeat Steps 1
.
3 to store more
–
frequencies into channels.
5. When you finish storing frequencies, set
ON
to prevent accidentally cha ng-
MEMOLOCK OFF/ON
to
ing them (see “Using Memolock”
on Page 23).
Note:
search bank key other than
VAT E
If you press a service
POLICE
,
, or
FIRE/EMG
PRI-
, the
scanner beeps several times and
Error
ning the banks, press
POLICE
appears. If you are scan-
PRIVATE
FIRE/EMG
, or
, then start
again from Step 1. If you are
searching the search bands,
,
21
Page 22

CLEARING
FREQUENCIES FROM
CHANNELS
You can clear a frequency from a
channel by storing an em pty frequency in its place.
Notes:
• You cannot clear or change any of
the frequencies in the scanner’s
search bands, any of the scanner’s preset weather frequencies,
or the preset frequencies in the
service search banks.
• When you clear a channel, the
scanner automatically locks out
the channel (see “Locking Out
Channels and Frequencies” on
Page 23).
1. Be sure
set to
on Page 23).
2. Press
press
band.
range for each band appear.
MEMOLOCK OFF/ON
OFF
(see “Using Memolock”
SEARCH
BAND
SRCH
, then repeatedly
to select a search
and the search band
is
5. Press s or t until
appears.
6. Press
7. Repeatedly press s or t until the
8. Press
9. Repeat Steps 2
10. When you finish clearing chan-
PRIVATE, POLICE
EMG
to select the bank that contains the channel you want to
clear.
HOLD
FIRE/EMG
or
channel number flashes.
scanner displays the channel you
want to clear.
alternately with the channel number and the frequency number.
frequency. The channel number
000.0000
and
To cancel clearing the channel,
press
channels.
nels, set
ON
to prevent accidentally changing them (see “Using Memolock”
on Page 23).
PRIVATE, POLICE
and
appears, and a
000.00 00
PROG
to store the empty
BAND
.
MEMOLOCK OFF/ON
000.0000
FIRE/
, or
flashes
appear.
8 to clear more
–
to
,
HOLD
3. Press
starts automatically searching that
HOLD
band.
4. Press
22
PROG
when the scanner
appears.
. CH flashes.
Page 23

SPECIAL FEATURES
USING MEMOL OCK
(add corr ec t e d illu s F25 showin g
antenna cable connected to
ANT jack. Please make sure
vendor places illus properly)
To keep from accidentally changing
the scanner’s programming, you can
lock the scanner’s memory by setting
MEMOLOCK OFF/ON
the
back of the scanner to
change the scanner’s programming,
Prg-Loc
ming does not change.
Set
or change information in the scanner’s
channels.
appears, and the program-
MEMOLOCK OFF/ON
switch on the
ON
. If you try to
OFF
to
to add
DELAY
LOCKING OUT
CHANNELS AND
FREQUENCIES
You can scan banks faster by locking
out frequencies or channels that have
a continuous transmission or static.
However, you cannot lock out any
weather frequencies or any frequencies within the AIR or MRN service
search banks.
To lock out a frequency or channel
while scanning, press
scanner displays the frequency or
channel number.
To remove the lockout, manually select the frequency or channel, then
press
channel number appears .
pears.
Notes:
L/O
when the frequency or
L/O
when the
L/O
disap-
Many agencies use a two-way radio
system that might have a pause of
several seconds between a q uery and
a reply.
When the scanner tunes to an active
frequency or channel, the scanner
automatically waits for 2 seconds after
the completion of each transmission
on that frequency or chan nel before it
resumes searching or scanning.
• The scanner automatically locks
out empty channels.
• You can lock out all frequencies
and channels in a bank. However,
if all frequencies and channels
within a bank are locked ou t, the
scanner beeps three times when
you press that bank key and does
not scan the bank.
• You can manually select locked
out channels.
23
Page 24

Removing a Lockout from All
Channels and Frequencies
within a Bank
Your scanner has these weather frequencies preprogrammed:
• 162.4000 MHz
1. Press the bank key to select the
bank containing the channels or
frequencies you want to remove a
lockout from.
2. Press
3. Hold down
Note:
an empty channel, the scanner automatically removes the lockout.
HOLD
.
L/O
until the scanner
beeps softly three times. The
scanner removes the lock out f rom
all channels and frequencies
within the selected bank.
When you store a frequency in
LISTENING TO
WEATHER
BROADCASTS
The FCC (Federal Communications
Commission) has allocated frequencies for use by the National Oceanic
and Atmospheric Administration
(NOAA). Regulatory agencies in other
countries have also allocated frequencies for use by their weather reporting
authorities.
• 162.4250 MHz
• 162.4500 MHz
• 162.4750 MHz
• 162.5000 MHz
• 162.5250 MHz
• 162.5500 MHz
To hear your local forecast and regional weather information, simply
press WX. Your scanner scans
through the weather frequencies. Your
scanner should stop within a few seconds on your local weather broadcast.
Follow these steps to manually tune to
a specific preprogrammed weather
frequency.
1. Press
2. Press
3. Repeatedly press s or t to move
WX
.
HOLD
.
forward or backward through the
frequencies.
Your local weather reporting authority
broadcasts your local forecast and regional weather information on one or
more of these frequencies. If your
scanner is within a weather reporting
authority’s broadcast range, you can
scan these frequencies.
24
Page 25

A GENERAL GUIDE TO SCANNING
g
Reception of the frequencies covered by your scanner is mainly “line-of-sight.” That
means you usually cannot hear stations that are beyond the horizon.
GUIDE TO FREQUENCIES
US Weather Frequencies
162.400 162.425 162.450 162.475
162.500 162.525 162.550
Other Weather Frequencies
161.650 161.775 162.440 163.275
Ham Radio Frequen cies
Ham radio operators often transmit emergen cy information when other means of
communication break down. The following chart shows the frequencies the scanner
receives that Ham radio operators normally use.
Wavelen
th (meters) Frequencies (MHz)
10-Meter 29.000–29.700
6-Meter 50.000–54.000
2-Meter 144.000–148.000
70-cm 420.000–450.000
33-cm 902.000–928.000
Birdie Frequencies
Every scanner has birdie frequencies. Birdies are signals created inside the scanner’s receiver. These operating fr equencies might interfere with broadc asts on the
same frequencies. If you program one of these frequencies, you hear only noise on
that frequency. If the interference is not severe, you might be able to turn
terclockwise to cut out the b irdie.
SQ
coun-
25
Page 26

The birdie frequencies to watch for on this unit are:
31.2000 161.8950 446.3000
41.6000 162.2950 508.7000
52.0000 168.3250 511.4000
114.4000 169.5300 511.4125
155.8700 173.1450
To find the birdies in your scanner, begin by disconnecting the antenna and moving
it away from the scanner. Make sure that no other nearby radio or TV sets are turned
on near the scanner. Use the search function and scan every frequency range from
its lowest frequency to the highest. Occasionally, the s earching will stop as if it had
found a signal, often without any sound. That is a birdie. Make a list of all the birdies
in your scanner for future reference.
GUIDE TO THE ACTION BANDS
United States Broadcast Bands
In the United States, there are several broadcast bands. The standard AM and FM
bands are probably the most well known. There are also four television audio broadcast ban ds — the lower three transmit on the VHF band and the fourth transmits on
the UHF band.
Typical Band Usage
VHF Band
Low Range 29.00–50.00 MHz
6-Meter Amateur 50.00–54.00 MHz
U.S. Government 137.00–144.00 MHz
2-Meter Amateur 144.00–148.00 MHz
High Range 148.00–174.00 MHz
26
Page 27

UHF Band
Military Aircraft 380.00–384.00 MHz
U.S. Government 406.00–420.00 MHz
70-cm Amateur 420.00–450.00 MHz
Low Range 450.00–470.00 MHz
FM-TV Audio Broadcast, Wide
Band
470.00–512.00 MHz
Primary Usage
As a general rule, most of the radio activity is concentrated on the following frequencies:
VHF Band
Activities Frequencies
Go v e r n m e nt, P olice, an d Fire 153.785–155.980 MHz
Emergency Services 158.730–159.460 MHz
Railroad 160.000–161.900 MHz
UHF Band
Activities Frequencies
Land-Mobile “Paired”
Frequencies
Base Stations 451.025–454.950 MHz
Mobile Units 456.025–459.950 MHz
Repeater Units 460.025–464.975 MHz
Control Stations 465.025–469.975 MHz
450.000–470.000 MHz
Remote control stations and mobile units operate at 5 MHz higher than
Note:
their associated base stations and relay repeater units.
27
Page 28

SPECIFIED INTERVALS
Frequencies in d ifferent bands a re acces sible on ly at spe cific intervals. F or example:
Frequency Range(s) Specified Interval
29–54 and 137–174 MHz 5.0 kHz steps
380–512 MHz 12.5 kHz steps
BAND ALLOCATION
To help decide which frequency ranges to scan, use the following listing of the typical services that use the frequencies your scanner receives. These frequencies are
subject to change, and might vary from area to area. For a more complete listing,
refe r to th e
able at your local RadioShack store.
Abbreviations Services
AIR . . . . . . . . . . . . . . . . . . . . . . . . . . . . . . . . . . . . . . . . . . . . . . . . . . . . . . . . Aircraft
BIFC . . . . . . . . . . . . . . . . . . . . . . . . . . . . . . . . . .Boise (ID) Interagency Fire C ache
BUS. . . . . . . . . . . . . . . . . . . . . . . . . . . . . . . . . . . . . . . . . . . . . . . . . . . . . . .Business
CAP. . . . . . . . . . . . . . . . . . . . . . . . . . . . . . . . . . . . . . . . . . . . . . . . . . .Civil Air Patrol
CB. . . . . . . . . . . . . . . . . . . . . . . . . . . . . . . . . . . . . . . . . . . . . . . . . . . . Citizens Band
CCA . . . . . . . . . . . . . . . . . . . . . . . . . . . . . . . . . . . . . . . . . . . . . . . .Common Carrier
CSB . . . . . . . . . . . . . . . . . . . . . . . . . . . . . . . . . . . . . . . . . . . . Convent ional Systems
CTSB . . . . . . . . . . . . . . . . . . . . . . . . . . . . . . . . . . . Conventional/Trunked Systems
FIRE . . . . . . . . . . . . . . . . . . . . . . . . . . . . . . . . . . . . . . . . . . . . . . . . Fire Department
HAM . . . . . . . . . . . . . . . . . . . . . . . . . . . . . . . . . . . . . . . . . . . .Amateur (Ham) Radio
GOVT . . . . . . . . . . . . . . . . . . . . . . . . . . . . . . . . . . . . . . . . . . . .Federal Government
GMR . . . . . . . . . . . . . . . . . . . . . . . . . . . . . . . . . . . . . . . . . . . .General Mobile Radio
GTR . . . . . . . . . . . . . . . . . . . . . . . . . . . . . . . . . . . . . . . . . . . . . . . .General Trunked
IND . . . . . . . . . . . . . . . . . . . . . . . . . . . . . . . . . . . . . . . . . . . . . . . Industrial Services
. . . . . . . . . . . . . . . . . (Manufacturing, Construction, Farming, Forest Products)
MAR . . . . . . . . . . . . . . . . . . . . . . . . . . . . . . . . . . . . . . . . . . .Military Amateur Radio
MARI. . . . . . . . . . . . . . . . . . . . . . . . . . . . . . . . . . . . . . . . . . .M aritime Limited Coast
. . . . . . . . . . . . . . . . . . . . . . . . . . . . . . . . . . . (Coast Guard, Marine Telephone,
. . . . . . . . . . . . . . . . . . . . . . . . . . . . . . . . . . Shipboard Radio, Private Stations)
MARS . . . . . . . . . . . . . . . . . . . . . . . . . . . . . . . . . . . . Military Affiliate Radio System
MED . . . . . . . . . . . . . . . . . . . . . . . . . . . . . . . . . . . . . .Emergency/M edical Services
MIL . . . . . . . . . . . . . . . . . . . . . . . . . . . . . . . . . . . . . . . . . . . . . . . . . . . . U.S. Military
MOV . . . . . . . . . . . . . . . . . . . . . . . . . . . . . . . . . . . . . .Motion Picture/Video Industry
NEW . . . . . . . . . . . . . . . . . . . . . . . . . . . . . . . . . . . . . . . . . . . . . New Mobile Narrow
NEWS . . . . . . . . . . . . . . . . . . . . . . . . . . . . . . . Relay Press (Newspaper Reporters)
OIL . . . . . . . . . . . . . . . . . . . . . . . . . . . . . . . . . . . . . . . . . . . . O il/P etrol eum Industry
Police Call Radio Guide including Fire and Emerge ncy Services
, avail-
28
Page 29

POL . . . . . . . . . . . . . . . . . . . . . . . . . . . . . . . . . . . . . . . . . . . . . . .Police Department
PUB . . . . . . . . . . . . . . . . . . . . . . . . . . . . . . . . . . . . . . . . . . . . . . . . . Public Services
. . . . . . . . . . . . . . . . (Public Safety, Local Govern ment, Forestry Conservation)
PSB . . . . . . . . . . . . . . . . . . . . . . . . . . . . . . . . . . . . . . . . . . . . . . . . . . .Public Safety
PTR . . . . . . . . . . . . . . . . . . . . . . . . . . . . . . . . . . . . . . . . . . . . . . . . .Private Trunked
ROAD. . . . . . . . . . . . . . . . . . . . . . . . . . . . . . . . . . . . Road & Highway Maintenance
RTV . . . . . . . . . . . . . . . . . . . . . . . . . . . . . . . . .Radio/TV Remote Broadcast Pickup
TAXI . . . . . . . . . . . . . . . . . . . . . . . . . . . . . . . . . . . . . . . . . . . . . . . . . . .Taxi Services
TELB. . . . . . . . . . . . . . . . . . . . . . . . . . . . . . . . . . . . . . . . . . . . . . . Mobile Telephone
. . . . . . . . . . . . . . . . . . . . .(Aircraft, Radio Common Carrier, Landline Companies)
TELC . . . . . . . . . . . . . . . . . . . . . . . . . . . . . . . . . . . . . . . . . . . . . . .Cordless Phones
TELM . . . . . . . . . . . . . . . . . . . . . . . . . . . . . . . . . . . . . . . . . Telephone Maintenance
TOW. . . . . . . . . . . . . . . . . . . . . . . . . . . . . . . . . . . . . . . . . . . . . . . . . . . . Tow Trucks
TRAN . . . . . . . . . . . . . . . . . . . . . . . . . . . . . . . . . . . . . . . . . Transportation Services
. . . . . . . . . . . . . . . . . . . . . . . . . . .(Trucks, To w Trucks, Buses, Railroad, Other)
TSB. . . . . . . . . . . . . . . . . . . . . . . . . . . . . . . . . . . . . . . . . . . . . . . . Trunked Systems
TVn. . . . . . . . . . . . . . . . . . . . . . . . . . . . . . . . . . . . . . . . . . . FM -TV Audio Broadcast
USXX . . . . . . . . . . . . . . . . . . . . . . . . . . . . . . . . . . . . . . . . . . Government Classified
UTIL . . . . . . . . . . . . . . . . . . . . . . . . . . . . . . . . . . . . . . . . . . .Power & Water Utilities
WTHR . . . . . . . . . . . . . . . . . . . . . . . . . . . . . . . . . . . . . . . . . . . . . . . . . . . . . .Weather
VERY HIGH FREQUENCY (VHF)
VHF Low Band—(in 5 kHz steps)
29.900–30.550 . . . . . . . . . . . . . . . . . . . . . . . . . . . . . . . . . . . . . . . . . . . . GOVT, MIL
30.580–31.980 . . . . . . . . . . . . . . . . . . . . . . . . . . . . . . . . . . . . . . . . . . . . . .IND, PUB
32.000–32.990 . . . . . . . . . . . . . . . . . . . . . . . . . . . . . . . . . . . . . . . . . . . . GOVT, MIL
33.020–33.980 . . . . . . . . . . . . . . . . . . . . . . . . . . . . . . . . . . . . . . . . .BUS, IND, PUB
34.010–34.990 . . . . . . . . . . . . . . . . . . . . . . . . . . . . . . . . . . . . . . . . . . . . GOVT, MIL
35.020–35.980 . . . . . . . . . . . . . . . . . . . . . . . . . . . . . . . . . . . BUS, PUB, IND, TELM
36.000–36.230 . . . . . . . . . . . . . . . . . . . . . . . . . . . . . . . . . . . . . . . . . . . . GOVT, MIL
36.250. . . . . . . . . . . . . . . . . . . . . . . . . . . . . . . . . . . . . . . . . . . . . . . Oil Spill Cleanup
36.270–36.990 . . . . . . . . . . . . . . . . . . . . . . . . . . . . . . . . . . . . . . . . . . . . GOVT, MIL
37.020–37.980 . . . . . . . . . . . . . . . . . . . . . . . . . . . . . . . . . . . . . . . . . . . . . .PUB, IND
38.000–39.000 . . . . . . . . . . . . . . . . . . . . . . . . . . . . . . . . . . . . . . . . . . . . GOVT, MIL
39.020–39.980 . . . . . . . . . . . . . . . . . . . . . . . . . . . . . . . . . . . . . . . . . . . . . . . . . .P UB
40.000–42.000 . . . . . . . . . . . . . . . . . . . . . . . . . . . . . . . . . . . . . . .GOVT, MIL, MARI
42.020–42.940 . . . . . . . . . . . . . . . . . . . . . . . . . . . . . . . . . . . . . . . . . . . . . . . . . .P O L
42.960–43.180 . . . . . . . . . . . . . . . . . . . . . . . . . . . . . . . . . . . . . . . . . . . . . . . . . . I ND
43.220–43.680 . . . . . . . . . . . . . . . . . . . . . . . . . . . . . . . . . . . . . . . .TELM, IND, PUB
43.700–44.600 . . . . . . . . . . . . . . . . . . . . . . . . . . . . . . . . . . . . . . . . . . . . . . . . TRAN
44.620–46.580 . . . . . . . . . . . . . . . . . . . . . . . . . . . . . . . . . . . . . . . . . . . . . POL, PUB
46.600–46.990 . . . . . . . . . . . . . . . . . . . . . . . . . . . . . . . . . . . . . . . . . . .GOVT, TELC
47.020–47.400 . . . . . . . . . . . . . . . . . . . . . . . . . . . . . . . . . . . . . . . . . . . . . . . . . .P UB
47.420. . . . . . . . . . . . . . . . . . . . . . . . . . . . . . . . . . . . . . . . . . . .American Red Cross
47.440–49.580 . . . . . . . . . . . . . . . . . . . . . . . . . . . . . . . . . . . . . . . . . . . . . .IND, PUB
49.610–49.990 . . . . . . . . . . . . . . . . . . . . . . . . . . . . . . . . . . . . . . . . . . . . . MIL, TELC
29
Page 30

6-Meter Amateur Band
50.00–54.00 . . . . . . . . . . . . . . . . . . . . . . . . . . . . . . . . . . . . . . . . . . . . . . . . . . . HAM
U.S. Government Band
137.000–144.000 . . . . . . . . . . . . . . . . . . . . . . . . . . . . . . . . . . . . . . . . . . GOVT, MIL
2-Meter Amateur Band
144.000–148.000 . . . . . . . . . . . . . . . . . . . . . . . . . . . . . . . . . . . . . . . . . . . . . . . HAM
VHF High Band
148.050–150.345 . . . . . . . . . . . . . . . . . . . . . . . . . . . . . . . . . . . . . . .CAP, MAR, MIL
150.775–150.790 . . . . . . . . . . . . . . . . . . . . . . . . . . . . . . . . . . . . . . . . . . . . . . . MED
150.815–150.980 . . . . . . . . . . . . . . . . . . . . . . . . . . . . . . . . .TOW, Oil Spill Cleanup
150.995–151.475 . . . . . . . . . . . . . . . . . . . . . . . . . . . . . . . . . . . . . . . . . ROA D, POL
151.490–151.955 . . . . . . . . . . . . . . . . . . . . . . . . . . . . . . . . . . . . . . . . . . . I ND, BUS
151.985. . . . . . . . . . . . . . . . . . . . . . . . . . . . . . . . . . . . . . . . . . . . . . . . . . . . . . TELM
152.0075. . . . . . . . . . . . . . . . . . . . . . . . . . . . . . . . . . . . . . . . . . . . . . . . . . . . . . ME D
152.030–152.240 . . . . . . . . . . . . . . . . . . . . . . . . . . . . . . . . . . . . . . . . . . . . . . .TELB
152.270–152.480 . . . . . . . . . . . . . . . . . . . . . . . . . . . . . . . . . . . . . . IND, TAXI, BUS
152.510–152.840 . . . . . . . . . . . . . . . . . . . . . . . . . . . . . . . . . . . . . . . . . . . . . . .TELB
152.870–153.020 . . . . . . . . . . . . . . . . . . . . . . . . . . . . . . . . . . . . . . . . . . .IND, MOV
153.035–153.725 . . . . . . . . . . . . . . . . . . . . . . . . . . . . . . . . . . . . . . . IND, OIL, UTIL
153.740–154.445 . . . . . . . . . . . . . . . . . . . . . . . . . . . . . . . . . . . . . . . . . . P UB , FIRE
154.490–154.570 . . . . . . . . . . . . . . . . . . . . . . . . . . . . . . . . . . . . . . . . . . . I ND, BUS
154.585. . . . . . . . . . . . . . . . . . . . . . . . . . . . . . . . . . . . . . . . . . . . . .Oi l Spill Cleanup
154.600–154.625 . . . . . . . . . . . . . . . . . . . . . . . . . . . . . . . . . . . . . . . . . . . . . . . BUS
154.655–156.240 . . . . . . . . . . . . . . . . . . . . . . . . . . . . . . . .MED, ROAD, POL, PUB
156.255–157.425 . . . . . . . . . . . . . . . . . . . . . . . . . . . . . . . . . . . . . . . . . . .OIL, MARI
157.450. . . . . . . . . . . . . . . . . . . . . . . . . . . . . . . . . . . . . . . . . . . . . . . . . . . . . . . MED
157.470–157.515 . . . . . . . . . . . . . . . . . . . . . . . . . . . . . . . . . . . . . . . . . . . . . . . TOW
157.530–157.725 . . . . . . . . . . . . . . . . . . . . . . . . . . . . . . . . . . . . . . . . . . . IND, TAXI
157.740. . . . . . . . . . . . . . . . . . . . . . . . . . . . . . . . . . . . . . . . . . . . . . . . . . . . . . . BU S
157.770–158.100 . . . . . . . . . . . . . . . . . . . . . . . . . . . . . . . . . . . . . . . . . . . . . . .TELB
158.130–158.460 . . . . . . . . . . . . . . . . . . . . . . . . . . . . .B US , IND, OIL, TELM, UTIL
158.490–158.700 . . . . . . . . . . . . . . . . . . . . . . . . . . . . . . . . . . . . . . . . . . . . . . .TELB
158.730–159.465 . . . . . . . . . . . . . . . . . . . . . . . . . . . . . . . . . . . . .POL, PUB, ROAD
159.480. . . . . . . . . . . . . . . . . . . . . . . . . . . . . . . . . . . . . . . . . . . . . . . . . . . . . . . . OI L
159.495–161.565 . . . . . . . . . . . . . . . . . . . . . . . . . . . . . . . . . . . . . . . . . . . . . . T R AN
161.580–162.000 . . . . . . . . . . . . . . . . . . . . . . . . . . . . . . . . . . . . . . OIL, MAR I, RTV
162.0125–162.35 . . . . . . . . . . . . . . . . . . . . . . . . . . . . . . . . . . . . GOVT, MIL, US X X
162.400–162.550 . . . . . . . . . . . . . . . . . . . . . . . . . . . . . . . . . . . . . . . . . . . . . .WTHR
162.5625–162.6375 . . . . . . . . . . . . . . . . . . . . . . . . . . . . . . . . . . G OVT, MIL, USXX
162.6625. . . . . . . . . . . . . . . . . . . . . . . . . . . . . . . . . . . . . . . . . . . . . . . . . . . . . . M ED
162.6875–163.225 . . . . . . . . . . . . . . . . . . . . . . . . . . . . . . . . . . . GOVT, MIL, USXX
163.250. . . . . . . . . . . . . . . . . . . . . . . . . . . . . . . . . . . . . . . . . . . . . . . . . . . . . . . MED
163.275–166.225 . . . . . . . . . . . . . . . . . . . . . . . . . . . . . . . . . . . . GOVT, MIL, US X X
166.250. . . . . . . . . . . . . . . . . . . . . . . . . . . . . . . . . . . . . . . . . . . . .GOVT, RT V, FIRE
30
Page 31

166.275–169.400 . . . . . . . . . . . . . . . . . . . . . . . . . . . . . . . . . . . . . . . . . G OVT, BIFC
169.445–169.505 . . . . . . . . . . . . . . . . . . . . . . . . . . . . . . . . . Wireless Mikes, GOVT
169.55–169.9875 . . . . . . . . . . . . . . . . . . . . . . . . . . . . . . . . . . . . .GOVT, M IL, USXX
170.000–170.150 . . . . . . . . . . . . . . . . . . . . . . . . . . . . . . . .BIFC, GOVT, RTV, FIRE
170.175–170.225 . . . . . . . . . . . . . . . . . . . . . . . . . . . . . . . . . . . . . . . . . . . . . . GOVT
170.245–170.305 . . . . . . . . . . . . . . . . . . . . . . . . . . . . . . . . . . . . . . . Wireless Mikes
170.350–170.400 . . . . . . . . . . . . . . . . . . . . . . . . . . . . . . . . . . . . . . . . . . GOVT, MIL
170.425–170.450 . . . . . . . . . . . . . . . . . . . . . . . . . . . . . . . . . . . . . . . . . . . . . . . B IFC
170.475. . . . . . . . . . . . . . . . . . . . . . . . . . . . . . . . . . . . . . . . . . . . . . . . . . . . . . . .PUB
170.4875–173.175 . . . . . . . . . . . . . . . . . . . . . . . . . . . .GOVT, PUB, Wireless Mikes
173.225–173.5375 . . . . . . . . . . . . . . . . . . . . . . . . . . . . . . . MOV, NEWS, UTIL, MIL
173.5625–173.5875 . . . . . . . . . . . . . . . . . . . . . . . . . . . . .MIL Medical/Crash Crews
173.60–173.9875 . . . . . . . . . . . . . . . . . . . . . . . . . . . . . . . . . . . . . . . . . . . . . . GOVT
ULTRA HIGH FREQUENCY (UHF)
U. S. Government Band
406.125–419.975 . . . . . . . . . . . . . . . . . . . . . . . . . . . . . . . . . . . . . . . . .GOVT, USXX
70-cm Amateur Band
420.000–450.000 . . . . . . . . . . . . . . . . . . . . . . . . . . . . . . . . . . . . . . . . . . . . . . . HAM
Low Band
450.050–450.925 . . . . . . . . . . . . . . . . . . . . . . . . . . . . . . . . . . . . . . . . . . . . . . . .RTV
451.025–452.025 . . . . . . . . . . . . . . . . . . . . . . . . . . . . . . . . . .IND, OIL, TELM, UTIL
452.0375–453.00 . . . . . . . . . . . . . . . . . . . . . . . . . . IND, TAXI, TRAN TOW, NEWS
453.0125–454.000 . . . . . . . . . . . . . . . . . . . . . . . . . . . . . . . . . . . . . . . . . . . PUB , OIL
454.025–454.975 . . . . . . . . . . . . . . . . . . . . . . . . . . . . . . . . . . . . . . . . . . . . . . .TELB
455.050–455.925 . . . . . . . . . . . . . . . . . . . . . . . . . . . . . . . . . . . . . . . . . . . . . . . .RTV
457.525–457.600 . . . . . . . . . . . . . . . . . . . . . . . . . . . . . . . . . . . . . . . . . . . . . . . . B US
458.025–458.175 . . . . . . . . . . . . . . . . . . . . . . . . . . . . . . . . . . . . . . . . . . . . . . . M E D
460.0125–460.6375 . . . . . . . . . . . . . . . . . . . . . . . . . . . . . . . . . . . .FIR E, POL, PUB
460.650–462.175 . . . . . . . . . . . . . . . . . . . . . . . . . . . . . . . . . . . . . . . . . . . . . . . . B US
462.1875–462.450 . . . . . . . . . . . . . . . . . . . . . . . . . . . . . . . . . . . . . . . . . . .BUS, IND
462.4625–462.525 . . . . . . . . . . . . . . . . . . . . . . . . . . . . . . . . .I ND, OIL, TELM, UTIL
462.550–462.925 . . . . . . . . . . . . . . . . . . . . . . . . . . . . . . . . . . . . . . . . . . GMR, BUS
462.9375–463.1875 . . . . . . . . . . . . . . . . . . . . . . . . . . . . . . . . . . . . . . . . . . . . . MED
463.200–467.925 . . . . . . . . . . . . . . . . . . . . . . . . . . . . . . . . . . . . . . . . . . . . . . . . B US
FM-TV Audio Broadcast, UHF Wide Band
(Channels 14 through 69 in 6 MHz steps)
475.750. . . . . . . . . . . . . . . . . . . . . . . . . . . . . . . . . . . . . . . . . . . . . . . . . . Channel 14
481.750. . . . . . . . . . . . . . . . . . . . . . . . . . . . . . . . . . . . . . . . . . . . . . . . . . Channel 15
487.750. . . . . . . . . . . . . . . . . . . . . . . . . . . . . . . . . . . . . . . . . . . . . . . . . . Channel 16
... ...
511.750. . . . . . . . . . . . . . . . . . . . . . . . . . . . . . . . . . . . . . . . . . . . . . . . . . Channel 20
Note: Some cities use the 470–512 MHz band for land/mobile service.
31
Page 32

FREQUENCY CONVERSION
The tuning location of a station can be e xpressed in frequency (kHz or M Hz) or in
wavelength (meters). The following information can help you make the necessary
conversions.
1 MHz (million) = 1,000 kHz (thousand )
To convert MHz to kHz, multiply the number of megahertz by 1,000:
30.62 (MHz) ¥ 1000 = 30, 620 kHz
To convert from kHz to MHz, divide the number of kilohertz by 1,000:
127,800 (kHz) ÷ 1000 = 127.8 MHz
To convert MHz to meters, divide 300 by the number of megahertz:
300 ÷ 50 MHz = 6 meters
32
Page 33

TROUBLESHOOTING
If your scanner is not working a s it sho uld, th ese s uggest ions m igh t he lp you e liminate the problem. If the scanne r still does not operate properly, take it to your lo cal
RadioShack store for assistance.
Problem Possible Causes Remedies
The scanner does not
work at all.
Poor or no reception. Improperly connected
Scanner is on but
does not scan.
In the scan mode, the
scanner locks on frequencies that have an
unclear transmission.
The AC adapter is not
properly connected.
The DC power cord or
DC cigarette-lighter
power cord is not connected.
antenna.
SQ
is not correctly ad-
justed.
Birdies. Avoid programming frequen-
Be sure the AC adapter is
plugged into a working AC
outlet.
Be sure the power cord is fully inserted int o the
jack.
Be sure the power cord’s red
wire is connected correctly to
a voltage source and the
black wire is connected correctly to ground.
Be sure the antenna is properly connected.
SQ
Adjust
(see “Turning On the Scanner/Setting Volume and
Squelch” on Page 19).
cies listed under “Birdie Frequencies” on Page 25 or only
listen to them manually.
counterclockwise
DC 13.8V
33
Page 34

CARE AND MAINTENANCE
Your RadioShack PRO -2056 50-Channe l Home/Mobile Scanner is an example of
superior design and craftsmanship. The following suggestions will help you care for
your scanner so you can enjoy it for years.
Keep the scanner dry. If it gets wet, wipe it dry immediately. Liquids
might contain minerals that can corrode the electronic circuits.
Keep the scanner awa y from d ust a nd di rt, whi ch can c au se prem ature wear of parts.
Handle the scanner gently and carefully. Dropping it can damage circuit boards and cases and can cause the scanner to work improperly.
Wipe the scanner with a damp cloth occasionally to keep it looking
new. Do not use harsh chemicals, cleaning solvents, or strong detergents to clean the scanner.
Modifying or tampering with the sc anner’s internal components can caus e a malfunction and might invalidate your scanner’s warranty and void your FCC authorization to operate it. If your sc anne r is not performing as it shoul d, take it to y our lo cal
RadioShack store for assistance.
34
Page 35

REPLACING THE FUSES
The fuses in the scanner’s DC power
cord and DC cigarette-lighter power
cord help protect your scanner from
power surges and short circuits. If the
fuse in the DC power cord has blown,
replace it with a 1-amp, fast-acting
glass fuse (such as RadioShack Cat.
No. 270-1005). For the fuse in the DC
cigarette-lighter power cord, replace it
with a 2-amp, fast-acting glass fuse
(such as RadioShack Cat. No. 270-
1007).
Warnings:
(add corrected illus F26,
deleting curved arrow)
3. If the fuse is blown, replace it.
4. To close the fuse hol der, push the
fuse holder ends together, then
turn either end clockwise.
• Before you begin, turn off the
scanner and your vehicle’s ignition.
• Make sure you replace the fuse
only with another fuse of the same
type and rating.
Replacing the Fuse in the DC
Power Cord
1. Turn off the scanner and your
vehicle’s ignition.
2. To open the fuse ho lder, push the
fuse holder ends together, then
turn either end counterclockwise
and release it.
Replacing the Fuse in the DC
Cigarette-Lighter Power Cord
1. Turn off the scanner and your
vehicle’s ignition.
2. To open the cigarette -lighter plug,
turn the cap counte rclockwi se and
remove it.
3. If the fuse is blown, replace it.
4. Replace the cap.
35
Page 36

SPECIFICATIONS
Frequency Coverage:
Ham . . . . . . . . . . . . . . . . . . . . . . . . . . . . . . . . . . . 29–29.7 MHz (in 5 kHz steps)
VHF Lo . . . . . . . . . . . . . . . . . . . . . . . . . . . . . . . . 29.7–50 MHz (in 5 kHz steps)
Ham . . . . . . . . . . . . . . . . . . . . . . . . . . . . . . . . . . . . 50–54 MHz (in 5 kHz steps)
Aircraft . . . . . . . . . . . . . . . . . . . . . . . . . . . . 108–136.975 MHz (in 25 kHz steps)
Government . . . . . . . . . . . . . . . . . . . . . . . . . . . . . 137–144 MHz (in 5 kHz steps)
Ham . . . . . . . . . . . . . . . . . . . . . . . . . . . . . . . . . . .144–14 8 MHz (in 5 kHz steps)
VHF Hi . . . . . . . . . . . . . . . . . . . . . . . . . . . . . . . . .148–174 MHz (in 5 kHz steps)
Ham/Government . . . . . . . . . . . . . . . . . . . . . 406–450 MHz (in 12.5 kHz steps)
UHF Lo . . . . . . . . . . . . . . . . . . . . . . . . . . . . . 450–470 MHz (in 12.5 kHz steps)
UHF T . . . . . . . . . . . . . . . . . . . . . . . . . . . . . . 470–512 MHz (in 12.5 kHz steps)
Programmable Channels:
POLICE Service Search Bank . . . . . . . . . . . . . . . . . . . . . . . . . . . . . . . . . . . . 20
FIRE/EMG Service Search Bank . . . . . . . . . . . . . . . . . . . . . . . . . . . . . . . . . . 10
PRIVATE Bank . . . . . . . . . . . . . . . . . . . . . . . . . . . . . . . . . . . . . . . . . . . . . . . . 20
Sensitivity (20 dB S/N with 60% modulation for AM, 3 kHz deviation for FM):
29–54 MHz . . . . . . . . . . . . . . . . . . . . . . . . . . . . . . . . . . . . . . . . . . . . . . . 0.4 µV
108–136.975 MHz . . . . . . . . . . . . . . . . . . . . . . . . . . . . . . . . . . . . . . . . . 1.7 µV
137–174 MHz . . . . . . . . . . . . . . . . . . . . . . . . . . . . . . . . . . . . . . . . . . . . . 0.8 µV
406–512 MHz . . . . . . . . . . . . . . . . . . . . . . . . . . . . . . . . . . . . . . . . . . . . . 0.6 µV
Scanning Rate . . . . . . . . . . . . . . . . . . . Up to 100 frequencies or channels/second
Search Rate . . . . . . . . . . . . . . . . . . . . . . . . . . . . . . . . . . . . Up to 100 steps/se cond
Delay Time . . . . . . . . . . . . . . . . . . . . . . . . . . . . . . . . . . . . . . . . . . . . . . . 2 seconds
Intermediate Frequencies (IF):
1st . . . . . . . . . . . . . . . . . . . . . . . . . . . . . . . . . . . . . . . . . . . . . . . . . . 10.85 MHz
2nd . . . . . . . . . . . . . . . . . . . . . . . . . . . . . . . . . . . . . . . . . . . . . . . . . . . . 450 kHz
Squelch Sensitivity:
Threshold . . . . . . . . . . . . . . . . . . . . . . . . . . . . . . . . . . . . . . . . . . . . . . . . 0 .4 µV
Tight . . . . . . . . . . . . . . . . . . . . . . . . . . . . . . . . . . . . . . . . . . . . . . (S+N)/N 25 dB
Antenna Impedance . . . . . . . . . . . . . . . . . . . . . . . . . . . . . . . . . . . . . . . . . 50 Ohms
Audio Power:
Maximum . . . . . . . . . . . . . . . . . . . . . . . . . . . . . . . . . . . . . . . . . . . . . . . . . 1.8 W
Normal . . . . . . . . . . . . . . . . . . . . . . . . . . . . . . . . . . . . . . . . . . . . . . . . . . . 1.5 W
36
Page 37

Current Drain:
Squelched . . . . . . . . . . . . . . . . . . . . . . . . . . . . . . . . . . . . . . . . . . . . . . . 130 mA
Unsquelched, full volume . . . . . . . . . . . . . . . . . . . . . . . . . . . . . . . . . . . 400 mA
Built-in Speaker . . . . . . . . . . . . . . . . . . . . . . . . . . . . . . . . . . . . . . . . 3 Inch (77 mm)
8-ohm, Dynamic Type
Power Requirements . . . . . . . . . . . . . . . . . . . . . . . . . . . .AC 120V, 60 Hz, 14 Watts
+13.8V DC
1
Dimensions (HWD) . . . . . . . . . . . . . . . . . . . . . . . . . . . . . . . . 2 ¥
5
/8 ¥
15
6
Inch-
/16
es
(50 ¥ 130 ¥ 175 mm)
(with feet folded up)
Weight . . . . . . . . . . . . . . . . . . . . . . . . . . . . . . . . . . . . . . . . . . . . . . . . . . . . . 1.11 lbs
(755 g)
Supplied Accessories . . . . . . . . . . . . . . . . . . . . . . . . . . . . . . . . . . DC Power Cord
DC Cigarette-Lighter Power Cord
AC Adapter
Telescoping Antenna
Window-Mount Antenna
Vehicle Mounting Hardware
Specifications are ty pical; Ind ividual unit s might vary. S pecifications a re sub ject to
change and improvement without notice.
37
Page 38

NOTES
38
Page 39

39
Page 40

Limited One-Year Warranty
This product is warran ted by RadioShac k against ma nufacturing defec ts in materi al and workman ship under normal use for one (1) year from the date of purchase from RadioShack company-owned
stores and author ized Radi oS hack fr anchi see s and deal er s. In the eve nt of a pr oduct defe ct d uring
the warranty period, take the product and the RadioShack sales receipt as proof of purchase date to
any RadioShack store. RadioS hack will, at its option, unless other wise provided by law : (a) correct
the defect by product re pair without char ge for parts and labo r; (b) replace the pr oduct with one of
the same or similar design; or (c) refund the purc hase price. All replaced parts and prod ucts, and
products on which a refund i s made, become the property of Radi oShack. New or reconditioned
parts and products may be used in the performance of warranty service. Repaired or replaced parts
and products are warranted for the remainder of the original warranty period. You will be charged for
repair or replacement of the product made after the expiration of the warranty period.
This warranty does not cover: (a) damage or failure caused by or attributable to acts of God, abuse,
accident, misuse, improper or abnorma l usa ge, failure to fol low i nstruc tions , imprope r insta llation or
maintenance, alterati on, lightning or other incidence of exc ess voltage or current; (b) any repairs
other than those provi ded by a RadioShack Autho rized Service Facilit y; (c) consumables such as
fuses or batteries; (d) cos metic da mage; ( e) trans por tation, sh ipping or insuranc e cost s; or ( f) costs
of product removal, installation, set-up service adjustment or reinstallation.
EXCEPT AS PROVIDED HEREIN, RadioShack MAKES NO EXPRESS WARRANTIES AND ANY
IMPLIED WARRANTIES, INCLUDING THOSE OF MERCHANTABILITY AND FITNESS FOR A
PARTICULAR PURPOSE, ARE LIMITED IN DURATION TO THE DURATION OF THE WRITTEN
LIMITED WARRANTIES CONTAINED HEREIN. EXCEPT AS PROVIDED HEREIN, RadioShack
SHALL HAVE NO LIABILITY OR RESPONSIBILITY TO CUSTOMER OR ANY OTHER PERSON
OR ENTITY WITH RESPECT TO ANY LIABILITY, LOSS OR DAMAGE CAUSED DIRECTLY OR
INDIRECTLY BY USE OR PERFORMANCE OF THE PRODUCT OR ARISING OUT OF ANY
BREACH OF THIS WARRANTY, INCLUDING, BUT NOT LIMITED TO, ANY DAMAGES RESULTING FROM INCONVENIENCE, LOSS OF TI ME, DATA , PROPERTY, REVENUE, OR PROFIT OR
ANY INDIRECT, SPECIAL, INCIDENTAL, OR CONSEQUENTIAL DAMAGES, EVEN IF RadioShack HAS BEEN ADVISED OF THE POSSIBILITY OF SUCH DAMAGES.
Some states do not allow the limitations on how long an implied warranty lasts or the exclusion of incidental or consequentia l damages, so the above limitations or exc lusions may not apply to you.
This warranty gives you specifi c legal rights, and you may also have oth er rights which vary from
state to state.
RadioShack Customer Relations, Dept. W, 100 Throckmorton St., Suite 600, Fort Worth, TX 76102
We Service What We Sell
1/97
RadioShack
A Division of Tandy Co rpo ration
Fort Worth, Te xas 76102
UBZZ01225HZ
4A7 Printed in the Philippines
 Loading...