


iQ24
US
ES
FR
www.philips.com/AVENT
© 2007 Philips Electronics North America Corporation.All rights reserved.
Philips of Holland.All logos, brands and product names are trademarks or registered trademarks of their
respective holders and are hereby recognised as such.
© 2007 Philips Electronics North America Corporation.Todos los Derechos Reservados.
Philips of Holland.Todos los logotipos,marcas y nombres de productos son marcas o marcas registradas
de sus respectivos titulares y son reconocidas como tales.
© 2007 Philips Electronics North America Corporation.Tous droits réservés.
Philips of Holland.Tous les logos ou noms de produit sont des marques de commerce ou déposées
de leur dépositaire respectif ou reconnu comme tel.
Call TOLL-FREE: 1.800.54.AVENT
Llame gratuítamente: 1.800.54.AVENT
Appelez SANS FRAIS : 1.800.54.AVENT
42133 5435 080 #2 (11/07)
Esterilizador no funcionará
Vapor excesiva se escapa de
debajo de la tapa
Ciclo de esterilización tarda
demasiado
Franjas inferiores
y laterales
intermitentes,
y pitido
Franjas superiores
y laterales
intermitentes,
y pitido
Asegure que el cable de poder esté conectado al esterilizador y enchufado al tomacorriente.
Piezas cargadas incorrectamente. Vea las instrucciones en la página 10-11.
El esterilizador está cargado con sólo unos pocos artículos – cargas ligeras requieren más
tiempo para ciclar.
Una cantidad insuficiente de agua ha sido colocada en el esterilizador. Desenchufe el cable de
poder, vacíe el agua, (tenga cuidado si el cuerpo del esterilizador está caliente) y reemplace
con 90ml de agua para uso con el Modo 1 O 200ml de agua para uso con el Modo 2. Prenda
nuevamente la unidad.
Una cantidad excesiva de agua ha sido colocada en el esterilizador. Desenchufe el cable de
poder, vacíe el agua, (tenga cuidado si el cuerpo del esterilizador está caliente) y reemplace
con 90ml de agua para uso con el Modo 1 O 200ml de agua para uso con el Modo 2. Prenda
nuevamente la unidad.
PITIDO
PITIDO
Guía de Solución de Problemas
Sterilizer will not work
Excessive steam escaping
from under the lid
Sterilizing cycle takes too long
Flashing
lower
and side
bars, and beep
Flashing
top and
side bars,
and beep
Check that the power cord is connected to the sterilizer and plugged into the electrical outlet.
Parts incorrectly loaded. Refer to instructions on pages 5-6.
The sterilizer is loaded with only a few items – light loads will take longer to cycle.
Insufficient water has been placed in the sterilizer. Unplug the power cord, remove water,
(take care if the sterilizer body is hot) and replace with 90 ml of water for use with Mode 1
OR 200 ml of water for use with Mode 2. Restart the unit.
An excessive amount of water has been placed in the sterilizer. Unplug the power cord,
remove water, (take care if the sterilizer body is hot) and replace with 90 ml of water for use
with Mode 1 OR 200 ml of water for use with Mode 2. Restart the unit.
BEEP
BEEP
Troubleshooting Guide
Le stérilisateur ne fonctionne pas
Il s’échappe trop de vapeur du couvercle
Le cycle du stérilisateur prend trop
de temps
Clignotements de la
barre latérale et de la
barre inférieure, et
signal sonore
Clignotements de la
barre supérieure et
de la barre latérale,
et signal sonore
Vérifiez si le cordon d’alimentation est branché dans le stérilisateur et dans la prise murale.
Mauvaises dispositions des accessoires. Voir les instructions des pages 15 et 16.
Le stérilisateur ne contient pas assez d’accessoires – les petits chargements prennent plus de
temps à stériliser.
Vous n’avez pas mis assez d’eau dans le stérilisateur. Débranchez le cordon d’alimentation,
retirez l’eau (attention à la chaleur de la cuve) et remplissez avec 90 ml d’eau pour
mode 1 OU 200 ml pour mode 2. Remettre en marche.
Vous avez mis trop d’eau dans le stérilisateur. Débranchez le cordon d’alimentation, retirez
l’eau (attention à la chaleur de la cuve) et remplissez avec 90 ml d’eau pour mode 1
OU 200 ml pour mode 2. Remettre en marche.
SIGNAL
SONORE
SIGNAL
SONORE
Guide de dépannage
21
iQ24 Electronic Steam Sterilizer
Esterilizador de Vapor Electrónico iQ24
Le stérilisateur vapeur électronique iQ24
US
ES
FR
C
192 20
a)
b)
c)
d)
e)
f)
h)
i)
g)
Control button
Botón de Control
Touche de commande
Display
Visualizador
Afficheur numérique
A
1
2
ISIS iQ Duo
ISIS Manual/
ISIS iQ Uno
3
D
1
2
6
E
F
1
2
3
4
Mode 1: 90 ml
Mode 2:
200 ml
5
6
7
BEEP
BEEP
BEEP
BEEP
8
BEEP
X
5
BEEP

Thank you for choosing
Philips AVENT
The Philips AVENT iQ24 Electronic Steam
Sterilizer is one of a new generation of
intelligent products from Philips AVENT. Based
on the hospital principle, the i
Q24 Sterilizer
uses the intensive heat of steam to eliminate
harmful bacteria.
There are two different modes for greater
convenience:
Mode 1 (Optional six hour mode) runs a
single 6 minute sterilizing cycle, then keeps
the contents sterile for 6 hours, providing the
lid is not removed.
Mode 2 keeps contents sterile for up to
24 hours by continuously repeating the cycle,
so you can have clean, sterile bottles day
and night.
As well as bottles and breastfeeding
accessories, you can sterilize any other boilable
items (please refer to the manufacturer’s
instructions regarding sterilization).
Please take a few minutes to read through
the ENTIRE INSTRUCTION LEAFLET before
using your i
Q24 Sterilizer for the first time.
PLEASE SAVE THESE INSTRUCTIONS. Also
available at www.philips.com/AVENT
Contents (see diagram A)
a) Lid
b) 2x Upper basket
c) Bottle rack
d) Lower basket
(same as b)
e) Central stem
Note: Upper and lower baskets are identical
Key to product label
FOLLOW OPERATING
INSTRUCTIONS
IMPORTANT
SAFEGUARDS
When using electrical appliances, basic
safety precautions should always be
followed including the following:
1. Read all instructions.
2. To protect against electrical shock
do not immerse cord, plugs or
appliance in water or other liquid.
3. Close supervision is necessary when
any appliance is used by or near
children.
4. Always switch off and unplug from
outlet when not in use and before
cleaning. Allow to cool before
putting on or taking off parts.
5. Always disconnect the cord from
the back of the sterilizer before
pouring away water and/or rinsing.
6. Do not operate any appliance with
a damaged cord or plug or after the
appliance malfunctions or has been
damaged in any manner.
7. The use of accessory attachments
not recommended by the appliance
manufacturer may cause injuries.
8. Do not use outdoors.
9. Do not let cord hang over edge
or table or counter, or touch hot
surfaces.
10. Do not place on or near a hot
gas or electric burner, or in a
heated oven.
11. Extreme caution must be used
when moving an appliance
containing hot oil or other hot
liquids.
3
US
f) Sterilizer body
g) Measuring Cup
h) Tongs
i) Power Cord
and plug

US US
4 5
12. Always attach plug to appliance
first, then plug cord into the wall
outlet. To disconnect, turn any
control to “off”, then remove plug
from wall outlet.
13. Do not use appliance for other
than intended use.
14. WHEN IN USE, THE STERILIZER
CONTAINS BOILING WATER AND
STEAM ESCAPES FROM THE VENT
IN THE LID.
15. Ensure the sterilizer is placed on a
firm level surface when in use.
16. Never open the unit when in use.
17. Always keep out of reach of
children.
18. Never place items on top of the
sterilizer.
19. To stop the sterilizer during the
cycle, unplug at the electrical
outlet or press the on/off button.
20. Take care when opening as steam
can burn.
21. Do not use chemical sterilizing
solutions/tablets or bleach in your
steam sterilizer or on products to
be sterilized.
22. Do not use abrasive, anti-bacterial
materials or scourers to clean the
sterilizer.
23. Do not use softened water in the
sterilizer.
24. A short power cord has been
provided to prevent the risk of it
becoming entangled or being
tripped over.
25. Extension cords may be used if
care is exercised in their use.
26. If an extension cord is used, its
electrical rating must be as great
as the rating of the appliance and
not draped over the edge of the
table top where it could be pulled
by children or tripped over. The
extension cord should be a
grounded type 3 wire cord.
27. The power cord supplied must not
be used on any other appliance
and no other power cord should
be used with the iQ24 Sterilizer.
28. Failure to follow de-scaling
instructions may cause irreparable
damage.
29. There are no serviceable parts
inside the iQ24 Sterilizer. Do not
attempt to open, service or repair
the iQ24 Sterilizer yourself.
30. Do not touch hot surfaces. Use
handles or knobs.
SAVE THESE
INSTRUCTIONS
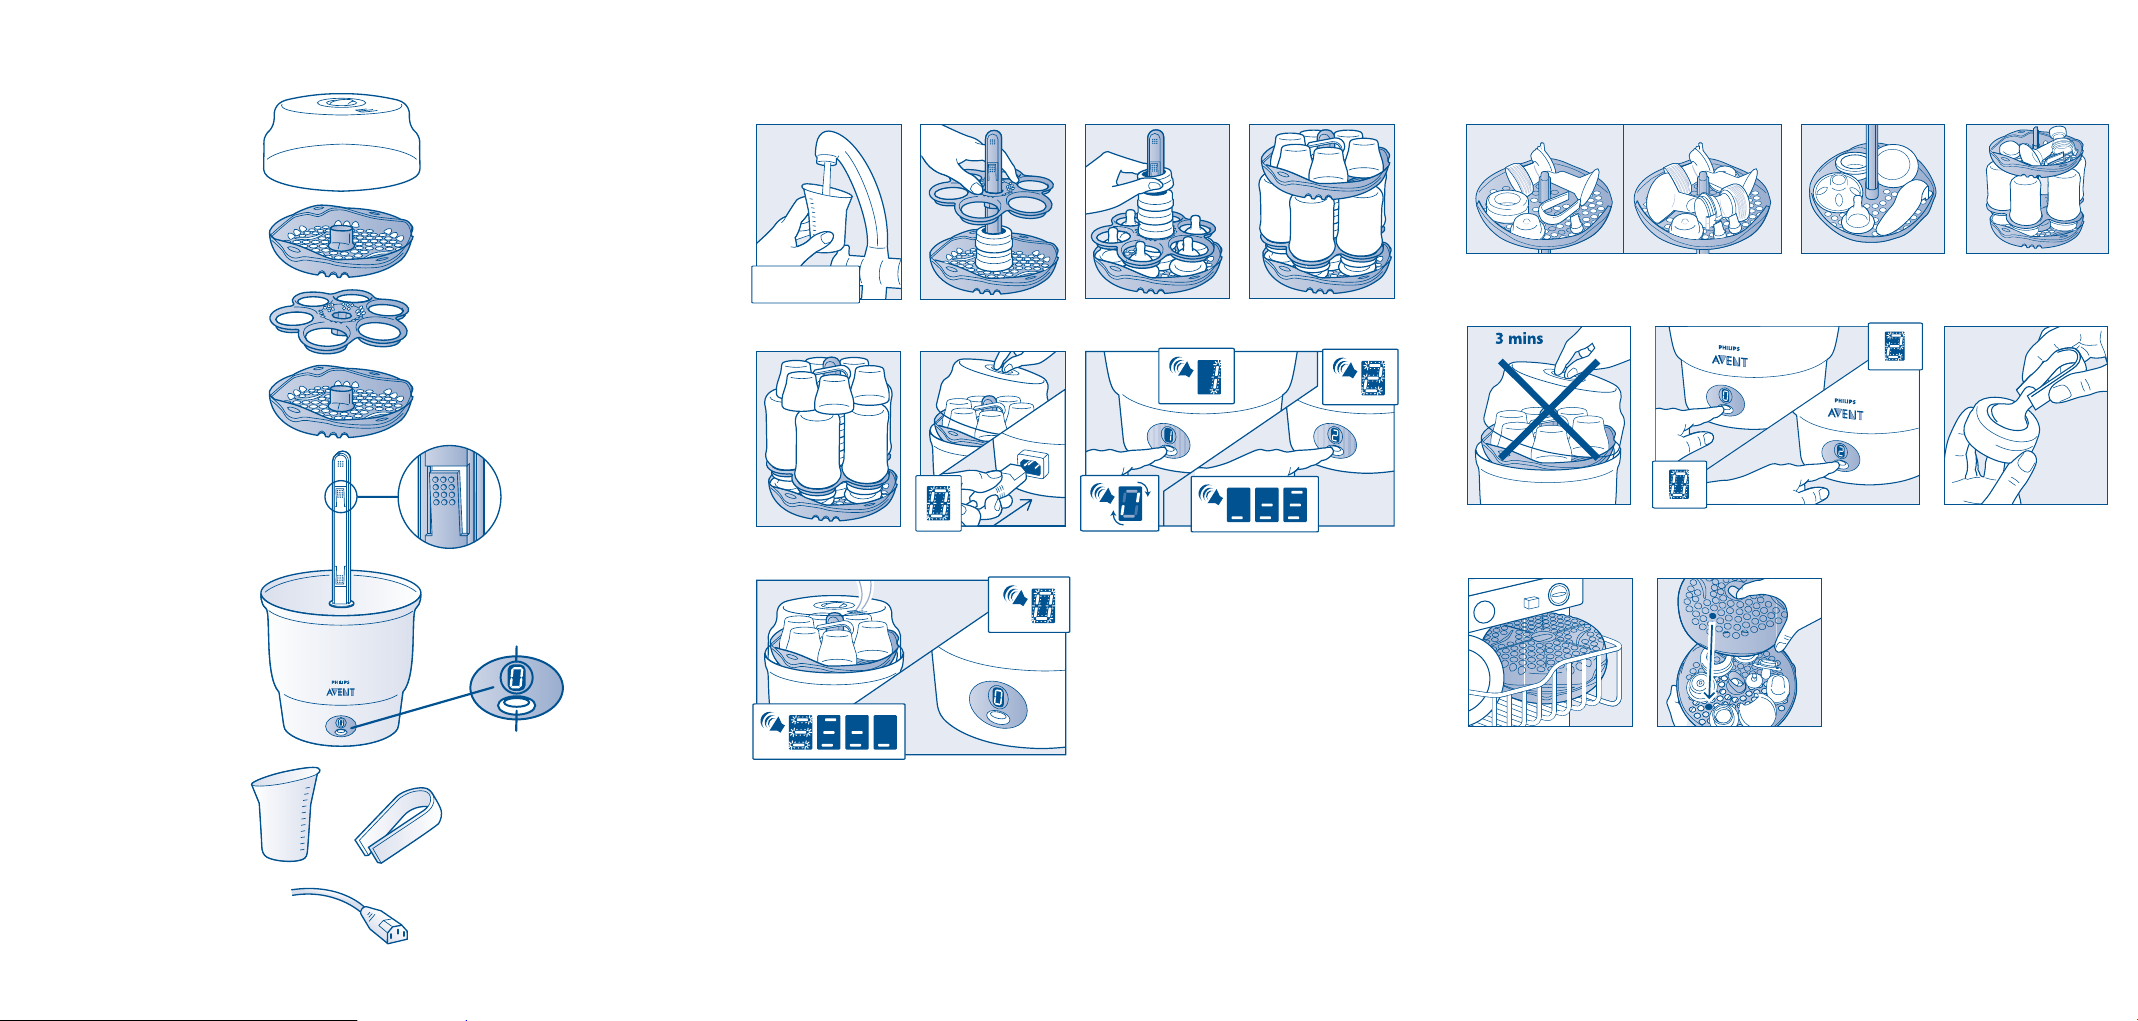
Instructions for use
Please refer to the diagrams in the back of the
leaflet.
Before using your sterilizer for the
first time
(see diagram B)
Remove all items from inside the sterilizer body.
1. Measure exactly 90 ml of distilled water and
pour in.
2. Assemble the blue components (baskets, stem
and bottle rack) and place into the sterilizer.
Put the lid on.
3. Connect the power cord into the back of the
sterilizer and plug into the electrical outlet.
4. The unit will display a flashing ‘0’ to indicate
you need to select a mode. One short press of
the control button will display a flashing ‘1’.
Hold the control button in for 2 seconds then
release, and a rotating ‘0’is displayed. Mode 1
is now in progress.
5. After the water has reached 100°C, it will turn
to steam. When the sterilizing cycle is almost
complete a numerical countdown will be
displayed (see ‘Electronic Display Guide’).
6. At the end of the cycle the unit will beep
5 times. Three bars will flash and then
remain displayed.
7. Let the sterilizer cool down for 3 minutes.
Unplug from electrical outlet and remove
power cord from the back of the sterilizer.
8. Remove the blue components and empty any
remaining water from the unit. Wipe dry. The
sterilizer is now ready for use.
Sterilizing in Mode 1 – 6 hour sterile period
Sterilizing in Mode 2 – 24 hour sterile
period (see diagram C)
To sterilize up to six 4 oz / 125 ml, 9 oz / 260 ml
or 11 oz / 330 ml AVENT Bottles
Before each use, wash items to be sterilized in
mild soapy water, and rinse.
1. Measure and pour in exactly 90 ml of water
if selecting Mode 1 OR 200 ml of water if
selecting Mode 2.
2. Slide the lower basket onto the central stem.
Thread 2 screw rings onto the central stem.
Slide the bottle rack down the central stem,
with the neck facing down, until it rests on
the top screw ring.
3. Place the nipples through the center of the
holes in the bottle rack onto the lower basket.
Thread 4 screw rings onto the central stem.
4. Place inverted bottles in the bottle rack and
push the upper basket onto the central stem
until it rests on the catch. Place dome caps and
tongs into the upper basket.
5. The upper basket is not required when
sterilizing 11 oz / 330 ml bottles.
6. Place the assembled unit into the sterilizer
body and put the lid on. Put the power cord
into the back of the sterilizer body and plug
into the electrical outlet. A flashing ‘0’ will
appear, indicating that you need to select
a mode.
7. To select Mode 1, press the control button
once and the mode number will be displayed.
To run this mode, hold the control button in
for 2 seconds, then release. A rotating ‘0’will
be displayed. Mode 1 is now in progress.
OR
To select Mode 2, press the control button
twice and the mode number will be displayed.
To run this mode, hold the control button in
for 2 seconds, then release. Three ascending
and descending bars will be displayed.
Mode 2 is now in progress.
8. Do not remove the lid until the 6 minute
sterilizing cycle has ended. This is indicated by
5 beeps and 3 bars being displayed. It is
recommended to let the sterilizer cool down
for 3 minutes after the sterilizing cycle has
been completed. Items will remain sterile for
up to 6 hours provided the lid is not removed.
After 2 hours, the display will show 2 bars and,
after a further 2 hours, one bar. To indicate the
end of Mode 1 or 2, the unit will sound a long
beep followed by a flashing ‘0’
†
. At this point
items should be used immediately or resterilized. (Please refer to ‘To remove sterilized
items after a cycle’.) Unplug from electrical
outlet and remove power cord from the back
of the sterilizer. Pour away any remaining
water, rinse out the inside of the sterilizer
body and wipe dry.
† The end of a cycle is 6 hours after
commencement of Mode 1 and 24 hours after
commencement of Mode 2. The unit can be
completely stopped at any time during a cycle,
by pressing and holding in the control button
for 2 seconds. The unit will beep and a flashing ‘0’
will be displayed, indicating the unit has returned
to selection mode.
To load the Philips AVENT ISIS Manual
Breast Pump
(see diagram D)
Before each use, wash items to be sterilized in
mild soapy water, and rinse.
1. Disassemble your ISIS Breast Pump and click
 Loading...