


Digital Voice Tracer
LFH 7780 / LFH 7790 / LFH7890
www.philips.com/dictation

EN |
User manual |
3 |
|
|
|
DE |
Benutzerhandbuch |
23 |
|
|
|
FR |
Manuel de l‘utilisateur |
43 |
|
|
|
ES |
Manual del usuario |
63 |
|
|
|
IT |
Manuale di istruzioni |
83 |
|
|
|
NL |
Gebruikershandleiding |
103 |
|
|
|
CZ |
Uživatelská příručka |
123 |
|
|
|
HU |
Felhasználói kézikönyv |
143 |
|
|
|
PL |
Instrukcja obsługi |
163 |
|
|
|
PT |
Manual do utilizador |
183 |
|
|
|
RU |
Руководство пользователя |
203 |
|
|
|
TR |
Kullanıcı El Kitabı |
223 |
|
|
|
User manual |
|
|
|
|
1 |
Your Digital Voice Tracer |
||
1 |
Your Digital Voice Tracer |
3 |
4.3 |
Search |
10 |
1.1 |
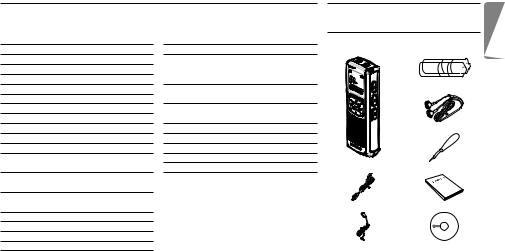
What’s in the box |
|
1.1 |
What’s in the box |
3 |
4.4 |
Repeat Playback |
10 |
|
|
|
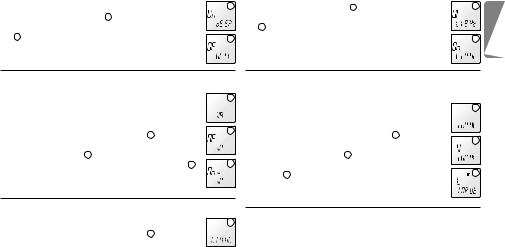
1.2 |
Overview |
4 |
5 |
FM Radio Reception (7890 only) 11 |
|
|
|
|
1.3 |
LCD indicators and symbols |
4 |
5.1 |
Program up to 20 Radio Stations |
11 |
|
|
|
1.4 |
Features and benefits |
5 |
5.2 |
Delete Programmed Stations |
12 |
|
|
|
2 |
Get Started |
7 |
5.3 |
Radio Playback Through the |
|
|
|
Batteries |
2.1 |
Replace the Batteries |
7 |
|
Built-in Speaker |
12 |
|
|
|
2.2 |
Switch the Voice Tracer On |
7 |
5.4 |
Button function overview - |
|
|
|
|
2.3 |
Set the Clock |
7 |
|
FM radio mode |
12 |
|
|
|
2.4 |
Switch the Voice Tracer Off |
7 |
6 |
MP3 Player Function |
13 |
|
|
Stereo earphones |
2.5 |
Hold Function |
7 |
7 |
Menu |
13 |
|
|
|
3 |
Record |
8 |
8 |
Warnings |
20 |
|
|
|
3.1 |
Record With the Built-in |
|
9 |
Troubleshooting |
21 |
|
|
|
|
Microphone |
8 |
10 |
Specifications |
22 |
|
Voice Tracer |
Neck strap |
3.2 |
Record With an External |
|
|
|
|
|
|
|
|
Microphone |
9 |
|
|
|
|
|
|
3.3 |
Record From an External Device |
|
|
|
|
|
|
|
|
(7890 only) |
9 |
|
|
|
|
USB cable |
User manual |
3.4 |
FM Radio Recording (7890 only) |
9 |
|
|
|
|
|
|
4 |
Playback |
9 |
|
|
|
|
|
|
4.1 |
Normal Playback |
9 |
|
|
|
|
|
|
4.2 |
Slow Playback |
10 |
|
|
|
Lapel microphone |
CD |
|
E N G L I S H
User manual |
|

1.2Overview
1Earphone socket
2Microphone socket, line-in socket 11
3Built-in microphone
4 |
Record/Pause/Power on |
12 |
|
5 |
STOP/MENU |
||
16 |
|||
|
Stop recording, menu entry |
||
|
|
6Volume up
7NEXT
|
Fast forward, file selection, |
|
|
|
menu selection |
|
|
8 |
Repeat/Folder |
17 |
|
9 |
Battery compartment |
|
13 |
10 |
Speaker |
|
|
11 |
Record/playback indicator LED |
14 |
|
12 |
LC display |
|
15 |
13 |
BACK |
|
|
|
|
||
|
Fast rewind, file selection, menu selection |
|
|
14 |
POWER/PLAY/SPEED/PAUSE |
|
|
|
Power on/off, normal play, slow playback |
|
|
15 |
Volume down |
|
|
16 |
Mini-USB socket for PC download |
|
|
17 |
Hold |
|
|
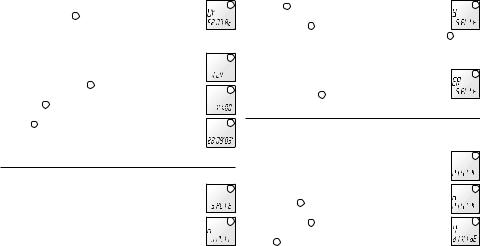
1.3LCD indicators and symbols
1 |
|
Folder indicator: A, B, C, D, M |
2 |
3 |
Battery indicator (Replace the |
|
||
|
batteries if the display alternates |
|
|
|
|
|
|
between status 3 and 4.) |
|
4 |
Stereo mode indicator: |
|
FM stereo/mono, |
|
|
5 |
recording stereo/mono |
|
FM radio reception indicator |
|
|
|
(7890 only) |
|
6 |
External input indicator (7890 only) |
|
File number, menu value, FM channel (7890 only) |
|
|
7 |
|
|
Recording quality indicator |
|
|
|
|
|
|
Alarm enabled indicator |
|
8 |
Voice-activated recording indicator |
|
Slow-speed playback indicator |
|
|
9 |
Timer recording enabled indicator |
|
Repeat mode indicator |
|
Shuffle mode indicator |
|
10 |
Play/recording time indicator, menu entries |
|
Remaining play/recording time indicator |
||
|
||
|
Recording time indicator |
|
|
User manual |

1.4 Features and benefits
Recording
Recording sensitivity: To record sounds from all directions (record conferences, for example), switch to high sensitivity mode. When recording personal notes and you want to avoid recording noises from around you, switch to low sensitivity mode.
Super HQ recording mode: Outstanding recording quality for brilliant, clear playback.
Choice of recording modes: Select your choice of recording modes; you have the freedom of choice between long-lasting recording capacity and outstanding sound quality. Choose according to your needs, or switch to lower recording quality modes when you want to conserve memory capacity.
Large voice recording capacity: Ample internal memory allows the recording and storage of long voice recordings. There is no need to download or delete files to free up space.
Voice-activated recording mode: Use this convenient feature when you want to dictate hands-free. When enabled, recording will start automatically when the input level exceeds a certain threshold
User manual
- usually when you start speaking. Recording stops automatically after you stop speaking and restarts automatically when you start speaking again.
Auto divide: Automatically divide long recordings into separate files (30 or 60 minutes in length each). This makes it much easier to find, edit and archive long recordings of meetings or lectures.
External source recording (line recording): With this feature, record directly from an external audio source such as an audio CD player in good sound quality. Available with DVT 7890.
Recording while powered through USB: To record long conferences, power the Digital Voice Tracer through a USB port. Connect the USB cable to a notebook computer, then press and hold the record button until REC is displayed. Record the conference or meeting without draining the battery.
Playback
File preview / intro scan: This function scans through all recordings by playing back the first few seconds of each file. This makes it easier to search for a specific file or to browse through all recordings.
E N G L I S H

Slow playback: Recordings will be played back at slower speed, for example to make it easier to take notes.
A-B repeat playback: Let the DVT repeat a voice section between two points (A <> B). For example, make it easier to note a telephone number, an address or a remark made in a recorded conversation.
File repeat playback: Let the DVT play your recording over and over. For example, replay your favorite song.
Alarm playback: Schedule a voice alarm to remind you of an important meeting or event, or a telephone call you need to make.
Convenience
Large backlit LCD display: View all relevant information at a glance, even in low-light conditions.
Hold: Lock and protect the current state of the DVT to avoid unintentionally switching the device on or off during recording, playback or when carrying the DVT in your pocket.
Time stamp: The time stamp feature assigns a date and time to every recording. This makes it more convenient to locate and verify the recordings later on.
File split: With this feature, split a long recording into two separate files so they can be more easily archived or e-mailed, or so that part of a file can be deleted.
Timer recording: With timer recording, program the DVT to record an important event in advance. Once timer is set, the event will be recorded automatically at the scheduled time and date. There is no need to switch the Digital Voice Tracer to Record mode when the meeting begins.
USB drive: The DVT can also be used as a standard Microsoft Windows USB storage device, offering the convenient storage and sharing of files (letters, presentations or spreadsheets).
With USB mass storage support, the DVT is automatically displayed as an external drive when it is connected to the computer. It can then be easily accessed with any Microsoft Windows program as
a regular drive. Since the Microsoft Windows operating system contains the generic mass storage-class driver, no separate driver needs to be installed for the device to be recognized.
User manual

2 Get Started
2.1Replace the Batteries
1 Switch the Voice Tracer off by pressing the PLAY/PAUSE button for a few moments in Stop mode. Do not replace the batteries while the Voice Tracer is switched on, as this may cause the device to malfunction.
2 Open the battery cover.
3 Insert the batteries. Make sure that the batteries are inserted properly (size “AAA”) and close the cover.
4 Press the PLAY/PAUSE button for a few moments to switch the Voice Tracer on.
DRemove the batteries if you will not be using the Voice Tracer for an extended period. Leaking batteries may damage the Voice Tracer. If the Voice Tracer malfunctions, remove the batteries and re insert them.
2.2Switch the Voice Tracer On
1 Press and hold the PLAY/PAUSE button for a |
1 |
2 |
few moments to switch the Voice Tracer on. 


 The Voice Tracer is in Stop mode 1 or Clock


 Set mode 2 . The Voice Tracer switches on in the same mode that it was in when it was switched off.
User manual
DIf the time is not set, the Voice Tracer will switch on in Clock Set mode. The Voice Tracer will change to Stop mode when the time is set or when the STOP/MENU button is pressed. Press and hold the REC button for a few moments to skip setting the clock and to begin recording immediately.
E If the HOLD switch is in the Hold position, On Hold will |
3 |
be shown briefly on the display, and the display will turn 

 off 3 . Unlock the Voice Tracer by moving the HOLD


 switch to the Off position.
2.3Set the Clock
1 Put the Voice Tracer in Stop mode.
2 Press and hold the STOP/MENU button for a few moments to enter Menu mode. Follow the instructions in the chapter Menu.
2.4Switch the Voice Tracer Off
In STOP or FM Radio mode, you can switch off the Voice Tracer by pressing and holding the PLAY/PAUSE button for a few moments. Switch off your Voice Tracer when you are finished using it for recording or playback for maximum battery life.
2.5Hold Function
When the HOLD switch (on the left side of the Voice Tracer) is in the Hold position, all buttons on the device are inactive.
E N G L I S H

1 Slide the HOLD switch to the Off position to enable the buttons on the Voice Tracer.
3 Record
•Press the REPEAT/FOLDER button to select the desired folder. The Voice Tracer will move to the next folder each time you press the button.
•Set the desired voice activation function and quality (Super HQ, HQ, SP, LP, SLP) before you start recording (see the Menu chapter for more details).
•Make a test recording to make sure that the Voice Tracer settings are correct.
•Press and hold the PLAY/PAUSE button during recording for a few moments to display the remaining recording capacity.
•The maximum number of files in each folder is 99, for a total
capacity of 396 files (99 files x 4 folders). |
1 |
|
• If the recording time exceeds the available capacity or |
||
|
||
the number of files reaches 396, “FULL” will be displayed |
|
|
and recording cannot be continued 1 2 . If this happens, |
2 |
|
delete a few recordings or move them to an external |
device (audio or computer).
• Do not remove the batteries during recording. This may
cause the Voice Tracer to malfunction. |
3 |
• If recording for a prolonged period of time, replace the batteries before beginning.
•When the Voice Tracer is in voice activation mode 3 , recording will stop automatically when no sound is detected. Disable the function when recording important conversations.
•Press the REC button while playing back an MP3 or WMA file in the M (Music) folder to enable the equalizer.
3.1Record With the Built-in Microphone
1 Press and hold the REC/PAUSE button for a moment to switch the Voice Tracer on and start recording 1 2 . The red LED will light.
2 Point the Voice Tracer’s built-in microphone towards the sound source. Press and hold the PLAY/PAUSE button during recording
to display the remaining recording capacity. |
1 |
|
3 Press the REC/PAUSE button to pause the recording. The |
|
|
red LED will blink, and “Pause” will flash on the display. |
|
|
4 Press the REC/PAUSE button again to resume |
2 |
|
recording. The red LED will light again. |
||
|
||
5 Press the NEXT button to create a new file during |
|
|
recording (file separation function). |
3 |
|
6 The total time of the recording is displayed when you |
stop recording by pressing the STOP/MENU button 3 .
User manual

3.2Record With an External Microphone
To record with an external microphone, connect the microphone to the microphone socket and follow the same procedure as for the built-in microphone.
3.3Record From an External Device (7890 only)
1 Switch the Voice Tracer on. If the Voice Tracer is in FM Radio mode, press the REPEAT/FOLDER button for a few moments to exit this mode.
2 Go to Menu mode and set up the input source line (L). For |
|
details, read the explanation under Menu Entry – Recording |
|
Input Setup. “LINE” will be shown on the display 1 . |
1 |
3 Connect the line-in socket with the audio source by |
means of an audio cable.
4 Press the REPEAT/FOLDER button to select the folder you want to record to.
5 Press the REC/PAUSE button to begin recording.
DTo pause or stop recording, follow the same procedure as for recording with the built-in microphone.
3.4 FM Radio Recording (7890 only)
1 Switch the Voice Tracer on.
2 If not in FM Radio mode, press the REPEAT/FOLDER button for a few moments to enter this mode.
User manual
3 Select the station to be recorded. For details, read the |
1 |
FM Radio Reception chapter.
4 Press the RECORD button to record the currently selected FM radio station 1 .
4 Playback
4.1Normal Playback
1 Press the PLAY/PAUSE button for a few moments to switch the Voice Tracer on. If the Voice Tracer is in FM Radio mode (7890 only), press the REPEAT/FOLDER button for a few moments to
exit this mode. |
1 |
2 Press the REPEAT/FOLDER button to locate the folder |
where the desired file is stored.
3 Press the PLAY button. The playback time will be shown on the display, and the green LED will light.
4 Adjust the volume using the Volume Up and Down buttons.
5 Press the STOP/MENU button during playback to stop. The total playback time of the current file will be shown on the display.
6 Press the PLAY button again to continue playback from the previous position.
E N G L I S H
4.2Slow Playback
D Available for voice file playback only.
1 Press the PLAY button for a few moments to switch |
1 |
from normal playback to slow playback 1 .
2 Press the PLAY button again for a few moments to return to normal playback.
4.3Search
1 Press and hold the NEXT or BACK button for a few moments during playback to scan forward or backward in the current file at a fast speed.
2 When the NEXT or BACK button is released, playback will resume at the selected speed (normal or slow) from the point where the button was released.
DPress and hold the NEXT button until the end of the current file. The Voice Tracer will continue scanning through the next file.
4.4Repeat Playback
4.4.1 Repeat a Section
1 During playback, press the REPEAT/FOLDER button at the beginning of the section to be repeated. The A B indicator will
blink on the display 1 . |
1 |
2 Press the REPEAT/FOLDER button again at the end of |
|
the section to be repeated 2 . |
|
3 The selected section will repeat continuously until the |
2 |
STOP/MENU button is pressed. |
|
4 Press the REPEAT/FOLDER button to stop Section |
|
Repeat mode and return to normal playback. |
|
|
|
4.4.2 Repeat a File |
1 |
1 Press the REPEAT/FOLDER button for a few moments |
|
during playback. The repeat indicator will be shown on |
|
the display. |
|
2 The current file will be repeated when the repeat indicator is |
|
shown on the display 1 . |
|
3 Press the STOP/MENU button to stop playback. The Voice |
|
Tracer will remain in File Repeat mode. |
|
|
|
4.4.3 Repeat a Folder |
1 |
1 With the Voice Tracer in File Repeat mode, press the |
REPEAT/FOLDER button for a few moments.
2 “FOLD” will be shown on the display inside the repeat arrow, and the current folder will repeat 1 .
4.4.4 Shuffle Mode
1 With the Voice Tracer in Stop mode, press the REPEAT/FOLDER
10 |
User manual |
button to select the M (Music) folder.
2 While the Voice Tracer is playing a song file, press the REPEAT/ FOLDER button three times for a few moments each.
3 “SHUF” will be shown on the display, and the files in the M (Music) folder will play in random order 1 .
Shuffle mode is only available in the M (Music) folder.
4 Press and hold the REPEAT/FOLDER button for a few moments
during playback to exit Shuffle mode. When the STOP/ |
1 |
MENU button is pressed to stop playback, the Voice |
Tracer will remain in Shuffle mode.
5 FM Radio Reception (7890 only)
1 With the Voice Tracer in Stop mode, press the REPEAT/FOLDER button for a few moments to activate the FM Radio mode.
2 Connect the earphones. FM reception is not possible if the earphones are not connected because they function as the antenna.
5.1Program up to 20 Radio Stations
5.1.1 Frequency Scanning
1 Press the NEXT button for a few moments.
2 The Voice Tracer will scan the FM frequency band automatically, stopping at the first station it finds.
3 Press the PLAY button briefly to save the current station. Then repeat step 1.
5.1.2 Manual Programming
1 Press the NEXT button once. The frequency will increase by 50 khz. 2 Continue pressing the NEXT button briefly until the desired
frequency is reached.
3 Press the PLAY button briefly to save the selected station.
D Use the BACK button to search in the opposite direction.
5.1.3 Automatic Programming
1 Select the menu entry “AUTO” to enable Automatic Programming mode. See Menu Entry – Automatic Programming for more details.
2 Press the STOP/MENU button to exit Automatic Programming mode.
DUndesired or weak stations may be saved depending on the reception conditions.
E N G L I S H
User manual |
11 |

5.2Delete Programmed Stations
Complete the following steps to delete undesired stations after Automatic Programming.
1 Press the REPEAT/FOLDER button briefly to change to |
1 |
Preset mode 1 .
2 Press the NEXT button to select the station you want to delete.
3 Press the PLAY button briefly to delete the selected station. 4 Press the NEXT button to go to the next station.
5.3 Radio Playback Through the Built-in Speaker
Complete the following steps to switch between earphone and speaker output.
1 Connect the earphones. The earphones must be connected to use the FM Radio mode because they function as the antenna.
2 Press the STOP/MENU button for a few moments to change the FM radio output to the speaker.
DThe Voice Tracer will automatically return to earphone output when the FM Radio mode is exited.
5.4Button function overview - FM radio mode
Button function |
FM radio reception mode |
FM scanning mode |
|
|
|
+, - |
Volume Up, Volume Down |
No function |
PLAY |
Channel memory (Frequency mode), |
No function |
short press |
Delete channel (Preset mode) |
|
PLAY |
Power off |
Power off |
long press |
|
|
NEXT |
Increase frequency one step |
No function |
short press |
(Frequency mode), Next channel up |
|
|
(Preset mode) |
|
NEXT |
Scan up (Frequency mode), |
No function |
long press |
Increase channel number continuously |
|
|
(Preset mode) |
|
BACK |
Decrease frequency one step |
Stop at frequency |
short press |
(Frequency mode), |
|
|
Next channel down (Preset mode) |
|
BACK |
Scan down (Frequency mode), |
Stop after finding |
long press |
Decrease channel number |
next station |
|
continuously (Preset mode) |
|
REC |
Record FM broadcast |
No function |
|
|
|
STOP/MENU |
Switch between stereo and mono |
Exit FM searching |
short press |
|
mode |
STOP/MENU |
Menu entry |
Exit FM searching |
long press |
|
mode |
REPEAT/FOLDER |
Switch between Frequency and |
No function |
short press |
Preset mode |
|
REPEAT/FOLDER |
Exit FM Radio Reception mode |
No function |
long press |
|
|
12 |
User manual |

6 MP3 Player Function |
7 Menu |
1 Copy MP3 or WMA files from your computer to the Voice Tracer. Consult the separate Download Manager program user manual for further details.
2 Press the REPEAT/FOLDER button to select the M
(Music) folder 1 . 3 Press the NEXT button to select the desired file, then
press the PLAY button.
4 Press the REPEAT/FOLDER button to enable Repeat 
 mode (File Repeat > Folder Repeat > Shuffle > Normal).

5 During playback, press the REC button to change the Equalizer mode (Normal 2 > Jazz 3 > Rock 4 > Pop 5 > Classical 6 > Normal).
D Slow Playback mode is not available for MP3 or WMA files saved in the M (Music) folder.
C Attention: Adjust the sound level with the volume control. Listening to music at high volumes can permanently damage hearing.
 1
1
 2
2
 3
3
 4
4
 5
5
 6
6
Menu mode is available in Stop mode or FM Radio mode. The available menu items differ depending on whether you are in a voice folder, a music folder or in FM Radio mode. The following description is based on Stop mode in a voice folder.
7.1Delete a Single File or All Files in a Folder
7.1.1 Delete a file
1 With the Voice Tracer in Stop mode, select the file to
be deleted. 2 Press the STOP/MENU button for a few moments 1 . 3 Press the PLAY button briefly. The file number (7) will
blink, and “ERASE” is shown on the display 2 . 4 Press the Play button again briefly. The file number
indicator will be replaced with “n” (no) and will blink 3 . 
 5 Press the NEXT button to change the confirmation


indicator to “Y” (Yes) 4 .
6 Press the PLAY button briefly to delete the selected file.
E N G L I S H
1
2
3
4
User manual |
13 |

7.1.2 Delete the Files in a Single Folder or All Files |
1 |
|
1 With the Voice Tracer in Stop mode, press the STOP/ |
||
MENU button for a few moments. |
|
|
2 Press the PLAY button briefly and the NEXT button |
|
|
to select the folder from which you want to delete all |
2 |
|
files. (A > B > C > D > M > A B C D M [all folders] > A). |
|
|
“ERASE” is shown on the display, and the indicator is |
|
|
shown for the chosen folder 1 2 . |
3 |
|
3 Press the PLAY button briefly. The confirmation |
||
|
||
indicator “n” (no) will blink on the display 3 . |
|
|
4 Press the NEXT button to change the confirmation |
4 |
|
indicator to “Y” (Yes) 4 . |
5 Press the PLAY button to delete all files in the selected folder or folders.
7.2Recording Quality Selection
D This function is available only in voice folders.
1 With the Voice Tracer in Stop mode, press the STOP/MENU button for a few moments.
2 Press the NEXT button briefly and then press 
 the PLAY button 1 . “REC” is shown and
  “SUPER HQ” blinks on the display 2 .

1 2
3  4
4
3 Press the NEXT button to select the desired |
5 |
recording quality 3 4 5 6 . 4 Press the PLAY button to save the setting,
then the STOP/MENU button to exit Menu mode.
7.3Microphone Recording Sensitivity
D This function is available only in voice folders.
1 With the Voice Tracer in Stop mode, press the STOP/ MENU button for a few moments.
2 Press the NEXT button twice 1 .
3 Press the PLAY button briefly. “SENSE” is shown and “HI” blinks on the display 2 .
4 Press the NEXT button to select the desired microphone recording sensitivity 3 2 .
5 Press the PLAY button to save the setting, then the STOP/MENU button to exit Menu mode.
7.4Beep Setting
1 With the Voice Tracer in Stop mode, press the STOP/ MENU button for a few moments.
2 Press the NEXT button briefly 3 times 1 .
 6
6
1
2
3
1
14 |
User manual |
3 Press the PLAY button briefly. “BEEP” is shown and “On” blinks on the display 2 .
4 Press the NEXT button to select “OF” (off) or “On”
3 .
5 Press the PLAY button to save the setting, then the STOP/MENU button to exit Menu mode.
7.5Enabling Voice Activated Recording (VA)
D This function is available only in voice folders.
1 With the Voice Tracer in Stop mode, press the STOP/ MENU button for a few moments.
2 Press the NEXT button briefly 4 times 1 .
3 Press the PLAY button briefly. “VA” is shown and “OF” blinks on the display 2 .
4 Press the NEXT button to select “OF” (off) or “On” 3 . 5 Press the PLAY button to save the setting, then the
STOP/MENU button to exit Menu mode.
7.6Backlight Setting
1 With the Voice Tracer in Stop mode, press the STOP/ MENU button for a few moments.
2 Press the NEXT button briefly 5 times 1 .
3 Press the PLAY button briefly. “LIGHT” is shown and
2
3
1
2
3
1
“OF” blinks on the display 2 . |
2 |
4 Press the NEXT button to select “OF” (off) or “On” |
|
3 . |
|
5 Press the PLAY button to save the setting, then the |
3 |
STOP/MENU button to exit Menu mode. |
|
7.7Record From an External Device (7890 only)
D This function is available only in voice folders.
|
|
1 |
|
1 With the Voice Tracer in Stop mode, press the STOP/ |
|
||
MENU button for a few moments. |
|
|
|
2 Press the NEXT button briefly 6 times |
1 . |
2 |
|
3 Press the PLAY button briefly. “INPUT” is shown and |
|||
|
|||
“V” blinks on the display 2 . |
|
|
|
4 Press the NEXT button to select “L” (line-in) or “V” |
3 |
||
(voice) 3 . |
|
||
5 Press the PLAY button to save the setting, then the STOP/MENU button to exit Menu mode.
7.8Clock Set Mode
1 With the Voice Tracer in Stop mode, press the STOP/MENU button for a few moments.
2 Press the NEXT button repeatedly until “CLOCK” is shown on
E N G L I S H
User manual |
15 |

the display 1 . |
|
1 |
|
3 Press the PLAY button briefly. The default system date |
|
||
is shown as “01” for the day and month, and “05” for |
|
||
the year 2 . |
|
2 |
|
4 Press the NEXT button to set the desired year, then |
|
||
press the PLAY button. |
|
||
5 The month will now blink “01”. Press the NEXT button |
3 |
||
to select the desired month and press the PLAY button. |
|||
|
|||
6 The day will now blink “01”. Press the NEXT button to |
|
||
select the desired day and press the PLAY button. |
|
||
7 The time will now blink. Set the time in the same manner the |
|
||
date was set, using the NEXT and BACK buttons to select the |
|
||
desired values |
3 . |
|
|
8 After the minutes are set, press the PLAY button to save the settings, then the STOP/MENU button to exit Menu mode. The clock will begin running when the time setting is saved.
7.9 Timer Set-up |
|
1 |
|
1 With the Voice Tracer in Stop mode, press the STOP/ |
|||
|
|||
MENU button for a few moments. |
|
||
2 Press the NEXT button repeatedly until “TIMER” is |
2 |
||
shown on the display |
1 . |
||
3 Press the PLAY button briefly. “OF” (timer setup off) |
|
||
blinks on the display |
2 . |
|
|
4 Press the NEXT button to select “ON” (timer setup) |
3 |
|
3 . |
|
|
5 Press the PLAY button briefly, then press the NEXT |
|
|
and BACK buttons to enter the desired hours 4 . Once |
4 |
|
the hours have been set, press the PLAY button and |
|
|
then set the minutes. |
|
|
6 Press the PLAY button to set up the recording interval |
5 |
|
5 . |
||
|
||
7 Press the NEXT button to set the interval time. |
|
|
8 Press the PLAY button, then press the NEXT button to |
6 |
|
select the folder to record to 6 . |
||
9 Press the PLAY button to save your settings, then the |
|
|
STOP/MENU button to exit Menu mode. |
|
|
|
|
|
7.10 Alarm Setup |
1 |
|
1 With the Voice Tracer in Stop mode, press the STOP/ |
|
|
MENU button for a few moments. |
|
|
2 Press the NEXT button repeatedly until “ALARM” is |
2 |
|
shown on the display 1 . |
||
|
||
3 Press the PLAY button briefly. “OF” (alarm setup off) |
|
|
blinks on the display 2 . |
3 |
|
4 Press the NEXT button to select “ON” or “V” (Voice). |
Select “ON” to use the beep tone as alarm or “V” (Voice) to use a recorded file or music file as alarm 3 .
16 |
User manual |

7.10.1 Set the alarm with a beep signal |
|
4 |
5 Press the PLAY button briefly to set the alarm time |
4 . |
|
6 Press the NEXT button to select the desired hour, then |
|
|
press the PLAY button to select the desired minutes in |
|
|
the same manner. |
|
|
7 Press the PLAY button to save the settings, then the STOP/ |
|
|
MENU button to exit Menu mode. |
|
|
|
|
|
7.10.2 Set the alarm with a voice or music file |
|
5 |
5 Press the NEXT or BACK button to select “V” (Voice) |
||
5 . |
|
|
6 Press the PLAY button briefly to set the alarm time |
6 . |
|
7 Press the NEXT button to select the desired hour, |
|
6 |
then press the PLAY button to select the desired |
|
|
minutes in the same manner. |
|
|
8 Press the PLAY button to select the folder 7 . |
|
7 |
9 Press the NEXT button to select the folder that |
|
|
|
|
|
contains the desired file. |
|
|
Press the PLAY button to save the settings, then the |
|
8 |
STOP/MENU button to exit Menu mode 8 . |
|
|
7.11 File Preview: Play the First Seconds of Each File
1 With the Voice Tracer in Stop mode, press |
1 |
2 |
the STOP/MENU button for a few moments. |
||
2 Press the NEXT button repeatedly until |
|
|
“SCAN” is shown on the display 1 . |
|
|
3 Press the PLAY button briefly and “N” blinks |
3 |
4 |
on the display 2 . |
|
|
4 Press the NEXT button to change the |
|
|
indicator to “Y” 3 . |
|
|
5 Press the PLAY/PAUSE button to play the first seconds of each |
|
|
file, starting with the first file of the current folder |
4 . |
|
|
|
|
7.12 Format: Delete All Files |
|
|
D This function deletes all files on the Voice Tracer, |
|
1 |
including all programmed FM radio stations! |
|
|
1 With the Voice Tracer in Stop mode, press the STOP/ |
2 |
|
MENU button for a few moments. |
|
|
|
|
|
2 Press the NEXT button repeatedly until “FRMAT” is |
|
|
shown on the display 1 . |
|
3 |
3 Press the PLAY button briefly and “N” blinks on the |
||
display 2 .
4 Press the NEXT button to change the indicator to “Y” 3 .
E N G L I S H
User manual |
17 |
5 Press the PLAY button to format the Voice Tracer and |
4 |
|
to delete all files 4 . |
|
|
|
|
|
7.13 Display the Firmware Version and Release Date |
|
|
1 With the Voice Tracer in Stop mode, press the STOP/ |
1 |
|
MENU button for a few moments. |
|
|
2 Press the NEXT button repeatedly until “VER” is |
|
|
shown on the display 1 . |
2 |
|
3 Press the PLAY button briefly to display the version |
||
|
||
number 2 . |
|
|
4 Press the NEXT button to display the firmware release |
3 |
|
date 3 . |
5 Press the PLAY button, then the STOP/MENU button to exit Menu mode.
7.14Split: Splitting a File Into Two Files
1
D This function is available only in voice folders.
1 Stop at the point where you want to split the file. |
2 |
2 With the Voice Tracer in Stop mode, press the STOP/ |
MENU button for a few moments.
3 Press the BACK button twice. “SPLIT” is shown on the
display 1 . |
3 |
4 Press the PLAY button briefly. The indicator “n” blinks |
|
on the display 2 . |
|
5 Press the NEXT button to change the indicator to “Y” 3 . |
|
6 Press the PLAY button, then the STOP/MENU button to exit |
|
Menu mode. |
|
D It is not possible to split a file when the Voice Tracer |
4 |
memory is full or when there are 99 files in the |
|
respective folder 4 . |
|
7.15Automatically Record to a New File Every 30/60 Minutes
D This function is available only in voice folders. |
1 |
|
1 With the Voice Tracer in Stop mode, press the STOP/ |
|
|
MENU button for a few moments. |
2 |
|
2 Press the BACK button once. “DIVIDE” is shown on |
||
|
||
the display 1 . |
|
|
3 Press the PLAY button briefly. The indicator “n” blinks |
3 |
|
on the display 2 . |
4 Press the NEXT button to change the indicator to “Y” 3 .
18 |
User manual |

5 Press the PLAY button to set the automatic division |
4 |
settings 4 . 

 6 Press the NEXT button to select 30 or 60 minutes.


 7 Press the PLAY button to save the settings, then the STOP/
MENU button to exit Menu mode.
7.16 Stereo/Mono Radio Sound Selection (7890 only)
D This function is available only in FM Radio mode.
1 With the Voice Tracer in FM Radio mode, press the |
|
1 |
|
STOP/MENU button for a few moments. |
|
|
|
2 Press the BACK button briefly 3 times. “STEREO” is |
|
|
|
shown on the display. |
|
2 |
|
3 Press the PLAY button briefly. “STEREO” blinks on the |
|||
|
|||
display 2 . |
|
|
|
4 Press the NEXT button to select “MNO” (mono) 3 |
or |
3 |
|
“STEREO” 2 . |
|
||
5 Press the PLAY button to save the settings, then the STOP/MENU button to exit Menu mode.
7.17 Automatic Programming (7890 only) |
|
L I S H |
|
D This function is available only in FM Radio mode. |
|
||
|
E N G |
||
1 With the Voice Tracer in FM Radio mode, press the |
1 |
||
|
|||
STOP/MENU button for a few moments. |
|
|
|
2 Press the BACK button briefly twice. “AUTO” and |
|
|
|
“FM” are shown on the display 1 . |
2 |
|
|
3 Press the PLAY button briefly. The indicator “n” blinks |
|
||
|
|
||
on the display 2 . |
|
|
|
4 Press the NEXT button to change the indicator to |
3 |
|
|
“Y” 3 . |
|
5 Press the PLAY button to begin automatically saving FM radio channels.
DOnce the entire FM band has been scanned, the Voice Tracer will return to FM Radio mode. Press the STOP/MENU button to exit Automatic Programming mode.
7.18Select FM Radio Output Through Earphone or Speaker (7890 only)
DThis function is available only in FM Radio mode.
The earphone must be connected even when using the speaker.
User manual |
19 |

1 With the Voice Tracer in FM Radio mode, press the STOP/MENU button for a few moments.
2 Press the BACK button briefly once. “OUTPUT” and “FM” are shown on the display 1 .
3 Press the PLAY button briefly. “EP” blinks on the display 2 .
4 Press the NEXT button to select “SP” 3 .
5 Press the PLAY button to save the settings, then the STOP/MENU button to exit Menu mode.
7.19 Firmware Upgrade
1 Download the firmware update for your Voice Tracer model number from www.philips.com/dictation >
Support Center > Software Downloads. Extract the file 


 and place it in the Digital Voice Tracer root directory.
2 With the Voice Tracer in Stop mode, press the STOP/ MENU button for a few moments.
3 Press the BACK button once. “UPGRAD” is shown on the display 1 .
4 Press the PLAY button briefly. The indicator “n” blinks on the display 2 .
5 Press the NEXT button to change the indicator to “Y” 3 .  6 Press the PLAY button. The Digital Voice Tracer will


install the new firmware file 4 and then switch off.
1
2
3
1
2
3
4
8 Warnings
•Do not attempt to open, repair, or modify the Voice Tracer.
•Do not use the Voice Tracer where the use of electronic devices is prohibited (such as in aircraft, etc.).
•Do not put the Voice Tracer or its accessories in your mouth.
•Do not immerse the Voice Tracer or spill liquids on it.
•Do not expose the Voice Tracer or its accessories to shocks, as this may cause malfunctions.
•Do not apply excessive force to the LCD display, as this may damage the display or cause malfunctions.
•Do not expose the Voice Tracer to direct sunlight or any source of heat for a prolonged period.
•Remove the batteries if the Voice Tracer will not be used for a long period of time.
•Do not pull attached earphone, micro-phone, or USB cables with excessive force.
20 |
User manual |
9 |
Troubleshooting |
• Delete some recordings or move |
|
I cannot hear anything from the |
|
|
recordings to an external device |
|
speaker |
||
|
|
|
|
|
|
LCD is blank |
I cannot play recordings |
|
Possible cause: |
||
|
|
|
|
|
• The earphones are plugged in |
Possible cause: |
Possible cause: |
|
• The volume is at the lowest setting |
||
• The batteries are exhausted |
• The Voice Tracer HOLD switch is engaged |
|
|
||
• The batteries are not inserted correctly |
• The batteries are exhausted |
|
Correction: |
||
|
|
• Nothing has been recorded yet |
|
• Remove the earphones |
|
Correction: |
• The volume is at the lowest setting |
|
• Adjust the volume |
||
• Replace the batteries with new ones |
|
|
|
|
|
• Insert the batteries correctly |
Correction: |
|
I cannot hear anything from the |
||
|
|
• Slide the HOLD switch to the Off position |
|
earphones |
|
I cannot record anything |
• Replace the batteries with new ones |
|
|
||
|
|
• Check the number of recordings |
|
Possible cause: |
|
Possible cause: |
• Adjust the volume |
|
• The earphones are not plugged in properly |
||
• The Voice Tracer HOLD switch is engaged |
|
|
|
• The volume is at the lowest setting |
|
• The batteries are exhausted |
I cannot stop, pause, play or record |
|
|
||
• The maximum number of recordings has |
|
|
|
Correction: |
|
been reached or the recording capacity |
Possible cause: |
|
• Plug in the earphones properly |
||
is full |
• The Voice Tracer HOLD switch is engaged |
|
• Adjust the volume |
||
Correction: |
Correction: |
|
|
||
• Slide the HOLD switch to the Off position |
• Slide the HOLD switch to the Off position |
|
|
||
• Replace the batteries with new ones |
|
|
|
|
|
E N G L I S H
User manual |
21 |

10 Specifications
Device |
|
LFH 7780 |
LFH 7790 |
|
LFH 7890 |
|
|
|
Super HQ (Encoder) |
9 h/64 kbps/16 kHz |
16 h/128 kbps/44.1 kHz |
|
16 h/128 kbps/44.1 kHz |
|
|
(ZVR Mono) |
(MP3 Stereo) |
|
(MP3 Stereo) |
|
|
|
|
|
|||
|
|
HQ (Encoder) |
12 h/48 kbps/16 kHz |
24 h/96 kbps/24 kHz |
|
24 h/96 kbps/24 kHz |
|
|
(ZVR Mono) |
(MP3 Stereo) |
|
(MP3 Stereo) |
|
|
|
|
|
|||
Recording time / bit rate / |
|
SP (Encoder) |
16 h/36 kbps/8 kHz |
64 h/36 kbps/8 kHz |
|
64 h/36 kbps/8 kHz |
sample rate |
|
(ZVR Mono) |
(ZVR Mono) |
|
(ZVR Mono) |
|
|
|
|
||||
|
|
LP (Encoder) |
90 h/6.4 kbps/8 kHz |
360 h/6.4 kbps/8 kHz |
|
360 h/6.4 kbps/8 kHz |
|
|
(ZVR Mono) |
(ZVR Mono) |
|
(ZVR Mono) |
|
|
|
|
|
|||
|
|
SLP (Encoder) |
144 h/4 kbps/8 kHz |
576 h/4 kbps/8 kHz |
|
576 h/4 kbps/8 kHz |
|
|
(ZVR Mono) |
(ZVR Mono) |
|
(ZVR Mono) |
|
|
|
|
|
|||
Stereo recording - Microphone / Line input |
- / - |
MP3 / MP3 |
|
MP3 / MP3 |
||
FM radio (87.5 - 108.0 MHz) - Reception / Recording |
- / - |
- / - |
|
Yes / Yes |
||
Alarm function / Timer recording |
|
Yes / Yes |
|
|||
Dimensions |
|
|
102 mm / 37 mm / 19mm |
|
||
Power supply |
|
LR03 (AAA, UM-4) 2 alkaline batteries |
||||
|
|
Voice: Record / Playback earphone / Speaker |
16 / 20 / 10 |
16 / 20 / 10 |
|
16 / 20 / 10 |
Battery life (hours) |
|
MP3: Record / Playback earphone / Speaker |
- / 16 / 9 |
11 / 16 / 9 |
|
11 / 16 / 9 |
|
|
FM Radio: Record / Playback earphone / Speaker |
- / - / - |
- / - / - |
|
9 / 17 / 13 |
Clock backup time |
|
|
Approximately 4 minutes |
|
||
Maximum number of recordings |
|
|
Total 396 (99 per folder x 4) |
|
||
Playback capacity - MP3 / WMA |
|
All bit rates / 32 kbps - 192 kbps / no DRM supported |
||||
USB standard |
|
1.1 |
1.1 |
|
2.0 “high speed” |
|
22 |
User manual |

Benutzerhandbuch |
|
|
|
|
1 |
Ihr Digital Voice Tracer |
||
1 |
Ihr Digital Voice Tracer |
23 |
4 |
Wiedergabe |
29 |
1.1 |
Verpackungsinhalt |
|
1.1 |
Verpackungsinhalt |
23 |
4.1 |
Normale Wiedergabe |
29 |
|
|
|
1.2 |
Übersicht über Bedienungselemente |
|
4.2 |
Langsame Wiedergabe |
30 |
|
|
|
|
und Anschlüsse |
24 |
4.3 |
Suchlauf |
30 |
|
|
|
1.3 |
LCD Anzeige und Symbole |
24 |
4.4 |
Wiederholung |
30 |
|
|
|
1.4 |
Gerätefeatures und Vorteile |
25 |
5 |
FM-Radio (nur DVT 7890) |
31 |
|
|
Batterien |
2 |
Erste Schritte |
27 |
5.1 |
Programmieren von bis zu |
|
|
|
|
2.1 |
Ersetzen der Batterien |
27 |
|
20 Radiosendern |
31 |
|
|
|
2.2 |
Einschalten des Voice Tracers |
27 |
5.2 |
Löschen programmierter |
|
|
|
|
2.3 |
Einstellen der Uhrzeit |
27 |
|
Radiosender |
32 |
|
|
Stereo-Kopfhörer |
2.4 |
Ausschalten des Voice Tracer |
27 |
5.3 |
Radiowiedergabe über den |
|
|
|
|
2.5 |
Tastensperre (Hold-Funktion) |
28 |
|
eingebauten Lautsprecher |
32 |
|
|
|
3 |
Aufnahme |
28 |
5.4 |
Übersicht über die Funktionstasten |
|
|
|
|
3.1 |
Aufnehmen mit dem eingebauten |
|
|
im Radiomodus |
33 |
|
Voice Tracer |
Umhängeband |
|
Mikrofon |
28 |
6 |
MP3-Player |
33 |
|
|
|
3.2 |
Aufnehmen über ein externes |
|
7 |
Menü |
34 |
|
|
|
|
Mikrofon |
29 |
8 |
Fehlerbehebung |
41 |
|
|
|
3.3 |
Aufnehmen über den externen Eingang |
9 |
Warnhinweise |
42 |
|
USB-Kabel |
Benutzerhandbuch |
|
|
(Line In) (nur DVT 7890) |
29 |
10 |
Technische Daten |
42 |
|
|
|
3.4 |
Aufnahme von Radiosendungen |
|
|
|
|
|
|
|
|
(nur DVT 7890) |
29 |
|
|
|
|
|
|
|
|
|
|
|
|
Ansteckmikrofon |
CD |
|
D E U T S C H
Benutzerhandbuch |
23 |

1.2 Übersicht über Bedienungselemente und Anschlüsse |
1.3 LCD Anzeige und Symbole |
1 |
Kopfhöreranschluss |
11 |
|
2 |
Mikrofonanschluss, Line-in |
||
|
|||
3 |
Eingebautes Mikrofon |
12 |
|
4 |
REC/PAUSE/POWER ON |
||
16 |
|||
5 |
STOP/MENU |
||
|
Stoppen Aufnahme, Menüeintrag |
|
|
6 |
Lautstärke LAUTER |
|
|
7 |
WEITER |
|
|
|
Schnell vor, Datei-/Menüwechsel |
|
|
8 |
REPEAT/FOLDER |
17 |
|
9 |
Ordnerwechsel und Wiederholen |
13 |
|
Batteriefach |
|
||
10 |
Lautsprecher |
14 |
|
11 |
LED-Anzeige für Aufnahme/Wiedergabe15 |
||
12 |
LCD-Anzeige |
|
|
13ZURÜCK
Schnell zurück, Dateiwechsel, Menüwechsel
14POWER/PLAY/SPEED/PAUSE
Ein-/Ausschalten, normale Wiedergabe, Pause, langsame Wiedergabe
15Lautstärke LEISER
16Mini-USB-Anschluss zum PC-Download
17HOLD-Tastensperre
1 |
|
|
2 |
3 |
Ordner A, B, C, D, M |
|
Batterieladezustands (Die Batterien |
|
|
|
|
|
|
müssen ersetzt werden, wenn die |
|
|
Anzeige zwischen den Zuständen 3 und |
|
4 |
4 hin und her springt.) |
|
|
Stereomodus |
|
5 |
FM Stereo-/Mono-Anzeige, Anzeige |
|
|
Stereo-/Mono-Aufnahme |
|
6 |
FM-Rundfunkempfangsanzeige |
|
(nur DVT 7890) |
|
|
7 |
|
|
Line-In-Eingang (nur DVT 7890) |
|
|
|
Dateinummer, Menüwert, FM-Sender (nur DVT 7890) |
|
|
Aufnahmequalität |
|
8 |
Alarm aktiviert |
|
9 |
Soundaktivierte Aufnahme |
|
Langsame Wiedergabe |
|
|
|
Timer-Aufnahme aktiviert |
10 |
Wiederholungsmodus |
|
Zufallswiedergabemodus |
||
|
||
|
Wiedergabe-/Aufnahmezeit, Menüeinträge |
|
|
Restliche Wiedergabe-/Aufnahmedauer |
|
|
Aufnahmedauer |
24 |
Benutzerhandbuch |

1.4 Gerätefeatures und Vorteile
Aufnahme
Aufnahmeempfindlichkeit: Zum Aufnehmen von Sound aus allen Richtungen, zum Beispiel beim Aufnehmen von Konferenzen, können Sie auf die Betriebsart mit hoher Empfindlichkeit umschalten. Beim Aufnehmen persönlicher Notizen, wenn keine Umgebungsgeräusche gleichzeitig aufgenommen werden sollen, schalten Sie auf die Betriebsart mit niedriger Empfindlichkeit um.
Super-HQ-Aufnahmebetrieb: Hervorragende Aufnahmequalität für gestochen klare Wiedergabe (Bitrate 128 Kbps, Samplingfrequenz 44,1 kHz, MP3-Stereo-Codierer).
Verschiedenen Betriebsarten für Aufnahmen: Wählen Sie aus den verschiedenen Betriebsarten aus, Sie können frei zwischen langer Aufnahmekapazität und hervorragender Tonqualität auswählen. Sie entscheiden in Abhängigkeit von Ihren Erfordernissen oder schalten auf Betriebsarten mit niedrigerer Aufnahmequalität um, wenn Sie Speicherplatz sparen wollen.
Großzügige Sprachaufnahmekapazität: Der große interne Speicher erlaubt es, lange Sprachaufnahmen zu speichern. Sie brauchen die Dateien nicht zu downloaden, um Speicherplatz frei zu machen.
Sprachaktivierte Aufnahme: Mit diesem bequemen Feature können Sie freihändig diktieren. Wenn Sie diese Funktion aktivieren, startet die Aufnahme, sobald das Eingabeniveau einen bestimmten Schwellenwert erreicht, im Allgemeinen in dem Augenblick, in
dem Sie mit dem Diktieren beginnen. Das Aufnehmen stoppt automatisch, wenn Sie aufhören zu sprechen und startet wieder, wenn Sie weitersprechen.
Automatische Aufteilfunktion: Diese Funktion teilt lange Aufnahmen automatisch in getrennte Dateien (zu je 30 oder 60 Minuten). Dadurch werden das Finden, Editieren und Archivieren langer Aufnahmen von Besprechungen oder Vorlesungen leichter.
Aufnahme externer Soundquellen (Line-Aufnahme): Dank dieser Funktion können Sie direkt von einer externen Audioquelle aufnehmen, wie zum Beispiel von einem CD-Player mit guter Soundqualität. Verfügbar mit dem DVT 7890.
Aufzeichnen mit USB-Stromzufuhr: Zum Aufzeichnen langer Konferenzen kann der Digital Voice Tracer über seinen USB-Anschluss gespeist werden. USB-Kabel an das Notebook
anschließen, sobald der USB-Anschluss besteht, die RECORD-Taste mehrere Sekunden niederhalten, bis die Anzeige REC-Zustand zeigt - jetzt können Konferenzen oder Besprechungen ohne Belastung der Batterie aufgezeichnet werden.
D E U T S C H
Benutzerhandbuch |
25 |

Wiedergabe
Dateivorschau / Titel anspielen: Diese Funktion scannt durch alle Aufzeichnungen, indem die ersten Sekunden jeder Datei kurz angespielt werden. Das erleichtert es Ihnen, eine bestimmte Datei zu suchen oder durch alle Aufzeichnungen zu laufen.
Langsame Wiedergabe: Die Aufnahmen werden mit langsamerer Geschwindigkeit wiedergegeben, um es zum Beispiel zu erleichtern, Notizen zu machen.
Wiederholte Wiedergabe: Der DTV kann einen Sprachabschnitt zwischen zwei Punkten (A <> B) wiederholen, um zum Beispiel das Notieren einer Telefonnummer, einer Adresse oder einer Bemerkung innerhalb eines aufgenommenen Gesprächs zu erleichtern.
Wiedergabe mit Alarm: Planen Sie einen Sprachalarm ein, um Ihnen zu helfen, Sie an wichtige Besprechungen oder Ereignisse, einen Telefonanruf zu erinnern.
Praktisch und bequem
Großes Display mit Hintergrundbeleuchtung: Sehen Sie alle relevanten Informationen auf einen Blick, auch bei schlechten Lichtverhältnissen.
Hold-Tastensperre: Blockieren und schützen Sie den aktuellen Zustand des DVT, um ein unbeabsichtigtes Einoder Ausschalten des Geräts während der Aufnahme oder Wiedergabe zu verhindern oder wenn Sie Ihren DVT in die Tasche stecken.
Zeitstempel: Das Zeitmarkierungsfeature weist jeder Aufnahme ein Datum und eine Uhrzeit zu. Das erleichtert es Ihnen, die Aufnahmen später zu finden und zu prüfen.
Dateiaufteilung: Dieses Feature erlaubt das Aufteilen einer langen Aufnahme in zwei getrennte Dateien, so dass sie leichter archiviert oder per E-Mail versandt werden können oder so dass Sie einen Teil der Datei löschen können.
Aufnahmetimer: Mit dem Aufnahmetimer können Sie den DVT programmieren, damit er eine Aufnahme in einem bestimmten Zeitpunkt startet. Sobald Sie den Timer eingestellt haben, wird das Ereignis automatisch ab der eingestellten Zeit am eingestellten Datum aufgenommen.
USB-Laufwerk: Der DVT ist auch ein Standard USBWechseldatenträger, der praktischen Speicherplatz und das geteilte Nutzen von Daten, wie zum Beispiel Briefen, Diapräsentationen oder Tabellenkalkulationen bietet. Sie brauchen keinen eigenen Treiber zu installieren, damit der DVT von Windows erkannt wird.
26 |
Benutzerhandbuch |

2 Erste Schritte
2.1Ersetzen der Batterien
1 Achten Sie darauf, dass das Gerät ausgeschaltet ist. Drücken Sie gegebenenfalls die WIEDERGABE/PAUSE-Taste für etwa 2 Sekunden, um das Gerät auszuschalten. Wenn Sie die Batterien ersetzen, während das Gerät eingeschaltet ist, kann dies Störungen verursachen.
2 Öffnen Sie das Batteriefach.
3 Legen Sie die Batterien ein. Achten Sie darauf, dass die Batterien richtig eingelegt sind (Größe „AAA“) und schließen Sie das Fach wieder.
4 Drücken Sie zum Einschalten für einige Sekunden die Taste WIEDERGABE/PAUSE.
DEntfernen Sie die Batterien aus dem Gerät, falls es während einer längeren Zeitspanne nicht verwendet wird. Ausfließende Batterien können den Voice Tracer beschädigen.
ENehmen Sie bei Funktionsstörungen des Geräts, die Batterien kurz heraus und setzen Sie sie wieder ein.
2.2Einschalten des Voice Tracers
1 Drücken Sie zum Einschalten für einige |
1 |
2 |
Sekunden die Taste WIEDERGABE/PAUSE. |
|
|
Der Voice Tracer befindet sich nach dem |
|
|
Einschalten im Stopp-Modus 1 oder im Uhrzeiteinstellmodus |
2 . |
|
DIst die Uhrzeit nicht eingestellt, stellt sich der Voice Tracer auf den Uhrzeiteinstellmodus. Der Voice Tracer wechselt auf den Stopp-Modus, wenn die Zeit eingestellt wird oder wenn die Taste STOP/MENU betätigt wird. Halten Sie die REC-Taste für einige Sekunden gedrückt, um das Einstellen der Uhrzeit zu überspringen und sofort mit der Aufnahme zu beginnen.
E Steht der Schalter HOLD auf der Position „On“, wird |
3 |
auf dem Display kurz „On Hold“ angezeigt, danach 

 schaltet sich das Display aus 3 . Die Tasten des Voice


 Tracers werden wieder aktiviert, wenn der Schalter HOLD auf die Stellung „Off“ gestellt wird.
2.3Einstellen der Uhrzeit
1 Der Voicer Tracer muss sich im Stopp-Modus befinden.
2 Drücken Sie die Taste STOP/MENU für einige Sekunden, um den Menu-Modus aufzurufen und folgen Sie den Anweisungen im Kapitel Menü.
2.4Ausschalten des Voice Tracers
Drücken Sie im STOPoder FM-Radio-Modus für einige Sekunden die Taste WIEDERGABE/PAUSE, um den Voice Tracer auszuschalten. Schalten Sie den Voice Tracer aus, wenn er nicht verwendet wird, um die Batterien zu schonen.
D E U T S C H
Benutzerhandbuch |
27 |

2.5Tastensperre (Hold-Funktion)
Wenn der Schalter HOLD auf der linken Seite des Voice Tracers auf der Stellung HOLD steht, sind alle Tasten des Geräts inaktiv.
1 Stellen Sie den Schalter HOLD auf die Position „Off“, um die Tasten des Voice Tracers wieder zu aktivieren.
3 Aufnahme
•Drücken Sie zum Auswählen des gewünschten Ordners auf die Taste REPEAT/FOLDER. Der Voice Tracer wechselt bei jedem Druck auf diese Taste zum nächsten Ordner.
•Aktivieren Sie bei Bedarf vor dem Beginn der Aufnahme die VAFunktion (sprachaktivierte Aufnahme) und stellen Sie den gewünschten Aufnahmemodus ein (Super HQ, HQ, SP, LP, SLP) (siehe Kapitel Menü).
•Erstellen Sie eine Testaufnahme, um sicherzustellen, dass die Einstellungen des Voice Tracers richtig sind.
•Um die restliche Aufnahmekapazität anzuzeigen, halten Sie während der Aufnahme die Taste WIEDERGABE/PAUSE gedrückt.
•Die maximale Anzahl der Dateien pro Ordner beträgt 99, insgesmat 396 Dateien des Geräts (99 Dateien x 4 Ordner).
•Überschreitet die Aufnahmezeit die verfügbare Kapazität oder wird die Anzahl von 396 Dateien erreicht, wird auf dem Display „Full“ angezeigt.
Ein Fortsetzen der Aufnahme ist unmöglich 1 |
2 . Löschen |
1 |
Sie in diesem Fall einige Aufnahmen oder verschieben Sie |
|
|
Dateien auf ein externes Gerät (Audio oder Computer). |
|
|
• Die Batterien dürfen während des Aufnehmens |
2 |
|
nicht herausgenommen werden. Das kann eine |
|
|
Funktionsstörung des Voice Tracers verursachen. |
|
|
• Soll eine lange Aufnahme angelegt werden, ersetzen Sie |
3 |
|
vor Beginn die Batterien durch neue. |
|
|
|
|
|
• Wenn sich der Voice Tracer im VA-Modus 3 |
befindet, |
|
stoppt das Aufnehmen automatisch, sobald das Gerät keinen |
|
|
Ton mehr erfasst. Die VA-Funktion sollte deaktiviert werden, wenn |
|
|
wichtige Gespräche aufgenommen werden. |
|
|
•Drücken Sie während der Wiedergabe einer MP3oder WMADatei aus dem Ordner M (Musik) auf die Taste REC, um den Equalizer zu aktivieren.
3.1Aufnehmen mit dem eingebauten Mikrofon
1 Halten Sie die REC/PAUSE für etwa 1 Sekunde gedrückt, um den
Voice Tracer einzuschalten und die Aufnahme zu beginnen |
1 |
|
1 2 . Die rote LED schaltet sich ein. |
||
|
||
2 Halten Sie das eingebaute Mikrofon des Voice Tracers |
|
|
in die Richtung der Tonquelle. Halten Sie die Taste |
2 |
|
WIEDERGABE/PAUSE gedrückt, um die restliche |
Aufnahmekapazität anzuzeigen.
3 Zum vorübergehenden Unterbrechen der Aufnahme
28 |
Benutzerhandbuch |
auf die Taste REC/PAUSE drücken. Die rote LED blinkt, |
3 |
und die Anzeige „Pause“ blinkt auf dem Display. 4 Zum Fortsetzen der Aufnahme noch einmal auf die Taste
REC/PAUSE drücken. Die rote LED schaltet sich wieder ein. 5 Drücken Sie während der Aufnahme auf die Taste WEITER
drücken eine neue Datei anzulegen (Dateitrennfunktion).
6 Drücken Sie zum Stoppen der Aufnahmen auf die Taste STOP/ MENU. Die Gesamtaufnahmezeit wird nach dem Stoppen der Aufnahme angezeigt 3 .
3.2Aufnehmen über ein externes Mikrofon
Zum Aufnehmen über ein externes Mikrofon wird dieses an den Mikrofonanschluss angeschlossen. Die Vorgehensweise beim Aufnehmen ist gleich wie bei einem eingebauten Mikrofon.
3.3Aufnehmen über den externen Eingang
(Line In) (nur DVT 7890) |
1 |
1 Schalten Sie den Voice Tracer ein. Wenn sich der Voice 
 Tracer im FM-Radiomodus befindet, einige Augenblicke auf


 die Taste REPEAT/FOLDER drücken, um diesen Modus zu verlassen.
2 Auf Menü-Modus stellen und die Aufnahmequelle (L) einstellen. Näheres dazu finden Sie unter „Menü > Einstellen der Aufnahmequelle“. „LINE“ wird auf dem Display angezeigt 1 .
3 Schließen Sie den Line-in-Eingang mit einem Audiokabel an die externe Audioquelle an.
4 Drücken Sie die Taste REPEAT/FOLDER, um den Ordner auszuwählen, in dem aufgenommen werden soll.
5 Drücken Sie die Taste REC/PAUSE, um die Aufnahme zu beginnen.
DZum Unterbrechen oder Stoppen der Aufnahme folgen Sie den Anweisungen beim Aufnehmen mit dem eingebauten Mikrofon.
3.4 Aufnahme von Radiosendungen (nur 7890) |
|
1 Schalten Sie den Voice Tracer ein. |
|
2 Halten Sie für einige Sekunden die Taste REPEAT/FOLDER |
|
gedrückt, um in den FM-Radiomodus zu wechseln. |
|
3 Wählen Sie den aufzunehmenden Sender aus. |
1 |
Genaueres dazu finden Sie im Kapitel FM-Radio. |
4 Drücken Sie die Taste REC/PAUSE, um den aktuellen FM-Radiosender aufzunehmen 1 .
4 Wiedergabe
4.1Normale Wiedergabe
1 Drücken Sie für einige Sekunden auf die Taste WIEDERGABE/ PAUSE drücken, um den Voice Tracer einzuschalten. Wenn sich der Voice Tracer im FM-Rundfunkmodus befindet (nur 7890), einige Augenblicke auf die Taste REPEAT/FOLDER drücken, um
D E U T S C H
Benutzerhandbuch |
29 |

diesen Modus zu verlassen. |
1 |
2 Drücken Sie die Taste REPEAT/FOLDER, um zum 
 gewünschen Ordner zu wechseln und wählen Sie mit


 den Tasten WEITER und ZURÜCK die gewünschte Datei aus.
3 Drücken Sie auf die Taste WIEDERGABE/PAUSE, um die Datei abzuspielen. Die Wiedergabedauer wird auf dem Display eingeblendet, die grüne LED leuchtet.
4 Mit den Tasten Volume Up und Down können Sie die Lautstärke lauter oder leiser stellen.
5 Um die Wiedergabe zu stoppen, drücken Sie auf die Taste STOP/ MENU. Die Gesamtwiedergabezeit der laufenden Datei wird auf dem Display eingeblendet.
6 Drücken Sie auf die Taste WIEDERGABE/PAUSE, um die Wiedergabe ab der vorhergehenden Stelle fortzusetzen.
4.2Langsame Wiedergabe
1
D Nur verfügbar für die Wiedergabe von Sprachdateien.
1 Drücken Sie während der Wiedergabe für einige Sekunden auf die Taste WIEDERGABE/PAUSE, um von der normalen Wiedergabe auf die langsame Wiedergabe umzuschalten 1 .
2 Drücken Sie erneut für einige Sekunden auf die Taste WIEDERGABE/PAUSE, um zur normalen Wiedergabe zurückzukehren.
4.3Suchlauf
1 Während der Wiedergabe die Taste WEITER oder die Taste ZURÜCK für einige Augenblicke gedrückt halten, um in der laufenden Datei mit hoher Geschwindigkeit nach vor oder zurückzuspulen.
2 Beim Loslassen der Taste WEITER oder ZURÜCK wird die Wiedergabe mit der ausgewählten Geschwindigkeit (normal oder langsam), fortgesetzt.
DWird die Taste WEITER bis zum Ende der laufenden Datei niedergehalten, setzt der Voice Tracer den Suchlauf in der nächsten Datei fort.
4.4Wiederholung
4.4.1 Wiederholen eines Abschnitts |
1 |
1 Drücken Sie während der Wiedergabe am Beginn des |
|
Abschnitts, der wiederholt werden soll, auf die Taste |
|
REPEAT/FOLDER. Die Anzeige A B blinkt auf dem |
|
Display 1 . |
2 |
2 Drücken Sie am Ende des Abschnitts, der wiederholt wer- |
den soll, noch einmal auf die Taste REPEAT/FOLDER 2 . 3 Der so ausgewählte Abschnitt wird ständig wiederholt,
bis die Taste STOP/MENU gedrückt wird.
4 Zum Stoppen der Abschnitt-Wiederholung und Zurückkehren zur normalen Wiedergabe auf die Taste REPEAT/FOLDER drücken.
30 |
Benutzerhandbuch |
 Loading...