


Register your product and get support at |
POCKET MEMO |
www.philips.com/welcome |
|
|
LFH9380/27 |
EN |
User manual |
3 |
|
|
|
DE |
Benutzerhandbuch |
29 |
|
|
|
FR |
Manuel de l‘utilisateur |
55 |
|
|
|
ES |
Manual del usuario |
81 |
|
|
|
IT |
Manuale di istruzioni |
107 |
|
|
|
NL |
Gebruikershandleiding |
133 |
|
|
|

User manual
1 |
Important |
2 |
2 |
Your Pocket Memo |
3 |
2.1 |
Product highlights |
3 |
2.2 |
What’s in the box |
3 |
2.3 |
Overview |
4 |
2.3.1 |
Controls and connections |
4 |
2.3.2 |
Display indicators and symbols |
5 |
3 |
Get started |
6 |
3.1 |
Install the batteries |
6 |
3.2 |
Use rechargeable batteries |
6 |
3.3 |
Insert and eject the memory card |
7 |
3.4 |
Format a new memory card |
7 |
3.5 |
Activate the Pocket Memo |
8 |
3.5.1 |
Set the language |
8 |
3.5.2 |
Set the date and time |
8 |
3.6 |
Power-save mode |
9 |
4 |
Use your Pocket Memo |
10 |
4.1 |
Recording |
10 |
4.1.1 |
Create a recording |
10 |
4.1.2 |
Add to a recording (insert/overwrite) |
11 |
4.1.3 |
Finish (lock) a recording |
12 |
4.1.4 |
Change the recording format |
13 |
4.1.5 |
Adjust the microphone sensitivity |
14 |
4.2 |
Playback |
15 |
4.2.1 |
Overview of playback functions |
16 |
4.3 |
Delete |
16 |
4.3.1 |
Delete a file |
16 |
4.3.2 |
Delete part of a recording |
17 |
4.3.3 |
Delete all dictations |
18 |
ENGLISH
5 |
Use more of your Pocket Memo 19 |
|
5.1 |
Use Philips SpeechExec software |
19 |
5.1.1 |
Advanced configuration |
19 |
5.1.2 |
Download recordings to the PC |
19 |
5.2 |
Menu settings |
20 |
5.2.1 |
Menu list |
20 |
5.3 |
Use voice-activated recording |
21 |
5.4 |
Work with index marks |
22 |
5.4.1 |
Insert an index mark |
22 |
5.4.2 |
Delete an index mark |
23 |
5.4.3 |
Delete all index marks |
23 |
5.5 |
Assign an author’s name |
24 |
6 |
Technical data |
25 |
User manual |
3 |

1 Important
Philips reserves the right to change products at any time without being obliged to adjust earlier supplies accordingly.
The material in this manual is believed adequate for the intended use of the system. If the product, or its individual modules or procedures, are used for purposes other than those specified herein, confirmation of their validity and suitability must be obtained.
Safety
•To avoid a short circuit, do not expose the product to rain or water.
•Do not expose the device to excessive heat caused by heating equipment or direct sunlight.
•Protect the cables from being pinched, particularly at plugs and the point where they exit from the unit.
•Back up your files. Philips is not responsible for any loss of data.
Hearing safety
Observe the following guidelines when using your headphones:
•Listen at reasonable volumes for reasonable periods of time.
•Be careful not to adjust the volume higher as your hearing adapts.
•Do not turn up the volume so high that you can’t hear what’s around you.
•You should use caution or temporarily discontinue use in potentially hazardous situations.
•Do not use headphones while operating a motorized vehicle, cycling, or skateboarding, etc. It may create a traffic hazard and is illegal in many areas.
Important (for models supplied with headphones):
Philips guarantees compliance with the maximum sound power of its audio players as determined by relevant regulatory bodies, but only with the original model of provided headphones. If these headphones need
replacement, we recommend that you contact your retailer to order a Philips model identical to that of the original.
Small children
Your device and its enhancements may contain small parts. Keep them out of the reach of small children.
Disposal of your old product
•Your product is designed and manufactured with high quality materials and components that can be recycled and re-used.
•When this crossed-out wheeled bin
symbol is attached to a product, it indicates that the product is covered by the European Directive 2002/96/EC.
•Become informed about your local separate collection system for electrical and electronic products.
•Act according to your local rules and do not dispose of old products with normal
household waste. The correct disposal of old products will help prevent potential negative consequences for the environment and human health.
•Batteries (including built-in rechargeable batteries) contain substances that may pollute the environment. All batteries should be disposed of at an official collection point.
4 |
User manual |
2 Your Pocket Memo
Congratulations on your purchase and welcome to Philips!
To fully benefit from the service that Philips offers, visit our Website for support information such as user manuals, software downloads, warranty information and more: www.philips.com/support.
2.1Product highlights
•The Pocket Memo’s asymmetrical and ergonomic design delivers unparalleled userfriendly operation. All buttons are within the sweep-angle of the thumb.
•Two smart buttons let you scroll through menu options and quickly make selections.
•A large graphical display lets you view all file information, such as keywords (author name), length of dictation, position within the file, and other vital information at a glance. A backlit display shows all information, even in poor lighting conditions.
•The .dss file format is the international standard for professional speech processing. Offering excellent audio quality for recorded voice, .dss files allow a high compression rate, reduced file sizes, network traffic and required storage capacity.
•SpeechExec Dictate is the perfect download software to manage voice files. The intuitive user interface makes job retrieval simple and fast, and the job status information allows the tracking of all the work in progress.
ENGLISH
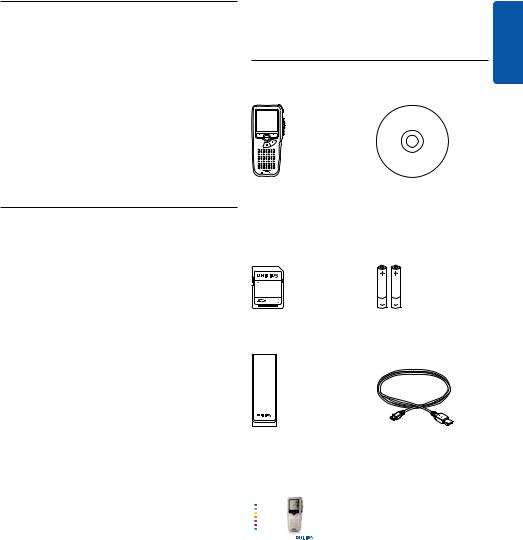
2.2What’s in the box
Pocket Memo |
CD-ROM containing |
|
software and user |
|
manual |
Memory card |
Rechargeable batteries |
Pouch |
|
USB cable |
|
|
|
|
|
|
Register your product and get support at |
POCKET MEMO |
|
|
www.philips.com/welcome |
|
|
|
|
LFH9380 |
|
|
|
|
|
|
EN Quick start guide |
|
|
|
DE Kurzanleitung |
|
|
|
FR Guide de démarrage rapide |
|
|
|
ES Guía de inicio rápido |
|
|
|
IT Guida rapida di introduzione |
|
|
|
NL Snelle startgids |
|
|
|
SV Snabbstartsguide |
|
|
|
|
|
|
Quick start guide
User manual |
5 |
2.3Overview
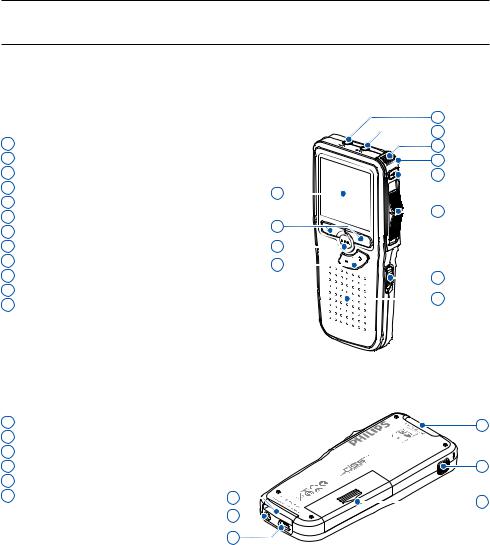
2.3.1 Controls and connections
1 |
Microphone socket |
|
|
2 |
Headphone socket |
|
|
3 |
Built-in microphone |
|
|
4 |
Status LED |
9 |
|
5 |
EOL (end-of-letter) button |
||
|
|||
6 |
Slide switch |
10 |
|
7 |
On/off switch |
||
|
|||
8 |
Speaker |
11 |
|
9 |
Display |
12 |
|
|
Smart buttons |
||
10 |
|
||
11 |
Menu button |
|
|
12 |
+/–, menu navigation and volume control |
|
|
13 |
Memory card slot |
|
|
14 |
FWD (forward) button |
|
|
15 |
Battery compartment |
|
|
16 |
Docking station connection slot |
|
|
17 |
Power supply socket |
|
18 USB connection slot |
16 |
|
17 |
|
18 |
1
5 |
6 |
7 |
8 |
13
14 |
15 |
6 |
User manual |

2.3.2 Display indicators and symbols
ENGLISH
6 |
7 |
8 |
9 |
10 |
11
5 9:23
9:23
4
3
2 |
DPM 9380.DSS |
||
1 |
BEGIN |
|
NEW |
|
18 |
17 |
16 |
12
13
14
15
1 |
Current function of the left smart button |
11 |
Recording level meter |
2 |
File name |
12 |
Sensitivity level for voice-activated recording |
3 |
Recording number |
13 |
Current position in the recording |
4 |
Position bar |
14 |
Positions of the slide switch |
5 |
Recording / playback time |
15 |
Current function of the right smart button |
6 |
Battery level indicator |
16 |
Recording is marked finished (EOL) and |
7 |
Recording format |
|
locked |
8 |
Memory card is write-protected (locked) |
17 |
Recording is marked priority |
9 |
Insert recording mode is activated |
18 |
Recording contains index mark |
10 |
Voice-activated recording in progress |
|
|
User manual |
7 |
3 Get started
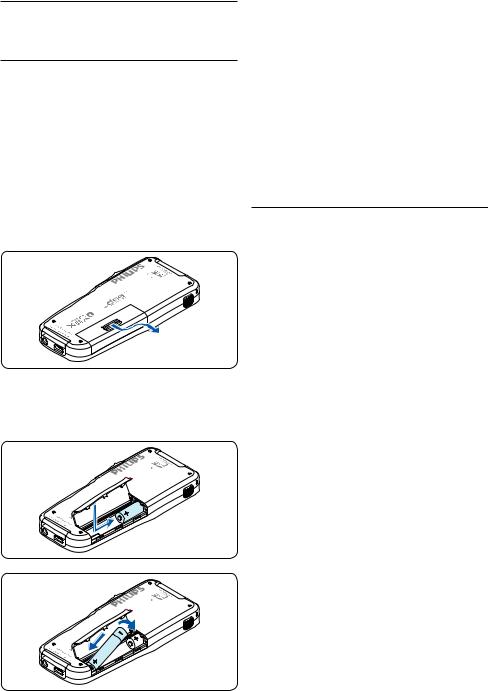
3.1Install the batteries
The Pocket Memo can be operated with the two AAA rechargeable batteries LFH9154 delivered with the product. Standard (nonrechargeable) AAA alkaline batteries may also be used.
1The on/off switch of the Pocket Memo must be in the OFF position.
2Open the battery compartment on the back side of the Pocket Memo by sliding it outwards then folding it up.
3Insert the two AAA batteries. The correct polarity is indicated on the inside of the battery compartment cover.
4Close the battery compartment by folding it down and sliding the battery compartment cover inward until it clicks.
D Note
Do not mix battery types! Use two rechargeable batteries (Philips LFH9154) or two non-rechargeable alkaline batteries.
3.2Charge the batteries
The Pocket Memo can be operated with Philips rechargeable batteries LFH9154. To recharge these batteries, use USB cable. Optionally, the
Philips Power Supply 9146 or the USB Docking Station 9120 may also be used.
When the Pocket Memo is connected to a PC or notebook computer with the supplied USB cable, the rechargeable batteries are
automatically recharged. If the USB port on the computer is high powered, a complete recharge cycle takes about 2.5 hours.
D Note
The PC must be ON when charging battery via the USB cable connection. The Pocket Memo may become warm during fast recharging.
C Important
If the USB port of the computer does not supply enough power capacity (500 mA), disable the USB quick charge function in the menu of the Pocket Memo and recharge.
8 |
User manual |

3.3 Insert and eject the memory card
The Pocket Memo operates with a SD (SecureDigital) memory card and supports SDHC cards with storage capacities of up to 32 GB.
To insert a memory card:
1Locate the memory card slot on the top back side of the Pocket Memo.
2Slide the memory card into the slot. A small illustration under the memory card slot indicates the correct orientation.
3Push the memory card in until it clicks.
To eject the memory card:
1Locate the memory card slot on the top back side of the Pocket Memo.
2Press the memory card into the Pocket Memo until it clicks.
3Release the memory card. It will slightly emerge from the memory card slot. Simply slide it out.
D Note
If the Pocket Memo is turned to the ON position and there is no memory card inserted, a warning screen is displayed.
3.4 Format a new memory card |
|
|
When a new, unformatted memory card (or a |
H |
|
memory card that was formatted with a non- |
LIS |
|
ENG |
||
Pocket Memo device) is inserted, the Pocket |
||
Memo will display a prompt to format the |
|
|
memory card. |
|
1To confirm and start the formatting process, press the OK smart button.
Delete all:
 Yes - format
!! ATTENTION !!
OK 
 CANCEL
2To cancel the formatting process, remove the memory card or press the CANCEL smart button.
Delete all:
 Yes - format
!! ATTENTION !!
OK 
 CANCEL
D Note
Formatting is not possible if the memory card is in read-only mode (locked).
User manual |
9 |
3.5Activate the Pocket Memo
The Pocket Memo is turned on and off by sliding the ON/OFF switch. When using it for the first time, you will be prompted to set the language, date and time.
D Note
It is possible to change the language later using the menu. See 5.2 Menu settings on page 22 for more information.
3.5.2 Set the date and time
When using the Pocket Memo for the first time, you will be prompted to set the current date and time.
1Press the + or – button to change the value for the year, month or day.
3.5.1 Set the language
When using the Pocket Memo for the first time, you will be prompted to set the language.
1Press the + or – button on the Pocket Memo to select a language.
LANGUAGE INT
LANGUE FR
SPRACHE DE
IDIOMA ES
EXIT - / + |
OK |
2Press the OK smart button to confirm the selection. The selected language will be displayed.
DATE:
2009-11-01
12/24: TIME: 24 14:22
OK
2Press the → smart button to advance the arrow (↑) to the next entry. After setting the day, press the → smart button to advance the settings to the correct time.
DATE:
2009-11-01
12/24: TIME: 24 14:22
OK
LANGUAGE INT LANGUE FR SPRACHE DE IDIOMA ES
EXIT - / + |
OK |
3Press the + or – button to select a 12-hour or 24-hour clock, AM or PM (if a 12-hour clock is selected), and to change the value of the hour and minute settings.
10 |
User manual |
DATE: 2009-11-01
12/24: |
TIME: |
24 |
14:22 |
|
|
OK
4Press the → smart button to confirm the date and time.
The Pocket Memo is now ready to function.
DATE: 2009-11-01
12/24: |
TIME: |
24 |
14:22 |
|
|
OK
3.6Power-save mode
After sixty minutes of inactivity, the Pocket Memo automatically goes into power-save mode and the LCD screen will display the date and time. Press any button to reactivate it.
If the Pocket Memo is not used for more than two hours, it turns off completely. Turn the unit on by moving the On/Off switch to the OFF position and then back to the ON position.
ENGLISH
D Note
If a mistake is made in setting the date/time, use the ← smart button any time during the procedure to step back to make corrections. It
is also possible to change the date and time later using the menu. See 5.2 Menu settings on page 22 for more information.
DATE: 2009-11-01
12/24: |
TIME: |
24 |
14:22 |
|
|
OK
User manual |
11 |
4 Use your Pocket Memo
4.1Recording
4.1.1 Create a recording
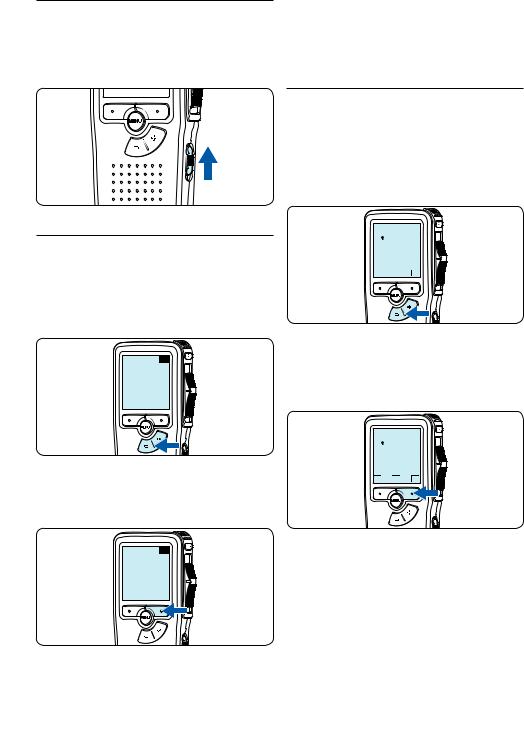
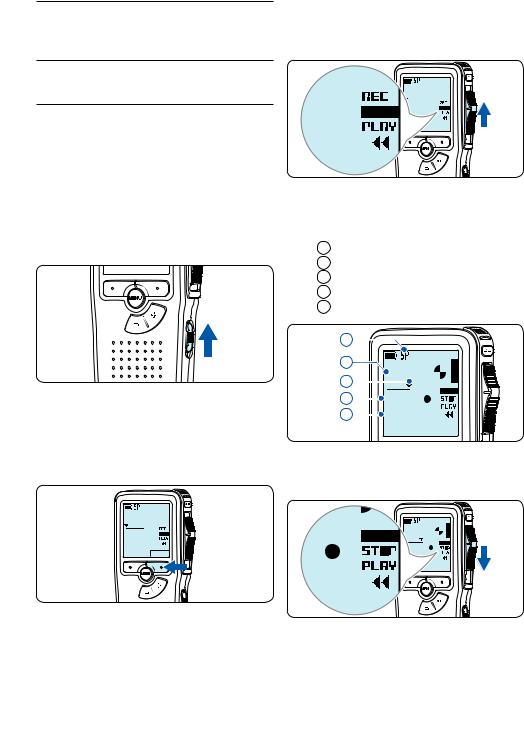
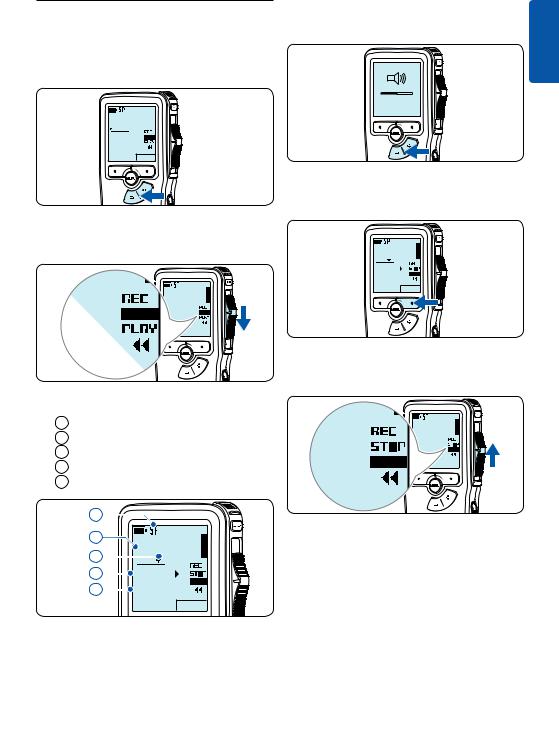
Follow these steps to create a recording with the Pocket Memo:
1A memory card must be inserted into the memory card slot. See 3.3 Insert and eject the memory card on page 9 for more information.
2Slide the On/Off switch to the ON position to switch on the Pocket Memo.
3Press the NEW smart button to create a new recording.
D Note
The NEW smart button is not displayed if the current recording is empty.
0.DSS
•The status LED glows in red (in overwrite mode) or green (in insert mode) while recording.
•The following information is displayed:
aRecording format
bRecording time
cCurrent position in the recording
dFile number
eFile name
a
b |
0:34 |
|
c |
||
|
||
d |
#2 |
|
e |
||
DPM 9380.DSS |
5To stop recording, move the slide switch to the STOP position.
0:00
#1
DPM 9380.DSS
NEW
4To start recording, move the slide switch to the REC position and start speaking.
0.DSS
D Note
For best results, speak clearly and keep the microphone about four inches (ten centimeters) away from your mouth.
12 |
User manual |
4.1.2Add to a recording (insert/ overwrite)
Files are recorded in overwrite mode by default. Follow these steps to switch to insert mode to make additions to a recording:
1Press the MENU button while in the stop position to open the menu.
0:00
#2
DPM 9380.DSS
NEW
2Press the + or – button to select the Insert mode menu and press the ENTER smart button to enter the submenu.
Insert mode: |
Insert mode: |
||
Overwrite |
|||
Overwrite |
|
||
|
|
||
|
Insert |
|
|
Insert |
OK |
CANCEL |
|
|
|||
OK CANCEL
4Press the OK smart button to save the setting or press the CANCEL smart button to exit the sub-menu without changing the setting.
Insert mode:
Overwrite
 Insert
OK CANCEL
Index set |
Delete dictation |
|
Index set |
Insert mode |
Insert mode |
Overwrite |
|
Overwrite |
Author |
ENTER |
|
Author |
2 |
|
|
|
1 |
3Press the + or – button to choose between
Insert or Overwrite mode.
•In insert mode, the record position of the slide switch reads iREC and the status LED glows in green while recording.
•In overwrite mode, the record position of the slide switch reads REC and the status LED glows in red while recording.
5Press the + or – button to select the file into which the insertion should be made.
0:00
#2
DPM 9380.DSS
NEW
6Play, forward or rewind to the position where the insertion should be made.
7To insert an additional recording, move the slide switch to the REC position and start speaking. The insertion will not overwrite the recording.
ENGLISH
User manual |
13 |

0.DSS
8To end the inserted recording, move the slide switch to the STOP position.
4.1.3 Finish (lock) a recording
When a recording is finished and no additional changes will be made, follow these steps to mark it as finished and protect it from being accidentally deleted:
1Press the + or – button while in the stop position to select the recording to be marked finished.
0:00
#2
DPM 9380.DSS
NEW
0.DSS
9 If the recording is not finished, simply fast forward to the end of the file and continue recording.
Repeat from step 1 to return to overwrite recording mode.
2Press the end-of-letter (EOL) button to lock the file and mark it as finished.
The symbol is displayed.
3To assign priority status to the recording, press the EOL button again within half a second.
The ! symbol is displayed, indicating that the file has priority status.
4To make changes to the recording, press the EOL button again to remove the finished mark.
E Tip
Philips SpeechExec software can be configured to download only those files from the Pocket Memo to the PC that are marked finished.
14 |
User manual |
C Caution
Locked files are deleted when the memory card is formatted or the delete-all-dictations function is used.
4.1.4 Change the recording format
The recording format determines the audio quality of recordings and affects the number of audio files that can fit on the memory card. The Pocket Memo supports the following recording formats:
•Standard Play (SP) requires 1 megabyte for 10 minutes of recording.
•Quality Play (QP) requires 1 megabyte for 5 minutes of recording.
1Press the MENU button while in the stop position to open the menu.
0:00
#2
DPM 9380.DSS
NEW
2Press the + or – button to select the Setup menu item and press the ENTER smart button.
Author |
Index set |
|
Insert mode |
|
|
|
Author |
|
Setup |
Setup |
ENTER |
BACK |
||
|
Language |
|
Language |
|
2 |
BACK |
ENTER |
1 |
3Press the + or – button to select the Record format menu item and press the ENTER smart button.
Voice activation Microphone
|
Voice activation |
||
Record format |
Record format |
||
SP |
<DSS> |
||
SP <DSS> |
Backlight |
||
BACK |
ENTER |
||
|
|||
Backlight |
2 |
|
|
|
1 |
4Press the + or – button to choose between
SP and QP.
Record format: |
Record format: |
|||
SP |
<DSS> |
|||
SP |
<DSS> |
|||
|
|
QP |
<DS2> |
|
QP |
<DS2> |
OK |
CANCEL |
|
|
|
|||
OK CANCEL
5Press the OK smart button to save the setting or press the CANCEL smart button to exit the sub-menu without changing the setting.
Record format:
 SP <DSS>
QP <DS2>
OK CANCEL
ENGLISH
User manual |
15 |
4.1.5 Adjust the microphone sensitivity
Set the microphone sensitivity for the environment and your recording preferences.
1Press the MENU button while in the stop position to open the menu.
0:00
#2
DPM 9380.DSS
NEW
4Press the + or – button to choose the microphone sensitivity: Private (low), Dictate (medium) and Conference (high).
Microphone: |
Microphone: |
||
Dictate |
|||
Dictate |
|
||
Private |
Private |
|
|
Conference |
|
||
|
OK |
CANCEL |
|
Conference
OK CANCEL
2Press the + or – button to select the Setup menu item and press the ENTER smart button.
Author |
Index set |
|
Insert mode |
|
|
|
|
|
|
Author |
|
Setup |
Setup |
ENTER |
BACK |
||
|
Language |
|
Language |
|
2 |
BACK |
ENTER |
1 |
3Press the + or – button to select the Microphone menu item and press the ENTER smart button.
Contrast
Device beep |
Record lamp |
|
Device beep |
||
|
|
Contrast |
Microphone |
|
Microphone |
|
Dictate |
|
|
|
|
|
|
BACK ENTER |
Dictate |
|
2 |
ENTER |
|
|
BACK |
1 |
|
|
|
|
5Press the OK smart button to save the setting or press the CANCEL smart button to exit the sub-menu without changing the setting.
Microphone:
 Dictate
Private
Conference
OK 
 CANCEL
16 |
User manual |
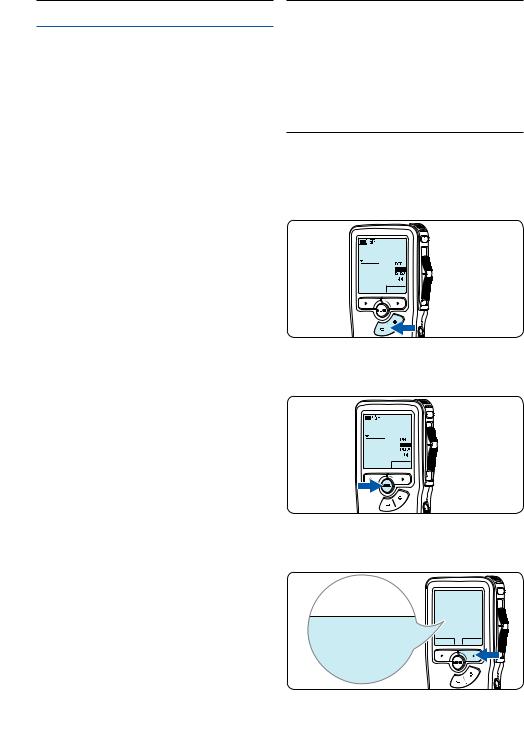
4.2 Playback |
3 Press the + or – button to adjust the |
|
playback volume during playback. |
1 Press the + or – button while in the stop |
|
position to select the file to play and locate |
|
the beginning of the recording. |
|
|
MIN MAX |
0:00 |
– + |
|
|
#2 |
|
DPM 9380.DSS |
|
NEW |
|
2Move the slide switch to the PLAY position to start playback.
4Press the SPEED smart button to adjust faster or slower file playback.
0:34
#2
DPM 9380.DSS
SPEED
0.DSS
The following information is displayed:
aRecording format
bPlayback position (minutes : seconds)
cCurrent position in the recording
dFile number
eFile name
a
5Move the slide switch to the STOP position to stop playback.
0.DSS
b |
0:34 |
|
c |
||
|
||
d |
#2 |
|
e |
||
DPM 9380.DSS |
SPEED
ENGLISH
User manual |
17 |
4.2.1 Overview of playback functions
File |
Press the + button once while in the |
selection |
stop position to skip to the end of a |
|
file. Press the + button again to skip |
|
to the beginning of the next file. |
|
Press the – button once while in the |
|
stop position to skip to the beginning |
|
of a file. Press the – button again to |
|
skip to the end of the previous file. |
Fast |
Move the slide switch to the ┤ |
rewind |
position. Move the slide switch to the |
|
STOP position to stop rewinding or |
|
the PLAY position to stop rewinding |
|
and begin playback. |
Fast |
Press and hold the FWD button while |
forward |
in the stop or play position. Release |
|
the FWD button to stop forwarding. |
Playback |
Press the SPEED smart button during |
speed |
playback to adjust faster or slower file |
|
playback. |
4.3Delete
D Note
Before deleting a file, make sure that it is not marked finished and that the memory card is not set to read-only (locked). If the file is marked finished, unlock it by pressing the EOL button once.
4.3.1 Delete a file
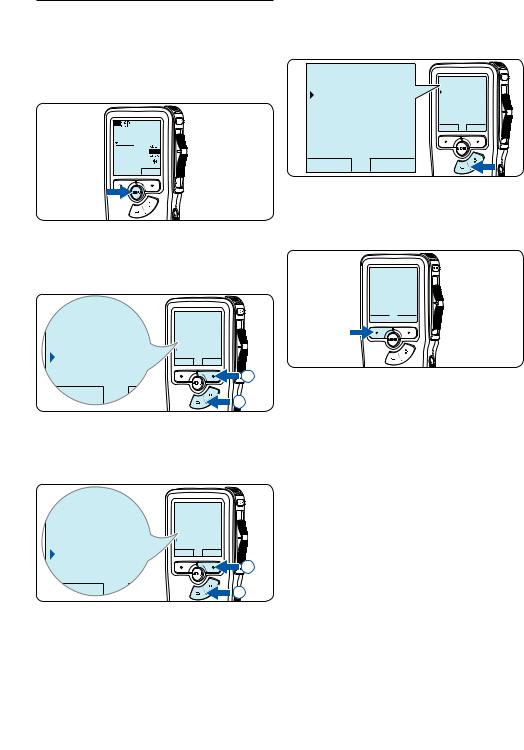
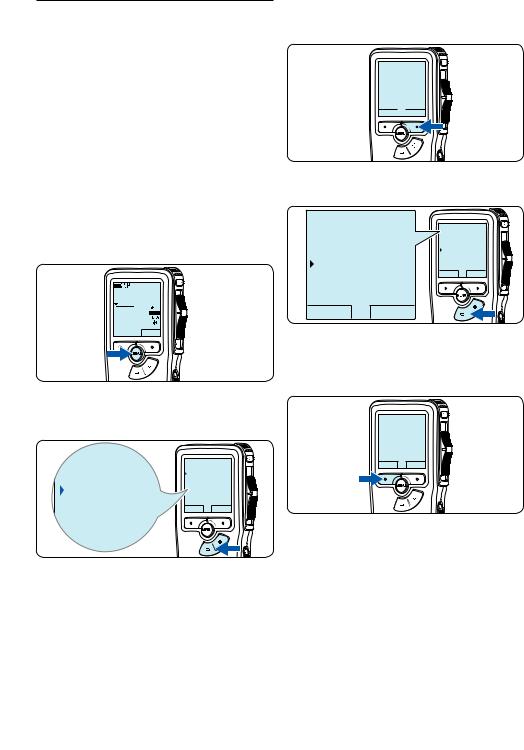
Follow these steps to delete a file entirely:
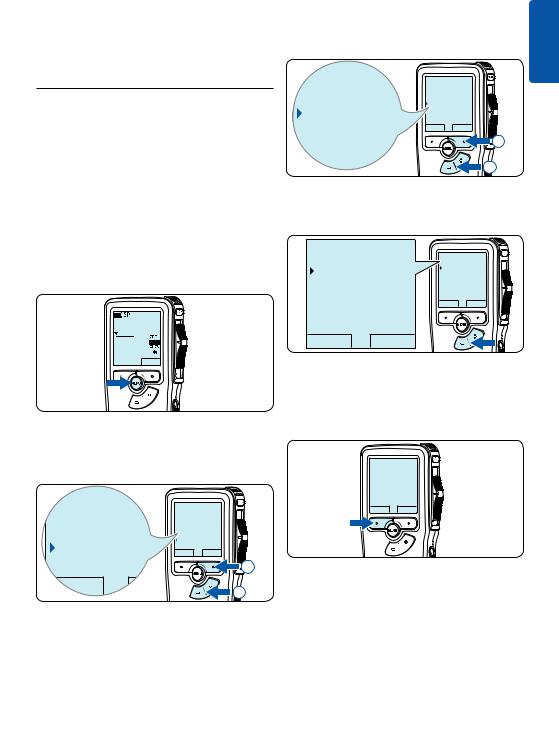
1Press the + or – button while in the stop position to select the file to be deleted.
0:00
#2
DPM 9380.DSS
NEW
2Press the MENU button to open the menu.
The Delete dictation menu item is selected.
0:00
#2
DPM 9380.DSS
NEW
3Press the ENTER smart button to enter the sub menu.
 Delete dictation
Delete?
Index set
 Delete dictation
Delete?
Index set Insert mode Author
ENTER
18 |
User manual |
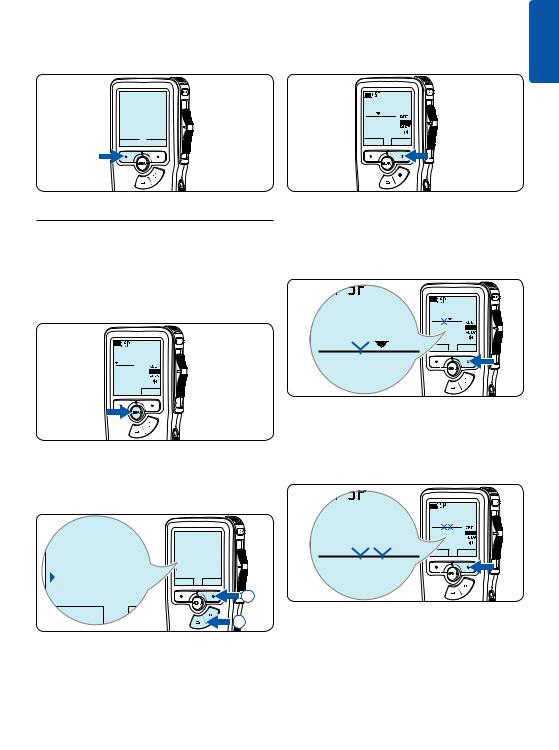
4Press the OK smart button to delete the file permanently. Press the CANCEL smart button to cancel the operation and leave the recording intact.
3Using the play, forward or rewind functions, navigate to the beginning of the section to be deleted. Press the MARK 1 smart button.
A cross symbol appears on the screen.
ENGLISH
Delete dictation:
 Delete ?
!! ATTENTION !!
OK 
 CANCEL
4.3.2 Delete part of a recording
Follow these steps to delete a section from a recording:
1Press the MENU button while in the stop position to open the menu.
0:00
#2
DPM 9380.DSS
NEW
0:25
#2
DPM 9380.DSS
CANCEL |
MARK 1 |
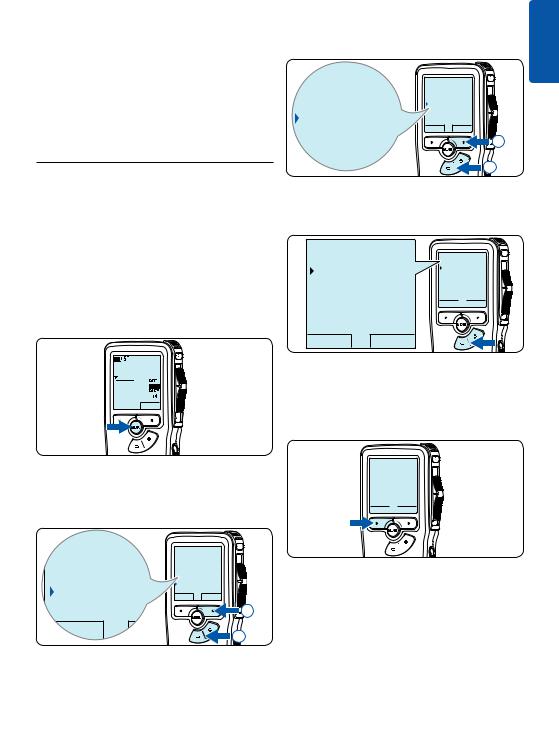
4Navigate to the second mark position using playback, forward or rewind. Press the MARK 2 smart button.
The second cross appears.
0:36 |
6 |
|
.DSS
MARK 2
#2 
2Press the + or – button to select the Delete section menu item and press the OK smart button.
Setup |
Insert mode |
|
Author |
||
|
||
|
Setup |
|
Delete section |
Delete section |
|
BACK ENTER |
 2
2
BACK |
ENTER |
1 |
5Press the DELETE smart button and the OK smart button to confirm the deletion of the marked section, or press the CANCEL smart button to exit without deleting.
0:36 |
6 |
|
.DSS
DELETE
#2 
User manual |
19 |

4.3.3 Delete all dictations
C Caution
Files marked finished (EOL) are deleted when the delete-all-dictations function is used.
Follow these steps to delete all recordings:
1Press the MENU button while in the stop position to open the menu.
0:00
#2
DPM 9380.DSS
NEW
4Press the ENTER smart button and the OK smart button to confirm the deletion, or press the CANCEL smart button to exit without deleting.
Delete all:
 Yes - delete
!! ATTENTION !!
OK 
 CANCEL
2Press the + or – button to select the Setup menu item and press the ENTER smart button.
Author |
Index set |
|
Insert mode |
|
|
|
|
|
|
Author |
|
Setup |
Setup |
ENTER |
BACK |
||
|
Language |
|
Language |
|
2 |
BACK |
ENTER |
1 |
3Press the + or – button to select the Delete dictations menu item and press the ENTER smart button.
Date & time
 Delete dictations
Delete all ?
BACK ENTER
Device beep
Microphone
Date & time
Delete dictations
Delete all ?
BACK |
ENTER |
 2
2

 1
1
20 |
User manual |
5Use more of your Pocket Memo
5.1 Use Philips SpeechExec software
Philips SpeechExec software can be used for advanced configuration of the Pocket Memo and automatic download, conversion and routing of dictation files.
D Note
For detailed information about SpeechExec software, refer to the SpeechExec user manual.
5.1.1 Advanced configuration
The Pocket Memo Configuration Wizard is part of the Philips SpeechExec Dictate software and guides users through the device configurations and settings of their Pocket Memo. The wizard assists users in configuring the time format, sound feedback, voice-activated recording, display appearance (standard or advanced display mode), the recording format, microphone sensitivity, author names, and file download to the PC.
1Connect the Pocket Memo to the PC using a USB cable.
2Start Philips SpeechExec Dictate software.
3Click Settings > General Settings on the menu bar of SpeechExec to open the settings menu and select DPM/DT Configuration > DPM Wizard from the list on the left side.
4Click the Start Wizard... button to open the
wizard. Follow the on-screen instructions to customize the Pocket Memo.
5Click the Finish button to close the wizard and confirm the transfer of the new settings to the Pocket Memo.
D Note
When the Pocket Memo is connected to the PC for the first time, Windows detects the new hardware and automatically installs the required drivers. When the installation is complete, Windows may prompt you to restart the PC.
5.1.2 Download recordings to the PC
With USB mass storage support, the Pocket Memo is automatically displayed as an external drive when it is connected to the computer. It can then be accessed easily with any Microsoft Windows program as a regular drive.
Use Philips SpeechExec software for automatic download, conversion and routing of files.
1Make a recording with the Pocket Memo.
2Start Philips SpeechExec Dictate software.
3Connect the Pocket Memo to the PC using the USB cable or the optional USB docking station.
4By default, the recordings on the Pocket Memo will be downloaded automatically to the PC and moved to the Finished dictations folder of the worklist.
D Note
How and which files are downloaded after a Pocket Memo is connected can be configured in the settings menu of SpeechExec or with the Configuration Wizard.
ENGLISH
User manual |
21 |

5.2Menu settings
To access the Pocket Memo menu:
1Press the MENU button while stopped to open the Pocket Memo menu.
0:00
#2
DPM 9380.DSS
NEW
4Press the BACK smart button to exit the menu.
Delete dictation
 Index set
Insert mode
Author
BACK ENTER
2Press the + or – button to select the next/ previous menu item.
Delete dictation
 Index set
Insert mode
Author
BACK ENTER
3Press the ENTER smart button or the MENU button to enter a submenu.
Delete dictation
 Index set
Insert mode
Author
BACK ENTER
5Press the + or – button to select a function.
6Press the OK smart button to confirm a selection or the CANCEL smart button to exit a sub-menu without changing a setting.
5.2.1 Menu list
Press the MENU button
|
(see page 18) |
|
|
DELETE DICTATION |
|
||
|
|
|
|
INDEX SET/CLEAR (see page 24) |
|
||
|
|
MENU |
|
INSERT / OVERWRITE MODE (see page 13) |
|||
|
|||
|
|
|
|
AUTHOR (KEYWORD) (see page 26) |
MAIN |
||
|
(see page 25) |
||
DELETE ALL INDICES |
|
||
|
|
|
|
DELETE SECTION (see page 19) |
|
||
|
|
|
|
SETUP |
|
|
|
|
|
|
|
LANGUAGE (see page 10) |
|
||
|
|
|
|
RECORD FORMAT (see page 15) |
|
||
|
(see page 23) |
|
|
VOICE ACTIVATION |
|
||
|
|
|
|
BACKLIGHT (OFF / 8 Sec. / 20 Sec.) |
|
||
|
|
|
|
RECORD LAMP ON/OFF |
|
||
|
|
|
|
LCD CONTRAST |
MENU |
||
|
|
||
DEVICE BEEP ON/OFF |
|
||
|
|
SETUP |
|
MICROPHONE SENSITIVITY (see page 16) |
|||
|
|
|
|
DATE & TIME (see page 10) |
|
||
|
|
|
|
USB QUICK CHARGE ON /OFF |
|
||
|
|
|
|
DELETE ALL DICTATIONS (see page 20) |
|
||
|
(see page 9) |
|
|
FORMAT MEMORY |
|
||
|
|
|
|
PLAYBACK VOLUME |
|
||
|
|
|
|
DEVICE FONT (MODERN/CLASSIC) |
|
||
22 |
User manual |
D Note
•Some settings, such as defining author names or switching to the simple display mode,
are available only through Philips SpeechExec Dictate. See 5.1.1 Advanced configuration on page 21 for more information.
•Press and hold the MENU button for a few seconds to access additional information about files, the device, and the memory card.
5.3 Use voice-activated recording
Voice-activated recording is a convenience feature for hands-free recording. When voiceactivated recording is enabled, recording will start when you begin speaking. When you stop speaking, the Pocket Memo will automatically pause recording after three seconds of silence, and resume only when you begin speaking again.
1Press the MENU button while in the stop position to open the menu.
0:00
#2
DPM 9380.DSS
NEW
2Press the + or – button to select the Setup menu item and press the ENTER smart button.
3Press the + or – button to select the Voice activation menu item and press the ENTER smart button.
Record format |
Record format |
|
|
Language |
|
Voice activation |
Voice activation |
|
Off |
||
Off |
Backlight |
|
BACK ENTER |
||
Backlight |
2 |
|
1 |
||
|
4Press the + or – button to choose Off or
On.
Voice activation:
Voice activation:
Off |
Off |
|
On |
On
OK 
 CANCEL
OK CANCEL
5Press the OK smart button to save the setting or press the CANCEL smart button to exit the sub-menu without changing the setting.
Voice activation:
Off
 On
On
OK 
 CANCEL
ENGLISH
Author |
Index set |
|
Insert mode |
|
|
|
Author |
|
Setup |
Setup |
ENTER |
BACK |
||
|
Language |
|
Language |
|
2 |
BACK |
ENTER |
1 |
6To start recording, move the slide switch to the REC position and start speaking.
The status LED glows in red (in overwrite mode) or green (in insert mode) while recording. When the sound level drops below the threshold sound level, recording pauses after three seconds and the status LED flashes.
User manual |
23 |
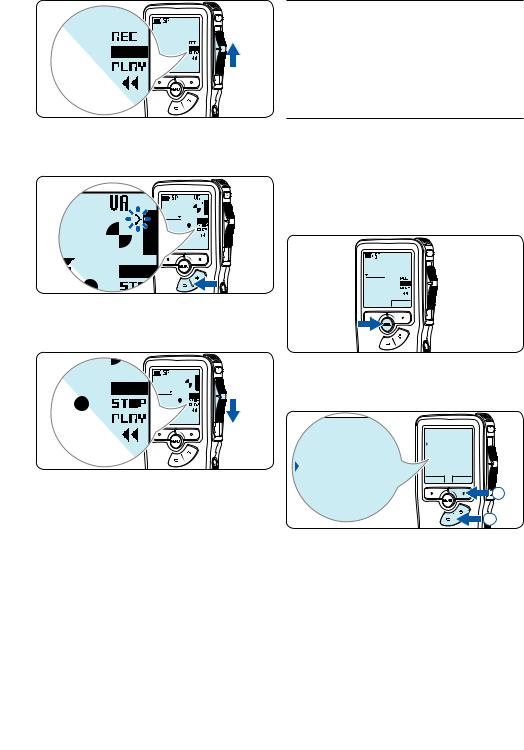
0.DSS
7Press the + or – button to adjust the threshold sound level while recording.
9
8To stop recording, move the slide switch to the STOP position.
0.DSS
24
5.4Work with index marks
Index marks can be used to mark certain points in a recording as points of reference. A point of reference may be the beginning of a major section, or a part of the recording that you may want to revise later or access quickly.
5.4.1 Insert an index mark
1Play back, fast forward or fast rewind to the position where the index mark should be set.
2Press the MENU button while in the stop position to open the menu.
0:00
#2
DPM 9380.DSS
NEW
3Press the + or – button to select the Index set menu and press the OK smart button.
Delete dictation |
Delete dictation |
|
|
Index set |
|
Index set |
Insert mode |
|
Author |
||
|
||
Insert mode |
BACK ENTER |
|
2 |
||
|
||
|
1 |
User manual

5.4.2 Delete an index mark |
5.4.3 Delete all index marks |
1Play back, fast forward or fast rewind to the index mark to be deleted.
2Press the MENU button while in the stop position to open the menu.
0:00
#2
DPM 9380.DSS
NEW
1Press the MENU button while in the stop position to open the menu.
0:00
#2
DPM 9380.DSS
NEW
3Press the + or – button to select the Index clear menu and press the OK smart button.
Delete dictation |
Delete dictation |
|
|
Index clear |
|
Index clear |
Insert mode |
|
Author |
||
|
||
Insert mode |
BACK ENTER |
|
2 |
||
|
||
|
1 |
2Press the + or – button to select the Delete indices menu item and press the ENTER smart button.
Setup |
|
Insert mode |
|
Author |
|
|
|
Setup |
Delete indices |
Delete indices |
|
BACK ENTER |
||
|
|
Delete all ? |
Delete all ? |
|
2 |
BACK |
ENTER |
1 |
3Press the ENTER smart button and the OK smart button to confirm the deletion, or press the CANCEL smart button to exit without deleting.
Delete all:
 Yes - delete
!! ATTENTION !!
OK 
 CANCEL
ENGLISH
D Note
The Delete Indices menu item is available only if the current file has at least one index mark.
User manual |
25 |
5.5Assign an author’s name
A keyword, such as the author’s name can be assigned to every recording. The keyword can be used to identify recordings and automatic file routing in Philips SpeechExec software.
D Note
Author names must first be set up with Philips SpeechExec software. See 5.1.1 Advanced configuration on page 21 for more information. By default, the keyword category AUTHOR with the keywords ‘DPM 9380’ and ‘- - -’ (empty = default) is available on the Pocket Memo.
To assign an author’s name to a recording:
1Press the MENU button while in the stop position to open the menu.
0:00
#2
DPM 9380.DSS
NEW
2Press the + or – button to select the Author menu item.
Insert mode |
Insert mode |
|
Author |
Author |
DPM 9380 |
Setup |
|
Delete indices |
|
DPM 9380 |
BACK ENTER |
Setup |
|
Delete indices |
|
3Press the ENTER smart button to display the list of names.
Insert mode
 Author
DPM 9380
Setup
Delete indices
BACK 
 ENTER
ENTER
4 Press the + or − button to select a name.
Author: |
Author: |
|
DPM 9380 |
|
|
DPM 9380 |
|
|
|
|
|
Peter |
Peter |
|
- - |
|
|
|
|
|
|
OK |
CANCEL |
- - - |
|
|
OK CANCEL
5Press the OK smart button to confirm or the CANCEL smart button to exit without assigning a name.
Author:
DPM 9380
 Peter
Peter
- - -
OK CANCEL
26 |
User manual |

6 Technical data
Connectivity
•Headphones: 3.5 mm
•Microphone: 3.5 mm
•USB: High-speed USB 2.0
•Docking connector
•Memory card slot
Display
•Type: LCD
•Diagonal screen size: 44 mm/1.7 in.
•Backlight: white
Storage media
•Exchangeable memory card
•Memory card types: Secure Digital (SD), Secure Digital (SDHC)
•Mass storage class compliant
Audio recording
•Recording formats: Digital speech standard (DSS)
•Built-in microphone: mono
•Recording modes: QP (DSS/mono), SP (DSS/ mono)
•Bit rate: 13.5, 27 kbps
•Recording time (2 GB card): 349 hours (SP), 170 hours (QP)
•Sample rate: 16 kHz (QP), 12 kHz (SP)
Sound
•Speaker type: built-in round dynamic speaker
•Speaker diameter: 30 mm
•Speaker output power: 200 mW
•Frequency response: 300–7,000 Hz (QP), 300–5,700 Hz (SP) Hz
Convenience
•Professional editing functions
•Multiple language support: 4 languages (EN, FR, DE, ES)
•2 smart buttons
•Author ID setting
•Control via slide switch
•File lock
•One-thumb operation
•Priority setting
•Voice-activated recording
•Automatic software updates
Power
•Battery type: AAA/LR03 Alkaline, Philips AAA Ni-MH LFH9154
•Number of batteries: 2
•Rechargeable: yes, via USB
•Battery lifetime: up to 23 hours in SP recording mode
•Batteries included
System requirements
•Processor: Pentium III 1GHz, Pentium IV recommended
•RAM memory: 512 MB (1 GB recommended)
•Hard disk space: 100 MB for SpeechExec, 250MB for Microsoft .NET
•Headphone output or speakers
•Operating system: Windows 7/Vista/XP
•Free USB port
•DVD-ROM drive
•Sound card
Green specifications
•Compliant to 2002/95/EC (RoHS)
•Lead-free soldered product
Accessories
•SpeechExec Dictate software
•USB cable
•Secure Digital memory card
•Pouch
•Quick start guide
•2 × AAA batteries
Design and finishing
•Color(s): silver/black
•Material: full metal body
ENGLISH
User manual |
27 |
28 |
User manual |

Benutzerhandbuch
1 |
Wichtig |
30 |
2 |
Ihr Pocket Memo |
31 |
2.1 |
Produkt-Highlights |
31 |
2.2 |
Packungsinhalt |
31 |
2.3 |
Übersicht |
32 |
2.3.1 |
Bedienungselemente und Anschlüsse |
32 |
2.3.2 |
Displaysymbole |
33 |
3 |
Erste Schritte |
34 |
3.1 |
Einsetzen der Batterien |
34 |
3.2 |
Aufladen der Batterien |
34 |
3.3 |
Einsetzen und Auswerfen der |
|
|
Speicherkarte |
35 |
3.4 |
Formatieren einer neuen |
|
|
Speicherkarte |
35 |
3.5 |
Aktivieren des Pocket Memo |
36 |
3.5.1 |
Einstellen der Sprache |
36 |
3.5.2 |
Einstellen von Datum und Uhrzeit |
36 |
3.6 |
Energiesparmodus |
37 |
4 |
Verwenden des Pocket Memo |
38 |
4.1 |
Aufnehmen |
38 |
4.1.1 |
Erstellen einer neuen Aufnahme |
38 |
4.1.2 |
Ergänzungen in ein Diktat einfügen |
39 |
4.1.3 |
Abschließen (Sperren) eines Diktats |
40 |
4.1.4 |
Ändern des Aufnahmeformats |
41 |
4.1.5 |
Mikrofonempfindlichkeit einstellen |
42 |
4.2 |
Wiedergabe |
43 |
4.2.1 |
Überblick Wiedergabefunktionen |
44 |
4.3 |
Löschen |
44 |
4.3.1 |
Löschen eines Diktats |
44 |
4.3.2 |
Löschen eines Abschnittes innerhalb |
|
|
eines Diktats |
45 |
4.3.3 |
Alle Diktate löschen |
46 |
5 |
Weitergehende Funktionen |
47 |
|
5.1 |
Philips SpeechExec verwenden |
47 |
|
5.1.1 |
Weitergehende Konfiguration |
47 |
|
5.1.2 |
Herunterladen von Aufnahmen auf den |
CH |
|
|
PC |
47 |
TS |
|
|
|
DEU |
5.2 |
Menüeinstellungen |
48 |
|
5.2.1 |
Menüübersicht |
48 |
|
5.3 |
Sprachaktivierte Aufnahme |
49 |
|
5.4 |
Indexmarkierungen verwenden |
51 |
|
5.4.1 |
Einfügen einer Indexmarkierung |
51 |
|
5.4.2 |
Löschen einer Indexmarkierung |
51 |
|
5.4.3 |
Löschen aller Indexmarkierung |
51 |
|
5.5 |
Einen Autornamen zuweisen |
52 |
|
6 |
Technische Daten |
54 |
|
Benutzerhandbuch |
29 |

1 Wichtig
Philips behält sich das Recht vor, Produkte jederzeit zu ändern, ohne die Verpflichtung, frühere Lieferungen entsprechend nachzubessern.
Die Informationen in diesem Handbuch werden für den bestimmungsgemäßen Gebrauch des Systems als angemessen erachtet.Wenn das Produkt oder seine einzelnen Module oder Vorgänge für andere Zwecke verwendet werden, als hier angegeben, ist eine Bestätigung für deren Richtigkeit und Eignung einzuholen.
Sicherheit
•Das Gerät vor Regen oder Wasser schützen, um einen Kurzschluss zu vermeiden.
•Das Gerät keiner durch Heizgeräte oder direkte Sonneneinstrahlung verursachten starken Hitze aussetzen.
•Darauf achten, dass Kabel nicht gequetscht werden, vor allem an Steckern und am Geräteausgang.
•Sichern Sie Ihre Dateien. Philips ist für Datenverlust nicht haftbar.
Gehörschutz
Halten Sie bei Verwendung der Kopfhörer die folgenden Richtlinien ein:
•Stellen Sie die Lautstärke moderat ein, und hören Sie nicht zu lange über Kopfhörer.
•Achten Sie unbedingt darauf, die Lautstärke nicht höher einzustellen, als es Ihr Gehör verträgt.
•Stellen Sie die Lautstärke nur so hoch ein, dass Sie immer noch hören, was um Sie herum geschieht.
•In möglicherweise gefährlichen Situationen sollten Sie sehr vorsichtig sein oder die Nutzung vorübergehend unterbrechen.
•Setzen Sie keine Kopfhörer auf, wenn Sie mit dem Auto, Fahrrad, Skateboard usw. unterwegs sind. Sie können dadurch den
Verkehr gefährden und verstossen damit eventuell gegen gesetzliche Bestimmungen.
Wichtig (bei Modellen mit Kopfhörern):
Philips garantiert die Übereinstimmung der maximalen Schallleistung seiner Audiogeräte mit den geltenden Bestimmungen, jedoch nur mit dem ursprünglichen Modell der im Lieferumfang enthaltenen Kopfhörer. Wenn diese Kopfhörer ersetzt werden müssen, sollten Sie bei Ihrem Händler ein dem Original entsprechendes Philips-Modell erwerben.
Kleinkinder
Das Gerät und sein Zubehör können Kleinteile enthalten. Halten Sie diese außerhalb der Reichweite von kleinen Kindern.
Entsorgung des alten Geräts
•Zur Herstellung des Geräts wurden hochwertige Materialien und Komponenten verwendet, die recycelt und wiederverwertet werden können.
•Das durchgestrichene Mülleimersymbol weist darauf hin, dass das Gerät der europäischen Richtlinie 2002/96/EC entspricht.
•Informieren Sie sich über das Mülltrennungssystem in Ihrer Region für elektrische und elektronische Geräte.
•Halten Sie sich an die jeweils geltenden gesetzlichen Vorschriften, und entsorgen Sie diese Produkte nicht mit dem normalen
Hausmüll. Durch die sachgerechte Entsorgung alter Geräte werden schädliche Einflüsse auf Umwelt und Gesundheit vermieden.
•Batterien und Akkus enthalten Substanzen, die die Umwelt gefährden. Sie müssen daher an offiziellen Sammelstellen abgegeben werden.
30 |
Benutzerhandbuch |
 Loading...