


 Loading...
Concerning Compact Discs
Only compact discs bearing this mark can be used with this unit.
However, continued use of irregular shape CDs can damage the unit.
How to remove a disc from its case How to store the disc in its case
Label side up
How to hold a disc
If the surface is dirty
Wipe it with a damp cloth and then wipe dry.
Wipe from the center toward the outer circumference.
Play surface (shiny surface)
Handling precautions
³If you are taking the CD from a cold to a warm environment, moisture may form on the CD. Wipe this off with a soft, dry, lint-free cloth before using the CD.
³Do not write on the label side with a ballpoint pen or other writing instrument.
³Do not use record cleaning sprays, benzine, thinner, static electricity prevention liquids or any other solvent.
³Do not attach labels or stickers to CDs. (Do not use CDs with exposed adhesive from tape or left over peeled off stickers.)
³Do not use scratch-proof protectors or covers other than those specified for use with this system.
Storage precautions
Be sure to store CDs in their cases to protect them from dust, scratches, and warping.
Do not place or store CDs in the following places
³Locations exposed to direct sunlight ³Humid or dusty locations
³Locations directly exposed to a heat vent or heating appliance
³In the glove compartment or on the rear deck of an automobile
Portable CD player
Dear Customer |
Operating Instructions |
Thank you for purchasing this product. |
|
|
|
For optimum performance and safety, please |
SL-SX469V |
read these instructions carefully. |
y,


SECO
NDS
Note:
The “EB” indication shown on the packing case indicates United Kingdom.
Supplied Accessories
Check the packing carton for these accessories.
AC adaptor . . . . . . . . . . . . . . . . . . . 1 pc. For United Kingdom (RFEA403B-S) For Others (RFEA403A-S)
Wired remote control . . . . . . . . . . . 1 pc. (RFEV012PCKS)
Stereo earphones. . . . . . . . . . . . . . 1 pc. For United Kingdom (RFEV335P-KS) For Others (RFEV326P-KS)
Soft case . . . . . . . . . . . . . . . . . 1 pc. (RFC0041A-K)
External battery case . . . . . . . . . . . 1 pc. (RFA1139-H)
Nickel-metal hydride rechargeable batteries with carrying case. . . . . 1 pc. (RFKFHHR4AHBA)
Remove the rechargeable batteries from their case before use. If the inner tray is removed, the case can be used to carry two LR6 (UM-3) batteries, used in the external battery case.
Use numbers indicated in parentheses when asking for replacement parts.
Before connecting, operating or adjusting this product, please read these |
EB |
|
GN |
instructions completely. Please keep this manual for future reference. |
|
||
|
|
|
|
|
|
|
|
|
Matsushita Electric Industrial Co., Ltd. |
pRQT5160-B |
|
|||
|
|
Osaka 542-8588, Japan |
F0100KK0 |
CAUTION!
THIS PRODUCT UTILIZES A LASER.
USE OF CONTROLS OR ADJUSTMENTS OR PERFORMANCE OF PROCEDURES OTHER THAN THOSE SPECIFIED HEREIN MAY RESULT IN HAZARDOUS RADIATION EXPOSURE.
DO NOT OPEN COVERS AND DO NOT REPAIR YOURSELF. REFER SERVICING TO QUALIFIED PERSONNEL.
WARNING:
TO REDUCE THE RISK OF FIRE, ELECTRIC SHOCK OR PRODUCT DAMAGE, DO NOT EXPOSE THIS APPLIANCE TO RAIN, SPLASHING, DRIPPING OR MOISTURE.
Marking sign is located on bottom of the unit.
CLASS 1
LASER PRODUCT
Bottom of the unit
DANGER |
INVISIBLE LASER RADIATION WHEN OPEN AND INTERLOCK DEFEATED. |
|
AVOID DIRECT EXPOSURE TO BEAM. |
||
|
||
ADVARSEL |
USYNLIG LASERSTRÅLING VED ÅBNING, NÅR SIKKERHEDSAFBRYDERE |
|
ER UDE AF FUNKTION. UNDGÅ UDSÆTTELSE FOR STRÅLING. |
||
|
||
VARO! |
AVATTAESSA JA SUOJALUKITUS OHITETTAESSA OLET ALTTIINA |
|
NÄKYMÄTÖNTÄ LASERSÄTEILYLLE. ÄLÄ KATSO SÄTEESEEN. |
||
|
||
VARNING |
OSYNLIG LASERSTRÅLNING NÄR DENNA DEL ÄR ÖPPNAD OCH |
|
SPÄRREN ÄR URKOPPLAD. BETRAKTA EJ STRÅLEN. |
||
|
||
ADVARSEL |
USYNLIG LASERSTRÅLING NÅR DEKSEL ÅPNES OG SIKKERHEDSLÅS |
|
BRYTES. UNNGÅ EKSPONERING FOR STRÅLEN. |
||
|
||
VORSICHT |
UNSICHTBARE LASERSTRAHLUNG, WENN ABDECKUNG GEÖFFNET |
|
|
UND SICHERHEITSVERRIEGELUNG ÜBERBRÜCKT. |
|
|
NICHT DEM STRAHL AUSSETZEN. |
(Bottom of product)
(Påsat under apparatet)
(Tuotteen pohjassa)
(Apparatens undersida)
(Produktets underside)
(Unterseite des Gerätes)
1
Power Supply Preparations
Refer to the specifications (page 8) for information on operating times when using rechargeable batteries or dry-cell batteries.
Using the AC adaptor
Connect the AC adaptor supplied.
DC IN jack (KDC IN 4.5 V)
Back panel of the unit
AC adaptor
H o u s e h o l d mains socket
Note!
³The configuration of the AC adaptor differs according to the area.
³The unit is in the standby condition when the AC adaptor is connected. The primary circuit is always “live” as long as the AC adaptor is connected to an electrical outlet.
³Turn the unit off before connecting or disconnecting the AC adaptor.
Using the rechargeable batteries
Make sure to recharge the batteries before using them. The unit cannot be used to charge rechargeable batteries other than those specifically designed for it.
³Supplied batteries (HHR4AHEBA1) ³Optional batteries
For United Kingdom: (HHR-4AHE/2B) For others: (HHR-4AHT/2B)
Recharging procedure
1 Insert the special rechargeable batteries into the unit.
2
3
1
-+
2 Connect the AC adaptor.
Refer to “Using the AC adaptor” for connection instructions.
Recharging starts and the “H” charging indicator flashes on and off on the unit’s display.
When the rechargeable batteries are fully recharged the charging indicator disappears.
3 When recharging is complete, unplug the AC adaptor from the household mains socket and the DC IN jack.
Note!
³Rechargeable batteries have a service life of approximately 300 charge-discharge cycles. If the operating time on one full charge becomes noticeably shorter than it used to be, the battery has reached the end of its service life and should be replaced.
³Recharging may only be performed when the unit is powered off.
³The AC adaptor and rechargeable batteries may become warm while recharging is in progress. This is not a malfunction.
³The rechargeable batteries should be changed when the unit is off.
If the battery lid |
Removing |
comes loose |
batteries |
Slide the lid back into |
Push up on the battery |
place horizontally. |
in the direction |
|
indicated by the arrow. |
|
Then lift it out. |
Using dry-cell batteries (not included)
After disconnecting the AC adaptor, insert two LR03 (UM-4) alkaline batteries.
The procedure for inserting and removing dry-cell batteries is identical to that for rechargeable batteries.
Note!
The dry cell batteries should be changed when the unit is off.
When the battery indicator flashes
Battery indicator
Power is cut off a short while later. Recharge the rechargeable batteries or replace the dry cell batteries with new ones.
Note!
³How long the unit continues to operate after the battery indicator starts flashing depends on the type of batteries and on whether you are using the unit to play CDs or the radio.
³The battery indicator may not flash if rechargeable batteries, other than those designated by Panasonic, are used.
Using the car adaptor (not included)
Be sure to obtain the car adaptor (SH-CDC9), available as an optional accessory.
The car adaptor can be used to recharge the unit’s batteries while in the car.
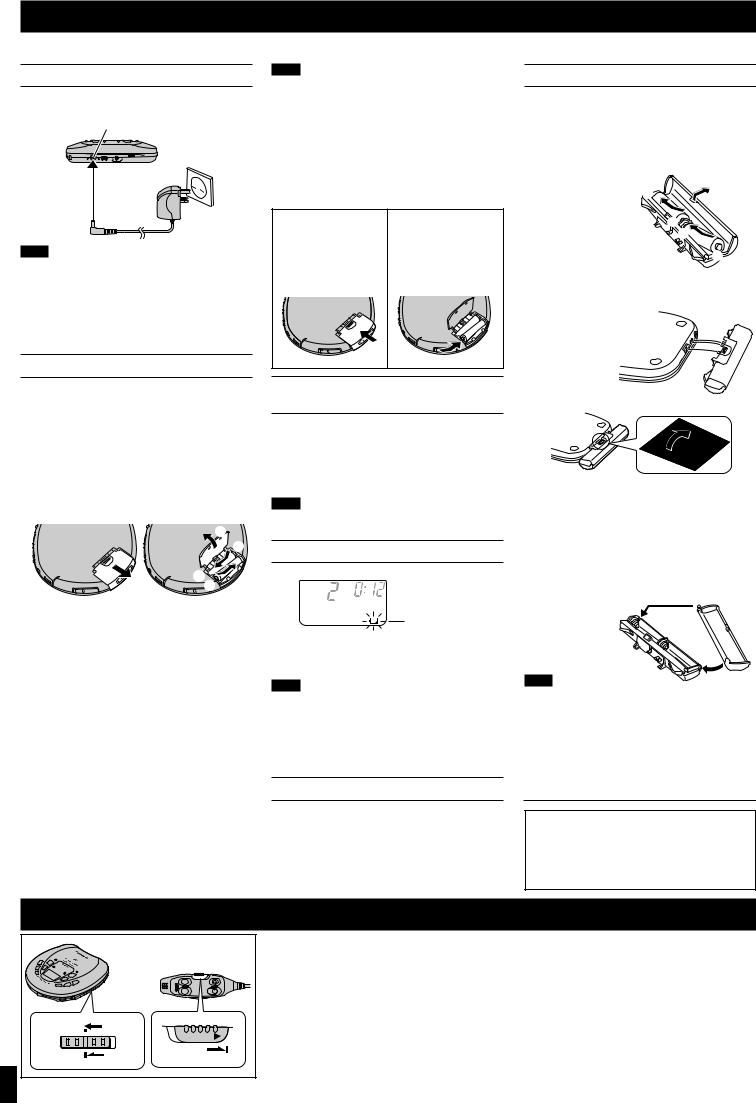
Using the external battery case
The external battery case allows you to extend the maximum playing time of the unit by loading an additional two LR6 (UM-3) (not included) alkaline batteries.
1 Open the cover of the battery case and insert the batteries.
Insert the end
marked (j) first. -
+
-
+
2 Mount the battery case on the unit body.
Insert the protrusions on the battery case into the three indentations in the unit body.
3 Secure in place with the screw.
Reverse the above procedure to remove the external battery case.
For your reference:
³The unit can be powered by the batteries in the external battery case alone. Batteries do not need to be loaded in the unit.
³The maximum playing time will differ depending on the type of batteries (rechargeable/dry-cell) loaded in the unit body.
If the cover of the battery case comes loose: 2
Insert the protrusions into the holes on either end of the case.
Note! |
1 |
³Though you can use rechargeable batteries in the battery case, it does not recharge them. (Use dry cell batteries if possible.)
³When using rechargeable batteries in the unit body, and dry-cell batteries in the battery case, be sure to use fully charged rechargeable batteries and new drycell batteries.
³When using four dry-cell batteries, do not mix new and old batteries.
If the unit malfunctions or freezes during use, disconnect the power sources (the AC adaptor or external battery case).
Re-connect the power source or continue operation.
HOLD Function
HOLD |
HOLD |
This function causes the unit to ignore short, accidental button presses. (The disc lid can still be opened and closed.)
HOLD function prevents the following:
³Powering on the unit accidentally (which can cause the batteries to go dead).
³Play being cut off unexpectedly in the middle of a selection.
To use HOLD function
Set [HOLD] to the HOLD position.
The unit and wired remote control have [HOLD] switches, each of which works independently.
(The hold indicator turns green when the remote control is in hold position.)
“(” Indication
When the unit is in HOLD status, pressing any operation button causes the indication “(” to appear on the display.
When the unit is powered off:
The “(” indication appears only when [1;] or [RADIO/BAND] is pressed.
2

Listening to CDs Basic Play
1 |
Label must face |
|
Close the lid. |
2 |
|
|
3 |
|
|
|
|
HOLD |
|
|
|
||||
upward. |
|
º |
|
RESUME RANDOM NORMAL |
|||||
|
|
POWER |
|
|
|
|
|||
|
|
OFF |
|
|
|
|
|||
|
|
|
|
|
|
|
|||
|
|
|
|
S |
|
|
|
|
|
|
|
|
|
EC |
|
|
|
|
|
|
|
|
|
ON |
|
|
|
|
|
|
|
|
|
DS |
|
|
|
|
|
|
9 |
|
|
|
HOLD |
|
|
|
|
|
|
|
|
|
|
|
|
|
|
|
TUNING |
|
|
|
|
|
|
|
|
|
: |
|
|
|
|
|
|
|
|
|
|
|
|
Plug type: |
|
|
4 R |
L |
|
|
|
|
|
3.5 mm stereo |
|
|
|
|
|
6 |
VOLUME |
5 |
4 |
|
|
Play/stop/off button |
Track number in play |
||
6 |
|
5 1; |
|
|
|||||
|
|
|
|
(Beep) |
Elapsed playing time of each track |
||||
1 Slide [OPEN] to open the lid, and insert the disc.
2 Release hold.
3 Set the play mode selector to [NORMAL].
4 Connect the wired remote control and the stereo earphones to [Ë].
(Plug in firmly.)
5 Press [1;] (main unit) or press the play/stop/off button
to start play.
(Play stops automatically when all the tracks have been played.)
6 Adjust the volume.
If the unit has been connected to the car audio system, adjust the volume level between 4 and 6 on the unit, then adjust the volume level on the system.
º To pause play (Available only from the main unit)
Press during play.
(Press again to restart play.)
1;
º To stop play
Press during play. Stop mode
Main unit |
Remote control |
(Beep...Beep) |
Total playing time |
|
º To turn off the unit Off mode
Press during stop mode (main unit) or press and hold during play or stop mode (remote control).
Main unit |
Remote control |
(Beep...Bee..p)
function
: Press during play.
:Press and hold during play.
Remote control
Forward
(Beep Beep)
(Beep Beep Beep)
Backward
play (page 4), these buttons are used or back through the programmed se-
tracks.
play (page 4), the skip buttons cannot skip back to tracks that were played previrandom sequence.
play, random play or 1-track repeat search operation is limited to the current
confirmation tones of the remote control
When an operation button is pressed, a confirmation tone sounds. Refer to the parentheses in the illustration for the different types of confirmation tones.
For your reference:
“


 ” indication
This indication appears for about 30 seconds if [1;] is pressed when no disc is loaded in the unit or if the disc is not completely seated.
“*” indication
This indication appears for about 10 minutes when the cover is opened. (However, the indication does not appear when the unit is powered off.)
Auto power off function
If the unit is left in stop or paused status for approximately 10 minutes, the unit powers itself off automatically in order to prevent the batteries from running down.
(If no disc is loaded in the unit it powers itself off in 30 seconds.)
Removing discs
1 Press [º, POWER OFF] to stop play and discs rotation.
2 Slide [OPEN] to open the lid.
3 Press [PUSH] to release the disc.
Do not stop the disc by hand or try to remove it before it stops rotating. This can damage CDs.
HSUP
P USH
Note!
Never insert foreign objects into the unit body.
3
Loading...