

Page 1
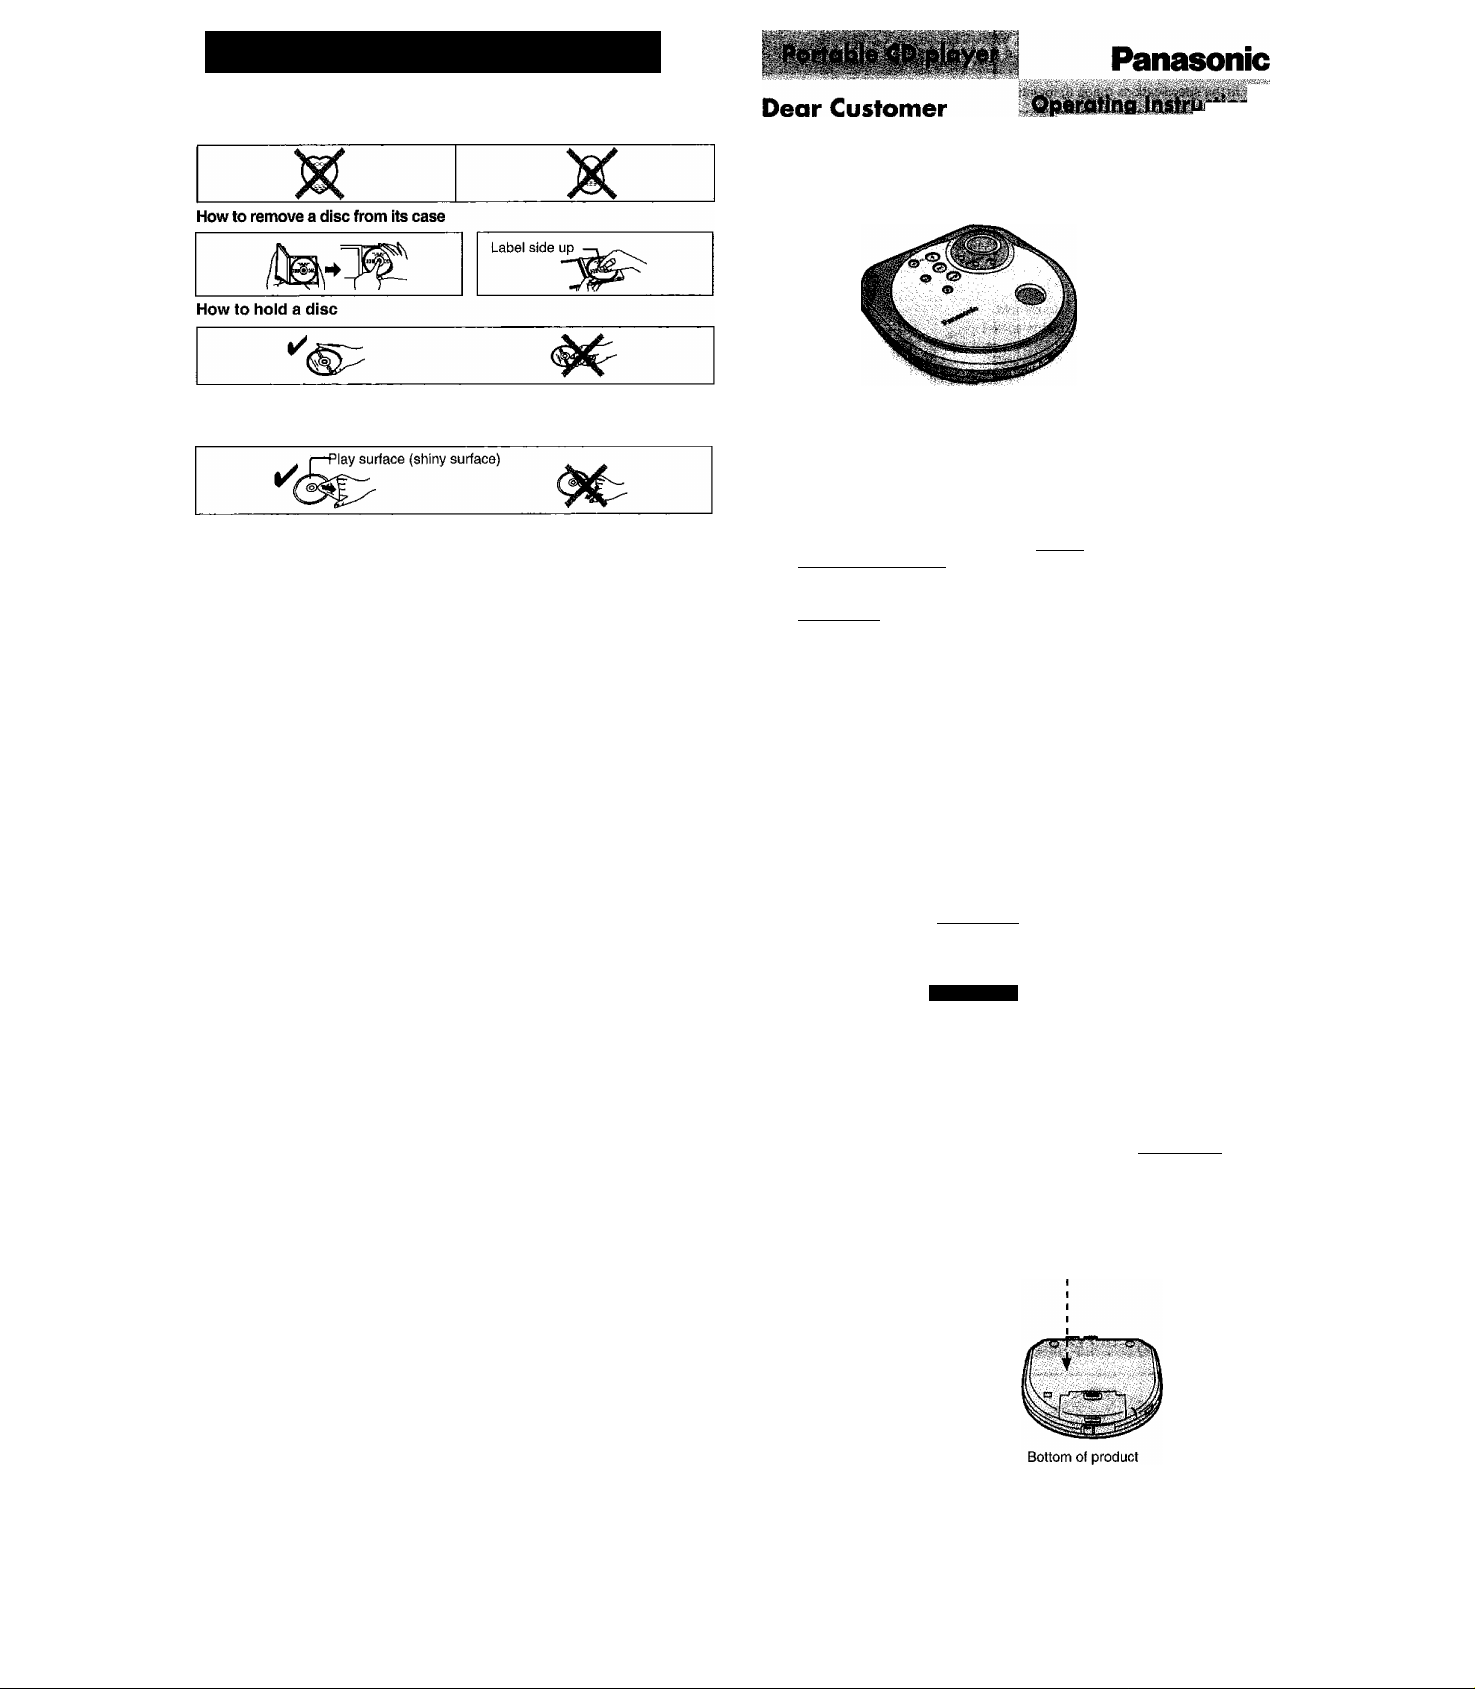
Concerning Compacf Discs
[o][f^E Only compact discs bearing this mark can be used with this unit.
DIGITAL AUDIO
However, continued use of irregular shaped CDs can damage the unit.
If the surface is dirty
Wipe it with a damp cloth and then wipe dry.
Wipe from the center toward the circumference.
Handling precautions
•If you are taking the CD from a cold
to a warm environment, moisture
may form on the CD. Wipe this off
with a soft, dry, lint-free cloth before
using the CD.
•Do not write on the label side with a
bail-point pen or other writing instru
ment.
• Do not use record cleaning sprays,
benzine, thinner, static electricity
prevention liquids or any other sol
vent.
•Do not attach labels or stickers to
CDs. (Do not use CDs with exposed
adhesive from tape or left over
peeled off stickers.)
• Do not use scratch-proof protectors,
etc.
Storage precautions
Be sure to store CDs in their cases to
protect them from dust, scratches, and
warping.
Do not place or store CDs in the fol
lowing places
•Locations exposed to direct sunlight
•Humid or dusty locations
• Locations directly exposed to a heat
vent or heating appliance
•In the glove compartment or on the
rear deck of an automobile
Thank you for purchasing this product.
For optimum performance and safety
please read these instructions carefully.
SL-SX390
SL-SX340
SL-SX361C
Note:
"EB” on the packaging indicates the United Kingdom.
Supplied Accessories
Check the packing carton for these accessories.
AC adaptor
Stereo earphones
Use numbers indicated in parentheses when asking for replacement parts.
Before connecting, operating or adjusting this product, please read these in
structions completely. Please keep this manual for future reference.
Matsushita Electric Industrial Co., Ltd.
Web Site: http://www.panasonic.co.jp/global/
..............................
I SL-SX390l|-tC.^X340-i
(N0JCCE000004)
...................
ISL-SXS^
(L0BAB0000124)
(LOBAB0000123)
1
1
I SL-SX390 I
Wired remote control
{N2QCBD000Û10)
Car adaptor
(SH-CDC12PEY)
Car stereo cassette adaptor . .1
(SHCDM10B1PYK)
..............................
[^D@®
DIGITAL AUDIO
(E^ RQT6335-B
F1201YH0
1
EB
CAUTION!
THIS PRODUCT UTILIZES A LASER.
USE OF CONTROLS OR ADJUSTMENTS
OR PERFORMANCE OF PROCEDURES
OTHER THAN THOSE SPECIFIED HEREIN
MAY RESULT IN HAZARDOUS RADIA
TION EXPOSURE.
DO NOT OPEN COVERS AND DO NOT
REPAIR YOURSELF. REFER SERVICING
TO QUALIFIED PERSONNEL.
WARNING:
TO REDUCE THE RISK OF FIRE, ELEC
TRIC SHOCK OR PRODUCT DAMAGE, DO
NOT EXPOSE THIS APPARATUS TO
RAIN, MOISTURE, DRIPPING OR
SPLASHING AND THAT NO OBJECTS
FILLED WITH LIQUIDS, SUCH AS VASES,
SHALL BE PLACED ON THE APPARA
TUS.
Marking sign is located on bottom of the unit.
THIS UNIT IS INTENDED FOR USE !N
MODERATE CLIMATES.
CAUTION!
• DO NOT INSTALL, OR PLACE THIS
UNIT, IN A BOOKCASE, BUILT-IN CABI
NET OR IN ANOTHER CONFINED
SPACE. ENSURE THE UNIT IS WELL
VENTILATED. TO PREVENT RISK OF
ELECTRIC SHOCK OR FIRE HAZARD
DUE TO OVERHEATING, ENSURE THAT
CURTAINS AND ANY OTHER MATERI
ALS DO NOT OBSTRUCT THE VENTILA
TION VENTS.
• DO NOT OBSTRUCT THE UNIT’S VENTI
LATION OPENINGS WITH NEWSPA
PERS, TABLECLOTHS, CURTAINS, AND
SIMILAR ITEMS.
• DO NOT PLACE SOURCES OF NAKED
FLAMES, SUCH AS LIGHTED CANDLES,
ON THE UNIT.
• DISPOSE OF BATTERIES IN AN ENVI
RONMENTALLY FRIENDLY MANNER.
This product may receive radio interference
caused by mobile telephones during use. If
such interference is apparent, please in
crease separation between the product and
the mobiie telephone.
SL-SX390n- indicates a feature which can be
enjoyed with SL-SX390.
SL-SX340 only.
SL-SX361C
AOVARSEL:USYNLIG LASERSTRALIMG
VEO A6NING,NAR SIKKERKEOSAFBRYOUtE ER UDE AF FUKKTIGN,
UNOGA UOSÆTTELSE FOR STRALING.
VORSICHT-UruicMbara
Lasantrahlunt, wenn
Abdeckung gebffnet und
Sicharheilsverriegelung
tlbeibrUckt. Nicht dem
Strahl aussetien.
SL-SX361C only.
VARO! Avattaessa ja
PI AC;c -j
LASER PRODUCT
DANGER-Invisible
laser radiation
when open and
interlock defeated.
AVOID DIRECT EX
POSURE TO BEAM
suojalukitus oh Retta essa
ölet aittiina näkymäthn
Ipsersäteilvlle.
Aid kalso saleasen.
VARNING! Dsynlig
laserstrâlning nar denna
del dr ëppnad ech
Ï
spdrren dr urkopplad.
Betrakta ej stralen.
ADVERSEU Usvniig
laserstrâling nar deksel
âpnes eg sÎKkerhedsISs
brytes. Unngâ
eksgonennj^oMtrSle^
A pleine puissance, récouta
prolongée du baladeur peut
endommager l'oreille de
l'utilisateur. rqls0196
Page 2
Power Supply Preparations
Refer to the specifications (page 6) for information on operating times when using dry cell batteries.
Using the AC adaptor
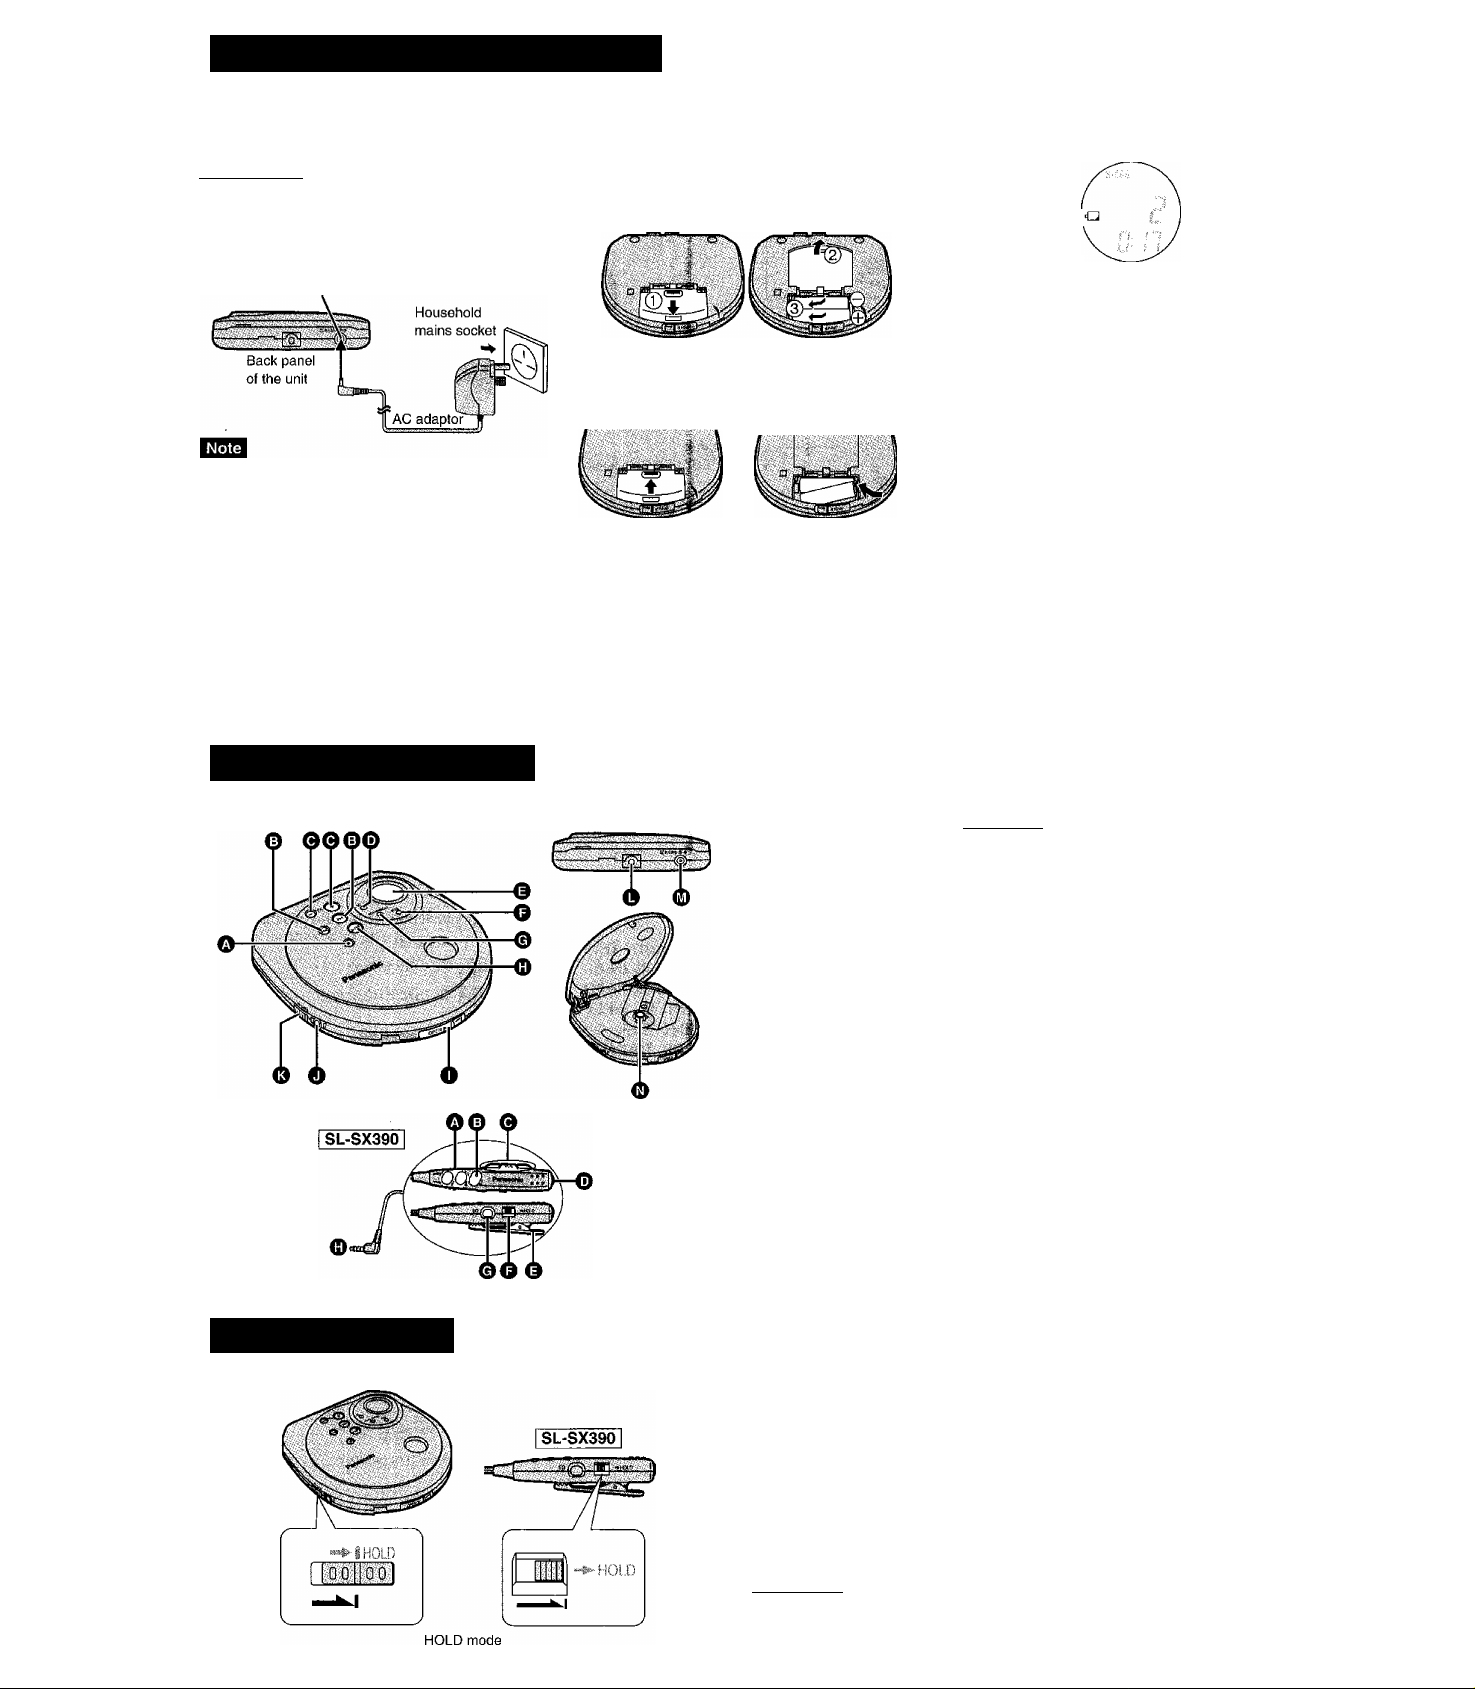
I SL-SX390 [F^l;^SX34d i
Use only the included AC adaptor. Use other adaptors
can damage the unit.
Be sure to obtain the optional AC adaptor (RFEA403B-S),
Connect the AC adaptor.
DC IN jack (DC IN 4.5 V )
•Turn the unit off before connecting or disconnecting
the AC adaptor.
•The unit is in the standby condition when the AC
adaptor is connected. The primary circuit is always
“live” as long as the AC adaptor is connected to an
electrical outlet.
Using rechargeable batteries
(not included)
• If rechargeable batteries are to be used, rechargeable
batteries manufactured by Panasonic are recommended.
•This unit cannot recharge batteries. The battery indicator will not function correctly when using recharge
able batteries.
Using dry cell batteries
(not included)
Insert two ‘‘LR6, AA, UM-3” alkaline bat
teries.
If the battery lid
comes loose
Slide the lid back into
place horizontally.
The dry cell batteries should be changed when the unit
is off.
If the unit malfunctions or freezes during use,
disconnect the power source (the AC adaptor
or batteries).
Re-connect the power source and continue op
eration.
Removing batteries
Push up on the battery
in the direction indicat
ed by the arrow. Then
lift it out.
Bottery indicator
Battery indicator —i
This indicator flashes when the batteries are almost out
of power. Power is cut off completely a short while later.
Replace batteries with new ones.
The length of time the unit will continue to operate be
tween when the battery indicator starts flashing and
when the power is cut off differs depending on the type
of batteries used.
Using the car adaptor
The SL-SX361C comes with a car adaptor. Be sure to
use the adaptor specially designed for this model.
(Refer to the separate “Installation Instructions",)
Use only the recommended car adaptor. Use of other
car adaptors can damage the unit.
Be sure to obtain the car adaptor (SH-CDC9) for SLSX390 and SL-SX340, available as an optional acces
sory.
Location of Controls
m
ET
HOLD Function
Back panel of the unit
Portable CD Player El Wired remote control
O Stop/operation off button (■)
O Skip/search buttons
(!◄◄, ►►!)
0 Headphone volume control
buttons (“,VOL, +)
0 EQ button (EQ)
0 Display
O Mode button (MODE)
0 Memory/recall button
(MEMORY/RECALL)
0 Play/pause button {^/11)
O Open switch (OPEN P*)
O Headphone jack (Q)
0 Hold switch (HOLD)
0
Hole for car mounting base
0 DC IN jack
(DC IN 4.5 V )
0 CD release button (PUSH)
O Skip/search buttons
i\«, ►►!)
0 PIay/stop/operation off button
(■/►)
G Volume control buttons
(",VOL,+)
0 Headphone jack/ earphone
jack
0 Clip
O Hold switch (HOLD)
0 EQ button (EQ)
0 Plug
This function causes the unit to ignore
short, accidental button presses. (The
disc lid can still be opened and closed.)
The HOLD function prevents the
following:
•The unit is powered on accidentally
when not in use, causing the batteries
to run down.
•A button is accidentally pressed during
play, interrupting the operation.
I SL-SX390 I
You still can operate the unit with the re
mote control when the main unit's HOLD
function is on and vice versa.
To use the HOLD function
Set [HOLD] to the HOLD position.
“ho I d” indication
When the unit is in HOLD mode, press
ing any button causes the indication
"ho I d" to appear on the display.
When the unit is powered off
The “ha 1 d" indication appears only
when [^/||] is pressed.
Before operating the buttons
Be sure to move [HOLD] to release
the unit from the HOLD mode.
Page 3
Sequential Play [Basic Play
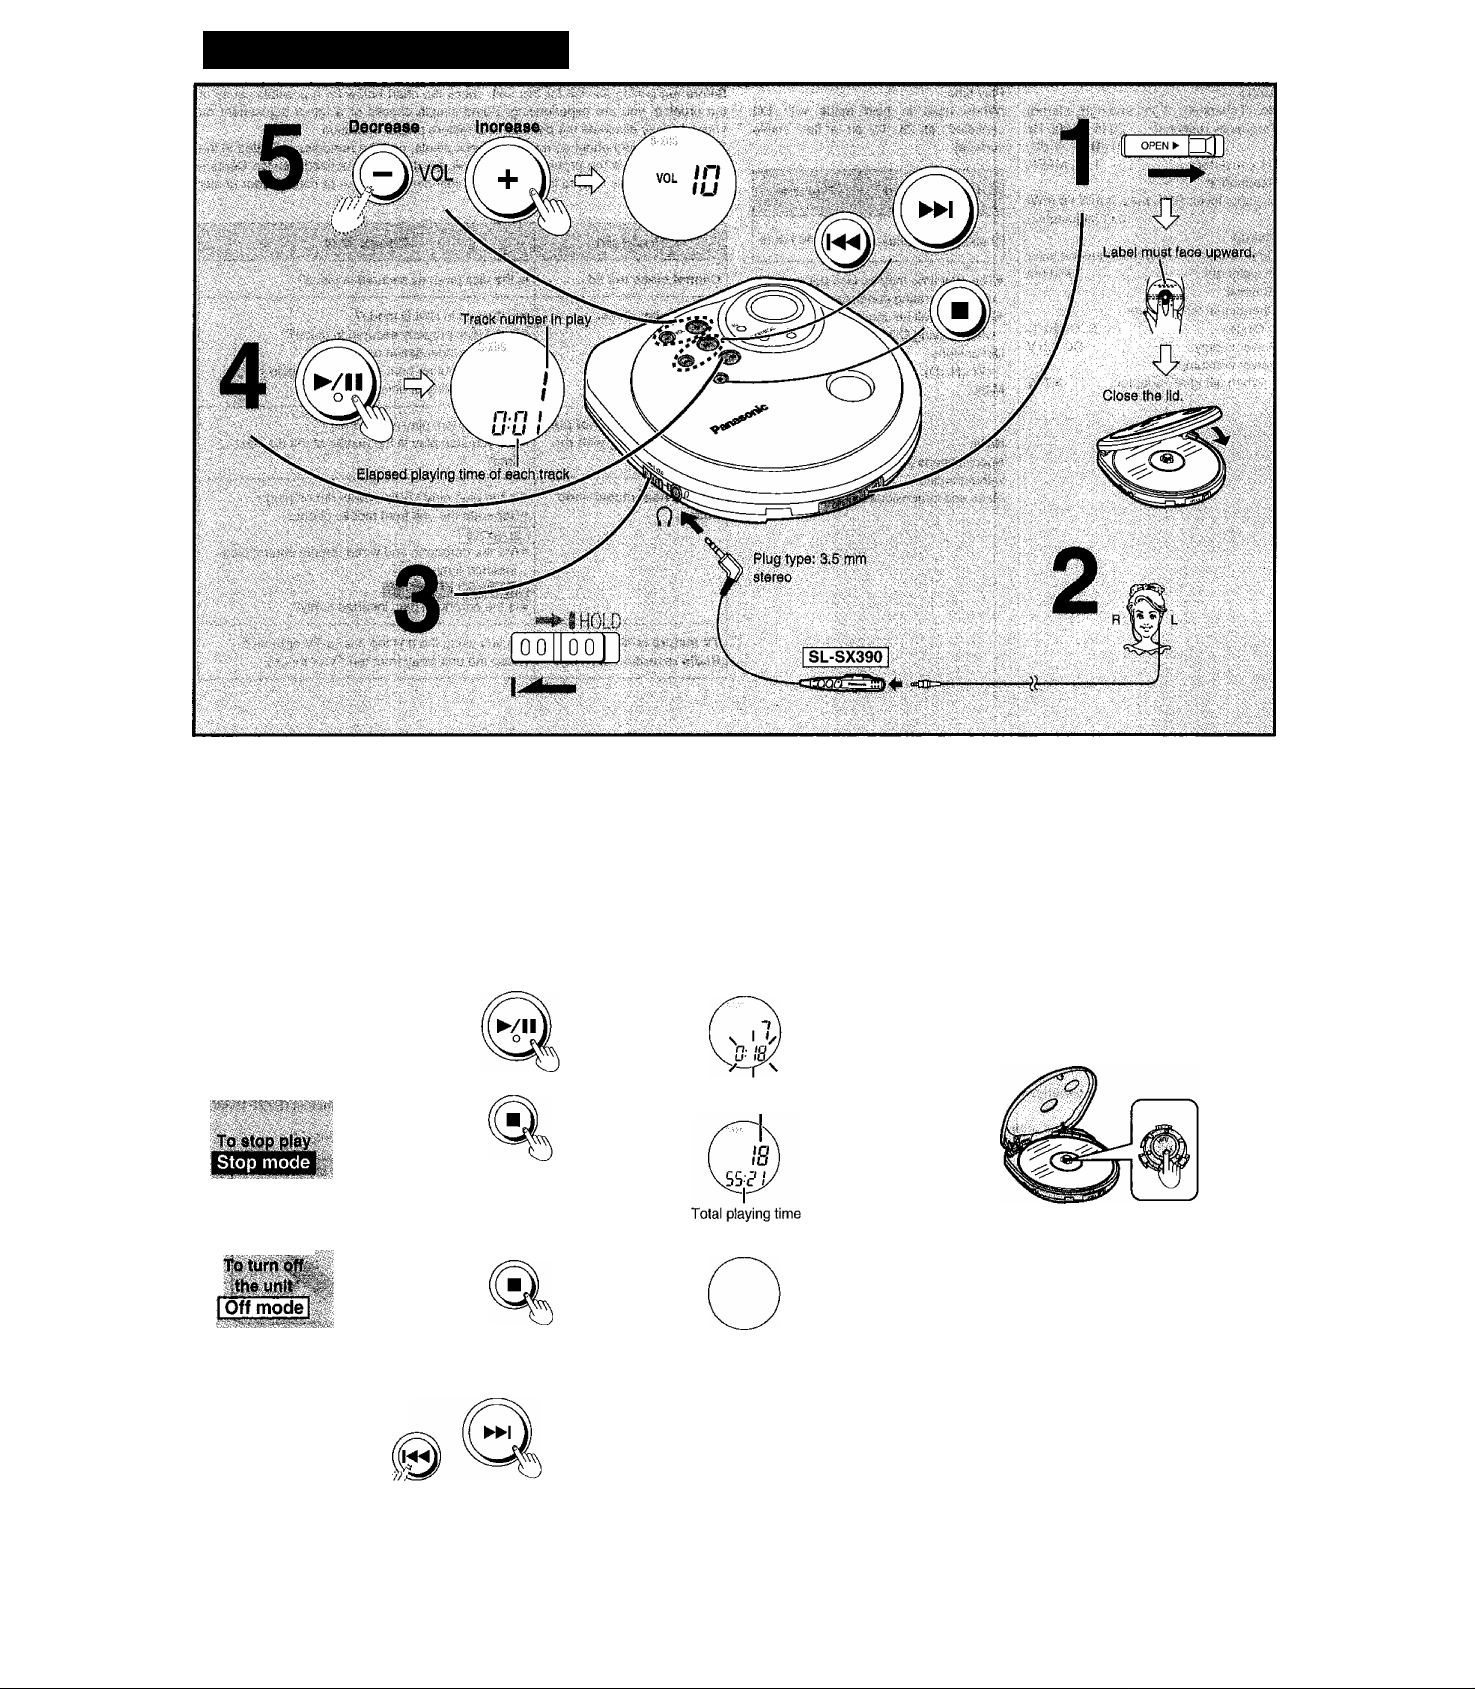
Follow steps 1-5.
In step 2: Connect the stereo earphones and wired remote control {SL-SX390) to the headphone jack (Qj.
In step 5: The volume range is 0-25. Press and hold to change the volume successively. The volume changes when
•Play stops automatically when all the tracks have been played.
• If the unit has been connected to the car audio system, set this unit’s volume to 10, then adjust the volume level on
(Plug in firmly.)
pressed while the level is displayed, if any other display is shown, it changes to show the current level. (The
volume returns to 10 when you disconnect the power source.)
the system.
Operation
---
----------
—r.----------
7—
Press during play.
,1 Button
Press again to restart play.
To pause play
■ ■
——
Skipforwafd/
backward
(ekfp function)
backward
(search function)
Press during play.
Resume function
Play starts from the beginning of
the current track the next time you
press [^/11] (main unit) or [H/^]
(remote control, SL-SX390 only).
Press during stop mode
Press during play.
(Press [!◄◄ ] twice to skip to the
beginning of the previous tracks.)
Backward
Press and hold during play.
Forward
Total number of tracks
No indicator is shown.
• During program play (page 4), these buttons are
used to skip forward or backward through the
programmed sequence of tracks.
•You cannot skip to tracks that have been played
in random or random repeat play (page 4).
• During program play, 1-track repeat play, random
play and random repeat play (page 4), search op
eration is limited to the current track only.
For your reference:
“ло d /Sl” indication
This indication appears for about 30 seconds if [►/II]
is pressed when no disc is loaded in the unit or if the
disc is not properly secured.
“i/Pfri” indication
This indication appears for about 10 minutes when the
cover is opened. (However, the indication does not ap
pear when the unit is turned off.)
Removing discs
1 Press [■] to stop play and disc rotation.
2 Slide [OPEN ►] to open the lid.
3 Press [PUSH] to release the disc.
Do not stop the disc by hand or try to remove it before
it stops rotating. This can damage CDs.
Never insert foreign objects into the unit.
Auto-off function
if you leave the unit in stop mode for about 10 minutes
(30 seconds if disc is not loaded), it turns off to save
the batteries.
Note on CD-R and CD-RW
This unit can play CD-DA format audio CD-R and
CD-RW that have been finalized* upon completion
of recording. It may not be able to play some CD-R
or CD-RW due to the condition of the recording,
^Finalizing is a process that enables CD-R/CD-RW
players to play audio CD-R and CD-RW,
Resume function notes
•Opening the lid while in the stop mode or replacing the disc while in the off mode cancels the function. (It may re
main active if you replace a disc in the off mode.)
• Play may resume from the beginning of the next track if you stopped play near the end of a track.
•The resume function works automatically and cannot be turned off.
Page 4
Other Play Methods
The letters such as Q in the various illustrations refer to the descriptions in the “Location of Controis” section (see page 2).
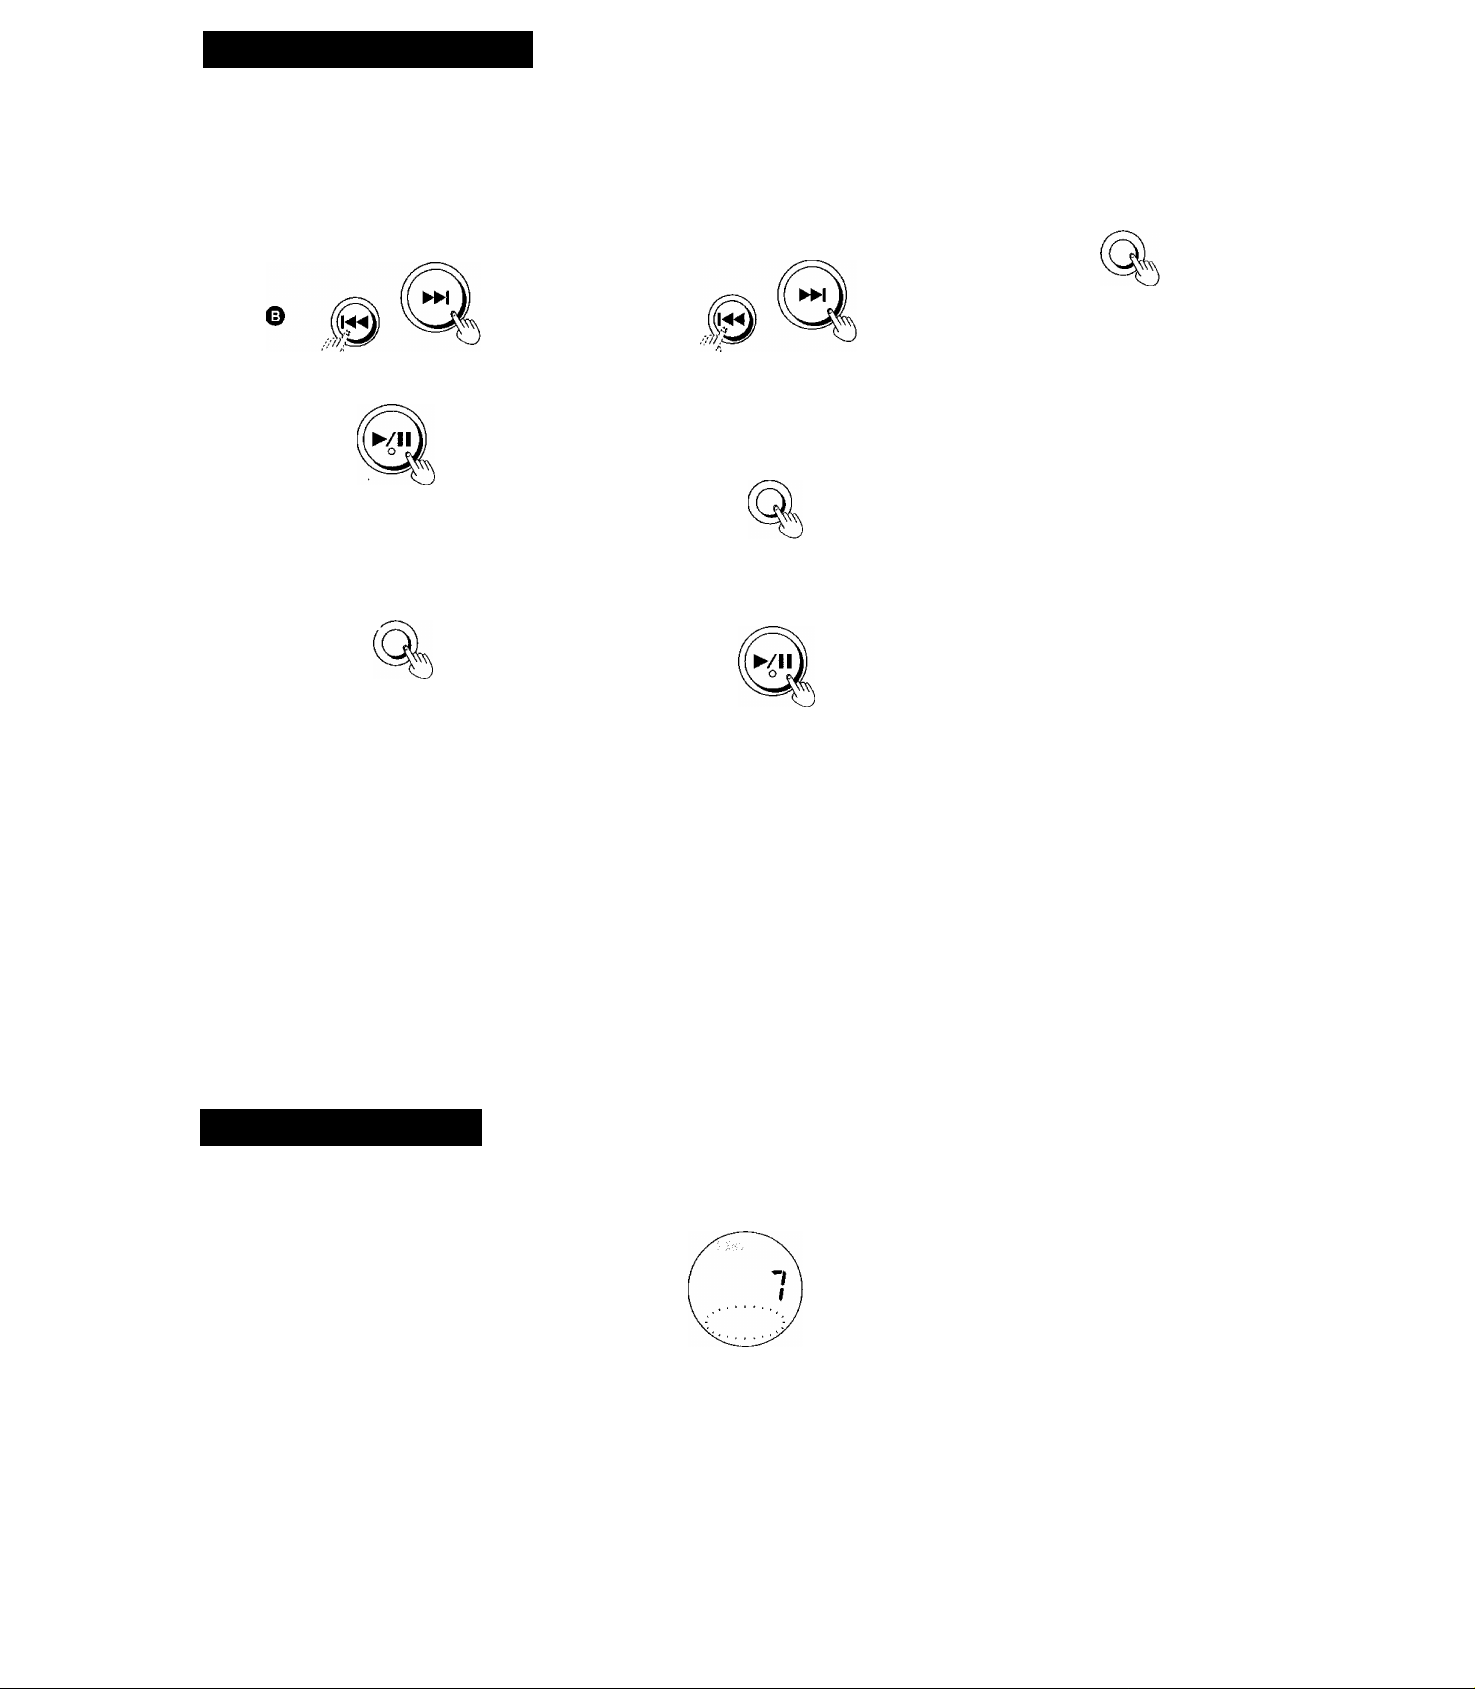
Skip play
The disc plays from the specified track through to the
end, then play stops automatically.
Preparation: Put unit in stop mode.
1 Select the desired track.
o
changing the sound quality
Press during play or stop mode.
EQ
e
The setting switches in the sequence indicated below
each time [EQ] is pressed.
S-XBS^TRAIN
t
__
_
S-XBS:
Select this setting to boost the low frequency range re
sponse.
TRAIN:
Select this setting to avoid annoying other passengers
with noise from your earphones while riding on the train,
or to reduce fatigue when listening for a long period of
time.
The setting returns to S-XBS when you disconnect the
power source.
^Cancel (no indicator is shown)
__
___^____
J
Program play
up to 24 tracks can be entered in the programmed
quence.
Preparation: Put unit in stop mode.
1 Select the desired track.
©
2 Register in sequence.
(The indication "M" and the programmed
quence appear on the display.)
MEMORY/RECALL
©
Repeat steps 1 and 2 to program all the desired tracks.
o
To program the same track in the se
quence more than once
After step 2, press [MEMORY/RECALL] desired
number of times.
If “ f ” is displayed
No more tracks can be programmed.
To confirm the contents of the program
Press [MEMORY/RECALL] while the disc is playing.
(The numbers of the programmed tracks appear on
the display in sequence.)
To delete the entire programmed se
quence
Press [■].
The repeat and random play modes are canceled after
steps 1 and 2.
Repeat play/Random play
Press during play or stop mode.
MODE
o
The setting switches in the sequence indicated below
each time [MODE] is pressed.
1 -track repeat (1 CD) <
One track is repeated.
All-track repeat (CD )
All the tracks on the disc are repeated.
Random (RANDOM)
The tracks play once each in random
order and then play stops.
Random repeat (RANDOM c!l3
The tracks play repeatedly in random
order.
Cancel (no indicator is shown)
-----------
When pressed during program play
The setting is switched in the sequence indicated below
each time [MODE] is pressed.
1-track repeat (1 M)<
One track is repeated.
Memory repeat (M)
The programmed tracks are repeated.
Cancel (M)
►You can select the first track to play in random play
and random repeat play by pressing [►►!] while the
disc is stopped. All the tracks are played.
►You cannot select random play or random repeat play
during program play.
►The resume function does not work when random or
random repeat are on.
►The mode is canceled when you disconnect the power
source.
-------
Anti-Skip System
This system deals with skipping in a variety
of ways:
•An anti-skip mechanism prevents skipping caused
when play speed changes due to swinging of the unit.
•A recovery system immediately returns the laser pick
up to its original position if it is knocked off the track by
a strong shock.
•An anti skip memory (max. 48 seconds) fills in inter
ruptions caused by bumps and vibrations.
The anti-skip system works automatically while the
system is on and cannot be canceled.
B
When bumps continue repeatedly
The elapsed playing time disappears and sound is inter
rupted.
•While the system is on, the disc rotates at a higher
rate than usual in collecting extra audio data. This
could result in a slight increase in disc rotation noise.
•The anti-skip memory compresses digital signals.
RQT6335
Page 5
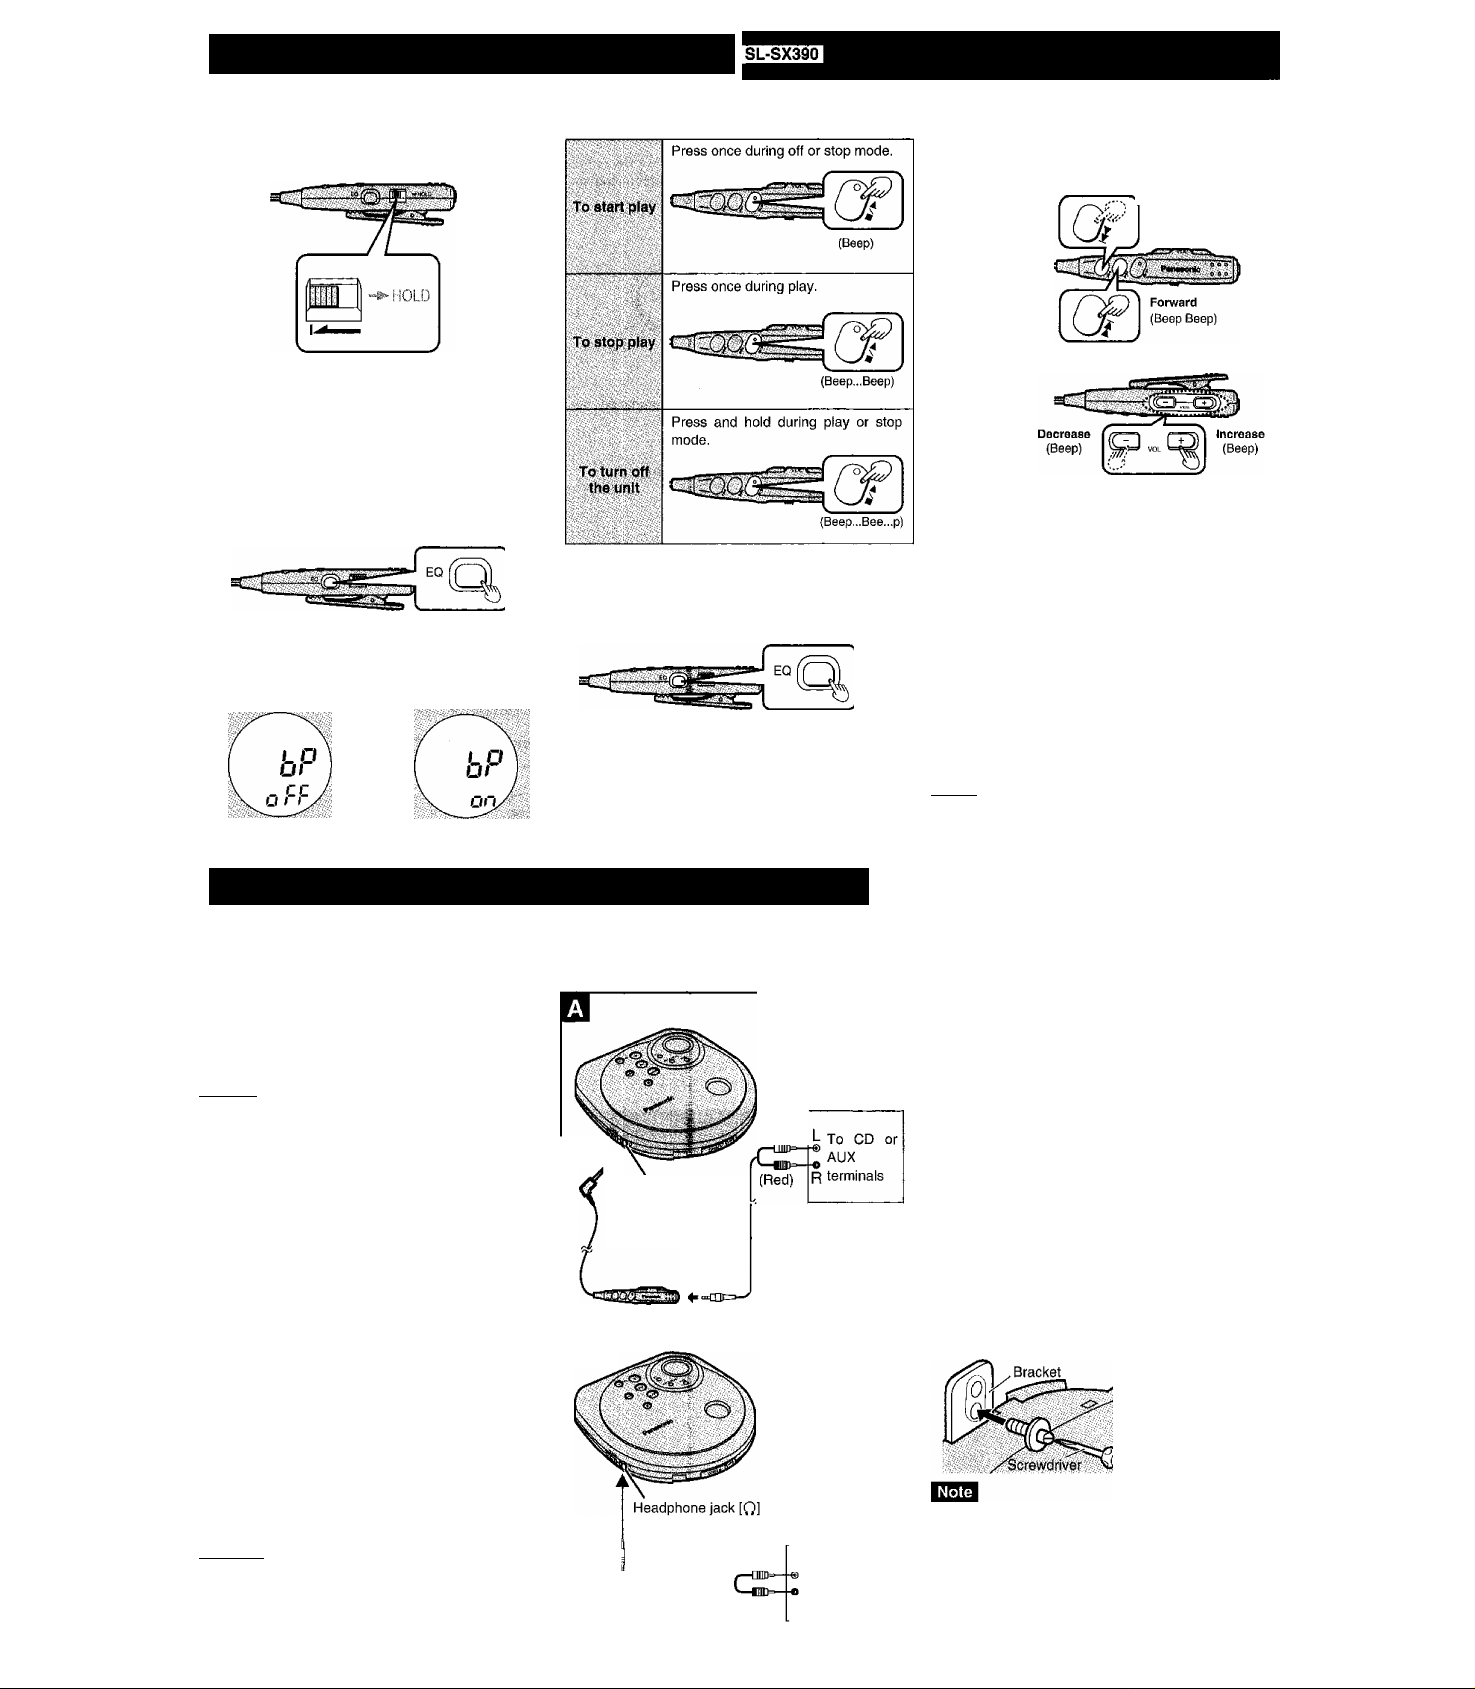
Using the Wired Remote Control
The remote control can be operated regardless of the
HOLD mode of the unit.
Preparation;
Release the remote control from the HOLD mode.
Operation confirmation tones
When an operation button is pressed, a confirmation
tone sounds. Refer to the parentheses in the illustra
tion for the different types of confirmation tones.
Turning the operation tones off and on
While stopped or during play
Press and hold [EQ] on the remote control for 5 sec
onds until the display appears. The tone sounds
when the setting is changed.
To turn the tone off To turn the tone on
Basic operation
Changing the sound quality
Press during play or stop mode.
(Beep)
The setting switches in the sequence indicated below
each time [EQ] is pressed.
S-XBS- ^TRA!N->Cancel (no indicator is shown)
Press during play.
(Press [m] twice to skip to the beginning of
Skipping '
tracks
S^rching?
through tracks
the previous tracks.)
Backward
(Beep Beep Beep)
Press and hold during play.
Toadfustthe
volume
•The volume range is 0-25. (Press and hold
to change the volume successively.)
•A tone (beep-beep) sounds when you
reach the minimum or maximum volume.
S-XBS:
Select this setting to boost the low frequency range re
sponse.
TRAIN:
Select this setting to avoid annoying other passengers
with noise from your earphones while riding on the train,
or to reduce fatigue when listening for a long period of
time.
MnsfBi
The setting returns to S-XBS when you disconnect the
power source.
Using the Unit with Optional Accessories
Using the unit with an audio system
Use a stereo phono cable (not included) to connect to
your audio system.
Turn off this unit and the other equipment before con
nection.
I SL-SX390 ]E1
1 Connect the remote control to [Q] on the unit.
2 Connect the stereo phono cable to the remote
control and the other equipment.
•The unit may malfunction if you connect directly to
[Q] on the unit.
3 Turn the operation tones off (see above) so they
are not heard when you press buttons on the re
mote control.
4 Set the volume to 10.
Make further volume adjustments with the other
equipment.
fi]
1 Connect the stereo phono cable to [(|^] on the
unit.
2 Set the volume to 10.
Make further volume adjustments with the other
equipment.
• Do not connect the cable to the PHONO jacks on the
amplifier.
•Obtain the optional connecting cable if the other
equipment comes with mini-phone jacks.
I SL-SX390 I
• If you connect speakers (active or otherwise) directly to
[Qj on the unit, ensure they have an impedance of 1 kQ
or less.
Headphone jack [Qj
K
(White)
/ (Red)
Stereo phono cable (not included)
Other equipment
(White)
Stereo phono cable
(not included)
Other equipment
L To CD or
AUX
R terminals
Using the unit with a car audio
system
The SL-SX361C model comes with a car adaptor and
car stereo cassette adaptor.
Please refer to the "Installation Instructions” (attached
sheet).
Use only the specified car stereo cassette adaptor and
car adaptor. The part numbers are indicated in paren
theses.
Items to be purchased (SL-SX390/SL-SX340)
For connection to the car audio system
Car stereo cassette adaptor (SH-CDM10A)
Connect the car stereo cassette adaptor to [Q] on
the unit. (When doing this, set this unit’s volume
to 10.)
For securing the unit and connecting to the power
supply:
•Car adaptor (SH-CDC9)
• Car mounting kit (SH-CDF20)
Note when using the car mounting kit (SH-CDF20)
©Remove the screw from
the bracket at the rear
of the car mounting
base.
(©Replace the screw in the
lower hole of the bracket.
•When you switch off the car, volume and sound quality
may return to the original settings and the resume
function may work even if you change the disc,
• It may not be possible to use the unit with some types
of car stereos owing to restrictions imposed by the
construction of the car stereo cassette adaptor.
For further details, refer to the instructions of the part
concerned.
Page 6
Specifications
Troubleshooting Guide
Audio
No. of channels; 2 (left and right, stereo)
Frequency response: 20 to 20,000 Hz
DA converter: 1 bit, MASH
Headphone
output level: RMS max. 8 mW+8 mW/
Pickup
Light source:
Wavelength:
General
Operational temperature
range:
Power supply:
Power consumption:
When using AC adaptor:
(+0dBto-7dB)
16 O (adjustable)
Semiconductor laser
780 nm
0 °C-40 °C
DC 4.5 V
3.7 W
Play time:
[When used in hold mode with EQ
canceled, at 25 °C, on a flat, stable
surface]
; Playtlrpe
- f -i
2 alkaline batteries
•The play time may be less depending
on the operating conditions.
•Play time will be considerably reduced
when playing CD-RW.
Dimensions
(WxHxD): 128x26.3x131.5 mm
Mass: 243 g (with batteries)
Note;
Specifications are subject to change
without notice.
Mass and dimensions are approximate.
About 40 hours
197 g (without batteries)
Before requesting service for this unit, check the chart below for a possible cause of
the problem you are experiencing. Some simple checks or a minor adjustment on
your part may eliminate the problem and restore proper operation.
If you are in doubt about some of the check points, or if the remedies indicated in the
chart do not solve the problem, refer to the directory of Authorized Service Centers
(enclosed with this unit) to locate a convenient service center, or consult your dealer
for instructions.
Cannot close the lid. Is the disc properly secured in place?
Cannot play discs. • Is the unit in HOLD mode?
Tracks on disk do not play
in order, starting with the
first track.
Cannot hear music—too
noisy.
TV picture is distorted.
Radio reception is noisy.
•Is the disc properly secured in place?
• Is there condensation on the lens?
(Wait for about an hour and then try again.)
•Is the disc dirty or scratched?
•Is the random play mode on?
•Did you stop play in the middle of the disc last
time?
•Is the plug dirty? (Wipe away dirt on plug.)
•Separate the unit from mobile phones.
I SL-SX390 I
•Are the earphone and wired remote control plugs
inserted firmly?
I SiL* *SX$4D I
• Is the earphone plug inserted firmly?
Are you using the unit too near a TV or tuner?
(Keep the unit away from the TV or tuner.)
Cautions Maintenance
Care of dry cell batteries
To prevent battery damage, electrolyte leakage and
short-circuiting, heed the following points.
•Do not peel off the covering on batteries and do not
use if the covering has been peeled off.
•Align the poles @ and © correctly when inserting the
batteries.
• Do not mix different types of batteries or old and new
batteries.
•Remove the batteries if you do not intend to use the
unit for a long time.
•Do not throw into fire, short-circuit, disassemble, or
subject to excessive heat.
• Do not attempt to recharge dry cell batteries.
• Do not allow metal objects to touch the battery termi
nals as this may cause short-circuiting which is dan
gerous.
•When carrying batteries in a pocket or bag, ensure no
metal objects such as necklaces are placed together
with them. Contact with metal may cause short-circuit
ing which can cause a fire.
AC adopter
•Handle the AC adaptor carefully. Improper handling is
dangerous.
• Do not touch it with wet hands.
• Do not place heavy objects on top of it.
• Do not forcibly bend it.
•Be sure to connect only the AC adaptor provided or
recommended one with the unit.
• Disconnect the AC adaptor from the household mains
socket if the unit is not going to be used for a long
time.
Unit
No altering or remodeling
This can cause malfunctioning.
No dropping or strong impacts
This may damage the unit.
Locations to be avoided
Avoid using the unit in the following locations since they
can cause malfunctioning.
1. Bathrooms and other moisture-prone places
2. Warehouses and other dusty places
3. Very hot places near heating appliances, etc.
Do not leave the unit exposed to direct sunlight for
long periods of time
This may deform or discolor the cabinet and may also
cause malfunctioning.
Precautions for Listening with the
Headphones or Earphones
• Do not play your headphones or earphones at a high
volume. Hearing experts advise against continuous
extended play.
• If you experience a ringing in your ears, reduce vol
ume or discontinue use.
• Do not use while operating a motorized vehicle. It may
create a traffic hazard and is illegal in many areas.
•You should use extreme caution or temporarily discon
tinue use in potentially hazardous situations.
• Even if your headphones or earphones are the openair type designed to let you hear outside sounds, don’t
turn up the volume so high that you can't hear what’s
around you.
• Discontinue use if you experience discomfort with the
headphones, earphones or any other parts that direct
ly contact your skin. Continued use may cause rashes
or other allergic reactions.
When driving a car
If the surfaces are dirty
To clean this unit, wipe with a soft, dry cloth.
•Never use alcohol, paint thinner or benzine to clean
this unit.
• Before using chemically treated cloth, read the instruc
tions that came with the cloth carefully.
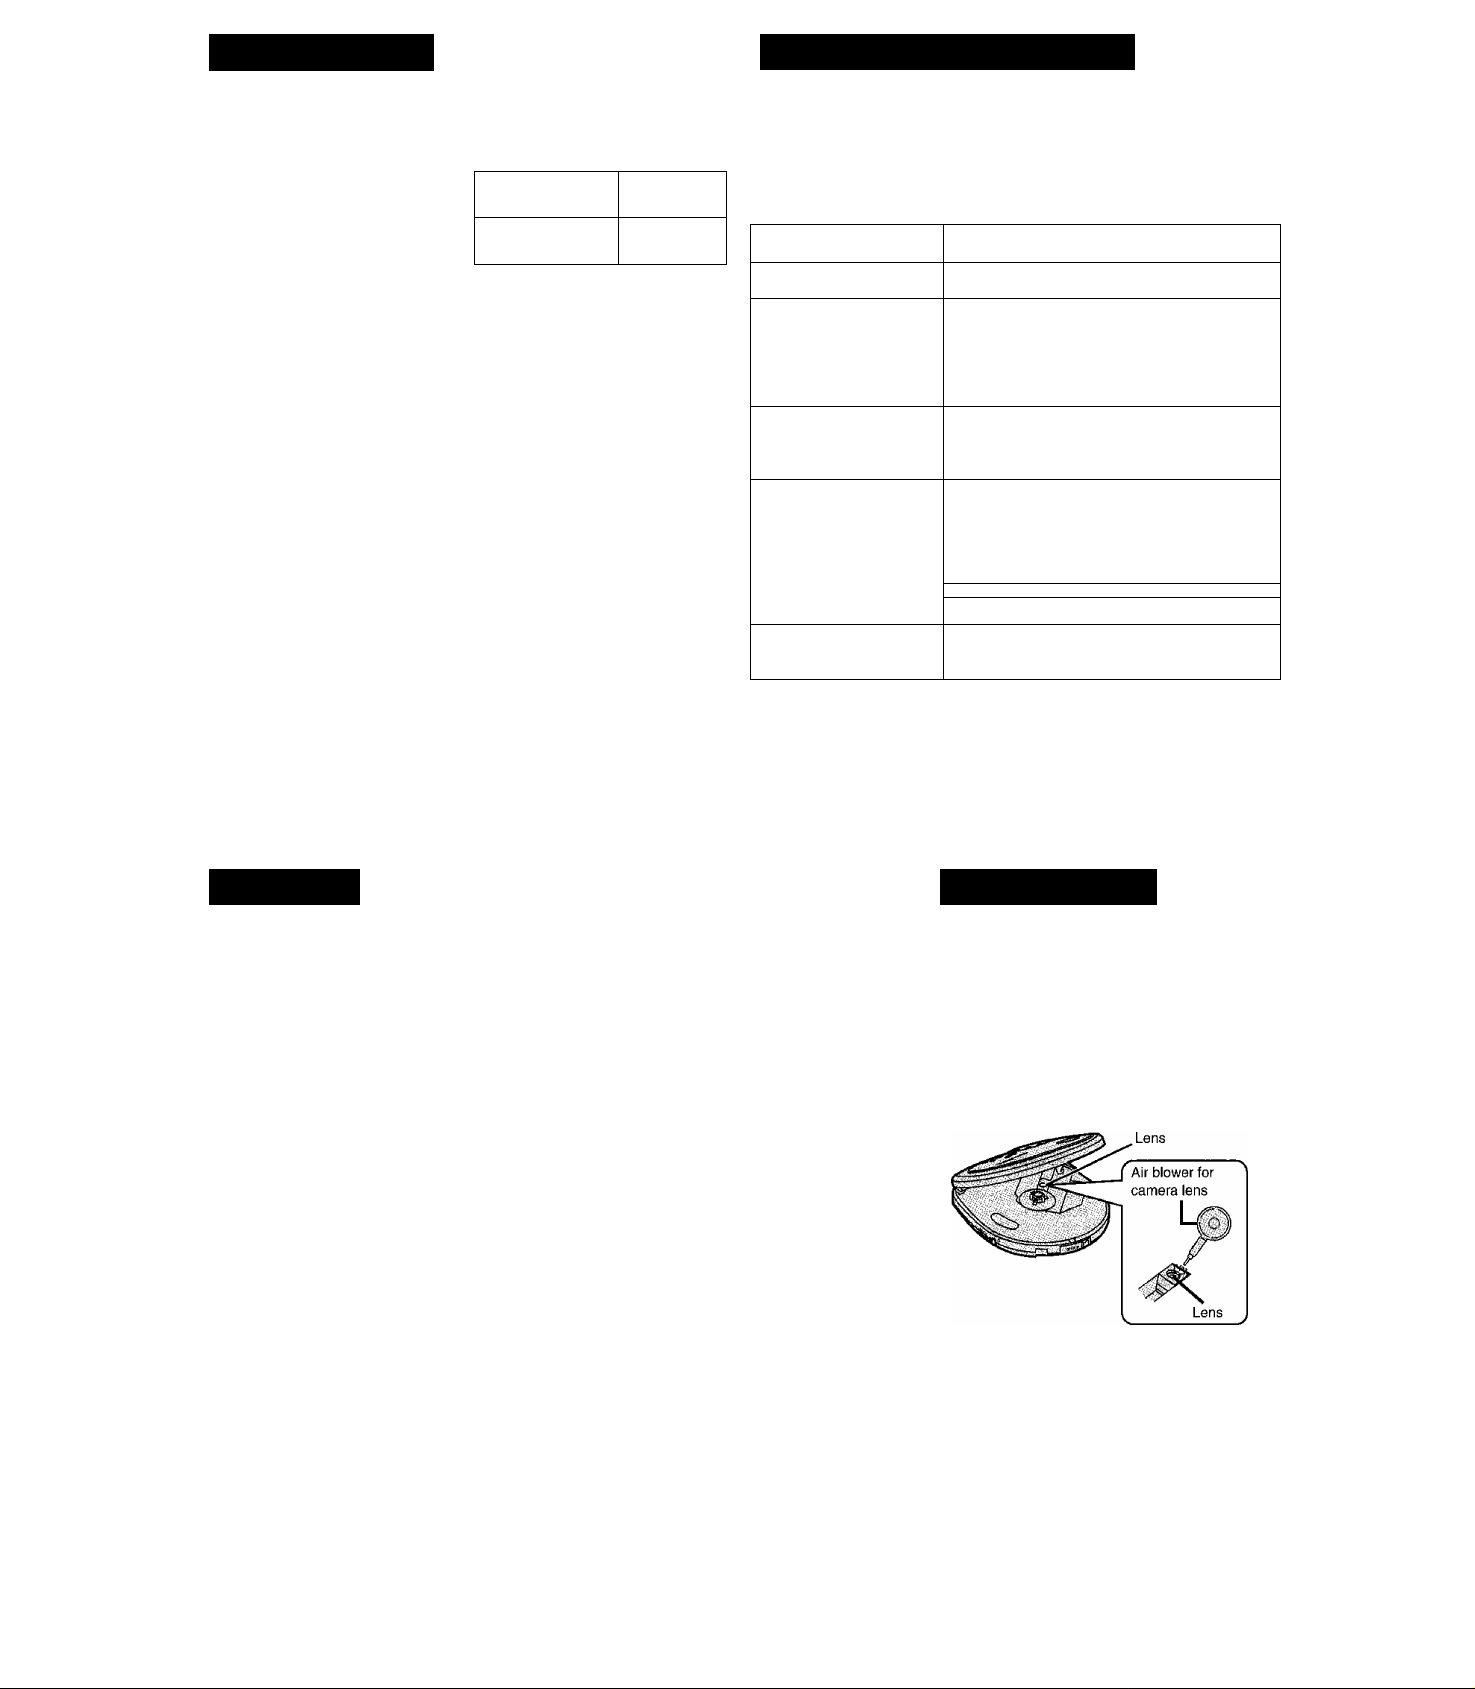
Maintaining the lens
Open the lid and clean the lens as shown in the figure.
Use a cotton swab to gently wipe off any finger-prints.
Recommended product: Lens cleaner kit (SZZP1038C)
In the interest of traffic safety, do not operate the unit
while driving.
 Loading...