


Portable Video CD Player
!"#$ s`a
SL-MV65
SL-MV60
Operating Instructions
!"
GCS
 GK
GK
Dear Customer
Thank you for purchasing this product.
For optimum performance and safety, please read these instructions carefully.
Before connecting, operating or adjusting this product, please read these instructions completely. Please keep this manual for future reference.
!"
!"#$%&!"#$%&'()*+,-./
!"#$%&'()*+,-./!"#$%&'()*#
RQT7022-G

A
B
C
D |
EСзк=пбкЙдЙлл=кЙгзнЙ=Езенкзд=зедуF |
|
!"#$%&' |
E
SL-MV65
F
SL-MV65 |
|
SL-MV60 |
G
H
SL-MV65
RQT7022
2
SL-MV65 : indicates a feature which can be enjoyed with SL-MV65 only.
SL-MV60 : SL-MV60 only.
Table of Contents |
|
|
Supplied Accessories ..................................... |
|
2 |
Features ........................................................... |
|
4 |
Wireless Remote Control Preparations ........ |
|
4 |
Setting up the Stand SL-MV65 ....................... |
|
6 |
Location of Controls ....................................... |
|
8 |
Power Supply Preparations .......................... |
|
10 |
Before Operating the Unit ............................ |
|
14 |
Playing Video CDs |
|
|
(with playback control) ............................... |
|
16 |
Playing Audio CDs and Video CDs |
|
|
(not equipped with playback control) ....... |
|
20 |
Repeat function/Random function .............. |
|
24 |
Changing TV display mode (OSD) ............... |
|
24 |
Various Play Using the Wireless Remote |
|
|
Control ......................................................... |
|
26 |
Resume Play .................................................. |
|
34 |
Multi Screen Function .................................. |
|
34 |
Playing MP3 Files .......................................... |
|
36 |
Sequential Play with MP3 Files .................... |
|
38 |
Other Useful Functions SL-MV65 ................ |
|
42 |
Other Play Methods with MP3 Files ............. |
|
44 |
Changing the Sound Quality ........................ |
|
50 |
Audio Channel Selection .............................. |
|
50 |
Using the Wired Remote Control SL-MV65 |
.. 52 |
|
Anti-Skip System .......................................... |
|
54 |
Using the Unit with an audio system .......... |
|
54 |
Concerning Compact Discs ......................... |
|
56 |
Cautions ......................................................... |
|
58 |
Troubleshooting Guide ................................. |
|
60 |
Maintenance .................................................. |
|
60 |
Specifications ................................................ |
|
62 |
Concerning the TV display |
|
|
(On screen display) .................................... |
|
64 |
Description of Terms ..................................... |
|
66 |
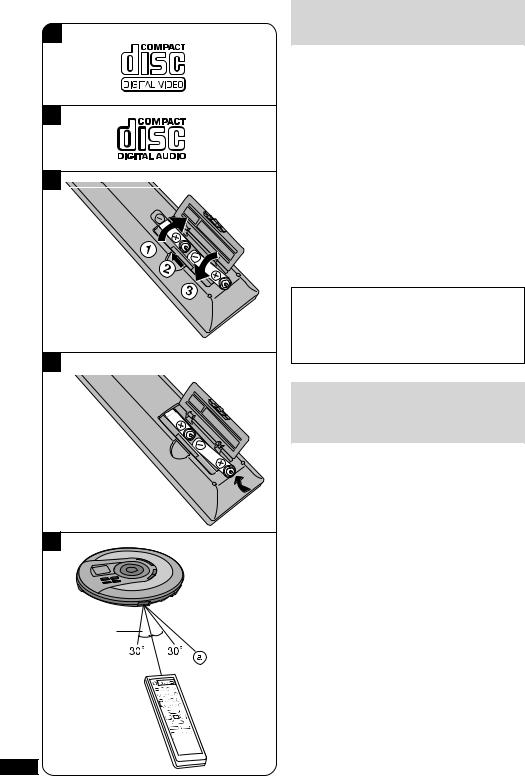
Supplied Accessories |
|
|
Check the packing carton for these |
||
accessories. A |
|
|
M AC adaptor B .......................................... |
|
1 pc. |
The configuration of the AC adaptor |
|
|
differs according to the area. |
|
|
M Wireless remote control |
|
|
(N2QAGB000031) C ............................ |
|
1 pc. |
M Batteries |
|
|
(for wireless remote control) D ........... |
2 pcs. |
|
M Wired remote control SL-MV65 |
|
|
(N2QCBD000036) E ............................ |
|
1 pc. |
M Stereo earphones F................................ |
|
1 pc. |
M Audio/Video cable G ............................... |
|
1 pc. |
M Stand SL-MV65 H ................................... |
|
1 pc. |

SL-MV65 !piJjsSR !"#
SL-MV60 piJjsSM
!"#== !!"
!KKKKKKKKKKKKKKKKKKKKKKKKKKKKKKKKKKKKKKKKKKKKKKKKKKKKKKKKKKKKK PKKKKKKKKKKKKKKKKKKKKKKKKKKKKKKKKKKKKKKKKKKKKKKKKKKKKKKKKKKKKKKKKKKKK R!"#$ KKKKKKKKKKKKKKKKKKKKKKKKKKKKKKKKKKKKKKKKKKKKKKKKKK R!= SL-MV65 KKKKKKKKKKKKKKKKKKKKKKKKKKKKKKKKKKKKKKKKKKKKK T!KKKKKKKKKKKKKKKKKKKKKKKKKKKKKKKKKKKKKKKKKKKKKKKKKKKKKKKKKKKKK V!KKKKKKKKKKKKKKKKKKKKKKKKKKKKKKKKKKKKKKKKKKKKKKKKKKKKKKKKKKK NN!"# KKKKKKKKKKKKKKKKKKKKKKKKKKKKKKKKKKKKKKKKKKKKKKKKKKK NR!`a !"#$%&' KKKKKKKKKKKKKKKK NT
!`a `a
!"#$%&' KKKKKKKKKKKKKKKKKKKKKKKKKKKKKKKKKKK ON!"#$ !KKKKKKKKKKKKKKKKKKKKKKKKKKKKKKKKKKKKKKKKK OR!"#$%&'lpa KKKKKKKKKKKKKKKKKKKKKKKKKKK OR!"#$%&'()*+, KKKKKKKKKKKKKKKKKKK OT!KKKKKKKKKKKKKKKKKKKKKKKKKKKKKKKKKKKKKKKKKKKKKKKKKKKKKKKKKKK PR!" KKKKKKKKKKKKKKKKKKKKKKKKKKKKKKKKKKKKKKKKKKKKKKKKKKKKKKK PRjmP =KKKKKKKKKKKKKKKKKKKKKKKKKKKKKKKKKKKKKKKKKKKKKKKKKKK=PT jmP !"#$=KKKKKKKKKKKKKKKKKKKKKKKKKKKKKKKKKKKKKKKK=PV
!"#$= SL-MV65 KKKKKKKKKKKKKKKKKKKKKKKKKKKKKKKK QP jmP !"#$%&=KKKKKKKKKKKKKKKKKKKKKKKKKKKKKKKKK=QR!KKKKKKKKKKKKKKKKKKKKKKKKKKKKKKKKKKKKKKKKKKKKKKKKKKKKKKKKKKK RN!"# KKKKKKKKKKKKKKKKKKKKKKKKKKKKKKKKKKKKKKKKKKKKKKKKKKK RN
!"#$%= SL-MV65 KKKKKKKKKKKKKKKKKKKKKKKKKKKK RP!KKKKKKKKKKKKKKKKKKKKKKKKKKKKKKKKKKKKKKKKKKKKKKKKKKKKKKKKKKK RR!"#$%&' KKKKKKKKKKKKKKKKKKKKKKKKKKKKKKKKKKKKK RR!KKKKKKKKKKKKKKKKKKKKKKKKKKKKKKKKKKKKKKKKKKKKKKKKKKKKKKKKKKK RT!KKKKKKKKKKKKKKKKKKKKKKKKKKKKKKKKKKKKKKKKKKKKKKKKKKKKKKKKKKK RV!"# KKKKKKKKKKKKKKKKKKKKKKKKKKKKKKKKKKKKKKKKKKKKKKKKKKK SN
KKKKKKKKKKKKKKKKKKKKKKKKKKKKKKKKKKKKKKKKKKKKKKKKKKKKKKKKKKKKKKKKKK SN
KKKKKKKKKKKKKKKKKKKKKKKKKKKKKKKKKKKKKKKKKKKKKKKKKKKKKKKKKKKKKKKKKK SP!"#$%& !' KKKKKKKKKKKKKKKKKKKKKKKKKKKKKK SR!KKKKKKKKKKKKKKKKKKKKKKKKKKKKKKKKKKKKKKKKKKKKKKKKKKKKKKKKKKK ST
!
!"#$%&'()*+,A
M !"#=BKKKKKKKKKKKKKKKKKKKKKKKKKKKKKKKKKKKKKKKKK N
!"# !"#$%&'
M !"=EkOn^d_MMMMPNF=CKKKKKKKKKKKKKKKKK N M !"#$%&'DKKKKKKKKKKKKKKKKKKKKKKKKKKKKKK O
M !"SL-MV65 kOn`_aMMMMPS E KK N M !"=FKKKKKKKKKKKKKKKKKKKKKKKKKKKKKKKKKKKKKKKKKKKKKKKKK N M L =GKKKKKKKKKKKKKKKKKKKKKKKKKKKKKKKKKKKKKKKKKKK N
M = SL-MV65 =HKKKKKKKKKKKKKKKKKKKKKKKKKKKKKKKKKKKKKKKKKKK N
RQT7022
3
A
B
C 


D
E
7m
RQT7022
4
Features
This is a portable video CD player with playback control (PBC).
The following CDs can be played on this unit.
Video CD:
(Motion picture + audio)
Only compact discs having this mark can be used. A
Version 2.0
These discs have PBC so you can control video and high resolution still pictures with menus.
Version 1.1
These discs do not have PBC so only normal video play is possible.
Audio CD:
Only compact discs having this mark can be used. B Only audio play is possible.
This unit can play CD-DA (digital audio), MP3 and video CD format CD-R and CD-RW that have been finalized (a process that enables CD-R/CD-RW players to play CD-R and CD-RW) upon completion of recording.
It may not be able to play some CD-R or CD-RW due to the condition of the recording.
Wireless Remote
Control Preparations
Battery installation C
Open the battery cover as shown in the figure.
Insert two R6, AA, UM-3 (included) as shown on the left.
•Align the poles d and e correctly when inserting the batteries.
•Do not use rechargeable type batteries.
Mishandling of batteries can cause electrolyte leakage which can damage items the fluid contacts and may cause a fire.
If electrolyte leaks from the batteries, consult your dealer. Wash thoroughly with water if electrolyte comes in contact with any part of your body.
Battery removal D
Press and push up batteries from the d end to remove them.
Wireless remote control operation range and precautions E
a Wireless remote control signal sensor
•Use within 7 meters of the sensor.
•Do not place obstacles between the sensor and wireless remote control.
•Keep the sensor and end of the wireless remote control free of dust.
•Do not expose to direct sunlight.

!"#$%&'m_` !"#$%&'
s`a
!"#$%`a
`a
H
!"#$%&'()*+A
OKM
!"#$%&'()*+ ,-./01&!"#$%&'()*+,
NKN
!"#$%&'()*+,-. /012!"#$%
`a
!"#$%&'()*+B!"#$%&
!"#$%&'()*+,-./`aJoL `aJot !"`aJo `aJot !
`aJa^ !"#jmP `a `aJo
`aJot
!"#$%&'()*+,-`aJo `aJot
!"#$
!=C
!"#$%&'()
!"#$%&oSI=^^I=rjJP !"#$
• !"#$%&'()=d =e !
• !"#$#%&
!"#$%&'($)*+,-./012!"#$%&'()*!"# $%&'()*+',-./01
!"#$%&'()*+,-./0123
!=D
!"#$%&' d !"#$%
!"#$%&'()*+=E a !"#$%&'
•!"#$%&'()*+,-.
•!"#$%&'()*+,-./0
•!"#$%&'()*+,-./0
•!"#$%&'()
RQT7022
5

A
a
Stand
 b
b

 a
a
Click!
>
b
Setting up the Stand
SL-MV65
Set Up A
1 Place the main unit on the stand with the unit facing up.
2 Slide the unit onto the stand, aligning the sensor a with the holder b.
awireless remote control sensor
bwired remote control holder
3 “Click” is heard when it is firmly inserted .
Placing the wired remote control B
You can clip the wired remote control onto the holder and place the cords as shown.
Placing the Audio/Video cable and AC adaptor cord C
Refer to Before Operating the Unit (page 14) and Power Supply Preparations (page 10) for information on connecting the Audio/Video cable and AC adaptor cord.
You can place the Audio/Video cable on the cable holder c and the AC adaptor cord on the other cable holder d.
B
Stand
C
RQT7022
Removing the main unit from the stand C
1. Unplug the Audio/Video cable and AC adaptor cord from the main unit.You can leave the cables on the cable holders c and d for the convenience of future use.
2. Remove the wired remote control from the stand.
3. Press down the catch e to remove the main unit from the stand.
e
 c
c  d
d 
6

!= SL-MV65
=A
N !"#$%&'(
O !"#$%&'(a !"b a !"#$%
b !"#$
P !"#$%&'()*+,
!"#$=B
!"#$%&'()*+,-./012
!L !"#$%&'()=C
! L !"#$%&'()*+!"#$%&'()*NR !"#$!NN
L !"#$%=c !!"#$%&'() #*+=d
!"#$%&=C
1.L !"#$%&'()*+,-.= !"#$%&'()c d !!
2.!"#$%&'()*
3.e !"#$%&'()*
RQT7022
7

A
|
PBC OFF |
|
NTSC |
PAL |
DC IN 4.5V |
NOR |
RESUME |
|
AV OUT |
Rear panel of the unit |
HOLD |
! |
SENSOR |
Front panel of the unit
!
B
C
D
SL-MV65
L
RQT7022 |
SL-MV60 |
|
R |
||
|
Location of Controls
Illustrations showing SL-MV65 are used in these instructions.
Main unit A
1Display
2Cursor button (ALBUM /MENU µ, ALBUM
 /MENU ∂, g PREV, f NEXT)
3EQ mode button (EQ)
4Return button (RETURN 
 )
)
5Play mode button (PLAY MODE)
6Album mode button (ALBUM MODE)
7Select/play/pause button ( :/J SELECT)
8Stop/operation off button (L OPR OFF)
9Headphone volume buttons (VOLUME, ∂, µ) ! DC IN jack (DC IN 4.5V —<±)
Play mode selector (NOR, PBC OFF, RESUME)
# Video format selector (NTSC, PAL)
$ Audio/video output terminal (AV OUT)
% Wireless remote control signal sensor (SENSOR) & Hold switch (HOLD)
( Headphone jack (l)
) Lid open switch (OPEN :)
Wireless remote control B
~ On screen display button (OSD)
+ Multi screen button (MULTI SCREEN) , Play mode button (PLAY MODE)
- A-B repeat button (A-B)
. Program button (PROGRAM) / Recall button (RECALL)
: Clear button (CLEAR)
; Previous, next buttons ( g PREV, f NEXT)
<Search/album skip buttons ((  ALBUM, ) ALBUM
  )
)
=Frame skip button (


 )
)
> Return button (
 )
)
? Voice mode button (MONO L/R)
@ Time access button (TIME ACCESS) [ Scene button (SCENE)
\ Numeric buttons
] Select/play button ( :SELECT) ^ Pause button ( J)
_ Stop/operation off/program clear button (L)
{ VCD index buttons (V-INDEX,  ,
,  )
)
Wired remote control SL-MV65 C
| Plug |
3 Display |
} Hold switch (HOLD) |
4 EQ mode button (EQ) |
V Headphone jack |
5 Play mode /album |
0 Volume button |
mode button |
(VOLµ, VOLp) |
(PLAY MODE) |
1 Play/stop/off button (:/L) |
6 Light/display button |
2 Track skip/search/album |
(•LIGHT/–DISP) |
skip button (g, f) |
7 Clip |
Stereo earphones D
8 Plug
8

!
!"#$%&'()*piJjsSR
=A
2=(ALBUM /MENU µ,
ALBUM /MENU ∂, g PREV, f NEXT)
3!"#$%= (EQ)
4=(RETURN 
 )
)
5!"#$=(PLAY MODE)
6!"#$=(ALBUM MODE)
7L L =( :/J SELECT)
8L !"=( L OPR OFF)
9 !"#$%&= (VOLUME, p, µ)
! a`=fk !"#$%= (DC IN 4.5V —<±)
|
!"#$=(NOR, PBC OFF, RESUME) |
# |
!"#$=(NTSC, PAL) |
$ L !"#=(AV OUT) |
|
% !"#$%&' (SENSOR) |
|
& |
!= (HOLD) |
( |
!"#=( l) |
) = (OPEN :)
!"=B
~ !" (OSD)
+ ! (MULTI SCREEN) , !"#$ (PLAY MODE) - ^J_ =(A-B)
. =(PROGRAM) / =(RECALL)
: (CLEAR)
; !"=( g PREV, fNEXT )
< L =(( ALBUM, ) ALBUM ) |
||||
= !=( |
|
|
|
) |
|
|
|||
|
|
|||
> =( |
) |
|||
? !"=(MONO L/R) |
||||
@ !"=(TIME ACCESS) |
||||
[ (SCENE) |
||||
\ |
|
|
|
|
] L |
|
|
|
( :SELECT) |
^ |
=(J) |
|
|
||
_ L !L !"=(L) |
|||||
{ s`a `a !=(V-INDEX, =, ) |
|||||
|
|
|
|
||
!"= |
|
C |
|
||
SL-MV65 |
|
||||
|
|
|
|
|
|
| |
|
|
3 |
|
|
} |
! (HOLD) |
4 |
!"#$% |
||
V |
!"# |
|
(EQ) |
||
0 |
|
! (VOLµ, VOLp) 5 |
!L !" |
||
1 |
L L |
|
=(PLAY MODE) |
||
|
(:/L) |
|
|
6 |
L |
2 |
!L L |
|
(•LIGHT/–DISP) |
||
|
=(g, f) |
7 |
|
||
|
|
|
|||
!"=D |
|
|
|||
|
|
|
|
|
|
8 |
|
|
|
|
|
RQT7022
9

A
|
PE |
N |
O |
|
|
|
|
1
B |
|
a |
|
|
c |
|
PBC OFF |
NTSC |
PAL |
|
DC IN 4.5V |
NOR |
RESUME |
AV OUT |
b
d
C
D
|
PE |
N |
O |
|
|
|
|
E
RQT7022
10
Power Supply
Preparations
Refer to the specifications (page 62) for information on operating times when using rechargeable batteries or dry-cell batteries.
Using rechargeable batteries (not included)
Obtain the optional rechargeable batteries.
Make sure to recharge the batteries before using them. The unit cannot be used to charge rechargeable batteries other than those specifically designed for it.
• Optional batteries (P-3GAVT/2B)
Recharging procedure
1 Insert the special recharg eable batteries into the unit. A
2 Connect the AC adaptor. B
aDC IN jack (DC IN 4.5V —<±)
bRear panel of the unit
cAC power outlet
dAC adaptor
Note
•The configuration of the AC adaptor differs according to the area.
•The battery indicator changes while recharging. C
•The battery indicator disappears when the batteries is fully charged.
•You can recharge the batteries before they are fully discharged.
3 When recharging is complete, unplug the AC adaptor from the power outlet and the DC IN jack.
Note
•Never mix dry cell and rechargeable batteries.
•Rechargeable batteries have a service life of approximately 300 charge-discharge cycles. If the operating time on one full charge becomes noticeably shorter than it used to be, the battery has reached the end of its service life and should be replaced.
•Recharging may only be performed when the unit is off. (It is not possible to recharge the batteries while playing discs.)
•The AC adaptor and rechargeable batteries may become warm while recharging is in progress. This is not a malfunction.
•The unit should be off when changing rechargeable batteries.
If the battery lid becomes loose D
Slide the lid back into place horizontally.
Removing batteries E
Push up on the battery in the direction indicated by the arrow, then lift it out.
If the unit malfunctions or freezes during use, disconnect the power source (the AC adaptor or batteries). Reconnect the power source and continue operation.
!
!"#$%'()*+(,-./01!SP !"#
!"!#$%&'()
!"#$#%&!"#$%&'("#)"*+,-./0
!"#$%&'()*+ !,- .
• ! mJPd^sqLO_
!
N !"#$#%&'()*A
O!"#$%&'B
a a`=fk=a`=fk=QKRs=—<±
b ! c !"#
d !"#$
=
•!"#$ !"#$%&'(
•!"#$ %&'()C
•!"# $% &'(
•!"#!$%&'()*+,-./0
P!"#$% &'()a`=fk=!"#$%&'
=
•!"#$!%!"&'(
•!"#$PMM !"#$%&'()!"#$%&'()*+,-(./0#!"#$%&'()*+,-./
•!"#$%&'()*+,-#.!"#$%&'()*+,
•!"#$ !"#$%& ' ()!"#$% &'"
•!"!#$%&'()*
!"#$%=D
!"#$%&'()*+,-
!"=E
!"#$%&'()*+,-./01
!"#$%&'()*+,-./012!" #$%& '()*+,-!"#$%&'
RQT7022
11

A
|
|
a |
|
|
c |
|
PBC OFF |
NTSC |
PAL |
|
DC IN 4.5V |
NOR |
RESUME |
AV OUT |
b
d
B
e


RQT7022
Power Supply Preparations
Using the AC adaptor A
Connect the AC adaptor supplied.
aDC IN jack (DC IN 4.5V —<±)
bRear panel of the unit
cAC power outlet
dAC adaptor
Note
•The configuration of the AC adaptor differs according to the area.
•The unit is in the standby condition when the AC adaptor is connected. The primary circuit is always “live” as long as the AC adaptor is connected to an electrical outlet.
Using dry-cell batteries (not included)
After disconnecting the AC adaptor, insert two LR6, AA, UM-3 alkaline batteries.
The procedure for inserting and removing dry-cell batteries is identical to that for rechargeable batteries.
Battery indicator B
e Battery indicator
This indicator starts flashing when the batteries are almost out of power. Power is cut off completely a short while later.
Rechargeable batteries: Recharge batteries. Dry-cell batteries: Replace batteries with new ones.
Note
•The length of time the unit will continue to operate between when the battery indicator starts flashing and when the power is cut off differs depending on the type of batteries used.
•The battery indicator may not be displayed if rechargeable batteries other than those designated by Panasonic are used.
12

!
!"#$%&'=A
!"#$%&'()*+ a a`=fk=
a`=fk=QKRs=—<± b !
c !"# d !"#$
=
•!"#$%&'()*+,-./
•!"#$%&'()*+,-.*/01!"#$%&'"#()*+,-./!"#$%& '()*
!"#$%&'(
!"#$%&'()*+,ioSI=^^I=rjJP!
!"#$%&'()* + ,-.
!"=B
e !"
!"#$%&'()*+,-./01!"#$%&'
!" ! "!"#$%& '
=
•!"#$%&'()*+,-./012!"#$%&'()*+,
•!"m~е~лзебЕ !"#$%&%'(!"#$%&'()*
RQT7022
13

RQT7022
14
TV
VIDEO IN AUDIO IN |
1 |
|
Before Operating the Unit
1 Connect the unit to your TV to play video CDs.
Use the Audio/Video cable (included).
a Yellow |
b White c Red |
d Black |
e Rear panel of the unit |
|
|
|
|
2 Set video format selector according to |
|
|
|
|
the television set. |
|
|
|
AV OUT |
NTSC: if your TV is NTSC |
|
|
2 |
PAL: if your TV is PAL |
|
|
|
For details, refer to the operating instructions of the TV. |
||
|
|
3 Release the hold mode. |
||
|
|
|
|
f Front panel of the unit |
|
PBC OFF |
NTSC |
PAL |
|
DC IN 4.5V |
NOR |
RESUME |
AV OUT |
|
|
|
|
|
Note |
3 A
HOLD |
SENSOR |
2 |
NTSC PAL |
|
3 |
HOLD |
|
A
 R
R 
 L
L 
 g
g 
SL-MV65
B

 HOLD
HOLD
h i
i
HOLD 
h i
i
SL-MV65 


EQ PLAY MODE ¥LIGHT/ —DISP
•Video CD output is generally lower than TV output. Reduce the TV volume before switching input back to TV.
•Some TVs are unable to output sound when there is no video signal.
To listen through the stereo earphones (included) A
•SL-MV65
Connect the stereo earphones and wired remote control (SL-MV65) to the (l) jack. (Plug in firmly.)
•SL-MV60
Connect the stereo earphones to the (l) jack. (Plug in firmly.)
g Plug type: 3.5mm stereo
•Before connecting the stereo earphones, reduce the volume level.
•When [AV OUT] is connected, you cannot listen through stereo earphones or adjust earphone volume. “VOLpp” will be displayed when [VOLUME, o, p] (unit) or [VOLo, VOLp] (wired remote control) is pressed.
HOLD function B
This function causes the unit to ignore short, accidental button presses. (The disc lid can still be opened and closed.)
The HOLD function prevents the following:
•Powering on the unit accidentally (which can cause the batteries to run down).
•Play being cut off unexpectedly in the middle of a selection.
To use the HOLD function
Set [HOLD] to the HOLD position. It is possible to operate the unit from the wireless remote control in the HOLD mode.
hRelease
iHOLD mode
SL-MV65
The unit and wired remote control have [HOLD] switches, each of which works independently.
” indication
When the unit is in |
pressing any button |
causes the indication |
” to appear on the display. |
When the wired remote control is in HOLD mode, pressing any button will not cause any effect.
When the unit is turned off
The |
” indication appears only when [:/J SELECT] |
is pressed. |
|

!"#
N !`a !"#$%&'(#)
!L !"#$%&
a= |
b= c = |
d= |
e ! |
O !"#$%&!'($)*+,
kqp` !"#$%kqp` m^i !"#$%m^i
!"#$%&'()*+,-./
P !"#$ f= !
=
•`a !"#$%&!'()*+ ,-!"#$%&'( !)*+,
•!"#$%&'( )* +
!"#$%&'()*=A
• |
SL-MV65 |
|
|
|
!"#$%&'()=EpiJjsSRF= xlz |
||
|
|
!"#$ %& |
|
|
|
|
|
• |
SL-MV60 |
|
|
|
|
!"#$%&xlz !"#$ %& |
|
g !"PKR !"
•!" !"#$%
•=x^s=lrqz= !"#$%&'()*+,!"# $ %& '()* xslirjbI=oI=pz= = = =xsli=oI=sli pz
!"#$%&'(sli pp !"#
elia !"#=B
!"#$%&'$()*+,-./012!"#$%&'()*"+
elia !"#$%&'
•!"#$%&'($)*+,-
•!"#$%&'#()
elia
xeliaz !elia !"#$%&'!"#$%&'()
h= i=elia
SL-MV65
!"#$%&'(!xeliaz !"#!"#


!"#$%&'()*+,-.+/012!"#$


 = !
= !
!"#$%&'()*+,-./01.2!"#$
!"#$%
!"x:/J=pbib`qz !"#$


 ==
==
RQT7022
15
RQT7022
16
|
|
|
Playing Video CDs |
||
|
|
|
(with playback control) |
||
|
2 |
|
PBC Play |
|
|
|
|
(See description of terms on page 66.) |
|||
|
|
|
|||
|
|
|
The method described below is for video CDs with playback |
||
|
|
|
control (PBC). If the video CD is not PBC supported, refer |
||
|
|
|
to page 20. |
|
|
|
|
1 |
Preparation: |
|
|
|
|
Switch on the TV and select the VIDEO input mode. |
|||
|
|
|
1 Slide [OPEN :] to open the lid, and |
||
|
|
|
insert the video CD. |
||
|
|
|
a Label must face upward. |
||
1 |
a |
b |
Press the area near the center of the disc until it |
||
clicks into position. |
|||||
|
|
|
|||
|
|
|
b Close the lid. |
||
|
|
|
2 Set play mode selector to [NOR]. |
||
|
|
|
When set to [NOR], PBC mode is engaged |
||
|
|
|
automatically. |
||
|
|
|
3 P r e s s [ :/ J S E L E C T ] ( u n i t ) o r |
||
2 |
|
|
[:SELECT] (wireless remote control). |
||
|
|
The unit comes on and a menu appears on the TV |
|||
|
|
|
(it may not appear immediately). |
||
|
|
|
Note |
|
|
|
|
|
[:SELECT] on the wireless remote control does not |
||
|
|
|
turn the unit on if the unit is being powered by batteries. |
||
3 |
|
|
4 Select an item and start play. |
||
|
|
|
1 On the unit: Press the cursor button |
||
|
|
|
[ALBUM /MENU µ] or [ALBUM / |
||
|
|
|
MENU ∂] to select an item and press |
||
|
|
|
[ :/J SELECT]. |
||
|
|
|
ALBUM |
/MENU o : |
|
|
|
|
to select the next item in ascending order |
||
|
|
|
ALBUM |
/MENU p : |
|
|
|
|
to select the next item in descending order |
||
|
|
|
The display shows the menu number and then play |
||
|
|
|
starts. |
|
|
|
|
|
2 On the wireless remote control: Press the |
||
|
|
|
numeric buttons. |
||
|
|
|
To select a two-digit menu number: |
||
|
|
|
Press [h10] then the numeric buttons corresponding |
||
|
|
|
to the menu number. |
||
|
|
|
Example: 20: [h10]→[ 2]→[ 0] |
||
|
|
|
5 Adjust the TV volume. |
||
4 |
|
|
Please refer to the TV operating instructions manual |
||
|
|
for adjusting the TV volume. |
|||
|
|
Menus depend on the discs. Read the disc’s |
|||
|
|
|
|||
|
|
|
instructions and screen display when selecting menu |
||
|
|
|
items. |
|
|
|
|
|
For your reference: |
||
|
|
|
Concerning the display that appears on the TV, refer |
||
|
|
|
to page 64. |
|
|
|
|
|
Note |
|
|
|
|
|
Play may stop if the disc is scratched or damaged. If this |
||
|
|
|
happens, set play mode selector to [PBC OFF]. Press |
||
|
|
|
[:/J SELECT] on the unit or [:SELECT] on the wireless |
||
|
|
|
remote control and regular play will start (See page 20). |
||

`a
!"#$%&'
==m_` !"#
!ST !"#
!"#$%&'()*+,-m_` !
`a !"`a m_` !"#$
ON
!"#$%&sfabl !"#$%&
Nxlmbk=:z !"#$%&'(
`a
a !"#$%
!"#$%&'()*+,-./0!
b !"
O!"#$%&'(x k l o z
!xkloz m_` !"#$"%
P x :L J = p b i b ` q z !"# x:=pbib`qz !"#$%&
!"#$%&'()*+,-./&'
=
!"#$"%&'()*+,- x:=pbib`qz !"#$%&
Q !"#$%&'()
1 !"#$%x^i_rj= Ljbkr z x^i_rj=
 Ljbkr z= !"#$%& x:LJ=pbib`qz
^i_rj= Ljbkr !"#$%&'( ^i_rj=
 Ljbkr !"#$%&'(!"#$%&'()*+,-./01
2= !"#$%&'()!"# $%&'(
xhNMz !"#$%&'()*+,
OM xhNMz→ xOz→ xMz
R !"#$%&
!"#$%&'()*+,!"-./
!"#$%&'()*"#+,-./0!"#$%&'()*
!"
!"#$%&'()*+,-./SR
=
!"#$%&'()*+,-.%/012!"#$%&'()*+,-./01xm_`
lccz !x:LJ=pbib`qz !
x: z !"#$%&'()*ON
RQT7022
17

A
RQT7022
Playing Video CDs
(with playback control)
|
|
|
|
|
|
|
|
|
|
|
|
|
|
|
|
|
|
|
|
|
|
Operations for PBC |
Unit or Wireless remote |
|||
|
|
|
|
|
|
|
|
|
|
|
|
|
|
|
|
|
|
|
|
|
|
play |
control |
|||
|
|
|
|
|
|
|
|
|
|
|
|
|
|
|
|
|
|
|
|
|
|
|
|
|
||
|
|
|
|
|
|
|
|
|
|
|
|
|
|
|
|
|
|
|
|
|
|
To return to the |
[RETURN ] or [ ] |
|||
|
|
|
|
|
|
|
|
|
|
|
|
|
|
|
|
|
|
|
|
|
|
|||||
|
|
|
|
|
|
|
|
|
|
|
|
|
|
|
|
|
|
|
|
|
|
|||||
|
|
|
|
|
|
|
|
|
|
|
|
|
|
|
|
|
|
|
|
|
|
previous menu |
|
|||
|
|
|
|
|
|
|
|
|
|
|
|
|
|
|
|
|
|
|
|
|
|
|
|
|
||
|
|
|
|
|
|
|
|
|
|
|
|
|
|
|
|
|
|
|
|
|
|
To advance to the |
Cursor button |
|||
|
|
|
|
|
|
|
|
|
|
|
|
|
|
|
|
|
|
|
|
|
|
continuation of the |
||||
|
|
|
|
|
|
|
|
|
|
|
|
|
|
|
|
|
|
|
|
|
|
[f NEXT] or [f NEXT] |
||||
|
|
|
|
|
|
|
|
|
|
|
|
|
|
|
|
|
|
|
|
|
|
menu |
||||
|
|
|
|
|
|
|
|
|
|
|
|
|
|
|
|
|
|
|
|
|
|
|
||||
|
|
|
|
|
|
|
|
|
|
|
|
|
|
|
|
|
|
|
|
|
|
|
|
|
||
|
|
|
|
|
|
|
|
|
|
|
|
|
|
|
|
|
|
|
|
|
|
To return to the |
Cursor button |
|||
|
|
|
|
|
|
|
|
|
|
|
|
|
|
|
|
|
|
|
|
|
|
previous screen |
[g PREV] or [g PREV] |
|||
|
|
|
|
|
|
|
|
|
|
|
|
|
|
|
|
|
|
|
|
|
|
|
|
|
||
|
|
|
|
|
|
|
|
|
|
|
|
|
|
|
|
|
|
|
|
|
|
Operations for PBC |
Unit or Wireless remote |
|||
|
|
|
|
|
|
|
|
|
|
|
|
|
|
|
|
|
|
|
|
|
|
and regular play |
control |
|||
|
|
|
|
|
|
|
|
|
|
|
|
|
|
|
|
|
|
|
|
|
|
|
|
|
||
|
|
|
|
|
|
|
|
|
|
|
|
|
|
|
|
|
|
|
|
|
|
To pause play |
|
|||
|
|
|
|
|
|
|
|
|
|
|
|
|
|
|
|
|
|
|
|
|
|
|
||||
|
|
|
|
|
|
|
|
|
|
|
|
|
|
|
|
|
|
|
|
|
|
Press during play. |
[:/J SELECT] or [J] |
|||
|
|
|
|
|
|
|
|
|
|
|
|
|
|
|
|
|
|
|
|
|
|
|||||
|
|
|
|
|
|
|
|
|
|
|
|
|
|
|
|
|
|
|
|
|
|
To resume play, press |
||||
|
|
|
|
|
|
|
|
|
|
|
|
|
|
|
|
|
|
|
|
|
|
|
||||
|
|
|
|
|
|
|
|
|
|
|
|
|
|
|
|
|
|
|
|
|
|
the button once again. |
|
|||
|
|
|
|
|
|
|
|
|
|
|
|
|
|
|
|
|
|
|
|
|
|
|
|
|
||
|
|
|
|
|
|
|
|
|
|
|
|
|
|
|
|
|
|
|
|
|
|
To stop play |
[L OPR OFF] or [L] |
|||
|
|
|
|
|
|
|
|
|
|
|
|
|
|
|
|
|
|
|
|
|
|
|
|
|
|
|
|
|
|
|
|
|
|
|
|
|
|
|
|
|
|
|
|
|
|
|
|
|
|
Stop mode |
|
||
|
|
|
|
|
|
|
|
|
|
|
|
|
|
|
|
|
|
|
|
|
|
Press during play. |
|
|||
|
|
|
|
|
|
|
|
|
|
|
|
|
|
|
|
|
|
|
|
|
|
To turn off the unit |
|
|||
|
|
|
|
|
|
|
|
|
|
|
|
|
|
|
|
|
|
|
|
|
|
|
|
|
|
|
|
|
|
|
|
|
|
|
|
|
|
|
|
|
|
|
|
|
|
|
|
|
|
Off mode |
|
|
[L OPR OFF] or [L] |
|
|
|
|
|
|
|
|
|
|
|
|
|
|
|
|
|
|
|
|
|
|
On the unit: Press |
||||
|
|
|
|
|
|
|
|
|
|
|
|
|
|
|
|
|
|
|
|
|
|
|
||||
|
|
|
|
|
|
|
|
|
|
|
|
|
|
|
|
|
|
|
|
|
|
during stop mode. |
|
|||
|
|
|
|
|
|
|
|
|
|
|
|
|
|
|
|
|
|
|
|
|
|
|
||||
|
|
|
|
|
|
|
|
|
|
|
|
|
|
|
|
|
|
|
|
|
|
On the wireless |
|
|||
|
|
|
|
|
|
|
|
|
|
|
|
|
|
|
|
|
|
|
|
|
|
|
||||
|
|
|
|
|
|
|
|
|
|
|
|
|
|
|
|
|
|
|
|
|
|
remote control: |
|
|||
|
|
|
|
|
|
|
|
|
|
|
|
|
|
|
|
|
|
|
|
|
|
|
||||
|
|
|
|
|
|
|
|
|
|
|
|
|
|
|
|
|
|
|
|
|
|
Press and hold in the |
|
|||
|
|
|
|
|
|
|
|
|
|
|
|
|
|
|
|
|
|
|
|
|
|
stop mode. |
|
|||
|
|
|
|
|
|
|
|
|
|
|
|
|
|
|
|
|
|
|
|
|
|
|
|
|
|
|
|
|
|
|
|
|
|
|
|
|
|
|
|
|
|
|
|
|
|
|
|
|
|
|
|
|
Skip forward: |
|
|
|
|
|
|
|
|
|
|
|
|
|
|
|
|
|
|
|
|
|
|
Skipping tracks |
Cursor button |
|||
|
|
|
|
|
|
|
|
|
|
|
|
|
|
|
|
|
|
|
|
|
|
[f NEXT] or [f NEXT] |
||||
|
|
|
|
|
|
|
|
|
|
|
|
|
|
|
|
|
|
|
|
|
|
(Regular play only) |
||||
|
|
|
|
|
|
|
|
|
|
|
|
|
|
|
|
|
|
|
|
|
|
Skip backward: |
||||
|
|
|
|
|
|
|
|
|
|
|
|
|
|
|
|
|
|
|
|
|
|
Press during play. |
||||
|
|
|
|
|
|
|
|
|
|
|
|
|
|
|
|
|
|
|
|
|
|
Cursor button |
||||
|
|
|
|
|
|
|
|
|
|
|
|
|
|
|
|
|
|
|
|
|
|
|
|
|
|
|
|
|
|
|
|
|
|
|
|
|
|
|
|
|
|
|
|
|
|
|
|
|
|
|
|
|
[g PREV] or [g PREV] |
|
|
|
|
|
|
|
|
|
|
|
|
|
|
|
|
|
|
|
|
|
|
|
|
|
|
Press [g PREV] twice to |
|
|
|
|
|
|
|
|
|
|
|
|
|
|
|
|
|
|
|
|
|
|
|
|
|
|
skip to the beginning of the |
|
|
|
|
|
|
|
|
|
|
|
|
|
|
|
|
|
|
|
|
|
|
|
|
|
|
previous track. |
|
|
|
|
|
|
|
|
|
|
|
|
|
|
|
|
|
|
|
|
|
|
|
|
|
|
|
|
|
|
|
|
|
|
|
|
|
|
|
|
|
|
|
|
|
|
|
|
|
|
|
|
|
|
|
|
|
|
|
|
|
|
|
|
|
|
|
|
|
|
|
|
|
|
|
|
|
|
|
|
Search forward: |
|
|
|
|
|
|
|
|
|
|
|
|
|
|
|
|
|
|
|
|
|
|
|
|
|
|
|
|
|
|
|
|
|
|
|
|
|
|
|
|
|
|
|
|
|
|
|
|
|
Searching through |
Cursor button [f NEXT] |
|||
|
|
|
|
|
|
|
|
|
|
|
|
|
|
|
|
|
|
|
|
|
|
tracks |
or [) ALBUM ] |
|||
|
|
|
|
|
|
|
|
|
|
|
|
|
|
|
|
|
|
|
|
|
|
Press and hold during |
Search backward: |
|||
|
|
|
|
|
|
|
|
|
|
|
|
|
|
|
|
|
|
|
|
|
|
play. |
Cursor button [g PREV] |
|||
|
|
|
|
|
|
|
|
|
|
|
|
|
|
|
|
|
|
|
|
|
|
|
|
|
|
or [( ALBUM] |
|
|
|
|
|
|
|
|
|
|
|
|
|
|
|
|
|
|
|
|
|
|
|
|
|
|
|
Note
•The picture moving on the menu screen will not pause even when [:/J SELECT] is pressed during play.
•You cannot search forward or backward with a “slide show” disc.
To switch video CDs with PBC to regular play A
|
Set play mode selector to [PBC OFF]. Refer to page 20 for |
|
18 |
||
regular play. |

!`a
!"#$%&'
|
m_` !" |
!"#$% |
|||
|
|
||||
!"#$% |
xobqrok= z= =x z |
||||
|
|
|
|
|
|
!"#$% |
|
|
|||
xf kbuqz= |
|||||
! |
|||||
xf kbuqz |
|||||
|
|
|
|||
|
|
|
|
|
|
|
|
|
|
|
|
!"#$ |
xg mobsz= |
||||
|
|
|
xg mobsz |
||
|
|
|
|||
m_` !"#$% |
|
|
|||
|
|
|
|||
!"# |
|
|
|||
!"#$% |
x:LJ pbib`qz= =xJz |
||||
!"#$%&' |
|
|
|||
|
|
|
|
||
|
|
|
|||
! |
xL=lmo=lccz= =xLz |
||||
|
|
|
|||
== ! |
|
||||
|
|
|
|
|
|
!"#$% |
|
|
|||
|
|
|
|||
! |
xL=lmo=lccz= =xLz |
||||
|
|
|
|||
== ! |
|
||||
|
|
|
|
|
|
! !" |
|
|
|||
|
|
|
|||
!"#$ |
|
|
|||
!"#$#%& |
|
|
|||
|
|
|
|
|
|
|
|
|
|
!" |
|
|
|
|
|
xf kbuqz |
|
! |
xf kbuqz |
||||
!"#$% |
|
!" |
|||
!"#$% |
|
xg mobsz |
|||
|
|
|
xg mobsz |
||
|
|
|
|
xg mobsz |
|
|
|
|
|
!"#$%&' |
|
|
|
|
|
|
|
|
|
|
|
|
|
|
|
|
|
!" |
|
|
|
|
|
|
|
!"# |
xf kbuqz= |
||||
!"#$%& |
x)=^i_rj= z |
||||
|
|
|
!" |
||
|
|
|
|
|
|
|
|
|
xg mobsz= |
||
|
|
|
x(= |
^i_rjz |
|
=
•!"#$%x:LJ=pbib`qz !!"#$%&'()*+
•!"#$%&'()*+,-./012
m_` !"`a !"#$%
A
!"#$%&'(xm_`=lccz !"#!"#ON
RQT7022
19

|
|
Playing Audio CDs |
|
2 |
|
and Video CDs |
|
|
(not equipped with playback |
||
|
|
control) |
|
3 |
|
Regular Play |
|
1 |
(See description of terms on page 66.) |
||
|
|||
|
The method described below will play the disc in sequence |
||
|
from the beginning. Regular play can also play video CDs |
||
|
|
equipped with the playback control (PBC). However, it is |
|
|
|
impossible to play some moving or still pictures. In this |
|
|
|
case, use PBC play. |
|
1 |
|
Preparation: When playing video CDs |
|
|
Switch on the TV and select the VIDEO input mode. |
||
|
1 SLIDE [OPEN :] to open the lid, and |
||
a |
b |
||
|
|
insert the CD. |
|
|
|
a Label must face upward. |
|
|
|
Press the area near the center of the disc until it |
|
|
|
clicks into position. |
|
|
|
b Close the lid. |
2
3
c d
e f
RQT7022
2 Set play mode selector to [NOR].
When set to [NOR], regular mode is engaged automatically.
3 P r e s s [ :/ J S E L E C T ] ( u n i t ) o r [: SELECT] (wireless remote control).
The unit comes on and play starts from the first track.
cTrack number
dElapsed play time
Play stops automatically when all the tracks have been played.
eTotal number of tracks
fTotal playing time
Note
[: SELECT] on the wireless remote control does not turn the unit on if the unit is being powered by batteries.
4 When playing video CDs: Adjust the TV volume.
Please refer to the TV operating instructions manual for adjusting the TV volume.
20
!`a `a
!"#$%&'(
= !
!ST !"#$%
!"#$%&'()*+,-./+,01! "#$m_` !"#`a !!"#$%&'()*+,-./0123 m_`
!`a
!"#$%&sfabl !"#$%&
Nxlmbk = : z !"#$%
`a
a !"#$%
!"#$%&'()*+,-./0!
b !"
O!"#$%&'(x k l o z
!xkloz !"#$%&'()*
P=x:LJ=pbib`qz= = = =x:=pbib`qz
!"#$%&
!"#$%&'(!)*+,-. c !
d !"#$
!"#$%&'( )*+,-.
e= ! f= !"
=
!"#$"%&'()*+,- x:=pbib`qz !"#$%&
Q!`a!"#$%&
!"#$%&'()*+,!"-./
RQT7022
21
 Loading...