


 Loading...
First, acquire pictures to PC!
Categorize pictures!
Cover
Operating Instructions
Digital photo management software
PHOTOfunSTUDIO -viewer- 2.1E
Thank you for using PHOTOfunSTUDIO.
Before use, please read these instructions completely.
Process |
Output pictures! |
|
pictures! |
||
|
© 2008 Matsushita Electric Industrial Co., Ltd. |
VQT1U24 |

Contents |
|
|
Contents |
|
|
|
|
||
Before Use |
|
Displaying enlarged pictures.......................................... |
29 |
|
Introduction |
4 |
Playing back slide shows............................................... |
30 |
|
Playing back pictures in an open folder as |
|
|||
What can PHOTOfunSTUDIO do? |
5 |
|
||
a slide show |
30 |
|||
System requirements |
6 |
|||
Creating a slide show from your favorite pictures .......... |
31 |
|||
Setting up |
|
Opening the saved slide show....................................... |
31 |
|
|
Settings for slide shows ................................................ |
32 |
||
Connecting the digital camera to PC................................ |
7 |
Playing music files ......................................................... |
34 |
|
Starting PHOTOfunSTUDIO............................................. |
8 |
Categorization |
|
|
Basic operations |
|
|
||
|
Flow of categorization.................................................... |
36 |
||
Switching among display modes .................................... |
11 |
Details on categorization ............................................... |
37 |
List mode ..................................................................... |
12 |
Focus mode ................................................................. |
14 |
Full Screen mode ......................................................... |
15 |
Calendar Mode ............................................................. |
16 |
Selecting pictures........................................................... |
18 |
Marking on pictures ........................................................ |
19 |
Copying pictures............................................................. |
21 |
Moving pictures .............................................................. |
22 |
Deleting pictures............................................................. |
23 |
Refreshing the display.................................................... |
23 |
Categorization by recording date................................... |
37 |
Categorization by recording scene ................................ |
37 |
Categorization by face detection ................................... |
39 |
Categorization by model name ...................................... |
39 |
Categorization by storage folder.................................... |
40 |
Categorization by keywords .......................................... |
40 |
Changing the keyword ................................................... |
41 |
Deleting categorization .................................................. |
42 |
Deleting pictures from categorization ............................ |
42 |
Deleting a folder in a categorization .............................. |
43 |
Deleting all categorizations ........................................... |
44 |
Acquiring and displaying pictures |
|
Acquiring pictures from a digital camera ........................ |
25 |
Displaying the acquired pictures in list view ................... |
27 |
Displaying pictures by recording date ............................ |
28 |
Process |
|
Process flow .................................................................. |
46 |
Resizing a picture .......................................................... |
48 |
Converting picture format .............................................. |
49 |
2

Contents
Changing several picture file names at one time |
|
(Batch renaming)............................................................ |
50 |
Adding date and title information to a picture (Burn-in) .. |
52 |
Changing the recording date .......................................... |
54 |
Creating still pictures from motion pictures .................... |
55 |
Rotating picture (Rotate) ................................................ |
57 |
Retouch |
|
Start and exit the retouch function.................................. |
59 |
Screen configuration for the retouch function................. |
60 |
Correcting pictures or add effects .................................. |
62 |
Saving retouched pictures.............................................. |
65 |
Retouch function menu .................................................. |
66 |
Outputting |
|
Output flow ..................................................................... |
69 |
Printing picture ............................................................... |
70 |
Attaching pictures to e-mail............................................ |
76 |
Using a picture as wallpaper .......................................... |
79 |
DPOF-setting.................................................................. |
80 |
Writing pictures onto a memory card.............................. |
81 |
Writing pictures to a CD or a DVD.................................. |
83 |
Other settings |
|
Customising picture display............................................ |
86 |
Changing view format of picture browser |
|
(View format) ................................................................ |
86 |
Changing order of display (Sort).................................... |
87 |
Setting types of pictures to be displayed in |
|
picture browser (View type) ........................................... |
88 |
Registering application in Launcher............................... |
89 |
Managing folders ........................................................... |
91 |
Properties of picture file ................................................. |
94 |
Setting the operations at the time of start ...................... |
96 |
Changing the settings of acquisition .............................. |
97 |
Changing the settings of rotation ................................... |
99 |
Convenient information |
|
Tool bar........................................................................ |
100 |
Picture browser view setting area................................ |
100 |
Status bar .................................................................... |
101 |
Output view.................................................................. |
101 |
Menu............................................................................ |
102 |
Context menu .............................................................. |
106 |
Context menu on the picture browser .......................... |
106 |
Context menu on the folder view ................................. |
107 |
Picture files that can be displayed |
|
by PHOTOfunSTUDIO................................................. |
108 |
Troubleshooting (Q&A) ................................................ |
109 |
Glossary....................................................................... |
111 |
Precautions for use...................................................... |
112 |
3

Before Use Introduction
Before Use
Introduction
zPlease note that some of the explanation and screens covered in these operating instructions may differ from actual ones depending on the operating environment of your PC. Please be aware of this beforehand.
zNo information is provided about basic PC operations and terms. Please refer to the relevant PC manual. zThe contents of these operating instructions may be
subjected to changes without prior notice. zReproduction of these operating instructions in part or in
full without permission is prohibited.
zThe description of Windows® in these operating instructions is based on the Windows® XP screen.
zThe English, French, German, Spanish and simplified Chinese versions of this software are available to the OS of the corresponding languages. If you use an OS of other language, the English version of this software will be installed and become available.
zPages to be referred to are shown as “ 00”.
zIn these operating instructions, PHOTOfunSTUDIO -viewer- 2.1E is indicated as “PHOTOfunSTUDIO”.
zIn these operating instructions, a memory card refers to an SD memory card, including the internal memory.
zThe usable operation items on the menu and context menu depend on the operation status of PHOTOfunSTUDIO or status of the selection of the pictures. The unusable items are displayed in grey.
Please be aware of this beforehand.
zSome digital cameras may not be equipped with the [BABY] mode, [PET] mode, [TRAVEL DATE] function, [DATE STAMP] function, [TEXT STAMP] function, RAW file function, etc. described in these operating instructions.
zMicrosoft®, Windows®, Windows Vista® and DirectX® are either registered trademarks or trademarks of Microsoft Corporation in the United States and/or other countries.
zIBM® and PC/AT are registered trademarks of International Business Machines Corporation of the U.S.
zIntel®, Pentium® and Celeron® are registered trademarks or trademarks of Intel Corporation in the United States and other countries.
zQuickTime and the QuickTime logo are trademarks or registered trademarks of Apple, Inc., used under license therefrom.
zMicrosoft product screen shot(s) reprinted with permission from Microsoft Corporation.
zOther names of systems and products mentioned in these instructions are usually the registered trademarks or trademarks of the manufacturers who developed the system or product concerned.
4
Before Use What can PHOTOfunSTUDIO do?
What can PHOTOfunSTUDIO do?
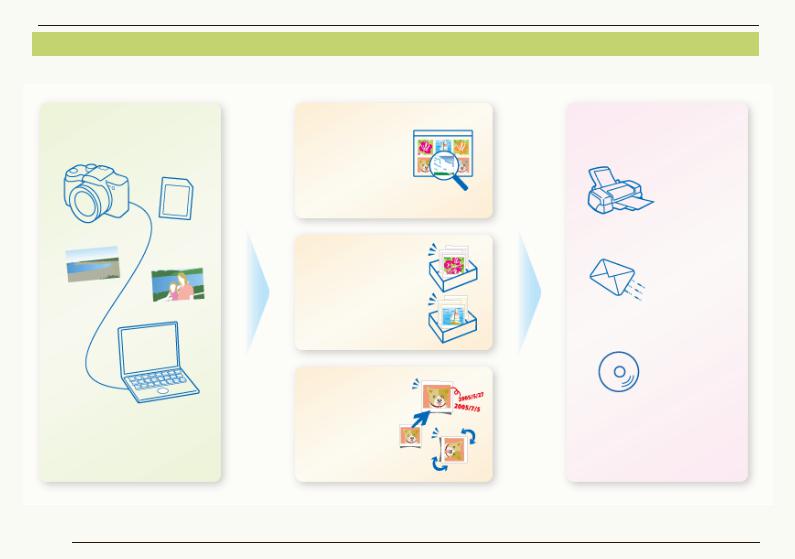
PHOTOfunSTUDIO allows you to easily acquire, display, categorize, process and output the picture on the personal computer.
Acquire |
Display |
Output |
In thumbnail
Enlarged view
Slide show
You can acquire still pictures or motion pictures all at once.
Categorize
By date
By recorded scene By keyword, etc.
CD/DVD
Process
Resize |
etc. |
Retouch, etc.
5

Before Use System requirements
System requirements
PHOTOfunSTUDIO -viewer- 2.1E
Personal |
IBM® PC/AT compatible personal computer |
computer |
having Intel® Pentium® III 500 MHz or higher CPU |
|
(including compatible CPU) |
|
(Intel® Pentium® III 800 MHz or higher CPU if |
|
using Windows Vista®) |
OS |
Preinstalled |
|
Microsoft® Windows® 2000 Professional |
|
Microsoft® Windows® XP Home Edition |
|
Microsoft® Windows® XP Professional |
|
Microsoft® Windows Vista® Ultimate |
|
Microsoft® Windows Vista® Business |
|
Microsoft® Windows Vista® Home Premium |
|
Microsoft® Windows Vista® Home Basic |
RAM |
256 MB or more |
|
(512 MB or more if using Windows Vista®) |
Display |
High Color (16 bit) or more |
|
Desktop resolution of 800k600 pixels or more |
|
(1024k768 pixels or more recommended) |
|
|
Free hard |
200 MB or more |
disk space |
|
|
|
Necessary |
QuickTime 6.1 or later |
software |
|
|
|
Sound |
Windows compatible sound device |
|
|
Drive |
CD-ROM drive (required to install this program) |
|
|
Interface |
USB port (USB2.0 or USB1.1) |
|
(When devices are connected through USB hub |
|
or by using USB extension cable, operation is |
|
not guaranteed.) |
|
|
zEven if the system requirements mentioned in these operating instructions are fulfilled, some personal computers cannot be used.
zThe operation of this software will not be guaranteed when fonts other than English fonts are selected and used.
zThis software cannot be used on Macintosh.
zThis software cannot be used on Microsoft Windows® 3.1, Windows® 95, Windows® 98, Windows® 98SE, Windows® Me and Windows NT®.
zOperation on an upgraded OS is not guaranteed. zOperation on an OS other than the one pre-installed is
not guaranteed.
zMulti-boot environment is not supported.
zLog on with an administrator account or standard user account before using this software. You cannot use this software with a guest account.
zOnly the system administrator can install or uninstall this software.
zThis software may not run properly on user-built computers.
zIf the settings for the size of characters in the screen settings dialog box in Windows is larger than the standard size, some buttons may be displayed off-screen and cannot be
operated. In this case, restore the font size to standard size. zThis software cannot be used on 64-bit OS. zQuickTime is needed to play motion pictures.
6
|
|
Setting up Connecting the digital camera to PC |
|
Setting up |
|
|
|
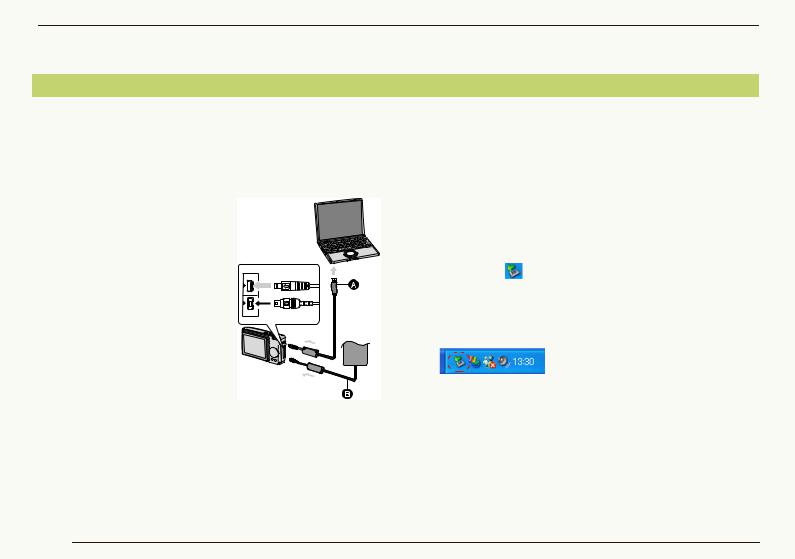
Connecting the digital camera to PC |
3 Make sure that the digital camera is properly |
||
When you connect the digital camera to the PC, use |
|||
batteries with sufficient battery power or the AC |
recognized by the PC. |
||
adaptors. If the remaining battery power is exhausted |
You may judge that the digital camera is properly |
||
during communication, the recorded data may be |
|||
recognized if a [Removable Disk] is added in [My |
|||
damaged. |
|
||
|
Computer]. |
||
1 Prepare the digital camera. |
|
||
|
PHOTOfunSTUDIO or LUMIX Simple Viewer may start |
||
• If you use the AC adapter, |
|
automatically. For details, refer to 9. |
|
|
Before removing the USB connection cable, make sure |
||
connect it. |
|
||
|
that the digital camera is not accessing the card. |
||
• Turn on the digital camera. |
|
||
|
Double-click [ ] icon in the system tray, and select the |
||
2 Connect the digital camera |
DIGITAL |
||
AV OUT |
USB connection cable ([USB Mass Storage Device]) and |
||
|
click [Stop]. Then you can safely remove the USB |
||
to the PC via the USB |
DC IN |
connection cable without causing any error message to |
|
|
|||
connection cable. |
|
appear. |
|
• Set the digital camera for |
|
|
|
connecting to a PC. (For |
|
|
|
details, refer to the |
|
Do not operate the digital camera or disconnect the USB |
|
operating instructions for |
A: USB connection cable |
connection cable while transferring data in the digital |
|
the digital camera.) |
B: AC adaptor |
camera. The software may not function correctly and |
|
damage the data being transferred.
The shape of the terminal varies depending on the digital camera used. For details, refer to the operating instructions for the digital camera.
7
Setting up Starting PHOTOfunSTUDIO
Starting PHOTOfunSTUDIO
Before using for the first time, select [start] [All
Programs] |
[Panasonic] [PHOTOfunSTUDIO |
||||
-viewer-] |
[Readme] and make sure to read the |
||||
supplementary explanation and the latest information. |
|||||
1 Select [start] [All Programs] |
[Panasonic] |
||||
[PHOTOfunSTUDIO -viewer-] [PHOTOfunSTUDIO |
|||||
-viewer-]. |
|
|
|
|
|
• Or double-click the shortcut icon [ |
|
] on the desktop. |
|||
|
|
|
|
|
|
|
|
|
|
|
|
|
|
|
|
|
|
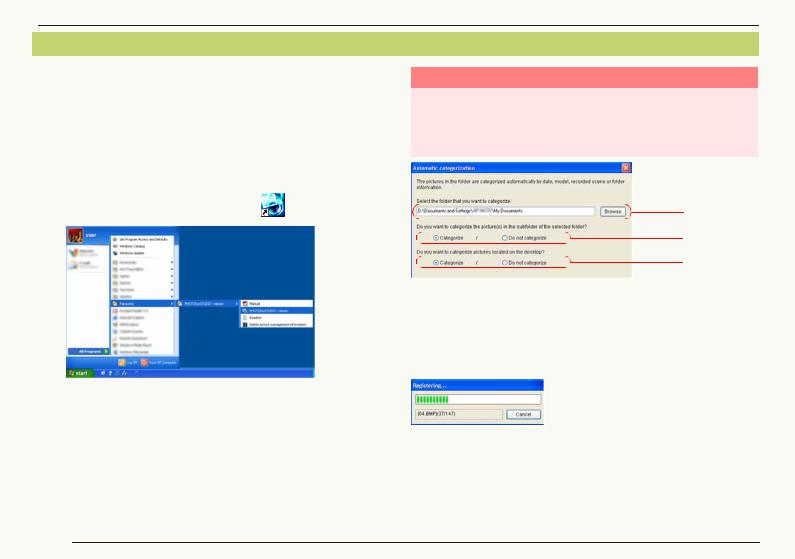
Automatic categorization of pictures
Whenever starting PHOTOfunSTUDIO, the [Automatic categorization] panel opens. Here, pictures saved on the personal computer are automatically categorized based on recording date, model of camera, recorded scene, stored folder, number of persons with detected faces and registered in PHOTOfunSTUDIO.
Caution
When automatic categorization is executed, categorization data which has already been set for pictures in the specified folder will be deleted, and the picture files will be recategorized based on data contained within the picture files themselves. Be aware that categorization data for pictures categorized with user-selected keywords will be lost.
1
2
3
1Click [Browse] to select the folder where pictures are saved on the PC.
2Select whether pictures saved in the subfolder of the selected folder (1) are categorized or not.
3 Select whether pictures on the desktop are categorized or not.
Click the [Start] button to start categorization.
Click [Cancel] while the [Registering] window is displayed to interrupt automatic categorization.
PHOTOfunSTUDIO can be set to perform automatic categorization on every startup. ( 96)
For details on categorization, refer to 37.
8

Setting up Starting PHOTOfunSTUDIO
Auto start
When a digital camera is connected to a PC or a memory card is inserted, the following window opens. (Depending on the settings)
• Window for PHOTOfunSTUDIO
When the auto start of PHOTOfunSTUDIO is enabled, the [Acquire from Memory Card] window opens. ( 25)
• Window for LUMIX Simple Viewer
When the auto start of LUMIX Simple Viewer is enabled, this opens.
To use PHOTOfunSTUDIO, click [No] to close the window.
• Window for selecting the operation of Windows
Depending on the settings, the window shown in the left opens. Select the icon for PHOTOfunSTUDIO and click [OK] to start PHOTOfunSTUDIO;
the [Acquire from Memory Card] window opens.
Auto start operation can be changed in Setting screen. ( 96)
Exiting PHOTOfunSTUDIO
1 Select [File] [Exit] on the menu.
•You may also exit the PHOTOfunSTUDIO by pressing the [Alt] key and the [F4] key at the same time when the picture browser is displayed.
9

Basic operations
Basic operations
The explanation of PHOTOfunSTUDIO screen and basic operation method is given.
Switching among display modes 11 |
||
You can view in the following four modes. |
||
- List mode |
12 |
|
- Focus mode |
14 |
|
- Full Screen mode 15 |
||
- Calendar mode |
16 |
|
Select pictures |
18 |
|
You can select one or more pictures. |
||
Mark pictures |
19 |
|
With the mark, you can select pictures in different folders at one time. Marked pictures become candidates for processing when you categorize, process or output pictures.
Copy, move or delete pictures 21 22 23
Refresh the display 23
Even after pictures are copied, moved or deleted, the result of the processes may not be reflected on the screen. In this case, refresh the picture browser or the folder view.
10
Basic operations Switching among display modes
Switching among display modes
With PHOTOfunSTUDIO, you can view in the following four modes.
1 2 3 4
Switching mode with a single click! ( 86)
1 |
|
|
|
4 |
|
|
|
||
|
|
|
|
|
You can also switch by double-clicking a picture.
2 |
|
|
|
3 |
|
|
|
||
|
|
|
|
|
You can also switch the mode by clicking [  ].
].
1List mode ( 12)
Displays pictures with reduced ones (thumbnail) in list form. •The thumbnail size can be changed in 5 levels.
2Focus mode ( 14)
A selected picture is displayed in the browser in enlarged view. •Pictures information can also be displayed.
•Motion pictures can also be played.
3Full Screen mode ( 15)
A selected picture is enlarged to full screen.
•To return to the previous screen (mode), press [Esc] key or
click [ ].
4Calendar Mode ( 16)
Sorts pictures by recording date and then displays them in the format for Monthly Calendar mode or the Daily Calendar mode.
You can also select each of the modes by selecting [View] [View Format] from the menu, or by right-clicking in the picture browser and selecting [View Format].
If you switch to the Focus mode or the Full Screen mode without selecting any picture, the first picture within the folder is displayed.
For the file formats that can be displayed, consult “Picture files that can be displayed by PHOTOfunSTUDIO” ( 108).
11
|
|
|
|
|
|
|
|
|
|
|
|
|
|
|
|
|
|
|
|
|
|
|
|
|
|
|
|
|
Basic operations Switching among display modes |
|
|
|
|
|
|
|
|
|
|
|
|
|
|
|
|
|
|
|
|
|
|
|
|
|
|
|
|
|
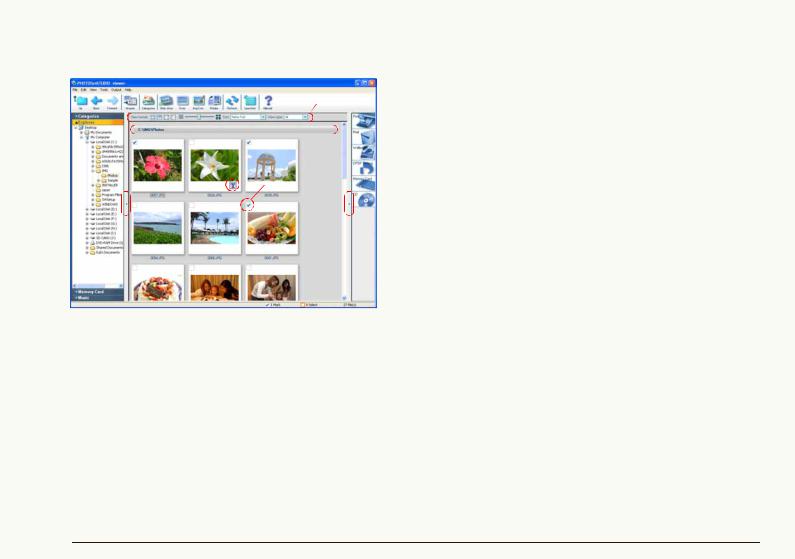
3 Folder view |
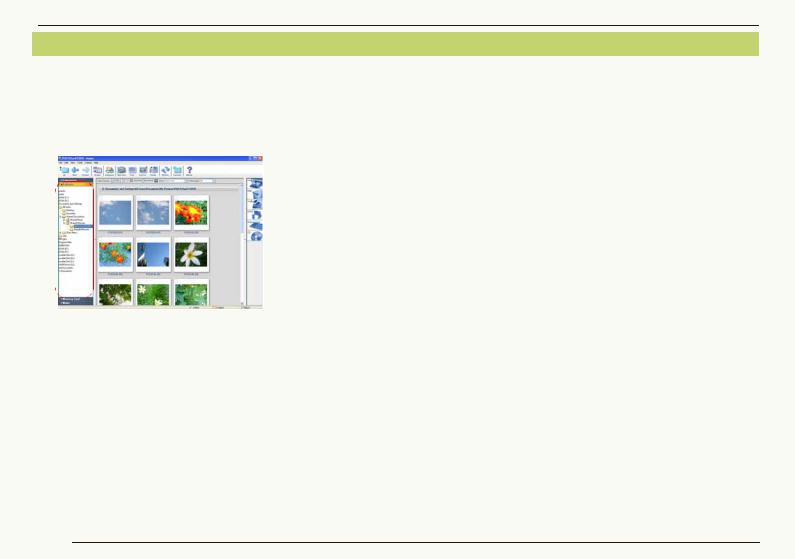
List mode |
|
|
|
|
|
|
|
|
|
|
|
|
|
|
|
|
|
|
|
||||||||||
|
|
|
|
|
|
|
|
|
|
|
|
|
|
|
|
|
|
|
Folders can be displayed by type ([Categorize], |
||||||||||
1 |
|
|
|
|
|
|
|
|
|
|
|
|
|
|
|
|
|
|
|
|
|
|
|
|
|
|
|
|
[Explorer], [Memory Card] and [Music]). |
|
|
|
|
|
|
|
|
|
|
|
|
|
|
|
|
|
|
|
|
|
|
|
|
|
|
|
|
||
|
|
|
|
|
|
|
|
|
|
|
|
|
|
|
|
|
|
|
|
|
|
|
|
|
|
|
|
The pictures within the folder selected here are |
|
|
|
|
|
|
|
|
|
|
|
|
|
|
|
|
|
|
|
|
|
|
|
|
|
|
|
|
|
||
2 |
|
|
|
|
|
|
|
|
|
|
|
|
|
|
|
|
|
|
|
|
12 |
displayed in the picture browser. |
|||||||
|
|
|
|
|
|
|
|
|
|
|
|
|
|
|
|
|
|
|
|
|
|
||||||||
|
|
|
|
|
|
|
|
|
|
|
|
|
|
|
|
|
|
|
|
|
|||||||||
|
|
|
|
|
|
|
|
|
|
|
|
|
|
|
|
|
|
|
|
|
|
|
|
|
|
|
11 |
• To open the window of any type, click its title bar |
|
|
|
|
|
|
|
|
|
|
|
|
|
|
|
|
|
|
|
|
|
|
|
|
|
|
|
(e.g., [Explorer]). The currently open window is |
|||
|
|
|
|
|
|
|
|
|
|
|
|
|
|
|
|
|
|
|
|
|
|
|
|
|
|
|
|
|
|
|
|
|
|
|
|
|
|
|
|
|
|
|
|
|
|
|
|
|
|
|
|
|
|
|
10 |
closed when another window is opened. |
|||
|
|
|
|
|
|
|
|
|
|
|
|
|
|
|
|
|
|
|
|
|
|
|
• Nothing can be displayed in the picture browser |
||||||
|
|
|
|
|
|
|
|
|
|
|
|
|
|
|
|
|
|
|
|
|
|
|
|
|
|
|
9 |
||
7 |
|
|
|
|
|
|
|
|
|
|
|
|
|
|
|
|
|
|
|
|
|
when [My Computer] is selected on [Explorer]. |
|||||||
|
|
|
|
|
|
|
|
|
|
|
|
|
|
|
|
|
|
|
|
|
|
|
|||||||
|
|
|
|
|
|
|
|
|
|
|
|
|
|
|
|
|
|
|
|
|
|
|
8 |
• Thumbnails may not be displayed when you select |
|||||
|
|
|
|
|
|
|
|
|
|
|
|
|
|
|
|
|
|
|
|
|
|
|
|
|
|||||
|
|
|
|
|
|
|
|
|
|
|
|
|
|
|
|
|
|
|
|
|
|
|
|
|
|
|
|
|
a folder including more than 10,000 pictures. |
|
|
|
|
|
|
|
|
|
|
|
|
|
|
|
|
|
|
|
|
|
|
|
|
|
|
|
|
|
• For more detailed setting, see 91. |
|
|
|
|
|
|
|
|
|
|
|
|
|
|
|
|
|
|
|
|
|
|
|
|
|
|
|
|
|
z[Categorize] ( 35) |
|
|
|
|
|
|
|
|
|
|
|
|
|
|
|
|
|
|
|
|
|
|
|
|
|
|
|
|
|
z[Explorer] |
|
|
|
|
|
|
|
|
|
|
|
|
|
|
|
|
|
|
|
|
|
|
|
|
|
|
|
|
6 |
All folders on the PC are displayed. |
|
|
|
|
|
|
|
|
|
|
|
|
|
|
|
|
|
|
|
|
|
|
|
|
|
|
z[Memory Card] |
|||
|
|
|
|
|
|
|
|
|
|
|
|
|
|
|
|
|
|
|
|
|
|
|
|
|
|
||||
|
|
|
|
|
|
|
|
|
|
|
|
|
|
|
|
|
|
|
|
|
|
|
|
|
|
|
|
|
Displays folders where pictures recorded by the |
3 |
|
|
|
|
4 |
|
|
|
|
|
5 |
|
|
|
|
|
|
|
|
||||||||||
|
|
|
|
|
|
|
|
|
|
|
|
|
|
|
|
|
digital camera are saved. |
||||||||||||
1 Menu bar |
|
|
|
|
|
|
|
|
|
|
|
|
|
|
|
|
|
|
|
z[Music] ( 34) |
|||||||||
The operating items in PHOTOfunSTUDIO are arranged |
4 Picture browser |
||||||||||||||||||||||||||||
according to the classifications such as [File], [Edit], [View] and |
The pictures within the folder selected in the folder |
||||||||||||||||||||||||||||
[Output]. ( 102) |
|
|
|
|
|
|
|
|
|
|
|
|
|
|
|
|
|
|
|
||||||||||
|
|
|
|
|
|
|
|
|
|
|
|
|
|
|
|
|
|
|
view (3) are displayed. |
||||||||||
2 Tool bar |
|
|
|
|
|
|
|
|
|
|
|
|
|
|
|
|
|
|
|
||||||||||
|
|
|
|
|
|
|
|
|
|
|
|
|
|
|
|
|
|
|
• If there are many pictures in a folder, it may take |
||||||||||
The operating items frequently used such as acquiring, |
time until they are thumbnail-displayed. |
||||||||||||||||||||||||||||
categorizing, and processing are arranged with buttons to |
• Even incompatible files are indicated with data file |
||||||||||||||||||||||||||||
facilitate operations. ( |
100) |
|
|
|
|
|
|
|
|
|
|
|
|
|
|
|
|
|
|
icons of their associated applications, if installed. |
|||||||||
12

Basic operations Switching among display modes
5 Output view
Operation items concerned with picture output are placed as buttons. ( 68)
• You can output in the following ways
|
- Printing |
- Outputting to the memory |
|
- Attaching to E-mail |
card |
|
- Setting as Wallpaper |
- Writing to a CD/DVD |
|
- DPOF Setting |
|
6 |
|
|
Status bar |
|
The total number of files in the selected folder, the number of files selected and the number of files marked are displayed.
7 Folder view open/close button
The folder view can be opened or closed by clicking this button.
8 Output view open/close button
The output view can be opened or closed by clicking this button.
9 Check box
This is the check box for marking. This is selected when you left-click the mouse in the box and the picture becomes marked. ( 19)
10 Identification icon
In the following cases, icons appear on the thumbnails.
[ |
|
]: Motion pictures |
|
[ |
|
]: Pictures set to “My favorites” ( 40) |
|
|
|||
[ |
|
]: Pictures with title information |
|
|
|||
[ |
|
|
]: RAW files |
|
|
||
11 Folder name display area
Displays the name or location (path) of the folder whose pictures are displayed in the picture browser.
12 Picture browser view setting area
- Changing the view format (mode) ( 11) ( 86) - Sorting pictures ( 87)
- Narrowing types of pictures ( 88)
13

Basic operations Switching among display modes
Focus mode
1
3
2
Same as the
List mode.
8
5 4 6 7
1 Folder name display area
The name or path of the folder whose pictures are being displayed in the picture browser are shown.
2 Thumbnail window
The picture selected here appears in enlarged view.
3Enlarged picture window
4Title information display area
Title information is displayed here, if it is included in the picture.
5 Motion picture PLAY/PAUSE button*
Each time this button is clicked, the motion picture switches between playback and pausing.
•Motion pictures automatically play when selected, and play repeatedly until pausing.
6 Motion picture playback slider*
The playback position can be changed by dragging this slider.
7 Full Screen mode select button
When clicking this button, a selected picture is enlarged to full screen.
• For motion pictures, playback starts automatically.
8 Information window
Information about the picture is displayed.
Clicking each information tab switches the contents displayed.
• The contents displayed are the same as those on the Properties screen. ( 94)
* Displayed only when a motion picture is selected.
When playing motion pictures, the pictures and/or voice may be interrupted depending on the performance of your PC.
14
Basic operations Switching among display modes
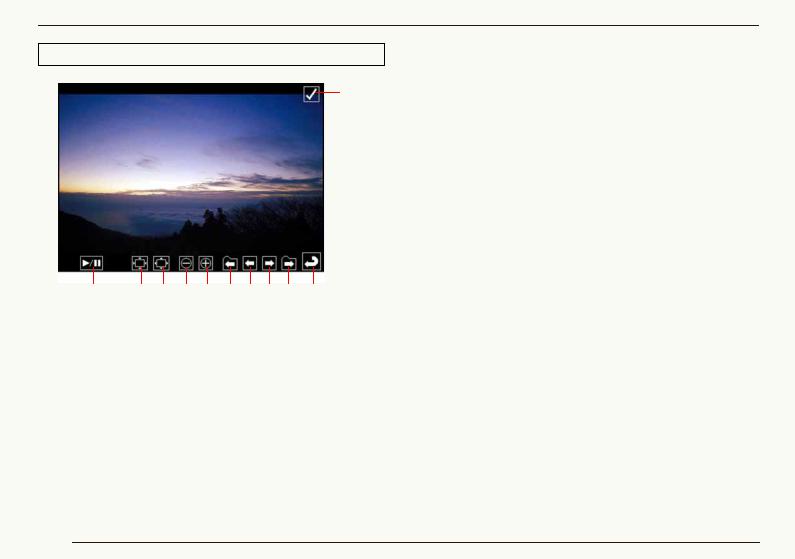
Full Screen mode
11
1 2 3 4 5 6 7 8 9 10
1 Motion picture PLAY/PAUSE button
Each time this button is clicked, the motion picture switches between playback and pausing.
• Motion pictures automatically play, and play repeatedly until pausing.
2Restores the picture to the original size.
3Fits to the window.
4Zoom out
5Zoom in
6To the first picture in the previous folder.
(Displayed only when two or more folders are selected.)
7To the previous picture.
8To the next picture.
9To the first picture in the next folder.
(Displayed only when two or more folders are selected.)
10 Returns to the previous screen (mode).
11 Check box
Sets/Cancels mark on the picture. ( 20)
Only available buttons can be displayed. When the mouse cursor is not operated, the buttons disappear.
When the whole of the picture is not displayed, you can move the position of the picture by dragging it with a mouse. (For still picture)
When playing motion pictures, the pictures and/or voice may be interrupted depending on the performance of your PC.
Depending on the picture, a black band may appear around it.
Pausing playback and switching to the original mode while motion pictures are playing back in Full Screen mode may result in audio being output momentarily. In that case, install QuickTime from the install CD-ROM for this software.
15

Basic operations Switching among display modes
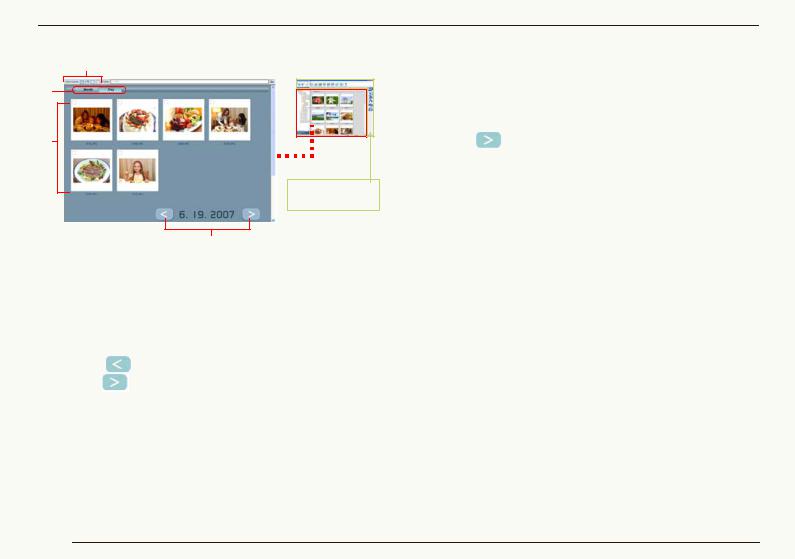
Calendar Mode
Monthly calendar display |
|
|
6 |
1 |
2 |
5 

3
Same as the List mode
( 12). However, some buttons are not
available.
4
1 Folder name display area
Displays the location (path) of the folder containing the pictures displayed in Calendar mode.
2 Folder change button
Click this button to open the folder selection screen and change the folder displayed in Calendar mode.
3 Calendar display area
Pictures in the selected folder (including pictures in the sub folders) are sorted by recording date according to the Exif information ( 111) and displayed in thumbnail view on the calendar. Double-click the date displayed in thumbnail view to switch to the daily calendar display
( 17), and display pictures recorded on that day.
•If there are two or more pictures recorded on the same day, the latest picture will be used in thumbnail view.
•Pictures with no recording date in Exif will be sorted according to the date the file was updated.
4 Month back/forward button
Click the [ |
|
] button to display the previous month, and |
click the [ |
] button to display the next month; however, |
|
a month with no picture to display will be skipped.
5 Month/Day button
Select a date with pictures in the calendar display area and click [Day] to switch the screen to the daily calendar display ( 17).
6 Picture browser display setting area
You can change the display format (mode). ( 11) ( 86)
• You cannot switch to Focus mode or Full Screen mode.
16
Basic operations Switching among display modes
Daily calendar display
4
3
1
Same as the List mode ( 12).
2
1 Picture browser
Pictures recorded on the selected day will be displayed in thumbnail view. You can select and mark pictures just like in List mode.
Double-click a picture to enlarge it to full-screen mode.
2 Day back/forward button
Click the [ |
|
] button to display the previous day, and |
click the [ |
|
|
] button to display the next day; however, a |
||
day with no picture to display will be skipped.
3 Month/Day button
Click [Month] to switch the screen to the monthly calendar display. ( 16)
4 Picture browser display setting area
You can change the display format (mode). ( 11) ( 86)
• You cannot switch to Focus mode.
Only a calendar during the period from 1971 to 2037 can be displayed. Pictures that were recorded/updated in 1970 or before or pictures that will be recorded in 2038 or after will be displayed collectively on the last page that can be displayed using the month forward/day forward
buttons [ |
|
]. (The year and date will be displayed with |
|
||
[`].) |
|
|
|
|
Since pictures are sorted according to the date when the file is first created or updated with the calendar display function on the digital camera, the same pictures may be displayed with a different date in PHOTOfunSTUDIO.
17

Basic operations Selecting pictures
Selecting pictures
Pictures cannot be selected while in the monthly calendar display in the Calendar mode. Double-click a desired date to switch the screen to the daily calendar display.
1 Click a thumbnail of the picture to be selected on the picture browser.
Clicked picture is enclosed by a frame and the picture is selected.
zTo select two or more pictures
Click the pictures to be selected while holding down the [Ctrl] key.
zTo select two or more successive pictures
Select the first picture, then hold down the [Shift] key while you select the last picture.
zTo select all pictures in the displayed folder
Select [Edit] [Select All] from the menu, or press the [A] key while holding down the [Ctrl] key after left-clicking the picture browser.
zTo invert the selection
Select [Edit] [Invert Selection] from the menu. The selected pictures will be deselected and the deselected pictures will be selected.
zTo deselect pictures
Select [Edit] [Deselect All] from the menu or click anywhere in the picture browser other than the thumbnails.
In Focus mode and Full Screen mode
You can select only one picture in Focus mode. When in the Full Screen mode, you cannot bring any picture into selected state.
To select multiple pictures in the Focus mode or select pictures in the Full Screen mode, mark them. ( 20)
18

Basic operations Marking on pictures
Marking on pictures
With the mark, you can select pictures in different folders at one time.
Moreover, the marks are kept until PHOTOfunSTUDIO is stopped unless you cancel them. Therefore, you can prevent mistakes in operations such as canceling the selection after you select multiple pictures, etc.
The mark function cannot be used for operations such as Cut and Delete. Select files to execute these operations.
It is impossible to mark pictures in the monthly calendar display in the Calendar mode. Double-click a desired date to switch the screen to the daily calendar display.
1 Click the check box on the picture you want to mark on the picture browser.
The check box is selected and the picture is marked.
zMarking multiple pictures
Click the check box on the pictures you want to mark by turns.
•You can also mark multiple pictures by selecting multiple pictures you want to mark and then clicking the check box of any 1 picture.
zCanceling all marks
• Select [Edit] [Cancel all marks] from the menu.
•Right-click on the picture browser and select [Cancel all marks] from the context menu.
The marks are kept until PHOTOfunSTUDIO is stopped unless you cancel them. When you select [Marked pictures] to operate files or output files, all of the marked pictures are processed at the same time even they are not displayed on the browser.
19

Basic operations Marking on pictures
Switching marks with [Ctrl] key + [M] key
If you press the [M] key while holding down the [Ctrl] key with the picture selected, marks on the selected pictures are alternatively switched.
When the conditions of the marks on the selected multiple pictures are different, all of the selected pictures follow the condition of the mark on the picture selected last.
1 Initial state. |
|
Only the picture on |
|
|
|
|
the center is |
|
|
|
marked. |
|
|
|
|
|
|
|
|
2 Select the picture on the center. |
|
||
|
|
|
|
|
|
|
|
|
|
|
|
3 Select the picture on the left. |
|
||
|
|
|
|
|
|
|
|
• How to select multiple pictures: |
18 |
|
|
|
|
|
|
4 Press [Ctrl] and [M] key. |
|
The picture on the |
|
|
|
|
left is marked. |
|
|
|
Along with it, the |
|
|
|
picture on the |
|
|
|
center is also |
|
|
|
marked. |
|
|
|
|
5 Press [Ctrl] and [M] key again. |
Marks on both |
|
pictures are |
|
canceled. |
|
|
6 Press [Ctrl] and [M] key once more. |
Both pictures are |
|
marked again. |
|
|
Setting/Canceling marks in Focus mode
In Focus mode, click the check box on any thumbnail picture to set/cancel the mark.
•You can also set/cancel the mark of a picture in selected state (with focus), by pressing the [M] key while holding down the [Ctrl] key on the PC.
Setting/Canceling marks in Full Screen mode
When in the Full Screen mode, click the check box at the top right corner to set or cancel the mark.
•You can also set/cancel the mark of a picture, by pressing the [M] key while holding down the [Ctrl] key on the PC.
20
|
|
|
Basic operations Copying pictures |
|
|
||
Copying pictures |
|
||
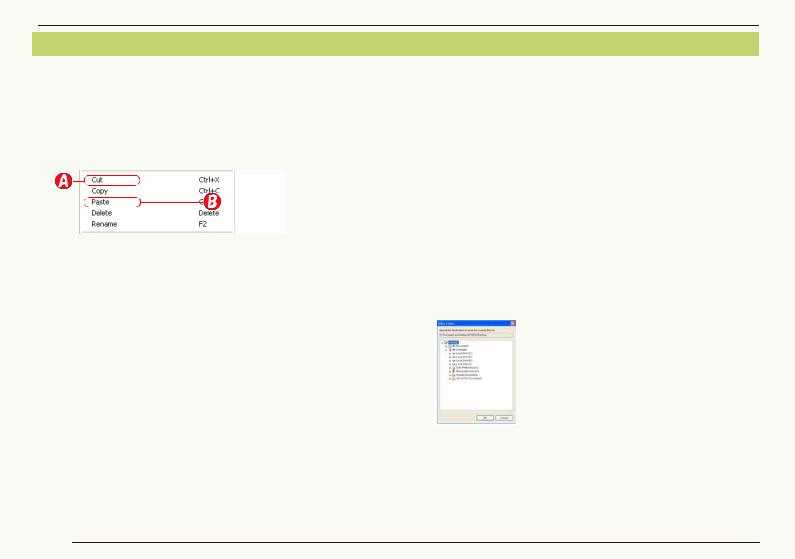
1 |
Select a picture to be copied in the picture browser. |
pressing the [Ctrl] key on the picture browser and then |
|
2 |
|
dropping it into the destination folder in the folder view. |
|
Right-click the picture to open the context menu |
|
||
and select  .
.
|
|
|
|
|
|
|
|
|
|
|
|
|
|
|
|
|
|
|
|
|
|
|
|
|
|
|
|
|
|
|
|
|
|
|
|
|
|
|
|
|
|
|
|
|
|
|
|
|
|
|
|
|
|
|
|
|
|
|
|
|
|
|
|
|
3 Open a target folder, right-click in the picture |
|
|
|
|
||||||||
browser to open the context menu, and select |
|
|
. |
• When you copy a picture to a folder in a different drive, |
||||||||
• You cannot copy any picture into [Categorize]. |
|
|
|
you can copy it by simply dragging and dropping it into |
||||||||
• When you apply this operation to a file in the |
|
|
|
the folder without holding down the [Ctrl] key. |
||||||||
|
[Categorize], its registration itself is also copied. |
|
|
|
To copy marked pictures |
|||||||
• When you want to copy pictures into [Memory Card], |
||||||||||||
1 ) Select [Edit] [Copying marked files] from the menu. |
||||||||||||
|
refer to “Writing pictures onto a memory card” ( |
81). |
||||||||||
|
The folder selection screen will appear. |
|||||||||||
Copying using Menu |
|
|
|
2 )Select the destination folder and click [OK]. |
||||||||
1 )Select a picture to be copied in the picture browser. 2 )Select [Edit] [Copy] from the menu.
3 )Open a target folder and select [Edit] [Paste] from the menu.
Copying by dragging and dropping
In the case of the List mode or the Focus mode, pictures can be copied by dragging the desired picture while
21
Basic operations Moving pictures
Moving pictures
1 Select a picture to be moved in the picture browser.
2 Right-click the picture to open the context menu and select  .
.
3 Open the target folder, right-click in the picture browser to open the context menu, and select  .
.
•You cannot move any picture into the [Categorize].
•When you apply this operation to files in the [Categorize], the original files are moved.
•No picture can be moved into [Memory Card]. To copy,
refer to “Writing pictures onto a memory card” ( 81).
Moving using Menu
1 )Select a picture to be moved in the picture browser. 2 )Select [Edit] [Cut] from the menu.
Moving by dragging and dropping
In the case of the List mode or the Focus mode, pictures can be moved by dragging the desired picture on the picture browser and then dropping it into the destination folder in the folder view.
•When you move a picture to a folder in a different drive, hold down the [Shift] key while you drag and drop it into the folder. If you do not hold the [Shift] key while you drag and drop it, the file will be copied, not moved.
To move marked pictures
1 )Select [Edit] [Moving marked files] from the menu.
The folder selection screen will appear.
2 )Select the destination folder and click [OK].
3 )Open a target folder and select [Edit] [Paste] from |
If the result of moving is not reflected in the picture |
|
browser after these operations, refresh the display on |
||
the menu. |
||
the picture browser. ( 23) |
||
|
22

Basic operations Deleting pictures
Deleting pictures
1 Select a picture to be deleted in the picture browser.
2 Right-click the picture to open the context menu and select  .
.
The confirmation message will be displayed. Select [Yes] to delete the picture.
•You may also delete the picture by pressing the [Delete] key while the picture is selected.
•If you delete pictures in the [Categorize], the pictures will be deleted only from the registration. The original pictures themselves will not be deleted.
Deleting using Menu
1 )Select a picture to be deleted in the picture browser.
2 )Select [File] [Delete] from the menu.
The confirmation message will be displayed. Select [Yes] to delete the picture.
If the result of deleting is not reflected in the picture browser after these operations, refresh the display on the picture browser. ( 23)

 Refreshing the display
When the result of the operating such as copying, moving or deleting pictures, etc. is not reflected on the picture browser, refresh the display on the picture browser.
1 Click [ ].
].
• The display on the picture browser is also refreshed by pressing [F5] key or selecting [View] [Refresh] from the menu.
When the operations to the files and folders performed on the software except PHOTOfunSTUDIO are not reflected on the picture browser or the folder view, refresh the display on the picture browser or the folder view.
When you eject a memory card from the digital camera or re-insert a memory card to the digital camera, refresh the display.
23

Acquiring and displaying pictures
Acquiring and displaying pictures
Acquire recorded pictures from the digital camera to the PC 25
Acquire pictures from a digital camera using PHOTOfunSTUDIO.
Displaying the acquired pictures in list view 27
Acquired pictures can be displayed in a list by the picture browser.
Displaying pictures by recording date 28
Pictures can be displayed by sorting in calendar format based on their recording date.
Displaying enlarged pictures 29
Pictures can be displayed by enlarging them to full screen size.
Playing back slide shows 30
Slide shows can playback using the acquired pictures.
You can also set desired switching effect and music to the slide shows.
Pictures may not be acquired normally if digital cameras other than Panasonic products are used. To acquire or to categorize pictures properly, set the clock setting properly on the digital camera before recording. You can properly acquire pictures with recording dates from 1971 to 2037 with this software.
24
Acquiring and displaying pictures Acquiring pictures from a digital camera
Acquiring pictures from a digital camera
Connect a digital camera and a PC. ( 7)
1 Click [ ].
].
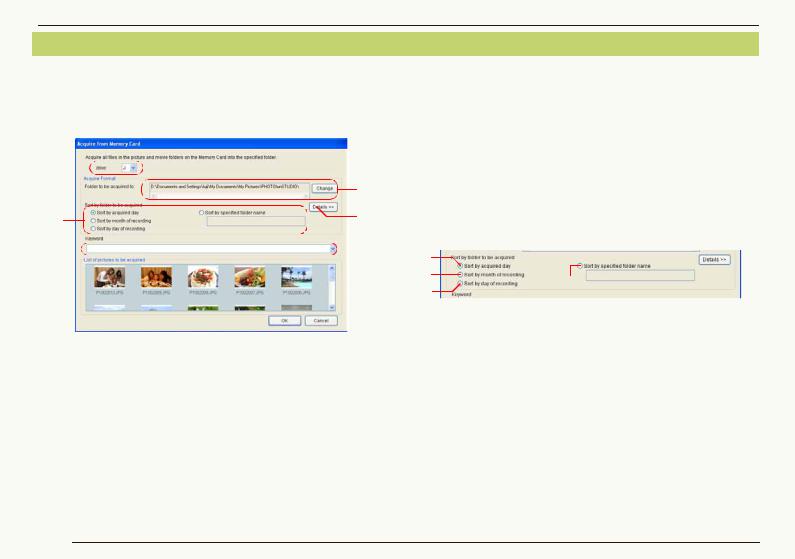
[Acquire from Memory Card] panel is opened.
1

2
3 |
4 |
|
5

•When two or more digital cameras are connected, select the appropriate drive letter (e.g., E, F) from 1 for the digital camera you wish to acquire from.
•Right-click the thumbnail of any picture and select [Properties], and you can see the picture information.
2 Check the acquisition destination folder. (2)
•The acquisition destination folder is [PHOTOfunSTUDIO] by default.
Folder path
(when Windows® is installed on drive C):
C:\Users\(User Name)\Pictures\PHOTOfunSTUDIO (Windows Vista®)
C:\Documents and Settings\(User Name)\
My Documents\My Pictures\PHOTOfunSTUDIO (Windows® 2000/XP)
•When you change the folder to save the acquired pictures, click [Change] to select the desired folder.
3 Set the classification (sub-folder). (3)
In the acquisition destination folder, pictures can be classified by creating sub-folders based on conditions.
A
B D
C
A.Classifies and stores the pictures in sub-folders created according to the acquisition date (today's date). (Example: 081225).
B.Classifies and stores the pictures in sub-folders according to the month when recorded. (Example: 0812).
C.Classifies and stores the pictures in sub-folders created according to the day when recorded. (Example: 081225).
D.Classifies and stores pictures in entered name sub-folders.
25

Acquiring and displaying pictures Acquiring pictures from a digital camera
4 Set optional settings.
The following setting items are displayed by clicking on [Details] (4).
E
F

G
E.Method of handling files with the same file name
F.File naming method
G.Setting automatic categorization
Refer to 97 – 98 for these settings.
5 Set a keyword.
The acquired picture can be categorized by giving a common keyword. ( 40) Keyword can be directly entered in 5 or selected from the existing keywords by
clicking  .
.
6 Click [OK].
Pictures are acquired based on the above settings.
After acquisition of picture is completed, the following message will be displayed.
The picture file saved to the computer is deleted from the memory card, if [Yes] is clicked.
Pictures will remain in memory card, if [No] is clicked.
•With some types of digital camera, it will not be possible to delete pictures in the memory card using PC operations.
If the message [Insert a memory card containing pictures taken by a digital still camera.] appears, check the following:
- Whether the USB connection cable is securely inserted into both the digital camera and the PC.
- Whether the digital camera is powered on.
- Whether the digital camera is set for connecting to a PC. (For details, refer to the operating instructions for the digital camera.)
- Whether the folder shown below is present on the memory card.
Memory card
If there is no folder shown in the figure, the card is not recognized as the memory card. In such cases, insert the card into the card slot of the digital camera again and record pictures, and folders are automatically created and the card comes to be recognized as the memory card.
(However, only the files stored in the folder enclosed in a red frame can be acquired.)
26
Acquiring and displaying pictures Displaying the acquired pictures in list view
Displaying the acquired pictures in list view
Displays pictures acquired from the digital camera in the picture browser.
1 Click [Explorer] title bar in the folder view to open [Explorer] window.
2 Click the folder where acquired pictures are saved.
Acquired pictures are displayed in a list by the picture browser.
• For details about various kinds of icons to display on thumbnails, refer to 13.
• If [Explorer] is not displayed, select [View] [Folder] [Explorer] from the menu.
When the screen display is distorted because the screen saver is started or other reasons, refresh the screen display. ( 23)
The acquisition destination folder is
[PHOTOfunSTUDIO] by default.
Folder path (when Windows® is installed on drive C):
C:\Users\(User Name)\Pictures\PHOTOfunSTUDIO (Windows Vista®)
C:\Documents and Settings\(User Name)\
My Documents\My Pictures\PHOTOfunSTUDIO (Windows® 2000/XP)
• If the whole folder view is not displayed, click folder view open/close button to display it. ( 12)
•To display folders in the picture browser, check [View subfolder] on [View] menu.
27
Acquiring and displaying pictures Displaying pictures by recording date
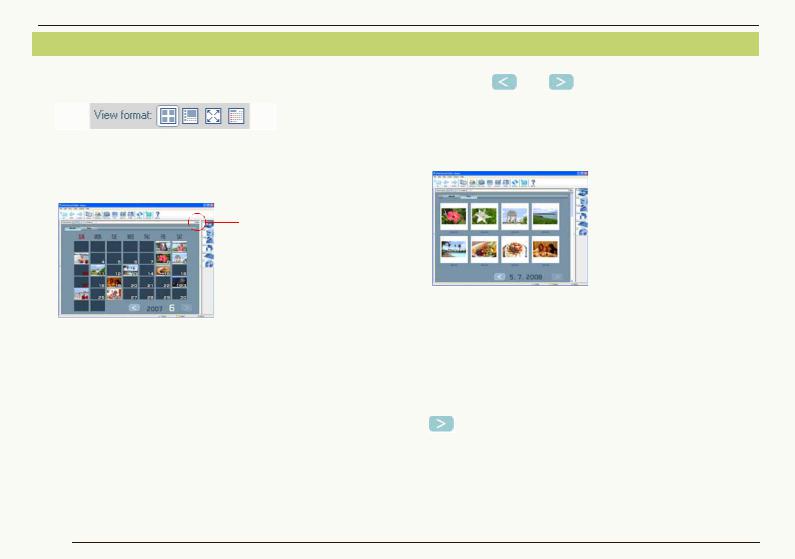
Displaying pictures by recording date
1 Select Calendar mode (1) from [View format]. |
2 |
Click the [ |
|
] or [ |
|
] button to display a specific |
|||
|
|
||||||||
|
|
|
1 |
3 |
month. |
|
|
|
|
|
|
|
Double-click the thumbnail of the date to be displayed. |
||||||
|
|
||||||||
|
|
|
|
||||||
Pictures in the [My pictures] ([Pictures]) folder (including pictures in the sub folders) are sorted by recording date according to the Exif information ( 111) and displayed in the calendar.
2
•The calendar for a month with a picture with the latest recording date in the folder will be displayed. If there are pictures from 1970 or before and 2038 or later, pages showing these pictures collectively are displayed first.
•If there are two or more pictures recorded on the same day, the latest picture will be used in thumbnail view.
•Pictures with no recording date in Exif will be sorted according to the date the file was updated.
•To display pictures in other folders, click the folder selection button (2) to select and display the desired folder.
The calendar will switch to the daily calendar display and a list of the pictures recorded on that day will be displayed.
•You can switch to the daily calendar display by selecting the thumbnail view and clicking the [Day] button on the top of the calendar.
Only a calendar during the period from 1971 to 2037 can be displayed. Pictures that were recorded/updated in 1970 or before or pictures that will be recorded in 2038 or after will be displayed collectively on the last page that can be displayed using the month forward/day forward buttons
[ |
]. (The year and date will be displayed with [`].) |
Since pictures are sorted according to the date when the file is first created or updated with the calendar display function on the digital camera, the same pictures may be displayed with a different date in PHOTOfunSTUDIO.
If displays on the screen are corrupted, such as after
starting the screen saver, update the display. ( 23)
28

Acquiring and displaying pictures Displaying enlarged pictures
Displaying enlarged pictures
In the Focus mode or the Full Screen mode, pictures can be seen in enlarged view.
You cannot enlarge pictures from the monthly calendar display in Calendar mode. Switch to the daily calendar
display or List mode. ( 86)
1 To enlarge a picture, click to select the picture in the picture browser.
2 Select Focus mode (1) or Full Screen mode (2) from [View format].
zTo return from the Full Screen mode (2) to the previous screen (mode):
•Press [Esc] key.
•Double-click the picture.
•Click [  ] on the screen.
When playing motion pictures, the pictures and/or voice may be interrupted depending on the performance of your PC.
12
•You cannot switch from the daily calendar display to focus mode.
zPictures can also be enlarged by the following methods.
•Double-click a picture.
•Right-click a picture and select [Focus] or [Full Screen] from [View Format].
• Select a picture and select [View] [View Format] [Focus] or [Full Screen] from the menu.
29

Acquiring and displaying pictures Playing back slide shows
Playing back slide shows
Pictures saved on the PC can be played back as a slide show.
The number of pictures in any one slide show should be restricted to 1000 or fewer. When there are more than 1000, the pictures may not play back correctly.
Operation handling during slide show
If the mouse is moved during the slide show, the operation button is displayed at the bottom of the screen.
Playing back pictures in an open folder as a slide show
1 Display the folder to be played back as a slide show in the picture browser.
2 Click [ ] on the toolbar and select [Start slide show].
The slide show of pictures saved in the folder starts.
•If a slide show starts in the daily calendar mode, pictures recorded on the same day play back as a slide show.
1 2 3
1 Slide show settings button
Click this button to display the settings window for the slide show. ( 32)
2 Slide show start/stop button
Click this button to start the slide show. Click again to stop.
3 Exit button
Click this button to return to previous screen and terminate the slide show.
30
Loading...