


 Loading...
Operating Instructions
LCD Projector
Model No. PT-AX200U
Before operating this product, please read the instructions carefully and save this manual for future use.
TQBJ0235
ENGLISH

Important
Information
Important Safety Notice
Dear Panasonic Customer:
This instruction booklet provides all the necessary operating information that you might require. We hope it will help you to get the most out of your new product, and that you will be pleased with your Panasonic LCD projector. The serial number of your product may be found on its bottom. You should note it in the space provided below and retain this booklet in case service is required.
Model number: PT-AX200U
Serial number:
WARNING: TO REDUCE THE RISK OF FIRE OR ELECTRIC SHOCK, DONOT EXPOSE THIS PRODUCT TO RAIN OR MOISTURE.
Power Supply: This LCD Projector is designed to operate on 100 V - 240 V, 50 Hz/60 Hz AC, house current only.
CAUTION: The AC power cord which is supplied with the projector as an accessory can only be used for power supplies up to 125 V, 7 A. If you need to use higher voltages or currents than this, you will need to obtain a separate 250 V power cord. If you use the accessory cord in such situations, fire may result.
The lightning flash with arrowhead symbol, within an equilateral triangle, is intended to alert the user to the presence of uninsulated “dangerous voltage” within the product’s enclosure that may be of sufficient magnitude to constitute a risk of electric shock to persons.
The exclamation point within an equilateral triangle is intended to alert the user to the presence of important operating and maintenance (servicing) instructions in the literature accompanying the product.
CAUTION: This equipment is equipped with a three-pin grounding-type power plug. Do not remove the grounding pin on the power plug. This plug will only fit a grounding-type power outlet. This is a safety feature. If you are unable to insert the plug into the outlet, contact an electrician. Do not defeat the purpose of the grounding plug.
Do not remove
NOTICE: This product has a High Intensity Discharge (HID) lamp that contains mercury. Dispose may be regulated in your community due to environmental considerations. For disposal or recycling information, please contact your local authorities, or the Electronic Industries Alliance: http:// www.eiae.org
2 - ENGLISH

Important Safety Notice
WARNING:
This equipment has been tested and found to comply with the limits for a Class B digital device, pursuant to Part 15 of the FCC Rules. These limits are designed to provide reasonable protection against harmful interference in a residential installation. This equipment generates, uses and can radiate radio frequency energy and, if not installed and used in accordance with the instructions, may cause harmful interference to radio communications. However, there is no guarantee that interference will not occur in a particular installation. If this equipment does cause harmful interference to radio or television reception, which can be determined by turning the equipment off and on, the user is encouraged to try to correct the interference by one or more of the following measures:
-Reorient or relocate the receiving antenna.
-Increase the separation between the equipment and receiver.
-Connect the equipment into an outlet on a circuit different from that to which the receiver is connected.
-Consult the dealer or an experienced radio/TV technician for help.
FCC CAUTION: To assure continued compliance, use only shielded interface cables when connecting to computers or peripheral devices. Any unauthorized changes or modifications to this equipment will void the users authority to operate.
If you use serial port to connect PC for external control of projector, you must use optional RS-232C serial interface cable with ferrite core. Any unauthorized changes or modifications to this equipment will void the user’s authority to operate.
Information
Important
Pursuant to at the directive 2004/108/EC, article 9(2)
Panasonic Testing Center
Panasonic Service Europe, a division of Panasonic Marketing Europe GmbH
Winsbergring 15, 22525 Hamburg, F.R. Germany
WARNING: Not for use in a computer room as defined in the Standard for the Protection of Electronic Computer/Data Processing Equipment, ANSI/NFPA 75.
|
Declaration of Conformity |
Model Number: |
PT-AX200U |
Trade Name: |
Panasonic |
Responsible party: |
Panasonic Corporation of North America |
Address: |
One Panasonic Way, Secaucus, New Jersey 07094 |
Telephone number: |
(888) 411 - 1996 |
This device complies with Part 15 of the FCC Rules. Operation is subject to the following two conditions: (1) This device may not cause harmful interference, and (2) this device must accept any interference received, including interference that may cause undesired operation.
Information on Disposal in other Countries outside the European Union
This symbol is only valid in the European Union.
If you wish to discard this product, please contact your local authorities or dealer and ask for the correct method of disposal.
ENGLISH - 3

Contents
Quick steps
1.Set up your projector
See “Setting up” on page 14.
2.Connect with other devices
See “Connections” on page 18.
Important Information |
|
Important Safety Notice........................................ |
2 |
Precautions with regard to safety ....................... |
6 |
WARNINGS................................................................. |
6 |
CAUTIONS.................................................................. |
7 |
Cautions when transporting......................................... |
8 |
Cautions when installing.............................................. |
8 |
Cautions on use .......................................................... |
9 |
Accessories ............................................................... |
10 |
Preparation |
|
About Your Projector.......................................... |
11 |
Remote control .......................................................... |
11 |
Projector body ........................................................... |
12 |
3.Prepare the remote control
See “Remote control” on page 11.
4.Start projecting
See “Switching the projector on/off” on page 19.
5.Adjust the image
See “Menu Navigation” on page 27.
Getting Started
Setting up............................................................. |
14 |
Screen size and throw distance................................. |
14 |
Projection method...................................................... |
15 |
Front leg adjusters and throwing angle ..................... |
15 |
Lens shift and positioning.......................................... |
16 |
Connections ........................................................ |
18 |
Before connecting to the projector............................. |
18 |
Connecting to COMPONENT IN/VIDEO IN/S-VIDEO IN |
|
18 |
|
Connecting to COMPUTER IN/HDMI IN ................... |
18 |
Basic Operation
Switching the projector on/off ........................... |
19 |
Power cord ................................................................ |
19 |
POWER indicator ...................................................... |
19 |
Switching on the projector ......................................... |
20 |
Switching off the projector ......................................... |
20 |
Projecting an image ............................................ |
21 |
Selecting the input signal........................................... |
21 |
Positioning the image ................................................ |
21 |
Remote control operation .................................. |
22 |
Operating range ........................................................ |
22 |
Turning on the button backlight ................................. |
22 |
Switching the preset settings..................................... |
22 |
Adjusting the image................................................... |
23 |
Switching the aspect ratio.......................................... |
23 |
Resetting to the factory default settings .................... |
23 |
Capturing an image ................................................... |
23 |
Setting your own color profile .................................... |
24 |
Switching the input signal.......................................... |
26 |
Assigning the functions for shortcut........................... |
26 |
4 - ENGLISH

Contents
Settings |
|
Menu Navigation .................................................. |
27 |
Navigating through the MENU .................................. |
27 |
Main menu and sub-menu ........................................ |
28 |
PICTURE menu..................................................... |
30 |
PICTURE MODE....................................................... |
30 |
CONTRAST .............................................................. |
30 |
BRIGHTNESS........................................................... |
30 |
COLOR ..................................................................... |
30 |
TINT .......................................................................... |
30 |
SHARPNESS ............................................................ |
30 |
COLOR TEMPERATURE ......................................... |
31 |
DYNAMIC IRIS.......................................................... |
31 |
LIGHT HARMONIZER .............................................. |
31 |
ADVANCED MENU................................................... |
31 |
FAVORITE SAVE...................................................... |
32 |
FAVORITE LOAD ..................................................... |
32 |
FAVORITE EDIT ....................................................... |
33 |
SIGNAL MODE ......................................................... |
33 |
POSITION menu ................................................... |
34 |
Maintenance |
|
TEMP and LAMP Indicators ............................... |
40 |
Managing the indicated problems............................. |
40 |
Care and Replacement ....................................... |
41 |
Cleaning the projector............................................... |
41 |
Replacing the lamp unit ............................................ |
42 |
Troubleshooting.................................................. |
44 |
Appendix |
|
Technical Information......................................... |
45 |
List of compatible signals.......................................... |
45 |
Serial terminal........................................................... |
46 |
Specifications............................................................ |
48 |
Ceiling mount bracket safeguards ............................ |
50 |
Dimensions ............................................................... |
51 |
Trademark acknowledgements................................. |
51 |
Index..................................................................... |
52 |
H-POSITION ............................................................. |
34 |
V-POSITION ............................................................. |
34 |
DOT CLOCK ............................................................. |
34 |
CLOCK PHASE......................................................... |
34 |
ASPECT.................................................................... |
34 |
WSS .......................................................................... |
36 |
OVER SCAN ............................................................. |
36 |
KEYSTONE............................................................... |
36 |
AUTO SETUP ........................................................... |
36 |
FUNCTION BUTTON............................................. |
37 |
FUNCTION BUTTON................................................ |
37 |
OPTION menu....................................................... |
38 |
INPUT GUIDE ........................................................... |
38 |
OSD DESIGN............................................................ |
38 |
OSD POSITION ........................................................ |
38 |
BACK COLOR........................................................... |
38 |
STARTUP LOGO ...................................................... |
38 |
AUTO SEARCH ........................................................ |
38 |
HDMI SIGNAL LEVEL............................................... |
38 |
INSTALLATION......................................................... |
38 |
SLEEP....................................................................... |
39 |
ALTITUDE................................................................. |
39 |
LAMP POWER.......................................................... |
39 |
LAMP RUNTIME ....................................................... |
39 |
TEST PATTERN ....................................................... |
39 |
Infomation
Important
Settings Basic Operation Getting Started Preparation
Maintenance
Appendix
ENGLISH - 5

Important
Information
Precautions with regard to safety
WARNINGS
If you notice smoke, strange smells or noise coming from the projector, disconnect the power plug from the wall outlet.
Do not continue to use the projector in such cases, otherwise fire or electric shocks could result. Check that no more smoke is coming out, and then contact an Authorized Service Center for repairs.
Do not attempt to repair the projector yourself, as this can be dangerous.
Do not install this projector in a place which is not strong enough to take the full weight of the projector.
If the installation location is not strong enough, it may fall down or tip over, and severe injury or damage could result.
Installation work (such as ceiling suspension) should only be carried out by a qualified technician.
If installation is not carried out correctly, there is the danger that injury or electric shocks may occur.
Do not use other than an authorized ceiling mount bracket.
If foreign objects or water get inside the projector, or if the projector is dropped or the cabinet is broken, disconnect the power plug from the wall outlet.
Continued use of the projector in this condition may result in fire or electric shocks.
Contact an Authorized Service Center for repairs.
Do not overload the wall outlet.
If the power supply is overloaded (for example, by using too many adapters), overheating may occur and fire may result.
Never attempt to modify or disassemble the projector.
High voltages can cause fire or electric shocks. For any inspection, adjustment and repair work, please contact an Authorized Service Center.
Clean the power plug regularly to prevent it from becoming covered in dust.
If dust builds up on the power plug, the resulting humidity can damage the insulation, which could result in fire. Pull the power plug out from the wall outlet and wipe it with a dry cloth.
If not using the projector for an extended period of time, pull the power plug out from the wall outlet.
Do not handle the power plug with wet hands.
Failure to observe this may result in electric shocks.
Insert the power plug securely into the wall outlet.
If the plug is not inserted correctly, electric shocks or overheating could result.
Do not use plugs which are damaged or wall outlets which are coming loose from the wall.
Do not place the projector on top of surfaces which are unstable.
If the projector is placed on top of a surface which is sloped or unstable, it may fall down or tip over, and injury or damage could result.
Do not place the projector into water or let it become wet.
Failure to observe this may result in fire or electric shocks.
Do not do anything that might damage the power cord or the power plug.
Do not damage the power cord, make any modifications to it, place it near any hot objects, bend it excessively, twist it, pull it, place heavy objects on top of it or wrap it into a bundle.
If the power cord is used while damaged, electric shocks, short-circuits or fire may result.
Ask an Authorized Service Center to carry out any repairs to the power cord that might be necessary.
Do not place the projector on soft materials such as carpets or sponge mats.
Doing so may cause the projector to overheat, which can cause burns, fire or damage to the projector.
Do not place liquid containers on top of the projector.
If water spills onto the projector or gets inside it, fire or electric shocks could result.
If any water gets inside the projector, contact an Authorized Service Center.
Do not insert any foreign objects into the projector.
Do not insert any metal objects or flammable objects into the projector or drop them onto the projector, as doing so can result in fire or electric shocks.
Do not allow the + and - terminals of the batteries to come into contact with metallic objects such as necklaces or hairpins.
Failure to observe this may cause the batteries to leak, overheat, explode or catch fire.
Store the batteries in a plastic bag and keep them away from metallic objects.
Do not touch the leaked liquid from the batteries.
If you touch the leaked liquid, it may hurt your skin. Immediately wash away the liquid with water and seek medical advice.
If you get the leaked liquid in your eye, it may cause blindness or damage. Never rub your eye, and immediately wash away the liquid with water and seek medical advice.
During a thunderstorm, do not touch the projector or the cable.
Electric shocks can result.
6 - ENGLISH

Precautions with regard to safety
Do not use the projector in a bath or shower.
Fire or electric shocks can result.
Do not place your skin into the light beam while the projector is being used.
Strong light is emitted from the projector’s lens. If you place directly into this light, it can hurt or damage your skin.
Do not look into the lens while the projector is being used.
Strong light is emitted from the projector’s lens. If you look directly into this light, it can hurt and damage your eyes.
Be especially careful not to let young children look into the lens. In addition, turn off the power and disconnect the power plug when you are away from the projector.
Do not place your hands or other objects close to the air outlet port.
Heated air comes out of the air outlet port. Do not place your hands or face, or objects which cannot withstand heat close to this port [allow at least
50 cm (20") of space], otherwise burns or damage could result.
CAUTIONS
Replacement of the lamp is recommended to be carried out by a qualified technician.
The lamp has high internal pressure. If improperly handled, explosion might result.
The lamp can easily become damaged if struck against hard objects or dropped, and injury or malfunctions may result.
When replacing the lamp, allow it to cool for at least one hour before handling it.
The lamp cover gets very hot, and touching it can cause burns.
Before replacing the lamp, be sure to disconnect the power plug from the wall outlet.
Electric shocks or explosions can result if this is not done.
Do not allow infants or pets to touch the remote control unit.
Keep the remote control unit out of the reach of infants and pets after using it.
Information
Important
Do not cover the air inlet port or the air outlet port.
Doing so may cause the projector to overheat, which can cause fire or damage to the projector.
Do not place the projector in narrow, badly ventilated places such as closets or bookshelves.
Do not place the projector on cloth or papers, as these materials could be drawn into the air inlet port.
Do not set up the projector in humid or dusty places or in places where the projector may come into contact with oily smoke or steam.
Using the projector under such conditions may result in fire, electric shocks or plastic deterioration. The plastic deterioration may cause the falling down of the projector which is mounted in the ceiling.
Do not set up the projector in a high temperature environment, such as near a heater or in direct sunlight.
Failure to observe this may result in fire, malfunction or plastic deterioration.
Do not set up the projector outdoors.
The projector is designed for indoor use only.
When disconnecting the power cord, hold the plug, not the lead.
If the power cord itself is pulled, the lead will become damaged, and fire, short-circuits or serious electric shocks may result.
Always disconnect all cables before moving the projector.
Moving the projector with cables still attached can damage the cables, which could cause fire or electric shocks to occur.
Do not place any heavy objects on top of the projector.
Failure to observe this may cause the projector to become unbalanced and fall, which could result in damage or injury.
Do not short-circuit, heat or disassemble the batteries or place them into water or fire.
Failure to observe this may cause the batteries to overheat, leak, explode or catch fire, and burns or other injury may result.
When inserting the batteries, make sure the polarities (+ and -) are correct.
If the batteries are inserted incorrectly, they may explode or leak, and fire, injury or contamination of the battery compartment and surrounding area may result.
Use only the specified batteries.
If incorrect or different kind of batteries are used, they may explode or leak, and fire, injury or contamination of the battery compartment and surrounding area may result.
ENGLISH - 7

Important
Information
Precautions with regard to safety
Do not mix old and new batteries.
If the batteries are inserted incorrectly, they may explode or leak, and fire, injury or contamination of the battery compartment and surrounding area may result.
Remove the used batteries from the remote control promptly.
If you leave used batteries in the remote control for an extended period of time, it may cause liquid leaking, abnormal internal temperature rising or explosion.
If not using the projector for an extended period of time, disconnect the power plug from the wall outlet and remove the batteries from the remote control.
If dust builds up on the power plug, the resulting humidity may damage the insulation, which could result in fire.
Keeping or leaving the remote control with batteries inside may cause insulation deterioration, electrical leakage or explosion which could result in fire.
Do not put your weight on this projector.
You could fall or the projector could break, and injury may result.
Be especially careful not to let young children stand or sit on the projector.
Disconnect the power plug from the wall outlet as a safety precaution before carrying out any cleaning.
Electric shocks can result if this is not done.
If the lamp has broken, ventilate the room immediately. Do not touch or bring your face close to the broken pieces.
Failure to observe this may cause the user to absorb the gas which was released when the lamp broke and which contains nearly the same amount of mercury as fluorescent lamps, and the broken pieces may cause injury.
If you believe that you have absorbed the gas or that the gas has got into your eyes or mouth, seek medical advice immediately.
Ask your dealer about the replacement of the lamp unit and check the inside of the projector.
Ask an Authorized Service Center to clean inside the projector at least once a year.
If dust is left to build up inside the projector without being cleaned out, it can result in fire or problems with operation.
It is a good idea to clean the inside of the projector before the season for humid weather arrives. Ask your nearest Authorized Service Center to clean the projector when required. Please discuss with the Authorized Service Center regarding cleaning costs.
We are constantly making efforts to preserve and maintain a clean environment. Please take non repairable units back to your dealer or a recycling company.
Cautions when transporting
Do not subject the projector to excessive vibration or shocks.
The projector lens need to be handled with care. Cover the lens with the lens cover when transporting the projector.
When transporting the projector, hold the body at the bottom securely.
Do not hold the adjuster legs or the top cover to move the projector, as this may damage the projector.
Cautions when installing
Avoid setting up in places which are subject to vibration or shocks.
The internal parts can be damaged, which may cause malfunctions or accidents.
Avoid setting up in places which are subject to sudden temperature changes, such as near an air conditioner or lighting equipment.
The life of the lamp may be shortened or the projector may be turned off. See “TEMP indicator” on page 40.
Do not set up the projector near high-voltage power lines or near motors.
The projector may be subject to electromagnetic interference.
If installing the projector to the ceiling, ask a qualified technician to carry out all installation work.
You will need to purchase the separate installation kit (Model No. ET-PKX100). Furthermore, all installation work is should only be carried out by a qualified technician.
See “Ceiling mount bracket safeguards” on page 50 for the safety cable installation.
If using this projector at high elevations (above 1 400 m), set the HIGHLAND to ON. See “ALTITUDE” on page 39.
Failure to observe this may result in malfunctions or the life of the lamp or the other components may be shortened.
8 - ENGLISH

Precautions with regard to safety
Cautions on use
In order to get the best picture quality
Draw curtains or blinds over any windows and turn off any lights near the screen to prevent outside light or light from indoor lamps from shining onto the screen.
Do not touch the surfaces of the lens with your bare hands.
If the surface of the lens becomes dirty from fingerprints or anything else, this will be magnified and projected onto the screen. Moreover, when not using the projector, attach the lens cover.
Liquid crystal panel
Do not project the same image for long periods of time, as this may remain as an afterimage on the liquid crystal panel.
The liquid crystal panel of the projector is built with very high precision technology to provide fine picture details. Occasionally, a few stuck pixels may appear on the screen as fixed points of blue, green or red. It is recommended to switch off the projector once and try after 1 hour later again. Please note that this does not affect the performance of your LCD.
The projector has a high pressure mercury lamp and that is characterized as follows.
The brightness of the lamp depends on the duration of use.
The lamp may explode or shorten the lamp life by shocks or chipping damage.
The lamp may explode only occasionally after using the projector.
The lamp may explode if using the projector after the instructed lamp replacement timing.
The lamp life is depends on individual lamp characteristics, usage condition and the installation environment. Especially the consecutive use of the projector for more than 10 hours, or the frequent switching on or off may greatly affect on the lamp life.
Screen
Do not apply any volatile substances which may cause discoloration to the screen, and do not let it become dirty or damaged.
Optical components
If you use the projector consecutively 6 hours every day, the optical components may need to be replaced in less than 1 year.
Information
Important
ENGLISH - 9
Important
Information
Precautions with regard to safety
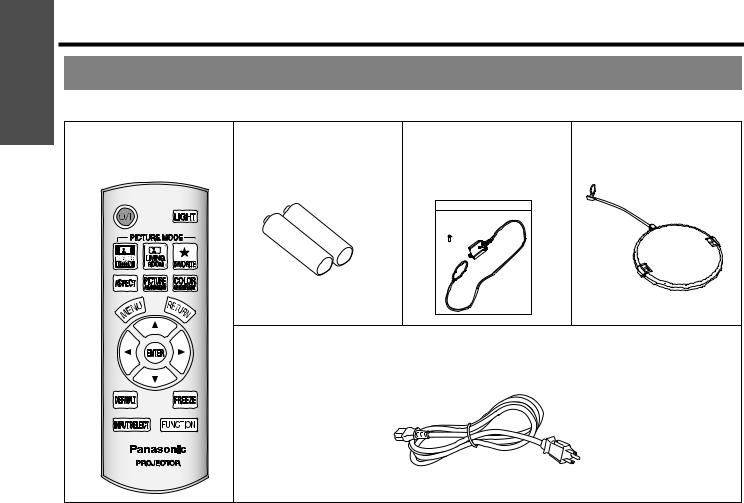
Accessories
Make sure the following accessories are provided with your projector.
Remote control for |
AA batteries for remote |
Safety cable |
Lens cover (x1) |
PT-AX200U (x1) |
control (x2) |
TTRA0140 |
TKKL5372 |
N2QAYB000194 |
|
Attachment screw (x1) |
|
|
|
Safety cable (x1) |
|
Power cord for continental Europe (x1)
K2CG3FR00001
* The protectors for enclosed products, such as a plug cover or foam cartons must be treated properly.
10 - ENGLISH

About Your Projector
Remote control
POWER button
While the MAIN POWER button is on, switch
between stand-by mode
and projection mode. (page 19)
PICTURE MODE buttons
Switch to the best setting for a darker room.
Switch to the best setting  for a brighter room.
Display the FAVORITE |
LOAD menu. (page 22) |
Switch to cycle through the aspect ratio.
(page 23)
Display the main menu or return to the previous menu. (page 27)
Navigate through the menus with FGIH, and activate the menu item with ENTER. (page 27)
Reset some of the settings to the factory default settings. (page 23)
Switch to cycle through the input method. (page 26)
Remote control signal emitter
Remote control signal. (page 22)
Turn the button backlight of the remote control on/ off. (page 22)
Display the COLOR MANAGEMENT menu. (page 24)
Display the PICTURE menu. (page 23)
Return to the previous menu. (page 27)
Capture the projected image as a still picture. (page 23)
Assign the frequently used functions from the option for shortcut. (page 26)
Battery compartment
1.Press the tab and lift up the cover.
2.Insert the batteries according to the polarity diagram indicated inside.
Preparation
NOTE:
•Do not drop the remote control.
•Avoid contact with liquids or moisture.
•Use manganese batteries or alkaline batteries with the remote control.
•Do not attempt to modify or disassemble the remote control. Contact an Authorized Service Center for repairs.
•Do not keep pressing the remote control buttons as this may shorten battery life.
•See “Remote control operation” on page 22.
ENGLISH - 11

Preparation
About Your Projector
Projector body
Top and front view
|
POWER/LAMP/TEMP indicators |
|
(page 19/page 40) |
|
Luminance sensor |
POWER |
Senses the luminance for the |
While the MAIN POWER is on, |
LIGHT HARMONIZER feature. |
switch between stand-by mode |
(page 31) |
and project mode. (page 19) |
|
|
|
RETURN |
|
|
Return to the previous menu. |
|
|
(page 27) |
Control panel |
|
|
INPUT SELECT |
MENU |
Navigate through the menus with |
Switch to cycle through the |
Display the main menu. |
F G H I, and activate the menu |
input method. (page 21) |
Return to the previous menu. |
item with ENTER. (page 27) |
|
(page 27) |
|
Air exhaust port |
Focus ring |
|
Heated air comes out of |
Adjust the focus of the image. |
|
(page 21) |
||
this opening. |
||
|
Zoom ring
Adjust the size of the image. (page 21)
|
Air intake port |
|
|
Shift lever |
|
Remote control signal |
Adjust the position of the |
|
projected image. |
||
receptor |
||
(page 16) |
||
Receive a signal from the |
||
|
||
remote control. (page 22) |
|
|
|
|
|
Projection lens |
|
Lens cover |
|
|
|
Protects the projection lens |
|
|
|||
|
|
from dust or dirt. |
|
|
|
|
|
NOTE:
•Do not cover the ventilation openings or place anything within 50 cm (20") of them as this may cause damage or injury.
•While the projector is not in use, keep the lens cover to protect the lens.
12 - ENGLISH

About Your Projector
Back and bottom view
SERIAL |
|
|
|
|
|
|
|
|
|
|
Connect a compatible cable for |
|
COMPUTER IN |
|
|||||||
controlling the projector |
|
Connect an RGB signal cable |
|
|||||||
remotely via your computer. |
|
from your PC. |
|
|||||||
|
|
|
|
|
|
|
|
|
|
|
|
|
|
|
|
|
|
|
|
|
|
|
|
|
|
|
|
|
|
|
|
|
|
|
|
|
|
|
|
|
|
|
|
Connecting terminals (page 18/page 46)
S-VIDEO IN
Connect a S-VIDEO signal cable.
VIDEO IN
Connect an RCA composite video cable.
Preparation
HDMI IN
Connect HDMI signal cables.
COMPONENT IN
Connect YPBPR signal cables.
MAIN POWER |
|
|
|
Switch the projector on/off |
|
|
|
(page 19) |
|
|
|
AC IN |
|
Lamp unit compartment |
|
Connect the power cord to |
Air intake port |
||
(page 41) |
|||
supply electronic power to the |
|||
|
|
||
projector. (page 19) |
|
|
Security lock
Attach the shackle lock provided with the projector. Compatible with the Kensington MicroSaver Security System. (page 50)
Air filter (page 41)
Lens cover attachment hole |
Front leg adjusters |
|
Screw up/down to adjust the |
|
projection angle. (page 15) |
NOTE:
•Do not cover the ventilation openings or place anything within 10 cm (4") of them as this may cause damage or injury.
•The projector should only be used with the attached power cord to ensure optimum performance and avoid damage to the projector.
ENGLISH - 13
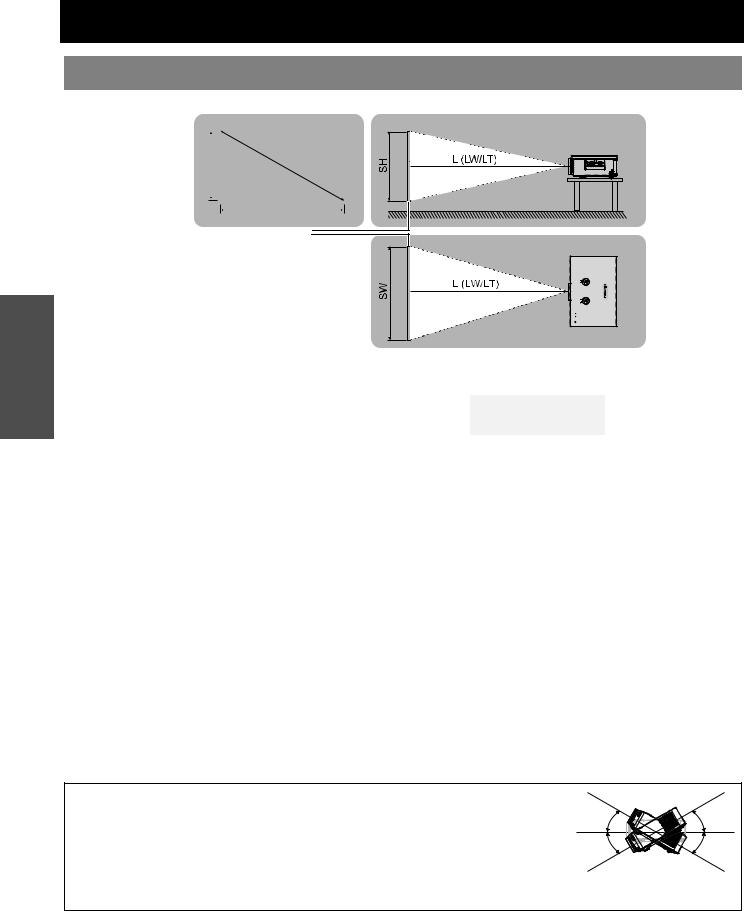
Setting up
Screen size and throw distance
You can adjust the projection size with 2.0x zoom lens. Calculate and define the throw distance as follows.
Started Getting
|
|
|
|
|
S |
Projected image |
SH |
|
|
D |
|
|
|
||||
|
|
|
|
|
|
|
|
|
|
|
|
SW
Screen
|
|
Projection size (16 : 9) |
|
|
|
Throw distance (L) |
|
|||
Screen Diagonal |
Screen height (SH) |
|
Screen width (SW) |
Minimum distance |
Maximum distance |
|||||
(SD) |
|
(LW) |
(LT) |
|||||||
|
|
|
|
|
||||||
1.02 m |
(40") |
0.50 m |
(1'7") |
|
0.89 m |
(2'11") |
1.2 m |
(3'11") |
2.4 m |
(7'10") |
1.27 m |
(50") |
0.62 m |
(2') |
|
1.11 m |
(3'7") |
1.5 m |
(4'11") |
3.0 m |
(9'10") |
1.52 m |
(60") |
0.75 m |
(2'5") |
|
1.33 m |
(4'4") |
1.8 m |
(5'10") |
3.7 m |
(12'1") |
1.78 m |
(70") |
0.87 m |
(2'10") |
|
1.55 m |
(5'1") |
2.1 m |
(6'10") |
4.3 m |
(14'1") |
2.03 m |
(80") |
1.00 m |
(3'3") |
|
1.77 m |
(5'9") |
2.4 m |
(7'10") |
4.9 m |
(16') |
2.29 m |
(90") |
1.12 m |
(3'8") |
|
1.99 m |
(6'6") |
2.7 m |
(8'10") |
5.5 m |
(17') |
2.54 m |
(100") |
1.24 m |
(4') |
|
2.21 m |
(7'3") |
3.1 m |
(10'2") |
6.2 m |
(20'4") |
3.05 m |
(120") |
1.49 m |
(4'10") |
|
2.66 m |
(8'8") |
3.7 m |
(12'1") |
7.4 m |
(24'3") |
3.81 m |
(150") |
1.87 m |
(6'1") |
|
3.32 m (10'10") |
4.6 m |
(15'1") |
9.3 m |
(30'6") |
|
5.08 m |
(200") |
2.49 m |
(8'2") |
|
4.43 m |
(14'6") |
6.2 m |
(20'4") |
12.4 m |
(40'8") |
* All measurements above are approximate and may differ slightly from the actual measurements.
Calculation methods for screen dimensions
You can calculate more detailed screen dimension from the screen diagonal.
SW (m) = SD (m) x 0.872 |
SH (m) = SD (m) x 0.490 |
LW (m) = 1.2244 x SD (m) - 0.056 |
LT (m) = 2.449 x SD (m) - 0.056 |
* The results above are approximate and may differ slightly from the actual measurements.
NOTE:
•Do not use the projector at a raised or a horizontally tilted position as it may cause malfunction of the projector.
•Make sure the projector lens surface is parallel with the screen. You can tilt the projector body less than approximately ± 30° vertically. Overtilting may result in shortening the component’s life.
•For the best quality of the projection image, install a screen where sun light or room light
does not shine directly onto the screen. Close window shades or curtains to block the lights.
14 - ENGLISH

Setting up
Projection method
You can use the projector with any of the following 4 projection methods. To set the desired method in the projector, See “INSTALLATION” on page 38.
Setting on a desk/floor and projecting from front
Setting on a desk/floor and projecting from rear
INSTALLATION: FRONT/DESK
Mounting in the ceiling and projecting from front
INSTALLATION: REAR/DESK
Mounting in the ceiling and projecting from rear
Getting Started
INSTALLATION: FRONT/CEILING |
INSTALLATION: REAR/CEILING |
NOTE:
•A translucent screen is required for rear projection.
•When mounting the projector in the ceiling, the optional ceiling mount bracket (ET-PKX200) is required.
•See “Ceiling mount bracket safeguards” on page 50.
Front leg adjusters and throwing angle
You can screw up/down the front leg adjusters to control the angle of the projector for adjusting the throwing angle. See “Positioning the image” on page 21.
NOTE:
•Heated air comes out of the air exhaust port. Do not touch the air exhaust port directly.
•If keystone distortion occurs, see “KEYSTONE” on page 36.
•Screw up the adjuster legs, and an audible click will be heard as the limit.
ENGLISH - 15

Started Getting
Setting up
Lens shift and positioning
If the projector is not positioned right in front of the center of the screen, you can adjust the projected image position by moving the lens shift dials within the shift range of the lens.
Adjusting the lens shift lever
1. Screw the shift lever counterclockwise to unlock.
2. Move the shift lever to adjust the projected image position. 3. Screw the shift lever clockwise to lock.
Horizontal shift
You can place the projector where the projector lens is up to 25% horizontally off-center from the screen and then adjust the image position with the lens shift feature.
Screen
Shifting the lever left:
Moving to screen’s right
Up to about 25 % of the projection
Up to about 25 % of the projection
Shifting the lever right:
Moving to screen’s left
Vertical shift
You can place the projector where the projector lens is up to 63% vertically off-center from the screen and the adjust the image position with the lens shift feature.
Shifting the lever down: Moving to screen’s bottom.
Up to about 63 % of the projection
Up to about 63 % of the projection
Shifting the lever up:
Moving to screen’s top.
16 - ENGLISH

Setting up
Projector location range
You can determine where to locate the screen and the projector by considering the lens shift possibilities. See “Positioning the image” on page 21.
When the screen position is fixed
Projector
Vertical center of screen
Placement
SH
Center of lens
SW
When the projector position is fixed
Getting Started
63% |
Shift range |
63%
25% |
25% |
|
|
|
|
Projector
NOTE:
•When the projector is located right in front of the screen and the lens shift dials is centered, you will get the best quality of the projection image.
•When the shift lever is at the vertical limit of the shift range, you cannot move the lever to the horizontal limit, likewise when the shift lever is at the horizontal limit of the shift range, you cannot move the lever to the horizontal limit.
•When the projector is tilted and you adjust KEYSTONE, the center of the screen and the lens need to be realigned.
•Do not attempt to pull hard the shift lever while adjusting as this may damage the projector.
ENGLISH - 17
Loading...