


2.4GHz Digital Cordless Answering
Model No. KX-TG2583ALB
KX-TG2583ALS
KX-TG2583NZS
Operating Instructions
KX-TG2583ALB
Caller ID Compatible
PLEASE READ BEFORE USE AND SAVE.
Charge the battery for about 6 hours before initial use.
Information Useful System Answering Telephone Cordless Preparation
Before Initial Use
Thank you for purchasing your new Panasonic cordless telephone.
For Australia
When you subscribe to Caller ID services from your telephone operator, this telephone will display the caller’s phone number. When available from your telephone operator, this telephone will also display the number of the second call or call waiting.
For New Zealand
Caller ID, where available, is telephone company service. After subscribing to Caller ID, this phone will display a caller’s phone number.
For your future reference
Serial No. |
Date of purchase |
(found on the bottom of the unit)
Name and address of dealer
Attach or keep original receipt to assist with any repair under warranty.
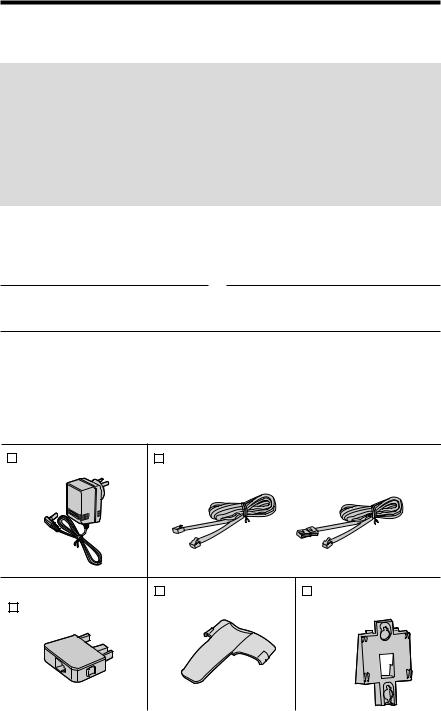
Accessories (included)
AC Adaptor (p. 10) |
Telephone Line Cord (p. 10) |
|
|
For Australia |
For New Zealand |
one |
one |
one |
For Australia only |
Belt Clip (p. 70) |
Wall Mounting |
Telephone Plug |
|
Adaptor (p. 68) |
(p. 10) |
|
|
one |
one |
one |
2
For Best Performance
Battery Charge
A rechargeable Ni-Cd battery powers the handset. Charge the battery for about 6 hours before initial use (p. 11).
•Clean the handset and the base unit charge contacts with a soft, dry cloth once a month. Clean more often if the unit is subject to grease, dust or high humidity. Otherwise the battery may not charge properly.
The battery is beneath this cover.
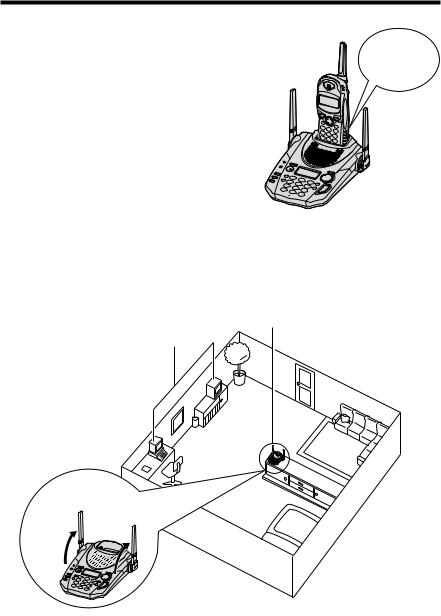
Base Unit Location/Noise
Calls are transmitted between the base unit and the handset using wireless radio waves. For maximum distance and noise-free operation, the recommended base unit location is:
Away from electrical appliances such as a TV, personal computer, cellular phone, charging units or another cordless phone.
In a HIGH and CENTRAL location with no obstructions such as walls.
Raise
the antennas.
Note:
While using the handset:
•If you are near a microwave oven which is being used, noise may be heard from the receiver. Move away from the microwave oven and closer to the base unit.
•If more than one cordless phone is being used and your handset is near another cordless phone’s base unit, noise may be heard. Move away from the other cordless phone’s base unit and closer to your base unit.
3

Contents |
|
Preparation |
|
Location of Controls...................................................................... |
6 |
Displays .......................................................................................... |
9 |
Settings........................................................................................... |
10 |
Connections.................................................................................. |
10 |
Battery Charge ............................................................................. |
11 |
Selecting the Line Mode ............................................................... |
13 |
Programmable Functions ............................................................. |
14 |
Setting the Auto Talk Feature....................................................... |
15 |
Selecting the Ringer Volume ........................................................ |
16 |
Preparing the Answering System ................................................ |
17 |
Greeting Message ........................................................................ |
17 |
Programming Summary for the Answering System ..................... |
19 |
Day and Time Adjustment ............................................................ |
20 |
Selecting the Caller’s Recording Time ......................................... |
22 |
Selecting the Number of Rings..................................................... |
23 |
Cordless Telephone |
|
Making Calls................................................................................... |
24 |
With the Handset .......................................................................... |
24 |
With the Base Unit (Digital Duplex Speakerphone) ..................... |
26 |
Simultaneous Keypad Dialling...................................................... |
28 |
Answering Calls............................................................................. |
29 |
With the Handset .......................................................................... |
29 |
With the Base Unit (Digital Duplex Speakerphone) ..................... |
29 |
Caller ID Service ............................................................................ |
30 |
Using the Caller List ...................................................................... |
32 |
Viewing the Caller List .................................................................. |
32 |
Calling Back from the Caller List .................................................. |
34 |
Editing the Caller’s Phone Number .............................................. |
34 |
Storing Caller List Information in the Directory............................. |
37 |
Erasing Caller List Information ..................................................... |
38 |
One-Touch Dialer........................................................................... |
40 |
Storing a Phone Number in the DIRECT Button .......................... |
40 |
Dialling the Stored Number in the DIRECT Button ...................... |
41 |
Using the Directory........................................................................ |
42 |
Storing Names and Numbers in the Directory ............................. |
42 |
Selecting Characters to Enter Names ......................................... |
44 |
Finding Items in the Directory ...................................................... |
46 |
Dialling from the Directory ........................................................... |
48 |
Editing an Item in the Directory ................................................... |
49 |
Erasing an Item from the Directory ............................................. |
50 |
4

Intercom.......................................................................................... |
51 |
Transferring a Call Using the Intercom......................................... |
52 |
Special Features ............................................................................ |
53 |
How to Use the PAUSE Button |
|
(For Analog PBX Line/Long Distance Service Users) .............. |
53 |
Automatic Security Code Setting.................................................. |
54 |
Call Waiting and Caller ID Compatible (For Australia only) ......... |
54 |
RECALL Button ............................................................................ |
54 |
Answering System |
|
Automatic Answering Operation.................................................. |
56 |
Setting the Unit to Answer Calls................................................... |
56 |
Listening to Messages .................................................................. |
57 |
From the Handset......................................................................... |
58 |
Erasing Messages ......................................................................... |
59 |
Remote Operation from a Touch Tone Phone ............................ |
60 |
Setting the Remote Code ............................................................. |
61 |
Voice Menu................................................................................... |
62 |
Direct Remote Operation.............................................................. |
64 |
Remote Operation with the Handset............................................ |
66 |
Useful Information |
|
Wall Mounting ................................................................................ |
68 |
Using the Belt Clip......................................................................... |
70 |
Using an Optional Headset ........................................................... |
70 |
Battery Replacement ..................................................................... |
71 |
If the Following Appear... ............................................................. |
72 |
Before Requesting Help ................................................................ |
74 |
Adding Another Phone.................................................................. |
80 |
Safety Instructions ........................................................................ |
81 |
Important Information (For Australia only) ................................. |
85 |
System Answering Telephone Cordless Preparation
Information Useful

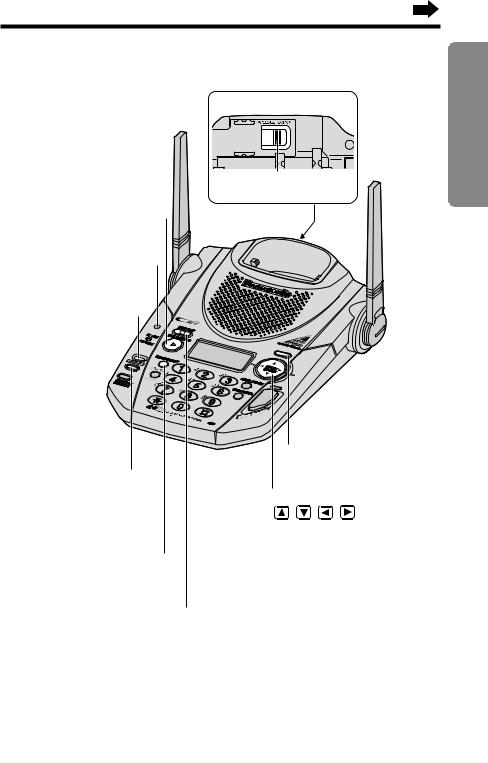
Location of Controls
Base unit
Antennas (p. 3, 10)
Charge Contacts (p. 12)
Display (p. 9, 73)
ERASE/CLEAR
(LOCATOR/INTERCOM) |
|
Button (p. 51) |
(DIGITAL!SP-PHONE) |
|
(Speakerphone) |
IN USE/CHARGE |
Button and Indicator (p. 26, 29) |
|
|
Indicator (p. 11) |
(REDIAL/PAUSE) Button |
|
|
|
(p. 27, 53) |
|
(HOLD/RINGER) Button (p. 16, 27) |
|
MIC (Microphone) (p. 17, 26, 29, 51) |
(RECALL) Button |
|
(p. 54, 55) |
|
6
Back Side
Cradle Lock Switch (p. 68)
(NEW!MESSAGE) Button (p. 57)
CALLER ID Indicator (p. 29, 31)
ANSWER ON Indicator (p. 56, 57, 59) 


ERASE/CLEAR
|
|
(ERASE/CLEAR) |
(ANSWER!ON) Button |
|
Button (p. 18, 38, 50, 59) |
(p. 56) |
Navigator Key |
|
|
||
|
( |
, , , ) |
|
(p. 18, 27, 32, 47, 57) |
|
(GREETING/EDIT) Button (p. 17, 36)
(STOP/EXIT) Button (p. 17, 32, 47, 56, 57)
Preparation

Location of Controls
Handset
Headset Jack (p. 70)
(TALK) Button (p. 24, 29)
(FUNCTION/EXIT/CH)
(Channel) Button
(p. 14, 19, 24, 32, 42, 46)
Charge Contact (p. 12)
(RECALL/PLAYBACK)
Button (p. 54, 55, 66)
|
|
|
|
|
|
|
DIRECT |
||
|
K |
|
|
|
|
|
|
|
|
TAL |
ON |
|
|
|
|
|
EDIT |
||
|
|
O |
FF |
|
|
|
|
FWD |
|
|
|
|
|
|
|
|
|
||
|
|
|
|
LOUD |
|
|
|
||
|
|
|
|
SEAR |
CH |
|
|
|
|
|
BACK |
|
|
|
|
|
CLEAR |
||
|
|
|
|
|
|
INT |
ERCOM |
||
|
CH |
|
|
|
|
|
|||
|
|
|
|
3 |
|
||||
|
EXIT |
|
|
|
|
||||
F |
UNC |
TION |
|
|
2 |
|
|||
1 |
|
|
|
|
|
||||
|
|
|
|
|
|
|
|
||
|
|
|
SK |
IP |
|
6 |
|
||
|
|
PE |
|
|
|
|
|||
|
|
RE |
AT |
|
|
5 |
|
|
|
|
|
4 |
|
|
|
|
|
||
|
|
|
|
|
|
|
|
||
|
|
|
|
|
SG |
|
9 |
|
|
|
|
|
SG |
ALLM |
|
|
|||
|
|
|
|
|
8 |
|
|
||
|
|
WM |
|
|
|
P |
|
||
|
NE |
7 |
|
|
|
|
|||
|
|
|
|
STO |
|
||||
|
|
|
|
SO |
|
||||
|
|
|
|
AN |
N |
|
|
|
|
|
|
|
|
0 |
|
|
|
||
|
|
|
|
|
|
|
|
|
|
|
|
|
|
ANS |
OFF |
|
|
|
|
|
|
|
|
|
|
|
|
||
|
|
|
|
|
|
|
REDIAL |
|
|
|
|
RECALL |
|
|
|
PAUSE |
|
||
|
|
|
|
|
|
|
|
||
|
|
|
CK |
|
|
|
|
|
|
|
|
PLAYBA |
|
|
|
|
|
|
|
Antenna
Display (p. 9, 72)
(DIRECT) Button (p. 40, 41)
(INTERCOM/CLEAR)
Button (p. 38, 44, 50, 51)
Navigator Key
(
 ,
,
 , BACK
 ,
,
FWD/EDIT  )
)
(p. 14, 19, 25, 32, 42)  Charge Contact (p. 12)
(REDIAL/PAUSE) Button (p. 25, 53)
8

Displays
Handset
$
# 0 new call
%
#The display shows the dialled number, call status, programming options and directory items etc. If you subscribe to a Caller ID service, caller information will be displayed (p. 30). The number of new calls will also be displayed.
$The directory icon displays when storing or viewing the directory items (p. 42, 46).
%The battery icon indicates the battery strength (p. 11).
Standby mode:
While the handset is off the base unit, the display will disappear (go blank) after you finish using the handset (making/answering a call, viewing the Caller List or directory list etc.) to conserve the battery life. However, the handset is still able to receive calls. While the handset is on the base unit, the battery icon and the number of new Caller ID calls are displayed in the standby mode (p. 31).
Preparation
Base unit
$ %
SUN 12:00AM
#
0 message
#The day and time and the number of incoming messages are displayed while the unit is not in use (Standby mode). The display shows the dialled number, call status, programming options and directory items etc.
If you subscribe to a Caller ID service, caller information will be displayed
(p. 30). The number of new calls will also be displayed.
$The directory icon displays when viewing the directory items (p. 47).
%The clock icon flashes with the day and time if the clock needs adjusting (p. 20).

Settings
Connections
Fasten the cords to prevent them from disconnecting.
Hooks |
Hooks |
For Australia
To Socket
Telephone Line Cord
Telephone
Plug
For New Zealand
To Single-Line
Telephone Jack
Telephone Line Cord
Power Outlet
230 V–240 V, 50 Hz)
Adaptor
Raise the antennas.
•USE ONLY WITH Panasonic AC ADAPTOR PQLV10AL.
•The AC adaptor must remain connected at all times. (It is normal for the adaptor to feel warm during use.)
•To connect a standard telephone on the same line, see page 80.
•If your unit is connected to a PBX which does not support Caller ID services, you cannot access those services.
•KX-TG2583ALB/KX-TG2583ALS and KX-TG2583NZS are not designed to be used with rotary (pulse dialling) services.
•KX-TG2583NZS will not answer incoming calls on your FaxAbility number.
10
Battery Charge
Place the handset on the base unit and charge for about 6 hours before initial use.
•The IN USE/CHARGE indicator lights and a beep sounds.
IN USE/CHARGE
Indicator
Battery strength
You can check the battery strength on the handset display while the handset is on the base unit, while it is in use (making/answering a call etc.), or after viewing the Caller List or directory items, programming etc. The battery strength will remain for a few seconds after using the handset, then the display will return to the standby mode (p. 9).
The battery strength is as shown in the chart below.
Display prompt |
Battery strength |
||||||||
|
|
|
|
|
|
|
|
|
Fully charged |
|
|
|
|
|
|
|
|
|
|
|
|
|
|
|
|
|
|
|
|
|
|
|
|
|
|
|
|
|
|
|
|
|
|
|
|
|
|
|
Medium |
|
|
|
|
|
|
|
|
|
|
|
|
|
|
|
|
|
|
|
|
|
|
|
|
|
|
|
|
|
|
|
|
|
|
|
|
|
|
|
Low |
|
|
|
|
|
|
|
|
|
|
|
|
|
|
|
|
|
|
|
|
|
|
|
|
|
|
|
|
|
|
|
|
|
|
|
|
|
|
(flashing) |
Needs to be recharged. |
|
|
|
|
|
|
|
|
||
|
|
|
|
|
|
|
|
||
|
|
|
|
|
|
|
|
|
|
Recharge
Recharge the battery when: |
|
|
|
|
|
||||
—“Recharge battery” is displayed on |
Recharge battery |
||||||||
the handset, |
|||||||||
—“ |
|
|
|
” flashes on the display, or |
|
|
|
|
|
|
|
|
|
|
|
|
|
||
—the handset beeps intermittently while it is in use.
•If you DO NOT recharge the handset battery for more than 15 minutes, the display will keep indicating “Recharge battery” and/or “ 

 ” will continue to flash.
•To fully recharge the battery, the handset should be left on the base unit for 6 hours.
Preparation

Settings
Battery information
After your Panasonic battery is fully charged (p. 11):
|
Operation |
Approx. battery life |
|
|
|
|
|
While in use |
|
near the base unit* |
Up to 4.5 hours |
|
|
|
|
(TALK) |
|
away from the base unit |
Up to 3.5 hours |
|
|
|
|
While not in use (Standby) |
Up to 11 days |
||
|
|
|
|
*Within about 3 m
•Battery life may be shortened depending on usage conditions, such as viewing the Caller ID Caller List or directory list, and ambient temperature.
•Clean the handset and the base unit charge contacts with a soft, dry cloth once a month. Clean more often if the unit is subject to grease, dust or high humidity. Otherwise the battery may not charge properly.
•If the battery is fully charged, you do not have to place the handset on the base unit until “Recharge battery” is displayed and/or “ 

 ” flashes. This will maximize the battery life.
•The battery cannot be overcharged.
12
Selecting the Line Mode
If the line is connected to a low voltage system such as a PBX, set to “B”. Otherwise the Call Waiting Caller ID Feature may not be used (p. 54). Your phone comes from the factory set to “A”.
Use the handset near the base unit.
Make sure the unit is in the standby mode initially.
1 |
Press (FUNCTION/EXIT/CH). |
2 |
Press (Å) or (Ä) repeatedly until the arrow |
points to “Program”. |
|
3 |
Press FWD/EDIT (É) (Yes key). |
4 |
Press (Å) or (Ä) repeatedly until the arrow |
points to “Set line mode”. |
|
5 |
Press FWD/EDIT (É) (Yes key). |
6 |
Press (Å) or (Ä) to select “B” or “A”. |
7 |
Press FWD/EDIT (É) (Save key). |
•A beep sounds. |
•To return to the standby mode, press
(FUNCTION/EXIT/CH).
HSave directory Ringer volume GF H=Yes
HProgram
GF H=Yes
HSave DIRECT#
Set recall time
GF H=Yes
HSet line mode Talk switching
GF H=Yes
Line mode
:A GF H=Save
Line mode
:B GF H=Save
Line mode
:B
•You can exit the programming mode any time by pressing (FUNCTION/EXIT/CH).
•If the handset has lost communication with the base unit, 3 beeps sound and “No link to base. Place on cradle and try again.” is displayed.
Preparation

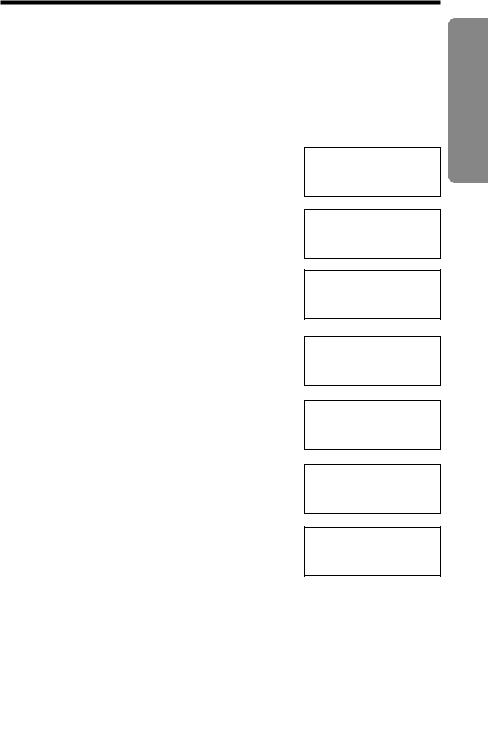
Programmable Functions
You can program the following function items using the handset near the base unit. The display shows the programming instructions. See the corresponding pages for function details.
Make sure the unit is in the standby mode initially.
Press (FUNCTION/EXIT/CH).
<Function menu>* |
|
||
|
HSave directory |
To store an item in the directory (p. 42). |
|
|
|
Ringer volume |
To select the ringer volume (p. 16). |
|
|
Program |
|
|
|
Press FWD/EDIT (É). |
|
|
|
|
|
<Function menu>* |
|
||
HSave DIRECT# |
To store a phone number in the DIRECT button |
||
|
|
|
(p. 40). |
|
Set recall time |
To select the recall time (p. 55). |
|
|
Set line mode |
To select the line mode (p. 13). |
|
|
Talk switching |
To set the auto talk feature (p. 15). |
|
|
TAD program |
To program answering system functions (p. 19). |
|
During programming:
*To select a desired function item, press (Å) or (Ä) repeatedly until the arrow points to the item. Then press FWD/EDIT (É) to go to the next step.
•You can exit the programming mode any time by pressing (FUNCTION/EXIT/CH).
•If you do not press any buttons for 60 seconds, the unit will return to the standby mode.
•If the handset has lost communication with the base unit, 3 beeps sound and “No link to base. Place on cradle and try again.” is displayed.
14
Setting the Auto Talk Feature
The Auto Talk feature allows you to answer a call by lifting the handset off the base unit without pressing (TALK). If you want to use this feature, turn the feature ON by programming. Your phone comes from the factory set to OFF.
Make sure the unit is in the standby mode initially.
1
2
3
4
5
6
7
Press (FUNCTION/EXIT/CH).
Press (Å) or (Ä) repeatedly until the arrow points to “Program”.
Press FWD/EDIT (É) (Yes key).
Press (Å) or (Ä) repeatedly until the arrow points to “Talk switching”.
Press FWD/EDIT (É) (Yes key).
Press (Å) or (Ä) to select “On” or “Off”.
Press FWD/EDIT (É) (Save key).
•A beep sounds.
•To return to the standby mode, press
(FUNCTION/EXIT/CH).
HProgram
GF H=Yes
Set line mode HTalk switching GF H=Yes
Auto talk
:Off GF H=Save
Auto talk
:On GF H=Save
Auto talk
:On
Preparation
•You can exit the programming mode any time by pressing (FUNCTION/EXIT/CH).
•In order to view Caller ID information before answering a call, leave the Auto Talk feature OFF.

Programmable Functions
Selecting the Ringer Volume
You can set the handset and base unit ringer volumes to HIGH, LOW or OFF. If set to OFF, the handset/base unit will not ring. Your phone comes from the factory set to HIGH.
With the handset
Make sure the unit is in the standby mode initially.
1 |
Press (FUNCTION/EXIT/CH). |
2 |
Press (Å) or (Ä) repeatedly until the |
arrow points to “Ringer volume”, |
|
|
and press FWD/EDIT (É) (Yes key). |
3 |
Press (Å) or (Ä) to select the |
desired volume. |
•The selected volume is displayed and rings.
•To turn the ringer OFF, press and hold (Å) until 2 beeps sound.
To turn the ringer ON, press (Ä) or (Å) in step 3.
|
Save directory |
||||
|
HRinger volume |
||||
|
GF |
|
|
H=Yes |
|
|
|
|
|
|
|
|
|
|
|
|
|
HIGH |
Ringer |
|
|||
Low |
High |
||||
|
GF |
|
|
|
|
|
|
|
|
|
|
|
|
|
|
|
|
|
|
|
|
|
|
|
|
|
|
|
|
LOW |
Low |
High |
|||
OFF |
|
|
|
|
|
|
|
|
|
|
|
|
|
|
|
|
|
|
|
|
|
|
|
|
Ringer off |
||||
|
|
|
|
|
|
•The ringer will sound at the LOW level.
•You can also select the ringer volume while a call is being received. Press (Å) or (Ä) while the unit is ringing.
•When set to OFF, “Ringer off” will flash for about 45 seconds before the handset returns to the standby mode.
•When you replace the battery, the selected ringer volume setting will return to the factory default (HIGH). Reprogram if necessary.
With the base unit
Make sure the unit is in the standby mode initially. (You can also select the ringer volume while a call is being received.)
•To select HIGH or LOW, press |
|
|
|
|
|
|
Ringer |
||||
(HOLD/RINGER). Each time you press the |
HIGH |
||||
|
|
|
|||
button, the selected ringer volume will be |
|
Low High |
|||
displayed and ring. |
|
||||
|
|
|
|
||
|
|
|
|
||
|
LOW |
•To turn the ringer OFF, press and hold |
OFF |
(HOLD/RINGER) until 2 beeps sound. |
|
“Ringer off” will be displayed.
•To turn the ringer ON, press (HOLD/RINGER). The ringer will sound at the HIGH level.
Low High
Ringer off
16

Preparing the Answering System
Greeting Message
You can record a personal greeting message of up to 2 minutes. If a greeting message is not recorded, one of two pre-recorded greetings will be played when a call is received (p. 18).
All messages (greeting, incoming, etc.) are stored in digital memory (p. 18). The total recording time is about 15 minutes.
We recommend you record a brief greeting message (see sample on next page) in order to leave more time for recording new messages.
To record a greeting message
1 |
Press and hold (GREETING/EDIT) until a |
Greeting record |
|
long beep is heard. |
|||
00-00 |
|||
|
|
||
2 |
Talk clearly, about 8 inches (20 cm) away |
Greeting record |
|
from the MIC (microphone). |
|||
|
|||
|
•The base unit display shows the elapsed |
00-12 |
|
|
recording time. |
|
|
|
•If you record for over 2 minutes, the unit will |
|
|
|
automatically stop recording. |
|
|
3 |
When finished, press (STOP/EXIT). |
|
|
•To check the recorded greeting, |
|
||
|
press (GREETING/EDIT) briefly. |
|
|
|
Greeting check |
|
|
|
00-12 |
(ERASE/CLEAR) |
|
|
|
||
|
•To change the message, |
|
|
|
start again from step 1. |
|
|
|
(STOP/EXIT) |
|
|
|
(GREETING/EDIT) |
|
Preparation
To increase the volume, press |
. |
|
To decrease, press |
. |
MIC |

Preparing the Answering System
To adjust the speaker volume:
9 levels (0–8) are available while using the answering system. To increase, press(Ä). To decrease, press (Å).
Ex. Level 8
Loud
Low High
Greeting message sample
“Hello, this is (your name and/or number). Sorry I cannot take your call. Please leave a message after the beep. Thank you.”
To erase the recorded greeting message
Press (GREETING/EDIT) briefly \ press (ERASE/CLEAR) while the message is being played.
•The unit will answer a call with a pre-recorded greeting.
Pre-recorded greeting message
If you do not record a greeting message (p. 17), one of two messages will be played when a call is received, depending on the caller’s recording time (p. 22).
To check the pre-recorded greeting, press (GREETING/EDIT) briefly.
•A pre-recorded greeting will be played as follows:
When the recording time is set to “1 minute” or “3 minutes”:
“Hello, we are not available now. Please leave your name and phone number after the beep. We will return your call.”
When the recording time is set to “Greeting only”:
“Hello, we are not available now. Please call again. Thank you for your call.”
Flash Memory Message Backup
Messages are stored on a “flash memory” IC chip and will not be affected by power failures. All messages are saved until you erase them.
18

Programming Summary for the Answering System
You can program the following functions using the handset near the base unit. Make sure the unit is in the standby mode initially.
Press (FUNCTION/EXIT/CH).
G
Press (Å) or (Ä) to select “Program”, and press FWD/EDIT (É) (Yes key).
G
Press (Å) or (Ä) to select “TAD program”, and press FWD/EDIT (É) (Yes key).
•“Answering system setting. See base unit.” is displayed on the handset.
G
The base unit display shows programming options. Enter a required command on the display using the handset dialling buttons. See the page numbers for details.
0=Day and time Adjusts the day and time (p. 20).  1=Remote code Sets the remote code (p. 61).
2=Number of ring Selects the number of rings (p. 23).
 *
*
5=Recording time Selects the caller’s recording time (p. 22).
* |
*The display will change every 3 seconds. |
G
Press FWD/EDIT (É) (Save key).
•You can exit the programming mode any time by pressing (FUNCTION/EXIT/CH).
•If you do not press any buttons for 60 seconds, the unit will return to the standby mode.
•If 6 beeps sound on the base unit during programming, a wrong key was pressed. Enter the correct number.
•If the handset has lost communication with the base unit, 3 beeps sound and “No link to base. Place on cradle and try again.” is displayed on the handset.
Preparation
Preparing the Answering System
Day and Time Adjustment
Voice Time/Day Stamp: During playback, a synthesized voice will announce the day and time that each message was recorded.
1
2
3
4
5
6
Press (FUNCTION/EXIT/CH).
Press (Å) or (Ä) repeatedly until the arrow points to “Program”.
Press FWD/EDIT (É) (Yes key).
Press (Å) or (Ä) repeatedly until the arrow points to “TAD program”.
Press FWD/EDIT (É) (Yes key).
•The base unit display shows programming options.
Press (0).
•“Set time” is announced.
If previously adjusted, the day/time will be heard.
HSave directory Ringer volume GF H=Yes
HProgram
GF H=Yes
HSave DIRECT#
Set recall time
GF H=Yes
HTAD program
GF H=Yes
Answering system setting. See base unit.
Base unit display
SUN 12:00 AM
 =AM/PM #=Day
7
8
Enter the time (hour and minute) using a 4-digit number. (Ex. To set 9:30, enter “0930”.)
Press (*) to select “AM” or “PM”.
Press (#) repeatedly to set the day.
20
9 |
Press FWD/EDIT (É) (Save key). |
•The unit announces the day/time. The clock starts working. |
•If 6 beeps sound, the setting is not correct. Start again from step 5.
•To return to the standby mode, press (FUNCTION/EXIT/CH).
•In step 7, you cannot enter numbers greater than 12. Do not use 24 hour clock time. (To set 13:00 hours, enter “0100”, and select “PM” by pressing (*).)
If a power failure occurs, the adjusted day/time will be erased. Readjust the day/time.
For Caller ID service users (p. 30)
•The Caller ID information will re-set the clock after the first ring if the adjusted time is incorrect. However, the day will not be re-set. Set the day following the procedures on pages 20 and 21.
•If the time has not previously been set, the Caller ID information will not adjust the clock.
•The Caller ID information will automatically adjust the clock for daylight saving time.
Preparation

Preparing the Answering System
Selecting the Caller’s Recording Time
You can select “1 minute”, “3 minutes” or “Greeting only” for the caller’s recording time. Your phone comes from the factory set to “3 minutes”.
1
2
3
4
5
6
Press (FUNCTION/EXIT/CH).
Press (Å) or (Ä) repeatedly until the arrow points to “Program”.
Press FWD/EDIT (É) (Yes key).
Press (Å) or (Ä) repeatedly until the arrow points to “TAD program”.
Press FWD/EDIT (É) (Yes key).
•The base unit display shows programming options.
Press (5).
•The current setting is displayed on the base unit.
HSave directory Ringer volume GF H=Yes
HProgram
GF H=Yes
HSave DIRECT#
Set recall time
GF |
H=Yes |
|
|
HTAD program |
|
GF |
H=Yes |
|
|
Answering system setting. See base unit.
Base unit display
Recording time :3min
7 |
Press (1), (2) or (3) to select the recording |
Base unit display |
time. |
|
|
Recording time |
||
|
1: 1 minute |
:Greeting only |
|
2: 3 minutes |
|
|
|
|
8 |
3: Greeting only |
|
|
||
Press FWD/EDIT (É) (Save key). |
|
|
•A beep sounds. |
|
•To return to the standby mode, press (FUNCTION/EXIT/CH).
If you select “Greeting only”, the unit will answer a call with the greeting message, and then hang up. The unit will not record any incoming messages. The base unit display will show “Greeting only” in the standby mode but the number of incoming messages will not be displayed.
22

Selecting the Number of Rings
You can select the number of times the unit rings before the answering system answers a call, from “2” to “7” or “Toll saver”*.
Your phone comes from the factory set to “Toll saver”*.
1 |
Press (FUNCTION/EXIT/CH). |
2 |
Press (Å) or (Ä) repeatedly until the arrow |
points to “Program”. |
|
3 |
Press FWD/EDIT (É) (Yes key). |
HSave directory Ringer volume GF H=Yes
HProgram
GF H=Yes
HSave DIRECT#
Set recall time
GF H=Yes
4 |
Press (Å) or (Ä) repeatedly until the arrow |
|
|
|
HTAD program |
||||
points to “TAD program”. |
||||
GF |
H=Yes |
|||
|
|
|||
|
|
|
|
|
5
6
Press FWD/EDIT (É) (Yes key).
•The base unit display shows programming options.
Press (2).
•The current setting is displayed on the base unit.
Answering system setting. See base unit.
Base unit display
Number of rings :Toll saver
7 |
Press (0), or (2) to (7) to set the number of rings. |
|
0: |
Selects “Toll saver”*. |
|
|
2–7: |
The unit will answer after the selected number of rings. |
8 |
Press FWD/EDIT (É) (Save key). |
|
•A beep sounds. |
||
•To return to the standby mode, press (FUNCTION/EXIT/CH).
*Toll saver
When you call the unit from a touch tone telephone:
If the unit answers on the 2nd ring, there is at least one new message. If the unit answers on the 4th ring, there are no new messages.
Hang up when you hear the 3rd ring. This will save you the toll charge for the call.
Preparation

Making Calls
With the Handset
1
2
3
(TALK) |
, |
|
|
(FUNCTION/EXIT/CH) |
(INTERCOM/CLEAR) |
|
|
|
(REDIAL/PAUSE) |
Press (TALK). |
Talk |
|
Dial a phone number.
•The dialled number is displayed.
•After a few seconds, the display will show the length of the call and the battery strength.
To hang up, press (TALK) or place the handset on the base unit.
Talk
0111112222
Talk
00-00-00
Off
00-01-08
•If the handset has lost communication with the base unit, 3 beeps sound and “No link to base. Place on cradle and try again.” is displayed.
If noise interferes with the conversation
Press (FUNCTION/EXIT/CH) to select a clearer channel or move closer to the base unit.
To redial the last number dialled on the handset
Press (TALK) and press (REDIAL/PAUSE).
24

To dial after confirming the entered number
1 |
Dial a phone number. |
•If you misdial, press (INTERCOM/CLEAR) and |
|
|
dial again. |
2 |
Press (TALK). |
•After a few seconds, the display will show the |
length of the call and the battery strength.
3 |
To hang up, press (TALK) or place the |
handset on the base unit. |
0233334444
Talk
0233334444
Talk
00-00-00
To redial after confirming the last number dialled
Press (REDIAL/PAUSE) and press (TALK).
To adjust the receiver volume while talking
To increase, press (Ä). To decrease press (Å).
•Each time you press (Å) or (Ä), the volume level will change.
•The display will return to the length of the call.
Backlit handset keypad
|
Loud |
|
||
HIGH |
Low |
High |
||
|
||||
|
|
|
|
|
(Ä) |
|
|
(Å) |
|
|
||||
|
|
|
|
|
|
Loud |
|
||
MEDIUM |
Low |
|
||
|
High |
|||
|
|
|
|
|
(Ä) |
|
|
(Å) |
|
|
|
|||
|
|
|
|
|
|
Loud |
|
||
LOW |
Low |
High |
||
|
||||
|
|
|
|
|
The handset dialling buttons will light when you press a button or lift the handset off the base unit, and flash when a call is received. The lights will go out a few seconds after pressing a button, lifting the handset, answering a call, hanging up a call, leaving the programming mode or ending the intercom.
Backlit LCD display
Telephone Cordless
The backlit handset display will stay on for a few seconds after pressing a handset button, lifting the handset off the base unit, hanging up a call, leaving the programming mode or ending the intercom.

Making Calls
With the Base Unit (Digital Duplex Speakerphone)
(REDIAL/PAUSE)
|
(HOLD/RINGER) |
(DIGITAL!SP-PHONE) |
|
|
MIC |
and Indicator |
|
1 |
Press (DIGITAL!SP-PHONE). |
|
Talk |
•The DIGITAL SP-PHONE indicator |
|
||
|
|
||
|
lights. |
|
|
2 |
Dial a phone number. |
|
Talk |
|
|
||
|
|
|
|
3 |
|
|
0111112222 |
When the other party answers, |
|
Talk |
|
talk into the MIC (microphone). |
|
||
|
00-00-00 |
||
|
|
|
|
4 |
To hang up, press (DIGITAL!SP-PHONE). |
Off |
|
•The indicator light goes out. |
|
00-00-00 |
|
|
|
|
|
•To switch to the handset while using the base unit speakerphone: —If the handset is off the base unit, press (TALK).
—If on the base unit, just lift up.
•During a call using the handset, the call can be switched to the speakerphone by pressing (DIGITAL!SP-PHONE).
26
Hands-free Digital Duplex Speakerphone
For best performance, please note the following:
•Talk alternately with the caller in a quiet room.
•If the other party has difficulty hearing you, press (Å) to decrease the speaker volume.
•If the other party’s voice from the speaker cuts in/out during a conversation, press (Å) to decrease the speaker volume.
To adjust the speaker volume (8 levels) while talking
To increase, press (Ä). |
Ex. Level 8 |
|
To decrease, press (Å). |
|
|
Loud |
||
|
||
|
Low High |
|
|
|
To redial the last number dialled on the base unit
Press (DIGITAL!SP-PHONE) and press (REDIAL/PAUSE).
To put a call on hold
Press (HOLD/RINGER). |
Hold |
•The DIGITAL SP-PHONE indicator flashes.
To release the hold
From the base unit, press (DIGITAL!SP-PHONE).
From the handset, press (TALK) or lift the handset off the base unit.
•If another phone is connected on the same line (p. 80), you can also release the hold by lifting its handset.
Telephone Cordless
 Loading...